RSS
 

Posts Tagged ‘Extreme’

Canon launches 1/1.8-inch sensor for video recording in extreme low light

27 Aug

Canon has announced a new CMOS image sensor that is designed to perform in extreme low light conditions. The LI7050’s is a sensor of the 1/1.8-inch variant which means it has the same size as many image sensors that can be found in smartphone cameras. However, this is not the new sensor’s intended use.

Instead it’s meant to be used for industrial applications that require extreme low light capabilities. For example, it could record low light video with realistic color and good detail in security cameras that are monitoring public areas, transport infrastructure or manufacturing facilities. Thanks to its compact dimensions it could also help improve image quality in underwater drones or wearable cameras for security personnel that operates in dark environments.

Canon says in its press release: ‘Conventional nighttime monitoring employs infrared cameras and records video in monochrome. However, network cameras equipped with the LI7050 can capture video at night in such locations as public facilities, roads or transport networks, thereby helping to identify details including the color of vehicles or subjects’ clothing.’

Thanks to the ‘architecture’ of its 4.1 µm pixels the sensor is capable of recording Full-HD color video in near darkness – light levels as low as 0.08 lux – and also comes with an HDR mode that dramatically expands the dynamic range. When recording in this mode the sensor can capture scenes with extremely high contrast (light levels between 0.08 lux and 80,000 lux) while avoiding clipping in both highlight and shadow areas of the frame, achieving a dynamic range of 120dB (approximately 20EV).

HDR mode merges a bright and a dark exposure into one frame and is only available at 30 frames per second. If you need faster frame rates of 60 frames per second the sensor can still avoid clipping anywhere between 0.08 and 500 lux and offers a dynamic range of 75dB (approximately 12.5 EV).

Those are impressive numbers and they are backed up by the low light footage in Canon’s sample clips which does not only have very good exposure but also maintains excellent detail in the bright illuminated areas of the frame, something that a lot of cameras struggle with.

Even though the sensor is marketed as a security and surveillance product there could be interesting applications in consumer imaging as well. Modern smartphones come with multi-camera arrays for different focal length already. Why not add a dedicated low light video camera?

Sample shipments of the LI7050 have started in August and official sales will be launched in late October. We’ll probably see sometime next year if the new sensor will be confined to its industry niche or possibly make it out to the wider consumer imaging market.

Articles: Digital Photography Review (dpreview.com)

 
Comments Off on Canon launches 1/1.8-inch sensor for video recording in extreme low light

Posted in Uncategorized


How to Use a 16-Stop ND Filter for Extreme Long Exposure Photography

18 Oct

The post How to Use a 16-Stop ND Filter for Extreme Long Exposure Photography appeared first on Digital Photography School. It was authored by John McIntire.

extreme-long-exposure-photography

Long exposure techniques are a fantastic way to inject interest into your photography. By nature, these techniques present your images in a way that is different to how the world is perceived by the human eye. Blurring moving elements within your frame (whether that be water, people or clouds) can also be a tool to help you isolate and focus on the elements of a scene that you want your viewers to focus on. This makes long exposures a valuable asset for composition and design. While most long exposures last for a matter of a few seconds, there are tools available that will allow you to do extreme long exposure photography – even in the middle of the day.

How to Use a 16-Stop ND Filter for Extreme Long Exposure Photography

This tutorial will show you how to use a 16-stop neutral density filter to do extreme long exposure photography. It will take you step-by-step through the equipment you need, the steps you need to take to get started, and the considerations you need to make to overcome some technical issues. There is also a list of tips at the end to help you get the most out of your 16-stop ND filter.

Why 16 stops?

Extreme-Long-Exposure-Photography

Using the long exposures provided by a 16-stop ND filter, you are able to blur moving elements (such as clouds and water) to simplify your frame and reduce visual clutter.

Long exposures, even with strong 10-stop neutral density filters, are usually limited to low light situations. For the most part, this is fine as that means you will be out at golden hour or blue hour when the light is at its very best for most types of photography.

What a 16-stop ND filter allows you to do is to extreme long exposure photography in the middle of the day when the light levels are at their highest. For example, a shutter speed of 1/125th of a second (sunny 16 rule) turns into an 8-minute and 44-second exposure when you put 16-stops of neutral density filter on the lens. This kind of exposure time turns the water and clouds into an almost ethereal, milky texture that works well visually. By blurring these elements, you are also potentially reducing visual clutter and contrast in your scenes, making them more visually appealing.

What you need

Extreme-Long-Exposure-Photography

Apart from the filter, this technique is going to require a few other pieces of equipment as well.

  • A camera with a Bulb setting.
  • A sturdy tripod that will hold still for several minutes or more.
  • A release that will allow you to trigger the camera without touching it.
  • An exposure calculator.
  • A 16-stop ND filter. (This tutorial will work the same with any strength of ND filter.)

How to do it

Once you’re out on location, setting up for a long exposure is pretty easy. In fact, these steps remain the same whether you are using a three-stop filter or a 16-stop filter.

Step 1: Set up your camera and line up your composition.

Make sure to attach all of your releases or filter holders at this point as well. Anything you can use to reduce the chance of camera movement between now and the time your exposure finishes will help to ensure there is no camera movement affecting your images. Take your time with this step and if you need to, take as many test shots as possible. Once you put the filter on, you will be stuck in place for several minutes.

Be sure of your composition before you get to that point.

Step 2: Meter and calculate exposure

Extreme-Long-Exposure-Photography

Here, a metered shutter speed (without the filter) of 1/160th of a second becomes 6 minutes and 49 seconds once the 16-stop ND filter is applied.

If you’ve taken test shots, you already know what your exposure is (without the filter). If not, read the camera’s meter. Take the exposure it has given you and input it into the exposure calculator of your choice to calculate the exposure required for 16-stops of ND filter. This will give you your required exposure for your final image.

There are a lot of exposure calculators available on iOS and Android. They all provide the same end result, so pick whichever one you would like.

Step 3: Set focus

Set the focus where you want in the frame and then place the camera in Manual Focus mode. Autofocus will not work at all with a 16-stop filter. It is way too dense. Putting your camera into manual focus will make sure that the camera does not attempt to focus when it can’t, thereby rendering your photos out of focus.

Step 4: Switch to Bulb

Put your camera into Bulb mode to allow it to keep the shutter open for as long as your exposure requires.

Step 5: Attach the filter

Extreme-Long-Exposure-Photography

With everything in place, you can now attach your filter. If you’re using a rectangular slot-in variety, attach the holder to the ring you’ve already placed on your lens. If you’re using a screw-in variety (shown), be very careful not to jostle your set-up because, if you do, you will have to start the process again.

Step 6 – Input shutter speed

Extreme-Long-Exposure-Photography

My trigger is controlled by my phone, so the shutter speed is inputted into the app as shown.

With the filter set up, you just need to input your shutter speed into whatever trigger you are using. In these examples, I am using a Pulse trigger which allows me to control it from my phone. There are a lot of available options at a variety of price points. Be sure to choose one that doesn’t require you to hold down a button for ten minutes though.

Step 7 – Release the shutter

With that done, the only thing left for you to do is to start your exposure and wait.

Easy as that

How to Use a 16-Stop ND Filter for Extreme Long Exposure Photography

This process may seem like a lot of steps, but it is quite easy. As long as you take care not to move the camera throughout the process, you will be fine. You will be able to set it up in a minute or so once you have practiced a bit. The key here is to know your equipment and to practice the movements so you can perform them as second nature.

Considerations

Now that you know how to create long exposures with your 16-stop ND filter, there are a few technical considerations you should bear in mind.

Noise

Image: Noise is a problem when taking long exposures and is especially prone to showing up in the sh...

Noise is a problem when taking long exposures and is especially prone to showing up in the shadow areas of your images. Be prepared to take care of it.

Unfortunately, long exposures with digital cameras mean noise. The longer the exposure, the more noise appears in your images. If you use a higher ISO to achieve shorter exposures, that will also increase the noise levels in your images.

To alleviate this as much as possible, try to avoid really, really long exposures if they are not necessary. If your camera has a Long Exposure Noise Reduction (or similar) feature, turn it on (remember that this will double your exposure time). It will also help if you to familiarize yourself with noise reduction software, either inside Photoshop or Lightroom, or other third-party program.

Hot pixels

Image: The two circled white dots are hot pixels. They’re easy enough to clone out just as lon...

The two circled white dots are hot pixels. They’re easy enough to clone out just as long as you are aware of them in the first place.

Hot Pixels are an unfortunate side effect of long exposures using digital cameras. While there is no way to truly avoid them, you need to be aware of their existence as they have the potential to ruin your efforts. These defects happen when your sensor gets hot during a long exposure (a simplified explanation, but it will serve).

To deal with them, you can heal, patch, or clone them out in Photoshop. Alternatively, you could use the Long Exposure Noise Reduction (or similar feature as appears in your camera system), but be aware this doubles your exposure time. If your exposure is close to nine minutes, that now means that all of your exposures will take about 18 minutes.

Light leaks

Extreme-Long-Exposure-Photography

While light leaks of this nature can be easy to take care of, there are a few steps you can take to make sure that they don’t appear in the first place.

With such long exposures, light leaks can be a common problem. These happen where excess light falls onto your sensor. This can happen where the filter attaches to the lens, or it can happen where the lens attaches to the camera. It can also happen through the viewfinder.

If you’re worried about light leaks, you can buy dedicated accessories that help to prevent them. If the leak is coming from the lens mount, you can also wrap material around it for a cheaper option. Some camera brands have a little rubber rectangle attached to the camera strap. This handy little feature is used to cover your viewfinder during long exposures. Simply slide off the exterior case over your viewfinder, and slide the rubber rectangle from your camera strap in its place. This will stop the light leaking in through the viewfinder.

Another option is to shoot a wider composition than you need and crop the light leaks out. This wouldn’t be my preferred method, but it will work in a pinch when you have no other choice.

Changing light

Image: This image is underexposed by several stops. Although it was taken at the exposure the meter...

This image is underexposed by several stops. Although it was taken at the exposure the meter dictated, the light dimmed significantly during the exposure, meaning the original exposure time was inadequate.

In the middle of the day, your exposure will be close to a near-constant. Later in the day, however, light levels can start to change rapidly.

If you meter for a long exposure of a hypothetical half hour in the late afternoon, it is entirely possible the light will lower in intensity during that time. Therefore, the actual time required for correct exposure will be much much longer. This will result in underexposed images.

You can compensate by preparing for that possibility beforehand. Choose a longer shutter speed than your meter dictates if you suspect that the light will change on you. This will be mostly guesswork based on plenty of experience though, so be sure to be out practicing as much as possible.

Filter size

Image: For the most versatility, consider opting for a filter system that will fit the complete rang...

For the most versatility, consider opting for a filter system that will fit the complete range of your lenses so you have the choice to use it at all of your available focal lengths.

Image: Alternatively, feel free to shoot wide and crop in. Not ideal, but this works just fine. Crop...

Alternatively, feel free to shoot wide and crop in. Not ideal, but this works just fine. Cropping is also a useful way to get rid of light leaks that appear at the edges of your images like in the example shown.

If you opt for the screw-in variety of filters, you may find yourself limited with the lenses you can use. In my case, I bought a filter that would fit my 16-35mm wide-angle zoom, and almost immediately found that I wanted to put it on my 70-200mm to crop in close on a particular building.

I was convinced that I wouldn’t want to use it on anything but the wide-angle lens. You can always buy stop-down rings, but if you think that you’ll use your filter on a  variety of lenses, a filter that fits a slot-in system may be the better choice for you.

Releases, triggers, and remotes

Extreme-Long-Exposure-Photography

As mentioned, there are a lot of options to fire your shutter without touching your camera. It doesn’t matter which you pick. However, it would be best to altogether avoid any releases that require you to hold down a button for the entire duration of the exposure. For thirty seconds, this may not be a problem, but in terms of ten-minute exposures, you are just increasing the chance that you might slip and ruin your frame.

Tips

Here are a handful of tips to help you get the most out of the technique.

ISO

Extreme-Long-Exposure-Photography

If you want shorter exposure times without using a different filter, you can increase your ISO. Here, changing the ISO from 100 to 400 (2 stops) has cut the exposure time by over 75%.

If you don’t want to wait around for, say, ten minutes for an exposure, you can halve it by upping your ISO one stop. This may introduce some more noise to your images, but as long as you don’t try to go past ISO 800, and your exposures are under or around 10 minutes, you should be fine as long as you are aware of the possibility.

Lighting

Image: In overcast conditions, the effect of the 16-stop filter can emphasize the flatness of the li...

In overcast conditions, the effect of the 16-stop filter can emphasize the flatness of the lighting. This may or not work with what you are trying to achieve.

Image: Conversely, the technique also helps to emphasize hard lighting and the contrast in such scen...

Conversely, the technique also helps to emphasize hard lighting and the contrast in such scenes. Use this to your advantage.

This is no rule, but I’ve found that this technique works well with subjects in direct light as the heavy contrast suits the technique. In overcast conditions, the flatness of the light is emphasized, and the results can feel a little less than inspiring. Again, this is not a rule and if you have no choice but to shoot in overcast conditions, do so anyway.

Moving things

Extreme-Long-Exposure-Photography

On a rare and anomalous sunny day in Manchester, this river was full of numerous boats that constantly went through my frames. The near ten-minute exposures have caused all evidence of them to disappear.

The longer your final exposure, the less any moving thing will show up in your frame. Is there a lot of river traffic in your scene? A bunch of tourists? Chances are those things will have left your frame by the time your exposure is finished. If you’re at a particularly crowded spot, see if you can make your exposure as long as possible to increase the chances that every unwanted element is removed from your frame.

Be sure of your composition

This technique is a very slow and deliberate form of photography. If you get something slightly wrong, it will cost you a fair amount of time to try again. To prevent having to do that, take your time with every single step in the set-up process and make sure that it is right. Composition, in particular, is vital for you to get right before you press the shutter release.

Embrace the time

Whilst your camera is recording your exposure, you will have a lot of time standing around. Take advantage of it. Take the opportunity to appreciate the scene around you without the viewfinder to your eye. Mindfully think about any other compositions in the area. It’s easy to start worrying about the remaining time on the exposure clock, but I encourage you not to. Instead, take a quiet few minutes for granted when you have nothing to do but stand next to your camera.

Be aware of your surroundings

Extreme-Long-Exposure-Photography

I was aware of the tide coming in here (I was counting on it) but did not expect it come this far in less than ten minutes.

Because you are going to be standing around for at least a good few minutes, it’s important that you pay extra care to your surroundings during your exposure. During normal-length exposures, you won’t usually have a problem with things like the tide coming in and submerging your tripod during the exposure. With exposures that last into the minutes or hours, that’s more than a possibility.

Simply put, pay attention to your environment and keep yourself and your equipment safe.

End results

Finally, here are a few examples of some of the results you can expect to achieve with a 16-stop ND filter.

Extreme-Long-Exposure-Photography

How to Use a 16-Stop ND Filter for Extreme Long Exposure Photography

How to Use a 16-Stop ND Filter for Extreme Long Exposure Photography

How to Use a 16-Stop ND Filter for Extreme Long Exposure Photography

How to Use a 16-Stop ND Filter for Extreme Long Exposure Photography

That’s it

If you already have experience with long exposures, the only thing new to you with this technique is the amount of time the shutter will be open. The skills may be basic, but the extra few stops of ND filter can lead to wonderful results.

I encourage anyone interested in long exposures to give the technique a try. If nothing else, experiencing the mindful, deliberate, and slow approach to photography that this technique commands are well worth the effort. Also, it is a nice departure from the faster-paced styles of photography.

Share your extreme long exposure photography with us in the comments below!

The post How to Use a 16-Stop ND Filter for Extreme Long Exposure Photography appeared first on Digital Photography School. It was authored by John McIntire.


Digital Photography School

 
Comments Off on How to Use a 16-Stop ND Filter for Extreme Long Exposure Photography

Posted in Photography


SanDisk Extreme Pro CFexpress Type B cards hit the market in Europe

04 Sep

Earlier this year, the CompactFlash Association unveiled the new CFexpress 2.0 specification that’ll be available in three form factors: Type A, Type B and Type C. A number of manufacturers revealed plans to offer these next-generation cards and it now appears SanDisk is one of the first off the line with its new SanDisk Extreme Pro CFexpress 2.0 Type B card, which is currently for sale in various European markets.

As we previously reported, the CFexpress 2.0 Type B card features the same dimensions as the existing XQD card, bringing with it a Gen3, 2 lane interface and a maximum theoretical speed of 2,000MB/s. According to SanDisk, its new Extreme Pro CFexpress Type B card gets close to that limit with read speeds of up to 1700MB/s and a write speed up to 1400MB/s.

SanDisk says this model can capture ‘raw 4K video with sustainable, low-latency performance,’ and it can be used with the data recovery software RescuePRO Deluxe. The model has appeared for sale in 64GB, 128GB, 256GB and 512GB capacities on Amazon for several European markets, including the UK, for £174.99 to £691.99. It’s unclear when the card will arrive for sale in the US.

Articles: Digital Photography Review (dpreview.com)

 
Comments Off on SanDisk Extreme Pro CFexpress Type B cards hit the market in Europe

Posted in Uncategorized


Top 5 Tips for Extreme Sports Photography

07 Nov

Top 5 Tips for Extreme Sports Photography 1

Extreme sports photography is a discipline all of its own.

Each sport has its intricacies, rules, and set of specialists who operate in each arena. Me, I am a long time skateboarder. I’ve been a skate rat since I was a kid. I’ve looked at thousands of images, know how a trick should look and know what the rider is looking for. Put me with a BMX rider and I may have an idea of how they want the trick to look, but I will be unsure of exactly what they’ll be doing. The key, like any genre of photography, is to know what you are shooting and work with your subject to form a bond of trust. 

To those who haven’t shot extreme sports before, it may look easy. But the truth is, unlike posing a model in a studio, sports photography is unpredictable and extreme sports, even more so. With this in mind, here are my top 5 tips to up your extreme sports photography game. 

1. Know The Sport

Ever photographed a ballerina? If you have, you know they will pick out the minute detail in a photo you take. Finger placement or how high they are on their toes will dictate whether a photograph is one they love or one they hate. Extreme sports athletes are exactly the same! The best way to know what a great shot looks like is to start by doing your research. Look on websites such as Thrasher and Ride BMX. See what their photographers are taking. Look at where the photograph is taken from, try to figure what lens they used and how it was lit. As with any photography, breaking it down and visualizing how you want things to look before you shoot is key. The only difference with extreme sports is that the person you are taking a photo of will more than likely be risking personal injury for your photo. You need to be ready, know what settings you want to use and have an angle in mind. Which brings me nicely to….

2. Camera Settings

To quote my all-time favorite movie Ferris Bueller’s Day Off:

 ‘Life moves pretty fast. If you don’t stop to look around once in a while, you could miss it.’

Extreme sports is fast. Whole tricks last barely a second. And you need to freeze an incredibly small percentage of that. There are two ways to freeze motion in extreme sports; one is to use a high shutter speed, the other is to use a flash with a small flash duration. Unless you know what you are doing with off camera flash or are shooting at night, using a high shutter speed is a much better option when you are starting out. You need to have your exposure nailed quickly and a high shutter speed will be the easiest way for you to do this. 

You should put your camera into ‘Shutter Priority’ and aim for a shutter speed of at least 1/500th of a second. This will mean your images will not suffer motion blur, which is important to capture those beautiful moves. The obvious pay off here is aperture and ISO. I would personally suggest when starting out to use a higher ISO and keep a wider aperture. This gives you a larger depth of field to work with and a higher chance of a sharp image. 

This is great when shooting outdoors, but when shooting at an indoor skatepark, you need to think about using flash. Plan your shoot accordingly.

In terms of focus mode for your camera, you should aim to use Ai servo mode. This is designed for shooting action and will give you the best chance of getting the rider in focus. An alternative to this is to pre-focus and then switch to manual focus to keep it locked. This technique involves getting your rider to position themselves where you anticipate taking the photo, focus on this point, then flick over to manual focus. As with everything, read your camera manual, experiment and see which works best for you.

3. Think Don’t Feel

As I said above, extreme sports tricks can last less than a second. By the time you see the perfect moment in your viewfinder, it is already too late. You need to trust yourself and shoot just before the peak moment. Anticipate what is about to happen and trust your instinct. Your instincts will sharpen with practice. With most extreme sports tricks you will have more than one chance to get the shot. In some cases, you may have too many tries. You can help cure your boredom by changing angles if you think of something different, or you can tough it out. However, the unwritten rule of action sports is that the trick must be landed. This argument has been going on for as long as the sports themselves. The rider must make the trick in order for you to put the photo out, otherwise, they are just posing it. Now the even bigger question is: does the photo have to be of the one they landed? This is up to you. Personally, I pick the best photo.

Top 5 Tips for Extreme Sports Photography 2

If I had waited to see this in the viewfinder it would be gone. Try to anticipate and press the shutter just before the peak moment

4. Angles

The best angle for shooting tends to be down low. This adds height to the object and power to the person in your photograph. This technique is one you will see a lot of in magazines, but there are no hard and fast rules. When you get the spot, look around, try taking photos from different angles, until you find the one that makes the trick look powerful. 

In terms of composition, to allow the photo to make sense to the viewer you need 3 key things: where they started, where they are and where they will land. I have lost count of the number of photos I have seen of riders in the air. It has no context, you may as well have just composited the rider onto a sky background. Context is key. 

The third and final tip for composition is to avoid the butt shot. The key to a good extreme sports photo is to be able to see the riders eyes. When finding the angle for your shoot, look at which way the rider approaches the trick and plan accordingly. By getting their face in their frame, you will always get a better photo. 

To answer the question that some of you might be asking, which lens is the best for extreme sports photography? It is the full frame fisheye. The lens gives that wonderful distortion that we associate with this kind of photography. However, this means you are incredibly close to the action, which brings me to my final point.

Top 5 Tips for Extreme Sports Photography 3

This was my second to last shot of this shoot. The next try I got hit with a board and cut pretty badly. Be careful!

5. Be Careful

You need to be aware of your surroundings at all times, even if you are shooting with a long lens, there will no doubt be more than one person at the skatepark or spot where you are taking photos. This means people and skateboards will be flying. It is incredibly easy to take a rogue skateboard to the ankle (and incredibly painful) but when shooting with an extremely wide angle lens, such as the fisheye, you can risk taking a rider, board or bike to the head. While it can be easy to feel secure when looking through your viewfinder, you need to remember that being a photographer can be as dangerous as being the rider if the trick goes wrong. Just keep your eyes open and remember a photo is not worth the pain of being hit in the head with a skateboard when a rider misses a trick. Trust me, I know!

Have you tried extreme sports photography? Do you have tips or photos you’d like to share in the comments below?


The post Top 5 Tips for Extreme Sports Photography appeared first on Digital Photography School.


Digital Photography School

 
Comments Off on Top 5 Tips for Extreme Sports Photography

Posted in Photography


Sony users are reporting issue using 128GB SanDisk Extreme SD cards with a7 III

18 Oct

According to multiple users on the Sony Alpha subreddit, Sony’s a7 III camera is having issues with a particular SanDisk SD card.

Reddit user “shadyashell” originally made a post regarding an issue they were having with their Sony a7 III camera and SanDisk Extreme Pro 128GB SDXC UHS-I Card (Class 3) memory card. In the text of the post, they wrote:

“Everytime I insert the card into slot 1 [I get] the error message ‘Unable to read memory card. Reinsert memory card. Slot 1’ appears. I’ve reset the camera multiple times, formatted the card both on slot 2 and my laptop. Any advice on solving this issue?”

Not long after posting, other Reddit users chimed in and echoed that they too had experienced an issue. Reddit user ‘iamtridluu3’ said “I’m having the same issue. All six cards. Identical 128gb Extreme Pro. I could use it in slot 2 fine. Just slot 1 of both my a7 III and all six cards. Something is wrong with these cards.”

Reddit user ‘dany74m’ claims to have contacted Sony and been told that “[Sony] officially recognize[s] the problem” and “the camera or the card are not defective [it’s] just an incompatibility with the SD extreme V.30 128GB.” Reddit user ‘dany74m’ added “[Sony] said they are aware and they are working to fix the issue with a firmware update in few weeks.”

DPReview contacted Sony regarding the issue. A spokesperson for the company kept it short and vague, saying “our team is currently investigating the claims.” We will update this article if any new information becomes available.

Articles: Digital Photography Review (dpreview.com)

 
Comments Off on Sony users are reporting issue using 128GB SanDisk Extreme SD cards with a7 III

Posted in Uncategorized


How to do Extreme Close-Up Photography with a Macro Bellows

06 Aug

Macro photography is technically designated as the ability to photograph subjects at magnifications equal to or greater than life size. This means that if the subject’s projection size on the camera’s sensor is the same size as the subject itself, then you have life-size magnification, also known as a 1:1 ratio.

Even though many lenses state they have macro functions, a true macro lens must be able to do 1:1 or greater ratio magnification. These specialized lenses allow for a closer focus distance and have great image quality, but they tend to be expensive.

There are cheaper ways to create macro images though. Reverse rings, extension tubes and close up lenses are good options, but my very favorite one is the macro bellows. In this article, I will show you how to use macro bellows to achieve great extreme macro images the easy way.

The Gear

I am very proud to be the lucky owner of one of the very rare Spiratone Kenlock tilt-shift macro bellows sold by Hama in the 80s.

This is probably the rarest and the fullest featured bellows out there, designed originally for 35mm SLR cameras.
In fact, it looks like a scaled down monorail camera with the ability to be adapted to an SLR body.

macro bellow - How to do Extreme Close-Up Photography with a Macro Bellows

This is an amazing piece of gear, despite the fact it was built in the 80s for film cameras, that remains perfectly actual and can be used with modern digital cameras.

It has removable adapters for different brands of lenses and camera bodies.
In this particular setup, I’m using an M42 mount 50mm Tessar Carl Zeiss Jena DDR 2.8 lens and full frame sensor Canon 5D MKIII.

Because this equipment was made for old cameras with flat fronts without a hand grip like the modern digital ones, I am also using a Canon 25mm Extension Tube between the camera body and the bellows to give me some space for the mount.

This is obviously an expensive setup, but you can find many inexpensive simple function macro bellows that can be used with your existing camera and lenses.

Magnification

The magnification ratio is simply the relationship between the size of the (in-focus) subject’s projection on the imaging sensor and the subject’s size in reality.

Imagine a subject like a bug that is 1cm long in real life;

  • If its projection on the camera’s sensor is also 1cm then you have a 1:1 ratio.
  • You have a 2:1 ration if its projection on the camera’s sensor is 2cm.
  • And so forth…

This magnification is achieved by the extension of the bellows operated by two knobs that allow you to move the front and rear elements.

macro bellow on a Canon body - How to do Extreme Close-Up Photography with a Macro Bellows

Retracted, the macro bellows creates a smaller magnification.

extended - How to do Extreme Close-Up Photography with a Macro Bellows

Extended, the macro bellows makes a greater magnification.

There is some really complex optics math behind this magnification process that I am not able to calculate myself. So I used an online calculator to try to understand what I could achieve with this setup and these are the results I got.

magnification - How to do Extreme Close-Up Photography with a Macro Bellows

I was able to find out that the combination of this particular lens with this macro bellows allows me to get a magnification of 3:1 with the bellows at its minimum extension and 5:1 at its maximum extension.

Focusing

The process of focusing is done by moving the whole set constituted by the lens, macro bellows and camera body along a rail, making it closer or further to the subject.

Although it might sound simple, it is, in fact, a very hard process due to the scale of the image we are composing. Any minimal movement throws everything out of focus. So the use of a sturdy tripod and making sure the subject doesn’t move are critical factors to minimize error and allow precise control.

The focusing process is usually done with the lens at its widest aperture to allow enough light in and then it is changed to the chosen aperture for the image capture.

lens - How to do Extreme Close-Up Photography with a Macro Bellows

This aperture open/close process is done automatically in modern cameras and lenses, but with most bellows, it is not possible to have the communication between the camera and the lens due to the lack of electronic contacts, so it has to be done manually.

Sometimes this simple act of changing the lens aperture is enough to change the focus plane, making it a really hard process to control.

Depth of Field

This is for sure the toughest factor to control in macro photography. The depth of field is extremely reduced at this magnification even when photographing with the lens’s narrowest aperture.

A tilt and shift bellows like the one I am using helps to minimize the depth of field issues with some focal plane movements. But many macro photographers choose to use a much more complex technique called focus stacking. The process consists of digitally merging multiple images taken at different focus distances, resulting in a greater depth of field in the final image.

Getting the Picture

Now we’ve gone through the basic technicalities it is time to put everything in action.

For this setup, I will be photographing a dead house fly I found near my living room window. The fact that is not moving makes it a perfect case study to use in a macro stage.

To allow me full control of the equipment, I prepared a tethered setup with the camera connected to a computer, being operated by its native capture software. This way I can avoid touching the camera to release the shutter.

For lighting, I will use two speedlights controlled by a transmitter connected to the camera’s hotshoe that also allows power control through software.

setup for macro - How to do Extreme Close-Up Photography with a Macro Bellows

The intention was to create some light and shadow volume on the fly and separate it from the dark background. Here is the result:

house fly - How to do Extreme Close-Up Photography with a Macro Bellows

Illuminating such a small subject is a very difficult task as the smallest changes produce totally different results. Such is the case in this next image with softer light where I used only one flash and one reflector, instead of two speedlights.

house fly - How to do Extreme Close-Up Photography with a Macro Bellows

To me, it is really fascinating to see a fly at this magnification with all the small details. It is a creepy experience for sure.

This was just with the macro bellows retracted. For the full magnification experience, I will now extend the bellows all the way and experiment greater magnification.

This time I will focus on the fly’s head and the lighting will be done with an LED panel and a small reflector.

behind the scenes shot - How to do Extreme Close-Up Photography with a Macro Bellows

Here is the result:

fly head extreme close-up - How to do Extreme Close-Up Photography with a Macro Bellows

Now we’ve achieved extreme macro with fantastic detail.

Conclusion

It is amazing how an old lens and macro bellows can produce such a high-quality image.

Give this technique a try, I’m sure you will have a lot of fun and make some great images along the way! Please share your macro images with a bellows in the comment area below.

The post How to do Extreme Close-Up Photography with a Macro Bellows appeared first on Digital Photography School.


Digital Photography School

 
Comments Off on How to do Extreme Close-Up Photography with a Macro Bellows

Posted in Photography


SanDisk launches ultra-reliable industrial memory cards that can handle extreme temperatures

07 Oct

Western Digital is working on a line of ultra-reliable, ultra-tough SanDIsk memory cards meant for automotive and industrial applications. There will be an automotive SD card for use in vehicles and drones, and three industrial cards in SD, microSD and XI formats, all of which are designed to withstand extreme temperature ranges and provide even better reliability than the manufacturer’s standard cards.

It’s safe to say you’ll have to encounter some pretty extreme climatic conditions to bring these cards to their metaphorical knees. The Industrial SD and microSD cards can be used in temperatures ranging from -13°F to 185°F, while the Industrial XI and Automotive SD cards can take temperatures between -40°F and 185°F.

At 80MB/s and 50MB/s, the cards also offer decent read/write speeds and come with a Status Monitor tool and a number of data protection features. According to a report on AnandTech, samples of the cards are in the process of being distributed to manufacturers. We’re just hoping the cards will also be available through retail channels at some point in the nearer future… photographers operating in extreme conditions would definitely appreciate this extra layer of reliability.

Articles: Digital Photography Review (dpreview.com)

 
Comments Off on SanDisk launches ultra-reliable industrial memory cards that can handle extreme temperatures

Posted in Uncategorized


The Airdog ADII is a lightweight, autonomous ‘extreme sports’ drone

14 Jul

Helico Aerospace has launched its new Airdog ADII camera drone on the crowdfunding website Kickstarter, seeking funds for the sequel to its original Airdog drone launched in 2014. This next-generation Airdog packs both intelligent features and a portable, durable design, the combination of which makes this model suitable for ‘extreme sport’ activities, according to Helico.

The ADII camera drone sports a built-in ‘enhanced’ gimbal system that is compatible with the GoPro HERO 5 Black action camera. This gimbal system includes a trio of brushless motors, as well as an adapter that charges the GoPro while it is connected. The drone is equipped with a start/stop recording function, as well, that is triggered upon take-off and landing.

$ (document).ready(function() { SampleGalleryV2({“containerId”:”embeddedSampleGallery_9295418314″,”galleryId”:”9295418314″,”isEmbeddedWidget”:true,”standalone”:false,”selectedImageIndex”:0,”startInCommentsView”:false,”isMobile”:false}) });

The main selling point of the Airdog ADII is that it offers hands-free operation through a combination of software and hardware that enable automatic follow modes.

The ADII can be set to follow a specific perspective or remaining locked onto that angle, via a mode called ‘fixed follow.’ The drone also offers an ‘adaptive follow’ mode, tracking a specific subject as they move. Dynamic shots are also possible thanks to a ‘circle’ mode, which causes the drone to circle around a specific subject.

Tracking and precision, meanwhile, are made possible via an array of sensors, including: GPS, gyroscope, magnetometer, accelerometer and LiDAR. The drone is suitable for use in wind speeds ranging up to 30 knots, and boasts a top operating speed of 45mph / 72km/h and a maximum operational ceiling of 11,500ft / 3500m above sea level.

The ADII’s battery is rechargeable and interchangeable, able to power the drone for between 10 and 20 minutes per charge.

$ (document).ready(function() { SampleGalleryV2({“containerId”:”embeddedSampleGallery_3897782224″,”galleryId”:”3897782224″,”isEmbeddedWidget”:true,”standalone”:false,”selectedImageIndex”:0,”startInCommentsView”:false,”isMobile”:false}) });

The Airdog Kickstarter campaign is offering interested consumers a single ADII model for pledges of at least $ 1,200 USD; shipping to these backers is estimated to start in October 2017 and will be limited to ‘certain’ countries.

Visit the Airdog Kickstarter to find out more.

Articles: Digital Photography Review (dpreview.com)

 
Comments Off on The Airdog ADII is a lightweight, autonomous ‘extreme sports’ drone

Posted in Uncategorized


Extreme Architecture: 15 Structures Built to Withstand the World’s Coldest Places

05 Jan

[ By SA Rogers in Architecture & Public & Institutional. ]

extreme-cold-architecture-main

You might say that the kinds of built structures you find in either Antarctic research stations or the coldest permanently inhabited place on Earth (located in Russia) are polar opposites: some are high-tech, capable of elevating themselves above the accumulating snow or departing to warmer climes via helicopter, while others are as humble as it gets. But people have learned how to survive in these harsh places, whether by keeping coal fires burning around the clock or burrowing into the earth for warmth, and even polar bears have some secrets to share with architects on surviving amidst all that ice.

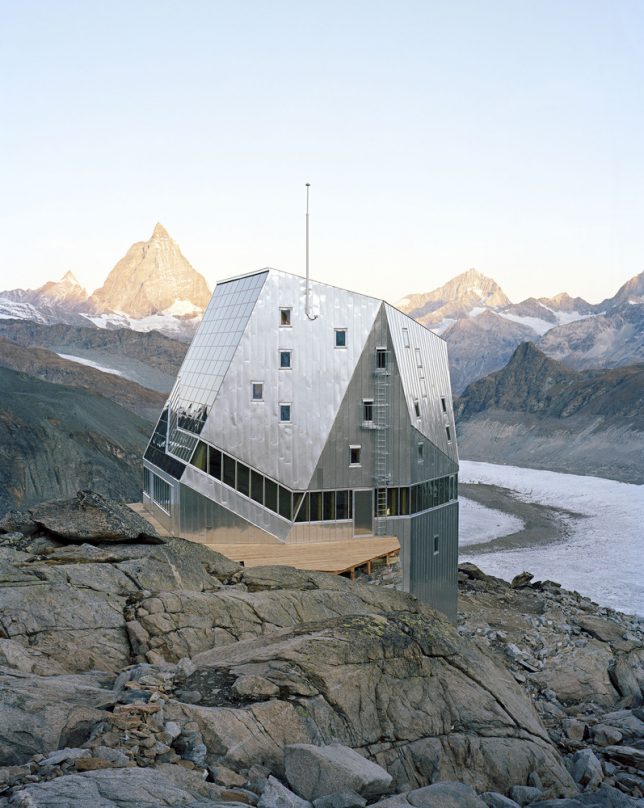
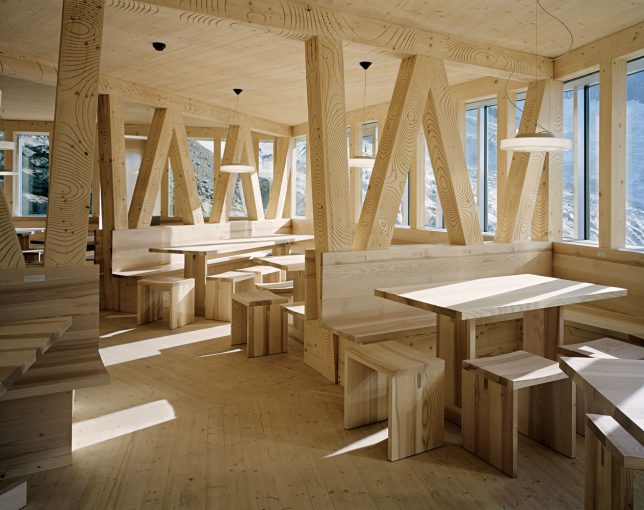
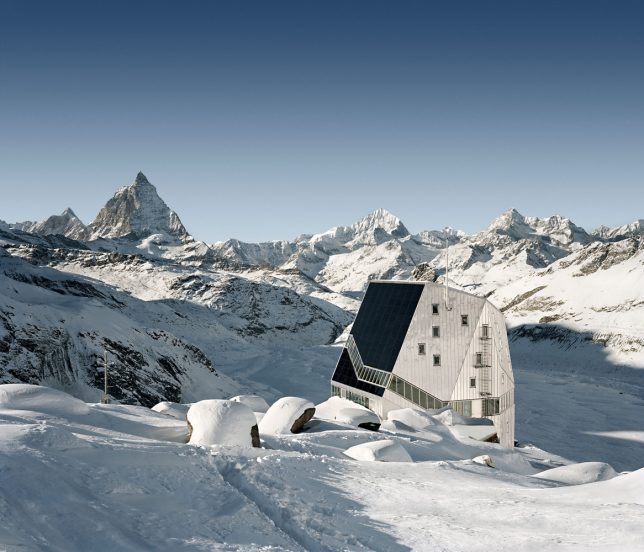
Monte Rosa Hut, Switzerland

extreme-cold-architecture-monte-rosa-hut-1

extreme-cold-architecture-monte-rosa-hut-2

extreme-cold-architecture-monte-rosa-hut-3

This five-story wooden structure on Switzerland’s Corner Glacier by Bearth & Deplazes Architekten has an exterior look befitting its environment, making it seem morel like a research facility than an ‘alpine hut’ for adventurers.

Memu Meadows Experimental House, Hokkaido, Japan

extreme-cold-architecture-meme-meadows-1

extreme-cold-architecture-meme-meadows-2

extreme-cold-architecture-meme-meadows-3

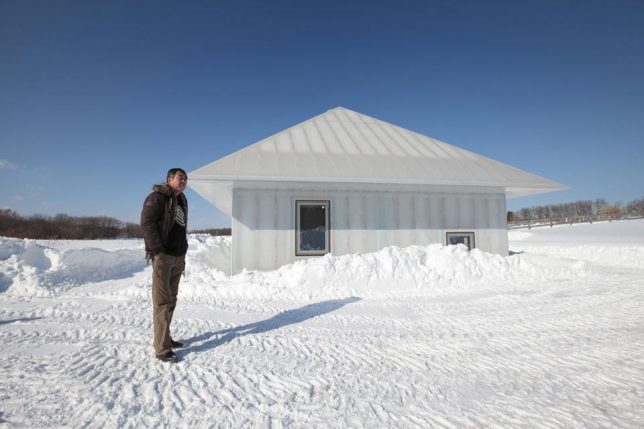
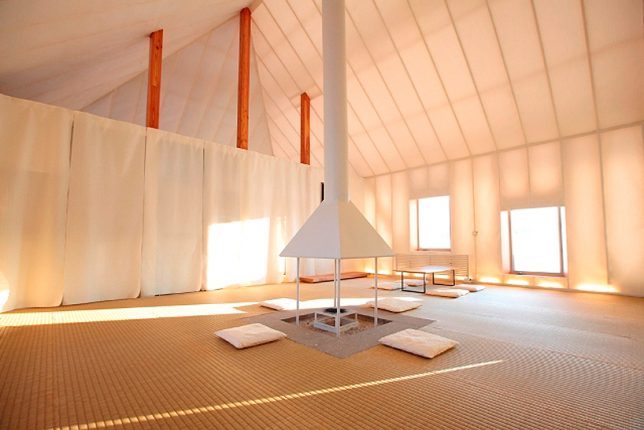
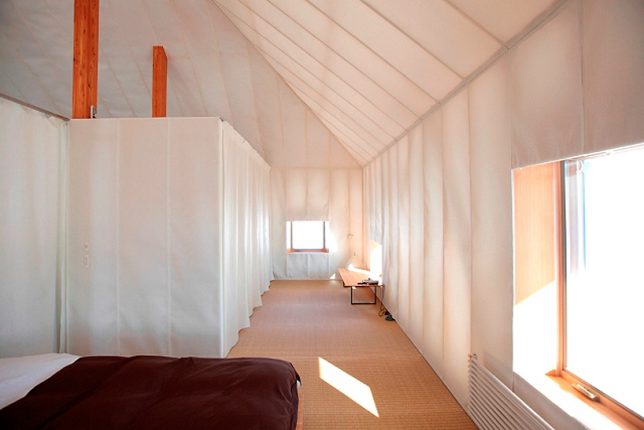
An experiment by architect Kengo Kuma, the translucent ‘Memu Meadows’ house was designed to test the limits of domestic architecture in extreme cold conditions. It’s a modern spin on the traditional homes of the indigenous Ainu, whose buildings used bamboo grass exteriors to hold in the heat of a central fireplace that remains burning all the time. Kuma’s version replaces grass with insulation and polycarbonate cladding but remains cheap and accessible, and allows the house to glow like a lantern after dark.

Halley VI, World’s First Mobile Research Station, Antarctica

extreme-cold-architecture-halley-vi-1

Ocean Waves Crashing on Seawall

extreme-cold-architecture-halley-vi-4

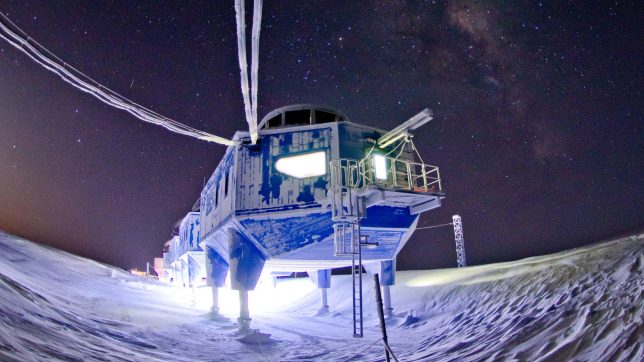
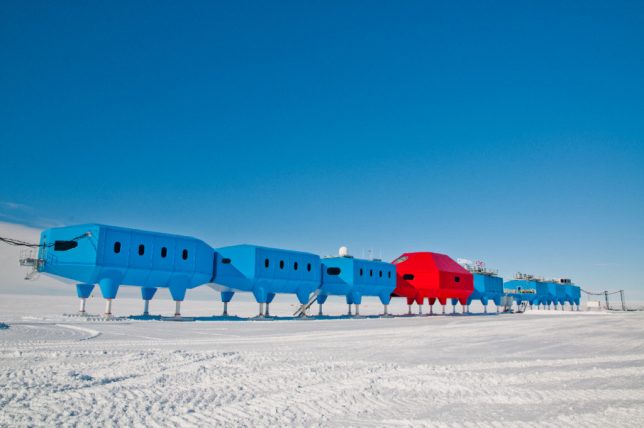
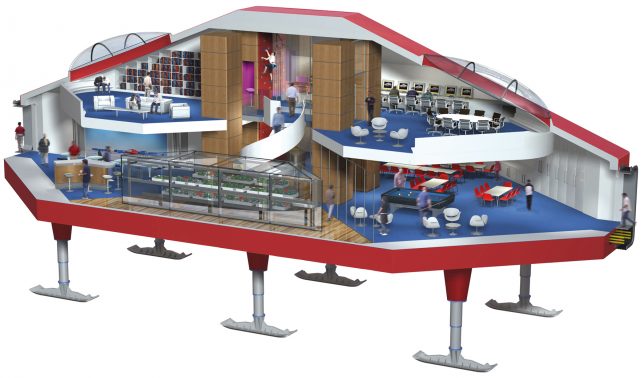
Halley VI by Hugh Broughton Architects stands up to some of the most extreme conditions on earth, serving as a mobile home base for Antarctic expeditions. It’s located on the floating Brunt Ice Shelf and can be transported on its ski-like feet, while hydraluic rams allow it to be raised above the snow as it accumulates. Seven interlinking blue modules offer offices, bedrooms, labs and energy plants while the central two-story red module contains social space for 16-32 crew members.

Arctic Adaptations: Concepts Reflecting Indigenous Canadian Traditions

extreme-cold-architecture-arctic-adaptations

extreme-cold-architecture-arctic-adaptations-2

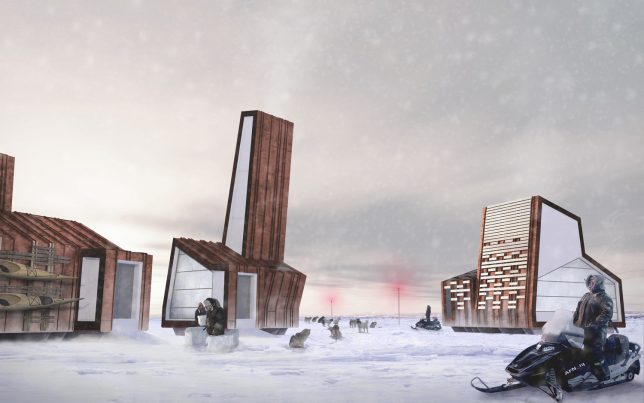
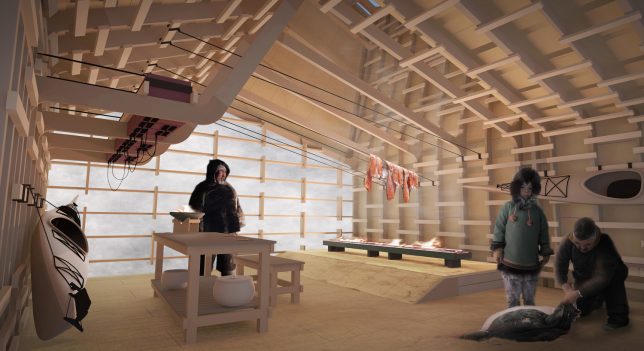
Canada commissioned Lateral Office to curate its Nunavut-inspired exhibition at the 2014 Venice Biennale, entitled ‘Arctic Adaptations: Nunavut at 15.’ The project proposes how architecture could improve the development of cohesive communities even as the environment and the world around them rapidly changes.

Trollstigen Tourist Route, Norway

extreme-cold-architecture-trollstigen-1

extreme-cold-architecture-trollstigen-2

extreme-cold-architecture-trollstigen-3

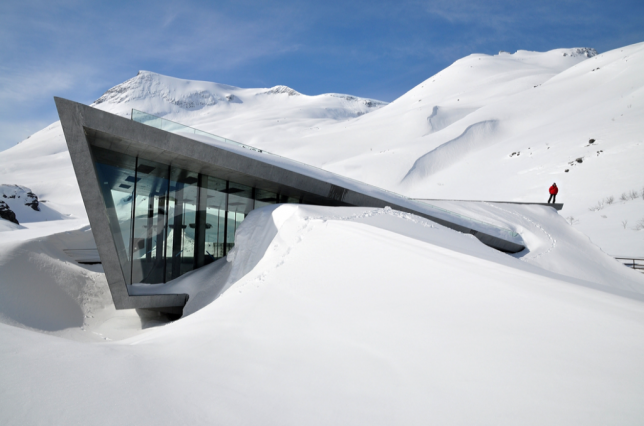
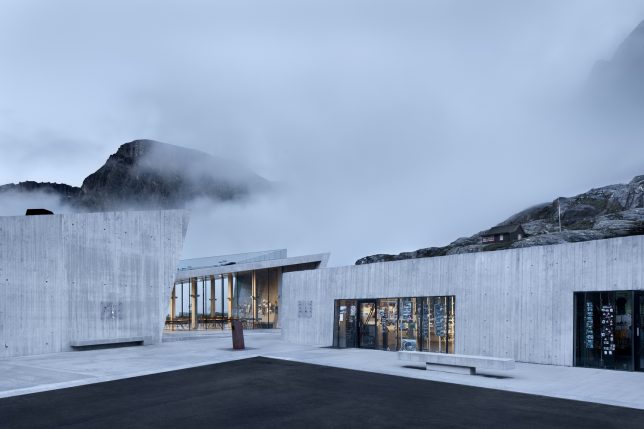
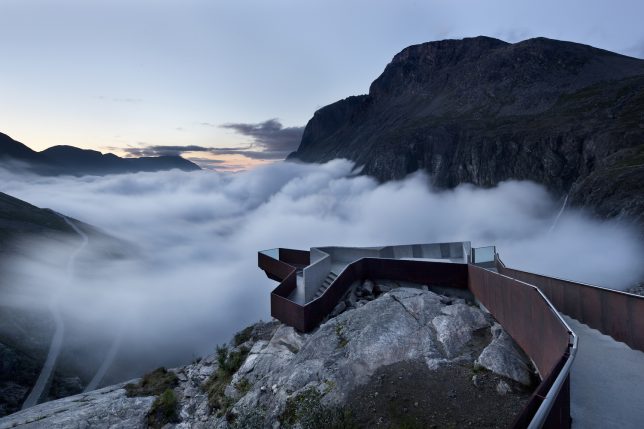
Set along the Trollstigen national tourist route in Norway, this visitor center and overlook by Reiulf Ramstad Architects gazes out onto a mountain pass that’s lush and green in the summer and formidably snowy in the winter. The overlook is particularly dramatic when the snow starts to accumulate.

Next Page – Click Below to Read More:
Extreme Architecture 15 Structures Built To Withstand The Worlds Coldest Places

Share on Facebook


[ By SA Rogers in Architecture & Public & Institutional. ]

[ WebUrbanist | Archives | Galleries | Privacy | TOS ]


WebUrbanist

 
Comments Off on Extreme Architecture: 15 Structures Built to Withstand the World’s Coldest Places

Posted in Creativity


Pulse: Extreme weather in black and white

04 Jan

Mike Olbinski has captured some pretty amazing footage over the past year; you may remember this video that we posted back in October and this one from July. Needless to say, he had a busy 2016. For his latest project, he decided to do something a bit different by presenting the entire 4K time-lapse film in black and white.

This type of treatment definitely comes with its own set of challenges, but we think it showcases the drama and unpredictability of thunderstorms in a refreshing way. Make sure to enjoy this one in HD with volume turned up and the lights turned down.  

Song by Tony Anderson: “The Way Home” (Licensed through The Music Bed)

Articles: Digital Photography Review (dpreview.com)

 
Comments Off on Pulse: Extreme weather in black and white

Posted in Uncategorized