RSS
 

Posts Tagged ‘Extra’

Tips for Setting Up and Photographing Mini-Sessions for Extra Income

17 Dec

The post Tips for Setting Up and Photographing Mini-Sessions for Extra Income appeared first on Digital Photography School. It was authored by Jackie Lamas.

Photographing mini-sessions is a perfect way to generate extra income from both new and returning clients. They can also create buzz and word of mouth during the slow season for many photographers. Knowing how to set them up and photograph them ensures you are successful and offer your clients the best mini-session experience.

1 - Photographing Mini-Sessions

What is a mini-session?

Mini-sessions are sessions that offer your clients a session at a reduced price and usually photographed in less time than a regular full session.

Typically, the sessions run between 30 and 45-minute time slots for each client. It is up to you if you want to offer your mini-sessions to families, individuals, or children. Perhaps you are willing to do all types of photography, which can also create more buzz in different niches.

2 - Photographing Mini-Sessions

Mini-sessions are a reduced price, but it is up to you to factor in costs so that you are still earning enough to generate income for your photography business. These mini-sessions are all about booking volume, and so don’t price it not too low, or you may burn out quickly. Set your price, so you are making enough money, however, not too high where it’s not cost-effective for your clients who perhaps don’t have money to spend on a full session.

How do you set up a mini-session?

It’s important to make sure that you have all of your mini-session details set up and prepped before sending the information out to social media or your client list.

3 - Photographing Mini-Sessions

Before you begin, figure out how much you to charge and what you intend to include in the mini-sessions. For instance, if you are charging $ 250 per session, perhaps you can include an 11×14 wall print. If you are only including digital prints, make sure to state how many your clients receive. Including a product can be an excellent incentive for clients to book rather than just getting a digital product.

4 - Photographing Mini-Sessions

For example, if you’re doing holiday minis, you may include a set of greeting cards. If you are doing beach mini-summer-sessions, perhaps a beautiful wall portrait is the best option. Either way, work out your costs and be sure that you price your sessions accordingly to avoid losing money or just breaking even.

5 - Photographing Mini-Sessions

This is an example of all the different poses you can do in the same location to make the most of the time limit of your mini sessions.

Once you have figured out the basic details of the session, it’s time to determine what season of the year you are planning on having the sessions. Weekend dates are advisable because many people tend to have the weekends off from work and are free from other obligations.

If you plan on doing fall minis, schedule them far in advance so that you have time to edit and deliver all of the materials to your clients before the holidays. For example, scheduling holiday minis from mid to the end of October is perfect because you still have plenty of time before the major holidays to deliver your photos.

6 - Photographing Mini-Sessions

Be sure to schedule enough time slots during the day so that enough clients can have their photos taken without overlap or running into each other. For example, start at 10 a.m. and photograph every hour and a half until 5 p.m., or an hour before the sun sets.

Depending on the season you’ve chosen to do the mini-sessions, you can photograph them all in one particular location or two very different locations to offer variety. For example, you can offer mini-sessions at a park on Saturday and Sunday photograph downtown. Offering two different locations for different days means clients can choose which look they would prefer.

You can also set up just one day, say a Sunday, and photograph in only one location like a park or field.

7 - Photographing Mini-Sessions

Prep before booking a single client

It is essential you be prepared for running mini-sessions. Otherwise, you can get lost in all of the small details. Here is a sample worksheet that you can use so that you can keep track of your mini-sessions.

Keep track of clients, payments, contracts, timeslots, and locations for each session. It can help you not get confused and also keep track of who has paid and who hasn’t.

8 - Photographing Mini-Sessions

Also, prep an exclusive print package for your mini-sessions that include several products. Doing this to send out to booked clients can prepare them just in case they want to buy more photos from you. Giving them an exclusive print package can boost your income and make up the difference for the reduced price of the mini-session.

Having your business ready for the mini-sessions ensures that the campaign runs smoothly and without fuss. Plus, having all of your materials ready, like contracts and product guides, makes you look more professional to both returning and new clients.

9 - Photographing Mini-Sessions

It also less stressful keeping track of all the mini-session details after the shoot and it’s time to edit and deliver.

Remember, photography is an art, but portrait photography is also a business. You must run your business efficiently to avoid burn-out or losing track of information or details.

Create a mini-session campaign

Now that you have all the details, the locations, and the dates set for the mini-sessions, it’s time to get the information out.

10 - Photographing Mini-Sessions

Create a buzz. Send out an email or social media post informing people that you are prepping for a run of mini-sessions and details are coming soon. Doing so gets your clients excited and gives them time to book because you have already informed them.

First, send the information to your existing client list. Give them the chance to book first. Not only does it make it more exclusive but also keeps your current clients happy. Returning clients are much more willing to book than new clients. Send them all of the information about a week before you send it out to new clients. While it gives them exclusivity, it also adds urgency for them to book because someone else may get their slot.

11 - Photographing Mini-Sessions

Returning clients have a higher rate of booking than new clients.

Afterward, send out your mini-session campaign through the best form that brings in clients. Try an email list, social media, or your website. Wherever you get the most traffic and exposure, publish your campaign there.

Continue announcing the campaign. Make sure that you remind people daily through email and social media. Once a time slot gets filled, make sure to update the information. You don’t have to do this every single time, but it can save people from trying to book the same time slot and be turned down.

12 - Photographing Mini-Sessions

Remember, the client who signs the contract and pays the retainer fee is the one who gets booked. People who message but don’t do those two things don’t get booked. Unless you know your client is reliable, don’t reserve the mini-session timeslot. Otherwise, you could miss out on a paying client.

Don’t be afraid of getting to the point! Mini-sessions have a reduced price, which makes them in-demand. Especially among your existing clients! If you get a request for a mini-session, direct them to where they can pay the retainer, and send them the contract as soon as possible.

13 - Photographing Mini-Sessions

You can write them something like this: Thank you so much for wanting a mini-session! I do have that time and date available, however, it’s first-come-first-served. To book your preferred time and date, please go to this link and pay the session retainer. As soon as I receive confirmation, I can send you the contract. I’m excited and look forward to photographing your beautiful family!

It’s short, simple, but to the point. Letting your clients know the steps they have to take to book the mini-session ensures that you filter out the people who are just shopping around. This way you’re not wasting your time.

14 - Photographing Mini-Sessions

How to photograph mini sessions

Mini sessions are wonderful because they usually mean that you have back to back sessions all in the same location. However, it also means that you are out there all day photographing in all types of light.

Prep your gear so that you are ready for any type of lighting situation that can occur during the sessions. For example, bring extra batteries for your flash in case you will be competing with the sun. Bring a reflector to bounce some light. Take a tripod.

15 - Photographing Mini-Sessions

Sessions typically run from 30 to 45 minutes spaced at every hour and a half. This timing gives you at least 30 minutes between sessions to rest, eat a snack and drink some water. It also helps to adjust to new lighting conditions for the next session.

Mini-sessions can enable you to look for new ways to photograph multiple families in the same location. Use their energy to determine which angles and specific locations work best for them. It’s a great time to push your creativity and perhaps experiment new ideas you’ve wanted to try.

16 - Photographing Mini-Sessions

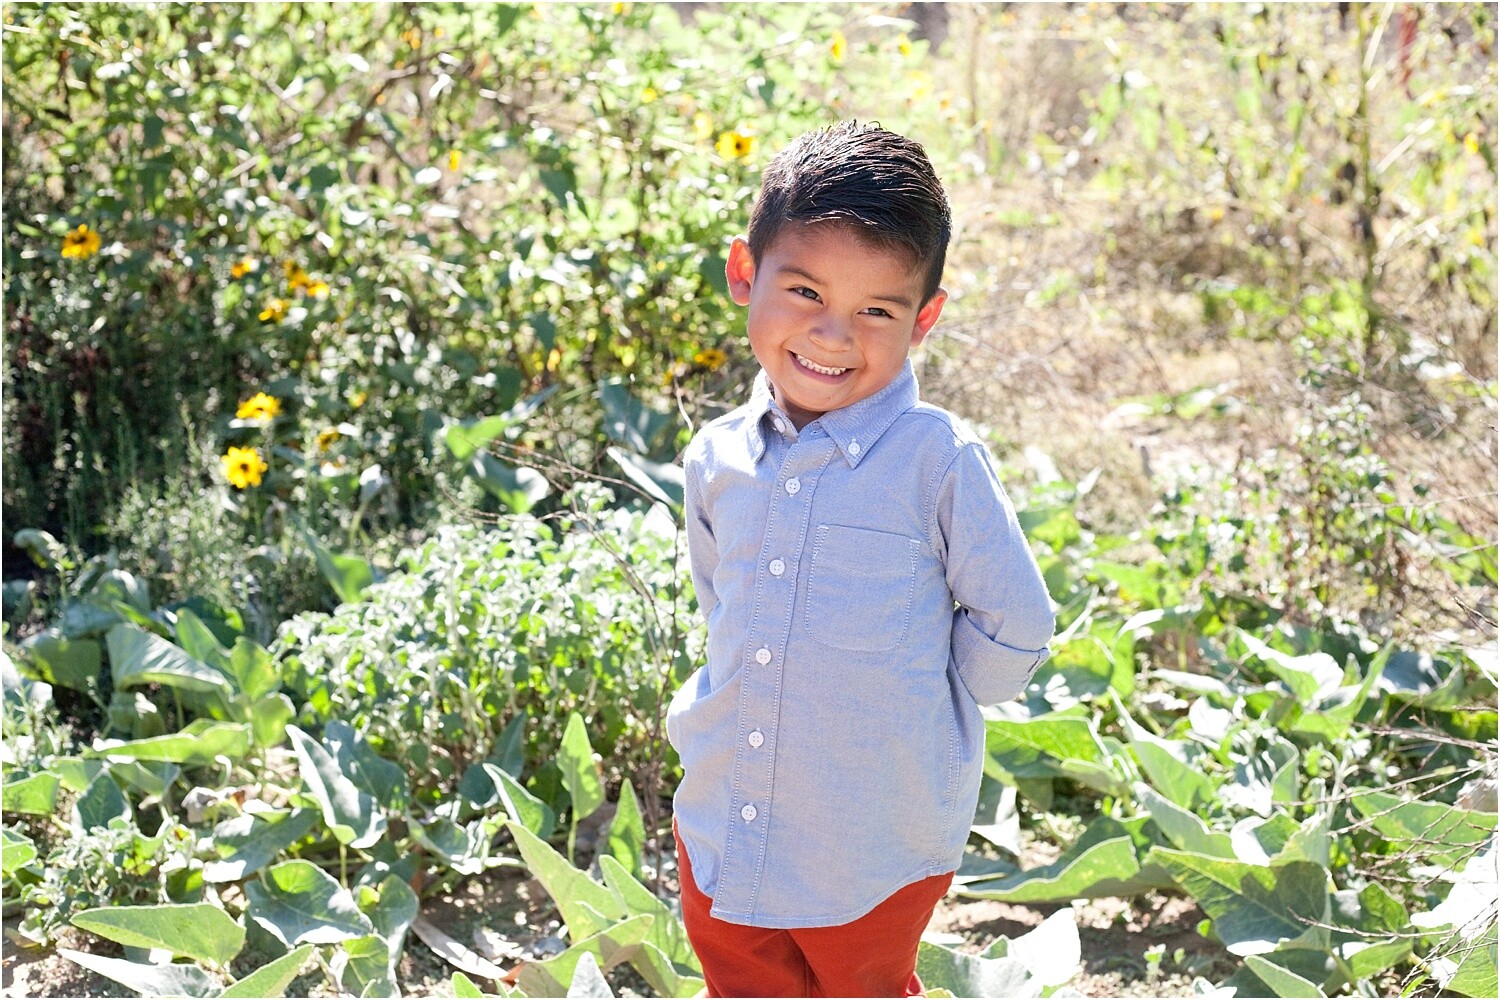
Here you can see all the variations in posing with different family combinations in the same location.

Make sure to set a timer so that you know when it’s time to stop photographing. Put your alarm about 5 minutes before the time is up to ensure you are aware you have a few extra minutes to get any last photos.

Time goes quickly, and your clients may feel like they didn’t have lots of variety or even that you took enough photographs. One thing that I do is I tell them how many photos I’ve taken, which is usually anywhere between 200 and 400 photos. Clients know that they won’t get all of the 200 photos, but they feel more confident that you’ve taken enough for them to choose.

17 - Photographing Mini-Sessions

If you offered your clients a set number of photographs, make sure that you photograph enough to cover that amount. For example, if you’ve offered 50 digital images, make sure you photograph more than double to have enough variety for them.

Making the most out of little time

Mini-sessions go by quickly, and if you have chosen to photograph for 30 minutes, it is important to make the most out of the time.

18 - Photographing Mini-Sessions

Make the most out of your time by having set poses for different combinations during the mini-session.

Prep yourself with 5 – 7 poses that work for all family types and sizes. Try to use poses that don’t require you to move your clients too much and waste time.

The most common set of poses include:

  • the whole family together
  • siblings only
  • parents only
  • each child
  • mothers and daughters
  • fathers and sons
  • mothers and sons
  • fathers and daughters

If grandparents are participating, you can also do the same above combinations with them included. Don’t forget to photograph the grandparents both individually and with only their grandchildren.

19 - Photographing Mini-Sessions

Once you have all of the main portraits taken, allow the children to have a bit of fun. Have them walk with their parents or play so you can capture them in a natural state of joy and happiness.

After the session

Immediately after taking the last photo at the mini-session, give your clients a printed pricing sheet that includes other products you offer. Also, include any exclusive packages you’ve created for the promotion. That way they can keep it in mind before they view a single photo.

20 - Photographing Mini-Sessions

After you’ve completed your mini-sessions, get one or two photos onto social media as sneak previews. Doing so can help drive more interest to your mini-sessions from potential clients.

Also, take the time to send a thank you message to your clients and email the price list again for the mini-sessions. If you have created something exclusively for the promotion, make sure to highlight the top three products. Do this before you show your clients the images so that they can plan how much they want to purchase and which products they like best.

21 - Photographing Mini-Sessions

Use this photo as inspiration for different posing during your next mini-session.

To keep the excitement of the mini-session going, edit and deliver the images to your clients quickly.

If your mini-sessions included a set number of images, allow downloads or choosing for that amount, but include all of the photos that you believe are great. For example, if your package includes 50 edited photographs for your client with only 10 downloadable images, include all 50 in the gallery or sales appointment slideshow.

22 - Photographing Mini-Sessions

Including more photos makes it likely that your clients purchase more than the ones included in the mini-session promotion.

Online versus in person

You have two options for your mini-session image delivery. You can send your clients an online gallery or make in-person sales. It’s up to you which you prefer to do depending on your business style.
23 - Photographing Mini-Sessions

If you do online, be sure you’ve outlined all the parameters regarding the gallery. Have your watermarks in place, limit the downloads to the number you’ve specified and use an expiration date. Also, add email logins to keep track of emails for future marketing.

Also, have your products displayed front and center so that your clients can find them quickly. If your clients have to jump through lots of hoops to get their images, they most likely won’t buy much. Make sure the gallery is user-friendly and easy to access.

24 - Photographing Mini-Sessions

If you have opted for in-person sales, schedule the appointment after you’ve finished photographing the family. Doing so helps settle any delays in delivering photos. Have a physical calendar or use your phone calendar to note the time and date of your in-person sales.

In-person sales can happen at your studio or the client’s home. Take your top products, pricing sheet, and samples along. Include a preview of the images in a premade slideshow that highlights the top 15 photos.

25 - Photographing Mini-Sessions

Work with your clients to choose their favorites from the promotion and any additional products they may want to purchase.

Take an order form and have a secure way to process payments. For example, use a PayPal credit card reader or Square software. Doing so allows clients to pay then and there, avoiding payment excuses. You also look more professional.

Pricing Sheet and Products

I want to highlight pricing sheets and products. I’ve repeated it throughout the entire article. Make it a point to put your pricing sheet and products in front of your client’s eyes at all times.

26 - Photographing Mini-Sessions

Mini-sessions often bring in quick income because you are working in volume. In the long run, what brings you greater income and returning clients is selling prints and products.

Reminding your clients of pricing and products allows them to think about what they would like to purchase. If you only say it once, it doesn’t stick. You’ll need them to see the information at least three times for them to think about buying something other than digital images.

27 - Photographing Mini-Sessions

Send out the pricing sheet and all other selling materials in an email when your client books the session. Send it along with their signed contract or payment receipt. Hand them a printed pricing/product sheet at the end of the session. Be sure to include your logo and any other necessary information such as credit card payment details. When you send the gallery invitation or see them at the in-person sales appointment, give them the pricing/product sheet again.

28 - Photographing Mini-Sessions

It’s important to keep the pricing/product sheet available to them and as a constant reminder to purchase printed products from their session. Having your work displayed in their home also serves as a good referral among friends and family who see their portraits.

In conclusion

Mini-sessions are a great way to drive volume business and get more experience in portrait photography. Price your mini-sessions according to your target market and business model so that you don’t lose money by doing the promotion.

29 - Photographing Mini-Sessions

Remember to get your pricing sheet and product pricing to your clients at least three times to ensure extra income after the sessions have been completed.

Have you photographed mini-sessions before? What was your experience?

The post Tips for Setting Up and Photographing Mini-Sessions for Extra Income appeared first on Digital Photography School. It was authored by Jackie Lamas.


Digital Photography School

 
Comments Off on Tips for Setting Up and Photographing Mini-Sessions for Extra Income

Posted in Photography


Eradicate Ugly Face Extra fat

13 Mar

Alright. So chubby cheeks are sweet over a little one. I just need to pinch them as well. But, as an adult, I don’t want them anymore than you probable do. So how can we eliminate chubby cheeks in addition to a face fat? Or perhaps like me, you would like to get rid of a double chin. The everyday recommend is eating plan, aerobic exercise, lessen salt ingestion and the like. All of that is audio guidance permanently health and fitness. Not to mention, you can find plentiful potions inside the form of lotions that develop several levels of temporary final results. Or you can go see a plastic surgeon. This is pricey and i’m not keen on obtaining slash on www.liquafit.com/how-to-get-rid-of-chubby-cheeks-in-a-day/.

I’ve to admit that i don’t need to get minimize on. What I actually want is usually a quick lower. Everyone knows we should be doing everything other stuff in any case. So let’s get right for the coronary heart with the make any difference. You can find experience physical exercises you are able to do that will company up your encounter and acquire rid of unsightly deal with fats, chubby cheeks, double chin and tighten the neck. And as being a reward you can seem younger.

While it can be not the fountain of youth, it works and it can be verified! And it’s easy to receive began, it is really uncomplicated to try and do plus the benefits are rapidly. So here’s your to start with work out. SMILE :0) Keep that smile for 8 – ten seconds. Now give me 5 smiling repetitions. Is uncomplicated or what. It’s my own most loved. I get in a number of added smiles every day and simply call it work out. How awesome is always that.

The post Eradicate Ugly Face Extra fat appeared first on Photonovice.

Photonovice

 
Comments Off on Eradicate Ugly Face Extra fat

Posted in Equipment


GorillaPod unveils the Mobile Rig: A flexible tripod with two extra accessory arms

30 Dec

GorillaPod has launched a new flexible tripod product called the Mobile Rig. With Mobile Rig, smartphone filmmakers get two extra arms in addition to the smartphone mount, making it possible to attach a small secondary camera or accessories, such as lights and a microphone. And, of course, Mobile Rig has the same flexibility as past GorillaPod tripods.

The GorillaPod Mobile Rig includes a pair of arms, each with 1/4″-20 connection points, as well as a pair of Cold Shoe mounts and a single GoPro mount. Joining those is the GripTight locking mount for securing a smartphone to the tripod. The tripod is made of aluminum, ABS plastic, zinc-aluminum, stainless steel, and TPE.

GorillaPod Mobile Rig is in stock on JOBY’s website for $ 100 USD.

Articles: Digital Photography Review (dpreview.com)

 
Comments Off on GorillaPod unveils the Mobile Rig: A flexible tripod with two extra accessory arms

Posted in Uncategorized


Memistore lets you store two extra memory cards right on your camera

14 Dec

There are two kinds of photographers out there: those who have lost a memory card, and those who are going to lose a memory card… it’s only a matter of time. That’s where Memistore comes in: this interesting little camera attachment lets you store two extra SDHC cards right on your camera itself, either using the tripod mount or your hot shoe.

The idea behind Memistore is that, unlike a memory card wallet, you’re not going to misplace your camera (and if you do, you have bigger issues to address…). This way, you always have two spare cards at the ready, securely housed in a splash-proof hard case that you can simply rotate out while your camera is still attached to the tripod:

This is the standard way the memistore creators imagine you’ll use their gadget, but it’s not the only way. A hot shoe adapter is in the works as well. Check out the campaign’s Kickstarter video below to learn more or see Memistore in action:

It’s a ridiculously simple idea, but one that we could actually see being quite popular, assuming they raise the requisite funding to bring this prototype to market.

To that end: Memistore hopes to raise ~$ 48,000 in funding on Kickstarter. As of this writing, you can still grab an early backer deal and get your own Memistore for just $ 20 AUD (~$ 15 USD), half the price it will cost if and when this little creation goes retail. And the first shipment to early backers is scheduled for May of 2018.

For more info, or if you’d like to order one or two of these for yourself, head over to the Kickstarter campaign page.

Articles: Digital Photography Review (dpreview.com)

 
Comments Off on Memistore lets you store two extra memory cards right on your camera

Posted in Uncategorized


How to Give Your Landscape Photos Extra Punch in One Easy Step

09 Nov

Have you ever felt that your landscape photography is missing a little punch? You look at other photographers’ images and their colours have a very appealing amount of contrast. But no matter how much you play around with HSL (Hue, Saturation, Luminance), Contrast, Vibrance or Saturation, your colours just don’t get the same depth and contrast and end up looking fake and oversaturated.

The quality of the lens being used affects color greatly (more expensive lenses generally give a much better colour contrast than entry-level lenses). But there is a step that you can do when post-processing your recent landscape photos to give the colours an extra little bit of punch and contrast and more importantly, keep them from looking overcooked.

before-after

Color space

You may be aware of a term Colour space which essentially determines how devices represent colour. The two most common colour spaces are Adobe RGB and sRGB. Adobe sRGB is used on the web and for many smart devices. Adobe RGB is a little bigger than sRGB and can show more colors. However, these are not the only colour spaces around. Lightroom, for example, uses one of the largest (able to produce a larger amount of colours) called ProPhoto RGB.

But enough about colour spaces! I can already see your eyes glazing over, mine are already as I type this. But knowing that there are different colour spaces can be helpful. Knowing exactly how they work isn’t necessarily all that important.

Convert to Lab Color

The colour space that you’ll want to recognize is LAB Color. How does it work? Doesn’t really matter. But how can you use it give your images that extra punch? In this article, I’ll explain how a very simple step (and I mean simple!) that will help give your images that extra punch using the LAB colour space in Photoshop.

Okay, so first up you’re going to want to bring your image into Photoshop. Before you do this, you may need to develop the image a little in Adobe Camera Raw or Lightroom. Fix up any exposure issues, correct the white balance, etc.

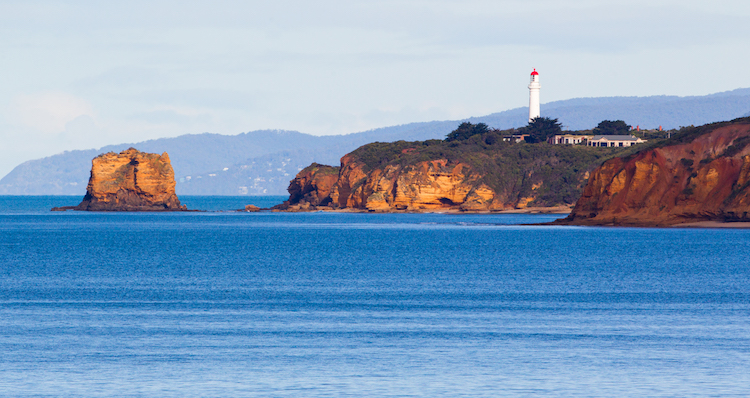
This is the image that I’ll use as an example.

before

This image has had very little done to it prior to Photoshop. A simple crop, general contrast and exposure correction were all that was applied.

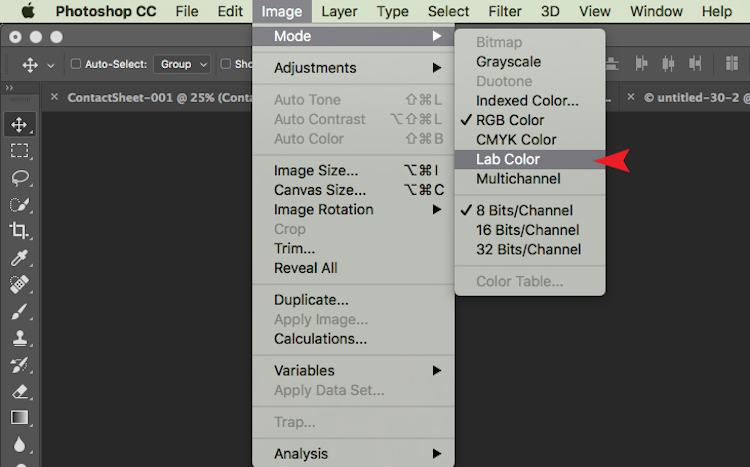
Now that your images is open in Photoshop, the very first thing you need to do is convert it from Adobe RGB or sRGB (depending on what you have set as the working colour space in Photoshop) to LAB Color.

To do this, go to: Image > Mode > Lab Color.

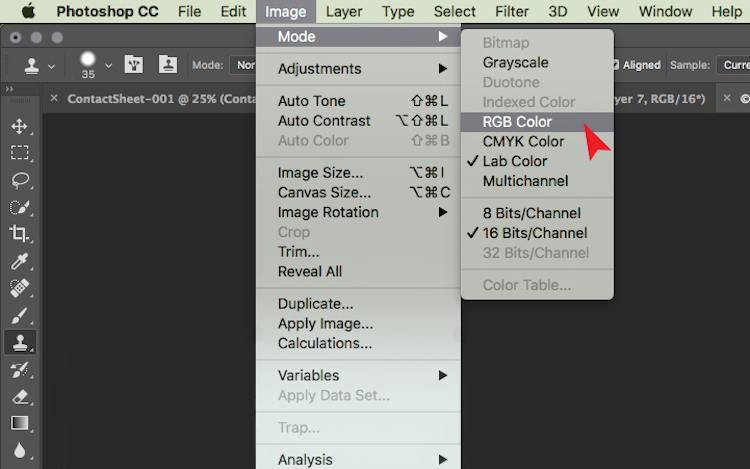
The tick next to RGB Color means that Adobe RGB is currently being used.

The tick next to RGB Color means that Adobe RGB is currently being used.

Now Photoshop is using LAB instead. You won’t notice a change at all at this step because nothing has changed on your end. All you have simply done is tell Photoshop which method to use to display colours.

Add a Curves Adjustment Layer

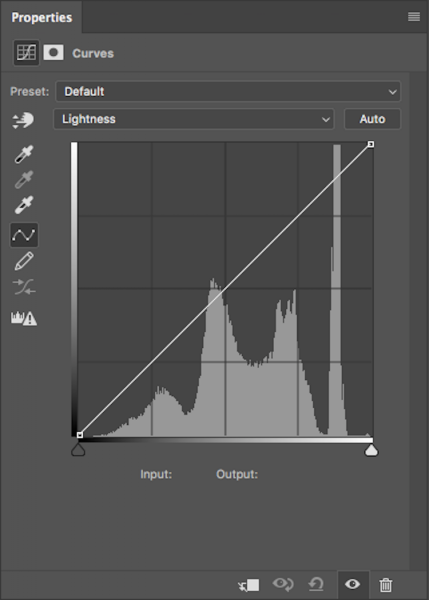
With your image in LAB Color, the next step is to create a Curves Adjustment Layer. Once this layer has been created, you should see something like this:

lab-curves1

Generally, this doesn’t look any different to any other Curves Adjustment Layer except for one thing. Instead of having RGB in the drop down menu, you will see Lightness.

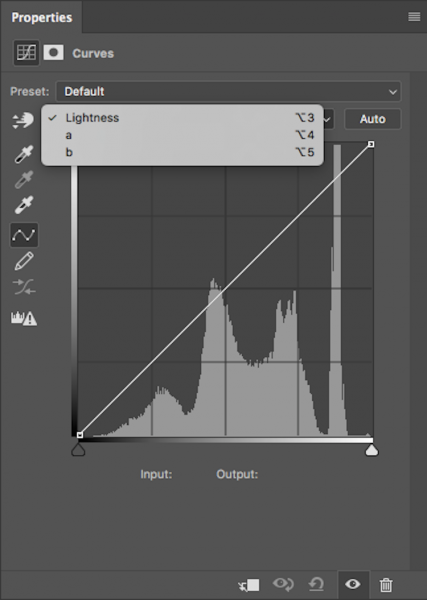
With this adjustment layer created, the next step is to click on the Lightness drop down menu. This brings up Lightness, A, B; which is what LAB is short for!

lab-curves

Adjust Channel A

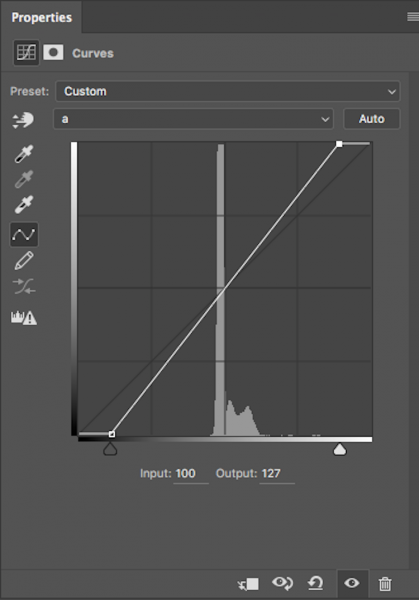
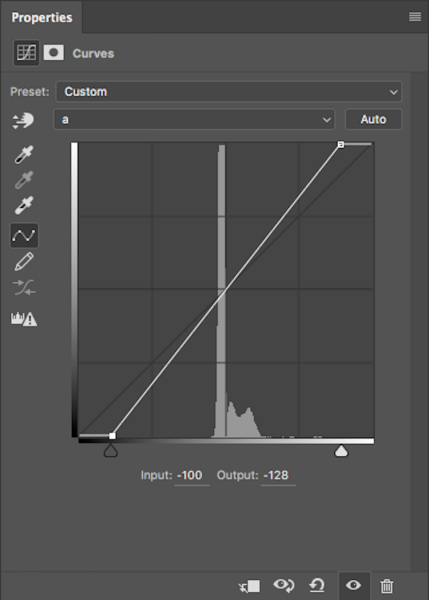
Now, you need to select the A-channel. With the A-channel selected, bring in the shadows anchor point at the bottom-left corner toward the bottom-centre. You will notice the Input numbers increasing from -128. As a starting point, I like to bring this value to -100. Now, find the highlight anchor point (top-right) and bring that toward the top-centre by the same value; for -100 set it to 100.

Notice the anchor points have moved toward the centre equally?

Notice the anchor points have moved toward the centre equally?

You’ll notice strange things happening to your colours as you slide the anchor points along. Don’t panic – this is supposed to happen.

Adjust Channel B

Now do the same steps by the same values for both shadows and highlights for the B-channel.

Same steps have been done for Channel B

Same steps have been done for Channel B

NOTE: make sure your Output value remains at -128 for the shadows and 127 for the highlights. If these numbers are altered it means that the anchor point is being lifted from the bottom for shadows and dropped from the top for highlights. You just want to drag the sliders along horizontally (not move them up or down).

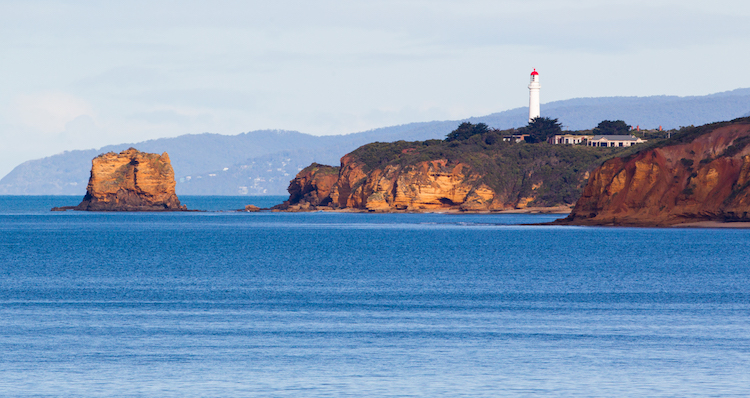
With both A and B channels having been done now, the colour and colour contrast of your image should look different from the original. This is how my original image looks after these steps.

This is after setting A/B shadows to -100 and highlights to 100.

This is after setting A/B shadows to -100 and highlights to 100.

Fine tuning

For me, that is looking a little overdone. But no problem! To change this, all you have to do is reduce the amount you moved the anchor points in both A and B channels. I generally find going by increments of 10 is most helpful.
If you feel your image needs more punch, then you will want to bring the anchor points closer to the centre. Just remember to keep each value across the shadow/highlight, A/B channels the same.

After increasing the numbers in my images, I felt that -110/110 in A/B worked the best (see below).

after-110

Convert back to RBG

Once you are happy with how your image looks, it’s time to change it back to RGB. To change your image from LAB to RGB, go to: Image > Mode > RGB color.

change-to-rgb

You’ll be alerted that changing modes will discard adjustment layers, but that is fine. Select OK and you’ll be brought back into RGB. You’ll notice that the Curves Adjustment layer is now gone and that your image is now the background layer. However, the effect on the colours should remain. Now you’re free to go about editing the photo as much as you like.

So that’s a very simple technique to add more colour punch in your images. Just remember these two points:

  • This is something that you should do at the beginning of editing your image in Photoshop and not the end as you will lose all your adjustment layers when changing modes.
  • Remember to alter the anchors points from A/B b by the same value to eliminate strange things happening to your colours.

googletag.cmd.push(function() {
tablet_slots.push( googletag.defineSlot( “/1005424/_dPSv4_tab-all-article-bottom_(300×250)”, [300, 250], “pb-ad-78623” ).addService( googletag.pubads() ) ); } );

googletag.cmd.push(function() {
mobile_slots.push( googletag.defineSlot( “/1005424/_dPSv4_mob-all-article-bottom_(300×250)”, [300, 250], “pb-ad-78158” ).addService( googletag.pubads() ) ); } );

The post How to Give Your Landscape Photos Extra Punch in One Easy Step by Daniel Smith appeared first on Digital Photography School.


Digital Photography School

 
Comments Off on How to Give Your Landscape Photos Extra Punch in One Easy Step

Posted in Photography


How to Get Started Making Extra Money with Your Nature Photography

16 Sep

Photography is expensive, there’s no doubt about that. Nature photographers have it bad, though, especially if you’re buying long telephoto lenses for wildlife. The Canon 200-400mm lens will set you back $ 11,000 – ouch. So it’s no wonder that many people want to make it in photography and start monetising their work. But can you make money with your nature photography?

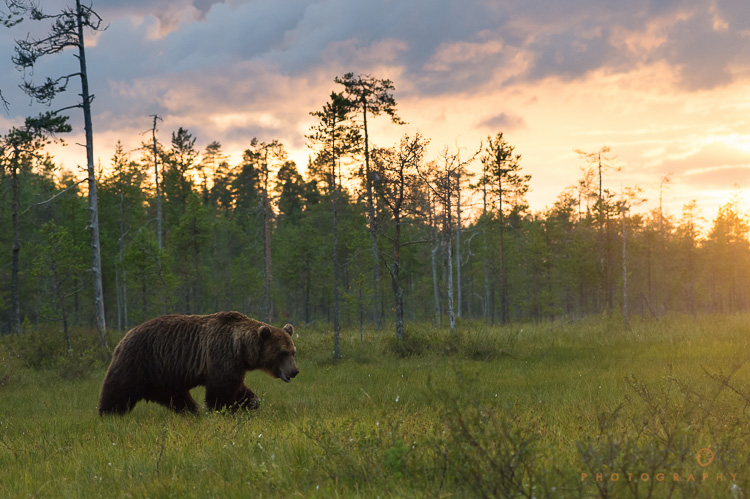
Brown Bear at Sunset

Making money from your photography isn’t easy, and it doesn’t get any easier as a nature photographer either. There’s less demand, and more people doing it. That means increased competition for a smaller slice of the pie. If you want to make money from your nature photos, then you must realize that it’s not easy by any means – but it’s also not impossible.

I’ve been working as a professional nature photographer for about six years now. What I’ve learned over my relatively short career so far is that you need to think outside the box to stay ahead of the competition. A bit of a cliché statement maybe, but one that you’ll have to embrace – especially if you want to be a full-time photographer.

But you’re probably reading this wondering how you can make a bit of extra cash from your photos on the side, rather than an entire life-altering career move. Well, that I can help you with! Let’s take a look at some of the main ways you can start to make money with your nature photography.

Prints and Other Products

The first print I ever sold was in 2008. That’s eight years ago now, and I’ve been doing it ever since. To the surprise of some, people do buy photographs to hang on their walls. This isn’t a space reserved solely for paintings.

Personally, I have my photos printed and framed myself, but you can have this process automated by dedicated web hosts. Zenfolio is a popular choice amongst photographers for a website, and they offer the ability to have orders automatically fulfilled by printing labs. This means you can sit back and relax, selling prints from your website.

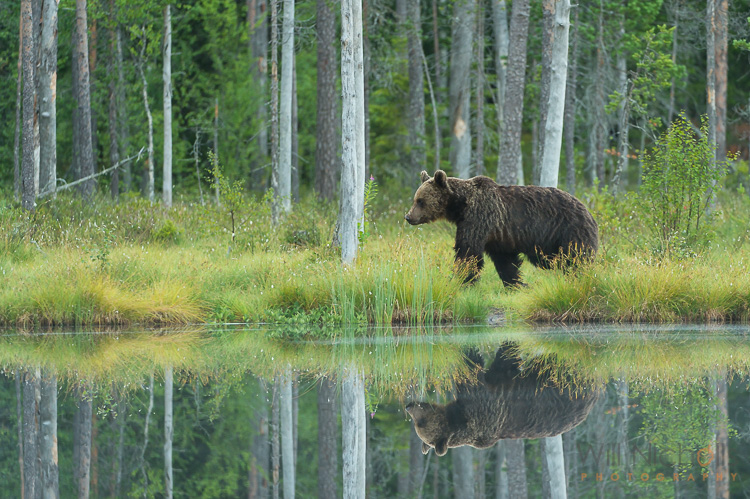
Brown Bear

Beauty and picturesque scenes sell better as prints, rather than action-packed shots.

It’s not just online though. You can sell prints in the real world too! Head to a market or trade show, set up a stall and get selling. It’s great fun talking to customers about your work and to sell your photos this way. Doing just a couple of shows a year can buy you a new camera or lens, so that’s something to think about.

What sells best? Well, I find the more traditional wildlife photography like; clean bokeh shots, cute animals, or dramatic scenes. You’re looking for something that someone will want to look at over and over again. After all, when was the last time you moved a framed picture in your house? They stay up for a long time.

Workshops

If you really know your way around your camera and can take a decent photograph, then this is something you could consider. Day workshops offer clients tuition in photography, let them know your secrets and just help them to take a better photo and understand their equipment. It’s a popular move amongst photographers nowadays, and almost everyone trying to make a living out of nature photography is offering workshops.

wildlife-photography

The best thing about it is that you can set your own hours and choose when you work. You can fit sessions in on the weekend around your full-time job, and have a little extra money coming in on the side. All of this helps to take the sting out the costs of new photography kit.

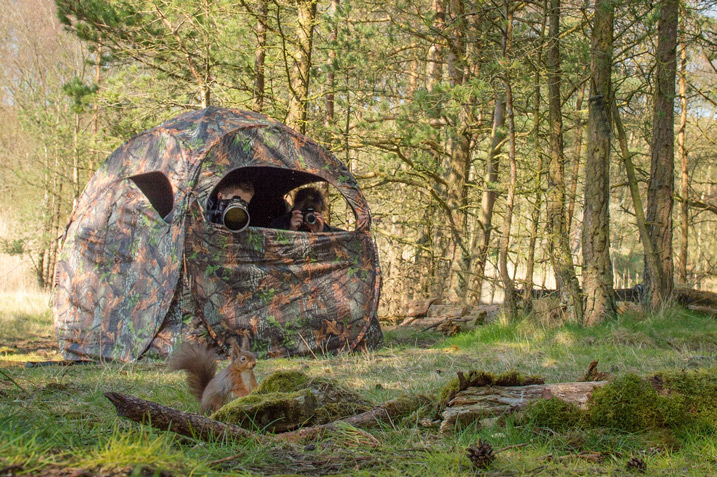
There are different types of workshops you can offer. Some photographers partake in one-to-one guiding days, showing clients different locations for landscapes or wildlife sightings while imparting photographic knowledge. Others may rent out a blind they have built to view a particular animal (see image above), something that is often in high demand by those who don’t have the time to create such possibilities themselves.

Sell Stock Images

The stock photography industry is depleting day by day, unfortunately. It used to be the case that you could make a five-figure salary, or more, from stock photography alone. Maybe not just as a nature photographer, but you could definitely make big bucks in comparison to nowadays.

nature-photography-money

But with the rise of microstock, photographers are seeing their earnings decrease. On top of that, many stock websites are taking increased percentages as a commission, leaving photographers with little left of the few sales they may still make.

Despite that bleak picture, there are specialist nature photography stock agencies you can submit to. The likes of Nature Picture Library still sell well, at least in the UK, and photographers are able to make a decent income from them. However, they are very selective about who they work with – you need something unique in your portfolio to be accepted.

Selling to Publications

This is where there is definitely still money. Selling images to newspapers or magazines can be pretty lucrative indeed – the trick is making it a regular gig. Publications are often looking to buy not just one photo, but a sequence of photos that tell a story. That’s where your best chance to get published sits.

Selling to newspapers and other publications can be a good source of income.

Selling to newspapers and other publications can be a good source of income.

Working with a press agency to get your photos syndicated and in front of the right people is the best way to go about it. While you can contact publications yourself, you’re likely to be ignored and if your photos are used you may have to spend months chasing them for payment. Press agents take the stress out of it. There are plenty around the world, and they’ll take a commission (usually 40-50%) of the sale price for their services. I work with

Press agents take the stress out of it. There are plenty around the world, and they’ll take a commission (usually 40-50%) of the sale price for their services. I work with REX Features, but there are plenty out there such as Caters News and Associated Press. If you think you have a good, fresh sequence of images then send some low-resolution copies over and you’ll soon find out if they are sellable or not.

nature-photography-money

In Conclusion

Here are just some ways that you can make money as a nature photographer. It takes work and dedication, especially if you want to make it a full-time job. It’s definitely not the path everyone will be able to take. But, there’s no harm in trying to make a bit of extra money at first and seeing where it takes you. You just have to take that first step.

googletag.cmd.push(function() {
tablet_slots.push( googletag.defineSlot( “/1005424/_dPSv4_tab-all-article-bottom_(300×250)”, [300, 250], “pb-ad-78623” ).addService( googletag.pubads() ) ); } );

googletag.cmd.push(function() {
mobile_slots.push( googletag.defineSlot( “/1005424/_dPSv4_mob-all-article-bottom_(300×250)”, [300, 250], “pb-ad-78158” ).addService( googletag.pubads() ) ); } );

The post How to Get Started Making Extra Money with Your Nature Photography by Will Nicholls appeared first on Digital Photography School.


Digital Photography School

 
Comments Off on How to Get Started Making Extra Money with Your Nature Photography

Posted in Photography


Manfrotto launches new Digital Director models and updates app with extra features

04 Aug

Manfrotto has added depth of field preview, an intervalometer and time-lapse controls to the app that runs its Digital Director camera-remote-control and external monitor device. Version 2.1 of the app, that is now compatible with a wider range of iPad models, also brings auto playback so images can be displayed automatically after they are recorded, as well as exposure bracketing and a more precise focusing system. The new app makes it possible to download Raw images to transfer via Wi-Fi web server, e-mail and FTP, and users can now send processed and resized JPEG files directly to social media apps on the host iPad.

Version 2.1 also imports metadata into the desktop version Adobe Lightroom via a plug-in. While the device offers controls for shooting video content it still isn’t possible to play video back through the Digital Director or to download movie files to the iPad. The Digital Director is compatible with 14 Canon EOS cameras and 15 DSLRs from Nikon but the company says that the new depth of field preview function only works with Canon models.

Manfrotto has also released a rigid case for the Digital Director as well as a sun shield and a range of frame inserts that convert the physical structure of the device to accommodate the different form factors of a series of iPad models.

The Digital Director now has configurations for iPad Pro 12,9”, iPad Air 2, iPad Air, iPad mini 4, iPad mini 3 and iPad mini 2 models, all of which cost $ 299.99/£249.95. For more information visit the Manfrotto website.

Press release:

Digital Director App V. 2.1, new Digital Director iPad compatibility and new accessories

Manfrotto, the leading global innovator and manufacturer of premium photo, video and lighting support products and accessories, announces the launch of Digital Director App V 2.1, new Digital Director models compatible with iPad Pro 12,9“ and iPad mini 4 – and new accessories including a new semi-rigid case, sunhood and frames.

Originally launched in 2015, Digital Director won Videomaker’s Best of NAB 2015 and was recently awarded the prestigious Red Dot Award: Product Design 2016.

Digital Director is the only Apple certified (MFi – Made for iPad Certification) electronic device that connects your camera and iPad for easier, more effective image making. Just tap the iPad screen to set up and control your camera, shoot, check, edit, share and manage your pictures. Digital Director ensures a reliable USB cabled connection between the camera and iPad, and its free dedicated App allows shoot monitoring and camera setting control. It is compatible with select Canon and Nikon DSLRs and iPad Pro 12,9”, iPad Air 2, iPad Air, iPad mini 4, iPad mini 3 and iPad mini 2.

Capturing, editing and sharing all your moments has never been so easy: it’s all just a touch away on your iPad!

The new Digital Director App V. 2.1 is available in the App store now and brings exciting new features and improvements, including:

Camera and shoot set up:
* Quick and easy Intervalometer + time-lapse set up
* Bracketing
* Depth of field preview in photo mode for Canon DSLR
* New, high-precision control step focus
* Optional continuous auto-play displaying full screen pictures as they are shot
* Simplified workflow

Album and picture management:
* Keyword assignment
* Pictures are easily moved to other albums
Edit with history option manages previous edits on images post produced in Digital Director
* Faster Gallery access

Sharing options:
* More sharing options: via social networks, using installed apps, via Wi-Fi web server straight to computer
* Manfrotto Digital Director Plug-in for Adobe Lightroom desktop imports Digital Director metadata into Adobe Lightroom for desktop
* Optional download of RAW images for sharing via Wi-Fi web server, e-mail and FTP
* Optional picture resizing when sharing
* Improved FTP configuration with subfolder option

The updated compatibility for iPad models is as follows:

* Digital Director for iPad Air 2 £249.95
* Digital Director for iPad mini 2 £249.95
* Digital Director for iPad mini 3 £249.95
* Digital Director for iPad mini 4 £249.95
* Digital Director for iPad Pro £249.95
In addition to the updated app and new compatibility, a range of new accessories will also be available:
* A new semi- rigid case designed to organize and carry Digital Director for iPad Air 2, iPad Air, iPad mini 4, iPad mini 3 and iPad mini 2. RRP £49.95

* A Sunhood, designed to protect the iPad screen from direct sunlight. Compatible for Digital Director for iPad mini 4, mini 3 and mini 2. RRP £24.95

* Separate frames for the iPad Air, Air 2, mini 2, 3 and 4, and iPad Pro 12.9”. This allows you to easily swap the frames to accommodate different iPad sizes with one Digital Director unit.

For more information please visit www.manfrotto.co.uk/shop-by/collections/digital/digital-director

Articles: Digital Photography Review (dpreview.com)

 
Comments Off on Manfrotto launches new Digital Director models and updates app with extra features

Posted in Uncategorized


Fotodiox introduces extra large WonderPana Free Arc system for Canon EF 11-24mm wide zoom

31 Mar

$ (document).ready(function() { SampleGalleryV2({“containerId”:”embeddedSampleGallery_4391102760″,”galleryId”:”4391102760″,”isEmbeddedWidget”:true,”standalone”:false,”selectedImageIndex”:0,”startInCommentsView”:false,”isMobile”:false}) });

US accessory manufacturer Fotodiox has announced an XL version of its WonderPana Free Arc filter system for wide angle lenses that it says is designed specifically to allow users of the Canon EF 11-24mm F4L USM lens to use filters over the front element. The Canon super-wide zoom has no filter thread of its own and the front element is heavily convex, so fitting filters in the traditional way is impossible. The WonderPana Free Arc system positions a filter holder over the front of the lens that takes 186mm screw-in filters and/or 80mm rectangular filter sheets. The holder is enormous so that large filters can be used to avoid vignetting when the lens is used at its widest setting.

The Free Arc clamps the hood of the lens between its collar and the screw-on filter-holding cone, and provides a 186mm thread for the company’s screw-in filters. A set of brackets can also be attached to the cone that allow two square filters to be fitted as well. The system makes it possible to fit one round filter and one square filter at the same time, and the whole filter stage is rotatable so graduated filters can be positioned to suit the subject.

The Fotodiox WonderPana Free Arc XL costs $ 225.95 and the 183mm filters start at $ 99.95. For more information visit the Free Arc page on the Fotodiox website.


Wide? Ultra-wide? WonderPana has you covered.

Ultra wide-angle lenses are typically impossible to filter due to their bulbous front lens element, lack of filter threads and potential for severe vignetting. The ALL NEWWonderPana FreeArc XL, however, is the latest in our line of aluminum filter collars that let you to attach our massive 186mm filter options, like ND 4-1000 and circular polarizers, to wide and ultra wide-angle lenses.

Perfect for landscape and architectural photographers and filmmakers, we designed the WonderPana FreeArc XL to suit Canon’s new breed of 11-24mm lens. Durable and lightweight enough for hand-held shooting, it can be ready at a moment’s notice to answer any image challenge that requires filters. You can even keep it installed on your lens as a critical layer of lens protection. Just check out our video below to learn more:

Articles: Digital Photography Review (dpreview.com)

 
Comments Off on Fotodiox introduces extra large WonderPana Free Arc system for Canon EF 11-24mm wide zoom

Posted in Uncategorized


Hammock suspension adds extra protection in the Kontrast Pro DSLR Backpack from Case Logic

25 Jul

Bag manufacturer Case Logic has launched a new backpack that features a hammock system, suspending a DSLR with lens attached within the space in the middle of the bag. The company claims this adds extra protection as less of the camera body is in direct contact with the structure of the bag. Read more

Articles: Digital Photography Review (dpreview.com)

 
Comments Off on Hammock suspension adds extra protection in the Kontrast Pro DSLR Backpack from Case Logic

Posted in Uncategorized


CP+ 2015 Ricoh Imaging interview – full-frame DSLR may have ‘something extra built-in’

08 Mar

We recently returned from the CP+ show in Yokohama, Japan, where we sat down with Kazunobu Saiki – General Manager of the Marketing Communication Department, in the Global Marketing Division of Ricoh Imaging. We spoke to Mr Saiki about Ricoh’s forthcoming full-frame DSLR, the success of the 645Z and about his desire to improve AF performance in Pentax’s DSLRs and lenses. Click through to read the interview

Articles: Digital Photography Review (dpreview.com)

 
Comments Off on CP+ 2015 Ricoh Imaging interview – full-frame DSLR may have ‘something extra built-in’

Posted in Uncategorized