By Andrew S. Gibson – the author of Understanding Exposure: Perfect Exposure on Your EOS Camera (currently 36% off at SnapnDeals).
Over the years that I’ve worked as a photography writer I’ve noticed that people keep asking the same questions about exposure on their EOS cameras.
One of the most common is why doesn’t the camera doesn’t get the exposure right every time?
This is a reasonable question. Modern digital SLRs are advanced machines with built-in microprocessors that can handle complex calculations. So just why do they get exposure wrong?
Part of the reason is that the light meter inside a camera measures reflected light. If a scene is darker or lighter than average, the camera may return an incorrect reading.
Optimum exposure
But think about this for a moment. Who gets to say whether a given exposure is correct or not? I don’t like using the word correct in relation to exposure because it implies that there is only one right answer.
I prefer the term ‘optimum exposure’. This is the exposure setting that is best suited to the scene that you are photographing and the medium you are using.
Imagine that you are photographing the same subject with four different cameras. One is loaded with black and white film, another with colour transparency film, the third with colour negative film and the last is a digital camera. Each has the same lens and frames the subject the same way. The quantity of light falling on the subject is also the same.
Potentially, the scene could require four different exposure settings. That’s because each camera is using a different medium which reacts to light in a slightly different way. Film users will know that black and white film, slide film and colour negative film all need to be treated differently. The same goes for digital cameras.
Put simply, the optimum exposure depends as much on the medium you are using as the quantity of light falling on the subject.
That’s another reason why cameras get exposure wrong. The metering system has yet to be invented that takes into account the medium being used as well as the amount of light entering the lens.
JPEG vs. RAW
Even with digital cameras, the optimum exposure may be different depending on whether you are using the JPEG or Raw format. In JPEG, the aim is to get the exposure as precise as possible. That’s because there isn’t much leeway in post-processing to make the image darker or lighter, and you certainly can’t bring back shadow or highlight detail lost due to poor exposure.
In Raw the aim is different. The idea is to create a file containing as much information as possible in preparation for converting to the JPEG or TIFF formats in Raw processing software. That may require different exposure settings.
Exposing to the Right
Exposing to the right (often referred to as ETTR online) is a technique used by photographers to create a Raw file containing the maximum amount of possible information.
The technique is simple – you use the exposure settings that allow the maximum amount of light possible to reach the sensor without clipping the highlights. The result is a histogram with a graph that is as close to the right hand side of the graph as possible without crossing it.
The main benefit of exposing to the right is that it reduces noise levels in your photos. It also ensures that you capture as much shadow detail as possible, without losing any highlight detail.
Lets take a look at how this works in practice:
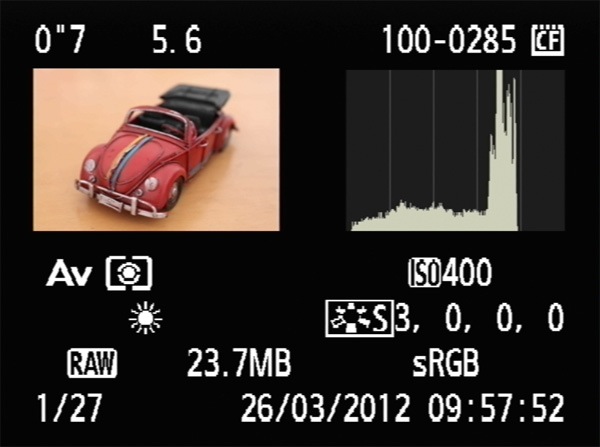
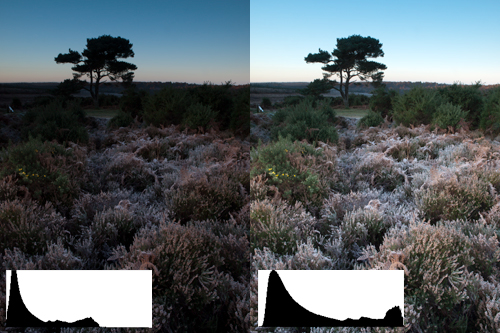
Here’s a photo take at my camera’s recommended exposure settings. It doesn’t cover the full range of the graph. The right hand fifth is empty. This tell us we can increase exposure without clipping any highlights.
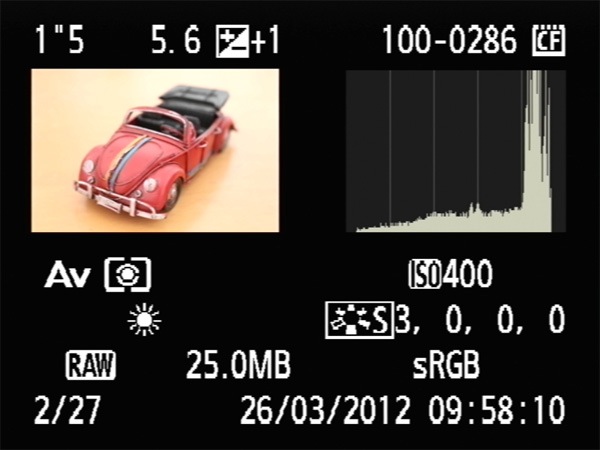
Here, I increased the exposure by a stop using exposure compensation. The histogram is further to the right, but no highlights have been clipped. These are the optimum exposure settings.
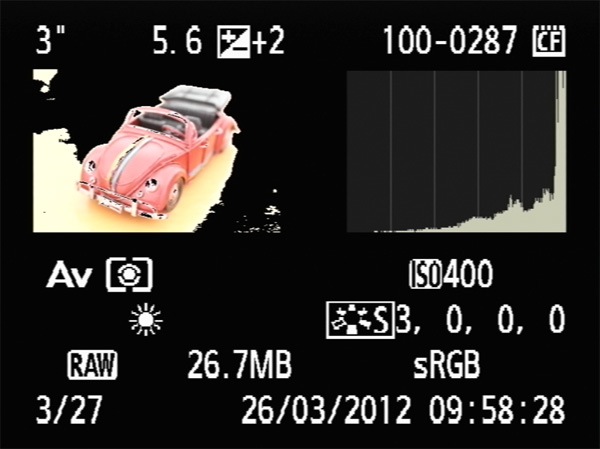
This is what happens if you increase exposure by too much. Here, I increased exposure by two stops. The histogram is cut off on the right hand side and the highlight alert (black region of photo) shows the clipped areas.
Exposure Technique
So, what’s the best way to put the exposing to the right technique into action?
A lot depends on what you are photographing. If your subject is static (such as a still life or a landscape) you have time to take a photo, look at the histogram, then change the exposure settings and take another one if necessary.
If you are shooting something like portraits or street photography you probably don’t have the luxury of time. But you should still check your histogram every now and then to see how your exposure is doing. If you notice that your camera is consistently under- or over-exposing the image, you can make an adjustment using exposure compensation. You may even find it easier to switch to manual mode. It’s your call – the most appropriate response depends on the situation.
High Contrast Scenes
The effectiveness of exposing to the right really depends on the contrast range of the scene that you’re photographing.
If you’re shooting a high contrast scene then you may find that you can’t successfully capture all the tones that you would like to, let alone use a technique like exposing to the right. The most common scenario where this might occur is in landscape photography, as the sky may be much brighter than the land.
If this happens to you, ask yourself whether the high contrast is a signal that you are shooting in the wrong light. It may be that you need to come back when the sun is lower in the sky. The quality of the light will be better and the contrast will be lower.
If the light is good, then there are two good options for dealing with the excessive contrast.
One is to use a graduated neutral density filter to reduce the brightness of the sky.
The other is to set the camera on a tripod and take two separate exposures, one for the sky and the other for the land, then merge the correctly exposed parts in Photoshop afterwards.
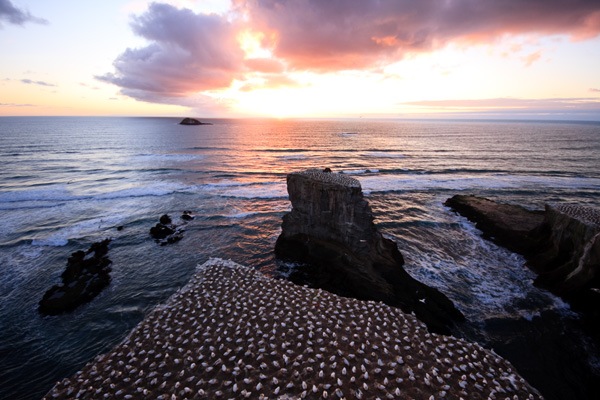
Here’s a landscape with a bright sky.
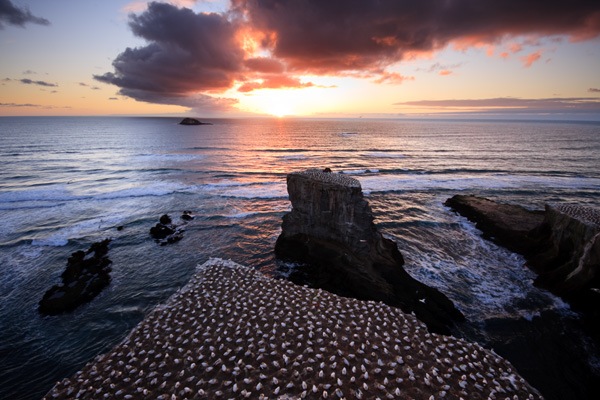
I created this version by taking separate images for the sky and the land and blending the two in Photoshop.
Flat lighting
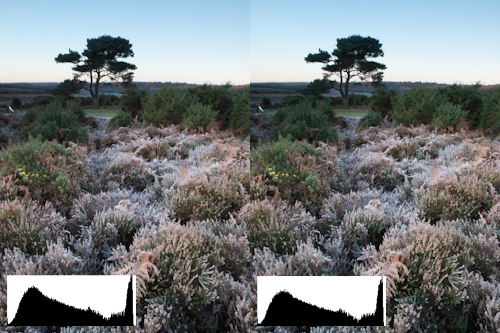
If the light is flat then your camera will have no trouble capturing all the tones of your subject. The histogram occupies just part of the graph, and you can push it to the right by increasing exposure.
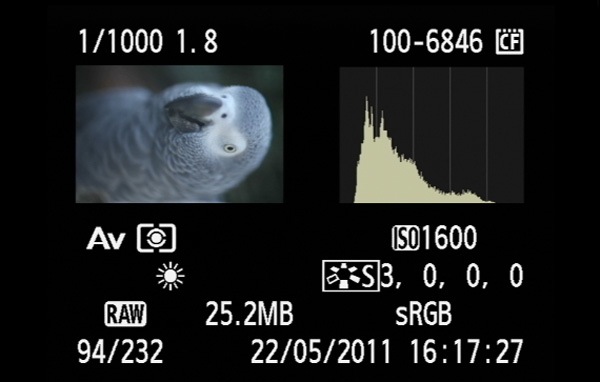
In this photo you can see that the histogram occupies just part of the graph. It is possible to increase exposure and push the histogram to the right to create a better quality Raw file.
Where Histograms come From
Finally, it helps to understand where the histogram comes from. When you take a photo on your EOS camera, even if you have selected the Raw format, the camera embeds a JPEG version of the photo you have just taken in the Raw file. The JPEG file is processed by the camera using the Picture Style and White Balance settings you have selected. The camera displays the JPEG file on your camera’s LCD screen when you play back your images.
The important thing to understand is that the histogram is generated from the JPEG file, not the original Raw file. This is significant for two reasons.
The first is that Raw files contain more highlight detail than JPEG files. If the histogram indicates that there are clipped highlights, that just means that the clipped highlights exist in the JPEG file. The highlight detail might be intact in the Raw file.
Some photographers may use this fact to encourage you to increase exposure to the point where the histogram shows clipped highlights, on the basis that you can pull back the lost detail when you process the Raw file. You can try that if you wish, but you’re taking bit of a risk, as you never really know at what point your highlights will clip.
The other thing to be aware of is that if you go into your Picture Style settings and increase the contrast, that only affects the JPEG thumbnail and not the Raw file. The more you increase contrast, the less accurate the histogram becomes in relation to the Raw file.
Understanding Exposure
My ebook Understanding Exposure: Perfect Exposure on Your EOS Camera covers everything you need to know in relation to exposure on your EOS camera. It’s on special now for a limited time at Snapndeals.
Post originally from: Digital Photography Tips.
Check out our more Photography Tips at Photography Tips for Beginners, Portrait Photography Tips and Wedding Photography Tips.
Exposing to the Right on Your EOS Camera

Digital Photography School


You must be logged in to post a comment.