RSS
 

Posts Tagged ‘Exposé’

Focus, Compose, and Expose with Intent in Photography

10 Dec

The post Focus, Compose, and Expose with Intent in Photography appeared first on Digital Photography School. It was authored by Kevin Landwer-Johan.

photograph with intent

Why do you take photographs? What’s your intention each time you press the shutter button? Do you visualize how you want your photo to look before you take it? When you photograph with intent, the pictures you make resonate more with the people who view them.

All of us have a unique worldview. No two people perceive what they see precisely the same way. Learning to express what you see through the lens of your camera requires paying attention to more than what you are looking at. You must also have intent as to how you want your photos to turn out.

Woman on a red couch outdoors for photographing with intent
© Kevin Landwer-Johan. Nikon D800 | Nikon 35mm f/1.4 | 1/125 sec | f/1.8 | ISO 100 | Manual Mode | Pattern Metering

Your camera does not take photos

Just as a musician’s instrument or a painter’s brush creates nothing on its own, your camera does not take photographs.

Instead, the interaction you have with your camera is what creates photos. The quality and creativity of your photographs depends on the level of synergy between photographer and camera. The connection between you and your chosen subject is also significant.

Modern digital cameras are all designed to be as simple as possible to use – especially consumer-level cameras. Scene modes, auto-exposure, autofocus, auto-everything allows unskilled photographers to take snapshots that turn out pretty well.

When I was a kid, our neighbors had a pianola. This was a piano that had a handy mechanism: we could push pedals with our feet and the pianola would play tunes. There were special rolls of paper with holes punched in them that could be loaded into the front of the pianola. As we pedaled, the paper roll would turn. The configuration of the holes determined what tune was played. We were playing music without being musicians.

This is similar to using a camera with its auto-functions turned on. It can be fun, and there will be a certain, but limited, satisfaction as pictures are created. Just as we loved “playing” the pianola, you can take photos with minimal creative input or skill.

To take truly wonderful photos, however, you must interact with your camera and your subject with intent. Relying on camera technology to make it easy to take photos will not make you a great photographer.

woman taking photo
© Kevin Landwer-Johan. Nikon D800 | Nikon 35mm f/1.4 | 1/400 sec | f/2 | ISO 100 | Manual Mode | Spot Metering

Know your camera well

Being familiar with your camera and its controls means you can concentrate more on the art of photography. You’ll no longer be distracted by the technical aspects of the camera.

Learn to control your exposure, focus, white balance, and all the other settings. As you do this, you will grow in confidence and begin to “see” what you are photographing in different ways.

Cameras used in auto-exposure mode tend to make very generically-exposed images. Your camera is programmed to do things in certain ways to produce photos with an even exposure. But the more you take charge of what your camera is doing, the more creative your photography becomes.

Lahu man smoking a bong photograph with intent
© Kevin Landwer-Johan. Nikon D800 | Nikon 105mm f/2.8 | 1/200 sec | f/5.6 | ISO 400 | Manual Mode | Spot Metering

Understand the exposure meter. Use your spot meter to measure the light from different zones in your composition. Experiment with manual exposure settings. Don’t always adhere to what the meter tells you is “correct.” Control where you are focusing and the amount of the image that is sharp.

This may all seem a bit overwhelming if you’re new to photography, or if you’ve been using your camera for years without adjusting the controls. But remember: We could not add any creative expression to the tunes we played with the pianola. Unless you intentionally set your camera’s controls, your photos will lack creativity.

Monk photographing with intent outdoors at a parade
© Kevin Landwer-Johan. Nikon D800 | Nikon 105mm f/2.8 | 1/200 sec | f/2.8 | ISO 400 | Manual Mode | Spot Metering

Visualize your photographs

Think about how you want your photos to look before you take them. Do you want to record a scene exactly as you see it? Or will your frame it in such a way as to exclude some ugly elements?

Make constant choices about what focal length lens you’ll use. How much of what you see will you include in the final shot? The same scene photographed with a 24mm lens will look very different than if you back up and photograph it with a 200mm lens.

How do you want your exposure to look? Will exposing for the highlights or shadows create a more interesting atmosphere? Are there things in the shadow areas you want to hide or reveal? When you have control over your exposure, you have the capability to express yourself in more creative ways.

Woman standing in a field with a cow
© Kevin Landwer-Johan. Nikon D800 | Nikon 105mm f/2.8 | 1/2000 sec | f/3.2 | ISO 200 | Manual Mode| Pattern Metering

Your choice of when you press the shutter release to take the photo can have an important creative influence on the outcome. This is sometimes a matter of a split second, or it can be a matter of waiting for the season to change. Picking the decisive moment when photographing a child playing versus photographing a landscape is very different. But timing is equally relevant to making good pictures.

Are you seeing in color or in black and white? Will your subject look more interesting as a monotone image? Will this alter the feeling of the photo? If you are intentional about color as you’re taking photos, you’ll create more compelling images.

portrait of a novice monk, high contrast black and white
© Kevin Landwer-Johan. Nikon D800 | Manual Mode | Spot Metering

Connect with your subject

As you’re taking photos, think about why you want to photograph your chosen subject. What has drawn you to want to make a picture of this person, thing, or scene?

When you think about the why, you can start to see your subject in new ways. Being aware of what motivates you can have an influence on how you photograph something.

Does your subject mean something personal to you? How can you show this in the photos you take? There are many ways you can choose to control your camera, or where you take your photos from, that will influence the final shot. Being aware of how you compose and expose your subjects will help build a story into your images.

Your photos will move from being snapshots to works of art that have depth and convey meaning.

black and white portrait of a woman photograph with intent
© Kevin Landwer-Johan. Nikon D800 | Nikon 85mm f/1.4 | 1/250 sec | f/2.8 | ISO 400 | Manual Mode | Spot Metering

Focus, compose, and expose with intent: conclusion

The more you are aware of what you want your photographs to look like, the more interesting they will be to you and to others.

Photographing with intent takes practice. It may seem somewhat abstract when you first try.

But, like anything creative, the more you apply yourself and practice, the better you will become – and this will show in your photos.

The post Focus, Compose, and Expose with Intent in Photography appeared first on Digital Photography School. It was authored by Kevin Landwer-Johan.


Digital Photography School

 
Comments Off on Focus, Compose, and Expose with Intent in Photography

Posted in Photography


Manual Exposure Cheat Sheet for Beginners: How to Expose Manually

22 Oct

The post Manual Exposure Cheat Sheet for Beginners: How to Expose Manually appeared first on Digital Photography School. It was authored by Kevin Landwer-Johan.

Photographers are visual people. Learning is often made easier for us with the help of graphics and images. In this article, I want to break down this classic manual exposure cheat sheet:

manual exposure cheat sheet

Beginner photographers, and even more experienced ones, often think that Manual mode is complicated.

It’s not.

But to learn how to use Manual mode well, you need to understand a few basics. These are the three camera controls that manage exposure:

  • Aperture
  • Shutter speed
  • ISO

You also need to use the exposure meter, LCD, or viewfinder to assist you in choosing the best settings. If you read the light, you can then set your exposure.

This manual exposure cheat sheet will help you understand these few essentials.

Woman in a red sofa outdoors manual exposure cheat sheet
© Kevin Landwer-Johan | Nikon D800 | Nikon 35mm f/1.8 | 1/125 sec | ISO 100

Reading the light

All modern cameras have a built-in exposure meter. This tool indicates when you have your settings balanced to achieve a good exposure. In most cameras, it looks something like this:

Exposure meter illustration manual exposure cheat sheet

Some cameras use a number system and a + or – symbol to show the exposure value.

Whatever display method your camera uses, you are aiming to have the meter read “0.” This is the indication you have a good exposure. If the display indicates the exposure is toward the – side, your photo will be underexposed. If it’s showing that the exposure is toward the + side, your photo will be overexposed.

This is a very simplified explanation of the metering system. To gain a more in-depth understanding of how it works, please read this article: Understanding Exposure Metering Modes.

With many cameras, you can also use the rear LCD to help you determine the best exposure settings. Additionally, mirrorless cameras allow you to see the effect of changes you make via the viewfinder.

To discover if your camera has this function, turn on Live View and set your camera to Manual mode. Now adjust your aperture and/or shutter speed. Can you see the brightness value of the LCD change as you do this? If so, you can use your LCD screen and/or viewfinder to help you manage your exposure settings. If you are new to using Manual mode, this method will make learning easier.

Whether you look at the exposure meter graphic or use your viewfinder/LCD to help you choose your settings, treat these as a guide. Your camera does not know what the main subject of your composition is. You must control the exposure so the most important part of your image is well exposed.

Tropical sunset manual exposure cheat sheet
© Kevin Landwer-Johan | Nikon D700 | 20mm | 1/125 sec | f/5.6 | ISO 400

Adjusting your aperture

Every lens has an aperture. This is an adjustable diaphragm that controls how much light can enter the lens. Each aperture setting corresponds to an f-stop.

A smaller f-stop number indicates more light will enter the lens. A higher number means the opening is smaller and less light will enter.

Aperture illustration for manual exposure cheat sheet

On this manual exposure cheat sheet, you can see there is a range of aperture settings. The smallest aperture setting, on the left, is f/16. To the right of the graphic is the widest setting, at f/1.4. Not all lenses have the same aperture settings. Some will have wider or narrower minimum and maximum settings.

Along with governing the amount of light that enters the lens, the aperture setting influences depth of field (DOF).

DOF is the amount of the photo that is acceptably sharp. The wider the aperture setting you choose, the shallower the DOF will be. You can see this on the cheat sheet graphic of the person and tree. At f/16, both the person and tree are sharp. At f/1.4, the person is sharp and the tree in the background is out of focus.

A narrow aperture setting allows less light to enter the lens. It also means you’ll have more of your photo in focus. A wide aperture setting allows more light into the lens and the DOF is shallower.

You can adjust the aperture setting to help balance your exposure and control how much of your composition is in focus. The amount of DOF can be used creatively in your photographs.

Woman taking a photograph manual exposure cheat sheet
© Kevin Landwer-Johan | Nikon D800 | 105mm | 1/320 sec | f/2.8 | ISO 100

Setting your shutter speed

Inside your camera, there’s a shutter. This typically consists of two “blinds” that open and close when you press the shutter release button. Opening the shutter exposes the camera sensor to light, which allows it to create an image.

The duration the shutter is open for controls how much light will affect the sensor. If the shutter is open for too long, the photo will be overexposed. If the shutter is open for a duration that is too short, the photo will be underexposed.

Your choice of shutter speed can also affect how sharp your photos will be.

If you choose a shutter speed that’s too slow and your camera moves during the time the shutter is open, your photo will be blurred. This is known as camera shake.

If you have a moving subject and use a slow shutter speed, your subject will be blurred. This is known as motion blur.

Using a faster shutter speed will help you avoid camera shake and unwanted motion blur.

Shutter speed illustration manual exposure cheat sheet

In the manual exposure cheat sheet, you can see the graphic of a person running. At a shutter speed setting of 1/1000s, the figure is sharp. At a setting of 1/60s, the figure is blurred a little. At a shutter speed of 1 second, the figure is very blurred. The relationship between how fast your subject is moving and the shutter speed will determine how much blurring occurs.

You can adjust the shutter speed to help balance your exposure and to control blur from camera shake or motion. Motion blur and camera shake, or a lack thereof, can be used creatively in your photography.

Woman at the fresh market - manual exposure cheat sheet
© Kevin Landwer-Johan | Nikon D800 |35mm | 1/2 sec | f/11 | ISO 100

Determining your ISO

ISO settings control how responsive your camera’s sensor is to light. A low number means your sensor is going to be less responsive than when you use a high number.

I prefer to use my ISO as a foundation for my exposure. I generally only adjust it when lighting conditions change significantly.

Outside on a sunny day, you will want to choose a low ISO. Inside or at night, you will want to choose a high ISO.

ISO illustration manual exposure cheat sheet

Unlike your other two exposure settings, ISO has no creative influence on your photos. It will affect the technical quality, though. At higher ISO settings, digital noise will start to appear in your photos. The color and contrast will also tend to flatten out.

In the manual exposure cheat sheet, you can see that lower ISO settings mean the sensor is less responsive compared to higher ISO settings. To avoid seeing digital noise in your photos, always aim to use the lowest ISO setting you can.

Thai entertainment
© Kevin Landwer-Johan | Nikon D800 | 105mm | 1/250 sec | f/4 | ISO 6400

Stop! This is important

Each incremental change indicated by the manual exposure cheat sheet is one “stop.” The term “stop” in photography is the measurement of exposure. Plus one stop means the exposure is doubled. Minus one stop means the exposure is halved.

A stop can be controlled by aperture, shutter speed, or ISO. If you adjust one setting by plus one stop, you can always achieve the same initial exposure by adjusting another setting by minus one stop, and so on.

As you can see on the cheat sheet, the increments I have used for the shutter speed and ISO are clearly half or double the adjacent numbers. The f-stop numbers appear a bit random, however. This is because they indicate the aperture opening size in relation to the lens focal length. But each f-stop setting is either half or double the setting on either side of it.

red lanterns against a blue sky
© Kevin Landwer-Johan | Nikon D700 | 20mm | 1/60 sec | f/4 | ISO 400

Manual exposure cheat sheet: Conclusion

Manual exposure of your photographs is not so complicated. All you need to do is manage the relationship between the three exposure settings.

The relationship between aperture settings, exposure, and depth of field is plain to see on this cheat sheet. How your choice of shutter speed affects both exposure and blurring is also well illustrated. Keep your ISO in mind and make it as low as you can. But don’t hesitate to alter it when you need to.

Print the manual exposure cheat sheet to make learning and mastering Manual mode a little easier. It will not happen without some commitment and practice.

But once you become familiar with Manual mode and manage your exposures well, your photography will become more creative.

The post Manual Exposure Cheat Sheet for Beginners: How to Expose Manually appeared first on Digital Photography School. It was authored by Kevin Landwer-Johan.


Digital Photography School

 
Comments Off on Manual Exposure Cheat Sheet for Beginners: How to Expose Manually

Posted in Photography


Is There a Right and a Wrong Way To Expose Your Photos?

27 Aug

The post Is There a Right and a Wrong Way To Expose Your Photos? appeared first on Digital Photography School. It was authored by Kevin Landwer-Johan.

I have never liked the term ‘correct exposure.’ I don’t believe there’s often a single right way to expose your photos. There’s always room for artistic interpretation depending on:

  • Light
  • Subject
  • Camera
  • Lens
  • Exposure setting choices
  • Composition choices
  • Intent

All these will have some influence on the way a photograph will appear. One of the most important aspects of achieving a pleasing exposure is your intent. This cannot be measured by an exposure meter.

Buddha statue for Expose your photos
© Kevin Landwer-Johan. Nikon D800 | 35mm | 1/8000 sec | f/2.8 | ISO 400.

Choose how you expose your photos

How you expose your photos is a key choice when working with your camera. Most photos you take will display variation in tone from the brightest point to the darkest. You won’t often photograph subjects that are the same tone throughout.

The quality of light and how it reflects off the surfaces in your composition will help determine the exposure value for each tone. Sometimes the range of tones in a composition means your camera will not be able to render them all with visible detail.

Young Chinese woman on a white background
© Kevin Landwer-Johan. Nikon D800 | 35mm | 1/200 sec | f/1.4 | ISO 100.

When the level of contrast is beyond what your camera’s sensor can capture in a single exposure, you have to choose how to expose your photos. What is the most important part of the composition you want to expose correctly? Often this will be the middle tones. Other times it will be either the highlights or the darkest parts of your composition.

Particularly with high contrast lighting, you must choose how you want to expose your photograph. This is where the intent you have for how the photo will look comes into play. Do you want a bright, energetic image, or a more somber and moody one? What look will best suit your subject?

With a more monotone subject, the tonal range will not be large, especially when what you are photographing is not highly reflective. It was very easy to make a nice, even exposure of this dusty little dog lying in the dirt. This was because of the limited tonal range, low-contrast light, and overall beige color.

looking down at a dog on the dirt for expose your photos
© Kevin Landwer-Johan. Nikon D800 | 50mm |1/1000 sec | f/4.5 | ISO 400.

Think like a film photographer

The dynamic range of film is far narrower than that of modern camera sensors. Our digital cameras are far more capable of recording a broader tonal range in a single image than any film. When you take photos with film, you need to be more precise about how you expose your photos. This is more vital in high contrast situations.

Because the tonal range of film is much narrower, you’re more likely to lose detail in the shadows and/or highlights than when you work with a digital camera. Imagining that you are using film can help you be more aware of what part of your composition you want to expose well.

Novice Buddhist monk in the dark
© Kevin Landwer-Johan. Nikon D800 | 35mm | 1/125 sec | f/3.2 | ISO 1000.

For example, when I photographed this novice monk (above), he was in a dark space with light coming through a window. The contrast was significant. I knew that if I let my camera decide the exposure, it would mean the light area of the boy’s face would be overexposed. This is because most of the composition was in shadow.

I used my spot meter to take an exposure reading from the light reflecting off the monk’s face and set my exposure accordingly. In my original file, there is some detail visible in the shadows. I have boosted the contrast during post-processing to eliminate it.

The bell-shaped histogram myth

The notion that a correctly exposed image will produce a bell-shaped histogram is nonsense. You can’t rely on a histogram to provide useful information about exposure.

Histograms are a graphical representation of the tones present in a photo. When the photo is mostly middle tones, you’ll see the histogram as a bell shape: high in the middle section and low toward the left and the right.

The tonal range of the scene you are photographing has an influence on what the histogram will look like. This is why you cannot gauge exposure by looking at the histogram. Some people may find it helpful, but it’s not good practice to rely on it to help you choose your exposure settings. Don’t aim to make your histogram a bell shape.

Old Karen woman against a black background for expose your photos
© Kevin Landwer-Johan. Nikon D800 | 85mm | 1/640 sec | f/2.8 | ISO 400.

For example, portraits made against a black background will never display a bell-shaped histogram. The graph will always spike on the left because there are more dark tones in the image than midtones or light tones. Depending on what a person is wearing, such a histogram may be very flat.

For the image above, the grandma’s face is where I wanted the correct exposure. It would not be possible, even if I wanted it, to set my exposure so that detail in both the background and the headscarf was visible.

Expose your photos with intent

Know what you want before you press the shutter release.

Often, you have chosen your subject. You’ve composed carefully. Then you take a photo with no real regard for the lighting or your exposure setting.

Letting the camera take care of the exposure using averaged metering and an automatic setting is the way many people take pictures. The results of such exposures are relatively predictable. This is because of how cameras are designed and calibrated. To obtain the best exposure each time you take a photograph, you must match it to your intent.

How do you want the light on your subject to look? What is the mood you want your photo to convey? Are you capable of achieving this with the current lighting? These things must be considered before you press the shutter release.

Be in control of your exposure settings. Read your meter as a guide. Rather than ensuring that your meter is reading zero for every photo, adjust your settings to where you can capture the photo that matches your intent.

Buddhist nun at a temple for expose your photos
© Kevin Landwer-Johan. Nikon D800 | 35mm | 1/100 sec | f/2.8 | ISO 400.

Conclusion

I do not believe there is a right or wrong exposure choice for any photo. You can take into account all the technical aspects, but while this approach may produce technically correct images, they will often lack expression and feeling of any kind.

Not being intentional when you expose your photos often produces bland results.

The post Is There a Right and a Wrong Way To Expose Your Photos? appeared first on Digital Photography School. It was authored by Kevin Landwer-Johan.


Digital Photography School

 
Comments Off on Is There a Right and a Wrong Way To Expose Your Photos?

Posted in Photography


How to Expose Correctly for High Contrast Wildlife

25 Oct

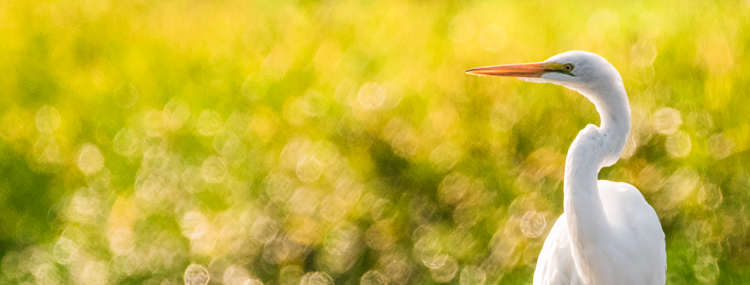
Photographing wildlife of deeply contrasting colors, such as black bears or white waterfowl, can present certain challenges setting up shots that are properly exposed for the wildlife and also the surroundings. Harsh lighting also makes exposing for these subjects especially difficult. The hurdle to overcome in these cases is to expose for the subject animal(s) properly and still capture a scene that is pleasing to the viewer. What often results are images where the exposure is correct for the surroundings, but the creature is either under or overexposed.

Getting the subject wildlife exposed correctly is a more important aspect because the background can be dealt with later in post-production. In some cases, the background just doesn’t really matter in comparison to the photo capture of the often elusive wildlife in the scene.What follows are methods to use in stark color-contrasting situations. One is for dark colored wildlife such as black bears or ravens, and another for light colored wildlife such as egrets or swans.

What follows are methods to use in stark color-contrasting situations. One is for dark colored wildlife such as black bears or ravens, and another for light colored wildlife such as egrets or swans.

Exposure Details

A reality of photographing wildlife is that when things happen, they happen fast. Lighting may change very quickly and there may not always be time to make adjustments while shooting the action of the wildlife in view.

Most experienced photographers want control of all camera settings and don’t generally choose to shoot in auto modes for shutter speed and aperture in order to control movement and depth of field. So is there was a way to set the shutter speed and aperture and still get the correct exposure without the hassle of continually changing settings as the light changes?

There are many ways of shooting wildlife resulting in a desirable exposure, but probably one of the most overlooked ways is using the Auto ISO setting in Manual mode. To use this method, set the camera in Manual mode, adjust shutter speed and aperture to the settings desired, and then set the ISO to auto-ISO. Most cameras will allow you to set a maximum ISO, so it’s helpful to know at what ISO the images become unacceptably grainy with your camera. However, this still doesn’t entirely solve the problem of correctly exposing for those dark and light animal subjects. To solve these problems you can fine-tune the exposure by using exposure compensation.

Correcting the background in post-production

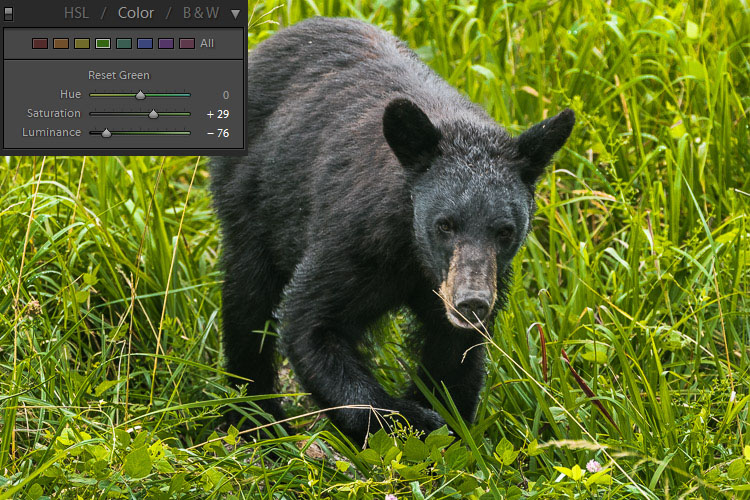
As in any image, if editing is planned it is important that the image be shot in RAW mode. When opening an image in Adobe Raw Converter (ARC) (or Lightroom) and if the exposure for the animal is correct in camera, then only the background may benefit from corrections in post. In most cases for wildlife images, the background hues are green, yellow or blue. To enhance or balance these colors in ARC, go to HSL/Grayscale panel and simply darken or lighten the luminance for green, yellow or blue until the background exposure appears to match the exposure of the animal. A little saturation may also be added. If a little punch or contrast would improve any background flatness, one may use an adjustment brush to add some contrast and clarity to the background. It’s that simple!

Dark Colored Wildlife

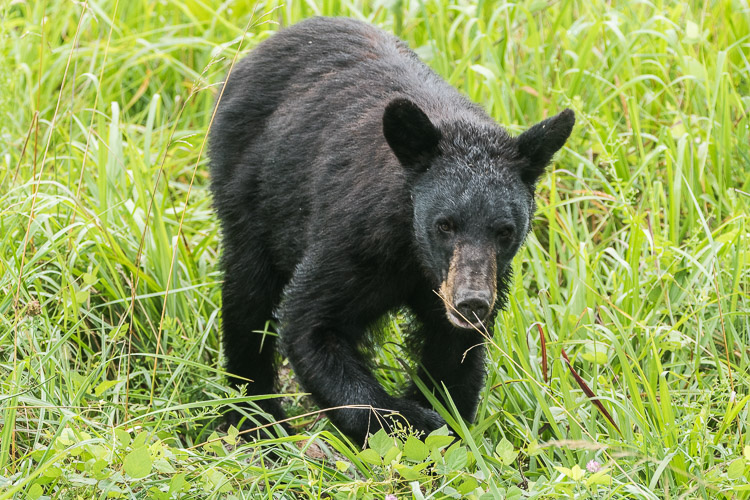
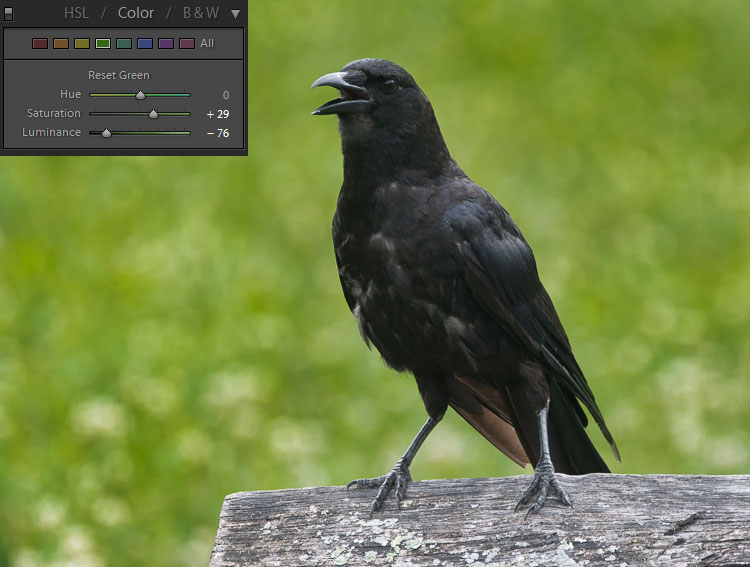
In this image the correct exposure for the black bear over-exposes the green background.

The luminance of the green has been adjusted to decrease the background exposure.

The dark hues of some wildlife will absorb more light than the scene around them, so it becomes necessary to increase the light taken in by the camera by using exposure compensation as mentioned above. For wildlife with dark colored coats or feathers, use exposure compensation and adjust by adding light (+value). This will suffice in most cases, depending on the amount of natural light available.

Keep in mind that the wild subject is the most important component in the image, so if any aspect of the image should be sacrificed in the moment, make it the background. For really dark creatures, such as bears, start out by using a compensation of +1. Remember, don’t worry about the background. The animal is the important exposure!

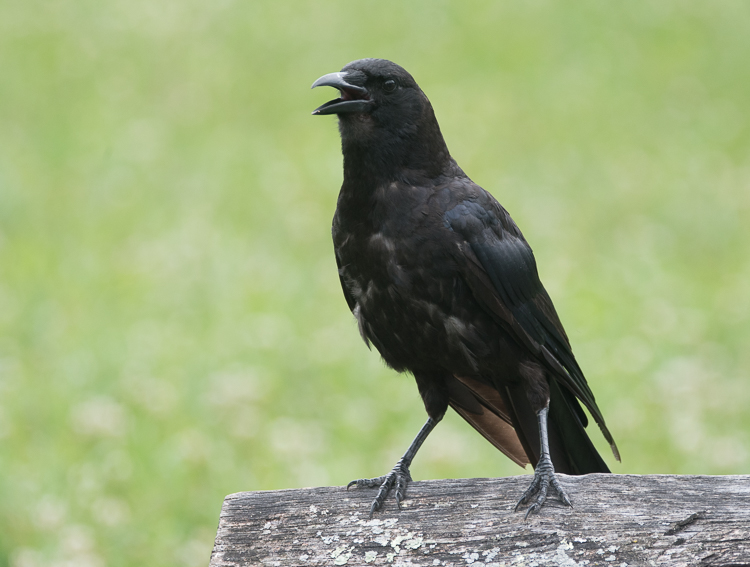
The exposure is correct for the black bird, but the background is washed out and boring.

Again, the luminance of the green has been adjusted. Then an adjustment brush has been used to add contrast, creating a vibrant background.

Light Colored Wildlife

Conversely, for light colored animals, use exposure compensation and adjust by subtracting light (- value). The whiter color of many beautiful creatures will reflect much more light than the background will, so it helps to decrease the light the camera takes in so as not to overexpose the animal.

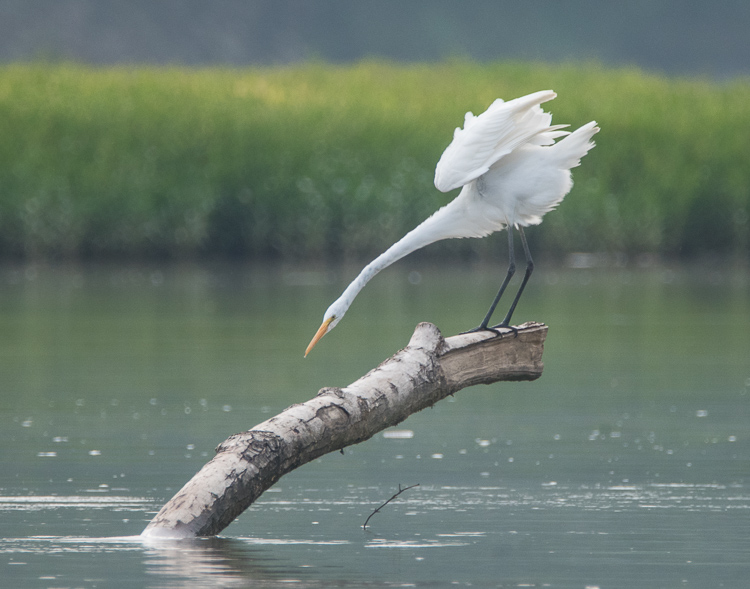
In keeping the white egret from being overexposed, the background appears dull and dark.

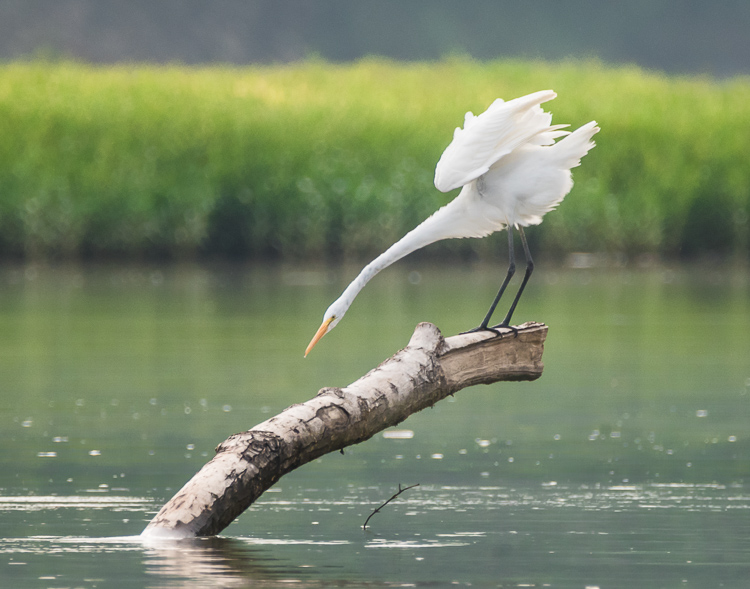
The green and yellow hues were adjusted to add life to the background. Notice that in every case the exposure of the subject is unchanged.

Why can’t I just correct the exposure of the wildlife in post-production?

Of course, this is an option. But there at least two reasons for not correcting the exposure of the subject later on the computer.

  1. Any time a major exposure correction is undertaken, there is a certain amount of digital data of the image that is lost. Therefore, it is best to get the main subject of the image captured as closely as possible in camera. (This is true of any image, not only wildlife subjects.)
  2. When photographing extremely light colored animals, if the white is over-exposed to absolute white there is nothing that can be done in post-production to pull out any detail. Darkening the subject will not bring back any nuance in the creatures coloring, and the image will lose desirable texture. Again, conversely, if the black-coated bear or bird is underexposed to absolute black there is no way to lighten the subject and pull out interesting details from the fur or feathers.

What about the Eagle?

Some animals are doubly challenging as in the case of the American Bald Eagle, with its white head and dark body. These magnificent creatures are almost impossible to photograph in harsh light. If choosing which end of your histogram to sacrifice, my opinion is to expose for the white head.  Again, avoid harsh lighting if at all possible.

Conclusion

Remember, when you’re faced with a choice of settings for an extreme exposure while photographing wildlife, never sacrifice your subject. Whether a light or dark-coated bird or animal, intentionally set up the shot to capture the creature and its distinctive features and keep the background as a secondary consideration. To make sure the subject will be correctly exposed, use a 3-shot bracketed exposure, with an exposure one stop over and another exposure one stop under the setting.

Do you have any wildlife exposure tips? Please leave them in the comments below.

googletag.cmd.push(function() {
tablet_slots.push( googletag.defineSlot( “/1005424/_dPSv4_tab-all-article-bottom_(300×250)”, [300, 250], “pb-ad-78623” ).addService( googletag.pubads() ) ); } );

googletag.cmd.push(function() {
mobile_slots.push( googletag.defineSlot( “/1005424/_dPSv4_mob-all-article-bottom_(300×250)”, [300, 250], “pb-ad-78158” ).addService( googletag.pubads() ) ); } );

The post How to Expose Correctly for High Contrast Wildlife by Bruce Wunderlich appeared first on Digital Photography School.


Digital Photography School

 
Comments Off on How to Expose Correctly for High Contrast Wildlife

Posted in Photography


Exposé: Zeig Dein wichtigstes Foto 2014

03 Jan

Doppelbelichtung mit Orchideenblüten in gelb und rot.

Wir möchten Euch nicht nur unsere eigenen Jahresrückblicke vorsetzen, sondern auch von Euch wissen: Wie sah Euer fotografisches Jahr 2014 aus? Anstatt uns in langen Berichten zu verlieren, reduzieren wir das aber gern wieder auf die Essenz: Zeig uns Dein wichtigstes Foto 2014.

Gibt es ein Foto, das symbolisch für ein ganzes Jahr stehen kann, es zusammenfassen oder gar zeigen kann? Um diese Frage zu beantworten, muss man entweder eine Weile in sein Archiv abtauchen, abwägen und sich irgendwann schweren Herzens entscheiden oder man weiß sofort die Antwort, weil ein Foto im letzten Jahr so etwas außerordentlich Besonderes war.

Wie auch immer Du herausfindest, welches Dein wichtigstes Foto 2014 war: Zeig es uns! Dabei möchten wir nicht wissen, welches Deiner Fotos die meisten Likes, Sternchen oder Kommentare bekommen hat, sondern welches Dich persönlich vorangebracht hat, die langersehnte Umsetzung Deines großen Projekts war oder vielleicht den schönsten Moment des Jahres festgehalten hat.

Teilnahmebedingungen

  • Suche Dein wichtigstes Foto heraus, das Du 2014 veröffentlicht hast.
  • Poste den Link dazu in einem Kommentar.
  • Beschreibe in ein paar Sätzen, warum Dir dieses Bild wichtig ist und wie es entstanden ist. Achtung: Fotos ohne Beschreibung werden nicht berücksichtigt.
  • Mit dem Kommentar stimmst Du einer möglichen Veröffentlichung auf kwerfeldein zu.
  • Der Einsendeschluss ist am Montag, den 5. Januar um 21 Uhr.

Wir freuen uns darauf, in ein paar Tagen wieder Eure persönlichen Rückblicke zu lesen und in Bildern zu schwelgen, die für jemanden ein ganzes Lebensjahr repräsentieren und immer in Erinnerung bleiben werden. Und wer weiß: Vielleicht brennt sich das eine oder andere dieser Bilder mit seiner Geschichte auch bei uns ein.

Am nächsten Samstag präsentieren wir Euch an dieser Stelle die ganz subjektive Auswahl der Redakteure aus Euren Bildern. Die spannendsten, berührendsten Geschichten und die gefühlvollsten, eindrucksvollsten oder einfach lustigsten Fotos.


kwerfeldein – Fotografie Magazin | Fotocommunity

 
Comments Off on Exposé: Zeig Dein wichtigstes Foto 2014

Posted in Equipment


Exposé: Zeig Dein wichtigstes Foto 2013

11 Jan

Na, habt Ihr schon drauf gewartet? Man kann ja von Traditionen halten, was man will. Einige langweilen und auf andere freut man sich immer wieder diebisch. Wir uns zum Beispiel darauf, nun wie jedes Jahr Eure wichtigsten Fotos zu sehen zu bekommen!

Nachdem unser Herausgeber Martin bereits einen Rundumschlag in Sachen Best-of veranstaltet hat, indem er die wichtigsten Fotos aus Artikeln und aus dem Ausblick für das vergangene Jahr zusammengestellt hat, seid nun Ihr gefragt.

Was war Euer wichtigstes Foto 2013? Vielleicht ein Schnappschuss, auf dem aber alles stimmt. Vielleicht das Bild, für das Ihr wochenlange Vorbereitungen und Recherchen betrieben habt, um es dann – endlich – genau so wie geplant in die Tat umzusetzen. Vielleicht zur richtigen Zeit am richtigen Ort gewesen?

Vieles kann dazu beitragen, ein Foto zu dem Bild eines ganzen Jahres zu machen. Auf jeden Fall möchten wir nun mit Euch ein letztes Mal auf 2013 schauen bzw. Euch bitten, das zu tun, falls Ihr es nicht ohnehin schon getan habt: Sucht das Foto heraus, das für Euch das wichtigste in 2013 war.

Teilnahmebedingungen

  • Suche Dein wichtigstes Foto heraus, das Du 2013 veröffentlicht hast.
  • Poste den Link dazu in einem Kommentar.
  • Beschreibe in ein paar Sätzen, warum Dir dieses Bild wichtig ist und wie es entstanden ist. Achtung: Fotos ohne Beschreibung werden nicht berücksichtigt.
  • Mit dem Kommentar stimmst Du einer möglichen Veröffentlichung auf kwerfeldein zu.
  • Einsendeschluss ist am Montag, den 13. Januar um 20 Uhr.

Wer schon länger hier liest, kennt das anschließende Prozedere bereits: Unsere Redaktion klickt und liest sich durch alle Eure Einsendungen und sucht ganz subjektiv ihre Lieblingsfotos und -geschichten dazu aus. Die Auswahl der Bilder, die die meisten Fans bei uns finden konnten, präsentieren wir am nächsten Samstag, den 18. Januar 2014 an dieser Stelle.

Wie immer lohnt es sich schon ob der schieren Masse an Einsendungen, auch hier in den Kommentaren mitzulesen, weil wir einfach nicht alle tollen Fotos im Anschluss präsentieren können. Und Geschmäcker sind ja auch verschieden. Also, auf geht’s! Welches ist Dein wichtigstes Foto 2013?


kwerfeldein – Fotografie Magazin

 
Comments Off on Exposé: Zeig Dein wichtigstes Foto 2013

Posted in Equipment


Unified Color Technologies introduces HDR Expose 3 and 32 Float v3

24 Jul

HDR_Expose_3_box_shot_hi_res.png

Unified Color Technologies has announced HDR Expose 3 and 32 Float 3 – the latest versions of its HDR software. HDR Expose is the company’s stand-alone software, which works in the company’s ‘Beyond RGB’ 32-bit color space and attempts to manipulate chroma and luminance data separately, while 32 Float is a Photoshop plugin built on the same principles. The latest versions gain improved tone mapping tools that attempt to retain local contrast while increasing the overall range of tones included in the final image, along with upgraded alignement and de-ghosting.

News: Digital Photography Review (dpreview.com)

 
Comments Off on Unified Color Technologies introduces HDR Expose 3 and 32 Float v3

Posted in Uncategorized


Exposé: Zeig Dein wichtigstes Foto 2012

12 Jan

Unsere Tradition, Euch nach Euren wichtigsten Bildern des jeweils vergangenen Jahres zu fragen, ist eine tolle Sache, auf die wir uns nach dem Trubel der Weihnachtstage und dem Rutsch ins neue Jahr immer wieder freuen.

Wir sind gespannt darauf, welche Bilder Ihr als Eure persönlichen Meilensteine der fotografischen Entwicklung, als Erinnerungen an ganz besondere Momente oder einfach als Lieblinge Eures Publikums ausgewählt habt.

Was dabei Eure Interpretation des Wortes „wichtig“ ist, ist dabei Euch allein überlassen. Jedes Jahr ist anders und jede Person, die eines gelebt hat, auch. Dieses ganz subjektive Empfinden der zurückliegenden 366 Tage darf und soll also auch in der Auswahl Eures persönlich wichtigsten Fotos mitspielen.

Teilnahmebedingungen

  • Suche Dein wichtigstes Foto heraus, das Du 2012 veröffentlicht hast.
  • Poste den Link dazu in einem Kommentar.
  • Beschreibe in ein paar Sätzen, warum Dir dieses Bild wichtig ist und wie es entstanden ist. Achtung: Fotos ohne Beschreibung werden nicht berücksichtigt.
  • Mit dem Kommentar stimmst Du einer möglichen Veröffentlichung auf kwerfeldein.de zu.
  • Einsendeschluss ist am Montag, den 14. Januar um 20 Uhr.

Wir freuen uns darauf, wieder mit Euch in diesen Fotos und ihren Geschichten schwelgen zu dürfen und in einer Woche hier eine Auswahl unserer – ebenfalls ganz subjektiver – Liebingsfotos und -geschichten präsentieren zu dürfen.

Wahrscheinlich wird die Auswahl wie immer ganz schön schwer werden. Deshalb laden wir Euch schon jetzt herzlich dazu ein, in den Kommentaren unter diesem Artikel zu verweilen und in den Fotos der anderen Leser zu stöbern. Viel Spaß dabei!


kwerfeldein – Fotografie Magazin

 
Comments Off on Exposé: Zeig Dein wichtigstes Foto 2012

Posted in Equipment