RSS
 

Posts Tagged ‘Expensive’

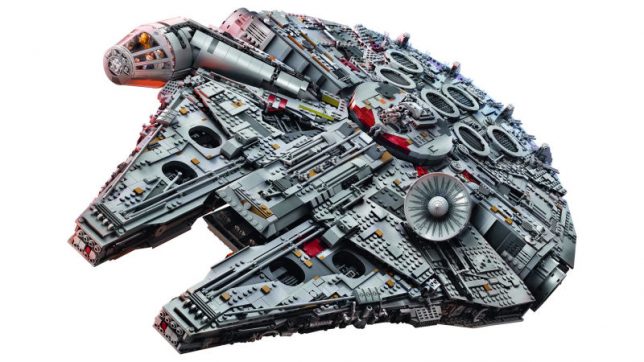
Lego’s Largest and Most Expensive Kit Ever is an $800 Millennium Falcon

08 Sep

[ By SA Rogers in Design & Products & Packaging. ]

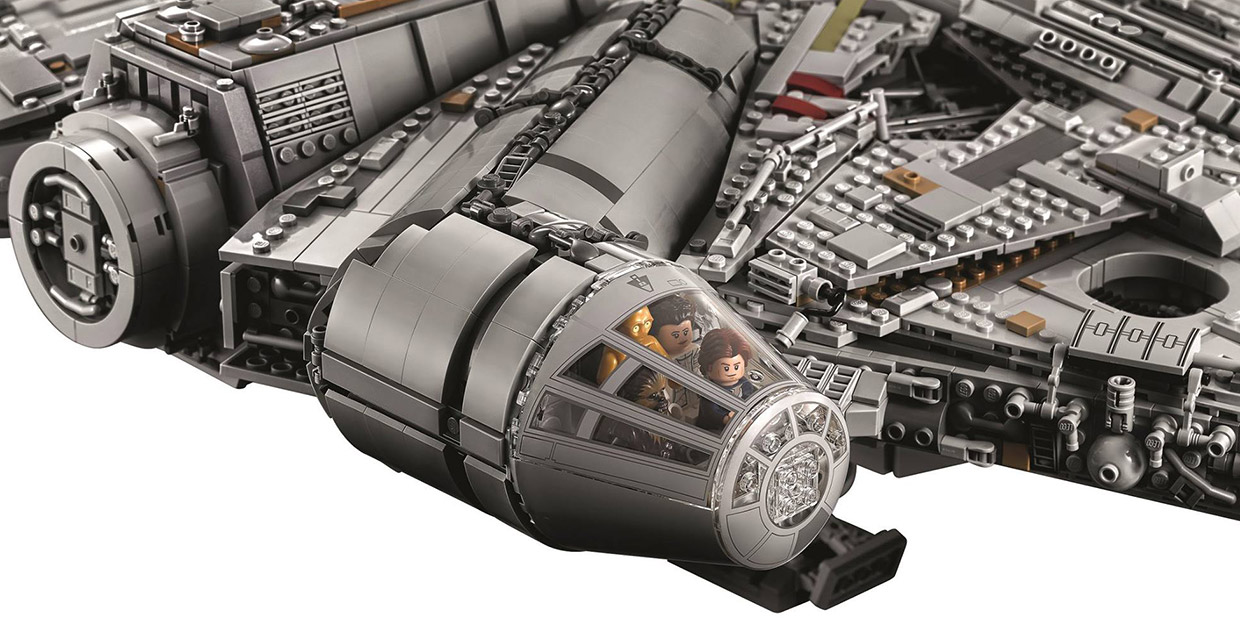
You don’t get a sense of just how large and complex Lego’s latest kit really is until you see it someone’s arms, or taking up the entire table surface in front of them. A gift for true enthusiasts of both the toy brick company and Star Wars, the Ultimate Collectors Series Millennium Falcon is the single largest and most expensive Lego kit ever sold, presented in a huge box full of 7,541 pieces. In fact, the box is so heavy that Lego teased on Twitter that they’d have to add wheels and a handle so customers can get it out the door.

An update on the last Ultimate Collector’s Millennium Falcon, which was released in July 2007, this new set expands it by over 2,000 pieces, adding a stunning range of details that will delight discerning fans. You can even swap out the deflector dishes to either look as they did in the original Star Wars trilogy or in The Force Awakens.

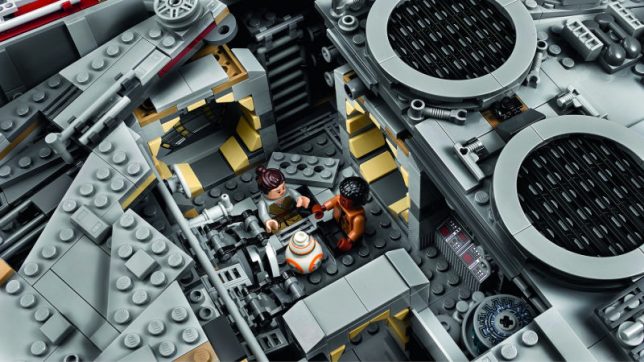
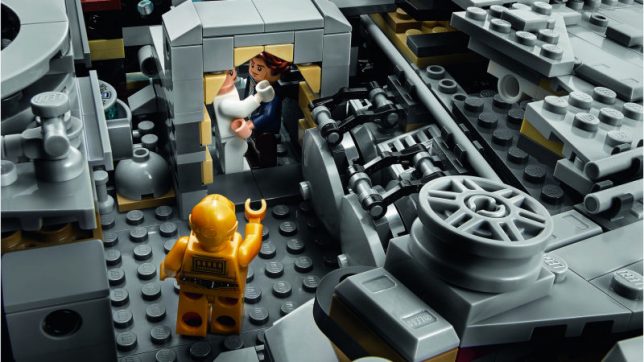
It comes with 10 minifigures, including Leia, C-3P0, Han and Chewbacca from the trilogy and Finn, Rey, BB-8, ‘Old Han’ and two porgs from The Force Awakens. You can even spin the original Han and Leia’s heads around to reveal optional faces outfitted with air respirators.

Fans who missed out on the 2007 model still pay up to $ 3,000 in the rare occasion that one pops up on eBay, and Lego expects the new set to sell out, so if all of this news has you swiping everything off your dining table in anticipation, you’d better run out and get one as soon as it goes on sale October 1st.

Share on Facebook


[ By SA Rogers in Design & Products & Packaging. ]

[ WebUrbanist | Archives | Galleries | Privacy | TOS ]


WebUrbanist

 
Comments Off on Lego’s Largest and Most Expensive Kit Ever is an $800 Millennium Falcon

Posted in Creativity


DPReview photographs Seattle’s famous cherry blossoms (with expensive gear)

22 Apr

There are an infinite numbers of ways to photograph a subject. So when a group of DPR staffers headed to the University of Washington campus recently to photograph the cherry blossoms, we each got a chance to show off our personal tastes and styles shooting the same subject.

See the DPReview cherry blossoms gallery

Click through the gallery to see each staffer’s approach and to find out what each of us chose to shoot with. And for more on the gear we chose and why, check out our behind the scenes video below.

Articles: Digital Photography Review (dpreview.com)

 
Comments Off on DPReview photographs Seattle’s famous cherry blossoms (with expensive gear)

Posted in Uncategorized


Parachut is a subscription service for borrowing expensive camera gear

13 Jul

If you’re really keen to shoot with a particular camera or lens, but you can’t afford to buy it, you don’t have many options. Renting gear for long periods of time can get very expensive, very quickly.

Parachut is a new subscription-based service that allows you to borrow from a wide variety of equipment – old and new – for $ 149 per month. Pitched as a service geared around ‘exploration’, Parachut allows subscribers to lease equipment based on their personal interests. You can add specific items to a wish list, but the precise contents of your first delivery – called a ‘Chut Drop’ – will be tailored to your picture-taking preferences, and skill level, and may include ‘surprises’. 

Parachut is a subscription-based service for long-term leasing of photographic equipment, both old and new.

Once you take delivery of a piece of equipment, provided that you maintain your subscription, you can keep it for as long as you like. An additional $ 49 per month covers accidental loss or damage.

Parachut is currently in beta, and only available to US-based subscribers. Expansion to other countries is planned, and an official launch for ‘founding members’ is scheduled for later this year. Right now, $ 149 will get you on the founding members list, ready for the first Chut Drop in autumn. 

For more information, watch the (slightly cringeworthy) video, above, and check out Parachut’s website. What do you think? For what amounts to almost $ 2000 a year, would you make use of a service like Parachut? Let us know in the comments. 

Articles: Digital Photography Review (dpreview.com)

 
Comments Off on Parachut is a subscription service for borrowing expensive camera gear

Posted in Uncategorized


Infographics 101: 10 Most Expensive Photographs in the World

26 Jun

The most expensive photograph in the world was sold at auction in 2007 and is worth a staggering €3.2 million. Titled “Rhein II” it was taken by Andreas Gursky in 1999. The image is digitally manipulated removing a factory building and dog walkers to leave the Rhine River flowing horizontally between fields under an overcast sky. The identity of the Continue Reading

The post Infographics 101: 10 Most Expensive Photographs in the World appeared first on Photodoto.


Photodoto

 
Comments Off on Infographics 101: 10 Most Expensive Photographs in the World

Posted in Photography


Lockheed Lounge: Meet The World’s Most Expensive Object

30 Apr

[ By Steph in Design & Furniture & Decor. ]

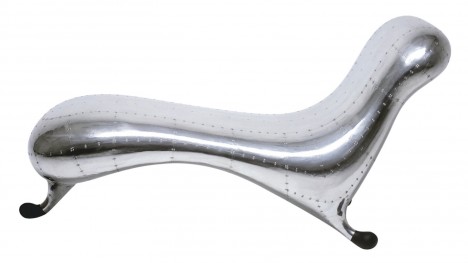
lockheed lounge 1

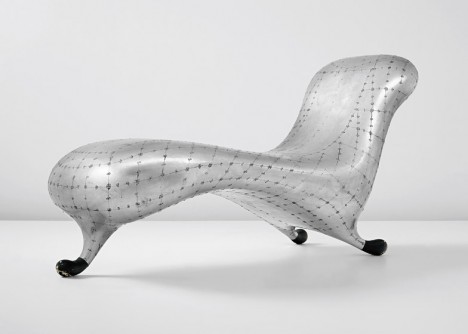
What about this chaise lounge makes it worth the equivalent of approximately ten middle-class suburban homes, or 5,000 Ikea couches? The Lockheed Lounge by Marc Newson set a record for the world’s most expensive design object created by a living person after it sold for more than £2 million (over $ 3 million USD at today’s exchange rate.)

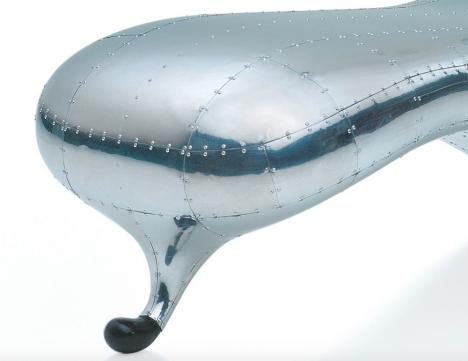
lockheed lounge 2

One prototype, four artist’s proofs and ten editions of the seat have been created since the Lockheed Lounge’s design in 1990, and it’s perhaps best known to people outside the design community for being prominently featured in Madonna’s 1993 video for the song ‘Rain.’ It’s this particular lounge that got snapped up for millions – over the phone, no less – when it recently went up for auction.

Screen Shot 2015-04-29 at 11.37.21 AM

The aircraft-inspired furniture design was an immediate success when an early version of it debuted at a Sydney gallery, and it’s been in demand among the world’s wealthiest design collectors ever since, especially since the shape was refined to become smoother and more free-flowing. It’s made of thin aluminum plates welded together and riveted from the inside. The core is made of fiberglass-reinforced plastic.

The sale cements Newson’s status as one of the world’s highest-grossing designers. His works collectively brought in over £8.5 million in April alone.

Share on Facebook


[ By Steph in Design & Furniture & Decor. ]

[ WebUrbanist | Archives | Galleries | Privacy | TOS ]


WebUrbanist

 
Comments Off on Lockheed Lounge: Meet The World’s Most Expensive Object

Posted in Creativity


How to do Surreal Digital Infrared Photography Without Expensive Gear or Camera Conversions

17 Jun

Photos made with invisible infrared light, rather than visible light, yield wildly strange and eerie photographs that always have the “WOW Factor.”  For landscapes or scenic imagery, infrared (IR) photography is highly regarded as fine art. But back in the days of film photography, shooting infrared was complicated, expensive and the results were often not great. For those with determination though, that one image that did ‘work” was always worth the trouble.
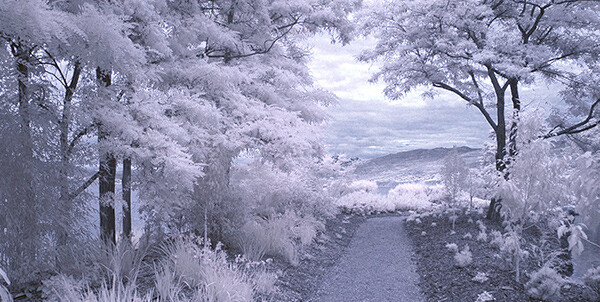
But now the complexity of capturing infrared photos has changed – digital cameras have made the technique almost foolproof, inexpensive, and a lot of fun! All you’ll need is a tripod, a special infrared filter, and any camera that is sensitive to infrared light. With a few easy steps you’ll be shooting infrared photos in no time at all.

But before I get into the process, it’s not my intention in this article to delve into the physics of infrared light, and all the scientific mumbo jumbo that goes along with understanding WHY infrared light creates amazing images, but rather to give you some simple steps to get you started in this super creative technique.
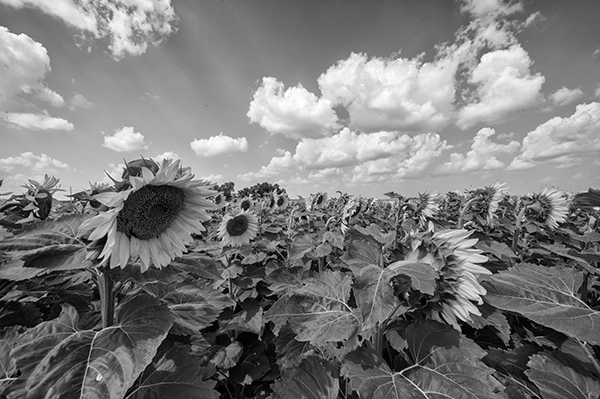
_DSC1747W

Visible Light Black and White Image

Just know that anything that is alive will reflect a greater amount of infrared light than inanimate objects. Leaves, foliage, and grass, along with skin, reflect the greatest amounts of infrared light, and so will be the whitest objects in your image. Stones, concrete, mountains, water and sky tend to absorb infrared light and so appear as darker objects in your images.  The tonality is very different from that of visible light black and white photography though. Notice how the tones of the leaves, seeds and sky are quite different in the infrared image below.

Digital Infrared Image

Digital Infrared Image

Okay, are you ready to give this a try? Here are the simple steps you need to follow so your images will turn out into hauntingly beautiful, surreal infrared photographs. The first steps deal with equipment and settings, and the last steps are all about how to best capture beautiful infrared light.

Step 1: Test your Camera

Before you go out and buy an infrared filter test your camera to make sure it’s sensitive to infrared light.  Not all digital camera sensors are able to “see” infrared light. In fact the newer the camera, the less sensitive to infrared light it may be. Try this simple test to see if your camera will give you good results.
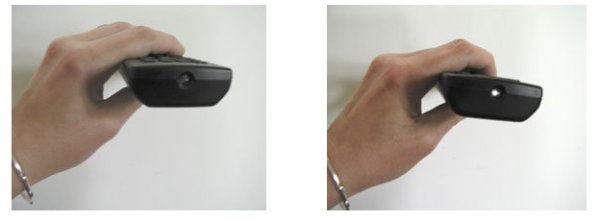
Testing your camera for infrared sensitivity.

Testing your camera for infrared sensitivity.

Hunt down a TV, VCR or DVD player remote control. Look at the end that points to the TV (or VCR etc), and you’ll see a little bulb or flat back plastic window. This is the transmitter that sends the signal from the remote to your device. That signal usually uses infrared light. You can see that it is invisible light – i.e. when you look at the remote with your eye, you can’t see anything when you press the buttons. But just wait until you do this looking through your camera! You’ll be able to see invisible light – the infrared spectrum that makes such cool photos.

If you have a point & shoot camera look through your LCD viewer while pressing any button on the remote. If you see the bulb light up, your camera can see infrared light.  If you have a DSLR you’ll have to take a photo to see the results, or if you camera has a live view feature, you will be able to see the the results on your LCD as well.

The whiter and brighter the light you see from the remote, the more sensitive your camera is to infrared. If the light is more purple or red your camera may not be a good candidate for shooting infrared photos.

Step 2: Equipment

If your camera passed the sensitivity test, you’ll need two more pieces of equipment before you can shoot infrared photos, a tripod and an infrared filter. The tripod will help you take a sharp shot, as your exposure times will be quite long. The filter will  block most of the visible light from reaching your camera sensor, but will allow the beautiful infrared light to pass through.

When I first started shooting infrared images, I used  a Hoya R72 screw-on infrared filter. B+W, Tiffen and other manufacturers also have equivalent infrared filters.  If you are using a slide in filter system, such as Cokin or Lee, they also make infrared filters to work with their holders. If this is the filter you’ll be using, make sure to slide it into the slot closest to the camera to prevent unwanted visible light from sneaking in. The R72 refers to the amount and type of infrared light that passes through to your sensor and I recommend using this to start. It allows some visible light to pass to the sensor so it will allow you do to all sorts of creative post processing with your images.
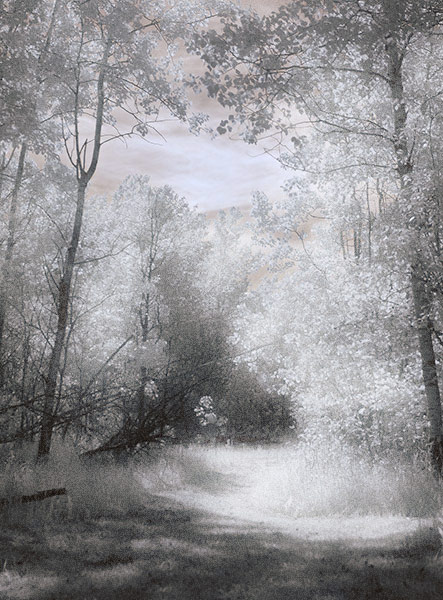
Infrared Image with creative post processing.

Infrared Image with creative post-processing

Step 3: Camera settings

Because the infrared filter blocks out most of the visible light, your exposures will be quite long. You’ll have to adjust your camera settings to ensure you get a good exposure, while keeping noise to a minimum.  Set up your camera on your tripod and make these adjustments:

  1. Set your ISO between 200 and 400, keep it as low as you can
  2. Set your Long Exposure noise reduction to ON
  3. Set your camera to shoot in RAW mode
  4. Set your camera to Aperture Priority (Av mode on a Canon), and your aperture to around f/8 for maximum sharpness
  5. If your camera does auto bracketing (refer to your owner’s manual), set your bracketing to +/-1 EV.  Your series should be -1 EV, 0 EV, good exposure, and + 1 EV. You can also bracket manually.

Shooting in RAW will give you a bit more latitude for processing and adjusting.  Bracketing will help you find the sweet spot for exposure at your preferred aperture and ISO.

I’m not going to go deep into the White Balance setting, as this could be an entire article on its own. But for now set your White Balance to the Sunny or Daylight preset.

Step 4: Composition

Just as in regular light photography, composition is a critical component of infrared photography. However there are a few additional considerations to keep foremost in your mind when planning your infrared composition.
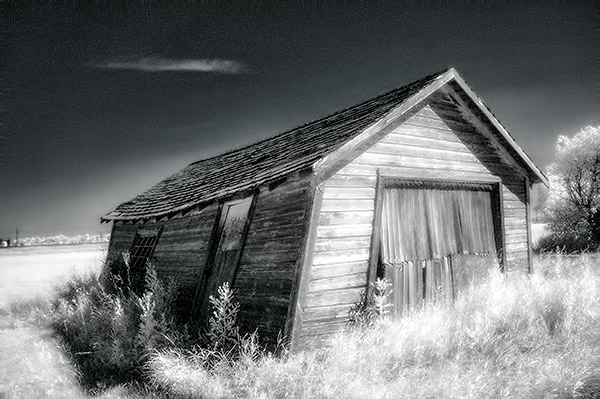
A variety of textures make the image more dynamic.

A variety of textures make the image more dynamic.

Infrared photography is similar to black and white photography, in that you are dealing with a limited number of tones. To add more dynamism and energy to your infrared shots, add contrasting elements. By this I mean using dark and light objects in close proximity to each other. But also use smooth and textured objects together. You can mix and match for artistic composition and design.

 COLUMN 1  COLUMN 2
  • light
  • white
  • smooth
  • large patterns
  • light with fine textures
  • light with large textures
  • dark
  • black
  • textured
  • small patterns
  • dark with fine textures
  • dark with large textures

In every infrared shot you make, include at least one element from Column 1 with the corresponding one from Column 2. You can add as many elements as you want, but it’s best to keep your composition simple. You can use light and small patterns, with dark and large patterns and so on. Foliage and clouds will always be a light element in your image; the sky, stones, bark, water  and concrete will be darker. Leaves from a distance are a rough texture, with many small elements appearing rough and textured; while human skin is very smooth.  This should give you a great starting point for infrared compositional considerations.

Step 5: Shooting Infrared

There is only one critical thing to remember when shooting infrared – you must shoot when there is lots of sunshine, and in the summer when there is lots of deciduous foliage. Overcast days won’t give you great results, and because living things reflect the most infrared light, snowy winter days are usually devoid of anything that reflects infrared.  If there are clouds in the sky these can add an element of interest, but don’t make your capture until the sun is out, and shining on your subject.

Find a great place to shoot and adjust the settings on your camera. I like graveyards, parks, and old abandoned buildings. The contrast between the stones, the pathways, the old wood and leaves and grass provides outstanding tonality for infrared images. If you can get a few wisps of cloud in your sky all the better.

Put your camera on your tripod, and compose your image. Place the infrared filter on your camera, and use your autofocus as usual. Yes, it works just fine for infrared photos! Your light meter will work too but be sure to bracket on either end to make sure you have at least one usable exposure. Then click the shutter.  You’ve just made an infrared photograph.
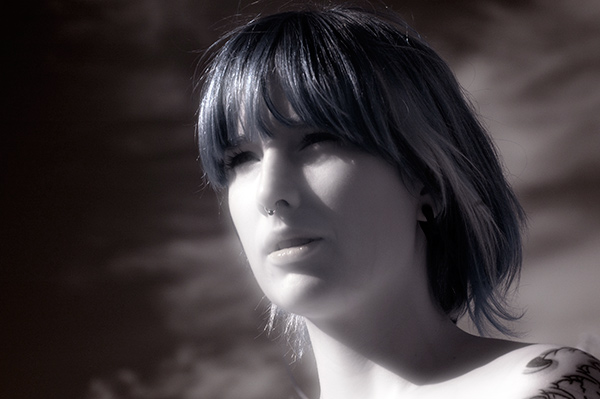
Skin looks like alabaster when shot using infrared light.

Skin looks like alabaster when shot using infrared light

For techniques and ideas for post-processing our infrared images, watch for my article on post processing infrared photos coming soon!

The post How to do Surreal Digital Infrared Photography Without Expensive Gear or Camera Conversions by Alex Morrison appeared first on Digital Photography School.


Digital Photography School
 
Comments Off on How to do Surreal Digital Infrared Photography Without Expensive Gear or Camera Conversions

Posted in Photography


In case you were curious, here are the 10 most expensive photos ever sold.

23 Jul

expensive05.jpg

Photography has been around for almost two hundred years, but amazingly, it’s only in the past couple of decades that it has gained widespread acceptance as an artform. These days, images by significant photographers command very high prices. But How high is ‘very high’? Internet community FreeYork.org has published a list of the ten most expensive photos ever sold. Click through for the list.

News: Digital Photography Review (dpreview.com)

 
Comments Off on In case you were curious, here are the 10 most expensive photos ever sold.

Posted in Uncategorized


Expensive DSLR/Lens vs a Speed Light for Indoor Low Light Photography

24 Nov

photographyequipment.yolasite.com (Budget Equipment) razzi.me www.facebook.com twitter.com In this video I talk about necessary equipment needed for indoor low light photography. I tested sample pictures taken with Nikon D3s and Nikkor 70-200 f2.8 VRII lens and compared it with inexpensive Nikon D7000 and 50mm 1.8 lens and Nikon SB700 to see which picture produces better results. Equipment used in this video. DSLR – Nikon D7000 and Nikon D3s Lenses – Nikon 70-200 f2.8 VRII and 50mm 1.8G lens
Video Rating: 4 / 5

www.dslrfilmnoob.com Just upgraded to a Zoom h4n and that it sync perfectly with the canon 7d, I ran this test to get an idea of what microphone configuration I’ll be using on my next project. The zoom h4n has no sync issues at all, and has a time and date stamp on each file which is great for matching up audio it will be replacing my zoom h4 as my most used field recorder. I have the Zoom h4n set in 4 channel mode so that i can use both microphones and the zoom h4n’s on board mic’s at the same time. Shot at 720p at ISO800 2f lens Nikon Nikkor 50mm 1.4f DFocus follow focus adapter and Indisystems square with 15mm rails
Video Rating: 4 / 5

 
Comments Off on Expensive DSLR/Lens vs a Speed Light for Indoor Low Light Photography

Posted in Nikon Videos