RSS
 

Posts Tagged ‘Exercise’

This Back-to-Basics Photography Exercise can Improve Your Photography

18 Jul

The post This Back-to-Basics Photography Exercise can Improve Your Photography appeared first on Digital Photography School. It was authored by Rick Ohnsman.

The digital age has made photography easier, cheaper, and more accessible than ever before.  Even people who wouldn’t call themselves “photographers” now carry a camera in their pocket in the form of their cellphone.

However, has the ability to snap a picture without skill or knowledge made photography too easy? Even for you reading this article who’ve come to this site to learn more about making better photos – has the ease of making digital photos with modern cameras robbed you of learning the basics?

Perhaps. Presuming you really do want to learn more, give the following exercise a try with the intent of improving your skills.

This Back-to-Basics Photography Exercise can Improve Your Photography

I’ll bet back when this grocery store was operating you could buy black and white film here. Now, both are relics. I shot all of the mono photos in this article with a 50mm prime lens during a photo walk, while conducting the exercise outlined.

Back to the film days

Some of you remember the film days, but with digital photography catching hold in the early 2000s, we already have a generation of new photographers who may never have loaded a roll of film.  Others may never have had to manually focus a camera, calculate exposure without a meter, or made monochrome photos in the camera.

My first “real” camera – a 35mm Hanimex Praktica Nova 1B

As the risk of dating myself, here’s a little background:

Back in the “pre-digital days” (back in 1970 when dinosaurs roamed the earth), I was 16 and in high school. I bought my first real camera – a 35mm Hanimex Practica Nova 1B. It was an East German camera built in Dresden and imported to the U.S. The Oreston f/1.8 50mm Meyer Optik Görlitz lens was fast and sharp (though I didn’t know much about such things at the time).  It was typically loaded with Kodak Plus-X film (ISO 125, previously called ASA) or sometimes Kodak Tri-X (ISO 400).

I learned how to process the film and later make black and white prints in a little darkroom in the corner of the garage.  Working under the dim glow of a safelight, and watching the image magically appear as the photographic paper bathed in a tray of Dektol, is something young photographers today have likely not experienced.

This Back-to-Basics Photography Exercise can Improve Your Photography 3

The orange glow of a safelight and the smell of photo chemicals. Before Lightroom, there was the darkroom.

I can’t say I miss it.

Today’s cameras are far superior. Also, the ease of working at a computer using Lightroom, where you can dodge and burn with the click of a mouse instead of with physical tools, gives so much more creative freedom.  I also don’t have a wastebasket full of failed paper prints, and money spent trying to master the art.

These were things I learned the hard way with no electronic assistance from my camera. Let’s see what you can learn. Set up your camera and take a photo-walk emulating the way it used to be.

Learning to focus manually takes some skill. Note in this shot the very closest weed at the bottom of the frame is focused, but the other portions are soft. You’ll also better learn the relationship between depth-of-field and aperture when you work in manual mode.

Camera setup

We’re going to want to go fully manual for this, putting you in charge of setting the aperture, shutter speed, and ISO. So put the dial in the “M” mode.  Turn autofocus off.  You will be focusing yourself.

If you have a 50mm prime lens, that will better emulate what most of us had on those old 35mm film cameras before we could afford to buy a zoom.  Composing with the “sneaker-zoom,” (that is, using your feet to move closer or further from your subject), is good practice, especially if you always rely on a zoom lens to compose.

Working with a prime lens will help teach you to compose without relying on a zoom.

Going Monochrome

Most beginning photographers, (and all of them in the pre-color era), shot black-and-white film. So to stick to the basics, we’ll be shooting monochrome as well.

Well, sort of.

The best option in a digital camera is to shoot in RAW mode, which will create a color image.  Later in editing, you’ll make a monochrome image from that color file.  Photographing for monochrome will also allow you to better concentrate on composition – another point of this exercise.

Photography Exercise can Improve Your Photography 4

It is thought the term “chimping” originated from the “ooh, ooh” sounds photographers made when reviewing their photos on their LCD screens, (not necessarily as in this case, whether the photographer had a simian-like appearance  :-D.   For this exercise, you will NOT be chimping.  – Photo of/by Rick Ohnsman.

To chimp or not to chimp?

You’ve heard the term “chimping” which refers to the practice of some digital photographers to look at the playback on their LCD screen after each shot?  Some scoff at the practice.  Others, (count me in that camp), think the ability to immediately review a shot, check the histogram, make adjustments and reshoot is the best thing to ever happen to photography.  Instant feedback, (rather than waiting days, weeks, months, whatever it was to get back the photos and only then discover your mistake?) – what a concept!

I still bow to the wedding photographers who shot film.  Those photographers knew their cameras relying on skills and experience so they could trust they had the photo before ever seeing the results.

Many cameras will do this. This is a Canon 6D. Set your Picture style to Monochrome, but shoot Raw images. The Raw file will be in color but the LCD display, (both in playback and Live View) will be Monochrome.

So… a choice for you as you do this exercise –  You have two options:

Option 1:

Shoot Raw, but set your camera so the image played back on the LCD (which is a .jpg thumbnail) is shown in monochrome

On a Canon camera, you will be using Picture Styles.  On a Nikon, Picture Controls is the term.  Look for Monochrome in the menu.  What you’ll be doing is taking a Raw color image but forcing the camera to playback a monochrome image on the LCD.

Check your camera manual for how to set this up.

The advantage is being able to see a monochrome image in playback rather than having to previsualize what it will look like.   Because your raw file will still be color, you will have more control in editing.  Should you decide you do prefer the color image, you can stick with it and not convert to black and white.

If you shoot .jpg only, your image will be monochrome with no going back.

Flexibility – it’s just one more of dozens of reasons to shoot raw images.

Or …

If you set your Image Review to “Off”, the photo will not be displayed in the LCD after you take it. Film photographers didn’t have the luxury of image review in the field and for this exercise, you won’t either.

Option 2

Turn off or tape over the LCD screen

If you really want to emulate shooting film, (and get the most from this exercise), you will not chimp at all.  There was no option to review your shots with film. The photographer had to trust their knowledge and instincts.

For those who’ve only made digital photos, (and even for those who may have used film but haven’t done so for a long time), this is harder than it might seem.  The reward, however, will be learning to analyze the scene better, make necessary camera adjustments, and trust your instincts.  You will make mistakes and not know about them until later, but lessons learned with a little “pain” attached will be those you’ll best remember.

I’m not suggesting you always work like this, instant LCD feedback is a beautiful thing. However, when practicing this exercise, see what it can teach you.  (Don’t forget to turn your LCD Review back on completion of the exercise!)

Photography exercise

With the Picture Mode in Monochrome, both Live View and Image Playback on the LCD screen will be Monochrome even though the Raw file will still record in color.

When more isn’t better

Another great thing about digital photography is how many images you can fit on a storage card.  Depending on the camera and the card size that can easily be hundreds, even thousands in some cases.  You also don’t have to worry about each shot costing you more.  If you don’t like what you see, that’s what the delete button is for.

Cards are reusable. Once you buy one, you can use it over and over.

As the saying goes, “digital film is cheap.”

Monochrome will help you better compose and concentrate on line, shape, tone, and texture. Also, note how simulating a red filter when editing allowed the blue sky to render very dark.

Shooting film wasn’t cheap.  There was the cost of the film, the cost of film processing, and the cost of printing.  Nothing was reusable, and so all the shots, both the keepers and the junk, cost money.  With digital, we also need not print if we don’t like a shot.

It was hard to view a film negative and judge what you had.  Unless you were printing your own images, you’d almost always print everything and prints cost money.  Some of us shot transparencies (slides). These were a little cheaper since you’d typically not print them. However, you had to get it right in camera as there was no editing a slide.

Beginning film photographers could spend lots of money learning with little to show for it.

There was also the limitation of how many photos could be made on a roll of film. The capacity typically measured in dozens, not hundreds or thousands of images like digital media.  If you used 35mm film, you could typically get 12, 24, or 36-exposure rolls.  With limited exposures and to save money, photographers wanted to make each shot count.

The downsides were making fewer images, (and thus reducing the odds of getting a keeper), less experimentation with new techniques, and a longer learning curve for a new photographer who’d be making fewer photos.  The upside, however, (and this is a big factor), was photographers took more time to do it right – more time to think before pressing the shutter button.

Putting it all together

Are you ready to give this exercise a try?

I’d suggest not doing this in a session that’s important to you. If you are doing it right, you’re apt to make some mistakes.  That’s okay, those will be mistakes from which you can learn.

Here are your settings and steps:

Camera in “M” – Manual Mode – You will control ISO, Aperture, and Shutter Speed

Autofocus Off – Focus with the focus ring.  Learn to see and concentrate on what you’re focusing on.  A mistake I often see new photographers make when learning to use an autofocus digital camera is letting the camera select the default center focus point when that may not be the spot they wanted in focus. Manually focusing puts you in charge of what’s in focus.   Also, consider when you might need to use your aperture to increase or decrease your depth-of-field.

Determine your lighting conditions and chose a “film type” ISO – Choose ISO 125 for bright daylight (emulating Kodak Plus-X or Ilford FP4), ISO 400 (to emulate Kodak Tri-X or Ilford FP5). If you’ll be photographing in low light, try ISO 800 and emulate “pushed” film.  The point here is set it once and leave it there for the entire session.  It wasn’t possible to change ISO with film, you were stuck with your choice for the entire roll.

Use a prime lens if you have one – Learn to compose without a zoom.

Decide how many exposures you have – Pick 12, 24, or 36.  Sure, film photographers often carried multiple rolls, but this exercise is designed to help you make each shot count.  Once you hit your pre-determined number, you’re done.

Here’s what came in a box of Kodak Plus-X or Tri-X film. Can you use this to calculate exposure and not rely on your camera meter? Give it a try!

Calculate Exposure – By the 1960s, most 35mm film cameras had light meters, but they were primitive by today’s standard.  A “match-needle” system where a needle could be centered when dialing in exposure and shutter speed was what many displayed.  If you wanted to purposely over or under-expose a bit, you’d adjust until the needle was over or under as desired.

On cameras without meters, many relied on the chart typically found in a box of film.  Often, these calculations were based on what was called the “Sunny 16 Rule.”  It said that on a bright sunny day if you put the aperture at f/16, then the shutter speed should equal the ASA, (now ISO), film speed.

For example, with Kodak Plus-X ASA 125 film a setting of ASA 125, f/125 at f/16 would give you a well-exposed image.  If you wanted to shoot at a different shutter speed or aperture, you could calculate from there. For example, f/250 @ f/11 (assuming you had the same ASA 125 film in the camera) would be an equal exposure.

If it wasn’t a bright sunny day, you were in the shade, or light conditions were different, sometimes the little printed chart could help.  Mostly, it was the practice that taught a photographer what was “about right” for a given film and a given lighting condition.

That’s another purpose of this exercise; to help teach you what’s about right for a given lighting condition.  See how you do without relying on the meter. At least pay close attention to what the aperture and shutter speed is for a given set of conditions.

Slow down

If this exercise teaches you nothing else, learning to slow down will make it worthwhile.  With limited exposures available on a roll of film, the “spray-and-pray” style of photography was rare.  Typically it was only sports and fashion photographers who had motor-drives (the mechanical version of what we now do with continuous mode).

Photographers took the time to carefully think about their composition, and what they wanted to convey with the image. What shutter speed choice might be best to freeze or blur the action?  How much depth-of-field might you desire and what aperture choice would be best?  Should you roll in a little exposure compensation?

All of these factors were given thoughtful consideration.  Bracketing shots to be sure everything was right could be done but at the expense of more quickly eating up that roll of film.  The difficulty of fixing anything in the darkroom was much greater too, and photographers didn’t have the attitude that they’d “just fix it in Photoshop.”  Consequently, the concept of “getting it right in-camera” was the norm.

Getting it right in-camera is among the goals intended with this exercise.  If you know you only have a minimal number of exposures available to you, each one has to count.  You won’t have the luxury of shooting, chimping, adjusting, and re-shooting if you’re doing this exercise as intended.

So, slow down, take your time, think about each part of the process. And then make your best shot.

Later, you will have a real advantage film photographers didn’t have – the ability to review your images with attached exposure data.

In the film days, conscientious beginning photographers carried a notebook and wrote down their settings to recall later.  Now, your digital camera keeps the notes.  Chalk up one more plus for digital photography.

Why monochrome?

We briefly touched on why monochrome was the choice for this exercise.  One, of course, is that it replicates what early beginning film photographers used and we are simulating the limitations of that time.

The more significant reason is without color, monochrome images rely much more on shape, form, line, tone, and texture.  It is also much easier to concentrate on composition without the added distraction of color.

Working in monochrome can help a photographer better key in on those elements that make a strong image and practice those techniques.

If you’ve done much monochrome photography, you’ll likely already know this.  If you’ve pretty much only made color images in the past, this part of the exercise will also be part of the process of improving your skills.

Back in edit

Film photographers typically dropped their film off at the lab, mailed it in, or sometimes did their own processing.  (I love the smell of D-76 in the morning!  It smells like… Victory.  – Not!  Sorry for the flashback, let’s resume).

You will come back with a few, (you limited your exposures as instructed, right?), Raw images on your storage card.  They will be in color, but you’ll be converting them to monochrome.  I will not spend the time in this article outlining the best ways to convert color to monochrome.  You will find a nice collection of those tutorials here on DPS.  You will find there are great ways to manipulate the tones in your monochrome conversion to create distinctive looks.

To complete the goals of the exercise, what you’ll want to give the most attention to is, were you able to make well-focused, properly-exposed, and nicely composed images with the self-imposed restrictions of the exercise?  Without the electronic assistance of a modern digital camera (auto-focus, auto-exposure), what worked?  What didn’t?

If this really had been film, what would you do differently next time?

The takeaways

This is a great time to be a photographer.  The sophistication of our cameras and the ease with which we can do amazing things in editing is fantastic.  The point of this exercise, however, is to teach you to use your brain as a photographer, to take full control over your camera, and not rely on a microchip to do it for you.  I personally would never go back to film, have no desire to get back in a darkroom, and love every electronic aid my camera supplies.

The point is, I want those things to build on a solid foundation of photo ability and knowledge.  That is the reason for this exercise.

The path to becoming a better photographer lies in using your brain, not a camera microchip, to do the thinking. Slow down, pre-visualize the image, and then use the camera as a tool to capture that vision.

I sincerely hope you give this a try.  If you make great images, wonderful!  If you struggle and make mistakes, fine – you will have learned something.

Either way, you will grow as a photographer.

Drop me a line in the comments and let me know how you made out.  Best wishes.


This Back-to-Basics Photography Exercise can Improve Your Photography


The post This Back-to-Basics Photography Exercise can Improve Your Photography appeared first on Digital Photography School. It was authored by Rick Ohnsman.


Digital Photography School

 
Comments Off on This Back-to-Basics Photography Exercise can Improve Your Photography

Posted in Photography


Playing Stuck in the Mud – A Creative Exercise for Photography

15 Jan

Do you remember that game called Stuck in the Mud we used to play as kids? It goes something like this; one kid is elected to be “it” and runs around to tag as many people as possible. When tagged, the other players have to freeze and stand with legs and arms apart, as if they were stuck in some glutinous mud. The only way to get free of the mud is when a non-tagged comrade climbs through the legs of the trapped players. It goes on until everybody inevitably gets stuck in the mud.

I was thinking about this game rather nostalgically over the course of this project.

Playing Stuck in the Mud - A Creative Exercise for Photography

Um… What has mud got to do with photography?

Actually, a fair bit sometimes. Fortunately, this project doesn’t involve wading in sticky mud (unless you want to).  This project is about parking your feet for a few minutes to have a good look around – as if you were stuck in the mud yourself.

Even when going for a dedicated photography walk, you are bound to miss the subtle details of a landscape. You can’t help it. The brain prioritizes images that portend to the mission at hand – surviving. Physical activity, self-preservation – it’s all the ingredients a brain focuses on to sustain its host. That’s why the best way to draw more detail out of a location is to slow down.

We know this because often when we see a potential photograph, we stop in our tracks to take the shot. So rather than halting for a brief second, the idea of this project is to and make a little extra time to investigate an environment. The shapes, colors, people, graffiti, or details in a window sill. There are countless moments that are ready for the taking, they just have to be caught.

Playing Stuck in the Mud - A Creative Exercise for Photography

How to play stuck in the mud with a camera

It sounds terrible, doesn’t it? The thought of my camera even coming near mud makes me sweat. But playing photographic stuck in the mud is easy.

The first step is to grab your camera and head out the door. Wander around, find a place to take a few shots and hold your position. Keep in mind that your spot doesn’t have to appear instantly enticing. In fact, choosing a boring location would be a quicker way to train yourself onto detail.  Plant your feet on the ground and have a good look around. I would recommend holding your position for a good one to two minutes at first. You’ll notice the time tends to go faster each try. In order to concentrate, set an alarm on your phone and get shooting!

Rules of the game

Apart from taking a few minutes to study the spot you’ve chosen, there aren’t any hard and fast rules to the stuck in the mud project. To advance, add a higher photo count or hang out in one spot for a longer period of time.

Want to stop every 100 steps? Do you want to be able to swivel around in a circle? Want to halt at particular points on a map? It’s totally up to you. You could even go out with a friend and compare shots from the same spot after! But I do recommend staying in the one spot for at least a minute or so – to truly get into that state of mindfulness and awareness. Sometimes it can be hard to get into that creative flow, so slowing down your process can help activate what I like to call “The Photography Zone”.

Also, it’s probably obvious, but don’t stop in the way of others or get yourself in a dangerous situation. This isn’t Pokemon Go, okay?

Playing Stuck in the Mud - A Creative Exercise for Photography

This is an example of a street corner I parked my feet on the other day. I was waiting for a friend and decided to take advantage of the surrounds. It doesn’t look like much, right? A fresh construction zone impeded by scaffolding. But, embracing the challenge I honed in on some of details that really make up the urban landscape.

Playing Stuck in the Mud - A Creative Exercise for Photography

This dark blue scaffold retains a sharp contrast in the midday sun.

Playing Stuck in the Mud - A Creative Exercise for Photography

A vibrant red scaffolding hanging just close enough to get a detailed shot.

Playing Stuck in the Mud - A Creative Exercise for Photography

Playing Stuck in the Mud - A Creative Exercise for Photography

You never know what you are gonna find! A cute little button.

Playing Stuck in the Mud - A Creative Exercise for Photography

And of course, don’t forget the selfie!

Pleasant Surprises

This short collection below surprised me a little because I’ve walked the route many so times before. But that’s what is so great about this project. It slows down your photographic practice, making room for unusual subjects to peek through.

Playing Stuck in the Mud - A Creative Exercise for Photography

The black and white conversion was a no-brainer to match tones in this image

Playing Stuck in the Mud - A Creative Exercise for Photography

Playing Stuck in the Mud - A Creative Exercise for Photography

I’ll often use these manholes to mark where I’ll stand next. This time, I decided to photograph one instead. I really enjoy the light filling out the overall image.

Playing Stuck in the Mud - A Creative Exercise for Photography

This tarp has been under construction for weeks but it took me a concerted effort to stop and explore the panorama of the city to capture this picture.

Sometimes the stuck in the mud project yields a cohesive series in itself. This image is the remains of Honeysuckle Creek Tracking Station in Australia. But instead of walking around to hunt out the obvious subject matter, I took a few minutes to plant my feet and take a good look at the detail around me.

It’s the act of staying put in the one space that allowed me to capture a different perspective of the old station.

Playing Stuck in the Mud - A Creative Exercise for Photography

The site of the Honeysuckle Creek Tracking Station. Before I set off to scurry around for subjects I deliberately took a minute or two to survey the details of the overall environment.

Playing Stuck in the Mud - A Creative Exercise for Photography

The results of a few minutes stuck in the mud. The detail of the ground around me lit up like an abstract artist’s canvas.

The variation from one tile to the next is a striking contrast. Perfect for focusing on the historical site in a different light.

Over to you

I would love to see the results of your stuck in the mud sessions. By taking a few moments to truly check out a landscape, odd little moments become clearer. You’ll almost definitely leave your spot thinking, “Wow, I never noticed that before!” So have a go! and share your images in the comments below.

The post Playing Stuck in the Mud – A Creative Exercise for Photography by Megan Kennedy appeared first on Digital Photography School.


Digital Photography School

 
Comments Off on Playing Stuck in the Mud – A Creative Exercise for Photography

Posted in Photography


A Quick Exercise to Help You Take Better Self-Portraits

08 Jun

This article will give you some tips on how to take better self-portraits. That is different than doing a selfie – let’s have a closer look at the issue.

A Quick Exercise to Help Improve Your Self-Portraits

Thank you to dPS writer Hannele Luhtasela-el Showk for contributing her self-portrait to the article.

The selfie – what not to do

The selfie has become such an important part of our culture. The invention of the selfie-stick shows just how important this phenomenon has become. Everyone is snapping pics and posting them online. Phones make it convenient to share images and show people the events of your day. But I would argue these images barely scratch the surface. They don’t do much more than give people a brief glimpse into how happy you were while visiting the zoo with your children.

Look back at your Facebook profile. Look at the pictures you’ve uploaded. If you are like the rest of us, I’m willing to bet you’ve filled your profile with images. Superficial images where you are smiling while hiking or maybe you’re shopping with friends. They don’t show much, do they? Sure you’re out having a great time, but there’s more to you than fun isn’t there? These smiling images don’t get at who you truly are. There’s a difference between a selfie and a self-portrait that shows something about you; an image that gets at who you are and tells your story in an intimate way.

A Quick Exercise to Help Improve Your Self-Portraits

We’ve all taken one of these images. You know the ones with terrible quality in low lit areas. This is a typical facebook selfie.

I think this is a pretty typical selfie. We’ve all posted images like this. Even I am guilty. Two happy friends together somewhere.

Self-portraits – take it up a notch

So if you’re like me if you’re tired of the superficial smile, then it’s time to think about how you can step up the selfie game and graduate to full-fledged self-portraits. I’ve said it before, and I’ll say it again – good photography needs some forethought. There’s more to quality pictures than using the correct settings. Let’s take a look at a quick exercise you can use to help you create more meaningful, telling and compelling self-portraits.

A Quick Exercise to Help Improve Your Self-Portraits

This was shot after 12 hours working outdoors for a photo shoot. I was exhausted and wanted to show the toll my work took on me. Hopefully, I look exhausted.

Exercise – Discover Treasured Objects

I’m going to ask you to get out a pen and paper. Sorry, but it’s necessary, and I promise it won’t be too onerous. It’s time to do some brainstorming and soul searching.

Let’s pinpoint the things that are really important to you. Think about all the physical objects you hold dear. Start by writing without restraint. Jot down the items that quickly come to mind. Try not to evaluate them too harshly. This is about fleshing out ideas. You can use your judgment later to question whether an object should stay on the list.

If you want to create a list no problem. Or if you’re like me and none of your thoughts are ever linear then maybe an idea web (or word cloud, or a mind map) works better for you, just go for it. Write down your thoughts in the way you are most comfortable. Maybe one of the items you list is a treasured photograph of your grandmother or a plastic beaded necklace a friend gave you. It doesn’t matter just get it down on paper. Try to list at least 10 objects.

A Quick Exercise to Help Improve Your Self-Portraits

Thanks to dPS writer and team member Simon Pollock for contributing his self-portrait to the article.

Here’s my mind map. I struggled to get 10 objects as I’m not someone who has a lot of physical possessions but I will bare my soul to you all.

Here are my brainstorming efforts.

Plan photos around your objects

Now that you’ve got your mind map all worked out it’s time to consider the items you’ve jotted down. How could you incorporate one of these items into a photograph? How will you portray yourself to the world? Use these treasured objects to help you to craft meaningful self-portraits.

Here’s the image I created after completing this exercise. I hate being in front of the camera so this was a big challenge for me. I spent an afternoon twirling around in my aunt’s deerskin dress. She often used this dress during sunrise ceremonies before she gifted it to me. The dress is an important part of my heritage. I wanted to show the world something about that part of my culture.

A Quick Exercise to Help Improve Your Self-Portraits

You don’t have to show your face to create self-portraits. Other details can tell a story.

This is in contrast to the following image. I created this one with my cell phone. I shot it while sitting on my couch watching TV. Is there a story here? Or is this just a nice picture?

A Quick Exercise to Help Improve Your Self-Portraits

Ask yourself this question

It might help to consider the following question when crafting your self-portrait.

“How is this portrait I am creating a story, rather than just a visually interesting image?”

I’m not sure who first asked me that question. It was probably some wise old grizzled photographer with years of knowledge. I wish I could remember. Use this question along with the exercise above to create a meaningful self-portrait.

You can also make idea maps that show important relationships or meaningful thoughts. Be creative, but try to push your self-portraits past the mundane. You don’t have to shoot portraits with a DSLR you can use your cell phone, but take a few minutes to consider the shot before you push the button. Look at the story you’re telling and leave your mark. Show the world exactly who you are.

dPS writer Sean McCormack took this self-portrait using a remote trigger.

A Quick Exercise to Help Improve Your Self-Portraits

Thanks to Hannele for contributing another image to the collection.

A Quick Exercise to Help Improve Your Self-Portraits

A self-portrait can be a silhouette. We don’t always have to see your face. Thanks, Simon for contributing this shot.

The post A Quick Exercise to Help You Take Better Self-Portraits by Erin Fitzgibbon appeared first on Digital Photography School.


Digital Photography School

 
Comments Off on A Quick Exercise to Help You Take Better Self-Portraits

Posted in Photography


An Exercise to Learn and Practice Shutter Speed at Home

13 May

Practice-shutter-speed-f11-1:60

One of the most important choices you make when taking a photograph is deciding what shutter speed to use. The shutter speed controls how much light comes into your camera, and how motion is recorded.

A faster shutter speed will freeze action and slower shutter speeds can create a blur. Both choices can produce great pictures. In this simple exercise that you can do at home with a ceiling fan, you will have the opportunity to practice setting your camera on different shutter speeds, and seeing how each affects motion in the image.

It’s best to do this during the day when there is some ambient light in the room. You might choose to shoot this with the ceiling lamp on or off, either will work. Or you might try both ways to see which you like better.

To get started, set your camera on shutter priority, or manual mode, and do a few test shots to check your exposure. Put your camera on a tripod for the most consistent results. I also chose to focus on the silver plate on the lamp of the ceiling fan to create consistency. It can be tricky in an exercise like this because your auto focus can get confused and focus on the ceiling, the blades, or the chain cord. (Note: you might try back button focus here, or use autofocus and then lock it or switch to manual).

Practice shutter speed using a ceiling fan/

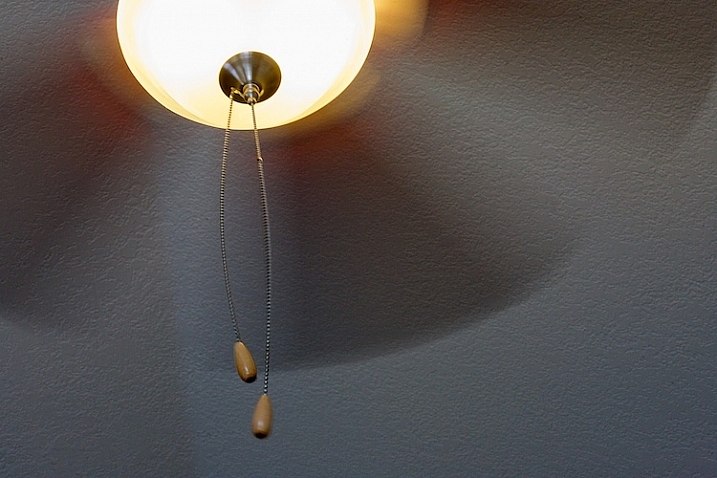
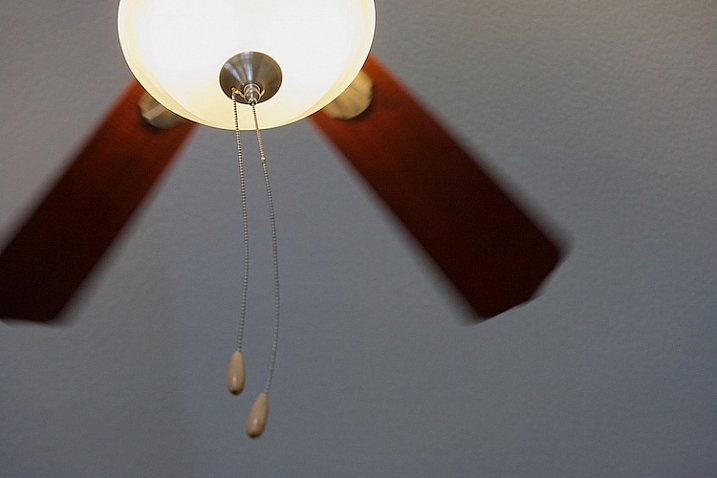
f/8 at 1/125th, ISO 1600.

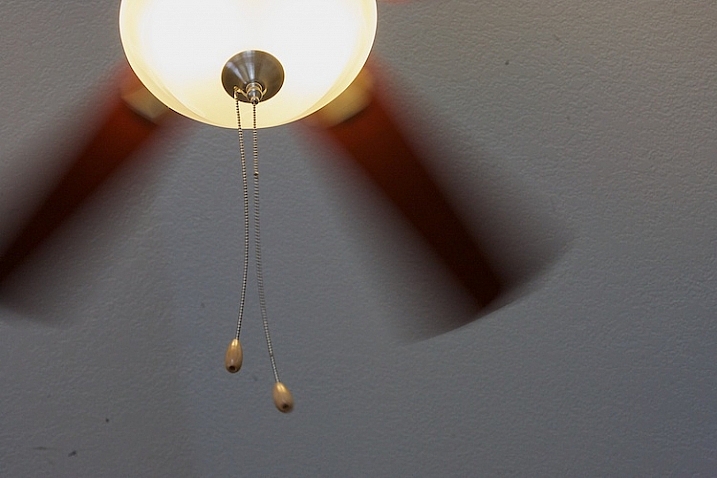
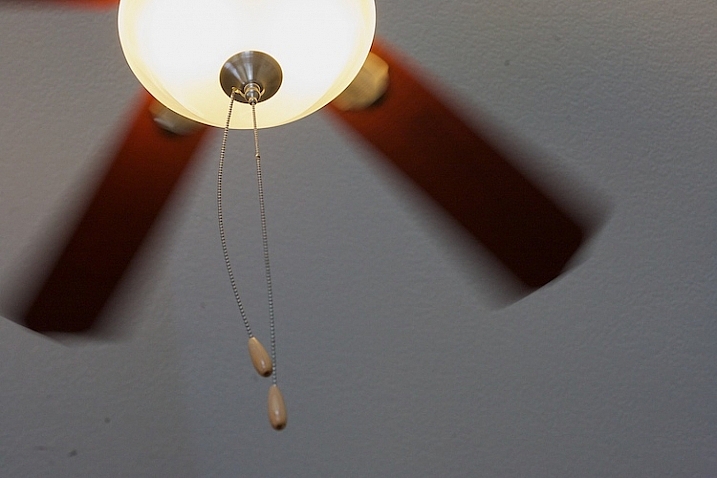
Start your series at 1/125th of a second. Notice that I focused on the metal plate on the lamp, and how sharp it is. The blurring in the fan blades is caused by motion.  Also look at the chain. It’s sharp toward the lamp, but the focus gradually falls off as it gets toward the pulls.

Now slow your shutter speed down to 1/60th, and see what happens. If you are shooting in manual mode, remember that when you change your shutter speed, you must also change your aperture or ISO too.

Practice shutter speed using a ceiling fan/

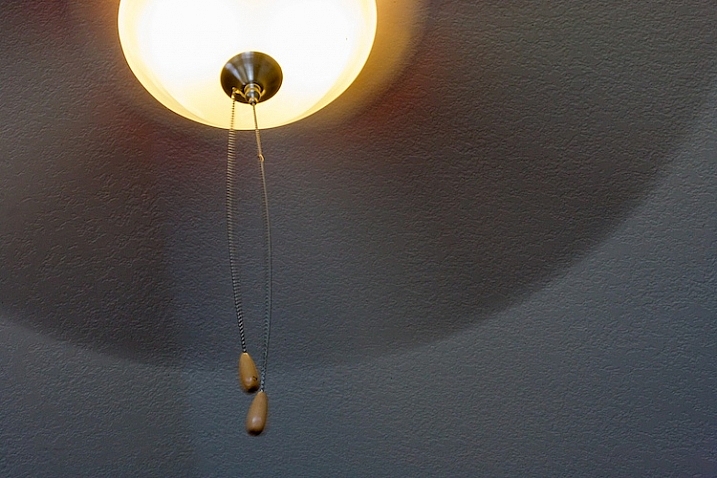
f/11 at 1/60th, ISO 1600.

Notice the blur in the blades at 1/60th. Next, look closely and you can also see that the pull chains show some movement. The depth of field is deeper as well, see how much is in focus between the metal plate on the lamp and the pulls.

Now, slow it down a little bit more.

Practice shutter speed using a ceiling fan/

f/13 at 1/40th, ISO 1600.

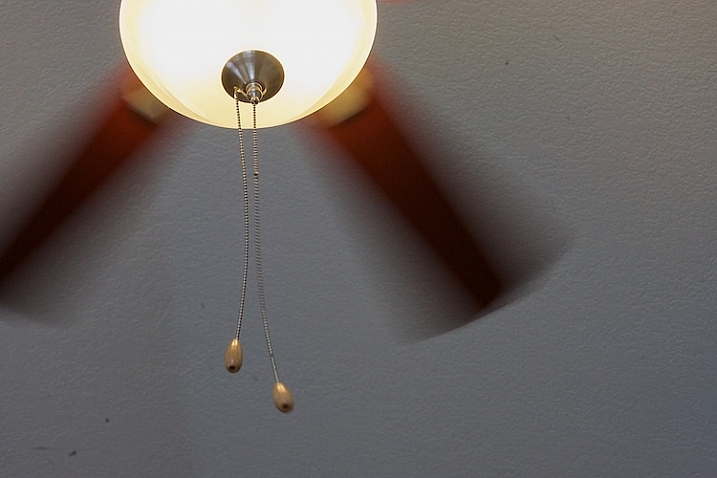
What do you notice at 1/40th? The blades seem to be moving faster because of the blur, but nothing has changed with the fan. There is a greater depth of field also, much of the pull chain is in focus now.
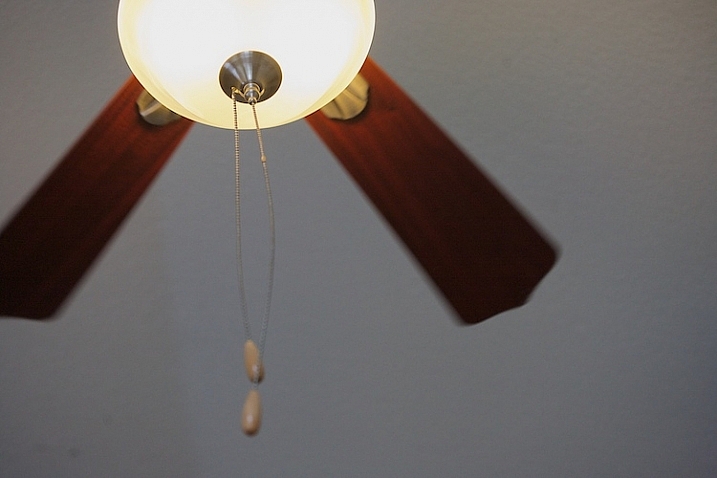
Let’s slow it down even more.

Practice shutter speed using a ceiling fan/

f/20 at 1/4, ISO 1600.

Now, at 1/20th, the blades have taken on a new look and the chain is more in focus. Let’s slow it down a little more and see what happens.

Practice shutter speed using a ceiling fan/

f/32 at 1/8th, ISO 1600.

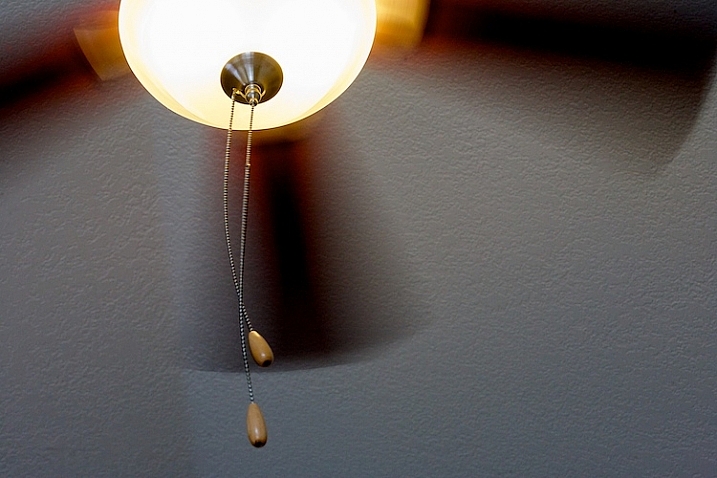
At 1/8th of a second, the blades are almost indistinguishable, and note that the metal plate is not as sharp as in the other photos. Ceiling fans are seldom perfectly still when the fans are moving and you can see slight movement in the metal plate.

Now, let’s go back and speed things up. Try a shutter speed of 1/250th and see what happens.

Practice shutter speed using a ceiling fan/

f/5.6 at 1/250th, ISO 1600.

Compare this to the first image, which was shot at 1/125th of a second. You can see that the blades still have motion, and notice the difference in the depth of field. At f/5.6, the chain is considerably more out of focus than at f/32.

Next, change your shutter speed to 1/500th.

Practice shutter speed using a ceiling fan/

f/4 at 1/500th, ISO 1600.

At 1/500th, the fan blades show motion. Now try 1/1000th.
Practice shutter speed using a ceiling fan/

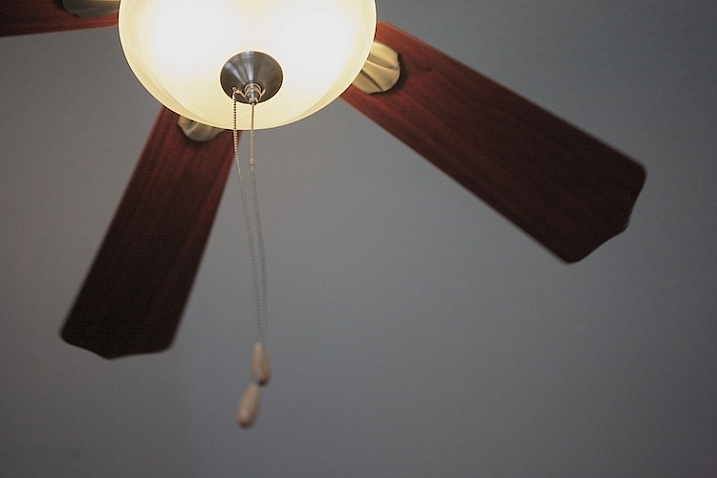
f/2.8 at 1/1000th, ISO 1600.

At 1/1000th of a second, the fan blades are frozen. It’s almost as if the fan isn’t turning. Notice the difference in the depth of field. The pull chain is out of focus due to the narrow depth of field at f/2.8.

Here are a couple of real world examples of how you might apply this to your photography:

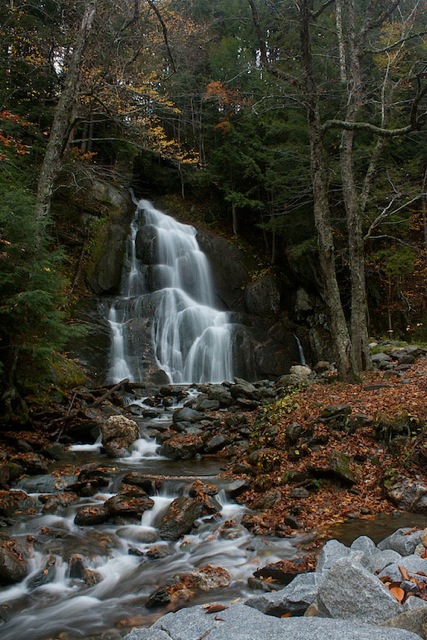
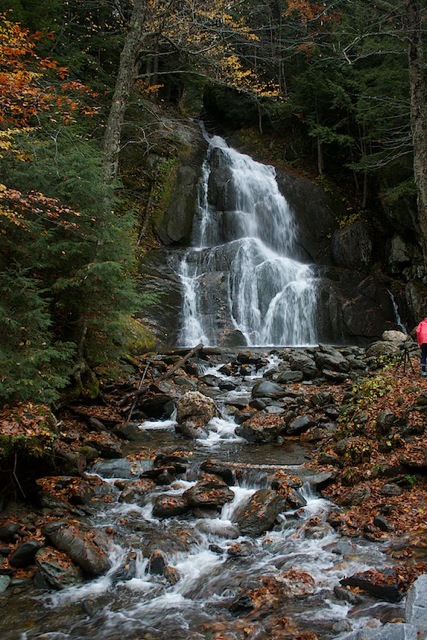
Shutter speed 1/30th - the water is partly frozen.

Shutter speed 1/30th – the water is partly frozen.

Shutter speed 1/2 second the water becomes silky and smooth

Shutter speed 1/2 second the water becomes silky smooth

You can also do this exercise by keeping your aperture consistent and changing your ISO. So what did you learn by doing this exercise? Give it a try and share your photos and what you learned below.

googletag.cmd.push(function() {
tablet_slots.push( googletag.defineSlot( “/1005424/_dPSv4_tab-all-article-bottom_(300×250)”, [300, 250], “pb-ad-78623” ).addService( googletag.pubads() ) ); } );

googletag.cmd.push(function() {
mobile_slots.push( googletag.defineSlot( “/1005424/_dPSv4_mob-all-article-bottom_(300×250)”, [300, 250], “pb-ad-78158” ).addService( googletag.pubads() ) ); } );

The post An Exercise to Learn and Practice Shutter Speed at Home by Vickie Lewis appeared first on Digital Photography School.


Digital Photography School

 
Comments Off on An Exercise to Learn and Practice Shutter Speed at Home

Posted in Photography


An Exercise For You to Practice Depth of Field Without Going Outside

01 Apr

lead-photo-Vickie-Lewis-Photography-for-dps

Many photographers, especially when starting out, have a difficult time understanding depth of field. I also hear quite often that photographers are waiting for nice weather to get out and shoot. So, here’s a fun exercise you can do at home, in any weather, that will help you understand the finer aspects of depth of field.

Depth of field is determined by which aperture you choose, what focal length you’re using, and the distance between the camera and the subject. In this example, we’ll explore depth of field using a 100mm lens.

To set up

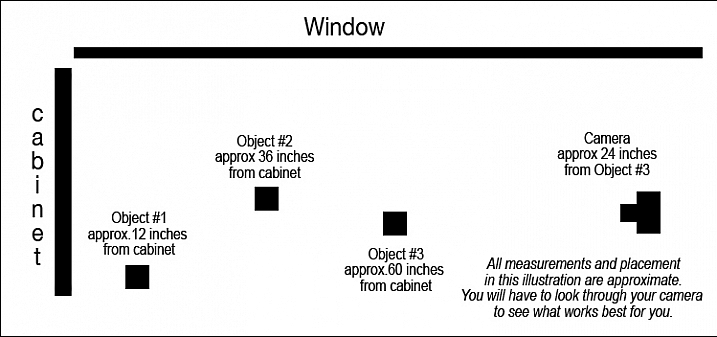
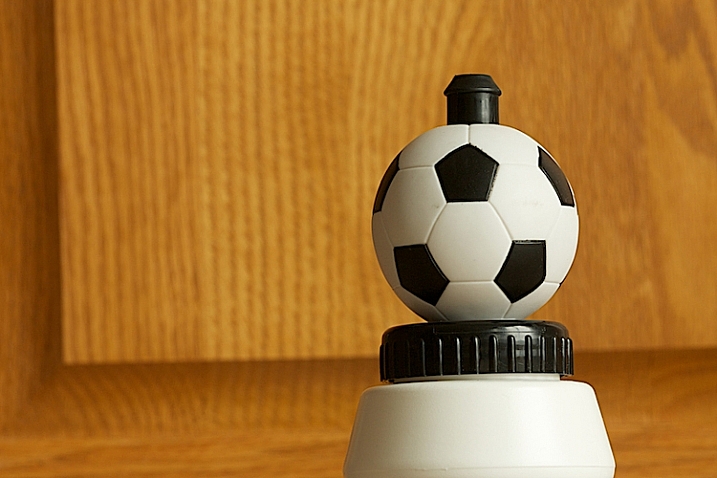
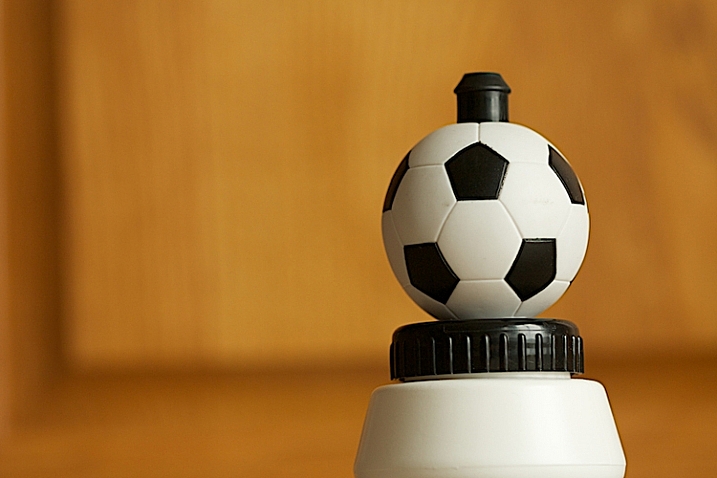
Find between one and three small objects you can photograph. I found three sports water bottles with balls on the top to shoot. Next, you need some studio space. A patio door or very wide window works well.

Your next step is to set up your object, or objects, in front of the window and to place your camera in position. The object and camera should be parallel to the window.

depth_of_field_illustration

This is how I set up my camera and objects.

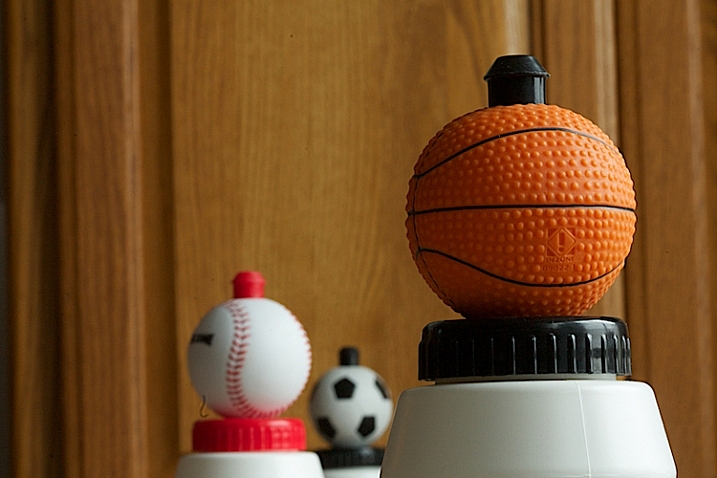
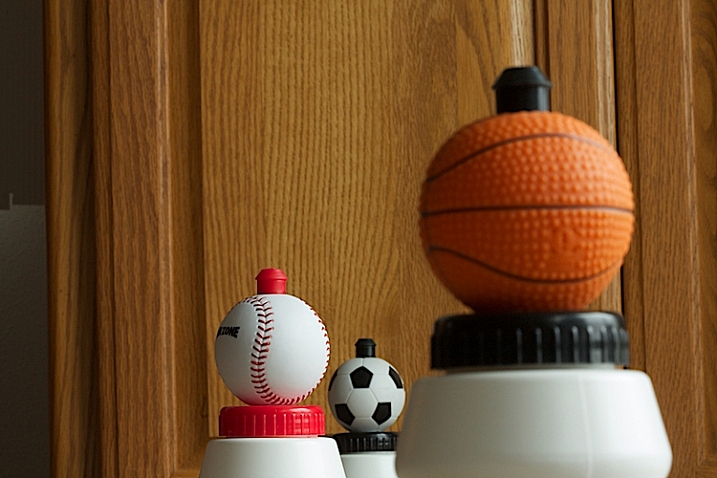
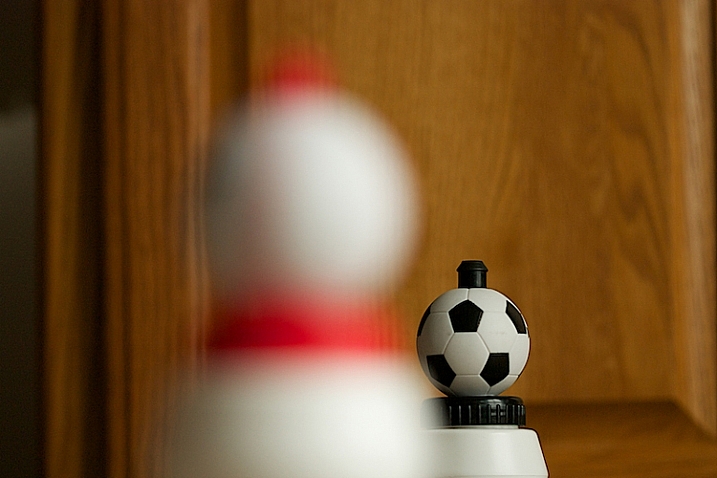
I put the first ball, the soccer ball, about 12 inches in front of the cabinet. Then I put the second ball, the baseball, about 24 inches in front of that. I put the third object, the basketball, 24 inches in front of the next object, and finally I set my camera about two feet in front of the last object.

You’ll need to play a little bit to see what works best for you. It will vary depending on the size of the object you are shooting, and the focal length you are using. You want to be able to focus on all three objects, and take a photo of them without moving your camera, so play for a minute. Focus on the first object and make sure you can see all three objects in the frame. Then focus on the second and make sure you can still see them all. Lastly, do it with the third one, too.

Set your camera on either aperture priority or manual exposure, and use the widest aperture you have. I chose f/2.8. Your lens might not have that aperture available, if so f/4 or f/4.5 will be just fine.

Shoot wide opened focusing on each object in turn

Now, without changing anything but your focus, take a photo of each of the three objects.

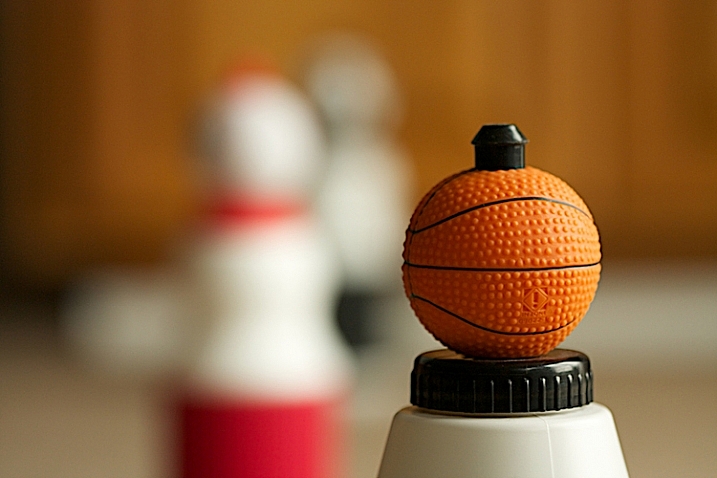
200__depth_of_field_f-2.8

This photo was shot at f/2.8 while focused on the object closest to the camera, the basketball. Notice the narrow depth of field, in other words, how blurry the background is.

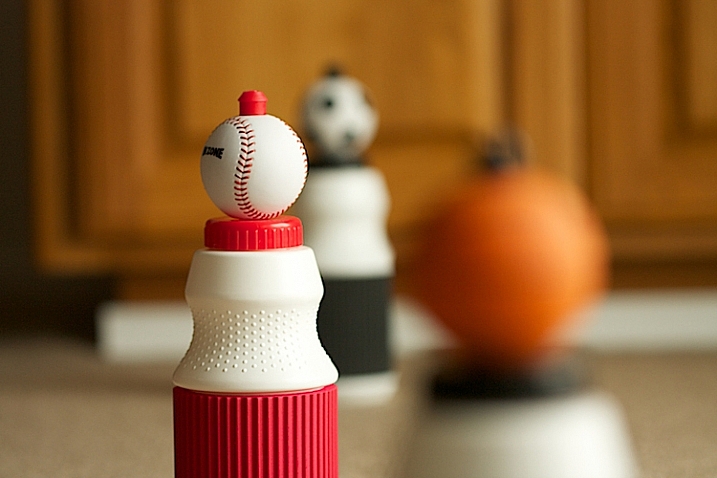
201__depth_of_field_f-2.8-f-2.8

This was also shot at f/2.8, but this time, I focused on the middle object, the baseball. Notice that it is blurry in front and in back.

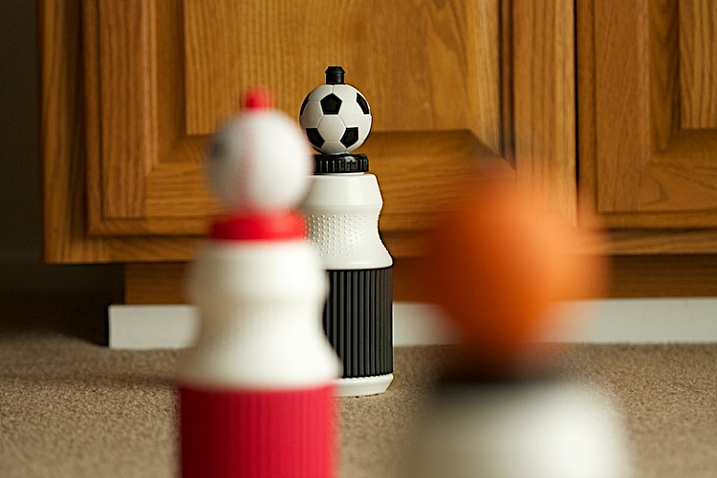
202__depth_of_field_f-2.8

This photo was also shot at f/2.8, but I focused on the soccer ball. I did not change camera position nor did I change lenses. Notice the depth of field, but also notice the change in perspective. Can you see that more of the cabinet is in the photograph?

Next shoot with a small aperture

Now, let’s try something a little different. Instead of shooting at your widest f-stop, shoot at your smallest, which means a higher number, like f/32 or f/16.

205__depth_of_field_-f-32

Here is the same situation. The camera hasn’t moved, but the aperture is now at f/32. The focus is on the basketball, but look how much is sharp.

204__depth_of_field_-f-32

Look closely. The aperture is still at f/32, but the focus has changed to the baseball. Notice the basketball is more out of focus, but the soccer ball in the back looks pretty sharp.

203__depth_of_field_-f-32

Above is the third example. The focus is on the soccer ball.

You can practice each of these things with different f/stops to see the difference between f/4, f/8, f/11, f/16 and f/32. Each choice will change the depth of field.

Change the distance to the subject

209__depth_of_field_-f-2.8

In the above photograph, I moved the camera closer to the baseball and shot at f/2.8. Practice isolating the elements and see what happens. Notice how the baseball really stands out, and look at the background. By isolating the baseball with a very narrow depth of field, the background becomes really out of focus. This tool is very helpful to clean up backgrounds.

210__depth_of_field_-f-2.8

Then I changed my focus to the soccer ball. The aperture is still at f/2.8. What do you notice about the background?

213__depth_of_field_-f-32

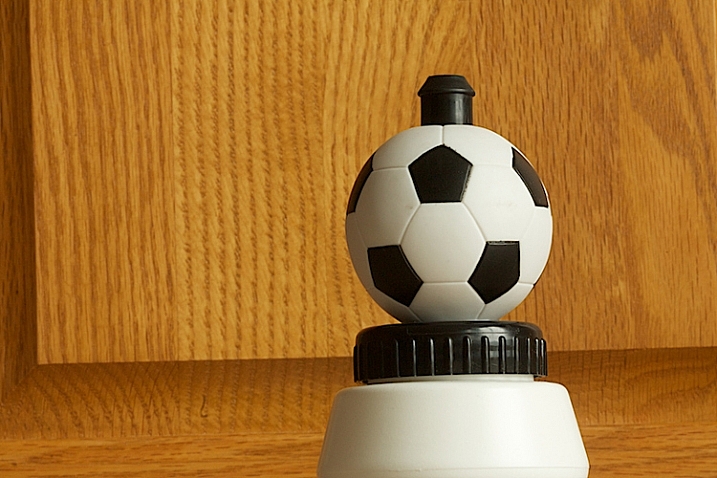
In the shot above the soccer ball is still in the original position, about a foot away from the cabinet. Notice how sharp the background is – this was shot at f/32.

214__depth_of_field_-f-11

Now, notice how we start to lose detail in the cabinet behind. This image above was shot at f/11.

215__depth_of_field_-f-2.8

Finally, by shooting at f/2.8, and without moving the position of the soccer ball or the background, the background has become more out of focus and less distracting.

Take some times and practice this at home. So what you’ve learned here is a great way to practice depth of field at home–even on a rainy day! So take out your camera, find some small objects to shoot and start practicing.

Please share in the comments below how controlling the depth of field could impact how you shoot. What did you learn by doing this exercise?

googletag.cmd.push(function() {
tablet_slots.push( googletag.defineSlot( “/1005424/_dPSv4_tab-all-article-bottom_(300×250)”, [300, 250], “pb-ad-78623” ).addService( googletag.pubads() ) ); } );

googletag.cmd.push(function() {
mobile_slots.push( googletag.defineSlot( “/1005424/_dPSv4_mob-all-article-bottom_(300×250)”, [300, 250], “pb-ad-78158” ).addService( googletag.pubads() ) ); } );

The post An Exercise For You to Practice Depth of Field Without Going Outside by Vickie Lewis appeared first on Digital Photography School.


Digital Photography School

 
Comments Off on An Exercise For You to Practice Depth of Field Without Going Outside

Posted in Photography


Climbing Wall Treadmill: Exercise Machine Rocks Your House

02 Dec

[ By WebUrbanist in Gaming & Computing & Technology. ]

rock wall interior rotating

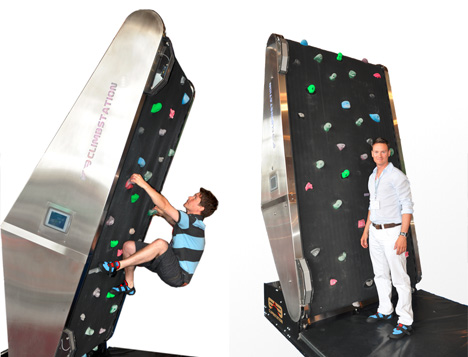
Far more exciting than a walking treadmill or elliptical machine, this infinite rock wall brings the challenges (and hard exercise) of scaling sheer cliffs right into your local gym or living room.

rock extreme tilt example

The Climbstation can be rotated between a slope of 15 degrees and negative 49 degrees, simulating everything from relatively generous slopes or dizzying upside-down climbing experiences.

rock wall climber demo

The device can also rotate through different slopes, speeds and durations on demand, in response to programmatic difficulty levels or in a pre-selected sequence. As in typical bouldering rooms at climbing wall centers, a mat placed below the device will cushion any fall.

rock wall slope tilt

rock wall example treadmill

Between climbs, users can swap out 90 holds that come with each machine between 600 potential positions, dynamically changing the landscape from one session to the next to keep things interesting and challenging.

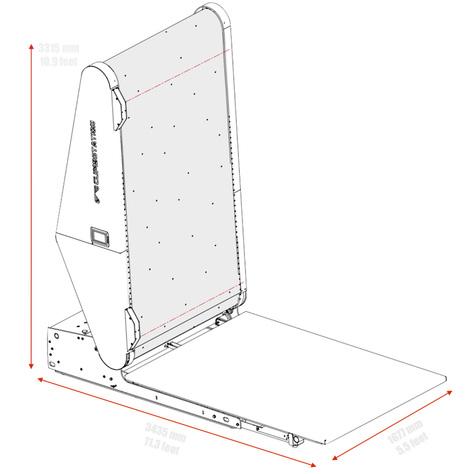
rock climbing treadmill diagram

rock wall gym version

The mid-five-figure price tag will be enough to put off casual users, but could also be sufficiently low for these to start showing up not just at the homes of the rich and famous but also at regional fitness centers – a great way for recreational climbers or professionals located far from mountains to train or simply stay in shape.

Share on Facebook


[ By WebUrbanist in Gaming & Computing & Technology. ]

[ WebUrbanist | Archives | Galleries | Privacy | TOS ]


WebUrbanist

 
Comments Off on Climbing Wall Treadmill: Exercise Machine Rocks Your House

Posted in Creativity


Composition Exercise: Frame Within a Frame

05 Oct

I teach a kids photography class (ages 11-15), and this week we started talking about composition. I don’t require a specific type or level of camera, so I have students shooting with DSLRs, as well as students with simple point-&-shoot models. Because of the wide range of cameras, I make this class a little less about the technical and a little more about how they see the world around them. I strive to make sure they understand the elements of exposure, the principles of lighting, and all of the other aspects of the craft that come into play when they push the button and capture a moment in time. Regardless of make and model, though, the one thing they all share is a viewfinder– a frame in which to compose and arrange those moments in time. The way that each of these young photographers grasps the concepts and applies them to their own world view is incredibly enlightening and fun to watch.

So, in class this week I explained that composition guides the viewer through the frame and answers the question, “What are you trying to say?” Put another way– “This is why I stopped and took this photo.”  Now that they are armed with another set of photographic fundamentals, I’m giving them a week or two to get comfortable with photographing the same subject different ways before giving them one of my favorite assignments of the semester– “A Frame Within a Frame.”

If the frame is your window on the world, composition is where you point it. The FWAF exercise basically pushes them to find boundaries within boundaries. On the one hand, that sounds pretty restrictive, and I suppose it can be. The flip-side, however, is that pushing them to compose within certain confines now will help unleash vast waves of creativity later. I tell them every chance I get that the rules of photography were made to be broken, but first they have to know what they are. Speaking of rules, the FWAF challenge has only one– no actual frames. That’s right– no posing your subject in the middle of a wheat field, along the railroad tracks, or any other overly cliche setting, while holding a big empty frame in front of them. I try, whenever possible, to shoot the assignments I give my students, and just about all of the images in this article were part of Frame Within a Frame exercises.

One of my favorite FWAF shots was one of those happy accidents where you don’t even realize what you’ve got until it’s off the camera and up on a bigger screen. I knew that mama lion had been pretty close, keeping a watchful eye over one of her growing cubs, but it wasn’t until I’d downloaded the images that I realized that I’d caught her attentive gaze perfectly framed between Junior’s two front legs.

frame-within-frame-01

See where I’m going with this? No literal frames were harmed in the creation of these photos. Anything that creates additional boundaries within the images effectively creates an additional frame, which then directs the viewer’s attention much more precisely where you want it to go.

This next image is a great example, not only of a frame within a frame, but of repetition as an interesting compositional element. A tighter crop of the artist at work would have been okay, I guess. We’d be able to make certain assumptions about what’s not in the photo– namely, the subject of her piece. By including it in my background, however, I not only created the additional frame, but also lead the viewer through the image from right to left, taking in the artist, her canvas, and her inspiration.

frame-within-frame-04

Once you get in the habit of looking for these extra frames you’ll start noticing them in all sorts of places. These boxers, for instance, are framed perfectly within the ropes of the ring. As a compositional tool, the added frame not only directs the viewer’s attention, but it also helps to minimize any distracting or non-essential elements from the photo.

frame-within-frame-03

Obviously, the frame within a frame is much more interpretive than literal. Doorways, windows, and mirrors– elements with clearly defined lines– can create great effects, but I enjoy seeing what my students do with the assignment when they are comfortable enough to ignore the obvious and go for something much more organic.

frame-within-frame-02

One of my favorite photography quotes comes from National Geographic photographer Jim Richardson, who says that “If you want to be a better photographer, stand in front of more interesting stuff.” One of the things that fascinates me about composition and exercises like this is how we push ourselves to not only stand in front of more interesting stuff, but to also photograph more interesting stuff in a more interesting way.

Try the Frame Within a Frame challenge and share your links in the comments section.


Post originally from: Digital Photography Tips.

Check out our more Photography Tips at Photography Tips for Beginners, Portrait Photography Tips and Wedding Photography Tips.

Composition Exercise: Frame Within a Frame

The post Composition Exercise: Frame Within a Frame appeared first on Digital Photography School.


Digital Photography School

 
Comments Off on Composition Exercise: Frame Within a Frame

Posted in Photography


A Simple Exercise on Working with Natural Light in Portraits

01 Apr

Today I thought it might be fun to share a little exercise that we feature in our Natural Light eBook (by Mitchell Kanashkevich) – both because it gives you a taste for the content but also because I think it’s a useful exercise to do to help you understand light and photograph portraits using it.

This exercise is particularly useful because one of the differences in shooting with natural light as opposed to artificial light is that with artificial light you’re able to ‘direct’ the light (by moving lights around your subject and changing how much those lights output).

When it comes to working with natural light we need to learn to direct ourselves and/or the subject in relation to the light source.

Rather than moving lights around… it is us (and the subject) that may need to be moved.

The exercise is simple:

Find a room with a window allowing fairly bright diffused (indirect) light.

Get your subject to move to different spots in relation to the window. Move around with the subject, take photos, and pay attention to what effect the movement of both of you has on the way that light makes the subject look.

For the eBook Mitchell did this exercise with his nephew. Below are the images and corresponding diagrams of where the subject was in relation to the window and below are descriptions of the shots, EXIF information and what Mitchell did and what impact that had on the shot.

3 directions window light

1. The subject is turned at approximately 45° towards the window.

Result: A very smooth progression of light to dark tones.

EXIF: 16-35@35mm, f/2.8, 1/125s, ISO 2000

2. Subject is at 90° or parallel to the window.

Result: Very harsh contrast between the side of the face close to the window and the side further away from the window.

EXIF: 16-35@35mm, f/2.8, 1/200s, ISO 500

3. The subject is at 90°, parallel to the window, with his head turned towards it.

Result: Light still works the same way, but instead of one side of the face being dark, the face is well lit and it is the back of my nephew’s head which is dark.

EXIF: 16-35@35mm, f/2.8, 1/125s, ISO 500

Mitchell also notes: Having a light source such as a window also gives you control over the intensity of light. The further away you are from the light source, the less intense it is. Less
intensity also means less contrast between light and dark.

I did this exercise recently with a family member and was fascinated with the results and was also reminded what an incredible variety of styles of shots that you can achieve – all in the one setting but by simply changing up where you position yourself and your subject.

Give the exercise a go and let us know how you go!

Get more exercises and teaching like this from Mitchell in his Natural Light eBook.

Post originally from: Digital Photography Tips.

Check out our more Photography Tips at Photography Tips for Beginners, Portrait Photography Tips and Wedding Photography Tips.

A Simple Exercise on Working with Natural Light in Portraits


Digital Photography School

 
Comments Off on A Simple Exercise on Working with Natural Light in Portraits

Posted in Photography