RSS
 

Posts Tagged ‘Environmental’

How to Create Environmental Portraits (Tips and Examples)

04 Apr

The post How to Create Environmental Portraits (Tips and Examples) appeared first on Digital Photography School. It was authored by Darren Rowse.

how to create environmental portraits

Are you looking to capture stunning environmental portraits?

You’ve come to the right place.

In this article, I’m going to share everything you need to know about environmental portrait photography.

And by the time you’re finished, you’ll be ready to create some beautiful portraits of your own!

Let’s get started.

What is an environmental portrait?

An environmental portrait is a photo taken of a person in a place that says something about who they are. It is often a place where they work, rest, or play.

environmental portrait woman behind counter

Why do I prefer environmental portraits?

Environmental portrait photography:

  • gives context to the subject you’re photographing
  • adds additional points of interest to compositions (though this is something you need to watch, as you don’t want to distract from your subject too much)
  • helps the subject relax
  • often gives the viewer real insight into the personality and lifestyle of your subject

Environmental portraits sit somewhere between the purposely posed shots of a studio portrait (environmental portraits are posed and are unmistakably portraits) and candid shots, which capture people almost incidentally as they go about their daily lives.

Now let’s turn our attention to some how-to tips for stunning environmental portraits:

Tips for beautiful environmental portrait photography

Capturing gorgeous environmental portraits can seem tough.

But there are actually a few simple ways to enhance your portrait photos, starting with:

Spend time getting to know your subject

man under archway

Before you select a location and start shooting, spend some time getting to know your subject.

Find out where they spend their time, what the rhythm of their life is like, and how they behave.

This will not only help you find appropriate locations but will also help you get a feel for the style of shots that might be appropriate for the session.

Plus, you’ll begin the process of helping your subject relax! If you can, you might even want to accompany your subject to some possible locations; that way, you can see both whether the location suits them, as well as how they behave and interact there.

Choose the right location

Sometimes a location chooses you – but on other occasions, you need to be quite deliberate and purposeful when making your choice. It can take a lot of searching.

You ideally want to find a location that:

  • says something about your subject. After all, that’s what this style of photography is all about.
  • adds interest to the shot. As I’ve written in previous tutorials, every element in an image can add or detract from the overall look. The environment in which you place your subject needs to provide context and interest without overwhelming the composition.
  • doesn’t dominate the shot. Sometimes the location can dominate the image so much that it distracts your viewer from your main focal point (i.e., the subject). So try to avoid cluttered backgrounds (and foregrounds) and colors that are too bright, etc. Keep in mind that you might be able to remove the distractions with clever cropping, depth of field, and subject placement.

Use props naturally

man with computer environmental portrait

Props can make or break an environmental portrait.

If your props are subtle and naturally fit in the environment, then they can be very appropriate and add to the image nicely.

But you’ll want to avoid any props that don’t quite fit or that distract the viewer.

The same goes for the clothes that your subject wears. Try to be true to the context without getting too outlandish.

Think about posing your subject

environmental portrait of woman painting

What sets an environmental portrait apart from a candid portrait is that you pose your subject.

(In truth, it’s a fine line between candid portraits and environmental portraits; you might end up doing a bit of both in any given shoot.)

Don’t be afraid to direct your subject to sit, stand, or act in a way that fits the environment. Some of the poses might seem slightly unnatural and dramatic, but it’s often these purposely posed shots that are more interesting and give a sense of style to your photography.

The expression on the face of your subject is also very important in environmental photography, and you should consider how it fits with the overall scene.

For example, if you’re shooting in a formal environment, it may not be appropriate to photograph your subject with a big, cheesy smile; you might prefer a more somber or serious look.

Ultimately, just mix it up to see what does and doesn’t work!

Deliberately choose your camera settings (especially your aperture!)

women laughing

There is no right or wrong way to set up your camera for an environmental portrait. It will depend completely upon the effect you’re after and the shooting scenario.

You might find that shooting at a smaller aperture (i.e., a larger f-number) will be appropriate as it’ll help keep the foreground and background in focus.

I generally shoot environmental portraits with a wider focal length to give the environment prominence in the shot.

Of course, that doesn’t mean you can’t shoot with a longer lens or with a large aperture and shallow depth of field. In the end, anything goes – plus, you’ll probably want to mix up your shots a little.

How to photograph environmental portraits: conclusion

Environmental portrait photography is a great way to create unique and beautiful images.

So the next time you’re doing portrait photography, try applying some of these tips.

You’ll love the results!

Now over to you:

Have you done any environmental portrait photography? What tips would you give other readers? Feel free to share your tips (and images!) in the comments below.

environmental portrait man with painting

The post How to Create Environmental Portraits (Tips and Examples) appeared first on Digital Photography School. It was authored by Darren Rowse.


Digital Photography School

 
Comments Off on How to Create Environmental Portraits (Tips and Examples)

Posted in Photography


How To Take More Creative Environmental Travel Portraits

06 Aug

The post How To Take More Creative Environmental Travel Portraits appeared first on Digital Photography School. It was authored by Kevin Landwer-Johan.

more creative environmental travel portraits

Including people in your travel photos creates a stronger sense of connection for anyone who views your photos. Environmental travel portraits add depth of interest to any album, presentation or book of travel images.

Adding a person to a landscape, cultural location, or market scene will almost always add appeal to the photo. Capturing locals engrossed in what they are doing can make for a more interesting picture. Stopping to chat with them and asking if you can take their portrait means a scene takes on a whole new dynamic.

Environmental travel portraits are photos of people involved in the setting they are in. They are usually connected in some way with the location. A regular portrait will typically be cropped tighter and contain little contextual information.

Karen woman cooking for environmental travel portraits
© Kevin Landwer-Johan Nikon D800, Lens 35mm f1.4, 1/160 sec., f/2.8, ISO 1600

This is an environmental portrait of a Karen woman cooking in her home. The composition contains visual information about her lifestyle and where she lives.

Here is a portrait of a Karen woman. We were in her village when I took this photo, but there’s no visual information to tell you this.

How To Take More Creative Environmental Travel Portraits
© Kevin Landwer-Johan Nikon D800, Lens 105mm, 1/125 sec., f/8, ISO 400

Connect with your subject for better environmental travel portraits

Don’t be a shy photographer. Connecting with people will often result in more interesting environmental travel portraits. Even if you don’t have a common language, you can still relate to people. Showing an interest in someone and what they are doing, you can build a connection. Choosing the right people to photograph provides you with a better opportunity.

I saw this guy on the streets in Bangkok selling his genuine crocodile skin wallets. He demonstrated to an interested tourist that they were real. To do this, he poured some lighter fluid on the wallet and put a flame to it. I set my camera and approached him, requesting he repeat the process. He was most obliging and played up to my camera.

How To Take More Creative Environmental Travel Portraits
© Kevin Landwer-Johan Nikon D800, Lens 20mm, 1/125 sec., f/4, ISO 400

When candid is a better option

When encountering people who are totally engrossed in what they are doing it’s best to not to interrupt them. This is when it’s best to remain separate and capture candid, or semi-candid photos. I rarely hide my camera, instead, I prefer to have it out in the open so people can be aware that I’m taking photos. Most people will pay no attention, especially when you’re in a touristic area.

For this photo, I wanted to capture the young boy advertising their goods at the top of his voice. He and the older man (I presumed it was his grandfather he was helping) were aware of my presence and that I was taking photos. I was able to do so without disrupting the action.

How To Take More Creative Environmental Travel Portraits
© Kevin Landwer-Johan Nikon D700, Lens 120mm, 1/800 sec., f/2.8, ISO 400

Framing your subject

Environmental travel portraits need to show something of your subject’s surroundings. Where you position your subject in the frame will influence how they look in their environment. As always, aim to fill your frame only with what is relevant to the photo you’re making. Compose so your subject looks connected to their surroundings.

Photographing this Akha woman picking coffee in northern Thailand, I chose to place her near the edge of the frame. I wanted to fill most of the frame with the coffee bush she was picking from. I also placed her further back from the camera and positioned myself, so there were coffee cherries closer to my lens. This helps draw your eye to the cherries and makes them more obvious.

How To Take More Creative Environmental Travel Portraits
© Kevin Landwer-Johan Nikon D700, Lens 24mm, 1/60 sec., f/5, ISO 800

Choosing the best lens for environmental travel portraits

The lens you use for environmental travel portraits will depend a lot on the location you are photographing in. Often a wider lens if more effective than a longer one because you’ll capture more of the location without being too far from your subject. Remember what Robert Capa said, “If your photos aren’t good enough, you’re not close enough.”

I used my 35mm lens to make this photo of a young French horn player. He was performing in a band during the Chiang Mai Flower Festival parade. Getting fairly close to him, I was also able to show other band members in my composition without including too many other distracting details in the area.

How To Take More Creative Environmental Travel Portraits
© Kevin Landwer-Johan Nikon D800, Lens 35mm, 1/5000 sec., f/1.4, ISO 400

Manage your depth of field well

A very shallow depth of field will not often show enough detail in the environment. Too much information can be excluded. Your aim is to include enough of the environment so it adds meaning to the portrait.

Too much in focus in an environmental travel portrait can mean your subject gets lost in the background. You must be aware of how sharp or how blurred your background is. Managing your depth of field well enables you to keep the person you’re photographing as the main subject. Done well, this will encompass enough background detail without it being distracting.

I made this portrait of a samlor (tricycle taxi) rider sitting in his cab. In the background is another samlor passing by. It’s blurred enough so it’s not distracting, but you can still make out what it is, so it adds to the photo.

How To Take More Creative Environmental Travel Portraits
© Kevin Landwer-Johan Nikon D800, Lens 50mm, 1/1250 sec., f/1.4, ISO 100

Wait for the right moment

Careful timing can really make a difference. Watch and observe the person you are photographing and how they are interacting with their environment. Look for patterns of movement and repetition. This can often help you pick the right moment to make your portraits.

For this photo of my friend on National Elephant Day in Thailand, I waited for the elephant’s handler to give the command for the elephant to kiss her. The other elephants and tables with food for them set the scene.

How To Take More Creative Environmental Travel Portraits
© Kevin Landwer-Johan Nikon D700, Lens 35mm f2, 1/100 sec., f/4.5, ISO 125

Always be aware of lighting

Light will add feeling to your environmental travel portraits when you use it well. Look at the type of lighting in the location where you’re making your portraits. Is it conducive to the style of the portrait you wish to make? Do you need to come back at another time of the day or night? Will adding some flash improve the portrait?

Often when you’re traveling, you can’t wait for the right light, so you must make the best use of available light. When the light at the location is not great, you need to get creative and add some using a flash or reflector.

For this night portrait of a Samlor rider, I was able to position him to make the most of the light in the street market behind him. I also used my flash to illuminate him and help catch a glimpse of the motorcycle passing behind him.

How To Take More Creative Environmental Travel Portraits
© Kevin Landwer-Johan Nikon D800, Lens 35mm, 4 sec., f/9, ISO 100

Make use of props when you can

Be sure to look around for items that may enhance your portraits. Including appropriate props will help make more interesting environmental travel portraits.

I’d asked this man if I could photograph him sitting outside his home in a small village in northern Thailand. As he went to sit down, he put his crutches inside, thinking I did not want to include them in the photo. I asked him if it was okay to have them in the picture too.

How To Take More Creative Environmental Travel Portraits
© Kevin Landwer-Johan Nikon D700, Lens 24mm, 1/125 sec., f/4.5, ISO 800

Conclusion

Be mindful of your surroundings and think about how you can make interesting pictures that tell a story. Who is this person, and how can I make a portrait that captures relevant information about their surroundings?

Please share other tips you have for creating environmental travel portraits, or some of your pictures in the comments below.

The post How To Take More Creative Environmental Travel Portraits appeared first on Digital Photography School. It was authored by Kevin Landwer-Johan.


Digital Photography School

 
Comments Off on How To Take More Creative Environmental Travel Portraits

Posted in Photography


9 Tips for Better Environmental Portraits

31 Mar

The post 9 Tips for Better Environmental Portraits appeared first on Digital Photography School. It was authored by Kevin Landwer-Johan.

Good environmental portraits tell a story. At a glance you will know something about the person in the picture. The best environmental portraits will provide a lot of visual information.

9 Tips for Better Environmental Portraits Kebab Chef in Istanbul

Kebab chef entertaining passers-by with his constant banter. Istanbul, Turkey. © Kevin Landwer-Johan

Here are 9 tips to help you create more illustrative pictures of people in their surroundings.

1. Do your research

Know your subject well. Not just who they are, but what they do. If you know who you’re going to be photographing, do some research and become informed about what they do.

At least have a conversation and show interest in them by asking questions. This will not only gain you insight, but your subject will appreciate you are showing interest in who they are.

Where they are located is important too. Know about the surroundings. If you’re not sure, ask questions. Hearing the answers, you may be surprised and learn things you didn’t know. Even if you are familiar with the area.

Copper Craftsman 9 Tips for Better Environmental Portraits

Copper Craftsman finishes a new piece as his father proudly looks on. Istanbul, Turkey. © Kevin Landwer-Johan

2. Be aware of the environment

Have all your senses working. Listen and watch what’s happening around. You may see things you want to include or that you don’t want in your pictures.

Move around and take photos from different places so you get alternative backgrounds.

Try to avoid any bright lights or other distractions within your composition. It’s important to fill the frame only with what is relevant to the story you are telling.

9 Tips for Better Environmental Portraits Mandalay Market Vendor

A vendor at Mandalay’s Ghost Train Market, Myanmar. © Kevin Landwer-Johan

3. Tell their story

Once you’ve chatted for a while, or at least observed keenly, tell their story.

Concentrate on what will communicate most visually about the person, where they are and what they are doing. This is the whole nature of environmental portraits.

Are they a quiet and reserved kind of person? Or are they a loud and boisterous character? Some people change when they get in front of a camera.

If they’ve been chatting away in an animated manner and freeze when you point your camera at them, it’s your job to help them relax. Frozen is not who they naturally are.

9 Tips for Better Environmental Portraits Tricycle Taxi Rider

Tricycle taxis in Thailand are called Samlor, which translates as ‘three wheels. The riders enjoy the camaraderie the job brings. ©Kevin Landwer-Johan

4. Connect with your subject

I know this is difficult for many people. The more you can connect with your subject, the better photos you will get.

Pleasant conversation builds confidence in people you want to photograph. They will be more interested in what you are doing and compliant if you show interest in them.

Sometimes you’ll want to give your subject some instructions to help the composition. If you’ve already connected with them they will be more receptive to your ideas.

9 Tips for Better Environmental Portraits Moken Sea Gypsie

This Moken sea gypsy was telling us stories of how he lost part of his arm in a fishing accident in the south of Thailand. © Kevin Landwer-Johan

5. Know your camera

Your subject is likely to lose interest in what’s happening if all they see is the top of your head as you peer down at your camera.

Preset your camera so you know the settings will be right. Do this as soon as possible so you will have time to concentrate on communicating with your subject and other important things.

Check that you have the best lens for the job on your camera ready to go.

9 Tips for Better Environmental Portraits Hmong Amputee

Hmong hill tribe man who is an amputee after having his leg blown off by a land mine on the Laos/Thailand border © Kevin Landwer-Johan

6. Make a deliberate choice of lens

Showing the surroundings is important. So is communicating with your subject while you are working.

If you have a telephoto lens on your camera, you’ll have to position yourself a long way from your subject to include enough of their environment.

With a medium to wide lens on you can be close enough and also include more of the setting. I love using my 35 mm f/1.4 lens on a full-frame body for environmental portraits. It allows me to be close enough to converse comfortably and still show a decent amount of background.

Be careful if you are using a lens much wider than 35mm as you will be at risk of distorting your subject.

Shan Waitress 9 Tips for Better Environmental Portraits

Shan waitress poses for a portrait at the entrance to the small roadside restaurant she works in near Mandalay, Myanmar. © Kevin Landwer-Johan

7. Control your depth of field

Making sure there’s sufficient detail visible in the composition is important.

If you’re a fan of taking photos with your aperture wide open, you may not make the best environmental portraits. Blurring out the background too much will not help you convey information.

Choose an aperture which provides a balance between too blurred and too sharp and distracting. Avoid extremes. This will help keep the main focus on your subject and enhance the story with what else is around them.

9 Tips for Better Environmental Portraits Akha Coffee Harvest

Akha woman harvesting coffee in north Thailand. © Kevin Landwer-Johan

8. Make good use of props

There’s not always an opportunity to make use of props, but if you can they can make a big impact.

Having your subject hold something significant can add to the story.

This Lahu man is a fabulous subject on his own and I have photographed him many times during our workshops. He likes to smoke tobacco in his bong, which adds even more visual interest and tells us more about him.

9 Tips for Better Environmental Portraits Lahu Smoker

Lahu Ethnic Minority man enjoys smoking tobacco in his bamboo bong near Chiang Mai, Thailand. © Kevin Landwer-Johan

9. Write good captions

A good caption will provide added detail that you may not be able to clearly convey in your photo. Informative captions help hold people’s interest by further stimulating their imaginations.

Offer a little more information about the person. This is another good reason to engage with them while you’re photographing them.

If you’re not clear on what to write, search the internet.

Recently I watched this documentary about the photographer Dorothea Lange. She is most well known for her work in the midwest USA during the Great Depression. The documentary emphasizes the need for the well-written captions she provided with her photographs.

9 Tips for Better Environmental Portraits Sea Gypsy

Moken sea gypsy fisherman biding his time on the bow of his boat waiting for a catch. © Kevin Landwer-Johan

Conclusion

Not all of these tips may be relevant each time you make environmental portraits. Make use of as many of them as you can to enhance your photography experience.

Make yourself a checklist with these tips and any others you can think of. Consult your list as you prepare to make your next series of portraits. This will help you grow as a photographer.

If you have any other helpful tips to offer about taking great environmental portraits, please include them in the comments below.

The post 9 Tips for Better Environmental Portraits appeared first on Digital Photography School. It was authored by Kevin Landwer-Johan.


Digital Photography School

 
Comments Off on 9 Tips for Better Environmental Portraits

Posted in Photography


Wildfire picture wins £3000 international Environmental Photographer of the Year Award

30 Jun

$ (document).ready(function() { SampleGalleryV2({“containerId”:”embeddedSampleGallery_1827965088″,”galleryId”:”1827965088″,”isEmbeddedWidget”:true,”standalone”:false,”selectedImageIndex”:0,”startInCommentsView”:false,”isMobile”:false}) });

The Chartered Institution of Water and Environmental Management (CIWEM) has announced the winners of its Environmental Photographer of the Year awards and given out £6000 (approx. $ 8000) in prizes as well as a job. The winner of the £3000 overall award is Swedish photographer Sara Lindstrom for a picture of a forest fire taken in Alberta, Canada.

Luke Massey took the £1000 Young Environmental Photographer of the Year award for pictures of a peregrine on a balcony in Chicago, and the Environmental Film of the Year, and £500, went to Sergiu Jiduc for a film called ‘The Karkoram Anomaly Project, Pakistan’ about dramatic climatic conditions that effect the Balti people in Pakistan.

SL Kumar Shanth from India won the Atkins Built Environment award that includes a year-long position of Photographer in Residence with design and engineering firm Atkins, while the Changing Climate award and £500 went to Sandra Hoyn and the People, Nature and Economy Award and £1000 went to Pedram Yazdani.

The winning images will be included in a 60-picture exhibition that will be held at the Royal Geographic Society in London from 29th June to 19 August 2016. The exhibition will then tour to Grizedale Forest, supported by Forestry Commission England, from 3 September 2016 until 1 January 2017. For more information on the exhibition and the awards visit the Environmental Photographer of the Year website.

Articles: Digital Photography Review (dpreview.com)

 
Comments Off on Wildfire picture wins £3000 international Environmental Photographer of the Year Award

Posted in Uncategorized


Shortlisted images from Environmental Photographer of the Year 2015 to go on display

04 Jun

London’s Royal Geographical Society is set to play host to an exhibition of the shortlisted entries of the 2015 Environmental Photographer of the Year competition. The exhibition, which opens for three weeks on June 22nd, will feature 111 of the best images as selected by the competition’s five judges. The ultimate winners will be announced at a ceremony on 25th June. Read more

Articles: Digital Photography Review (dpreview.com)

 
Comments Off on Shortlisted images from Environmental Photographer of the Year 2015 to go on display

Posted in Uncategorized


Atkins Ciwem Environmental Photographer of the Year 2014 shortlist

21 Jun

tuyet_trinh_do.jpg

From over 10,000 entries, the shortlist selection has been revealed for the 2014 Atkins Ciwem environmental photographer of the year competition. In its seventh year, the competition sponsored by the Chartered Institution of Water and Environmental Management (Ciwem) encourages entrants from around the globe to showcase work that ‘will inspire people around the world to start taking care of our environment’. See gallery

News: Digital Photography Review (dpreview.com)

 
Comments Off on Atkins Ciwem Environmental Photographer of the Year 2014 shortlist

Posted in Uncategorized


5 Tips for Better Environmental Portraits

11 Mar

Environmental portraits typically show the subject in their natural environment. They are different from traditional portraits in that they tend to show more of the character of the subject, rather than just the subject in front of a neutral background. Most people, unless they are professional models or natural hams, tend to stiffen up in front of the camera. Because your subject is in his or her natural environment, they tend to be more relaxed, resulting in better facial expressions and body language.

Environmental portraits are my favorite way to photograph people. I love it when I get a shot that makes the subject’s friends and family say ‘Oh yeah, he’s got you down!” In this article I’ll discuss five things I always keep in mind when taking environmental portraits.

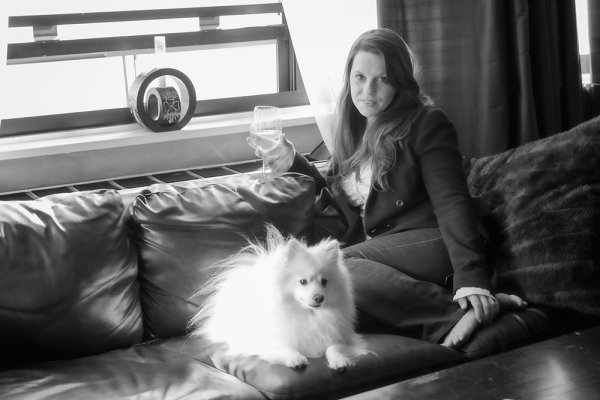
For this portrait, my client was very specific that she wanted to be captured in her apartment, just being who she is. It became quickly apparent that her dog was a very important part of that, so it was decided early that we would include him. EOS 5D Mark III with EF 24-70 f/2.8L IS II. 1/125 @ f/4, ISO 640.

For this portrait, my client was very specific that she wanted to be captured in her apartment, just being who she is. It became quickly apparent that her dog was a very important part of that, so it was decided early that we would include him. EOS 5D Mark III with EF 24-70 f/2.8L IS II. 1/125th at f/4, ISO 640

1. Do your homework

To properly photograph someone in their environment, you need to know your subject. You don’t have to be close friends, but generally speaking, when someone asks for an environmental portrait, you want to make sure you capture who they are. Ask what they have in mind. Ask what their hobbies are. If they want a portrait in their home, what’s their favorite spot in the house? What do they do in that spot? If it’s outside the home, where do they want to be photographed? Why? You need to become a bit of a reporter and sniff out the story. Then you need to illustrate it.

2. Get them talking

Now that you know a little about your subject, what they like to do, and where they like to do it, it’s time to point a camera at them.  This can be the “make-or-break” point of the shoot. If your subject is uncomfortable in front of the camera, this will come across in the images, unless you find a way to get them to relax. One of the easiest ways to get them to relax is to start a conversation. Make them forget that you are taking their photo by asking them about themselves. Have them talk about the spot they’ve chosen for the portrait, their hobbies, their families, their job – anything to get their mind off of the camera in front of them.

In the portrait below, my subject lives in the shadow of this bridge, and is most definitely a New Yorker. This was an impromptu session after a private tutoring session and she was reluctant to let me point the camera at her. She wanted to learn photography herself, so I wrapped a lesson into the banter and pretty soon she was just talking photography and forgetting I was snapping images.

My subject lives in the shadow of this bridge, and is most definitely a New Yorker.  This was an impromptu session after a private tutoring session and she was reluctant to let me point the camera at her. She wanted to learn photography herself, so I wrapped a lesson into the banter and pretty soon she was just talking photography and forgetting I was snapping images.  EOS 5D Mark II with EF 70-200 f/2.8L IS II. 1/200 @ f/4; ISO 100.

EOS 5D Mark II with EF 70-200 f/2.8L IS II – 1/200th at f/4,  ISO 100

3. Use Live View (if your camera has it)

This plays right along with item number two above.  Most people tense up when you raise the camera to your eye, waiting for the image to be taken. Some may even inadvertently shut their eyes, expecting a flash. If you can use Live View on your camera, you can get it away from your face. Your subject will be looking at you, and not at the camera, and will not necessarily anticipate you pressing the shutter button. This works especially well with cameras that feature articulating screens. It can be helpful to mount the camera on tripod as well, using a remote release to trigger the camera.

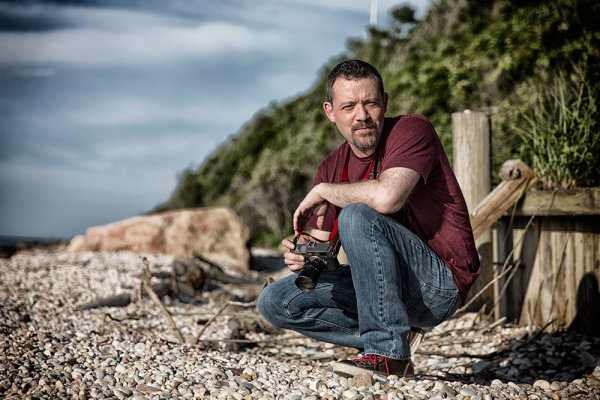
This is an image of my friend Chris (below), taken while he was supposed to be shooting me and my kids. We were discussing what shots we wanted next when I clicked this, using Live View to frame the shot and focus.

This is an image of my friend Chris, taken while he was supposed to be shooting me and my kids.  We were discussing what shots we wanted next when I clicked this, using Live View to frame the shot and focus. EOS-1D X with EF 24-70 f/2.8L II. 1/2500 @ f/2.8; ISO 100.

EOS-1D X with EF 24-70 f/2.8L II – 1/2500th at f/2.8, ISO 100

4. Modify the light

I try to go as minimal as possible with gear for environmental portraits, using the natural light at the location. However, there are always times where the light is less than optimal and you need to modify it in some way. This can be as simple as adding a reflector in a strategic location, or setting up a flash in a soft box or umbrella. It will all depend on what the available light is like and the look you are going for. One thing I always try to do is keep the light looking as natural as possible.

This was a business portrait, but my client wanted more than a simple headshot. It was taken late in the day, meaning I had to create my own light. She wanted her team in the background working, to show when you worked with her, she had a whole team backing her up. I used a Canon 430 EX II to light the background, aiming it off a white wall and the ceiling, out of the frame. I then used a Canon 580 EX II off camera in a Westcott Apollo 28″ soft box to light my client. I adjusted the intensity of the lighting so that the background light was at a 2:1 ratio with my main light.

This was a business portrait, but my client wanted more than a simple headshot.  It was taken late in the day meaning I had to create my own light. She wanted her team in the background working, to show when you worked with her, she had a whole team backing her up. I used a Canon 430 EX II to light the background, aiming it off a white wall and the ceiling, out of the frame. I then used a Canon 580 EX II off camera in a Westcott Apollo 28" soft box to light my client.  I ratio'd the lighting so that the background light was at a 2:1 ratio with my main light. EOS 5D Mark II with EF 24-105 f/4L IS. 1/100 @ f/4, ISO 400.

EOS 5D Mark II with EF 24-105 f/4L IS –  1/100th at f/4, ISO 400

5. Don’t be afraid to shoot tight

While it’s true than an environmental portrait normally means showing some of the area around your subject – the environment – you can get close and still show your subject’s character.  Take an element of your subject’s hobby, and show them participating in the hobby. If they’re a model builder, you could do a tight shot of them applying glue or assembling the pieces.  This is your chance to be creative, trying different angles, focusing on different aspects of  their personality and character.  Emphasize features that stand out, in a flattering way, if that’s the goal. Find out what makes the person in front of your camera special, and capture it!

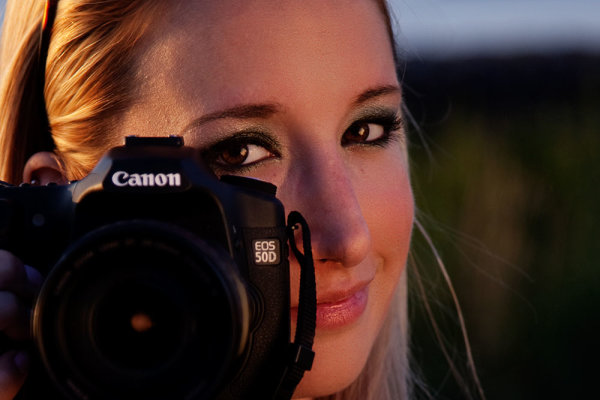
Here's my subject from the shot in front of the bridge. She's a photographer as well now, but back then she was just a hobbyist who wanted to know more about her camera. I used the beautiful sunset light I was getting, and set up a reflector to camera right to bounce the light back into her face.  I wanted her peeking out from behind her camera, illustrating that she's into photography. EOS 5D Mark II with EF 24-105 f/4L IS. 1/250 @ f/4, ISO 100.

EOS 5D Mark II with EF 24-105 f/4L IS – 1/250th at f/4, ISO 100

This is the same girl as the shot in front of the bridge. She’s a photographer as well now, but back then she was just a hobbyist who wanted to know more about her camera. I used the beautiful sunset light I was getting, and set up a reflector to camera right to bounce the light back into her face. I wanted her peeking out from behind her camera, illustrating that she’s into photography.

Do you have any additional tips you’d add to this list? Please share in the comments below.

For more portrait photography tips check out these articles:

  • How to Create Great Environmental Portraits
  • 10 Techniques for Amazing Portraits
  • How to Choose the Perfect Portrait Lens
  • Portraits: Striking The Pose – a dPS ebook
  • Portraits Lighting The Shot – another dPS ebook

The post 5 Tips for Better Environmental Portraits by Rick Berk appeared first on Digital Photography School.


Digital Photography School

 
Comments Off on 5 Tips for Better Environmental Portraits

Posted in Photography


How to Create Great Environmental Portraits

27 Oct

Interested in learning how to take better Environmental Portraits? If so, do yourself a favour and watch this video of a training session by photographer David Handschuh and what he has learned about the topic from the last 20 years of his doing environmental portraits.

Thanks to the team at BHPhoto for putting this video out there.

Further Reading on Environmental Portraits:

  • How to Create Portraits that Captivate and Intrigue
  • An Introduction to Environmental Portraits

Post originally from: Digital Photography Tips.

Check out our more Photography Tips at Photography Tips for Beginners, Portrait Photography Tips and Wedding Photography Tips.

How to Create Great Environmental Portraits

The post How to Create Great Environmental Portraits by Darren Rowse appeared first on Digital Photography School.


Digital Photography School

 
Comments Off on How to Create Great Environmental Portraits

Posted in Photography


Recycled Cargo Container Bridge Spans Environmental Gap

02 Feb

[ By Delana in Architecture & Cities & Urbanism. ]

ariel sharon park econtainer bridge

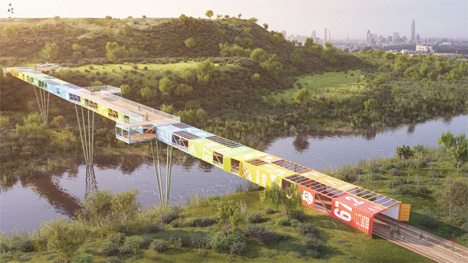
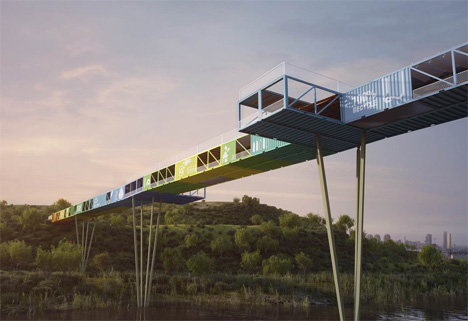
Ariel Sharon Park in Israel is planned to be a stunning ecological retreat in the middle of a densely populated urban area. The site was once an enormous landfill, but today it is being turned into the largest urban park to be built anywhere in the world in the last century. One of the centerpieces of this oasis will be the ECOntainer Bridge, a 160-meter-long bridge made of repurposed shipping containers.

recycled shipping container bridge israel

In keeping with the ecological theme of the new Ariel Sharon park, the bridge – designed by Yoav Messer Architects – is composed of recycled waste. These shipping containers were among the 800,000 or so discarded every year. The architects turned these wasted cargo containers into a beautiful and functional space.

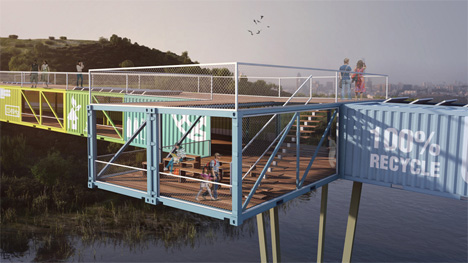
econtainer bridge cantilevered lookout

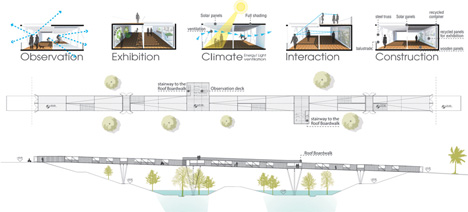
Far from being simply a conveyance over a body of water, the ECOntainer Bridge is an attraction unto itself. It features numerous observation points and exhibition spaces, making it into a fascinating space rather than just a way to get from one side of the park to the other. Available only to pedestrians and light vehicles, the bridge will be a tranquil structure free of cars.

ECOntainer bridge drawings

(all images via: designboom)

Thanks to the modular nature of the cargo container bridge, most of the construction can be done off-site. The containers also lend themselves well to quick and easy repairs and upgrades. When work must be done on one part of the bridge, removing and swapping out parts is much quicker and simpler than it would be with a conventional structure.

Share on Facebook


[ By Delana in Architecture & Cities & Urbanism. ]

[ WebUrbanist | Archives | Galleries | Privacy | TOS ]


WebUrbanist

 
Comments Off on Recycled Cargo Container Bridge Spans Environmental Gap

Posted in Creativity


Correcting For Under Exposure and Boosting Dynamic Range with an Environmental Portrait in Lightroom 4

17 Dec

Introduction

This tutorial is a demonstration of the SLR Lounge Lightroom 4 Preset System. With over 200 presets, the LR4 Preset System has been critically acclaimed as the most powerful and intuitive preset system available for Lightroom 4. DPS users can get 10% off by using the DPS10 coupon code upon checkout. Click the link above to learn more/purchase.

Overview

Often times when shooting environmental portraits we “expose to the right”, meaning we are pushing our highlights to the right of the histogram without blowing out too much of our highlights, or clipping too much of our shadows. Depending on the type of scene, this can lead to what looks like an underexposed image directly out of the camera since we are trying to preserve the majority of our highlight detail. However, since most of the range in the highlights and shadows are still retained, we can bring it out through post production. In this step-by-step tutorial, we will demonstrate how to not only correct the exposure in this type of portrait, but also how to increase its dynamic range.
Lightroom 4 Preset System Mixology

This effect can be achieved quickly in under a minute with the SLR Lounge Lightroom 4 Preset System, If you don’t own the preset system, please skip to Step 1 to learn how to do it manually.
1. MY MIXOLOGY > 25 HDR Strong
2. BASE ADJUSTMENTS > 23 Light Soften Skin (Detail)
3. BASE ADJUSTMENTS > 34 Medium Boost (Contrast)
4. BASE ADJUSTMENTS > 62 Light Noise Reduction (Noise Reduction)
5. Add +.30 Exposure
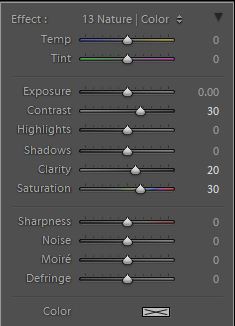
6. 13 Nature | Color Adjustment Brush
7. 12 Sky | Cloud | Ocean Adjustment Brush

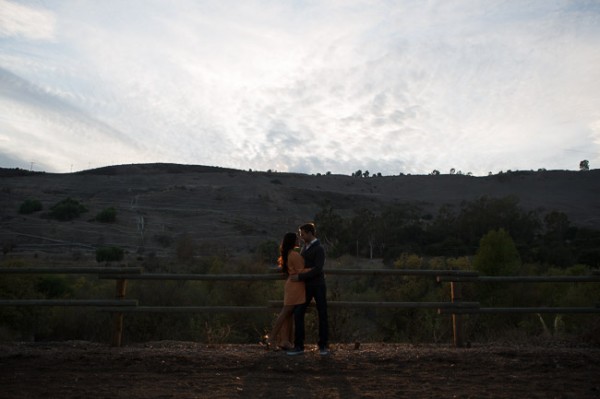
The Original Image

Step 1. Applying our Basic Adjustments

What we usually recommend when working in Lightroom is to work your way down the Develop Module Panels starting from the Basic Adjustment Panel.

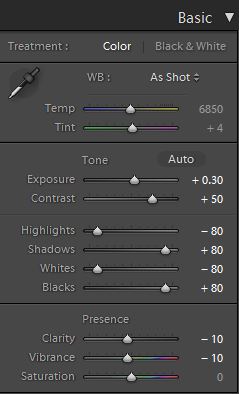
Because the image is underexposed, one of the first steps that we need to do is to correct the exposure by adding +0.30 stop to Exposure. In order to increase the dynamic range, we are also going to bring down the Highlights and Whites by -80 and lift up the Shadows and Blacks by +80. When applying this technique to your own photos, you may be better off dialing in your Highlights, Whites, Shadows and Blacks and then adjusting the Exposure as necessary.

At the same time, when we increase the dynamic range, the contrast flattens out, so we do need to add Contrast to compensate.

Because we are working with a portrait, we want to have nice, smooth skin tone that is not overly saturated, so let’s decrease Clarity and Vibrance by -10. Your Basic Panel adjustment and image should look like the following:

02 Basic Adjustments

Step 2. Adding Additional Contrast via Curves

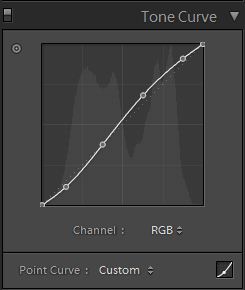
The image can still use some more contrast, so let’s add a subtle contrast-boosting “S” curve.

03 Tone Curve

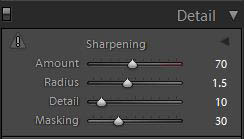
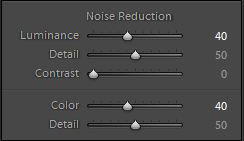
Step 3. Sharpening and Noise Reduction

With the SLR Lounge Preset System, we typically apply the following Sharpening setting to our image:

Detail

We are also going to add Noise Reduction because we to smooth out any noise that is introduced from the dynamic range boost. We use this setting for Noise Reduction:

Noise-Reduction

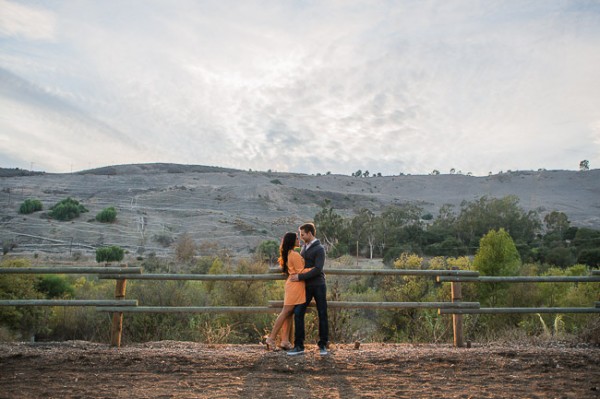
Here is how your image should look like after applying all of these adjustments.

04 Detail

Step 4. Using Adjustment Brushes for Sky and Landscape

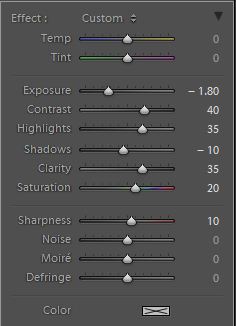
Even though we boosted the dynamic range of this image, the sky is still overblown. The LR4 Preset brush we use for the sky is called “Sky | Cloud | Ocean.” This brush lowers the exposure, highlights, and shadows, and increases contrast, clarity, and saturation in the sky. Here is our settings for this brush.

Sky Cloud Ocean Brush

Finally, we want to add more midtone contrast and saturation to the foliage in order to make them pop. Here is how the settings look like for the “Nature | Color” LR4 Preset Brush that we applied to the landscape. This also increases contrast, clarity, and saturation.

Nature Color Brush

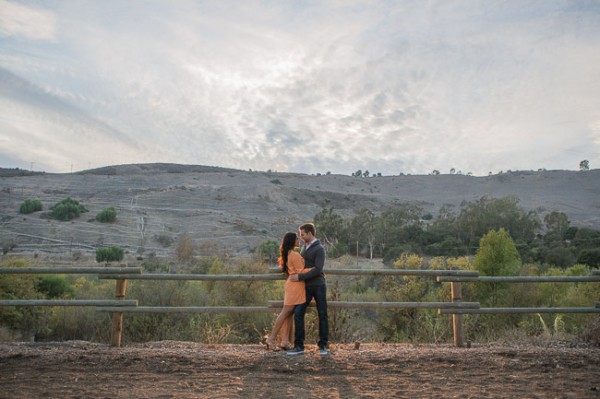
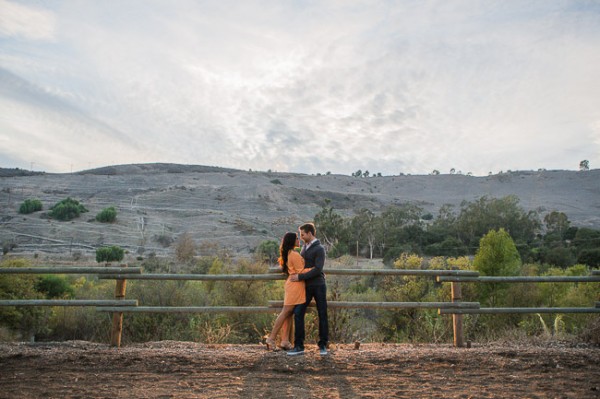
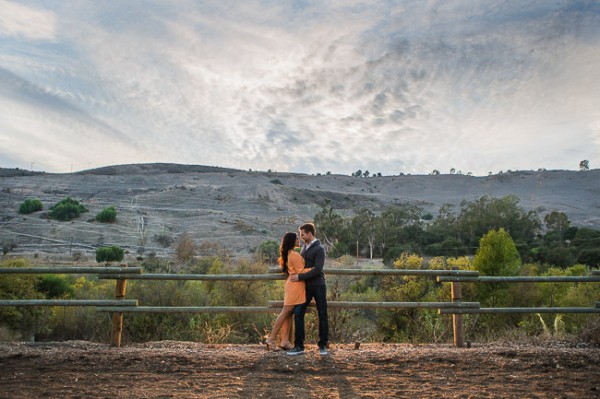
Now that all our adjustments have been applied, let’s take a look at the before and after images to compare the original underexposed image against the final image.

ORIGINAL

HIGH DYNAMIC RANGE PORTRAIT

05 Finished

The Lightroom 4 Preset System

The SLR Lounge Lightroom 4 Preset System is designed to enable users to achieve virtually any look and effect within 3-5 simple clicks. From basic color correction, vintage fades, black & white effects, tilt-shift effects, faux HDR, retouching, detail enhancing, and so much more. The sky is the limit with what has been dubbed the most powerful and intuitive preset system available. Click the link above to learn more/purchase.

Post originally from: Digital Photography Tips.

Check out our more Photography Tips at Photography Tips for Beginners, Portrait Photography Tips and Wedding Photography Tips.

Correcting For Under Exposure and Boosting Dynamic Range with an Environmental Portrait in Lightroom 4


Digital Photography School

 
Comments Off on Correcting For Under Exposure and Boosting Dynamic Range with an Environmental Portrait in Lightroom 4

Posted in Photography