RSS
 

Posts Tagged ‘Element’

Lensrentals tears down a Canon RF 100-500mm F4.7-7.1 lens to solve the mystery of a cracked element

22 Jan

Roger and Aaron are back at it again for Lensrentals, this time with a teardown of a Canon RF 100–500mm F4.7–7.1 lens with a little secret inside.

As Roger tells it, Lensrentals has come across ‘several’ copies of Canon’s RF 100–500mm F4.7–7.1 lens with a cracked element inside. He believes this crack occurs during shipping, but notes that ‘if you’ve ever rented from [Lensrentals], you know how we pack […] Nothing should break in shipping.’ As such, he did what he usually does when he can’t get an answer from the outside, he tore the lens down (with the help of Aaron, of course).

The large crack, seen through the rear elements of the lens. Click to enlarge.

Upon taking a closer look, Roger suspected the cracked element was inside the image stabilization module of the lens, due to the crack appearing to move when the lens was shifted around. He explains that while Canon was known for physically locking down IS units in its EF lenses, that practice has become less commonplace with RF lenses due to improved engineering measures. Naturally, he assumed this lack of lockdown could be the culprit for the cracked element in shipping.

As it turns out though, that wasn’t quite the case.

Roger and Aaron went through the usual routine, starting at the front of the lens. Despite easily removing the filter barrel and front optical group, they hit a roadblock with the light baffle inside. So, ‘like the cowards [they] are,’ Roger and Aaron turned the lens around and started to take it apart from the lens mount side.

A close-up view of the ribbon cables neatly tucked away inside the barrel of the lens.

Along the way, the pair ran into the usual array of screws, ribbon cables and sensors. But it wasn’t all that bad to take apart, thanks to the lens’ modular construction. Roger particularly appreciated how Canon managed to integrate almost all of the ribbon cables into the barrel of the lens, meaning there was little need to trace and mark down where every cable was supposed to be routed to:

‘I get accused every so often of being a Canon fanboy (or Sony, or Sigma, etc.). I’m not, but I’ll readily admit I’m a Canon lens construction fan; these are a pleasure to work on compared to most brands.’

A comparison of how the internals of the lens look when zoomed out versus zoomed in. Click to enlarge.

With the rear barrel off, Roger and Aaron took a look at the intricacies of the zoom section of the lens. Roger notes ‘everything moves in an impressively complex fashion’ and is almost overbuilt in some areas. Specifically, Roger points out that the front barrel moves along six heavy-duty rollers (as opposed to three in most other zoom lenses), each of which has custom-fitted nylon bearings to ensure the tightest fit possible while still offering a smooth glide. To this, Roger says ‘This is why nice things cost more; a lesser lens has three same-size small nylon bushings over screws.’

A close-up of one of the nylon bushings precisely fitted to the guide rail. Click to enlarge.

Another detail Roger noticed is that the two optical groups responsible for zoom operate independent of one another. That is, rather than both optical groups extending together with the barrel, the rear zoom optical group moves into the barrel, but isn’t doing so at the same rate as the front optical group.

From there, it was on to the inner barrel to see if the duo could get to the broken element. Before getting to the IS module though, Roger noted the use of springs to hold the rear baffle in place. He says Canon has been using more and more tensioning springs in its lenses over the years, ‘which suggests they originally thought it was a good idea, found out they were correct and increased usage.’ This particular lens has ‘over a dozen springs.’

A look at the tensioning springs used to hold the rear baffle tight. ‘It’s a complex little bit of engineering for a baffle,’ says Roger. Click to enlarge.

Eventually, Roger and Aaron hit the IS module, which Roger describes as ‘a pretty robust unit.’ He elaborates:

‘In older lenses, we sometimes saw IS units that were encased in a ‘cage’ of plastic bars, which broke sometimes. This is not that at all, it’s heavy-duty interlocking plastic shells with multiple screws and tension springs. We could (OK, we did) shake the heck out of it. It just rattled a bit, but there was nothing but solidness here.’

A close-up view of the ‘robust’ IS unit inside the RF 100-500mm F4.7-7.1 lens. Click to enlarge.

However, as you can see in the above image, there was no crack in sight. So it was on to more disassembling to get to the problematic element. After removing countless cams, spacers, screws and more, Roger and Aaron were able to find the cracked element — a thin, single element that sits right behind the aperture assembly and is also the forward focusing element.

Note the aperture assembly in front of the cracked element. Click to enlarge.

Still confused as to how the element cracked, the pair measured and tested everything around the element and determined there’s no way it could’ve impacted anything inside the lens. So, what could’ve caused it to crack? Roger doesn’t really know.

In his conclusion, Roger says:

‘My first thought, given that it’s winter, was perhaps temperature shock, moving from sub-zero trucks to warm indoors or something. But I’ve asked several people more knowledgeable than I and none think that’s a possibility. The ones that cracked are all early copies from a similar serial number range, perhaps there were some flawed elements early on. Maybe it’s just a statistical anomaly; we have a lot of copies and stuff happens. Or maybe it’s something we do or something with shipping. Nobody else has reported this. It’s worth looking into further, there are a number of things we’ve noticed before anyone else just because we have a lot of gear and a lot of repairs and inspections. But it may be an oddity that never happens again.’

Whatever the case, Lensrentals has sent all of its data and broken lenses to Canon, who already has a team assigned to more thoroughly investigating the issue. Roger says ‘Canon is always proactive about investigating these things and [is] one of the few companies willing to publicly say when they actually have a problem.’

Broken element aside, Roger says the rest of the teardown is what he’s come to expect from Canon RF L series lenses:

‘It’s filled with very robust construction, neatly and clearly laid out in a modular manner. It’s a very well-built and sturdy lens with cutting edge technology.’

To conclude, we’ll let Roger’s Rule of Broken Parts speak for itself: ‘the hardest to get to part is the one that’s broken.’

Articles: Digital Photography Review (dpreview.com)

 
Comments Off on Lensrentals tears down a Canon RF 100-500mm F4.7-7.1 lens to solve the mystery of a cracked element

Posted in Uncategorized


Manfrotto unveils Element Carbon entry-level carbon fibre tripod range

09 Oct

Popular tripod and accessory maker Manfrotto has just revealed a new range of entry-level carbon fibre tripods that it hopes will attract photographers looking for good quality gear at a slightly more affordable price. The two new Element Carbon tripods are aimed at travel photographers and come in two sizes with payload recommendations of 4kg/8.82lb and 8kg/17.64lb.

The three-position carbon fibre legs feature twist locks, and the larger of the two has a detachable leg that can be fitted to the centre column to form a full-sized monopod. The ball-and-socket heads that come with the legs are made from aluminum and use an Arca-style quick release plate.

The maximum height of the Manfrotto Element Carbon tripods is 143cm/56.3in for the small version and 164cm/64.57in for the large one, and they weigh 1050g/2.3lb and 1400g/3.08lb, respectively. The new tripods will be priced at £175 and £200—US pricing has yet to be released. For more information, visit the Manfrotto website.

Press Release

INTRODUCING THE NEW MANFROTTO ELEMENT CARBON

Fast Setup. Perfect shot.

  • Smart traveller tripods for photographers who want to learn, experiment and travel free
  • Lightweight on your shoulders, stable on the ground.
  • Essential design ensures instant set up for an enjoyable shooting experience

Manfrotto, world leader in the photography, imaging equipment and accessories industry, presents Manfrotto Element Carbon. The Manfrotto Element Carbon tripods are the perfect fit for travel photographers who are just starting out and enthusiasts.

The two new Element Carbon traveller tripods are reliable, lightweight and easy to carry. Both feature a compact and sturdy carbon fibre construction that makes them strong but still very portable. The three leg-angle positions mean they are highly versatile so they are perfect for experimenting with all kinds of creative shots. The twist lock mechanism enables photographers to get into the right position fast, in a few, easy moves, while the aluminum ball head is designed to deliver the fast movement when framing and a firm lock for setting equipment up exactly as you need it. The ball head mounts an Arca-type quick release plate with a 1/4″-20 camera screw on top that ensures equipment is balanced even when using zoom lenses.

In addition, the Element Traveller Carbon Big Tripod features a detachable leg that, when removed and attached to the centre column, becomes a full size lightweight monopod.

The Element Carbon Tripods have a payload of 4kg on the small tripod, and 8kg on the big tripod and feature a branded Manfrotto bag, an additional set of spike feet (big tripod only) and an Allen key to fix and tighten your gear.

The Element Carbon Tripods are available from £174.95.

For more information, please visit www.manfrotto.co.uk

Articles: Digital Photography Review (dpreview.com)

 
Comments Off on Manfrotto unveils Element Carbon entry-level carbon fibre tripod range

Posted in Uncategorized


How to Easily Add a New Element to Your Image Using Photoshop

09 Aug

This is an article for beginners in Photoshop. You will learn how to simply add an element to your photo and transform a daylight image into a nighttime one.

Open your selected images in Photoshop

First thing you want to do is select a photo of a mountain (in raw format). For that, open Photoshop then go to File > Open, it will open a window where you can select the photo that you want. Here we select raw file of the mountain:

Add element using photoshop 01

Raw adjustments first

Because we opened a raw file it is going to pop up in Adobe Camera Raw and we are going to retouch it to make it look like night first. Let’s set the White Balance towards the blue, so move the Temp slider to 4150. Then you want your Exposure to be very low so it looks dark, try -1,90, lower your Highlights to -84, add some Contrast to +39, boost the Blacks to +28, and lower the Whites to -46. Basically bring down the bright parts and boost the darker parts to give the image a night mood.

Add element moon photoshop 02

Now click on the sentence under your photo: ProPhoto.. and select Open in Photoshop as a Smart Object.

Add element photoshop 03

Open the element you want to add

Once you have done that you can come back and open an image or element to add to the first image. We are going to select a moon that we want to add to this mountain. Go to File > Open and select one photo of a moon in jpg.

Add moon photoshop 04

Arrange your workspace

You should have the photo of the moon and the mountain in tabs on the top of your Photoshop interface. If you don’t see that, you can go to Window > Arrange > Consolidate all tabs:

Add moon photoshop 05

For this tutorial we need a workspace with two windows on the right, one is to show Layers and one is for Properties. For that you need to select “3D” from the pull-down menu for Workspace in the upper right corner.

Add moon photoshop 06

Move the moon or element onto the mountain image

Go to your moon photo and grab the Move tool, it is the first icon on your left side (tools palette), the keyboard shortcut is V.

Add moon photoshop 07

Using the Move tool you need to click on the moon, hold your mouse button, drag it over to the tab of the mountain and let go of the mouse to drop it.

Add moon photoshop 08

Blending the images together

You can see that we have black around the moon still, so we are going to blend that out. In the layer window there are different options for Blending Modes, For this one we are going to use Screen. Pull it down and select Screen from the options.

Add moon photoshop 09

That took most of the black out.

Resize and place the element

To make the moon even bigger, go to Edit > Free Transform.

Add moon photoshop 10

Using the shift key to maintain its proportions, you can extend the moon by grabbing the corner and pulling it down.

Add moon photoshop 11

You can also move the moon or your element around, and see where you want to put it. It looks pretty cool already but now we are going to get into masking. For this you will need to click on the Eye icon next to the moon layer number (to turn it off) and click on the layer of the mountain to select it.

Add moon photoshop 12

You should see this now.

Select the Quick Select Tool (W on your keyboard) and drag your mouse over the sky to select it.

Add moon photoshop 13

Turn the moon layer back on and click on the little square icon at the bottom to create a layer mask (shown in red below).

Add moon photoshop 14

This is going to create a mask and because we have an active selection, a part of the moon is now hidden.

Add moon photoshop 15

If you want to reposition the moon you just have to select the moon layer and click on the little chain on the side to unlink the image of the moon from the mask.

Side note: if you make a mistake you can select Cmd/Ctrl+Z to go back or undo the last step.

PHOTO 16

Fine adjustments

You can see that there is a difference of color around the moon because of the layer, so to fix grab the Brush tool. (hit B for brush on the keyboard) or the select the Brush on the tool palette).

PHOTO 17

Make sure that the opacity is at 100% and that black is your foreground color. Right-click and set the hardness to zero. This makes your brush very soft and you can brush over the white to remove it.

Side note: Click on the Control and Alt keys to make your brush or any tool in Photoshop smaller or bigger.

Add moon photoshop 18

Add moon photoshop 20

Here you can see where I painted on the mask.

Finished!

Add moon photoshop 19

There you go! You have added a moon to your landscape!

I hope you liked this article and you feel more comfortable using Photoshop so you can add the moon or another element into your landscapes and create this cool effect.


If you enjoyed this tutorial and want to learn more about how to use Photoshop, check out Serge’s course Photoshop for Photographers 2017. Use the special promotional code – DPS65 – to get 65% off as a dPS reader!

The post How to Easily Add a New Element to Your Image Using Photoshop by Serge Ramelli appeared first on Digital Photography School.


Digital Photography School

 
Comments Off on How to Easily Add a New Element to Your Image Using Photoshop

Posted in Photography


PanoMoments cleverly adds the element of time to 360-degree images

14 Nov

PanoMoments’ ‘360-degree living photos’ are a kind of mashup between 360-degree images and Apple’s Live Photos. It’s not quite video, and it’s not a static image: PanoMoments can be created using any robotic panorama head (though the company is producing a specialized one), uploaded to their website for conversion and viewed on the web, with a VR headset or on a mobile device. Varying the time it takes for the device to complete a full rotation gives the resulting product a ‘live photos’ feel or a more time-lapse effect. 

Click to view this PanoMoment. Note that you will need to be running Google Chrome version > 52.x or viewing on a modern Android/iOS smartphone.

The process for creating a PanoMoment begins with the camera of your choice (ideally a larger sensor ILC) and a circular fisheye lens. Using PanoMoments’ PanoCatcher Loop or any panorama head, the camera is rotated 360-degrees while capturing at least 120 images. Convert your images to equirectangular format, upload them to PanoMoments.com and voila – you’ve got a PanoMoment. You can upload up to 20GB worth of images for free, while a ‘Pro’ membership will get you 500GB.

At the moment, PanoMoments’ creators are looking for funding through Kickstarter to help with building costs. Currently, a $ 270 pledge will get you a PanoCatcher Loop along with a 1 year Pro membership.

Head over to their Kickstarter page to learn more and see additional PanoMoments.

Articles: Digital Photography Review (dpreview.com)

 
Comments Off on PanoMoments cleverly adds the element of time to 360-degree images

Posted in Uncategorized


Venus Optics launches Loawa 105mm F2 with apodization element

12 Mar

$ (document).ready(function() { SampleGalleryV2({“containerId”:”embeddedSampleGallery_2207710493″,”galleryId”:”2207710493″,”isEmbeddedWidget”:true,”standalone”:false,”selectedImageIndex”:0,”startInCommentsView”:false,”isMobile”:false}) });

Chinese lens manufacturer Venus Optics has announced a portrait lens that uses an apodization element and dual diaphragms to produce better looking out-of-focus highlights. The company says that the apodization element in the new Laowa 105mm F2 STF acts as a radial gradient filter that becomes darker towards its outer edge. This graduation of tone is said to help produce smooth tonal transitions in out-of-focus discs. The element works in conjunction with a 14-bladed diaphragm that Venus Optics says forms a constantly circular aperture directly before the light meets the main second aperture, which still determines the f-number and the depth of field.

This approach is very similar to the one used in the Minolta (and, more recently, Sony) 135mm STF F2.8 [T4.5] lens.

The lens uses 11 elements arranged in eight groups and includes a single forward element that has a high refractive index and three made from low dispersion glass. The company claims that this design is ‘proven to deliver images with extreme sharpness and limit the chromatic aberrations at its lowest.’

The all-metal lens will be available in mounts for Canon EF, Nikon F, Sony FE, Pentax K and Sony A cameras. The Loawa 105mm F2 STF will cost $ 699. For more information visit the Venus Optics website.


Press release:

Anhui China, Mar 10, 2016 – Venus Optics, the Chinese camera lenses manufacturer who had launched the world’s Widest 1:1 Macro lens last June, has just released another extraordinary lens, Laowa 105mm f/2 (t/3.2) Smooth Trans Focus Lens for DSLR cameras.

The new Laowa 105mm f/2 Smooth Trans Focus Lens incorporates an unique optical design with an apodization (APD) element next to the aperture. The APD element resembles the function of an ND filter which becomes thicker towards the perimeter, gradually reducing the amount of light transmission towards the periphery to produce a soft, natural and beautifully diffused out-of-focus rendition (or called bokeh).
The new Laowa 105mm f/2 Smooth Trans Focus Lens offers two separate diaphragms. The stepless 14-bladed perfectly circular aperture, in conjunction with the apodization element gives this lens the ability to produce smooth and pleasing bokeh. It is also useful for videographers to control the amount of light passes through the lens. The 8-bladed aperture is to determine the effective aperture opening (f-number) and the depth-of-field formed.

The lens houses with 11 elements in 8 groups with 1 piece of High Refractive elements, 3 pieces of Low Dispersion elements and 1pc of Apodisation element. This optical design is proven to deliver images with extreme sharpness and limit the chromatic abberations at its lowest. The enclosure of the lens is made of metal to strengthen its durability. Canon EF, Nikon F, Sony FE, Sony Alpha and Pentax K mounts are available.

Pricing and Availability
The Laowa 105mm f/2 Smooth Trans Focus lens will be available at authorized resellers and at the English official website (http://www.venuslens.net). The recommended retail price without tax is USD 699. Free shipping will be provided during the promotion period.

Pre-order starts from today and shipping for Canon EF / Nikon AI / Sony FE mounts will start from April. Delivery for Sony A / Pentax K mounts will start from May.

Articles: Digital Photography Review (dpreview.com)

 
Comments Off on Venus Optics launches Loawa 105mm F2 with apodization element

Posted in Uncategorized


Landscape Photography and the Human Element

03 Sep

2-for-1 special

As part of Landscape Photography Week here on dPS, we’re offering TWO for the price of ONE on our best-selling Living & Loving Landscape Photography ebooks!

Click here to take advantage of this offer.


When I think of landscape photography, my mind conjures up a towering mountain vista with a glowing tarn sprawled out in the foreground, or a tumbling torrent flanked by evergreens.

It’s hard to not be drawn in by a great landscape image. After all, most of us yearn for wilderness or a connection to nature, especially in our electronics-dominated lifestyles. Of course the landscape that unfolds in front of us isn’t always the wilderness, on the contrary, sometimes it’s a concrete jungle.

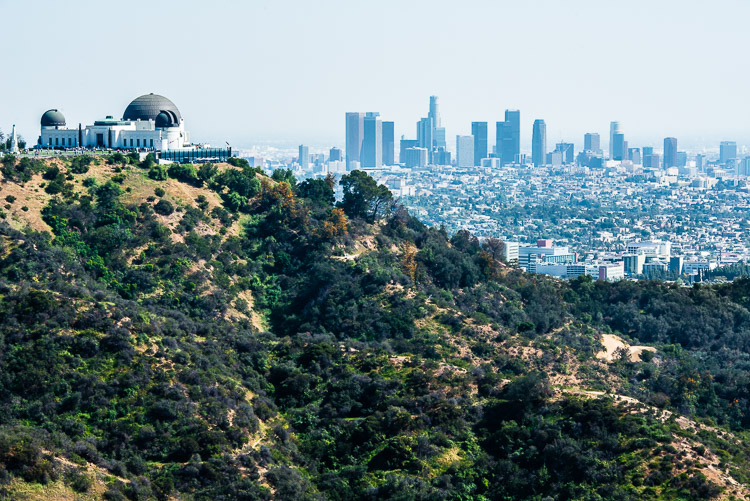
The Los Angeles urban landscape

Urban landscapes focus on the human element as the subject.

What does it mean to have a human element in a landscape image? By definition landscape photography should be purely natural, but as is often the case with art, it is subjective and the lines delineating the rules are blurred.

I find that sometimes adding a human element – whether it is a person or something that hints at the presence of people – can help humanize the image and bridge our connection to the story within. Every photo can tell a story if you open your mind and look into it deep enough. Even pictures of nature tell the tale of an eternity of geologic processes at work or the incredible diversity of life that has blossomed out of seemingly nothing.

One thing about photographing the world, that I’ve learned over the years, is that many images offer more intrigue, or become more powerful by including a person. A landscape image can certainly evoke a host of emotions, but seeing another human being in the photo seems to help nudge us in a certain direction.

A tiny person among a huge landscape can give you perspective and scale, while an expression or form can suggest a feeling of awe, contemplation, or any number of emotions.

People in a landscape photo for sense of scale

They shouldn’t be the main subject of the image, but including people in a landscape photo can help provide a sense of scale.

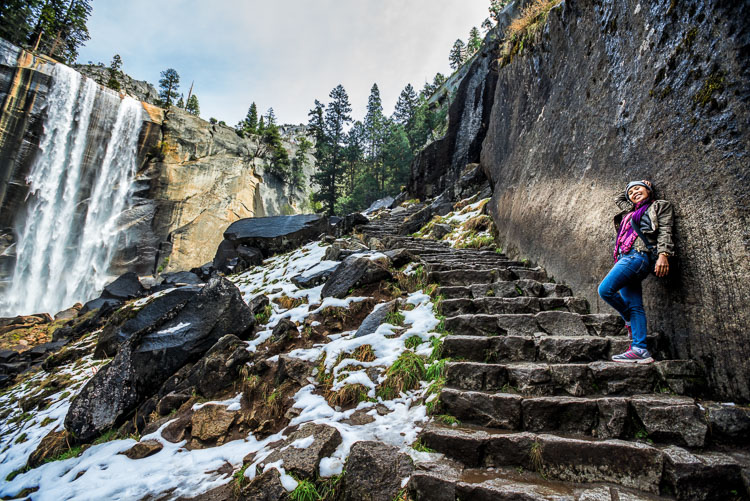
This photo below of Vernal Falls in Yosemite Valley could have easily excluded people as well as the stairs – also a human element. This waterfall is visited by hundreds of people per day and has been photographed from a million angles. After reviewing my photos from this little excursion, I realized that I liked this one the best. I like seeing the steps which were obviously very difficult to construct. I picture workers toiling for weeks or months to build them decades ago. They also reveal the steep incline you must climb to get a good view. The girl’s posture and expression shows her relaxing after the climb and obviously happy with the reward.

Lanscape including a person for balance and mood

Photographic genre lines are often blurred, like this image which lies in the realm between a landscape image and an environmental portrait.

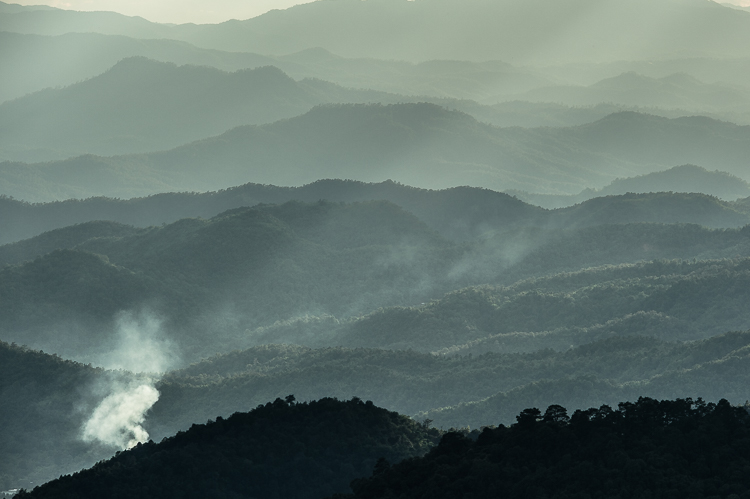
Although this next photo doesn’t show people, it provides evidence that the mountains aren’t just empty wilderness. With just a small plume of smoke sneaking into the frame, you now have more than a dramatic vista of the late day sun trickling over these mountains in northern Thailand. Even though you don’t have all the details, you know there’s a story. Are there people camping in that spot? Is there a village? A wildfire just beginning?

Smoke from a mountain village

Sometimes simply hinting at the presence of people can add intrigue.

The wisps of smoke also give another point of focus. Without it, whatever this photo has to offer is quickly recognizable with just a quick glance – a pretty pic of some rolling hills. In this case the human element adds intrigue and a bit of mystery.

In the summer of 2012 Colorado was hot, dry, and on fire. Several fires torched mountainsides, as well as the houses perched on their slopes. There was a lot of smoke, and even some ash floating around. Later in the day, the low angle sun would illuminate the smoke and make it glow all sorts of colors, which simultaneously looked both beautiful and apocalyptic.

I wandered out with camera in hand and found this lake, which I thought would be a nice elemental balance of water in the foreground with dry, burning hills behind, and that brilliant glowing reflection. It was a private lake with a barbed wire fence around it, which I included in some of the frames I shot.

The human element adding symbolism

The human element can be used to add symbolism.

I found that the barbed wire helped accentuate that apocalyptic feeling while insinuating symbolism at the same time. That symbolism could be interpreted many ways. To me, I have studied some fire ecology and learned of the dangerous conditions we have created by suppressing wildfires for decades, and the barbed wire symbolized that maybe we should keep out of nature’s business.

What do landscape photos mean to you? Do you prefer them devoid of any hint of human presence?


Here on dPS this is landscape week – the first of several articles and tips was posted earlier today. You can see it here: 6 Tips for Better Low-Light Landscape Photography. Watch for a new article (or two) on landscape photography daily for the next week.

googletag.cmd.push(function() {
tablet_slots.push( googletag.defineSlot( “/1005424/_dPSv4_tab-all-article-bottom_(300×250)”, [300, 250], “pb-ad-78623” ).addService( googletag.pubads() ) ); } );

googletag.cmd.push(function() {
mobile_slots.push( googletag.defineSlot( “/1005424/_dPSv4_mob-all-article-bottom_(300×250)”, [300, 250], “pb-ad-78158” ).addService( googletag.pubads() ) ); } );

The post Landscape Photography and the Human Element by Jeremie Schatz appeared first on Digital Photography School.


Digital Photography School

 
Comments Off on Landscape Photography and the Human Element

Posted in Photography


How to Make Your Photos More Interesting with a Human Element

21 May

The human element in photography

I believe that when someone asks how to improve their composition, that what they’re really asking is how they can make their photos more interesting.

The skill of composition is in arranging the elements of the scene in such a way that the resulting image is aesthetically pleasing, and interesting to look at. Composition involves using techniques such as including leading lines, isolating the subject, exploiting tonal contrast, deciding what to leave out of the frame, and so on. But none of this matters much if your subject matter is boring.

The most effective way to create interesting images is to find an interesting subject. Composition becomes much easier when your subject is interesting. You are more likely to be enthusiastic about the photos, and put more effort into finding a good composition, if you are engaged with, or passionate about the subject.

Luckily, there are lots of interesting things to take photos of. But for me the most interesting subject of all is people.

The human element in photography

Unlike static subjects like the landscape, which change slowly or not at all, people are transient. They change. Jobs change. Towns and cities change. The ebb and flow of life creates many interesting and varied subjects for the curious photographer.

Many of the great photographers (and yes, there are exceptions) built their reputations taking photos of people. Masters like Steve McCurry, Sebastião Salgado, David Bailey and Annie Leibovitz predominantly photograph people and their affect on the world.

So, how do you add the human element in your photos? Here are some ideas.

1. Include human figures in the landscape to show scale and context

Including human figures in the landscape provides both a focal point and a guide to scale.

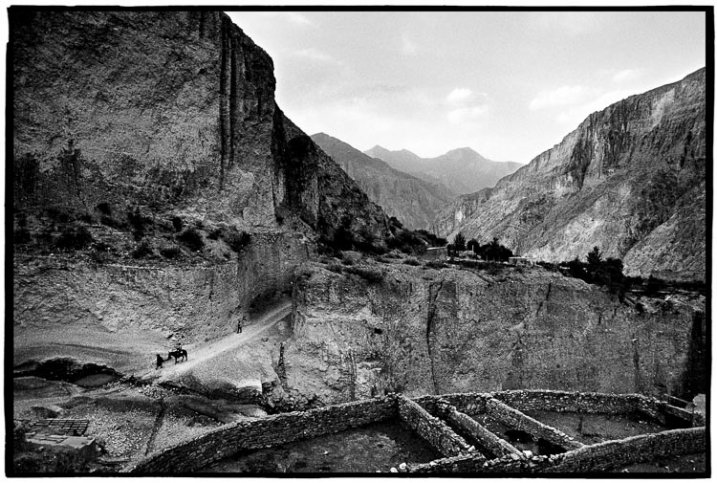
I took the following photo in a remote region of northwest Argentina. The scene caught my eye not just because it is spectacular, but because of the people walking in the middle ground. The presence of the figures reveals the height of the cliff face behind them. We know how big it is because we can compare its size to the them.

Even though the people are small in the frame they are still large enough for you to see they are wearing traditional dress. There are also some stone walls in the foreground, which are animal pens.

The human figures, and evidence of human activity, adds information, providing context about the relationship between the individuals in it and the landscape.

The human element in photography

2. Take environmental portraits

One way to create interesting photos of people is to take environmental portraits – photos that include information about the person’s surroundings. The person will be the focal point of the photo but really there are two stories being told here; one about the person, and another about their environment.

The photo below came about after I asked a friend of mine if I could take some portraits with her new gypsy caravan that she built herself from scratch. She loved the idea. This photo is as much about her caravan and the way she created a unique place for herself to live, as it is about capturing her likeness.

The human element in photography

3. Find interesting people to photograph

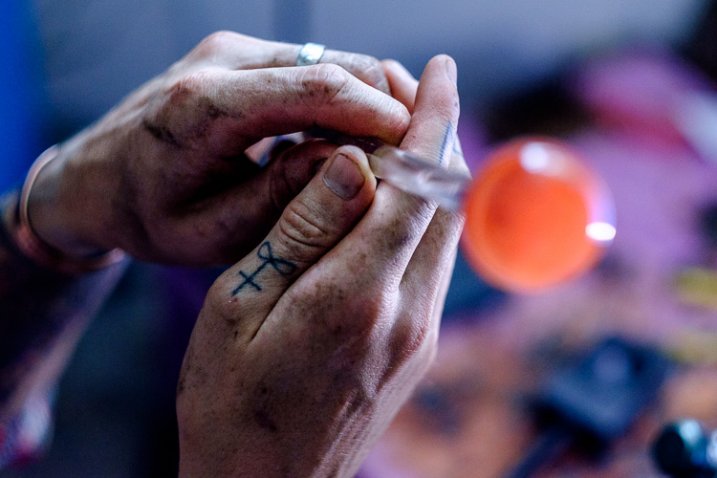
The easiest way to find interesting people to take photos of is to set yourself a project. One of my current projects is to take photos of local craftsmen. This led me to take photos of Eoin in his glass blowing studio.

After I had taken some photos of him blowing glass, we went outside to take some portraits. You can see one of the images below. He has a very interesting face, and was a great subject, but I would never have found him if it hadn’t been for the project.

The human element in photography

You may have read the story where a student asks photographer Jay Maisel how to take more interesting photos. The reply was,

“If you want to make more interesting pictures, become a more interesting person.” – Jay Maisel

Another way to find interesting people is to lead a more interesting life. The more hobbies and activities you participate in, the more people you will meet in everyday life. Some of them may make interesting subjects.

Your turn

Do you agree with my idea that people are the most interesting subject for photographers? Please let us know in the comments, I’m looking forward to hearing what you think.


Mastering Composition ebookMastering Composition

My new ebook Mastering Composition will help you learn to see and compose photos better. It takes you on a journey beyond the rule of thirds, exploring the principles of composition you need to understand in order to make beautiful images.

googletag.cmd.push(function() {
tablet_slots.push( googletag.defineSlot( “/1005424/_dPSv4_tab-all-article-bottom_(300×250)”, [300, 250], “pb-ad-78623” ).addService( googletag.pubads() ) ); } );

googletag.cmd.push(function() {
mobile_slots.push( googletag.defineSlot( “/1005424/_dPSv4_mob-all-article-bottom_(300×250)”, [300, 250], “pb-ad-78158” ).addService( googletag.pubads() ) ); } );

The post How to Make Your Photos More Interesting with a Human Element by Andrew S. Gibson appeared first on Digital Photography School.


Digital Photography School

 
Comments Off on How to Make Your Photos More Interesting with a Human Element

Posted in Photography


Texture as a Design Element in Photography

08 Oct

While it’s true that photography is a visual medium, I am always fascinated by images that can suggestively invoke my other senses. Have you ever looked at a photo in a cookbook or magazine and commented that the food looked so good you could practically taste it? What really pulls me into the essence of a photograph, though, is texture. Whether I’m feeling colorful autumn leaves crunching under my feet, the delicate edges of flower petals on my fingertips, or the jagged shards of a broken window– when a photo makes me want to touch it you have me hooked. That’s probably why I’m such a sucker for texture and why I strive to include it as a design element in so much of my photography. I want (or is it need?) these images to speak not only to your eyes, but to as many of your other senses as I possibly can. I want them to speak to your heart.

texture-002-leaves

1/80, f/5, ISO 250

One of the first things to consider when photographing texture is that the beauty is in the details. While the deserted hallway of an abandoned building can evoke a strong sensory response, it’s filling the frame with a broken window or rusted pipe from the deserted hallway that’s going to really bring your textures to the forefront. That’s not to say that the deserted hallway doesn’t have its own story to tell, but this is not the time for cramming as many elements as you can into the frame. Keep it simple.

1/250, f/8, ISO 400

1/250, f/8, ISO 400

As with just about everything we do as photographers, lighting is crucial in accurately and effectively creating a both visual and textural  experience for the viewer. The three characteristics of light– color, quality, and direction– are just as defining when highlighting textural elements as they are when photographing people, landscapes, or any other subject. While it is difficult to separate the three, I find that quality and direction of light tend to have the most impact on photographing textures– accentuating them, rather than overpowering them. Generally speaking, soft, cool lighting will enhance softer, smoother textures like ice or water, while hard side-lighting will not only bring out the detail on that rusty pipe or stone statue, but elevate it as a tactile experience. Ambient light almost always works best, providing a more organic, natural feel.

1/100, f/4.8, ISO 100.

Remember that when you are shooting for texture, your model isn’t going to get bored or tired. Your child is not going to get all fidgety, wondering about the ice cream you promised if they sat still for a nice picture. The only timing issues you have to deal with when shooting texture are your shutter speed and how long your ambient light is going to cooperate.  As result, you usually have the luxury of taking your time. Experiment with your composition. Play with your angles. Adjust your camera settings, then adjust them again.  Your available light may be your primary tool in these scenarios, but you still have to able to make sure that your camera sees the scene the same way you do. Your digital camera is nothing more than a computer with a window on it. It has no opinions or artistic intent. You have to tell it what you are seeing, so play with your shutter speed and aperture. See where they take you.

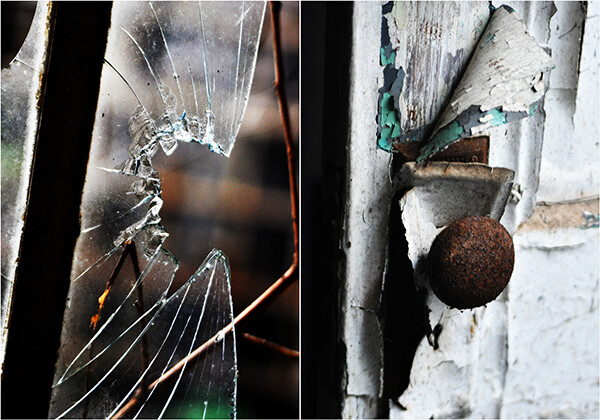
texture-008-broken-glass

Taken at an abandoned prison, the broken glass and decades worth of peeling paint not only tell a story, but evoke an almost physical reaction. Both shot at 1/250, f/5.6, ISO 640.

Obviously, a certain amount of personal taste and preference come into play, but I tend to use smaller apertures when shooting textures. Shooting wide open and its resulting depth-of-field, can throw parts of your image out of focus– something I want to avoid when photographing texture, simply because textures will no longer look as they should when out of focus. I will, however, use wider apertures if I am including any background elements. Just as with a portrait, an out-of-focus background will place added emphasis on my subject and foreground– emphasis which will significantly enhance the textures in the frame. Try bracketing your exposures until you get the desired results.

In the examples below, I did go with wider apertures because of the background elements. For the cookbook shot, we needed a clearly defined background in order to really emphasize the texture of the ingredients. Blurring out the background behind the butterfly in the next example gave more definition to the textures of the wings and flowers.

texture-007-food-photog

1/80, f/5.6, ISO 400

texture-009-butterfly

1/250, f/5, ISO 200

For the sunflower, however, notice that there are multiple textures on the same visual plane. Since I was working with a mostly solid, dark background, I wanted to make sure that every element– as well as all three textures– was in focus, which meant going with a smaller aperture.

texture-006-sunflower

1/250, f/5.6, ISO 100

Texture is such an  interesting and effective design element because it provides visual cues that allow the viewer to put your images into their own context. It gives them something they can relate to. If your photo truly speaks to them, this is one of the reasons why. You’ve given them something that helps make it their own. By capturing the texture, you’ve captured at least part of the essence– and it doesn’t get much cooler than that.

Post originally from: Digital Photography Tips.

Check out our more Photography Tips at Photography Tips for Beginners, Portrait Photography Tips and Wedding Photography Tips.

Texture as a Design Element in Photography

The post Texture as a Design Element in Photography by Jeff Guyer appeared first on Digital Photography School.


Digital Photography School

 
Comments Off on Texture as a Design Element in Photography

Posted in Photography


Using the Sun As A Compositional Element

29 Mar
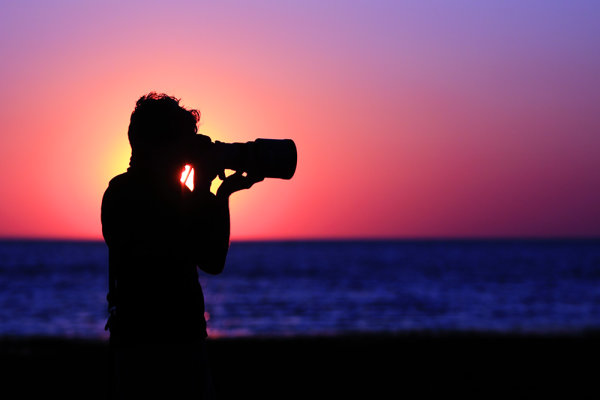
As the sun set on Massachusetts Bay, I turned and saw my buddy Joe lining up a shot. I walked around him until the sun was directly behind his head, and dialed my exposure way back to -2 stops to create the sihouette. Canon EOS 50D, EF 70-200 f/2.8L IS USM. ISO 100, 1/6400, f/2.8. Shot in Av mode at -2 exposure compensation.

As the sun set on Massachusetts Bay, I turned and saw my buddy Joe lining up a shot. I walked around him until the sun was directly behind his head, and dialed my exposure way back to -2 stops to create the sihouette. Canon EOS 50D, EF 70-200 f/2.8L IS USM. ISO 100, 1/6400, f/2.8. Shot in Av mode at -2 exposure compensation.

For the most part, as photographers, we avoid shooting into the sun for fear that we’ll get some unsightly flaring.  The sun DOES present some exposure challenges, and of course, flare is a concern, but by carefully composing your shot, and properly exposing, including the sun in your images can create stunning results.

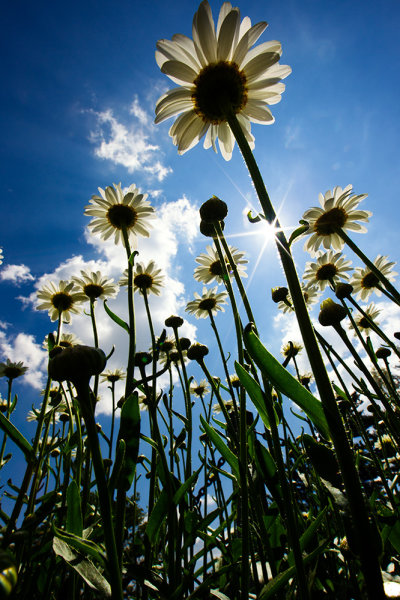
The first secret to using the sun is about positioning.  When you can, position the sun behind something else in your image. In the image of the photographer above, this gives the effect of a halo, helping create the silhouetted image.  By using exposure compensation to darken the exposure, I kept the sun from blowing out, and darkened the main subject into the silhouette. I then adjusted the white balance and color saturation to get the final result. Because the image was shot at f/2.8, the sun appeared as a giant ball in the image. In another example, the image of the daisies, a wide angle lens was used to make the sun smaller in the image, and was then positioned just behind the stem of the daisy. Because the image was shot at a smaller aperture, f/22, the sun appears as a star rather than a ball.  One of the cool things that happens when shooting into the sun with a wide angle lens at a small aperture is that the light falls off in the areas away from the sun, creating dramatic skies that go from near white by the sun, to deep blue in the corners.

This image of daisies was shot with the EOS-1D Mark IV and EF 14mm f/2.8L II. Exposure was 1/100, f/22, ISO 100. Aperture Priority.

This image of daisies was shot with the EOS-1D Mark IV and EF 14mm f/2.8L II. Exposure was 1/100, f/22, ISO 100. Aperture Priority.

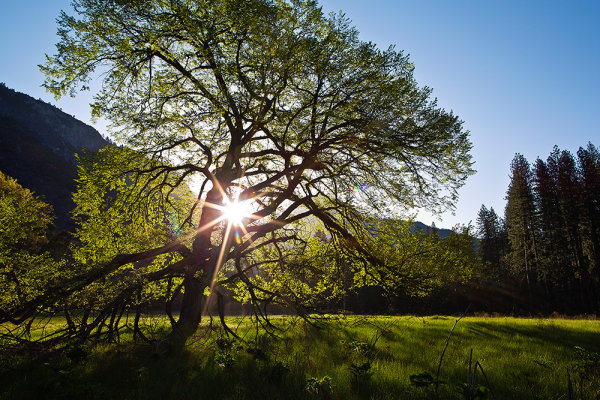
Shooting into the sun does pose some exposure challenges.  Shooting into such a bright light can cause underexposure.  That’s not necessarily a problem if you’re going for a silhouette, but if you want some detail in the subjects that are backlit by the sun, you’ll need to dial in some exposure compensation to counter the brightness of the sun.  In the image of the Elm In Cook’s Meadow, the image at what the camera said was the proper exposure was a bit dark, and devoid of shadow detail.  Thankfully, for this image, I shot several images at varying exposures (also called bracketing). The image you see here was shot at +1.6 exposure compensation, in aperture priority mode.  This allowed for a level of detail in the shadow areas, while not allowing the highlights to blow out.

For this shot in Yosemite National Park, I shot in Aperture Priority, with exposure comensation set to +1.6.  EOS 5D Mark III, EF 24mm f/1.4L II. ISO 100, 1/30, f/16.

For this shot in Yosemite National Park, I shot in Aperture Priority, with exposure comensation set to +1.6. EOS 5D Mark III, EF 24mm f/1.4L II. ISO 100, 1/30, f/16.

By bracketing your exposures, you can see how changing your exposure will affect the look of the image.  Normally, I set my aperture and bracket my exposures by changing shutter speed, as I will generally know what I want my depth of field to be.  There are times to try it the other way, setting your shutter speed and adjusting your aperture. This will affect your depth of field, however, so be aware of what’s in focus and what’s not.  Your final option is to adjust the ISO.  The risks here are that when you raise the ISO to achieve the overexposure, you run the risk of introducing unwanted noise into your image, depending on how high you set the ISO.  This technique can give your several options when working with the contrast ranges you deal with when shooting into the sun.

Don’t be afraid to include the sun in your shots, using it as a strong compositional element. Too often we forget to use the sun in the image, simply using its light.   Including the sun in the shot creates new possibilities that can make for some dramatic images.

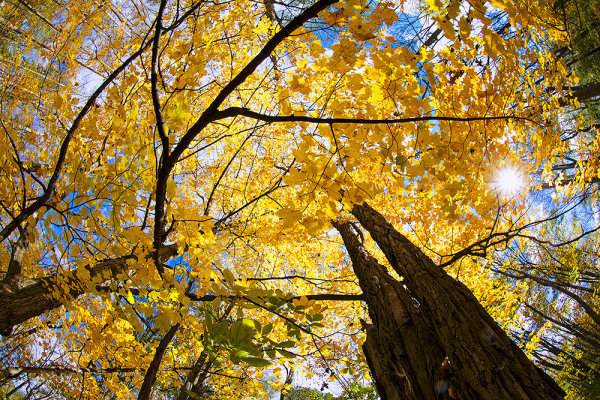
This shot of the canopy of autumn leaves in upstate NY was taken with a fisheye lens. The sun shining through the gap in the leaves added just the touch of drama I needed. EOS-1D X, EF 8-15mm f/4L.  1/60, f/16, ISO 100.

This shot of the canopy of autumn leaves in upstate NY was taken with a fisheye lens. The sun shining through the gap in the leaves added just the touch of drama I needed. EOS-1D X, EF 8-15mm f/4L. 1/60, f/16, ISO 100.

Post originally from: Digital Photography Tips.

Check out our more Photography Tips at Photography Tips for Beginners, Portrait Photography Tips and Wedding Photography Tips.

Using the Sun As A Compositional Element


Digital Photography School

 
Comments Off on Using the Sun As A Compositional Element

Posted in Photography