Camera Bits, the company behind the popular photo ingestion program Photo Mechanic, has released its newest product, Photo Mechanic Plus. This new program features all of the ingestion, code replacement and other features within the standard Photo Mechanic program, but takes it a step further by adding a full-fledged digital asset manager (DAM) for organizing and sorting through your photographs with ease, not unlike Adobe Photoshop Bridge or the ‘Catalog’ module in Lightroom.
The new program includes all of the features of Photo Mechanic 6, but also adds a powerful database option for managing all of your photos on macOS and Windows computers. This includes the ability to create individual catalogs that can be accessed independently or together based on the filters and parameters you’ve applied.
Camera Bits claims you can scroll through a million photos ‘without a pause’ in its new DAM. While this might seem implausible, anyone who’s used Photo Mechanic knows how quickly the program is capable of displaying and sorting through thousands of images without bringing your computer to a halt.
Other features include a powerful search box for finding exactly the images you need as well as saved searches for keywords and parameters you frequently need to access. Filters and Collections can further be used to sub-categorize your images. Below is a fantastic video rundown from Camera Bits showing off the new features inside Photo Mechanic Plus:
Photo Mechanic Plus includes all functionality of Photo Mechanic 6, but is a separate purchase. A perpetual single-user license will set you back $ 229 (as an introductory price, with $ 399 being the eventual retail price), while an upgrade from Photo Mechanic 5 and Photo Mechanic 6 will set you back $ 179 and $ 90, respectively. A 30-day free trial is available as well if you want to take Photo Mechanic Plus for a spin before purchasing a license.
You can find out more information on Camera Bits’ website and view the pricing details on the Photo Mechanic product page.
Stacked Architecture of the chipset Samsung details in its new paper.
Samsung has published a paper detailing a new stacked CMOS mobile image sensor that uses a 14nm processing layer to deliver high-resolution images while reducing power consumption.
The stacked sensor consists of two chips: a 12MP backside-illuminated (BSI) pixel chip on the top that uses 65nm process and a bottom chip for analog and logic circuits that uses 14nm process. By using the super-fine 14nm process on the processing layer, Samsung says it could achieve a 29% drop in power consumption compared to current conventional sensors that use a 65nm/28nm process.
Microphotograph of Implemented Sensor (Left: Top Chip & Right: Bottom Chip)
Samsung says the chip is capable of outputting at 120 frames per second while consuming just 612mW of power. The analog and digital power supply requirements also drop to 2.2V and 0.8V, respectively, compared to conventional 65nm/28nm process chipsets.
What this all translates to is a more energy-efficient stacked sensor for future smartphones that also manages to improve data throughput and reduce noise. It also paves the way for creating sensors with smaller pixel pitches, maximizing the potential for even higher-resolution sensors without increasing the size of mobile sensors. As illustrated in the below graphic, a 16MP sensor with a 1.0um pixel pitch is the same size as a 13MP sensor with a 1.12um pixel pitch.
Of course, smaller pixels means each pixel will be less sensitive, but Samsung emphasizes this shortcoming can be overcome through its pixel-merging technologies such as its Tetracell (2×2) and Nonacell (3×3) technologies, which will merge data from neighboring pixels together to achieve better image quality when light is scarce.
Specifications of the 12MP sensor Samsung details in its paper.
Samsung specifically notes the power-saving nature of stacked sensors using the 65nm/14nm process will be ‘critical’ for 8K video capture and even higher-resolution sensors, as power consumption is one of the biggest factors limiting 8K capture on current smartphones.
As tends to be the case with developments of this kind, there’s no knowing when we might see this 65nm/14nm stacked sensor design inside a consumer smartphone.
The post Tips for Culling Images for Better Results and More Efficiency appeared first on Digital Photography School. It was authored by John McIntire.
When it comes to a photographer’s workflow, there is one stage that might be more important than any other. It is the image selection process, also known as the culling stage. This critical stage is the point where you get your images into Lightroom (or other software) and start choosing which to work on.
But while this is the stage where you choose the photos that ultimately end up representing your work as a photographer, without systems in place it can turn into a huge time sink.
So focusing on the process of culling images can help speed up image selection significantly.
Being able to quickly whittle down a set of photos is an important skill for any photographer. At 36 images, this is a small set of photos, but the principles are the same whether it’s 36 images or 360.
This article aims to show you why having a good system for image selection can be beneficial to your photography and your portfolio. It will also provide an overview of a basic system that you can start to use in your workflow right away, and it will provide tips on how to use Lightroom’s built-in functionality for this purpose.
Note: My examples here are portraits, but the system applies to just about any genre in photography. There are instances where you might not be able to apply some of these principles and the criteria you apply in different genres will be different, but they are exceptions.
The forest for the trees
Take a moment to imagine that you’ve just finished a big session and imported all the images into Lightroom. Now you may have hundreds of images that you have to sift through to find the ones that you want to work on.
When you have hundreds of photos from a shoot all in one place, and test shots, outtakes, and misfires are still included, it can feel like a chore to go through them all.
Without a system for culling images in place, it’s all too easy to find yourself continually scrolling through the same set of images and reviewing the same ones multiple times. This may not be a problem if you only have a handful of frames, but once you get into larger shoots, you can waste a lot of time doing things this way.
Additionally, after going through the same images over and over again, it can also become discouraging. This makes it easy to give up and leave some gems unspotted, which are ultimately relegated to obscurity on your hard drive.
By using Collection Sets to divide a large shoot into ten outfit changes, the images become much easier to manage.
So what type of system can you create?
Using Collection Sets to divide up large shoots into smaller, more manageable chunks is a good place to start.
This is just a small reason why you should consider developing a system for your editing process.
Editing
The image selection process is also known as editing. Now, I know that the word edit (and editing) has come to mean something else in everyday vernacular for photographers. You can call it whatever you want, as I am not one to dictate or prescribe. But as you will be going about image editing in the future, consider thinking about your post-processing workflow in terms of these two job descriptions:
Photo (Picture) Editor: Someone whose job it is to select photos appropriate for the use in question.
Retoucher: Someone whose job it is to alter the appearance of photos and manipulate photos to achieve a final result.
Tools
Lightroom has a huge variety of tools that makes culling images easier. While this is not an exhaustive list, here are a few features that I use regularly:
Fullscreen Mode
Using Fullscreen Mode during the image selection process will help to remove any distractions from your screen. You’ll see the photo that you are evaluating and nothing else.
Being able to view a single image at a time makes this whole process go more smoothly. It also takes away the distraction of Lightroom’s standard interface on the screen. To enter Fullscreen Mode, select any single image in the Library Module and press the “F” key.
Compare
If you want to look at two similar images side by side, use the Compare feature in Lightroom.
The Compare feature allows you to look at two images side by side. Although you won’t use this until later in the selection process, it becomes very useful when you are trying to choose between two similar images with minor differences.
To use the Compare feature, select any two images in the Library Module and press the “C” key. To get back to your normal view, press “G.”
Reject
When you reject a photo in Lightroom, the image will be grayed out and marked by a black flag with an “X.” Any images you mark in this way should be recognizable at a glance.
If you follow my process, you are going to use this tool a lot. When you press the “X” key while any image is selected, you flag that image as a reject. This marks the image with a black flag with an “X” in the upper left-hand corner, and it grays the image out in the Library Module. This makes it very easy to see which images you have already reviewed and marked as unsuitable.
Pick
Marking an image as a Pick will annotate it with a highly-visible white flag.
When you are going through your images, you will eventually come across a photo that you love. You’ll know that you want to work on it no matter what.
In this instance, press the “P” key; the image will be flagged as a Pick. A little white flag icon will appear at the top left of the image in Lightroom.
Star ratings
Using the star ratings in Lightroom is another quick and useful way to annotate images that you want to review again later.
Because you will be going through your images multiple times, you can use the star ratings in Lightroom to mark any images you are unsure of or aren’t able to make a final decision on yet. You can mark them with one to five stars by using the corresponding number key. This makes them clearly labeled when you return to them in the future.
On being ruthless
Before we get into the actual steps of the editing process, there is one thing to discuss. Most everything outlined in this article can be changed up as required, but there is one thing that will be important for you to follow no matter what.
To make this process faster and more efficient, and to ensure that you are only left with your best images, you have to be ruthless. If something is not right about an image, reject it. If you have to think about it for more than a few seconds, reject it. If you have even so much as a niggling doubt, reject it.
Being able to quickly recognize obvious faults will allow you to reject images quickly. Overexposure, outtakes, reflections in glasses, cropped body parts, and awkward arm placements are some of the reasons these images were rejected at first glance.
A lot of the wasted time in this part of the workflow comes from hemming and hawing over an image for a length of time when the image doesn’t wind up getting used anyway. Make decisions fast. Be ruthless.
The system
Keeping the images you are working on separate from the rest will make this process go much more smoothly.
Now that you know the desired end result, you can get started with the actual process of image selection.
The first step is to isolate the set of images you are working on from everything else. There should be no distractions. If you are working on a set from a portrait session where there were multiple outfit changes, separate each outfit into its own folder.
In Lightroom, this is easy. You can create a Collection Set for your shoot, and then create a Collection for every outfit change inside that set. This will keep all of the images from a session in one place, but separated by things like outfit changes or lighting changes.
Criteria
Chances are that you already have preconceived notions of what you don’t like in photos. Whether these ideas come from things you’ve heard from other photographers or opinions you’ve developed yourself, it doesn’t matter. Knowing what these things are is going to help you speed through the process much, much faster.
Technical: Things that fall on the technical side are relatively easy to identify. What you are evaluating for here are things like focus, exposure, the absence of motion blur, etc. When you are going through your images, learn to identify technical faults at a glance.
Technical faults, like reflections in glasses, are easy to spot and make quick decisions on.
Aesthetic: This one is all down to your personal tastes. If you can figure out what you don’t like, then you can spot those things in an instant and rule the photos out of the selection process.
Don’t like when portrait subjects bring their hands to their face? That rules out any photos fitting that description. Don’t like it when catchlights appear in the whites of the eyes? You get where I’m going with this.
Aesthetic faults come down to personal preference and taste. Here, the eyes are dark and the pose isn’t the best.
The first pass
The goal of your first pass is to reject as many images as possible as fast as possible. If you can identify a reject at a glance and mark it as such, you won’t waste any time later going over that image multiple times.
Once you’ve isolated the images that you’re working on, you can begin the first pass of the culling process.
The only goal here is culling images as fast as possible. Select the first photo in your folder and enter Fullscreen Mode in Lightroom (press “F”). Use the right arrow key to scroll through your images one at a time.
You should have an idea of what isn’t a good photo in your mind. You’re looking for things that fall into that category. Did the flash misfire? Are the eyes partly closed? Is the facial expression not flattering? Is the lighting not quite right? Is the focus off?
If there’s a fault in the image, find it and press “X.”
The second pass
Now that you have completed the first run through your images, you should find that you’ve rejected most of them. The next step is to isolate the images that you haven’t culled from the ones you need to review again.
There are a few ways you can do this. You can create a new Collection and add the images that are to be reviewed. Or you could remove the rejected images from the Collection you are working in.
Using the sorting options on the bottom toolbar, you can sort by Pick. This will put all of your rejects at the bottom of the catalog, making it easy to go through for the second pass.
You could also use the sorting options on the bottom toolbar in the Library Module. This will put any rejected images at the end of the gallery. From there, you can select all of the unflagged images and enter Fullscreen Mode again. As you cycle through the images a second time, you’ll first see the shots you have selected.
For this pass, you are trying to achieve the same thing as the first: to reject as many images as possible. This time it will take longer, as these are images that you have already decided don’t have any immediate faults. Feel free to take extra time and have a careful look over the images. Just remember that you are still not picking any photos yet, merely getting rid of the ones that aren’t suitable.
You can repeat this stage as many times as you need in order to narrow down your Collection to the few best images. For the sake of brevity, we’ll move directly on to the next stage and assume you’ve narrowed your images down as much as possible.
The third pass
Using this method, I was able to narrow down this set to three images in a little over ten minutes.
At this point, you should have a much smaller group of images to work with.
(If you still have a lot of photos, go back and be more ruthless.)
You can now go through and start making your final selections. It should be a lot easier now that you have a much smaller pool to go through. Use the Pick flags or star ratings to indicate the photos you want to work on and reject any photos that still need rejecting.
At the end of your culling sessions, you should have a concise selection of images that reflect the best shots from a particular set.
How many should you aim for?
If you’re wondering how many images you should aim to have left once this is all over, the answer is: it depends.
The number of final images is going to vary wildly depending on how you shoot and what you are shooting for. For example, if I am shooting for myself, I will be looking for one or two images per set. That set may start with 10 photos in it. It may start with 100. I am still only looking for one or two.
If I’m doing a short portrait session for a client, I might end up with 15-20 proofs to present. If I was photographing an event, I would go through and get rid of the obvious rejects and keep everything that was left.
Canon 5D Mark III | Canon EF 85mm f/1.8 | 85mm | 1/2000 sec | f/2.8 | ISO 200
There is no right answer. Only you can answer how many images you need in the end. This whole process of culling images is there to get you to those final photos faster, rather than get you to a certain number.
Keeping it basic
The tools and the process outlined in this article are very basic. It’s how I do it and it’s like that for a reason. The process is uncomfortable and forces you, for a little while, to focus on your mistakes.
When I am culling images, I want it completed as soon as possible, and I don’t want my tools to get in the way of the process. That said, Lightroom has a whole host of other features that could be used in the culling process. By all means, use them if they suit you. It doesn’t matter how you get the job done as long as you get it done.
Conclusion
I know that this can be a difficult process. You have a catalog of images on the screen that you created and poured all kinds of effort into. You just want to look through them and feel good about the photos you’ve made. You don’t want to jump in and start finding faults with 90% of them. I understand. I’m the same.
However, as disheartening as it feels at first, once you start culling images and the best images from a shoot start showing themselves (usually after a short while), that allows you to focus only on the best.
Trust me: The images that you cut get quickly forgotten, anyway. It’s best to be done with them fast; that way you can focus the rest of your time and effort on the images that will benefit you and your portfolio.
The post Tips for Culling Images for Better Results and More Efficiency appeared first on Digital Photography School. It was authored by John McIntire.
You wouldn’t start cooking dinner and go to the supermarket each time you need an ingredient, that wouldn’t be very efficient, right? For any activity you want to undergo in life it’s always best to have everything you’re going to need before you start, don’t you agree? With the Photoshop interface, it is the same.
You will be able to work more efficiently if you set up your workspace according to what you need right from the beginning.
The Photoshop Interface
In order to set up your workspace, you need to know what tools are available to you, how they behave, and what are the options. All of these things combined are called the interface, so let’s get to know it.
The big central area is called Canvas.
What is in the canvas area
This is where your image will be displayed, therefore it’s quite an important component. All around the canvas area you’ll find tools and information to help you manage your image.
On the right-hand side, you have the panels. There are tabs here that provide you with information about what you have on the canvas. Which tabs are there is entirely up to you as it is completely customizable, but I’ll get to that later on.
On the left-hand side, you’ll find the Tool box which, as the name suggests, contains the various tools you can use to modify your image. I’ll show you later how it can be moved but as a default, you’ll find it here.
On top, there’s the Option bar which provides the setting options for each tool that you select from the Tool bar, therefore it is constantly changing.
And on top of that, you’ll find the menu bar with many options to control your canvas, file, and interface.
When you put together these sections you can transform your workspace. Now that you know what everything is and where to find it you can start personalizing it according to your needs. Let’s get to it.
Personalizing your workspace
The very first thing that catches your eye, and therefore is something you want to decide, is the color. If you go to Menu > Photoshop > Preferences > Interface you’ll find the options.
You’ll notice on the image below that I have used the lightest shade of grey. But the choice is completely personal, try all of them and see which suits you best.
No matter which one of those you choose, you can change the color of the canvas any time because each photo may need a different background.
For example, if you are working on a black canvas and you start working on a black photo you might not be able to see the edges of the image. Just right-click anywhere on the canvas area and choose any of the default colors or make a custom one.
I’ll make it a really evident green, not because it’s something I would recommend using, but because I want you to be clear on which area is changing with this option.
Usability and function
Now that you fixed the look of your Photoshop interface and workspace, it’s time to move to the practicality aspects.
As a starting point, you can use any of the default workspaces that Photoshop has built-in. To find them just go to the drop-down menu on the top right corner. Feel free to try them all out.
However, since you are reading this in a Digital Photography School article, I’ll suggest you start with the Photography Workspace and we’ll start building up from there.
To start personalizing, it’s worth knowing that most panels can be detached and dragged anywhere on your workspace. You can just click on the top of the panel where there is a dotted line and let go wherever you want the panel situated.
However, this can get very messy really quickly. So if you want to move the panels around, I suggest you still attach them into another available slot. To find them just hover over the workspace and look for the blue lines as they indicate snapping points.
Panels
Let’s now focus on the panel area as it’s the most flexible of all. In here, you have different information windows in tabs that can be grouped or stacked. You may think that it would be helpful to have all of them open but that would take away space on the canvas for your image.
So it is actually much more practical to have as little as possible opened at one time. Therefore, let’s start by closing the ones you don’t need from the default setup. To close a tab just go to the top right corner of the tab and click on the drop-down menu, from there choose “Close”.
You’ll notice that the panel area is divided into smaller boxes. This is because tabs can be grouped. To move tabs from one group to another just drag them. And to close an entire group just choose Close Tab Group instead of Close from the drop-down menu.
Editing the Panels
If you need a panel that didn’t come with the default preset, you can access it by going to Menu > Window and select the desired option. It will be dropped into the collapsible column on the left of the panels which is a collapsible extension of the panels.
If you need it open all the time, like the Layer panel for example, then you can have it on the right so it displays all the information all the time. But if it’s something you need just on occasion, you can keep it collapsed on the left and just click on it when you need it.
If you don’t need a panel at all you can always make it disappear from that column just by right-clicking it and then choosing “Close”.
This column can also be customized to show the icon and name of the panel or just the icon. Just click on the arrow at the top to choose.
While I’m on that, let me tell you that the Tool Bar has a similar feature by giving you the choice of one or two columns. Keep in mind that expanding it means losing Canvas space, so I like to keep it in the slimmer version.
Finishing up
Now you know how to customize your Photoshop interface and workspace.
But, if you work on different projects (i.e you’re a photographer but also do design) you may need different workspaces according to each specific needs. Or if you use a shared computer with another family member or a co-worker then you also might need different workspaces for each of you.
This is why you want to save your customized workspace so you can come back to it easily each time without the need for repeating this process.
To do this, go back to the drop-down menu of the top-right corner and choose New Workspace. Name it and go back to it any time you need.
Furthermore, if you are in your workspace but still find that are some changes from how it’s supposed to look, just click reset and everything will be back to normal. One last tip, from the bottom of the Tool box you can also choose the screen mode you want to use.
Okay, no more procrastination, get to work!
The post How to Set Up the Photoshop Interface and Workspace for Maximum Efficiency appeared first on Digital Photography School.
A great deal of post processing can be done in Photoshop, more than most photographers realize actually. As a designer, I didn’t have Lightroom, and just wanted to adjust my photos to look a little nicer, little did I know the power behind Photoshop and its post processing capabilities.
Today I am going to give you some tips and tricks I learned that increased my efficiency within Photoshop.
1 – Photoshop Layout and Organization
The first way to increase efficiency before doing any photo editing, is to organize and optimize your Photoshop layout. Setting up and customizing your Photoshop layout is key to configuring exactly how you want your panels and canvas to look. It is also very easy to do, and can improve your workflow a lot.
Here are a few things to keep in mind when editing your Photoshop layout.
Only keep the necessary, delete all panels that are superfluous to your photo editing process. They really just get in the way and clutter your workspace.
Organize your panels based on your workflow. Keeping certain windows paired will help you work faster and make adjusting much easier.
Adjust spacing and panels so you can have the largest size available for your image.
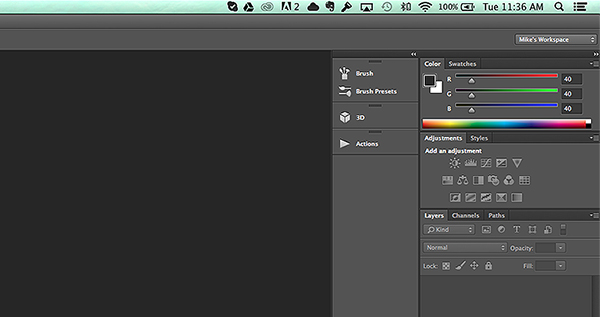
Here is a quick preview of my layout, in case you need some inspiration.
After you carefully adjust and tweak the panels to perfection, it is really simple to save your workspace. Simply go to the top right corner of your Photoshop Document, where is says Mike’s Workspacein the image above, and click to activate the drop-down menu. Then click new workspaceand you can save it as your very own Photoshop layout. You can even save shortcuts and menus within the layout.
2 – The Basic Effects
Now that you’ve organized your layout, it’s time to start editing your photos. When I start editing any photo I have a few basic steps I do religiously. These don’t have to be the same for you, and it is totally ok to completely disregard them (or come up with your own), but it is sort of a habit that can help contribute to your photography style.
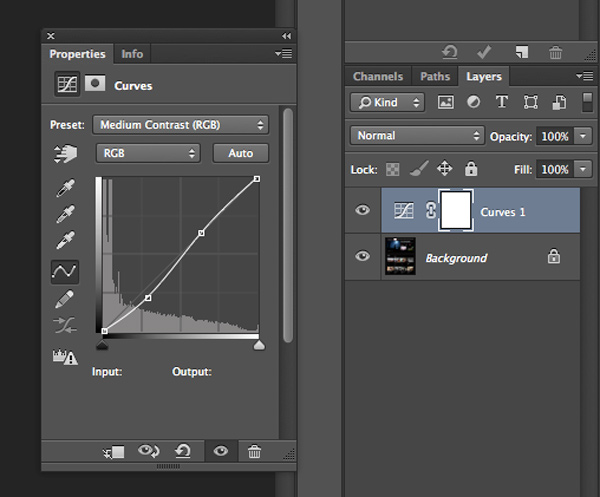
The first small task I complete is duplicating the image layer. To ensure I don’t damage my original photo. From there I add a few subtle Adjustment Layers to balance the light in the image. It looks something like the image below.
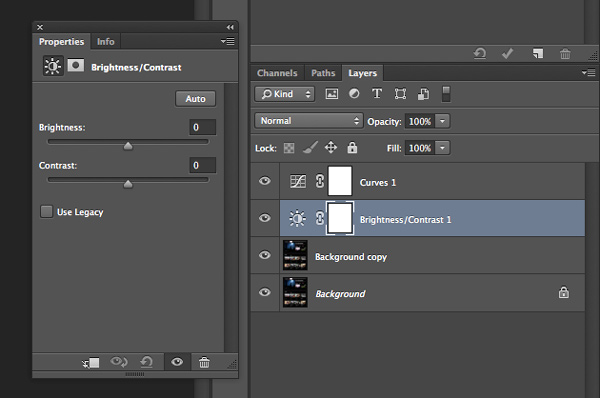
The above effect is a simple curves adjustment that helps balance light and tone down the colors in a subtle manner. After that I mess with the brightness and contrast just a little bit to get the image looking clean and balanced (as an Adjustment Layer as shown below).
Consider all the above steps as precursory steps to the actual photo editing process. These are simply done to balance light, prevent error, and it is like a little system I use to keep my style inline.
3 – Grouping and Organizing Layers
The next thing I do that really helps me work more efficiently is to organize and group my layers. It is really easy and not time consuming at all to rename layers so that you know exactly what effect they are applying to your photo. Then you don’t need to go through all your layers, switching them on and off, to find one you want to remove or readjust.
These are the key areas I group and label my adjustment layers and filters.
Light and contrast adjustment groups
Tints and color variations
Strong filters such as HDR and blurs
Gradients and vignettes
By labeling these I can easily go to certain effects and adjust them accordingly. This makes photo editing a much faster process, and makes re-editing a photo way simpler and fun.
4 – Subtle Adjustments that Make a Huge Difference
As a final tip for efficiency I am going to share a few subtle effects that work wonders for photo editing. The tools used include:
Blend Modes
The Levels adjustment tool
Tints
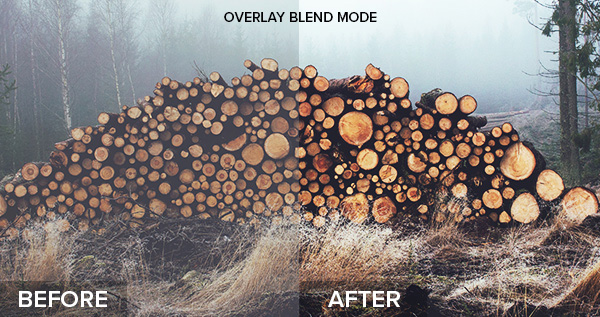
Take a look at the difference a simple blend mode can do to an image, with just the click of one button. In the example below I’ve used the Overlay blend mode. Remember to duplicate your original layer and play with the blend modes on the top, copy layer. Blend modes dictate how the pixels in one layer behave and react with the layer below it. Try them all and see what they do.
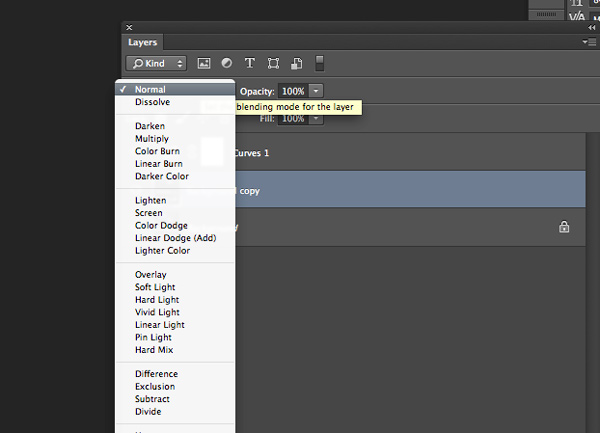
Blending modes can be applied in a few ways. The easiest way, and the way I achieved the above effect is to duplicate your image and select the blend modes drop-down by double clicking your layer (or selecting it right from the Layers panel)
Double click the layer to get this dialog box
You can also find layer blend modes here on your layers panel
Simply pick the blend mode that looks best and adjust the opacity accordingly. Some of my favorite blend modes are – screen, overlay, soft light, and lighten.
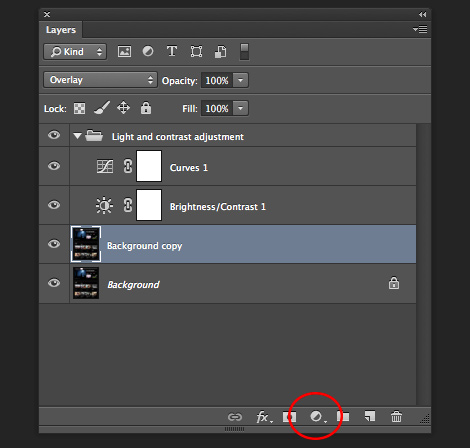
I then use a Levels adjustment layer to adjust light and colors at the same time, adding a crisp and subtle tint. To add a new adjustment layer go to Layer > New Adjustment Layer > then choose the one you want. Or select it from the bottom of the layers panel as shown below.
Adjustment layer icon location on the layers panel
Adjustment layer options
Adjust the various levels by clicking the drop-down and working on the red, green, and blue tones. It is very versatile and easy to use. Just remember – pulling top sliders the ones under the graph) to the left will darken, to the right will lighten. The bottom sliders under the black-white scale, do the opposite.
Summed Up
This is the process I used to create ultimate efficiency when I started editing my photos more frequently. These steps probably won’t apply to everyone, but they are helpful in getting organized when beginning. To wrap it up:
Organize your Photoshop Layout to improve your workflow
Use some basic effects for consistency
Group and label your adjustments so you can easily find them for future reference
Take advantage of the subtle, but highly effective adjustment layers such as photo tints, levels, and blend modes
Now it’s up to you
Got some interesting tips or tricks for efficiency? Share them in the comments and help other photographers improve the way they work and edit photos in Photoshop.
The post 4 Tips for Post Processing Efficiency in Photoshop by Mike Moloney appeared first on Digital Photography School.


You must be logged in to post a comment.