RSS
 

Posts Tagged ‘effectively’

How to Remove Wrinkles From Clothes in Photoshop (Fast and Effectively)

24 Feb

The post How to Remove Wrinkles From Clothes in Photoshop (Fast and Effectively) appeared first on Digital Photography School. It was authored by Ana Mireles.

how to remove wrinkles from clothes in Photoshop

Did you know that you can easily remove wrinkles from clothes in Photoshop?

Wrinkled clothing is one of those details that gets easily overlooked. You just don’t notice them until you get back home, open your image, and see a big, ugly wrinkle ruining your photo.

Fortunately, there are several simple ways to get rid of those wrinkles and keep clothing looking as good as new!

And in this article, I’ll show you the techniques for quick and easy wrinkle removal.

Let’s get started.

Why do you need to remove wrinkles from clothes in Photoshop?

Wrinkles are distracting.

In fact, most people underestimate how eye-catching wrinkles can be.

And if you’re after a great image, then everything in the shot needs to work together and guide the viewer’s eye toward key compositional elements.

That’s why wrinkles can have such a negative impact. Viewers will get fixated on the flaw instead of considering what they love about your photo.

And if you plan on doing professional portraiture, you must get wrinkles under control.

Because here’s the truth:

Often, the difference between a professional photo and one taken by a beginner is merely attention to detail.

(Detail such as wrinkles!)

Removing wrinkles from clothes in Photoshop: The basics

There are many tools you can use to easily remove wrinkles from clothes in Photoshop.

But the most popular options are the healing tools.

Now, there are three healing tools in Photoshop: the Healing Brush tool, the Spot Healing Brush tool, and the Patch tool. Each of these can be used to “iron” your clothes and remove wrinkles in Photoshop.

When you heal an image, Photoshop samples pixels from the area’s surroundings and then matches the texture and lighting to the pixels being healed. That way, the retouch blends with nearby elements.

Using the spot healing brush to remove wrinkles from clothes in Photoshop

Now, the Spot Healing Brush will automatically determine the best pixels to sample, so all you have to do is set the size and hardness of the brush and paint over the wrinkle. Photoshop takes care of the rest.

Note that the Mode menu (in the top bar) allows you to choose the Spot Healing Brush painting mode. For removing wrinkles in clothes, the best option here is Replace. You see, fabric always has texture, and the Replace mode allows you to preserve this even as you heal away wrinkles.

You can then choose the Healing Type. You have three options: Content-Aware, Create Texture, and Proximity Match.

There’s no single “best” pick; instead, just experiment to see which one works best for your photo. In the example above, I found that Content-Aware gave the best results.

The Healing Brush tool works the same way, except that you choose the pixels you want to sample. Simply hold the Alt/Option key and click on the area from which you want to sample, then release the Alt/Option key and click on the pixels you want to heal.

Finally, the Patch tool lets you draw a selection around the area that you want to heal, then drag it toward the pixels that you want to source.

The Patch tool will allow you to work faster, as you can cover large areas with each retouch. Don’t overdo it, though. If the area is too big, the Patch tool won’t do a great job – so you need to find the right balance.

You can also move the Diffusion slider to adjust the blending speed and quality. Use lower values for pixels that have a lot of detail and higher values for smoother areas.

Using the Patch tool to remove wrinkles from clothes in Photoshop

Challenges when removing clothing wrinkles

these wrinkles looked fake when removed

When you are removing a single, isolated wrinkle, things are not very complicated. However, when there are many wrinkles or you have large areas to cover, you can run into trouble.

Some of the most common issues when using any of the healing tools – as well as the Clone Stamp tool – are the accidental patterns you can create.

To avoid this, adjust the size and hardness of your brush. Also, change the source point and distance to avoid any recognizable repetitions. Finally, vary the blend mode and the opacity.

Keep in mind that, while you don’t want to create accidental patterns, you do need to follow the patterns of the fabric’s design and texture.

That’s the challenge.

Another difficulty is maintaining luminosity. Always clone or heal from places where the brightness appears to match the surroundings, though this doesn’t necessarily mean you should source pixels from right next to your wrinkle.

Otherwise, while you might not notice your heal on the first brushstroke, you will after a handful of strokes.

So when you have to work with big areas, it’s better to use an advanced technique (which I explain in the next section).

An advanced technique for removing wrinkles from clothes in Photoshop: Frequency separation

Frequency separation is a popular, high-level technique for retouching skin blemishes.

But it’s also fantastic for getting rid of wrinkles in fabric.

The basic idea is that you separate the texture and the color into two different layers.

To do this, create two copies of the original layer.

Then hide the top copy by clicking on the eye icon next to it.

Select the middle layer (i.e., the layer sandwiched between the top copy and the original). If you want, you can rename it Color.

Select Filter>Blur>Gaussian Blur. Drag the slider until you don’t see the details of the fabric.

adding a Gaussian blur when removing wrinkles

Now enable the top layer again and select it. You can rename this one Texture.

Select Image>Apply Image.

In the dialog box, choose the layer called Color. Then select Subtract as the blending mode.

Finally, set the Opacity to 100%, the Scale to 2, and the Offset to 128. Then click OK.

using the Apply Image option when removing wrinkles

Now head to the Layers panel. Make sure the Texture layer is selected, then set the blend mode to Linear Light.

And that’s the basics of frequency separation – now your photo is divided up into Texture and Color layers. And you can heal each layer separately!

Frequency separation when removing wrinkles from clothes in Photoshop

Also, if you feel that the subject is too flat after applying this frequency separation technique, you can dodge and burn to bring back some dimensionality.

How to remove wrinkles from clothing in Photoshop: Conclusion

example with wrinkles removed

You should now be able to confidently remove wrinkles of any type – with just a few quick edits in Photoshop.

In fact, I used very extreme examples for this article, and it’s unlikely you’ll face wrinkles that serious unless you don’t iron anything at all.

(In fact, I recommend you or your client/model do a bit of ironing before a photoshoot, just to save time in editing later.)

I hope that, the next time you need to remove wrinkles from clothes in Photoshop, these techniques can be of help!

Now over to you:

Have you ever been faced with frustrating wrinkles in your photos? How did you get rid of them? Share your thoughts and images in the comments below!

The post How to Remove Wrinkles From Clothes in Photoshop (Fast and Effectively) appeared first on Digital Photography School. It was authored by Ana Mireles.


Digital Photography School

 
Comments Off on How to Remove Wrinkles From Clothes in Photoshop (Fast and Effectively)

Posted in Photography


How to Use Pattern and Repetition in Photography Effectively

06 Mar

The post How to Use Pattern and Repetition in Photography Effectively appeared first on Digital Photography School. It was authored by Lily Sawyer.

How to use pattern and repetition in photography feature image

One of the many ways we can make images more creative is to utilize pattern and repetition in photography. To beginners in photography, this may sound a little daunting, but trust me, it’s not.

All it takes is to train your eye to look for them in everyday objects and situations. They are everywhere around us if we only take the time to slow down, stop, and look a little closer.

DPS How to use pattern and repetition in photography by Lily Sawyer – Black and white image of dew drops on string
Nikkor 105mm f/8 SS 1/250 ISO 400

But first, let’s talk about what pattern and repetition contribute to our images other than an injection of creativity. Even the slightest hint of pattern and repetition in photography adds a sense of dynamics to the image. You can see many images of detailed pattern and repetition in photography that I have written within the context of developing an eye for detail, here.

What do pattern and repetition contribute to an image?

Photo by Lily Sawyer – A picture of a field taken through a wire fence.
f/8 SS 1/250 ISO 200

1. Heightened interest

DPS photo by Lily Sawyer – Sun Rays shing through dark clouds over the water
f/8 SS 1/200 ISO 800

Pattern and repetition no doubt raise the level of interest in photographs with the space they occupy in the frame and the dynamic and rhythm they bring into that space. With pattern and repetition, what would have been a flat image with little going on, becomes a space of visual activity.

In the photo above, the cloud pattern is rather abstract, dense, and fills the frame. But pair this with the repetitive pattern of the sun’s rays, and your eye immediately stops and is invited to linger and look closely.

2. Hold attention

DPS How to use pattern and repetition in photography by Lily Sawyer – checkered pattern and staircase
Left: f/8 SS 1/200 ISO 400 Right: f/5.6 SS 1/160 ISO 200

Pattern and repetition in photography hold the viewer’s attention by using strong repetitive elements. The patterns can keep the eye anchored or move it around an image using line.

The centered composition of the image above-left anchors the eye straight away whilst also making it look further towards the horizon.

The checkered black and white pattern brings the eye back to this foreground space to explore more.

3. Direct gaze

photography by Lily Sawyer
Left: f/11 SS 1/250 ISO 100 Right: f/8 SS 1/125 ISO 100

Once the image holds that attention, you want the attention to stay, linger for a while and live the space. This is precisely what pattern and repetition do. Effective use of both, invite the eye to move around the frame and scrutinize the parts that made the image great. Or in the very least, takes the viewer on a visual journey.

In the photo above, the angle I shot this photo from provides a leading line. It makes the eye stop at the strong vertical block on the right and look towards the left.

Where to find pattern and repetition

We live in a world saturated with them! From natural objects and phenomena to man-made structures, we are surrounded by pattern and repetition.

1. Nature

Photography by Lily Sawyer – water ripples
f/4 SS 1/80 ISO 2000

Pattern and repetition are around in great abundance. Take nature, for instance, it is brimming with activity at all times. When we care to stop and look, we see innumerable patterns and countless repetitions.

This could be obvious pattern and repetition, for example, the wake patterns created by waves from a sailboat, various types of cloud formations, raindrops on a washing line, mussels on the beach, birds flying in formation, sand dunes, surfing waves, or trees in a forest. It could be symmetrical and asymmetrical designs in nature like shells and fossils, florals, veins on leaves, snowflakes… the list is endless.

DPS How to use pattern and repetition in photography by Lily Sawyer – Dewdrops on a string and seashells on a beach
Left: Nikkor 105mm f/8 SS 1/250 ISO 400 Right: f/11 SS 1/800 ISO 100

To add to that list, there are subtle forms of pattern and repetition in nature too – like grass growing in a field, the night sky, close-up corals, converging gentle ripples, the effect of the wind, smoke, and haze just to name a few.

DPS How to use pattern and repetition in photography by Lily Sawyer – grass tussels with beach in the background
f/4 SS 1/500 ISO 100

2. Human-Made

Similar to a wake of waves from a boat, you can see contrails or vapour trails from aeroplanes. They may look like clouds but they are actually condensation trails resulting from the changes in air pressure in the sky and, therefore, can be arguably nature and human-made.

More easily recognizable patterns and repetition made by people include architectural forms and structures, sculptures and installations, floors and wall tiles, mosaics, shadows, light beams and lasers, and many other objects.

DPS Photography by Lily Sawyer –  interior building archway
f/5.6 SS 1/60 ISO 1000

3. Create it yourself

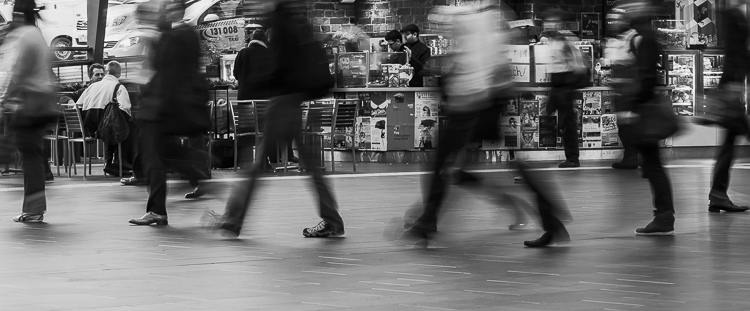
The search for pattern and repetition in photography doesn’t have to stop there! As a matter of fact, we can create it ourselves. This shot below has been created using a very slow shutter speed while popping the flash several times as the subjects moved.

Read this article on how I achieved this double exposure in camera.

DPS How to use pattern and repetition in photography by Lily Sawyer – multi-exposure of people in black and white
Experiment between f/8 – f/16, ISO 100 – 400, Shutter 2 seconds to bulb

I created the photo below using an iPhone lit up in the dark and shot it with a very slow shutter speed. This is also called dragging the shutter but without the use of flash and is a way of painting with light too.

DPS Photography by Lily Sawyer – light painting with an iphone
Shutter set on bulb for about 10 seconds or so, f/11, ISO 400

Now that we have some ideas on where to look for pattern and repetition, let’s look at how to use them effectively to strengthen our images.

How to use pattern and repetition in photography to add strength

1. Composition

The key to any image is its composition. Perhaps it’s using the rule of thirds or a centered composition. It may be symmetrical or asymmetrical. There are many factors in composition and you can read more about mastering it here.

DPS How to use pattern and repetition in photography by Lily Sawyer – Patterned windows
Left: f/2.8 SS 1/160 ISO 400 Right: f/5.6 SS 1/200 ISO 100

2. Use color and contrast

By placing the colors in specific areas of the frame, you can strengthen your image immensely. On the image below-left, by positioning the strongest color red and it’s shadowed contrast and light contrast off-center to the left (and again off center diagonally downwards), the image takes on a dynamic look.

Compare this to the image below-right, which although has 3 strong colors of the same tonal values, lacks the light and shadow contrast. The red image has a much stronger impact.

DPS How to use pattern and repetition in photography by Lily Sawyer – Light shining through large windows creating a pattern
Left: f/5.6 SS 1/160 ISO 400 Right: f/5.6 SS 1/160 ISO 800

3. Use forms and shapes

To create pattern and repetition in photography, use dynamic forms and shapes like spirals, curves, triangles, cubes, and other angular shapes, are key to emphasizing the dynamics in a space and heightening its interest level.

In the image below-left, although there are many things going on in terms of repetitive lines, there are not as many acute angles of these lines and shapes compared to the image on the right. The image on the left is a three-dimensional space and the image on the right is a flat floor, yet it is much more dynamic.

DPS How to use pattern and repetition in photography by Lily Sawyer – patterned floor and interior
Left: f/4 SS 1/200 ISO 400 Right: f/4 SS 1/125 ISO 2000

4. Use leading lines

Concentric lines, spirals, zigzags, waves, and diagonals are easy to use lines that lead the eye to various places in the frame. In the image below, which has no other subject but the lines themselves, there is still a sense of movement and interest despite the lack of additional colors and strong contrast. You can read more on leading lines here.

DPS photography by Lily Sawyer – circles repeated in wood
f/4 SS 1/125 ISO 2000

5. Use perspective

Photographing from an angle as opposed to a straight-ahead, same-level shot also accentuates pattern and repetition. The images below are high up and full of lines. The addition of the love angle adds more depth to the image. Changing your perspective makes you see things from a new angle and in a new light.

DPS How to use pattern and repetition in photography by Lily Sawyer – patterned interior roofs
Left: f/5.6 SS 1/125 ISO 1200 Right: f/4 SS 1/100 ISO 3200

Conclusion

In this article, we have seen how using pattern and repetition in photography is an easy way to improve our images. All it takes is to look more carefully at the world around us and incorporate these elements into our images using some basic photography principles.

DPS How to use pattern and repetition in photography by Lily Sawyer – dewdrops on lines in balck and white
Nikkor 105mm f/8 SS250 ISO 400

What’s more exciting, is that you can also create your own images using pattern and repetition!

Now it’s time to get those creative juices flowing, and go and make your own!

DPS Photography by Lily Sawyer – multi exposure of people against a patterned backdrop
Experiment between f/8 – f/16, ISO 100 – 400, Shutter 2 seconds to bulb

Do you have any other tips for using pattern and repetition in photography?

Also, we’d love to see your images of pattern and repetition, so please share them with us in the comments section.

The post How to Use Pattern and Repetition in Photography Effectively appeared first on Digital Photography School. It was authored by Lily Sawyer.


Digital Photography School

 
Comments Off on How to Use Pattern and Repetition in Photography Effectively

Posted in Photography


How to Pose Grooms and Groomsmen Effectively

21 May

The post How to Pose Grooms and Groomsmen Effectively appeared first on Digital Photography School. It was authored by Jackie Lamas.

Wedding days aren’t just about the bride, even though it might seem that way. As photographers we must also take photos of the groom by himself and with his groomsman buddies – whether they like it or not.

Posing the groom alone

When posing the groom alone you often see stiffness and shifting eyes because most men don’t feel  comfortable having their photo taken. So it’s worth starting a conversation that has nothing to do with the wedding to relax them and settle their nerves.

Find a nice background where you can photograph the groom at three different crops: full-body, half-body, and close-up. These three crops will add variety to your portraits, and give you more options when choosing the best portrait to deliver to your clients.

For example, window lighting can add dimension and depth while the groom is adjusting his tie or watch, or buttoning his shirt. Have the groom look out the window, or at his watch or tie. This keeps his hands busy, and because he’s not looking at the camera he won’t feel as vulnerable.

When you’re outside you can have the groom lean on a wall, or simply stand in the middle of a walkway. To help him pose naturally, tell him to stand as if he was by himself and not getting his photo taken.

Also, remind him to breathe. The stiffness is often caused by the groom holding his breath. It will also help him relax his shoulders and overall stance.

Photographing the groom at three different crops is a great way to add variety to the final images.

If the groom usually puts his hand in a pocket, have him put the one furthest from the camera into his pocket. This can help make the portrait feel more natural. Having the groom look at various points beyond the camera (to the side, behind you, or even at his shoes) can reduce the nerves and stiffness, and make him feel more comfortable.

As you’re taking the groom’s portraits, feel free to joke around, talk about things they like, or simply compliment them. This can make them feel more comfortable and bring about natural smiling and laughing, as well as fill in the silence.

Sitting is another great way to pose the groom. Have him sit on steps, a short wall or a chair. It will make the groom feel less stiff, and allow you to focus on various details of his outfit such as his shoes or socks if he chose something special.

Portraits of the groom while with the bride

But the groom doesn’t have to be completely alone in his portraits. A beautiful portrait of the groom with his bride can isolate him while placing him in the overall story of the wedding day.

Pose the couple facing each other, and ask the bride to place her head on his chest or arm to bring her face out a little. Then have her close her eyes while you direct the groom to look at the camera.

Another great portrait is having the groom at a 45-degree angle, with the bride behind him. Ask her to put her head on his back/shoulders, and have him look either directly at you or off into the distance.

He doesn’t have to smile. He can even look a little more serious. But the big picture will still look romantic and show that the couple is sharing a special moment.

You can move the groom and bride from there and create variations where the groom is:

  • in focus
  • in the forefront
  • looking directly at the camera
  • the main focal point in the photo.

These will all make great portraits of the groom and help him pose with his bride.

Groomsmen

Groomsmen are really fun to photograph. Most of the time they’re buddies and will joke around a bit, which can make for great candid photos. But it can also mean they won’t take the photo shoot seriously.

One way to get them to listen and cooperate is to let them know the faster they get through the photo shoot, the sooner they can start having fun. But don’t use this trick until you’ve captured some candids showing how they all interact, as it will be nice for the groom to have those as well.

Keep at least three different groomsmen setups in mind before photographing the wedding. You can find inspiration online and save those inspirational photos on your phone to recreate or build on them. This can save you lots of time if you’re new to wedding photography.

Try and keep the conversation light and easygoing. It will help the groomsmen relax, and you’ll get much more authentic expressions from them.

Group huddles and hugs are great icebreakers, and can lighten the mood if you feel the photos are getting a little stiff or the groomsmen are losing steam. A slow walking photo is also nice to have and having them looking at each other and talking is a great way to get them all smiling.

A staggered photo, either on a staircase or in a big area, can provide you with more varied poses for your final photos. If you have enough time, get a photo of each groomsman with the groom. Keep the photos moving by keeping the groom in the same place and having the groomsmen take turns standing beside him.

Keep everyone’s height variations in mind when taking photos of the groom with his groomsmen. Taller groomsmen may need to stand further back. If there are big height differences between the groom and his groomsmen, place those who are about the same height next to the groom, or bring the groom closer to the camera. This can help isolate the groom and make him the focal point of the photo, which is exactly what you want.

Keep everyone moving and try to get the photos done quickly. Groomsmen are usually ready for the next event pretty quickly and get sick of the camera much faster than the bride and bridesmaids.

If the groomsmen have ideas for poses, go along with them. It may be an inside joke or something that brings them closer together as buddies. And they’re usually the photos they love to remember.

Also, always ask if the groomsmen are wearing something special or have a gift from the couple – watches, socks, matching shoes, flasks, etc. These items have far more meaning when they’re photographed in the hands of those who received or are wearing them.

For example, these groomsmen all received personalized flasks from the groom, so a toasting photo was fun to create for them, along with a close-up of one of the flasks.

In conclusion

Grooms and groomsmen are fun to photograph during a wedding. But it’s best to have a few poses in mind so you can work quickly, as they often don’t like having their photos taken and may tire quickly. Keeping the mood light and fun gives them a great experience, and they’ll look back at the photos with fond memories.

dps-How-to-Pose-Grooms-and-Groomsmen-Effectively

The post How to Pose Grooms and Groomsmen Effectively appeared first on Digital Photography School. It was authored by Jackie Lamas.


Digital Photography School

 
Comments Off on How to Pose Grooms and Groomsmen Effectively

Posted in Photography


B&H effectively cancels out internet sales tax in US with its new ‘Payboo’ credit card

08 May

Just shy of a year ago, the United States Supreme Court ruled that out-of-state retailers are required to collect sales tax on internet sales. B&H has long been known for the absence of sales tax outside the state of New York and to account for the ruling, it’s decided to take a unique approach to effectively cancelling out the sales tax for B&H customers.

It’s called Payboo, and it’s a credit card B&H has created in partnership with Synchrony Bank that will automatically reward you, instantly, with the amount sales tax would effectively cost at checkout. As explained on B&H’s FAQ page about the new Payboo card, ‘B&H issues instant Payboo Card Savings on all non-tax-exempt purchases shipped to eligible states paid for with the Payboo Card in the form of a reward concurrently issued and redeemed directly on your order during checkout.’

B&H further explains the process under the question ‘How does the Payboo Card benefit really work?’

‘When you pay for B&H purchases with the Payboo Credit Card, B&H will charge the total of merchandise plus applicable fees and taxes; but we instantly issue and apply a reward on orders made in our SuperStore or shipped to eligible states right in checkout as a form of customer payment. Then, the amount charged to the Payboo Card is net of the benefit applied.’

In other words, consumers won’t notice any difference in the cost, as B&H effectively takes on the cost of the sales tax. Better yet, since B&H collects and disburses state sales tax in accordance with state sales tax laws and regulations, nothing needs to be done on the consumer’s end come tax season.

B&H says there will be no upper-limit on how much you can save using this benefit and notes that the savings will vary based on the zipcode products are being shipped to. To apply for the B&H Payboo Card, which doesn’t require an annual fee, you must have a valid Social Security Number (SSN) or Individual Tax Identification Number (ITIN) and a U.S. billing address. Of course, applying doesn’t guarantee a card, which is subject to credit approval.

B&H addresses further questions on its Payboo page and has a dedicated page for signing up.

Articles: Digital Photography Review (dpreview.com)

 
Comments Off on B&H effectively cancels out internet sales tax in US with its new ‘Payboo’ credit card

Posted in Uncategorized


Full Moon and Eclipse Photography: Your Guide to Where They Are in 2019 and How to Capture Them Effectively

26 Feb

The post Full Moon and Eclipse Photography: Your Guide to Where They Are in 2019 and How to Capture Them Effectively appeared first on Digital Photography School. It was authored by Caz Nowaczyk.

Jongsun Lee

Full moons and eclipses are a unique time to capture some interesting photographs.

Full Moons

Full moons usually happen once a month, with the occasional second full moon falling in the same month. This second full moon is called a Blue Moon.

Solar and Lunar Eclipses

A solar eclipse happens when the new moon passes between the earth and the sun, casting a shadow over the sun.

A lunar eclipse occurs when the earth passes between the full moon and the sun, causing the moon to fall into earth’s shadow. Lunar Eclipses occur only at the full moon.

To give you the opportunity to shoot the moon, below is a calendar of Full Moons and Eclipses for 2019, followed by some articles that will help you to capture the moon or eclipse effectively.

Full Moon and Eclipse Calendar

Full Moons

New York, N.Y (US/Eastern)

Date Time
Jan 21 00:17
Feb 19 10:53
Mar 20 21:43
Apr 19 07:12
May 18 17:11
Jun 17 04:31
July 16 17:39
Aug 15 08:31
Sep 14 00:35
Oct 13 17:10
Nov 12 08:37
Dec 12 00:14

Eclipses

Date Type
July 2 Total Solar Eclipse
July 16 Partial Lunar Eclipse
Nov 11 Mercury Transit
Dec 26 Annular Solar Eclipse


Full Moons

Sydney, Australia (AEST)

Date Time
Jan 21 00:17
Feb 20 02:53
Mar 21 12:42
Apr 19 21:12
May 19 07:11
Jun 17 07:38
July 17 17:38
Aug 15 22:29
Sep 14 14:32
Oct 14 08:07
Nov 13 00:34
Dec 12 16:12

Eclipses

Date Type
July 17 Partial Lunar Eclipse


Full Moons

London, England, UK

Date Time
Jan 21 05:16
Feb 19 15:53
Mar 21 01:42
Apr 19 12:12
May 18 22:11
Jun 17 09:30
July 16 22:38
Aug 15 13:29
Sep 14 05:32
Oct 13 22:07
Nov 12 13:34
Dec 12 05:12

Eclipses

Date Type
July 16-17 Partial Lunar Eclipse
Nov 11 Mercury Transit


How to Achieve Better Full Moon and Eclipse Photography

20 Dos and Don’ts for Shooting the Moon

Beyond Full Moon Photography

Moon Photography: 6 Tips for Better Moon Photos

How to Photograph a Solar Eclipse

Tips for Photographing a Lunar Eclipse

How to Photograph a Lunar Eclipse


The post Full Moon and Eclipse Photography: Your Guide to Where They Are in 2019 and How to Capture Them Effectively appeared first on Digital Photography School. It was authored by Caz Nowaczyk.


Digital Photography School

 
Comments Off on Full Moon and Eclipse Photography: Your Guide to Where They Are in 2019 and How to Capture Them Effectively

Posted in Photography


7 Different Situations Where You Can Use Fill Flash Effectively

05 Feb

The post 7 Different Situations Where You Can Use Fill Flash Effectively appeared first on Digital Photography School. It was authored by Kevin Landwer-Johan.

Many photographers experience anxiety when they think about using flash. It’s a big unknown, difficult to control and to predict what the results might look like.

Knowing when you need to use flash to improve a photograph is just another choice you need to make. A little like deciding what lens to use to take a particular photo. Obtaining the right amount of light from your flash to compliment your picture is key to effective fill flash photography.

Attractive Young Photographer 7 Different Situations Where You Can Use Fill Flash Effectively

© Kevin Landwer-Johan

In this article, I share some thoughts on when and why you might choose to add fill flash. I’ll also walk through seven situations where using fill flash helps enhance a picture.

Using fill flash – what, when and why

Fill flash is typically used to balance with the ambient light to provide the main subject with a more pleasing exposure. So you are filling in some additional light to obtain a better or more interesting exposure. Balance is key. When light from a flash overpowers the ambient light, this is not fill flash.

You can make use of fill flash not only at night or in dark locations, but also when there is plenty of light. Fill flash can be used to effectively decrease or eliminate unwanted shadows when the ambient light is very bright.

1. Fill flash and bright sun

mannequin hitch hiker 7 Different Situations Where You Can Use Fill Flash Effectively

© Kevin Landwer-Johan

The bright sun casts a hard-edged, dark shadow. When there’s no other light source or reflected light, contrast can cause problems.

Photographing people in bright sunshine they will often have dark shadows under their eyes, nose, and chin. Adding some fill can help to fill in these shadows.

Adding just the right amount of light from your flash is important so it’s balanced with the sunlight. In this photo of a mannequin I saw on the roadside one morning, I have added fill flash. I directed my flash at the smiling figure. I set the output so she was well lit, but her shadow, from the sunlight, is still clear.

2. Electric light source and fill flash

Circuit Board 7 Different Situations Where You Can Use Fill Flash Effectively

© Kevin Landwer-Johan

When you have any light source which causes your main subject to be poorly lit, adding fill flash can help.

The large magnifying glass in this photo has a light behind it to illuminate the electronic board. Had I not added any fill flash, the electronic board would be well exposed, but the white surround of the magnifying glass would be underexposed.

Fill flash can even out the light when it’s important to have everything in your photo well exposed.

3. Using ambient light as backlight

Thirsty Traveler 7 Different Situations Where You Can Use Fill Flash Effectively

© Kevin Landwer-Johan

Photographing your subject with the main light source behind it is known as backlighting. This situation again can create problems when you want evenly exposed photos.

Adding fill flash to a subject which is backlit, you can bring a balance of light and obtain an even exposure.

In this photo of the young woman drinking, I wanted to include the train in the background. The light behind her was quite strong so I balanced it by adding in a burst of flash from my right.

By controlling the flash power to output slightly less light from the ambient light, I was able to leave a soft shadow on her face. Had I not included the flash, the shadow would be too dark and not help convey that it was a hot day so well.

4. Fill flash with a bright background

Young Woman in the Park 7 Different Situations Where You Can Use Fill Flash Effectively

© Kevin Landwer-Johan

Bright backgrounds, even on cloudy days, can sometimes cause you to underexpose your subject if you’re not careful. Adding some flash helps.

The bright background behind my model in this photo was not super bright, as it was an overcast day. I wanted her to be a little brighter than the background, so I placed the flash to my left. I also had a small softbox for the flash so it was diffused to match the feeling of the ambient light.

5. Light your subject at sunset or sunrise

Evening Jetty 7 Different Situations Where You Can Use Fill Flash Effectively

© Kevin Landwer-Johan

At either end of a day, when the sun is low in the sky or just below the horizon, fill flash can be helpful. Sunrise and sunset can produce beautifully colored skies, but they are often going to be brighter than your subject.

If you set your exposure for the sky, your subject will be underexposed. If you set your exposure for your subject, your sky overexposes and you lose the effect of the color in your photo.

Adding a little flash to your subject, so it’s balanced with the light in the sky, will light your subject and allow the color in the sky to be captured also.

6. Fill flash and fire

Bronze Crucible 7 Different Situations Where You Can Use Fill Flash Effectively

© Kevin Landwer-Johan

This example is a little different but has the same principle. In this case, part of the main subject is the light source.

I photographed this inside. The workshop was fairly dark so the flames were throwing shadows over the dark metal.

Had I not included any flash in this scene, the crucible, tongs, and surrounds would have been too dark. I wanted more detail to be visible in these areas.

7. Slow shutter and fill flash

Buddhist Chedi Luang 7 Different Situations Where You Can Use Fill Flash Effectively

© Kevin Landwer-Johan

Any time you have movement in a scene you can use a slow shutter speed to create motion blur in your photos. Using some fill flash can add a whole other dynamic, particularly if you set camera and flash to synchronize well.

Many cameras allow you to set the synchronization to fire the flash just before the second, or rear curtain of the shutter closes. This causes a partial ‘freezing’ of the motion in a more attractive manner.

Again, balancing your flash output is important to achieve the best effect. For this technique, I generally set my flash output to be slightly brighter than the ambient light. If the output is the same or less you will not see the effect much or at all.

How to use your flash well

Woman and Elephants 7 Different Situations Where You Can Use Fill Flash Effectively

© Kevin Landwer-Johan

You do not need to have your flash mounted on your camera’s hot shoe pointing directly at your subject.

Diffusing your flash, or bouncing it off a reflector or other surface, will soften the light. Placing your flash off to one side, above or below, will often produce more interesting, pleasing results.

Controlling the output of your flash is always vital. Too much or too little light from your flash causes an imbalance. You need to decide how much light your photo requires and make the correct adjustments to your flash.

Through the lens (TTL) metering is often the easiest setting. You can also use the Auto mode. Sometimes, with either of these settings, you may need to dial in compensation so the light will be a little stronger or weaker.

Using the Manual setting on your flash requires a little more thought and experimentation. It can often produce a more reliable output from the flash when you are taking a series of photos. This is particularly useful when there are variables in light or camera/subject/background distances.

Conclusion

Akha Coffee Harvest 7 Different Situations Where You Can Use Fill Flash Effectively

© Kevin Landwer-Johan

Adding fill flash can make a positive difference to your photos in many situations. When you are not content with the ambient light alone, consider adding a little light from your flash. Even if the only flash you have is the pop up one on your camera.

You may not get the right result the first few times you try this method. Practice. Study your results. Compare photos where you did not use the flash with ones where you did. In time, you will develop a sense for when adding some fill flash will enhance your photographs.

Share some photos in the comments section below and tell us of your experience with using fill flash, whether you were successful or not.

The post 7 Different Situations Where You Can Use Fill Flash Effectively appeared first on Digital Photography School. It was authored by Kevin Landwer-Johan.


Digital Photography School

 
Comments Off on 7 Different Situations Where You Can Use Fill Flash Effectively

Posted in Photography


How to Use Your On-Camera Speedlight to do Bounce Flash Effectively

26 Jul

An on-camera flash (or speedlight) is the tool many photographers own, but few know how to use. Every day I see this amazing piece of equipment go to waste, slamming harsh light into a subject, when it could be caressing it with soft, directional illumination. The flash is a sculptor’s chisel, not a sledgehammer. You just need to know some basic technique.

Photo6

In the 400-plus weddings I’ve photographed over the years, much of what I shoot indoors is lit with a speedlight. I have a trunk full of studio lights that I’ll set up and use sometimes at events, but more often than not, I end up preferring the photos from my little on-camera flash (not to be confused with the built-in one). You can create beautiful light bouncing your flash off of walls, ceilings, mirrors, professional wrestlers or herds of sheep.

Let me illustrate with a few examples, using my favorite model, my wife Karen. Every photo below is taken with the same lens (50mm), shutter speed (1/180), and aperture (f/4). We also don’t move at all. We are about 10 feet in front of a gray paper backdrop, white walls to the left and right are about seven feet away. The ceiling is also white. The only thing that changes in these photos is that I am spinning my flash head into different positions.

WHAT NOT TO DO

Photo1

In our first example, I’ve photographed Karen with direct flash. (She is laughing because she thinks I’m incompetent for having my flash in that position).

This is harsh, flat light. There is a nasty shadow on the background. This is the opposite of bounce flash, and typically a last resort flash position. Let’s move on.

A SLIGHT IMPROVEMENT

Photo2

Here I’ve improved things a bit by bouncing my flash off the ceiling. This has softened the light, but it is still coming from overhead, creating unattractive shadows under her eyes, and a lack of catchlights. We can do better!

LOOKING GOOD

Photo3

Here I’ve pointed my flash to the side, so it bounces off the wall to my left, giving me some softness and better directionality and volume of light. I think this is a keeper!

WHAT HAPPENED HERE?

Photo4

Just for fun, I turned my camera upside down here and pointed the flash at the floor, so the light is coming up from below. We call this Franken-light (monster lighting). Not something you are going to do a lot, but if you ever get hired to photograph a vampire, this is a good one to have in your toolkit.

All of these photos illustrate the two main factors I think about when shooting bounce flash: light direction and light quality (softness).

LIGHT DIRECTION

This just refers to the direction the light is coming from, something that is very easy to control with a bounce flash. If you point your flash up at the ceiling, it will hit your subject coming from above. If you bounce your light off a wall to the right, the light will come back from the right, etc.

Photo5

Check out this simple portrait of a wedding guest (above). She was looking to her right in the photo, so I bounced the light off a wall on that side to get some beautiful light into her face. If the next person I want to photograph is facing the other way, all I have to do it spin my flash 180 degrees and bounce it off the opposite wall. This sort of versatility is wonderful when shooting live events.

Photo6

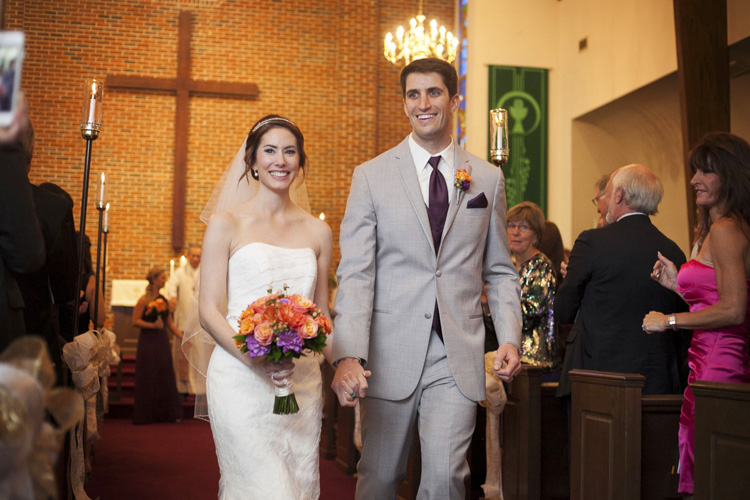
In this photo of a just married couple walking down the aisle, I bounced my flash off a wall to the left again, to get some wonderful light on them. If you look at the people in the background, you can get an idea of the ambient illumination in the room.

The nicest light often comes more from the side than from above. If you fire your flash 90 degrees to your left, the light will come back from the left at 90 degrees. Incidentally, this is a similar angle to the great light you can get at dusk and dawn.

LIGHT QUALITY (SOFTNESS)

The softness of your light is mainly affected by the size of your light source. With bounce flash that is the section of wall or ceiling illuminated by your flash. I think this is the hardest concept for people to get with bounce flash. Just think of your light source as the surface that is illuminated by your flash (rather than the flash itself).

The bigger the light source, the softer the light. In other words, the larger the area you cover with your flash, the softer the light coming back. To cover a larger area with bounce flash, simply move farther from your bounce surface, to allow the light from the flash to spread out more. A lot of flashes also allow you to zoom the flash head in and out, creating a narrower or wider beam (a wider beam allows the flash to spread out faster, and vice versa).

Bounce sample 1

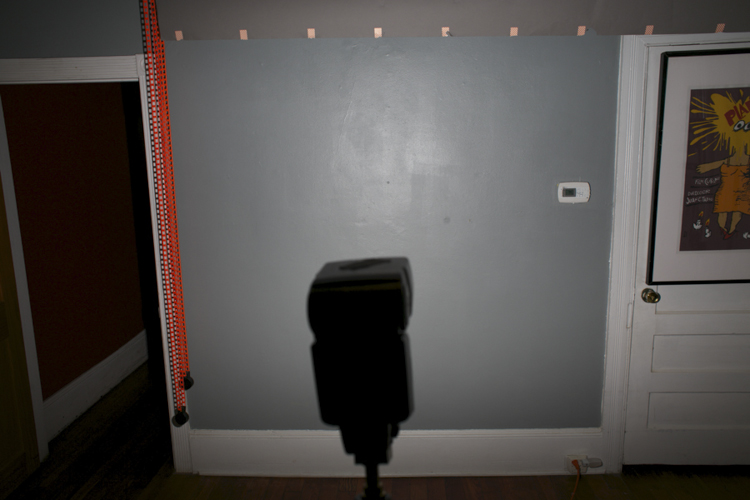
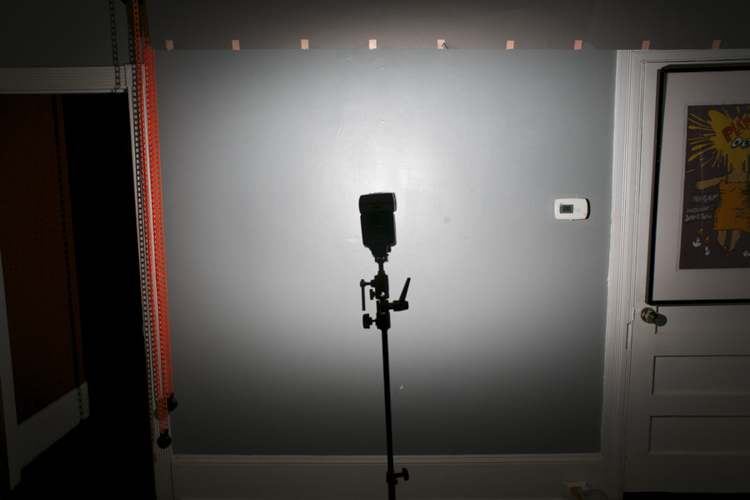
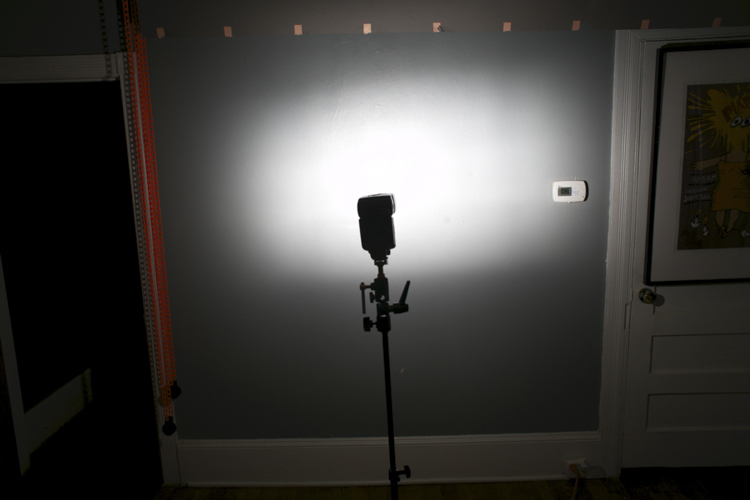
This can be a little hard to visualize, so I’ve taken a couple of photos to help illustrate how it works. In the first photo (above), I have my flash head zoomed all the way out, to create the widest beam possible. I then fired it at a wall in my studio about 10 feet away. As you can see, the flash lights up most of the wall. This would makes for some nice soft light bouncing back towards us.

In the second photo (below), I have moved my flash closer to the wall with the same amount of zoom. As you can see, it is lighting up less wall now, meaning the light source is getting a bit smaller (more harsh/hard – less soft).

Bounce sample 2

In the third photo, I’ve kept the flash in the same position, but zoomed in the flash head all the way. So the light source is now smaller still (the area on the wall which is reflecting light is the light source).

Bounce sample 3

What you may not realize is that you can send your light all the way across a massive hotel ballroom, for example, and have it come back nice and soft. In the photo below of adoring parents listening to a wedding speech, the light from my flash is traveling 20 or 30 feet to the wall and back. The farther it goes, the more it spreads out, and the softer the resulting light. Beautiful!

Photo7

POWER ISSUES AND TRICKY LOCATIONS

Now there is a limit to your flash power, and therefore, to how far away you can be from your bounce surface. Fortunately with digital cameras it’s easy to do some quick tests to see what you can get away with.

For example, let’s say you find yourself in a huge convention space photographing the keynote speaker at the annual prune sellers convention. The lighting in the room is from horrible overhead spotlights, and if you don’t improve upon it you’ll never get another job from this plum client. So you try bouncing your flash off a wall to the speaker’s left, but your flash just isn’t powerful enough. Your image is underexposed and your camera batteries are straining to recharge the flash.

In this situation, you can try a couple of different things to fix your problem:

  1. Ramp up your ISO as high as you can.
  2. Open your aperture up as much as possible.
  3. Zoom your flash head in as far as it will go, to narrow the light beam you are firing at the wall.

If nothing works, you may have to resort to shooting direct flash, but that should be a last resort.

Off course you won’t always be in white-walled rooms, but you can usually find something to bounce off if you look around. White ceilings and dark wood walls? Bounce off that ceiling (but try to point your flash slightly to one side or the other to give some better directionality to your light). You can also bounce off of darker surfaces. If the surface isn’t black, that means it is still reflecting some light and you can bounce a flash off it.

I’ve bounced off of everything from brick to wood paneling, though admittedly these surfaces do suck up a lot of your flash output and drain your batteries faster, so they aren’t ideal (they will also add a color cast to your image).

When I walk into a space where I’m going to use bounce flash, I immediately look around and think about what my bounce surfaces (light sources) could be. I’ll identify the surfaces that look good (generally light colored/reflective things), and position myself so I can use them to my advantage.

Let’s look at some more examples:

Photo8

This wedding couple is having their first dance at the Peabody Library in Baltimore, a very large space that doesn’t even have complete walls to bounce off, just columns, because of the way the library stacks are arranged. But I cranked my ISO up to 4000 and was able to bounce my flash and get some nice light for the photo.

Photo9

I’ve also included a photo above showing the entire space so you can get a better idea what I was dealing with.

Photo11

This sleepy little girl was photographed at a wedding reception at a country club in Virginia. I bounced my flash off a wall about 30 feet to my left, and got a little help from the purple lighting in the background.

Photo12

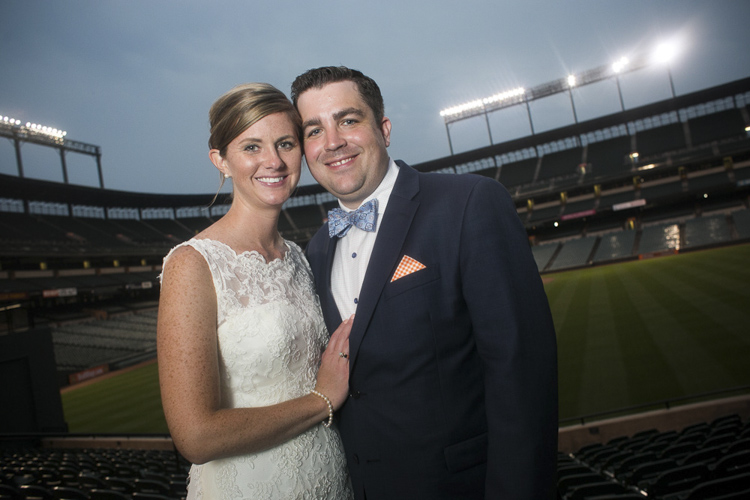
This wedding portrait was made at night at Camden Yards baseball stadium in Baltimore. This was outside and there was nothing to bounce a flash off, so I had an assistant hold a white reflector behind me to camera left, and I bounced my flash into that.

As I write this article, I’m sitting in a dark restaurant with a black ceiling, dark walls, dark carpet and dark furniture. It’s a real light-sucking pit, but there are a bunch of framed photos on the wall, and also a mirror. I’m pretty sure I could bounce a flash off of those and get some decent light if I needed to.

You can get really good at bounce flash fast. Once you are aware of the possibilities, it’s just a matter of experimenting, and refining your technique. Look around your environment and ask yourself what you can use as a bounce surface. Look at your subject and think, “Where do I want the light to come from?”

Then experiment, point your flash to the right, to the left, behind you. Before you know it, you’ll be a bounce flash master!

Please share your bounce flash tips and images in the comments below.

googletag.cmd.push(function() {
tablet_slots.push( googletag.defineSlot( “/1005424/_dPSv4_tab-all-article-bottom_(300×250)”, [300, 250], “pb-ad-78623” ).addService( googletag.pubads() ) ); } );

googletag.cmd.push(function() {
mobile_slots.push( googletag.defineSlot( “/1005424/_dPSv4_mob-all-article-bottom_(300×250)”, [300, 250], “pb-ad-78158” ).addService( googletag.pubads() ) ); } );

The post How to Use Your On-Camera Speedlight to do Bounce Flash Effectively by Dennis Drenner appeared first on Digital Photography School.


Digital Photography School

 
Comments Off on How to Use Your On-Camera Speedlight to do Bounce Flash Effectively

Posted in Photography


The Good, The Bad, and the Ugly of Watermarks and When and How to Use Them Effectively

20 May

When going out and photographing you put your heart and soul in to capturing that special moment, and later, you may pay great care and attention to finishing the image off in post-processing. You are so proud of the results you simply cannot wait to share it online, or add to your portfolio on your website!

One of the most popular practices amongst many photographers is the humble watermark; an opaque logo or text layered on top of an image. But is watermarking really necessary to protect your images – and is it really beneficial, or does it just get in the way?

Image 3

For the benefit, if are unfamiliar with what a watermark is, it is placing a logo or text  (or a combination of the two) with a reduced opacity over the main image. So why watermark in the first place?

Don’t know how to make a watermark? Check out: How to Watermarking Images With Photoshop and Lightroom.

What do watermarks do?

Watermarks prevent, or reduce the chance, of your images being stolen or used without your permission.

You’ve worked very hard – from capturing the image to editing it, and the last thing you want is for somebody to use your image without your permission; especially if it’s for the their financial gain. You would also like to have control over who uses your image. Many people believe that by adding a watermark to their images it will stop people, or at the very least deter them, from using their images without permission.

However, there is no real proof that a watermark does indeed reduce this from happening at all. It’s now all too easy to crop a watermark out of an image, or for the more savvy, clone it out altogether. Some thieves may not even bother with any of that; they may just simply take the image, with or without a watermark, and use it. The truth that is once your images are online, you cannot stop your images from being used without your permission – watermark or no watermark.

 A watermark on your work looks professional

This is a yes, and no answer. A good watermark can, in a very loose sense, look professional. However, the vast majority of watermarks – at least the ones I’ve seen – bring the level of professionalism right down. They are either simply too big, too distracting, have too much going on, or are poorly designed. They can even be a mix of all those things. A bad watermark can quickly degrade even the best image.

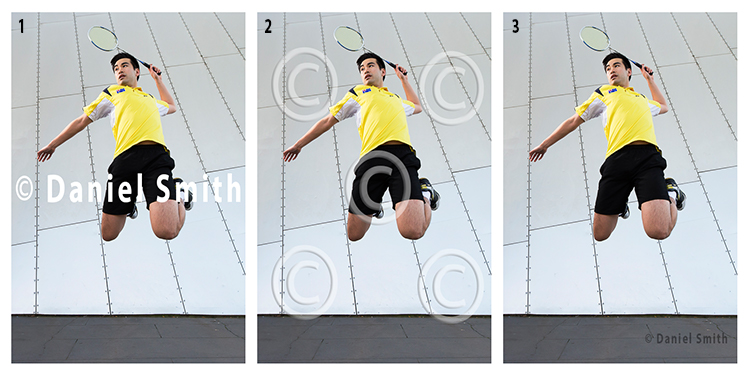
If you’ve decided that you still wish to watermark your work, here’s a quick example of bad, and good watermarks.

Watermarks

Example 1 (above left)

The watermark in the first example here has no reduced opacity, and is also straight across the middle of the image. By having it in that position, it is obstructing the view of the subject. In addition, it is also far too large. This would count as a bad example of a watermark.

Example 2 (above middle)

In this example, the opacity of the watermark has been reduced, which helps the image behind show through more than the first example. However, the watermark covers the entire image. The design is also quite generic which is okay for a stock website, where the images might be sold. But for a personal watermark, it looks too plain.

Example 3 (above right)

This is how a watermark should look; it’s small and discrete. It won’t stop people from stealing the image as it could easily be cloned out. However, if you wanted to try and prevent theft, this watermark could be placed closer to the main subject.

Generally, a watermark should:

  • Be small and monochromatic – or have very little color. Large, colored watermarks, detract from the image as they can compete with the subject too much.
  • Be placed in a descreet area of the image that does not interfere with the view of the image, but will make it more difficult to remove or clone out.
  • Have limited text
  • If the watermark is small, then having text will be all but near impossible to read

When and where to watermark

Watermarks can have their place on images. Although, they should not be on every image that you post online. Social media platforms, such as Facebook and Pinterest for example, could benefit with a subtle watermark on your images. In this case, if other users do share your photo, you can at least get a little exposure, provided they do not crop the watermark out.

Another instance where a watermark could be of benefit, is when you are showing images to someone as proofs or previews; perhaps after a wedding, or a model photoshoot for example. In those cases, the watermark could say SAMPLE or PROOF; something to make it known that those images are not the final product. In this scenario, the watermark is not intended to stop the unauthorized use of the images – rather it is there to make it known that, if these images are used, they are not the final product.

On the other hand, if you have a website that you use to show off your work, or even to potential clients as a portfolio, watermarking your images will not be of great benefit, as they generally do not look that professional.

Image 1

Conclusion

I am of the opinion that watermarks are used all too often nowadays, by photographers who want to get their name out there and prevent the theft or unauthorized use of their work, which is perfectly understandable. However, I believe that in most cases, a watermark does not add any significant purpose to your work. A watermark does not stop anyone from stealing your image, nor can it guarantee that your name will gain greater exposure if your images are shared. Rather, watermarks only degrade the quality of your work as they are most often not designed correctly, and are an obstruction to your image.

The only way that you can guarantee that your work will not be stolen, or used without your permission at all, is to never post or upload your images anywhere on the internet.

I enjoy sharing my work on the internet. But likewise, I like to share work that people can enjoy without the degrading distraction that a watermark provides. What are your thoughts? Do you use watermarks? Please share your thoughts and opinions in the comments below.

Image 2

googletag.cmd.push(function() {
tablet_slots.push( googletag.defineSlot( “/1005424/_dPSv4_tab-all-article-bottom_(300×250)”, [300, 250], “pb-ad-78623” ).addService( googletag.pubads() ) ); } );

googletag.cmd.push(function() {
mobile_slots.push( googletag.defineSlot( “/1005424/_dPSv4_mob-all-article-bottom_(300×250)”, [300, 250], “pb-ad-78158” ).addService( googletag.pubads() ) ); } );

The post The Good, The Bad, and the Ugly of Watermarks and When and How to Use Them Effectively by Daniel Smith appeared first on Digital Photography School.


Digital Photography School

 
Comments Off on The Good, The Bad, and the Ugly of Watermarks and When and How to Use Them Effectively

Posted in Photography


Go with the glow: How to effectively use Orton Layers in post processing

08 May

This image was taken in the summer of 2015 on the Skyline Trail near Panorama Point on the slopes of Mt. Rainier, WA.  The image is composed of 8 focus stacked frames and was shot at the following settings: 16mm, f/8, 1/25sec, ISO 400 using a Sony a7R and a Canon 16-35mm f/2.8L II lens.

Photo: Chris Williams Exploration Photography

Have you ever wondered how some of the top landscape photographers achieve that dreamy yet sharp look in their photos? It turns out that the answer is really quite simple. The Orton effect, as it has been dubbed in recent years, is achieved by selectively adding a Gaussian Blur layer in Photoshop. When applied correctly the technique can add depth, atmosphere and an almost surreal feeling to your images.  It can also help reverse some of the ‘crunchiness’ that sometimes results from web sharpening and compressing a large scene dynamic range into one, tone-mapped image. 

The technique itself was developed by photographer Michael Orton in the darkroom some years ago. This ‘Orton’ effect was achieved through the process of sandwiching two slightly over exposed images; one of which was slightly out of focus while the other remained tack sharp. The result of this process yielded a soft glowy image that retained much of its edge detail. 

Lucky for us this effect is now easily attained and even simplified in the digital age through the use of tools like Photoshop. In the following steps I will outline how to use and refine the technique that has been made popular by landscape photographers like Ryan Dyar over the past few years. 

Apply the Blur

The first step to this process is to take care of your focus stacking, exposure blending and touch up work before you apply the blur layer. Once that has been completed, sharpen your image as you would normally and merge the visible layers. Right click on your merged image layer and duplicate it.  

Now that you have the duplicated layer you can begin the process of applying the Orton effect. Select your duplicated layer (leave it at 100% opacity and normal blending mode) and apply the Gaussian filter to your layer. The radius at which you blur the pixels really depends upon your camera’s resolution and the desired outcome for your finished product. 

Selecting the Gaussian Blur layer is as simple as browsing through the filter options in Photoshop and selecting the appropriately named layer.

I typically blur the Raw files from my Sony a7R at a pixel radius of around 37. If you’re using a lower resolution file from something like a Sony a7S or even an APS-C camera I wouldn’t go further than a pixel radius blur of 25. The methodology behind this is that you don’t want to lose all of your edge detail and compromise the contrast in your blur layer, so choosing the correct blur radius is important. It’s a balance, and one that you should really play with to determine what blur radius works best for your needs and file types. Generally speaking, you want to stay within a pixel radius blur range of 15-40.  

A preview of the effect of your Gaussian blur settings can be seen prior to applying the setting to the layer; adjust the pixel blur radius here to determine what works best for your image.

Once you have selected the Gaussian blur settings that work best for your image click ‘okay’ to apply the filter to your layer. Leave the opacity of the layer at 100% for now.  

Bring Back the Contrast and Select the Opacity

One of the most important steps to this process is to apply a ‘levels’ adjustment to this layer. More often than not, when photographers first start to experiment with this type of technique in post processing, their images are left with haloing and a lack of contrast. Applying a levels adjustment selectively to your Orton layer can make a huge difference in your final result by bringing back the blacks and highlights that the Orton layer tends to bleed out. I normally bring the blacks in to between 10-25 and the highlights to around 245. Applying this step to your layer will ensure that you lose a minimal amount of contrast and will help to blend the layer in areas of harsh transition.   

Choose the ‘levels’ tool and adjust the blacks and lights to your taste.

Once you have completed this step it’s now time to adjust the opacity of your Orton layer. I typically aim for between 10-20% opacity. This really depends on your style and what the overall desired look and feel of your image is.  The example below illustrates what can happen if you increase your Orton layer to 35%, which can be a bit on the excessive side depending upon your image.   

10% Orton Layer 35% Orton Layer

The Devil is in the Details

Now that you’ve got this great atmosphere and glow going on in your image, you may ask yourself what happened to the detail? Loss of detail can happen when this layer is applied in your workflow, but there is a very easy solution to remedy this issue; the High-Pass filter. 

The first step is to duplicate your original background image layer (that has no Orton applied to it), select it, pull it to the top of your workflow and navigate to the filters tab.  Scroll down to find the ‘other’ category and select ‘High Pass’. A high-pass filter brings the detail out in the areas that tend to be most effected by the Gaussian layer: the edges of the elements in your composition. 

Choosing the high-pass filter follows many of the same steps as locating the Gaussian filter only this time the filter is located in the sub-menu titled ‘other’.

Once you have done this you will be given an option to select the pixel radius you wish to apply to your layer. I normally try to stay within a pixel radius of 4-5.5 (any larger and the image detail can get grainy). Pick your desired radius and click OK.  

Once you have selected the high-pass filter you can choose your pixel radius size; I normally choose between 4 and 5.5.

If you aren’t familiar with this type of application your first thought will probably be: ‘what did I just do to my image?’ as you stare at the grey layer on your screen. Fear not! There’s a very easy solution; you will need to select the layer and choose the ‘Soft Light’ blending mode.  

Make sure to apply the ‘soft light’ blending mode to your layer to blend the high-pass pixel detail seamlessly into your exposure.

This mode seamlessly blends the High-Pass pixel detail back into your image. You may want to adjust the opacity of this layer to your tastes after its application, but that’s all there is to it!  If you feel like you’ve got your settings down to a science you may want to even record this as an action. Be aware that every image will be a bit different from a processing stand point, however, so you may want to make subtle changes on a case by case basis.

Toggle the application of your layers off and on and make changes in opacity, detail and contrast as you see fit.

The Final Product

No Orton applied Orton applied

If you’ve completed all of these steps successfully, you now know how to effectively utilize an Orton layer in your workflow. This type of layer can be added to anything from landscapes, to wildlife, and even to portraits in some cases. The limits are only bound by your creativity. Have fun with it and happy shooting!    

Articles: Digital Photography Review (dpreview.com)

 
Comments Off on Go with the glow: How to effectively use Orton Layers in post processing

Posted in Uncategorized


How to Use Leading Lines Effectively in Landscape Photography

15 Mar

Leading lines composition technique is the easiest to understand and apply in landscape photography.

In fact, we compose some photographs using leading lines unknowingly! You may have done that too, it comes to us naturally. Let me show you, using an example.

Imagine you are driving through a forest, and you see beautiful line of trees on either side of the road. The autumn leaves are so breathtakingly colorful, that you couldn’t help but pull your car to a side. You want to capture that beautiful moment in your camera. Now…how would you photograph it?

Would you stand parallel to the road and just take trees on one side of the road, or would you consider taking a photograph standing right in the middle of the road, with trees on either side?

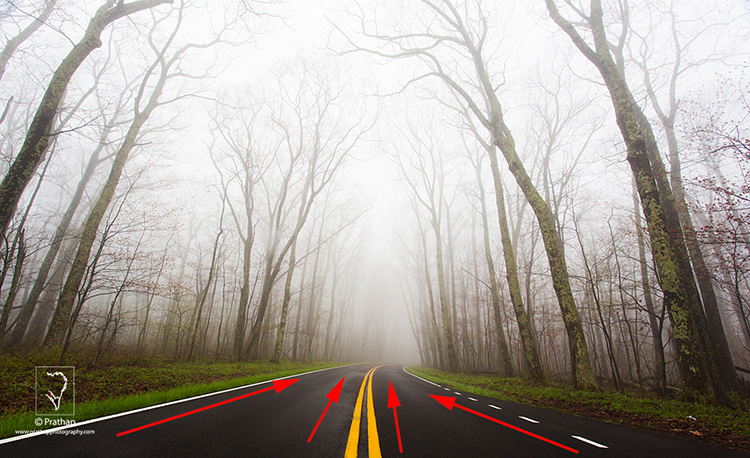
01 Leading Lines Composition Techniques Landscape Photography by Prathap Skyline Drive

Invariably, you would likely consider the latter approach. Right? Of course, you don’t want to stand in the middle of a busy road, just be careful when you do it. Don’t hang me for this idea.

When you photograph the road running from the bottom, to the center of the image, you are using the leading lines composition technique, and the road serves as the line.

Leading Lines

Simply put, a leading line is a one that leads you from one point to another in your image. Our eyes naturally follow the line unconsciously.

Check it out now. Your eye will invariably follow the line from left to right (or right to left). Look at the examples below. Your eye connects the dot subconsciously. You make a line, a triangle, and a square! That’s the power of the line.

This very nature of ours is exploited in photography, by composing an image using leading lines. By using this technique, you can force the viewer to follow the line, taking them on a visual journey. The journey becomes more interesting when you have some high drama surrounding the line.

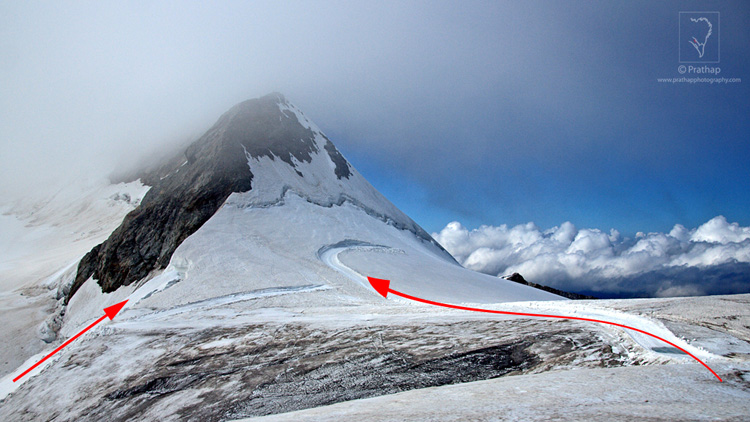
08 Leading Lines Composition Techniques Landscape Photography by Prathap Swiss Alps

It is one of the simplest, and most powerful composition techniques used in the landscape photography. Landscape photographers always look for leading lines in nature, to create a sense of depth in the image, and also to lead the viewer to the main subject of interest.

The idea is to lead the viewer into the scene with the help of literal, or imaginary/implied lines, in the scene. The photograph becomes much more interesting when this line leads the viewer to the main subject of interest, or an anchor point.

Some of the important aspects of using leading lines in composition are:

  • Leads the viewer into the photograph.
  • Leads the viewer from one point to another.
  • Leads the viewer to the main subject of interest.
  • Creates the illusion of depth, that is much needed in landscape photographs.

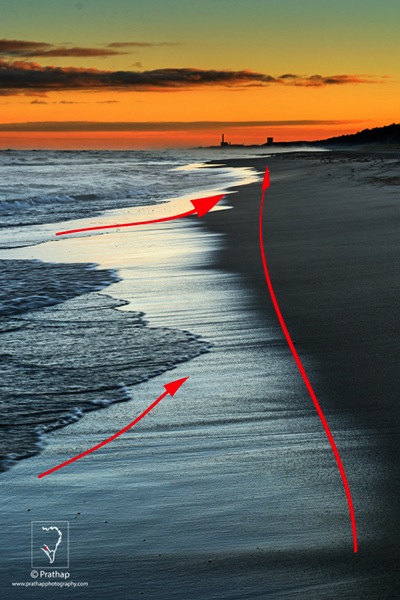
You can make most the compelling landscape photographs, by combining leading line composition technique, with the Rule of Thirds. Below is one such example where I have used leading lines to guide the viewer from the foreground, all the way to the background. Also, I have placed the horizon on the upper third of the frame, following the Rule of Thirds, and creating a dynamic landscape photograph.

02 Leading Lines Composition Techniques Landscape Photography by Prathap Indiana Dunes State Park Beach

The beauty of nature is that there are plenty of elements in nature which can be used as leading lines:

  • Roads
  • Railway tracks
  • Boardwalks
  • Pathways
  • Waterfalls
  • Streams
  • Shorelines
  • Series of trees, poles, etc.
  • Fencing
  • Pebbles or rocks on the shoreline

The list can go on. It’s amazingly simple to use leading lines in your landscape photographs, you just have to look around.

Types of Leading Lines

Leading lines can be straight or curved, and straight lines can also be horizontal, vertical, or diagonal.

A horizontal line induces a feeling of calmness, whereas a vertical line represents strength.

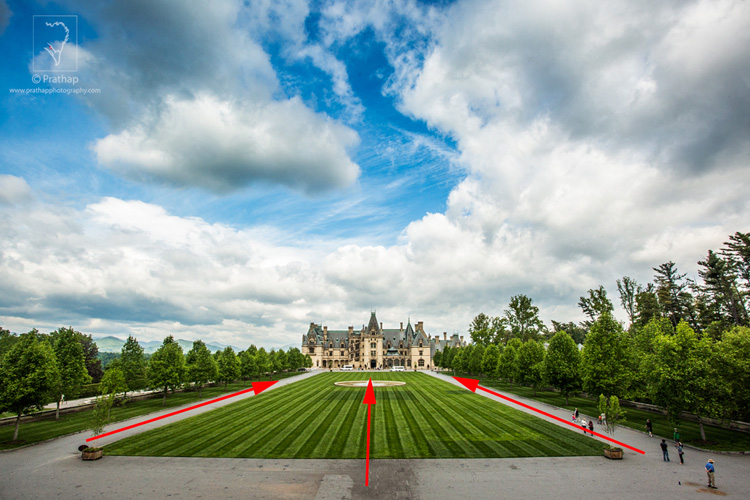
03 Leading Lines Composition Techniques Landscape Photography by Prathap Biltmore Estate

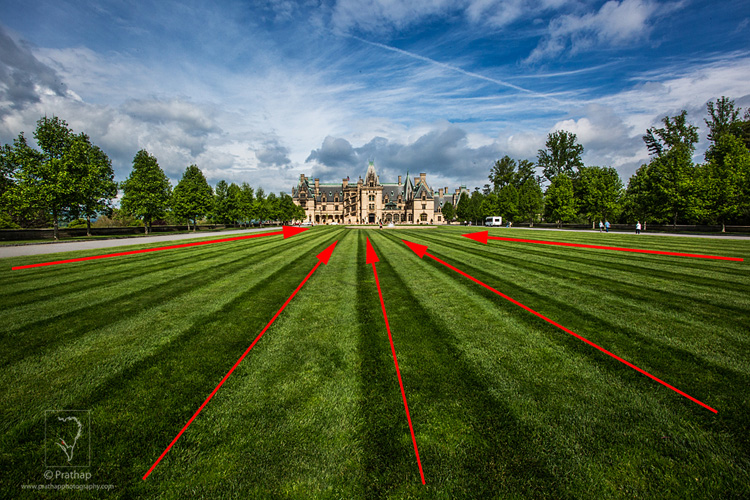
Diagonal lines can be very interesting as they represent energy. If used properly, diagonal lines can make a dull image look more compelling.

04 Leading Lines Composition Techniques Landscape Photography by Prathap Biltmore Estate Closeup

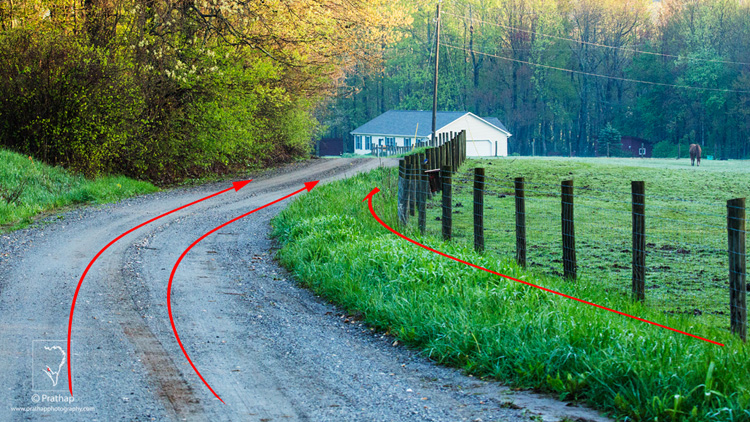
A curved line makes it for an interesting composition, as it spirals around the frame asking for more attention. The viewer will eventually scan more parts of the image.

05 Leading Lines Composition Techniques Landscape Photography by Prathap Blue ridge Parkway Countryside

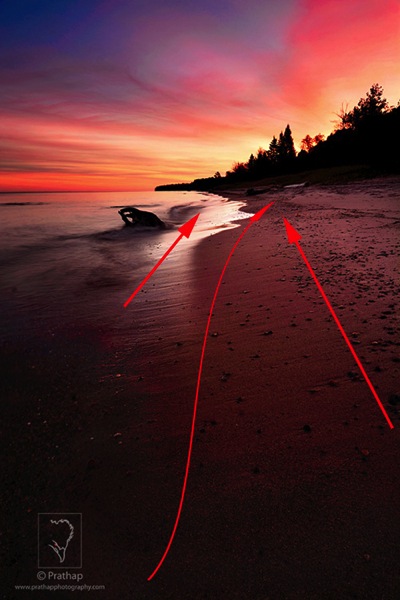
An s-curve is predominantly preferred by many landscape photographers, for its ability to connect many parts of the image. It gives a soothing feeling in the viewer.

06 Leading Lines Composition Techniques Landscape Photography by Prathap Beautiful Sunrise in Lake Superior

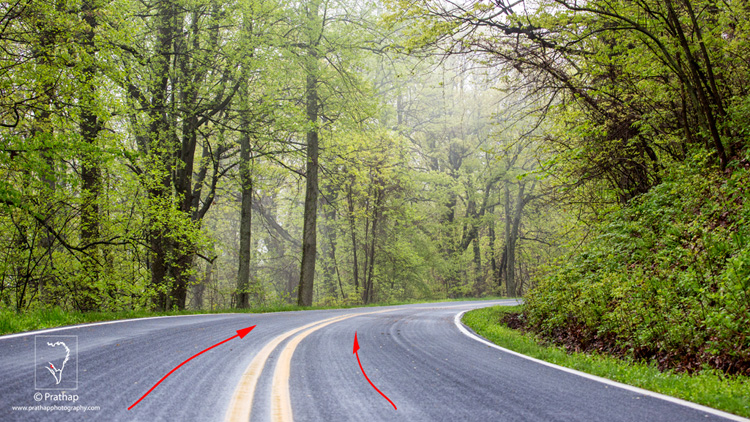
A tighter curve, however, might induce sense of danger.

07 Leading Lines Composition Techniques Landscape Photography by Prathap Blue ridge Parkway

The most important point is to use the leading lines to direct the viewer into the scene. It wouldn’t make much sense, or be effective, if it leads the viewer out of the scene.

Conclusion

Leading line photographic composition is the most powerful natural technique a landscape photographer can use to lead the viewer into the photograph. When combined with the Rule of Thirds, you can make some compelling photographs.

It is by far the easiest method to create a 3-dimensional effect, in a 2-dimensional photograph. Landscape photographers use this very effectively to force the viewer to scan the photograph from foreground to background.

“Lead the viewer in to the scene, not out of the scene.”

Embrace it now, and see how it transforms your landscape photographs into something more realistic and interesting. Think photography! Think Simple!

How do you use leading lines in your photography? Please share in the comments below.

googletag.cmd.push(function() {
tablet_slots.push( googletag.defineSlot( “/1005424/_dPSv4_tab-all-article-bottom_(300×250)”, [300, 250], “pb-ad-78623” ).addService( googletag.pubads() ) ); } );

googletag.cmd.push(function() {
mobile_slots.push( googletag.defineSlot( “/1005424/_dPSv4_mob-all-article-bottom_(300×250)”, [300, 250], “pb-ad-78158” ).addService( googletag.pubads() ) ); } );

The post How to Use Leading Lines Effectively in Landscape Photography by Prathap DK appeared first on Digital Photography School.


Digital Photography School

 
Comments Off on How to Use Leading Lines Effectively in Landscape Photography

Posted in Photography