RSS
 

Posts Tagged ‘Efex’

Software review: Nik Silver Efex Pro 3 gives the look of black and white film without the fuss

18 Oct

Nik Silver Efex Pro 3
$ 149 as part of Nik Collection 4

A few months ago we found a lot to like in the latest iteration of the Nik Collection, a suite of eight image processing tools initially developed by Nik Software and these days owned by French software company DxO. At the time, we looked at the overall suite with a focus on what was new. For this review, though, we’d like to take a closer look at just one of the suite’s most useful components, Silver Efex Pro 3.


Introduction

Nik Silver Efex Pro 3 is a black-and-white conversion tool that goes far further than the grayscale or black-and-white tools built into Adobe Photoshop. It allows users to simulate the look of specific real-world film types, manually tuning their color sensitivity and grain with an incredible amount of flexibility and precision. For less experienced users, a generous selection of presets are provided to get you started with minimal effort.

Silver Efex allows you to make a wide range of adjustments to brightness, contrast, structure and tonality, either globally or locally using control points. You can also apply color filters, reduce haze and finish your creations with toning, vignetting, borders and more.

Even at its default ‘neutral’ setting, Silver Efex Pro’s rendering is noticeably different to that of a simple grayscale conversion in Photoshop.
Click here for the full-sized Silver Efex image, here for Photoshop grayscale or here for full color.

Available immediately as part of the Nik Collection 4 bundle, Silver Efex Pro 3 can function either standalone or as a plugin for Photoshop, Lightroom and other compatible apps on both Windows 8.1+ or macOS 10.14+. (And as of the recently-released Nik Collection 4 version 4.2, this includes support for Adobe Photoshop running natively on Apple M1 devices.)

The overall Nik Collection 4 is priced at $ 149 for new customers, with upgrades available to existing customers for $ 79. That actually makes it around $ 50 less for the full suite than Silver Efex Pro 1 or 2 used to cost standalone.


What’s New?

Let’s take a quick look at what’s new in Silver Efex Pro 3. The biggest change is to the user interface, which has been completely redesigned with a far more modern look. Gone are the busy 3D-effect buttons, bevels and drop shadows of the Silver Efex Pro 2 UI, with the new version aiming to reduce distraction with a flatter, cleaner and more modern interface.

Compared to that of version 2, Silver Efex Pro 3’s interface is much cleaner and more modern.

DxO has also updated its U-Point control point technology to reduce visual clutter, significantly increase versatility and in the latest v4.2 release, bring a modest boost to performance as well. Control points can be grouped or renamed, saved for reuse in presets, and in Lightroom Classic can also be copied and pasted between images. Their individual sliders now appear in the right panel rather than directly on the image, and the luminance/chrominance values to which they respond can be tuned.

The company has also borrowed two features from its other apps to further extend Silver Efex Pro. It now boasts both the haze-busting ClearView slider from DxO PhotoLab, as well as the ability to add one of 39 black and white film grain types from DxO FilmPack. Both of these additions can only be applied globally, rather than via U-Point controls.


User interface and controls

Just like the other apps in the Nik Collection, Silver Efex Pro 3 can be used completely standalone and without the need for third-party applications.

Works standalone but it’s best used as a plugin

As a standalone app, Silver Efex can only open images in JPEG or TIFF formats, which rather limits its utility. Since it doesn’t support Raw files standalone, many photographers will instead want to pair it with other apps.

Standalone mode is very similar to plugin mode but without the bottom-of-screen status bar you’d use to apply changes as a plugin. Instead, you must use save command in the file menu.

As well as DxO’s own PhotoLab series, it can officially be used only with Adobe Photoshop and Photoshop Elements 2020+, Lightroom Classic 2019+, Affinity Photo 1.8+ or, as of its v4.2 release, Capture One 21. Other applications may work to varying degrees, but aren’t officially supported.

For example, Exposure X6 works even for Raw files, first converting them to TIFF format, but functions as if Silver Efex had been opened standalone. You aren’t shown the status bar at the bottom of the screen, and instead must use the file menu to save your results. And prior to v4.2, Capture One didn’t work at all, appearing fine but failing to apply its adjustments in the final step.

The good news is that a free 30-day unlimited trial is available, so if you’re using an application that’s not officially supported with the Nik Collection, you can try them together first to see if everything works before paying.

A fair few presets keep things simple for beginners

The quickest way to get results from Silver Efex Pro 3 is to use one of its presets, of which there are a reasonably generous 58 in all. They’re separated somewhat haphazardly into five groups with not-so-informative names: Classic, En Vogue, Modern, Vintage and 25th Anniversary. You can also view all five groups together, filtering them to show only your favorites or the ten most recently-used presets.

$ (document).ready(function() { SampleGalleryV2({“containerId”:”embeddedSampleGallery_8828424994″,”galleryId”:”8828424994″,”isEmbeddedWidget”:true,”selectedImageIndex”:0,”isMobile”:false}) });

The presets are all shown atop the left-hand pane, along with your editing history for the current image. For each preset you’re shown a small preview based upon the image you’re currently editing. These are rendered very quickly, making it easy to simply scroll through the list and find the look you’re after, or a preset that will make a good jumping off point for your own creation.

You can’t permanently modify the 58 base presets, but you can create new custom presets which can be exported and imported to allow sharing with other photographers or across multiple workstations. Your custom and imported presets are each grouped separately from the base presets, so there’s no way to quickly access favorites from all three categories or to see them all as one scrollable list.

A vast selection of controls to tune results to your tastes

Of course, while presets are great for beginners who want quick results, more experienced photographers will prefer to capture their own artistic vision, not simply borrow someone else’s.

Silver Efex Pro 3’s control list is so vast that, even with just one control point active and on a 1080p display, the right pane is still almost 3500 pixels tall. The cropped screenshots above link to the top and bottom halves of the right pane, respectively.

Thankfully, Silver Efex Pro 3 offers a huge amount of control over your images courtesy of a whopping 50+ controls in its right-hand pane. And that’s just counting the controls which affect the entire image globally. If you add one or more of DxO’s U-Point control points to the image, you’ll unlock another dozen-plus sliders per point or group of points.

Not only global adjustments, but local ones too

Each control point you add to the image is indicated with a small donut-shaped mark at its center, and while it is selected, an outer circle appears showing the extent beyond which the effect will gradually be feathered away to nothing. This outer limit can be resized to cover the portion of the image you need.

For each point, there are also both luminance and chrominance sliders, and these help you to target specific areas of the image based on their brightness and color before the black and white conversion. If you dial both sliders down to zero, the control point will effectively become a graduated radial selection, instead.

The ability to group and rename control points is very handy. In this mask view, I’ve selected the taxi’s body with one group of control points, and the road markings with another group.

Once placed, multiple control points can be grouped together. You can also rename both individual points and groups of them, and when saving new presets you can choose whether or not control points should be included. Of course, once the preset is subsequently applied to a different image, you can adjust the point positions if they don’t quite match what’s needed from shot to shot.

A closer look at the global controls

The bulk of Silver Efex Pro 3’s controls are grouped under its global adjustments header, with subgroups including brightness, contrast or structure adjustment headers, as well as tonality protection.

Click here for the full-sized Silver Efex image or here for the original color image.

Brightness can be adjusted globally, or for the highlights, midtones and shadows. There’s also a dynamic brightness slider which tries to hold onto local contrast in the highlights and shadows will brightening or darkening the image globally.

For contrast, you have a choice of either the basic contrast slider or a soft contrast slider which aims for a less harsh effect with more diffuse transitions. There are also sliders to amplify whites or blacks alone.

Under the structure header, you get both the basic structure control and one for fine structure, as well as individual controls for structure in the highlight, midtone and shadow areas. And finally, the tonality protection section contains sliders to recover lost detail in just the highlight and shadow areas of the image.

Local adjustments get a subset of these global controls

The selective colorization slider lets you bring back a specific color range to your otherwise-black and white image using U-Point selections. Image uses Full Dynamic (Smooth) preset.
Click here for the Silver Efex image or here for the original color image.

Each individual control point or group of them also offers a subset of the controls from the previous section. Confusingly, they’re grouped rather differently to those for global adjustments, though. All but the dynamic brightness, soft contrast, tonality protection and high/mid/shadow/black structure sliders have equivalents for control points.

There’s also one extra control which is specific to the control points – selective colorization. This allows you to bring some of the color back into specific parts of your otherwise black and white image, and since you can have multiple control points, you can also bring back multiple colors if you wish.

Vanquish haze with the ClearView slider

The ClearView filter in Silver Efex Pro is quite effective, but can’t be targeted only at specific areas of the image, so can cause overly-contrasty foregrounds if pushed too far.
Click here for the full-sized default image, here for the ClearView image or here for full color.

One of the new features in Silver Efex Pro 3, inherited from DxO’s flagship PhotoLab application, is its new ClearView slider. Just like its PhotoLab equivalent, it’s very effective at recovering detail and increasing contrast in hazy backgrounds and other lower-contrast areas of your image.

I sometimes found it hard to push far enough though, simply because the areas of moderate contrast in my images would start to show too much contrast before the hazy background was fully recovered. I’d really like to see DxO allow ClearView to be paired with U-Point or some other form of localized selection in a future release to help in these situations.

Color filtering without the physical filters

With traditional black and white film, if you wanted to tune the response to individual colors of light you’d do so with filters attached to the front of the lens. For example, you might attach a yellow, orange or perhaps even a red filter to make a blue sky more dramatic, or a green filter to lighten foliage.

With Silver Efex Pro, that’s all achieved post-capture with no need to fumble for physical filters, however. Red, orange, yellow, green and blue filter presets are all provided, but if you prefer you can also dial in a specific hue in one-degree increments, and you can also control the strength of the filter from 0 to 200%.

Color filters can be simulated after the fact in Silver Efex Pro 3, so you can do things like darkening a blue sky with a yellow filter to help give the clouds more definition.
Click here for the full-sized unfiltered image, here for the filtered image or here for full color.

Simulate the look of real B&W film in two somewhat-contradictory ways

Silver Efex Pro 3 now offers two different tools to simulate the look of black and white film grain. The two can be used in concert together, but the division between the two tools is unnecessarily confusing.

Firstly, the film types tool lets you select one of 28 different film types and dial in your desired level of grain size and hardness. You can also control the film’s sensitivity in red, yellow, green, cyan, blue and violet channels, and adjust levels/curves. All of this is carried over from earlier version and is based on code from Nik Software, the original creator of the Nik Collection.

Through the new film grain tool, DxO now also lets you simulate the look of specific, real film grains based on the same algorithms it used to create its FilmPack plugin. In all, there are 38 film grain types on offer, including almost every black and white film type from FilmPack. For each you can adjust the intensity from 0 to 200%, and the grain size from 1.0 to 10.0.

The new film grain tool’s grain patterns have a very authentic feel, but unlike the earlier film types tool, it only handles grain simulation and forgoes any attempt to tune the film’s responsiveness to different wavelengths of light. You can, however, use both tools at once, in which case the new tool overrides only the grain pattern of the earlier one. (And you can, if you want, choose different film types in each section to, say, create a fictitious film with the light response of one film but the grain of another.)

Full-size, no-grain-added image.

A wide range of authentic-looking film grains are available in Silver Efex Pro 3. In order, these are 100% crops of the above image with no added grain, Fuji Neopan 1600, Kodak T-Max 3200, Ilford Delta 3200 and filtered Kodak HIE. All share the same Neutral profile and differ only in their grain selections.

$ (document).ready(function() { SampleGalleryV2({“containerId”:”embeddedSampleGallery_3329018719″,”galleryId”:”3329018719″,”isEmbeddedWidget”:true,”selectedImageIndex”:0,”isMobile”:false}) });

Finish your images with toning, vignetting, burnt edges and borders

Finally, Silver Efex provides four different categories of finishing adjustments: Toning, vignetting, burnt edges and borders. By default, these are one-click adjustments involving no more than making a selection from a list, but far more control is available if you want it.

For toning, you can not only select a color but also control strength, hue and toning for both silver and paper, and the balance between the two. For vignetting, you can adjust the strength of the vignette (which can either darken or lighten), as well as its size, roundness and center point.

For burnt edges, you control the size, transition softness and strength of the effect on all four edges individually. And finally, image borders allows you not only to choose one of 14 predefined border types, but also how thick the border is and how far it extends into the image. You can also adjust the roughness of the border, and provide a ‘seed’ number that the program should use when generating the random details in border textures.

The compare tools allow you to quickly toggle between before and after views, view the image with an adjustable side-by-side or under/over split, or see both before and after images together.

Before-and-after comparisons are quick and easy

View controls can be found at the top of the screen, and I found the comparison controls in particular to be rather handy. The leftmost of these toggles between the results of your current settings or the default black and white conversion, and holding the P key down achieves the same thing.

The central button splits the image in two either vertically or horizontally, and allows you to move the dividing line across the image to allow a careful before-and-after comparison anywhere within the image. And finally, the rightmost button gives you either side-by-side or under/over views of the full image.

The histogram tool allows you to highlight which image areas are within ten different luminance levels at your current settings, even in the loupe view. Note also the history panel at screen left.

The histogram tool is surprisingly handy, too

One last function I found to be particularly handy was Silver Efex Pro 3’s histogram tool, which sits beneath the loupe at the top of the right pane. It not only gives you access to RGB, red, green, blue or luminance graphs of your image, but also splits it into ten different luminance ranges.

For any of the ten, you can enable an overlaid pattern on the image, with the pattern color varying by the range selected. This makes it really easy to see which parts of the image share the same luminance, and I found it even more useful than the more-common technique of just highlighting the brightest and darkest image areas.

Click here for the full-sized Silver Efex image or here for the original color image.

Conclusion

It’s been more than a decade since Silver Efex Pro’s last major update and until just this year, it hadn’t been significantly changed since the suite’s original creator, Nik Software, was sold first to Google and then DxO.

A lot has changed in all that time, not only for Silver Efex itself but also in the imaging software market. Gone are the days when a plugin of its ilk could command the heady price of $ 200. These days you can purchase the entire eight-plugin Nik Collection for a much more reasonable $ 150, but sadly you can’t pick and choose which of those plugins you want to save even more.

Click here for the full-sized Silver Efex image or here for the original color image.

In its overhauled form Silver Efex Pro 3 is much easier on the eye than its predecessor, making it much easier to focus on your images. And while some of its new features sit a little awkwardly alongside earlier ones, once we got used to the differences between film types vs. film grain and global vs. local adjustment sliders, we found it to be pretty easy to use considering the level of control on offer.

Performance, while not mindblowing, is sufficient to prevent frustration. On my 2018-vintage Dell XPS 15 9570 laptop running Windows 10 version 20H2 and Nik Collection v4.2, most sliders update within a half-second or less of being tweaked, even those using U-Point controls to limit their effect to certain area of the image. Final renders can take perhaps 20-30 seconds, which again doesn’t feel unduly slow.

Click here for the full-sized Silver Efex image or here for the original color image.

And it’s hard to argue with Silver Efex Pro’s results. If you’re a fan of black and white photography and are willing to put in a bit more effort than simply clicking on a preset, you can get much more authentic-looking images than you would from the black and white tools in your camera or most all-in-one apps like Photoshop.

If you’re still using the previous release of Silver Efex Pro, its successor represents a no-brainer upgrade. As well as a nicer interface and more film grain types, you’ll also find the new ClearView tool and improved U-Point technology to be big improvements. And if you’re not already a Nik Collection user but want a solid plugin that can deliver realistically film-like black and white images, we’d definitely recommend giving the trial version a spin.

What we like:

  • Yields convincingly film-like results
  • Presets get beginners up and running quickly
  • Making and sharing custom presets is simple
  • Both global and local adjustments
  • Loads of controls to fine-tune the look you’re after
  • ClearView tool is quite effective at correcting haze
  • New user interface is cleaner and less distracting
  • More affordable as a suite component than its predecessors were sold separately

What we don’t:

  • Can no longer be purchased separately
  • No Raw support when used standalone
  • Presets feel rather disorganized
  • Film types vs. film grain tools are unnecessarily confusing
  • Ditto the differing global and local adjustment slider arrangements

Who’s it for:

More experienced photographers who want fine-grained control over their black and white creations, and who desire a convincingly film-like final result.

Articles: Digital Photography Review (dpreview.com)

 
Comments Off on Software review: Nik Silver Efex Pro 3 gives the look of black and white film without the fuss

Posted in Uncategorized


Nik Collection 3 by DxO announced: Includes new Perspective Efex, faster workflow & more

03 Jun

DxO has announced the Nik Collection 3, the latest version its popular plugin suite that brings multiple new features and an entirely new plugin, Perspective Efex.

The new Perspective Efex fixes geometric distortion in your images via automatic corrections or manually placed reference lines. Perspective Efex can correct distortions such as keystone distortion in architecture images and is able to address lens distortions such as barrel, pincushion and fisheye distortion.

The new Perspective Efex plugin allows users to fix distortion in their images and adjust perspective. This example shows before (left) and after (right) when using Perspective Efex to fix distortion. Distortion correction can be applied automatically by the software or manually by the user through the use of placed reference lines. Image credit: DxO

In addition to being used to fix issues with distortion, Perspective Efex also includes a Miniature Effect tool, which allows you to control shallow depth-of-field effects. This allows you to replicate the effect of using a tilt-shift lens just with only software.

Nik Collection 3 includes a revised Nik Selective Tool. This tool allows the user to quickly access the suite of plugins within Nik Collection 3 from inside Adobe Photoshop. The redesigned Selective Tool lets you select favorite filter presets or revisit a prior edit, which DxO promises will result in a faster and more efficient workflow.

Speaking of workflow improvements, Nik Collection 3 introduces a non-destructive workflow option when working with Adobe Lightroom Classic. After you have made edits to your raw image in Lightroom Classic, you can export images as TIFF files from LR Classic into Nik Collection 3 and adjust plugin edits indefinitely while maintaining a completely reversible editing process.

In total, Nik Collection 3 by DxO includes eight plugins: Color Efex Pro, Viveza, Silver Efex Pro, Dfine 2, Sharpener Pro, Analog Efex Pro, HDR Efex Pro and Perspective Efex. Between all the plugins, you can perform tasks such as preset application, localized editing, black and white conversions, noise reduction, sharpening, film emulation, HDR creation and perspective adjustments. The local editing tools in Nik Collection by DxO are particularly popular with users due to Nik’s famous U-Point editing technology, which was a primary reason for DxO purchasing Nik from Google in late 2017.

This screenshot shows Color Efex Pro in Nik Collection 3 by DxO. This popular plugin allows users to add and adjust various filters to their images. You can adjust the individual application of filters and their strengths through the Nik Collection’s U-Point technology. Image credit: DxO

Nik Collection 3 by DxO is sold as a lifetime license. For a limited time, users can purchase Nik Collection 3 for $ 100 USD. Existing Nik Collection by DxO owners can purchase Nik Collection 3 at a reduced price. A free trial is also available, which you can download here. Nik Collection is compatible with DxO PhotoLab, Adobe Photoshop and Adobe Lightroom Classic.

Articles: Digital Photography Review (dpreview.com)

 
Comments Off on Nik Collection 3 by DxO announced: Includes new Perspective Efex, faster workflow & more

Posted in Uncategorized


3 Ways to Make Selective Color Portraits Using Lightroom and Silver Efex Pro 2

26 Jan

3 Ways Make Selective Color Portraits Using Lightroom and Silver Efex Pro 2Selective coloring is a post-processing technique where you convert an image to black and white, but leave part of it in color. It has a bad reputation because it can be used to create some truly horrendous images where the only thing on display is the photographer’s lack of ability.

But the good news is that you can use selective coloring in a far more sophisticated way to create some interesting images. The key is to keep it subtle and to use it only on suitable photos. I like to make selective color portraits, but of course you are free to experiment with other subjects as well (but please, no flowers).

I prefer to keep my workflow within Lightroom whenever possible as it saves hard drive space and makes the entire photography workflow much simpler. The first two techniques below are for Lightroom, the third uses Silver Efex Pro 2, a free plug-in you can download from Google.

1. Selective color in Lightroom using the Adjustment Brush

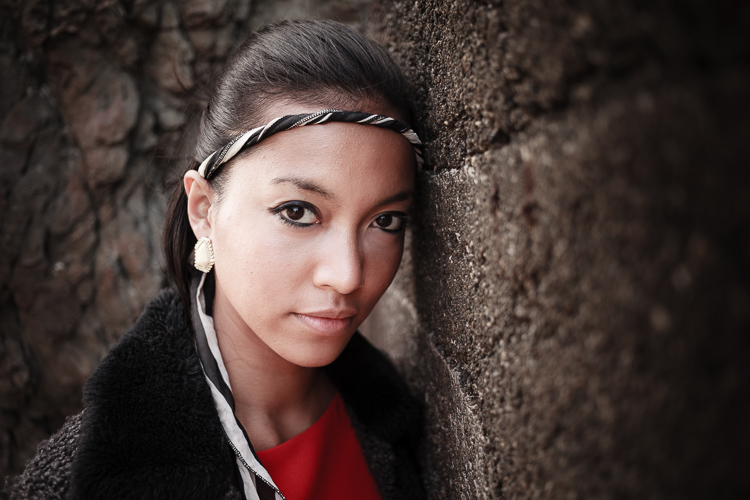
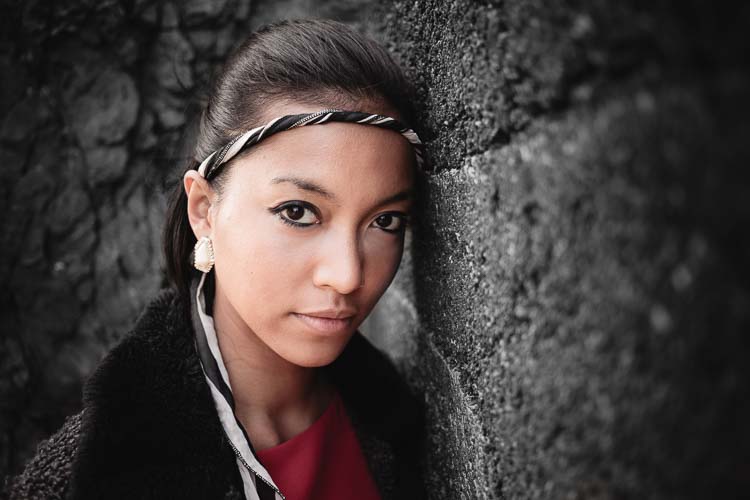
The first example, below, shows what you can do in Lightroom. This is the portrait that I am going to work with for this technique.

3 Ways Make Selective Color Portraits Using Lightroom and Silver Efex Pro 2

The simple background means it’s ideal to use for a selective color portrait.

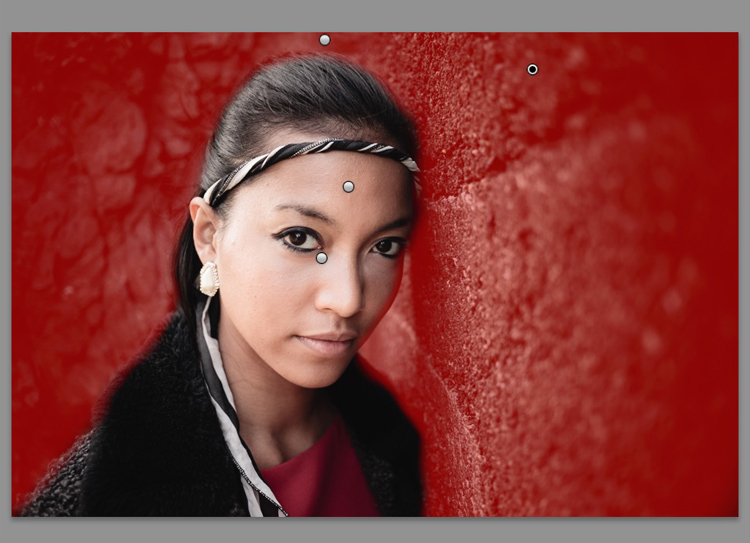
Start by going to the Develop module and activating the Adjustment Brush tool. Paint in the background to create a mask (as shown below).

3 Ways Make Selective Color Portraits Using Lightroom and Silver Efex Pro 2

The mask is shown here in red.

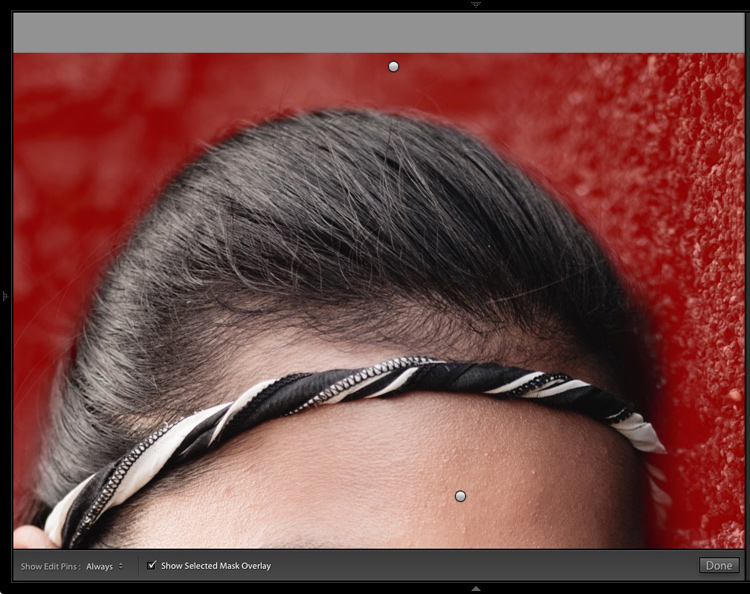
It may help to zoom in and use a smaller brush around the model for a more accurate mask.

3 Ways Make Selective Color Portraits Using Lightroom and Silver Efex Pro 2

View zoomed in so you can mask more accurately around the model.

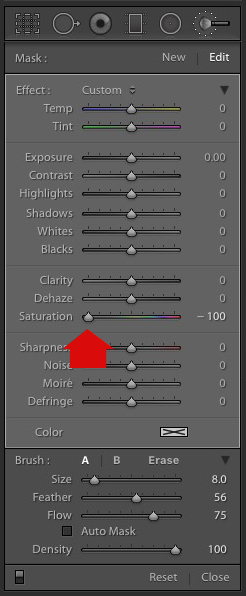
Go to the Adjustment Brush sliders and set the saturation to zero.

3 Ways Make Selective Color Portraits Using Lightroom and Silver Efex Pro 2 - set saturation to zero

That removes all color from the background, giving this effect. Don’t forget you don’t have to move Saturation all the way to zero – you can simply lower it to reduce the color intensity of the background. Play around and see what works best for your image.

Selective coloring in Lightroom

It’s important that you chose the correct image for this technique to get the best effect. There are several reasons it works well with this portrait.

  • The background is monochromatic. It wouldn’t work as well with a colorful background.
  • The rocks in the background have plenty of texture, which looks good in black and white.
  • Some of the model’s clothes are black or charcoal gray, so introducing this color into the background fits with the overall aesthetic of the image.

2. Selective coloring in Lightroom using the HSL

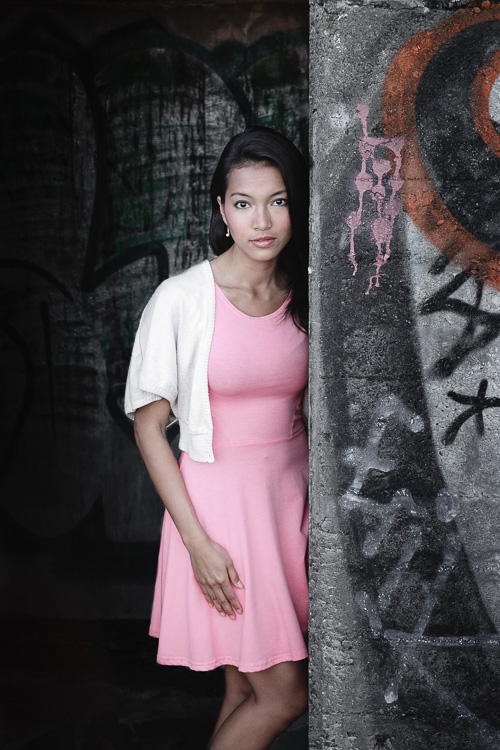
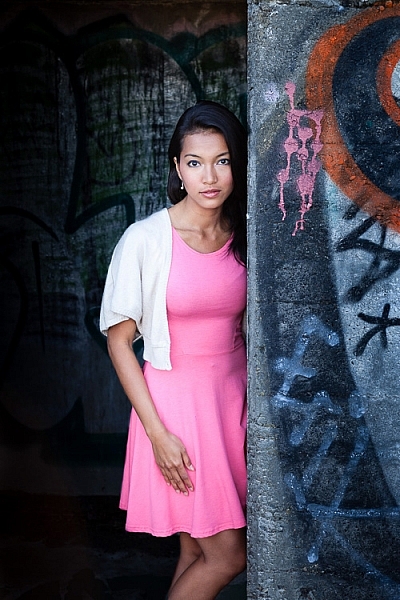
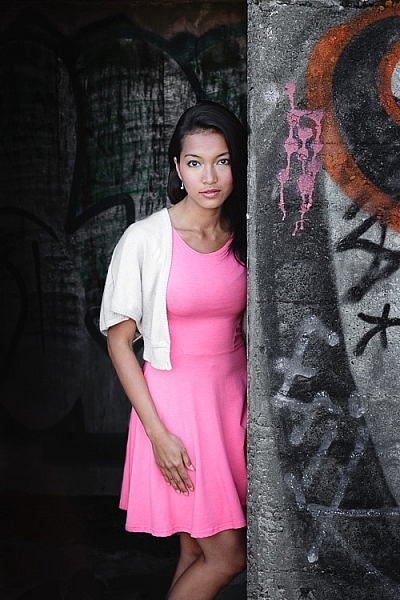
The next portrait (below) has a more colorful foreground. I’m not going to remove the color completely, but I would like to make it more monochromatic. That will help the subtle colors in the model’s dress and skin to stand out.

3 Ways Make Selective Color Portraits Using Lightroom and Silver Efex Pro 2

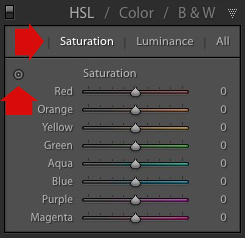
Go to the HSL / Color / B&W panel in the Develop module. Click the Saturation tab, then the Targeted Adjustment tool (marked below) to activate it.

Selective coloring in Lightroom

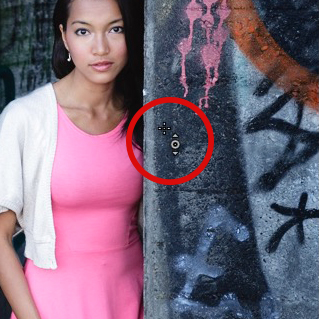
Move the cursor over part of the image that you want to desaturate. In this case, the foreground has a blue cast that I want to remove, so I chose this spot (marked by the small cross circled in red below).

Selective coloring in Lightroom

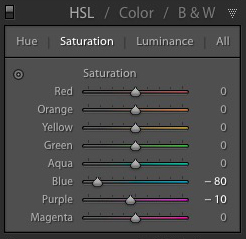
Click and hold the button as you move the mouse downward. Lightroom reads the pixels under the cross representing the Targeted Adjustment tool and reduces the saturation of those colors across the entire image. The matching color sliders in the HSL panel move to the left. When I did this, Lightroom set Blue to -80 and Purple to -10.

Selective coloring in Lightroom

This is the result.

3 Ways Make Selective Color Portraits Using Lightroom and Silver Efex Pro 2

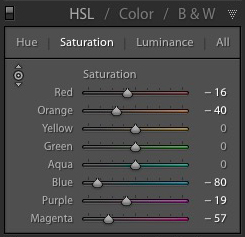
I took it further by repeating the technique. This time using the Targeted Adjustment tool on the pink and orange paintwork on the wall, resulted in the following saturation settings.

Selective coloring in Lightroom

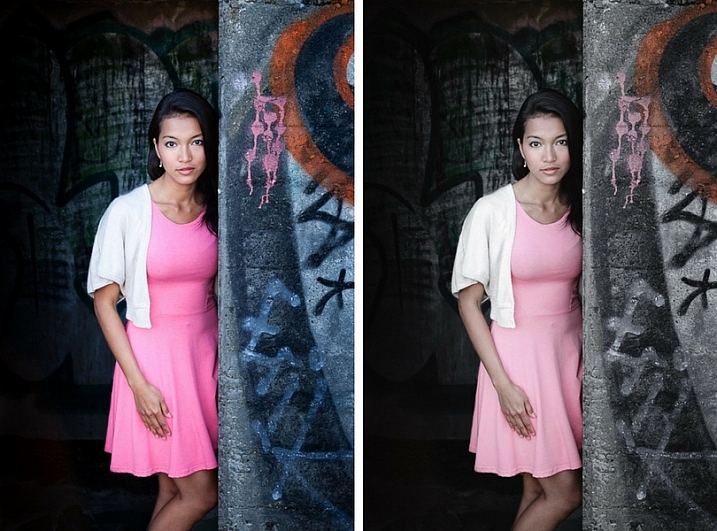
This is a before and after of the final portrait showing these extra adjustments.

selective-colored-portrait-01

Notes:

One key thing to be aware of is how the colors in your photo are related. In the photo above reducing the saturation of the pink paint affected the model’s dress, which is also pink.

Reducing the saturation of the orange paint also affected the model’s skin. In this case, it worked out okay, but you should always zoom in and double check, especially when changing the color settings of Red, Orange or Yellow hues, as this can have some strange effects on skin tones.

3. Selective coloring using Silver Efex Pro 2

Silver Efex Pro 2 is one of my favorite black and white plug-ins. I’d like to show you how to use it for making a selective color portrait with a subtle effect that almost looks like an old style hand-tinted black and white print.

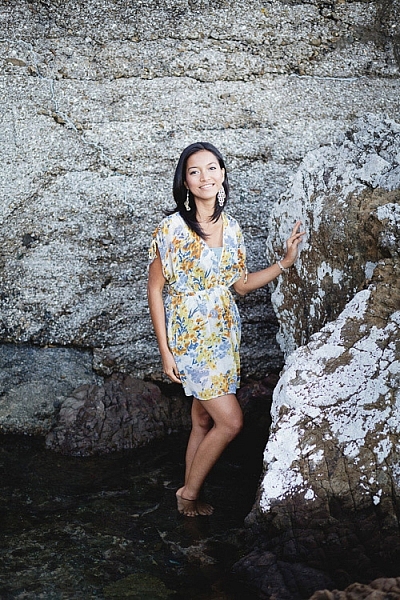
This is the portrait I’m going to use. It’s a good photo to use as the colors are subtle.

3 Ways Make Selective Color Portraits Using Lightroom and Silver Efex Pro 2

If you don’t have Silver Efex Pro 2 already, you can download it for free from the official Nik Collection website.

Once it’s installed go to Lightroom’s Library module and select the photo you want to edit. Go to File > Edit In > Silver Efex Pro 2 (you can also find this option by right-clicking the photo).

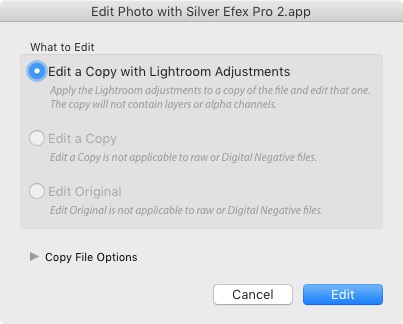
Select the option that says “Edit a Copy with Lightroom Adjustments” in the next window (it will probably be the only one you can select) and click Edit. Lightroom converts the Raw file to a TIFF file and opens it in Silver Efex Pro 2.

Selective coloring in Silver Efex Pro 2

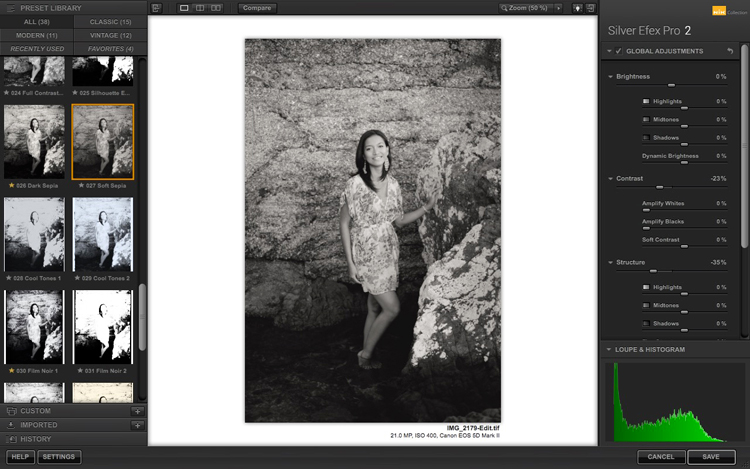
Your first task in Silver Efex Pro 2 is to decide whether you want to stay with the default neutral black and white conversion or use one of the built-in presets. I selected the Soft Sepia preset (below), then made some adjustments to the tonal values until I was ready to apply selective coloring.

3 Ways Make Selective Color Portraits Using Lightroom and Silver Efex Pro 2

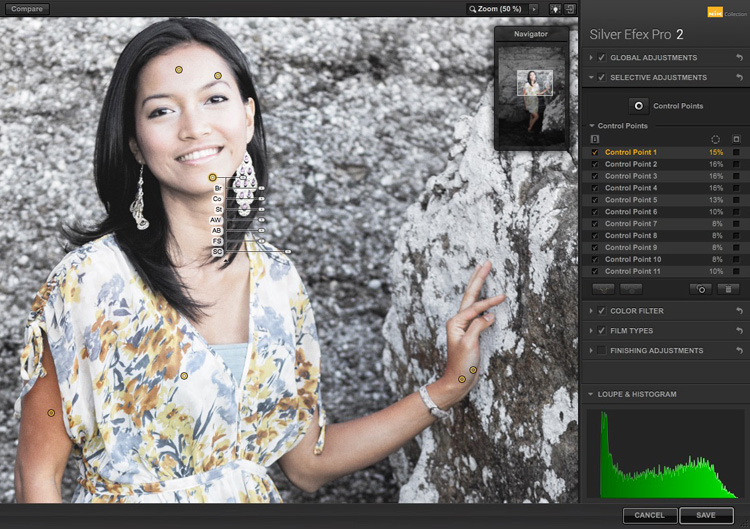
In Silver Efex Pro 2 you make local adjustments by going to the Selective Adjustments panel and adding Control Points. This screenshot shows seven of the Control Points that I added to this photo. Each one is depicted by a yellow dot.

Selective coloring in Silver Efex Pro 2

Using Control Points

Control Points work by analyzing the color and brightness of the pixels underneath them, then applying the selected effect to the pixels within the circle. In this photo, I moved the Selective Coloring slider (SC) to the right to bring the colors back to the model, but not the background.

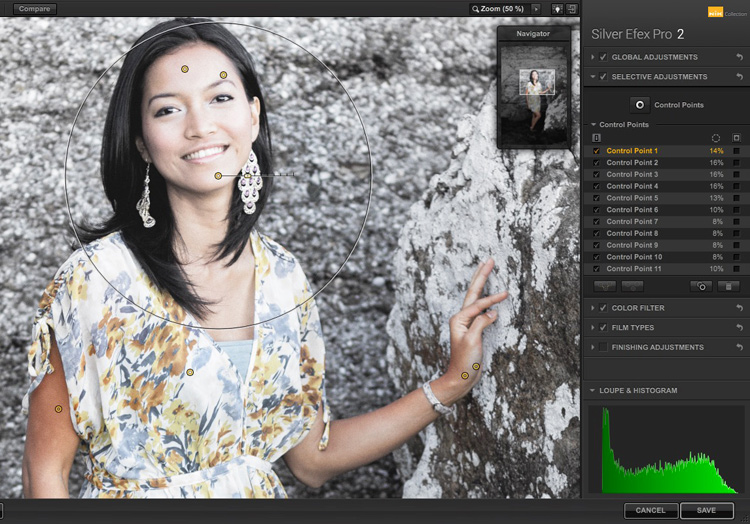
You control the size of the circle by moving the top slider. Silver Efex Pro 2 displays a circle to show you the area affected by the Control Point.

3 Ways Make Selective Color Portraits Using Lightroom and Silver Efex Pro 2

Add multiple Control Points with circles that cover the model but as little of the background as possible. When you are finished, click the Save button. Silver Efex Pro 2 closes, saving the new TIFF file in the same folder as the original file and adding it to the same Collection in Lightroom.

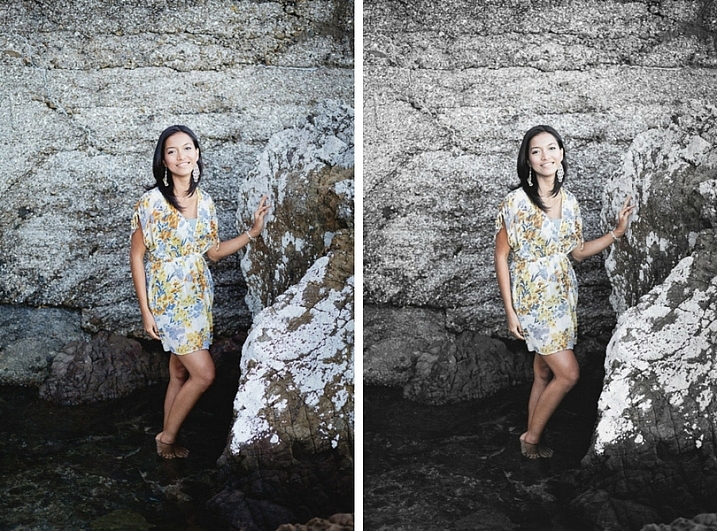
Here’s the before and after with portrait after selective coloring in Silver Efex Pro 2. Notice it’s very subtle.

selective-colored-portrait-02

Conclusion

Hopefully, this article has shown you how to use selective color in a subtle and sophisticated way that moves on from the garish examples you have probably seen online. Do you have any questions about these techniques? Let me know in the comments below.


If you’d like to learn more about Lightroom, then please check out my popular Mastering Lightroom ebooks.

googletag.cmd.push(function() {
tablet_slots.push( googletag.defineSlot( “/1005424/_dPSv4_tab-all-article-bottom_(300×250)”, [300, 250], “pb-ad-78623” ).addService( googletag.pubads() ) ); } );

googletag.cmd.push(function() {
mobile_slots.push( googletag.defineSlot( “/1005424/_dPSv4_mob-all-article-bottom_(300×250)”, [300, 250], “pb-ad-78158” ).addService( googletag.pubads() ) ); } );

The post 3 Ways to Make Selective Color Portraits Using Lightroom and Silver Efex Pro 2 by Andrew S. Gibson appeared first on Digital Photography School.


Digital Photography School

 
Comments Off on 3 Ways to Make Selective Color Portraits Using Lightroom and Silver Efex Pro 2

Posted in Photography


How to Sharpen Your Photos using Lightroom and Nik Efex

02 Nov

Do you want to take razor sharp photos? One of the best methods for creating tack sharp images is what I call The 20/20 Technique. It’s a process that combines the editing power of Adobe Lightroom and Nik Efex to sharpen your images.

sharpen, photos, tips, photography, Lightroom, Nik Efex

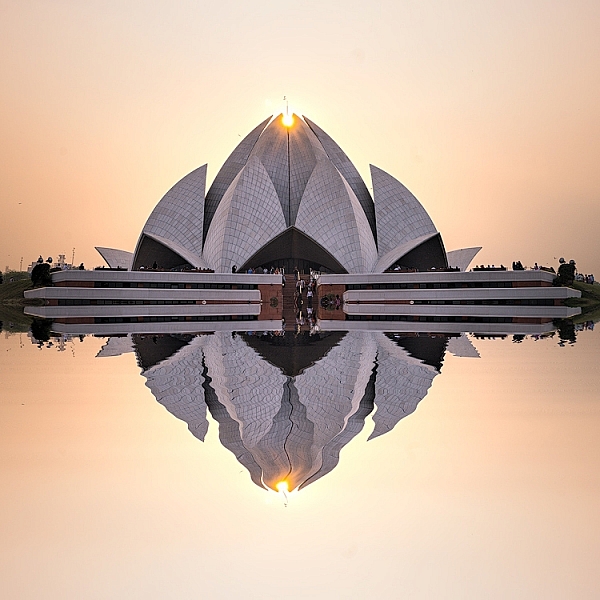
Lotus Temple, Delhi: Bringing out sharpness in architectural photos can really make them pop. © Pete DeMarco

Is sharpness overrated?

The godfather of street photography, Henri Cartier-Bresson, once quipped, “Sharpness is a bourgeois concept.” It’s true that sharpness does not turn a bad photo into a good one. In fact, some of the greatest photographs of our time aren’t that sharp. A picture that evokes emotion will always win over an image that is technically great but lacks feeling.

In the digital age, however, sharpness is another tool in the photographer’s kit that can transform an image from good to great. Have you ever seen a photo so clear that it makes you feel as if you could reach through the screen? It’s almost as if it’s not even a photograph at all but a window into another world.

sharpen, sharper photos, tips, photography, Lightroom, Nik Efex

Bundi, India: Be careful not to sharpen people too much. © Pete DeMarco

Popular advice about getting sharp images usually centers around buying expensive lenses or having the proper settings in camera, as is explained in this article; How to Take Sharp Images. Although those two factors have a major impact on the overall sharpness of the image, today’s top photographers take an additional step. They enhance the sharpness in post-processing.

Sharpen Using The 20/20 Technique

In the modern digital darkroom, there are a number of ways you can add a superior amount of sharpness to your images. I’m going to explain one of the most simple and effective methods you can use to get incredible results. Here is my 20/20 Technique workflow:

sharpen, photos, tips, photography, Lightroom, Nik Efex

Burj Khalifa Reflection, Dubai: Nik Efex is a powerful photo editing suite you can download for free. © Pete DeMarco

Step 1. Open your image in LR

Import your image into Adobe Lightroom (or the editing software of your choice). Open the Develop Module and go to the Detail Panel, then to Sharpening. Increase the sliders up to somewhere between 40 – 50. This is just a general number to start. You’ll have to decide what works best for your image (make sure to view it full size or 1:1). Then finish editing your photo (correcting the white balance, exposure, etc.).

Step 2. Open the image in Nik Efex

For the next step, you will need a piece of software called NIK Efex. You can download NIK Efex for free here. Look for the blue download button in the top-right corner.

NIK Software is a company that develops image editing tools for others like Adobe and Google. In fact, Google bought the company in 2012. Then they copied the best editing algorithms from NIK Efex and created the photo editing app Snapseed. Sadly, NIK Efex has not been updated since then. Most assume it will die a slow death, especially after Google announced the software is now free.

sharpen, photos, tips, photography, Lightroom, Nik Efex

Busan, South Korea: Adding a slight tilt-shift blur effect to the edges of your photo can accentuate the sharpened areas. © Pete DeMarco

Anyways, once you install Nik Efex, right click on your photo in the Lightroom Develop Module > Edit in Nik Output Sharpener, and choose; Edit a copy with Lightroom Adjustments. Your photo will then open in a new Nik Output Sharpener window.

Step 3. Adjust using the Nik filters

From the Nik Output Sharpener window, move the sliders until you get the look and sharpness you are after. For me, I usually leave the “Adaptive Sharpening” at 50%. Then I increase the “Local Contrast” and “Focus” sliders up to around 15-20%.

Google, Nik Efex, sharpen, photograph, output

The Nik Efex Output Sharpener interface.

Step 4. Save and head back to Lightroom

Click on “Save” and the final version of your image will import as a new file back in Lightroom. That’s it!

Here is a video from Nik showing how to use this filter:

Words of warning

Don’t sharpen too much. Know when to pump it up or turn it down. For instance, clouds are soft so you usually don’t want to apply a lot of sharpening to them. Nature scenes usually call for less sharpening. With architecture, some extra sharpening really makes it pop (try adding a little “Structure” sharpening to those). Sharpening people can be hit or miss. It all depends on what you’re trying to achieve.

sharp, photos, tips, photography, Lightroom, Nik Efex

Xingping, China: Selectively sharpening parts of your image, like the houses in the foreground of this photo, helps to lead the viewer’s eye. © Pete DeMarco

Watch out for noise. The more digital sharpening you apply, the greater the noise in your photo. Just zoom in on your photo to see it more clearly. You can apply some Noise Reduction in Lightroom if need be. I don’t like to use it much though because it softens the image. Some noise really doesn’t matter anyways, especially if you are sharing your photo as a smaller size online.

Make sure you’re using a good monitor. If you are viewing or editing your photos on an old monitor, it’s possible that you will not see much difference in sharpness. You can get the best results on a retina display or by printing your photos.

sharpen, photos, tips, photography, Lightroom, Nik Efex

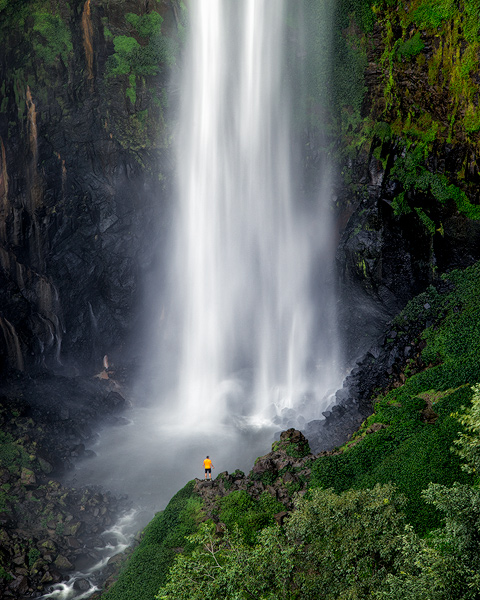
Sipisopiso Waterfall, Indonesia: Transform your images by combining the 20/20 Technique with split toning. © Pete DeMarco

Share your work

Try the 20/20 Technique and share your photo in the comments below. I’d love to see what you do with it. And if you enjoyed this article, you might also like my previous article: How To Use Split Toning to Make Your Photos Stand Out.

googletag.cmd.push(function() {
tablet_slots.push( googletag.defineSlot( “/1005424/_dPSv4_tab-all-article-bottom_(300×250)”, [300, 250], “pb-ad-78623” ).addService( googletag.pubads() ) ); } );

googletag.cmd.push(function() {
mobile_slots.push( googletag.defineSlot( “/1005424/_dPSv4_mob-all-article-bottom_(300×250)”, [300, 250], “pb-ad-78158” ).addService( googletag.pubads() ) ); } );

The post How to Sharpen Your Photos using Lightroom and Nik Efex by Pete DeMarco appeared first on Digital Photography School.


Digital Photography School

 
Comments Off on How to Sharpen Your Photos using Lightroom and Nik Efex

Posted in Photography


The 5 Best Google Nik Color Efex Pro 4 Filters and How They Can Amplify Your Images

21 May

The Google Nik collection has been considered one of the top photographic effect plugin suites for a few years now, and it just got better in a big way – as of March 24th, 2016, it’s available free of charge.

This move has been applauded by many, yet accompanied by caution with by some, since a few analysts see this as the beginning of the end for the software suite. This is all speculation of course, and regardless of what the future holds for the Nik collection, it is a highly useful set of tools that can benefit any photographer, of any skill level.

Nik color efex pro

Color Efex Pro

The highlight of this set has always been the all-around workhorse, Color Efex Pro. The current version, Color Efex Pro 4, is a complete package in itself, featuring a variety of effects of the highest quality. Although you can sort the list of effects by photo type (landscape, portrait, etc.), there is a lot to explore.

Let’s go through five of the most useful and effective tools available in this package, and see how they can boost the appearance and effectiveness of your images.

Foreword

As with all of the tools within this suite, the filters described below include a Control Points feature within the panel of individual filter controls. This feature is invaluable, and allows you to add positive or negative points anywhere in the image, adding or reducing the effect of the filter in targeted areas. Each point can be individually controlled to modify range of effect and opacity. Combining these points with the filters gives you almost unlimited control of how the filters will effect your final photograph. I encourage you to play around with the control points, and you’ll quickly see how they can help you turn your image into the picture you initially envisioned.

1 – Bi-Color Filters

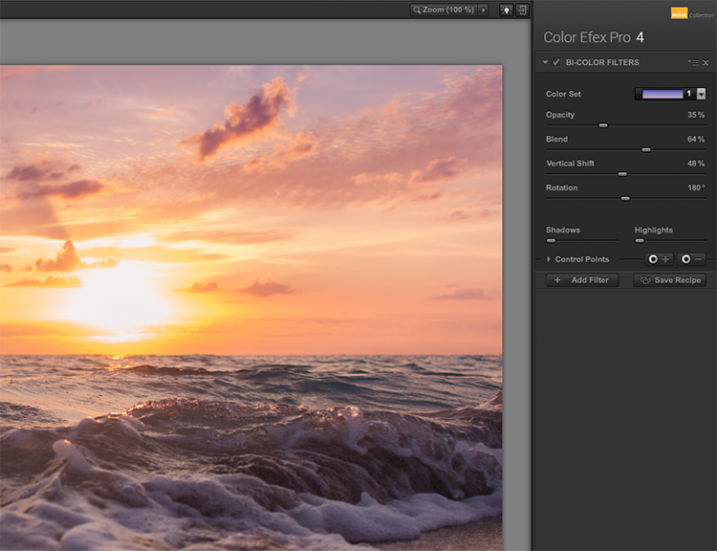
This filter is meant to simulate standard bi-color filters that would normally be affixed to your camera lens. Two preselected colors are blended together along a plane and mixed with your original image, creating a very customizable look that can completely change the tone of the photograph.

Although another bi-color filter is available that allows you to choose the two colors to be blended, the original filter has already selected many color combinations divided into five shade groups, such as browns, cool/warm, violet/pinks, and so on.

Nik color efex pro

Once you have selected a color set, you can further modify the appearance of the filter by adjusting several sliders, including Opacity which allows you to increase or decrease the intensity of the overall effect, and Blend slider, which softens or sharpens the line between the two colors. The entire effect can be rotated around the image using the Rotation slider.

article_cep4_screen6

Once you have mastered the controls for adjusting the bi-color filter effect, you can then move on to the User Defined Bi-Color Filter, which has similar controls, and allows you pick any two colors to blend with your image.

2 – Contrast Color Range

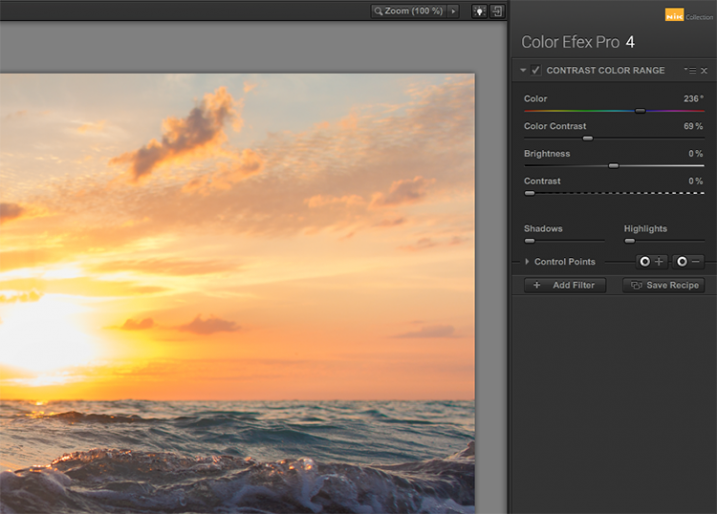
The Contrast Color Range filter allows you to selectively modify contrast within certain colors of a photo. Selecting a color will cause that color range to become lighter or less saturated, and colors opposite of it to become darker or more saturated. For example, selecting a blue or purple color range in an image featuring a sunset (with a lot of orange within the photo) will intensify the red and orange colors, making the sunset much more dramatic.

Nik color efex pro

The two main tools to understand here are the Color, and Color Contrast sliders. The Color slider will select the color range, while the Color Contrast slider will adjust the intensity of the effect by increasing or decreasing the contrast between the color selected and its reciprocal.

Nik color efex pro

Below these are controls for Brightness and Contrast, which behave similarly to their counterparts in Photoshop or Lightroom.

3 – Detail Extractor

While most users might argue in favor of using the excellent Pro Contrast filter (discussed below) over the Detail Extractor, I’d argue that it depends on what look you’re going for. For a smoother, less enhanced result, Pro Contrast would definitely be the way to go, but to add insane levels of drama to your image, the Detail Extractor is just what the doctor ordered.

Nik color efex pro

This tool adds that drama by disrupting the balance of shadow and light within the photo, to pull much more detail, giving you a dark and gritty stylized result that can really grab the viewer’s eye.

Nik color efex pro

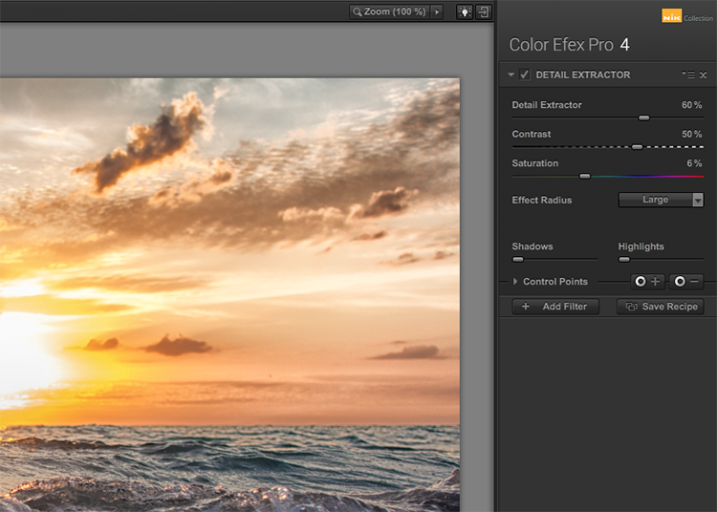
The main control used to create the effect here, is the Detail Extractor slider. Moving it to the right increases the amount of details highlighted. In addition to Contrast and Saturation adjustments, there is also an Effect Radius adjustment available, which allows you to target whether fine or large elements within the image are modified.

4 – Pro Contrast

Without a doubt, the Pro Contrast module in Color Efex 4 is my favorite filter by far. Admittedly, half of my interactions with the Nik Filters involve me making all of my adjustments in Lightroom, and using Color Efex 4’s phenomenal Pro Contrast to add the bit of drama and flair I’m looking for, without going over the top and getting an overcooked result.

The tool analyzes the image to determine how the contrast adjustment will affect the loss in detail inevitable in this type of correction, and minimizes it. The filter can turn a flat, lifeless, image into a colorful and vibrant photo with almost perfect levels of contrast.

Nik color efex pro

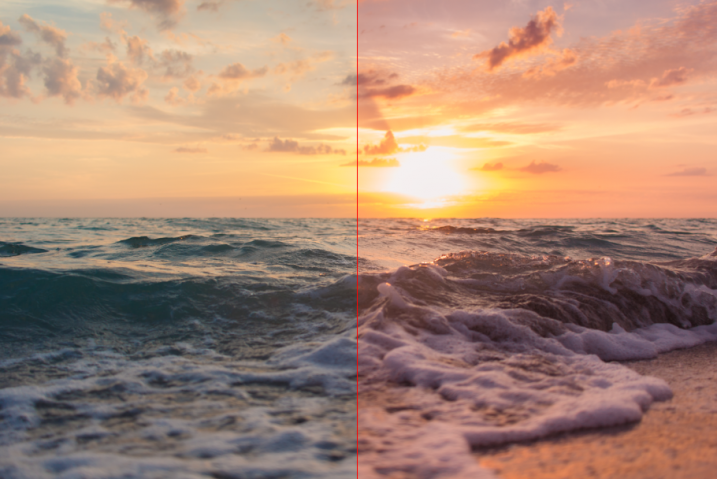
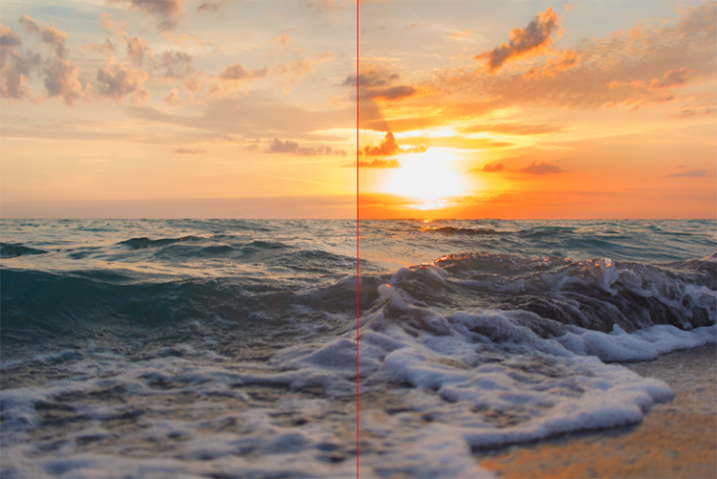
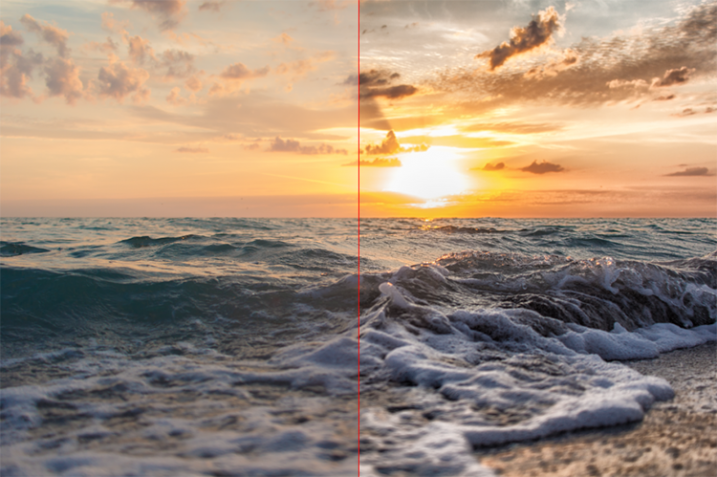
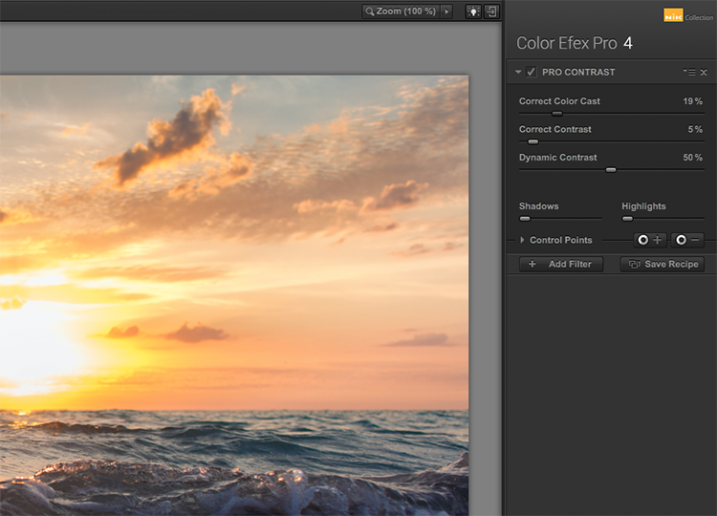
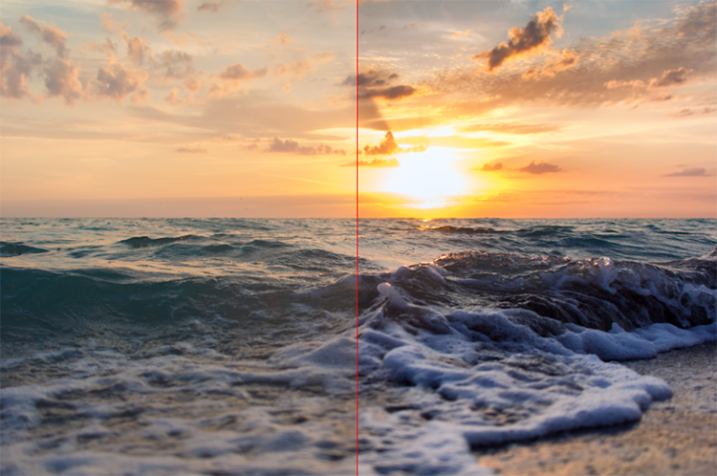
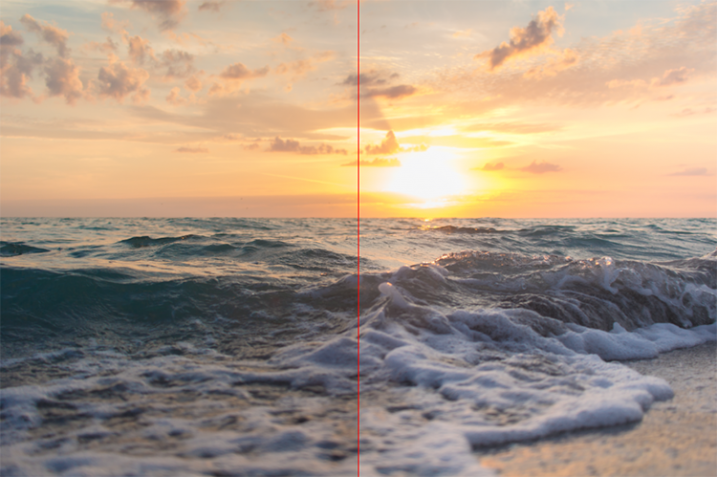
Pro Contrast features three sliders, each one of them important to the final result. Correct Color Cast analyzes the photo, and produces an algorithm to remove any inherent color cast it finds. Moving the slider to the right will reduce this cast and smooth out the tonal scheme of the image. In the ocean sunset image shown here, applying Correct Color Cast removes the orange hue cast upon the waves in the foreground, and returns them to their proper blue.

Nik color efex pro

Correct Contrast applies a general contrast adjustment based on the tonality of the image, as analyzed by the software. Finally, Dynamic Contrast introduces the real magic; areas of the photo that are flat are boosted in contrast, while areas already featuring high contrast are not. This allows for a rich, beautiful enhancement, without muddy tonal structures and details that might normally be lost.

5 – Reflector Efex

We all understand the need for a reflector when creating portraits; whether it be a natural-light or studio situation, certain areas of our subject (usually a person’s face) are befallen with shadows due to the interaction of the subject with the light being used. Reflectors allow us to bounce light onto our subject, and target it to fill in these areas of shadow, producing an even layer of light.

Nik color efex pro

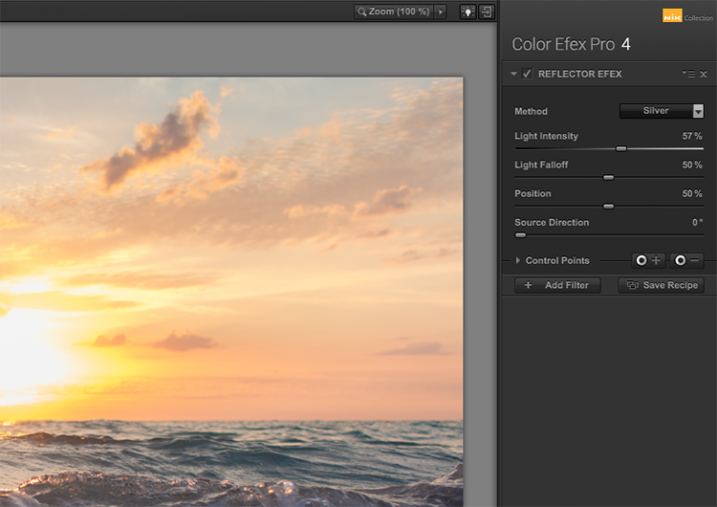
The Reflector Efex filter takes that concept and turns it up to 11, by simulating a silver or gold reflector’s use within your image, and allowing you to modify it in a number of ways to illuminate the photo exactly as you envision it.

First, you select a Method, which is effectively picking which color of reflector to use; gold, soft gold, or silver. You’ll then use the Intensity slider to select how much light will be bounced onto the image. This is equivalent to adjusting power output of a studio light, or the harshness of sunlight in an outdoor situation.

Nik color efex pro

The Light Falloff and Position sliders allow you to adjust how softly or sharply the effect of the bounced light trails off, as well as the position of this falloff. Finally, the Source Direction adjustment lets you change the position of the reflector; if you need light directed to your subject’s left side, you would position the Source Direction between 270° and 360°, which is the bottom, to bottom right corner of the frame.

Conclusion

We don’t know what the future holds for the Nik collection, as a price reduction to zero doesn’t bode well for continued enhancements or updates of any kind. But, for users of the software this may not matter, as it is already an integral part of many photographer’s toolkits, amateurs and professionals alike. The entire collection is of incredible value. But, Color Efect Pro 4 in particular, features these, and many more tools that can be incorporated into your everyday photographic workflow from Lightroom or Photoshop, and give your images a competitive edge!

What about you? Do you already use Google’s Nik Collection? If not, will you try it now after it has been changed to a free product? Are there other filters within the collection you find just as useful for your own workflow? Sound off below please, ladies and gents!

googletag.cmd.push(function() {
tablet_slots.push( googletag.defineSlot( “/1005424/_dPSv4_tab-all-article-bottom_(300×250)”, [300, 250], “pb-ad-78623” ).addService( googletag.pubads() ) ); } );

googletag.cmd.push(function() {
mobile_slots.push( googletag.defineSlot( “/1005424/_dPSv4_mob-all-article-bottom_(300×250)”, [300, 250], “pb-ad-78158” ).addService( googletag.pubads() ) ); } );

The post The 5 Best Google Nik Color Efex Pro 4 Filters and How They Can Amplify Your Images by Tim Gilbreath appeared first on Digital Photography School.


Digital Photography School

 
Comments Off on The 5 Best Google Nik Color Efex Pro 4 Filters and How They Can Amplify Your Images

Posted in Photography


5 Best Nik Color Efex Pro 4 Filters for Amazing Photos

23 Mar

How do you know which filter in Nik Color Efex Pro 4 you should use for processing your photos? With a total of 55 filters in Color Efex Pro 4, there is a lot of filters to explore. However, here is a little help. I have gathered 5 of the best and most powerful Nik Color Efex Pro 4 filters Continue Reading

The post 5 Best Nik Color Efex Pro 4 Filters for Amazing Photos appeared first on Photodoto.


Photodoto

 
Comments Off on 5 Best Nik Color Efex Pro 4 Filters for Amazing Photos

Posted in Photography


8 Reasons to Use Silver Efex Pro 2 for Your Black and White Conversions

13 Jun

Silver Efex Pro 2 review

You can convert colour photos to black and white in Photoshop and Lightroom (or your Raw conversion software of choice). But the last few years have also seen an increase in the number of plug-ins built to do nothing else, other than convert photos to monochrome.

Today I’m going to look at what many people consider to be the best black and white plug-in around – Nik Software’s Silver Efex Pro 2. Rather than provide a comprehensive review of the software, I’m going to look at some of the things you can do with it that you can’t (or would be much more difficult) in Photoshop or Lightroom.

1. Presets

Silver Efex Pro 2 has 38 presets that you can use as starting points for your processing work, including vintage looks as well as modern ones. This places the plug-in ahead of Photoshop, and probably ahead of Lightroom too. You can buy Develop Presets for Lightroom, but it will be difficult to find some that give you as many options as those in Silver Efex Pro 2.

Here’s a sample of some of the presets. The original colour photo is shown top left.

Silver Efex Pro 2 review

2. There are more tools for enhancing texture

Silver Efex Pro 2 review

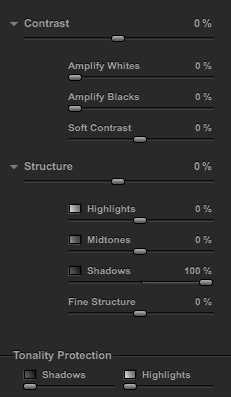
The full set of Contrast and Structure sliders in Silver Efex Pro 2.

One of the elements that makes black and white photos so effective is texture. You can enhance texture in both Photoshop and Lightroom (the Contrast and Clarity sliders are my favourite tools for this) but Silver Efex Pro 2 takes it several steps further.

The Contrast sliders

Silver Efex Pro 2 has four sliders for adjusting contrast. The Contrast slider is the same as the one in Lightroom or Adobe Camera Raw. The Amplify Whites and Amplify Blacks sliders let you increase Contrast in the highlights and shadows respectively. There’s also a Soft Contrast slider that increases contrast but in a less aggressive way, almost as if there is an overlay of gaussian blur. This slider is very useful for portraits.

If you get carried away with the Contrast sliders you can lose detail in the highlights and shadows. So, in addition to the four sliders already mentioned, there are two Tonality Protection sliders used to bring back detail in clipped areas.

Silver Efex Pro 2 review

These portraits show the difference between Contrast and Soft Contrast. Soft Contrast is ideal for portraits, while Contrast is better for subjects like architecture and the landscape.

The Structure sliders

Structure slider is similar to Clarity in Lightroom and Adobe Camera Raw. But while in those programs the Clarity slider affects all the tones in the selected area, in Silver Efex Pro 2 you can choose to adjust Structure independently in the shadows, midtones and highlights. There is also a Fine Structure slider for increasing mid-tone contrast in areas of fine detail.

Silver Efex Pro 2 review

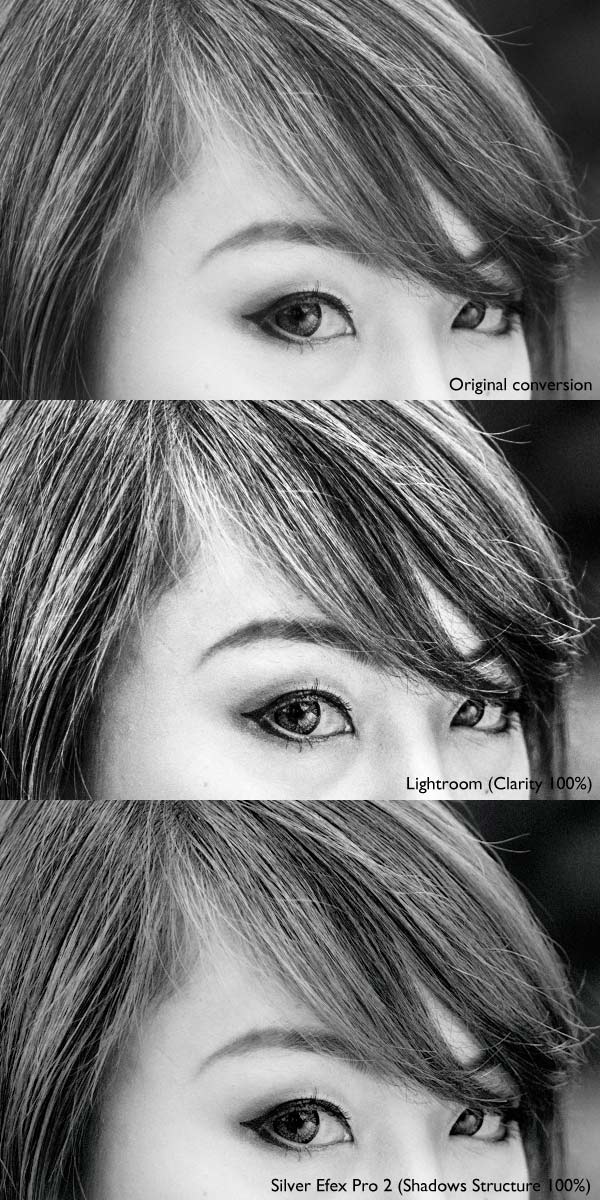
The above photo shows three close-ups of the same portrait used earlier.

Top: A neutral black and white conversion, with no increase in Clarity.

Middle: This is what happens when you increase Clarity to 100% in Lightroom (note that you wouldn’t normally push it that far for a portrait, I did it here to show you the effect). Clarity is increased uniformly across the frame, affecting the skin tones as well as the hair.

Bottom: Shadows Structure set to 100% in Silver Efex Pro 2. Only the shadows are affected, leaving the midtones and highlights alone. This brought out the detail in the model’s hair and eyes, but left her skin untouched. You would have to use a selection or a mask in Photoshop or the Adjustment Brush in Lightroom to achieve the same effect.

3. Control Points make local adjustments easy

Just like in Photoshop and Lightroom you can apply adjustments locally as well as globally, using a system called Control Points.

A Control Point is the centre of a circle within which you can make tonal adjustments. The adjustment is applied to tones similar in brightness and colour to the pixels underneath the Control Point itself. For example, if you place a Control Point over a dark tone, then increase the brightness, only the dark tones within the circle are adjusted. Light tones remain untouched.

Silver Efex Pro 2 review

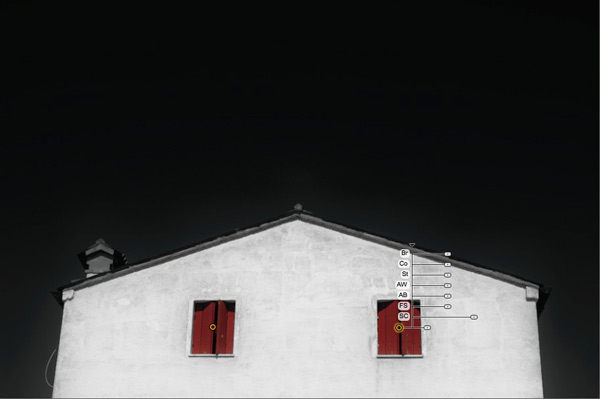
The yellow and black dot marks the Control Point. Adjustments are made to pixels matching the colour and brightness of the pixels underneath it. There are seven sliders you can adjust: Brightness (Br), Contrast (Co), Structure (St), Amplify Whites (AW), Amplify Blacks (AB), Fine Structure (FS) and Selective Colorization (SC).

It may sound complicated but it only takes a little practice to understand how it works. You can use as many Control Points as you want in an image, and group them together to cover areas that don’t conform easily to a circular shape.

4. Selective colouring is easy

Selective colouring is the technique of converting an image to black and white while leaving part of it in colour. This is easy with Silver Efex Pro 2 as all you have to do is place a Control Point over the area where you want to retain colour.

I used two Control Points in the following example, one on each coloured shutter:

Silver Efex Pro 2 review

5. The History panel is excellent

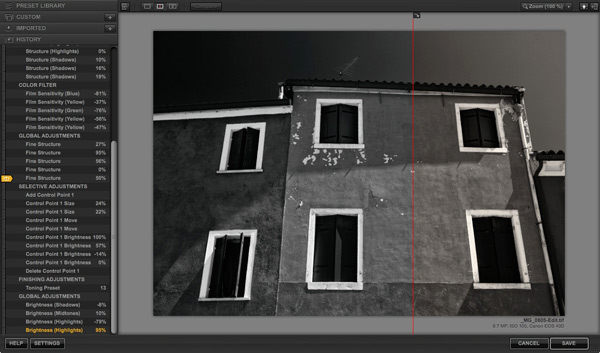
Silver Efex Pro 2 has the best History panel I’ve seen in any software. Every adjustment you make to your photo is listed.

Silver Efex Pro 2 review

The History panel works together with the Compare view. The yellow tab on the left indicates the photo used for the Before view, and the entry used for the After view is displayed in yellow text. This simple method lets you compare any two entries in the History panel.

6. The Zone System

Silver Efex Pro 2 can show you where the tones in your photo fall within the eleven zones of the Zone System. One useful application of this is that you can use it to see which areas of your photo may block up in print because they are too dark or too light.

This screenshot shows the tones which fall into zone 3. They are indicated by the brown diagonal lines.

Silver Efex Pro 2 review

7. Black and White film emulation

The Film Types panel gives you a choice of 18 different black and white films. When you choose one the plug-in emulates the tonality and grain structure of the selected film. It’s an easy way to get the film look without having to shoot, develop, and scan black and white film.

8. Silver Efex Pro 2 comes bundled with other software

Silver Efex Pro 2 is part of the Nik Collection, which includes seven applications and costs $ 149. That works out to less than $ 25 a plug-in.

Note: If you’re on a tight budget, the standalone version of OnOne Software’s Perfect Photo Suite 8 represents even better value at $ 79. Click the link to learn more.

Further resources

You can learn more about Silver Efex Pro 2 at these links:

  • Silver Efex Pro 2 official page
  • Silver Efex Pro 2 tutorials
  • Silver Efex Pro 2 videos on YouTube

Your turn

What software do you use for black and white conversions? Do you prefer Photoshop, Lightroom, another Raw conversion program or a plug-in? Let us know in the comments – what would you recommend to other readers?

The post 8 Reasons to Use Silver Efex Pro 2 for Your Black and White Conversions by Andrew S. Gibson appeared first on Digital Photography School.


Digital Photography School

 
Comments Off on 8 Reasons to Use Silver Efex Pro 2 for Your Black and White Conversions

Posted in Photography


20 Cool Things You Can Do With Nik Software’s New Analog Efex Pro 2

27 May

I’ve been playing around with Nik Software’s new Analog Efex Pro 2 photo processing software (brought to you by the good folks at Google) all weekend long and I’m super impressed. The purist film photographers out there are probably going to hate this new software, but for you digital photographers who dig an analog look and feel, you are going to love this.

I shot film exclusively for about 15 years before switching to digital in the early 2000s. While there is an absolute undeniable romance with rolling your own film, hanging out in a darkroom with your college girlfriend, and licking the fixer off your own prints you made yourself, it’s not something I think I’ll ever go back to — unless and maybe when my hipster buddy Daniel Krieger finally convinces me to buy a film Hasselblad.

I used to joke around with anyone who asked me what camera I shot and tell them a Holga. Now it’s like I really am shooting a Holga, just with my Canon 5D Mark III. ;)

Anyways, check out 20 different looks you can create with Analog Efex Pro 2. I’m a fan. You can buy it here if you want.

Motion Blur. It’s like owning a lensbaby without having to actually use one of those horrible awkward things. Just kidding, lensbabys are great!

How did I ever get a double exposure of this classic neon sign? I’ll never tell.

Hey It’s Amanda Morgan shot with my cool Toy Camera #9.

Wet plate photography, without all the sticky wet plates.

Jenna Jamieson shot with Toy Camera #1.

Every respectable concert photographer brings their Toy Camera #2 to the photo pit these days. Chvrches rock!

Instant triptychs.

Classic Camera #7 has such a nice warm film feel, doesn’t it?

Hey tilt shift and I didn’t even have to buy the $ 2,500 Canon TS-E 17mm f/4L Tilt-Shift Lens! Which is a totally awesome lens by the way that I actually will buy someday. Canon L lenses are the best. I cannot say enough positive things about all my Canon glass. I’m not being sarcastic there, I’m being serious.

One of my neon signs that I took back in 1972 while on a photography junket across America with Stephen Shore.

Motion blur with Jeremiah Owyang. It’s just like Star Wars only better because it’s got Jeremiah in it.

Colorcast #2 makes butterflies look so pretty.

Colorcast #2 makes models look so pretty too, but this one was already pretty to begin with. :)

I think this painting from the Met in New York City looks better this way, don’t you? I could totally print this up and hang this in my house. So can you too, because I licensed it Creative Commons non-commercial. Friends share right? ;)

Oopsie, a little light leak thing happened in my Holga again.

Doing wet plate photography in Holbrook, Arizona.

Love the authentic real life colors from Classic Camera #2 on this San Francisco victorian in the Mission District. A couple million in stock options and this too can be yours.

Smoothdude let me borrow his Hasselblad to make this photo on our Route 66 trip last year.

I took a photo of my Kodak Instamatic with my Kodak Instamatic. Get it?

More Seattle fun with Toy Camera #2.


Thomas Hawk Digital Connection

 
Comments Off on 20 Cool Things You Can Do With Nik Software’s New Analog Efex Pro 2

Posted in Photography


Nik Software ships HDR Efex Pro

18 Oct

HDR Efex Pro, Nik Software’s previously-announced HDR processing plug-in for Adobe Photoshop, Lightroom and Apple Aperture is now available for Mac and PC.
News: Digital Photography Review (dpreview.com)

 
Comments Off on Nik Software ships HDR Efex Pro

Posted in Uncategorized


17 September, 2010 – Definitive Black and White with Nik Silver EFEX Pro

17 Oct

Over the past several years new software options have become available for converting RGB images into Black and White.

One of the most versatile programs on the market for doing this is NIK Silver EFEX Pro. It has developed an avid user base, including our regular contributor, Mark Segal, who today takes us through the full preparation of an image to demonstrate key aspects of the program’s creative possibilities.


"Awesome video presentation.
 
I have learnt so much more after looking through this on the weekend.  The tip about pushing blacks and fill light in the Basic Module was worth the price alone.  My images of a recent trip to the Australian Outback are popping and punching with delight!
 
Thanks Michael and Jeff – I really appreciate you taking the considerable time to share your in-depth knowledge and insights."


The Luminous Landscape – What’s New

 
Comments Off on 17 September, 2010 – Definitive Black and White with Nik Silver EFEX Pro

Posted in News