The post Luminar Neo to Offer Advanced AI Photo Editing (and Debut This Winter) appeared first on Digital Photography School. It was authored by Jaymes Dempsey.
Skylum has announced yet another eye-catching photo-editing program, Luminar Neo, billing the software as “a creative image editor driven by AI technologies of the future.”
As the company behind Luminar 4 and Luminar AI – programs that debuted innovative, AI-based tools such as AI Sky Replacement and Composition AI – Skylum is no stranger to success in the AI photo editing market. And Luminar Neo aims to improve upon the Skylum formula, offering amateur photographers an AI route to pro-level edits, along with higher-level control for advanced shooters.
Yet Luminar Neo isn’t a simple Luminar AI iteration. According to Skylum, Luminar Neo “is a quintessence of all [the company’s] applications released to date,” and “will retain almost all of Luminar AI’s features” but add “all-new, cutting-edge, AI-powered tools.”
For current Luminar AI users wondering whether it makes sense to upgrade, Skylum spells out the difference between Luminar AI and Luminar Neo:
“Luminar AI is the easiest-to-use image editor fully powered by artificial intelligence for those who prefer a time-saving, Template-driven workflow for quick results…Luminar Neo is for those who want more editing options and more creative control.”
In other words, while anyone – including complete beginners – will feel at home in Luminar AI, the new Luminar Neo pushes in the direction of programs like Luminar 4 and Adobe Lightroom Classic, both offering a slew of tools for enthusiasts and pros alike.
Skylum has already teased a handful of new Luminar Neo tools, including a powerful photo relighting option, intelligent background switching, sensor dust removal, power line removal, and some form of AI masking, but we’ll have to wait to learn precisely how these features work and who they’re for.
Luminar Neo has no release date – the promotional materials merely claim a “winter” launch – though you can expect an announcement sometime in the next few months. An early December release would make sense, given the upcoming holiday season. And if you know you want Luminar Neo, you can preorder a one-time license for $ 54 USD.
So who should think about buying Luminar Neo? The new program should suit serious hobbyists all the way up through advanced amateurs (and potentially even pros). If you like the idea of creative AI effects but still want to be in control, Neo is likely a better pick than Luminar AI. On the other hand, if you’re looking for an ultra-easy, no-effort-necessary editor, Luminar AI is the better option.
Now over to you:
What do you think of Luminar Neo? Will you purchase it? Does it sound good? Bad? Are you disappointed? Share your thoughts in the comments below!
The post Luminar Neo to Offer Advanced AI Photo Editing (and Debut This Winter) appeared first on Digital Photography School. It was authored by Jaymes Dempsey.
The post Capture One vs Lightroom: Which Editing Program Is Best? (2021) appeared first on Digital Photography School. It was authored by Dawn Gilfillan.
Not sure whether to use Capture One or Lightroom for your image editing? Both programs have plenty of fans, but which option is best for you?
This article aims to give you a clear, unbiased assessment of the pros and cons of Capture One vs Lightroom. By the time you’re done, you’ll know all about these two programs – and you’ll know which one is right for your needs.
Let’s get started.
Capture One overview
Thanks to its advanced tools, Capture One is often the choice of professional photographers and retouchers. It’s a high-end program that offers powerful tethered shooting, in-depth image editing, and a robust image-organization system that’ll satisfy even the most demanding of photographers.
Pros
A vast range of image-editing tools and features
Tethered shooting option that performs well
Designed for professional workflows
Superior RAW image processing
Cons
The user interface can be confusing – it’s not always easy to find the tools you need
Not beginner-friendly
Expensive
Image organization/library feature is clunky and difficult to use
No simple one-click presets or filters
Lightroom overview
Lightroom offers image organization and library features, as well as RAW, TIFF, and JPEG image processing. Thanks to Lightroom’s smooth integration with Adobe Photoshop, many photographers use both programs for image editing. Lightroom is easy to use and includes a range of one-click presets to speed up your workflow.
Pros
Easy for beginners to use
Simple and effective image library/organization
Good range of one-click presets available online
Good for beginners and advanced photographers
Affordable
Cons
No image adjustment layers
Subscription-only model
Tethered shooting performs poorly
Image editing tools not as advanced as Capture One
Capture One vs Lightroom: in-depth comparison
Now that you’re broadly familiar with these two programs, let’s take a closer look at how they stack up, starting with:
Editing tools
While both Capture One and Lightroom offer a near-identical range of basic image editing tools, there are some key differences worth considering.
First, Capture One offers adjustment layers, while Lightroom does not.
Adjustment layers in Capture One.
Lightroom is designed to be used alongside Adobe Photoshop, an advanced layer-based editor. So if you want to use adjustment layers, you do have the option to send your Lightroom-adjusted files across to Photoshop, though this can be inconvenient compared to Capture One’s more comprehensive, one-stop-shop approach.
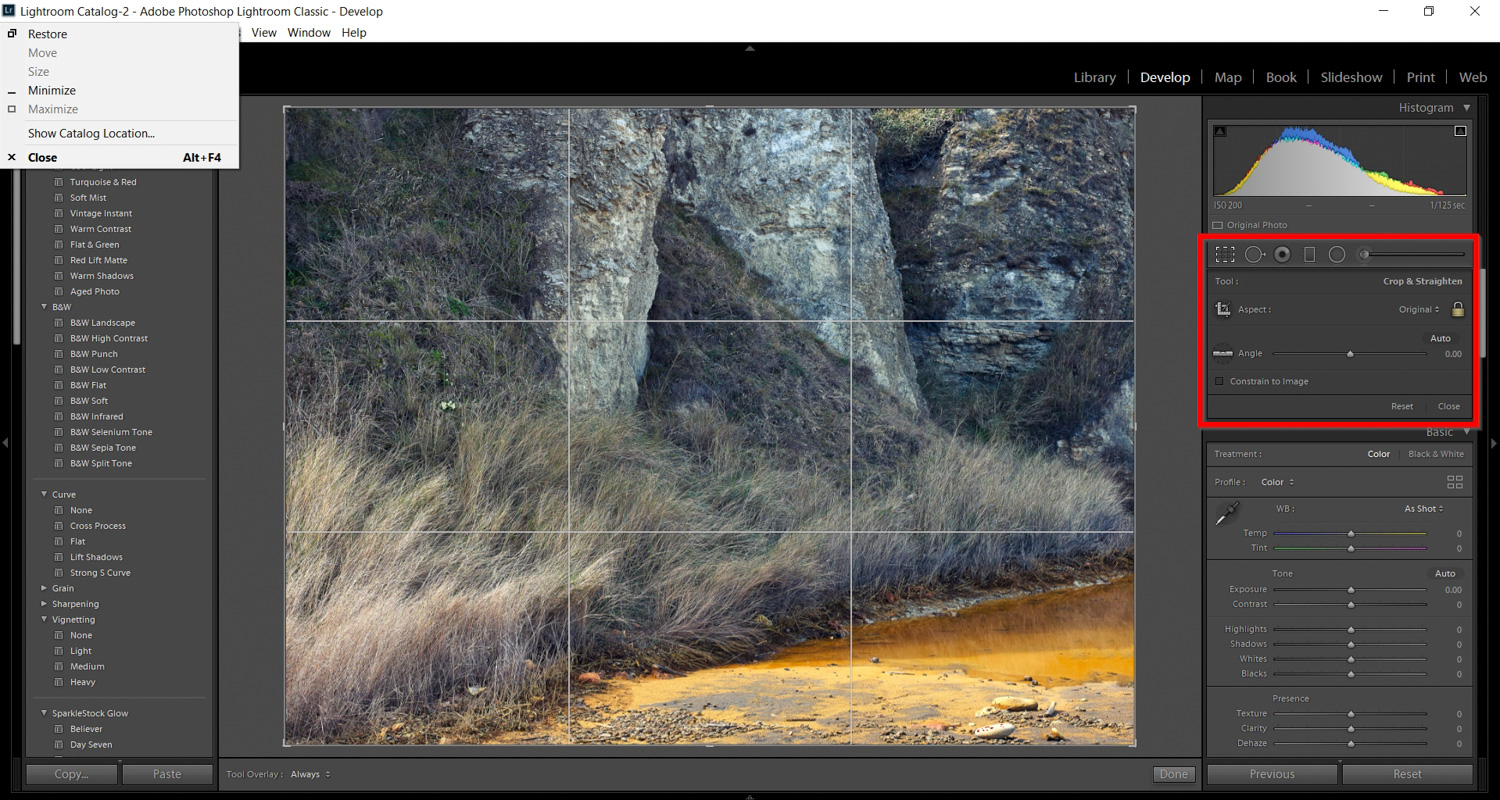
Both programs offer lens corrections and profiles, as well as the usual cropping and rotating features, etc. As a quick aside, the Crop tool in Lightroom is simpler to use than the one in Capture One – and it’s also far easier to find!
Crop tool in Lightroom.
Capture One and Lightroom can process RAW files, but Capture One does have the edge here, especially considering the amount of fine-tuning you can do with the shadows and highlights. Capture One offers high dynamic range editing of your RAW files, which lets you make significant adjustments to the highlights, shadows, blacks, and whites:
High Dynamic Range tool in Capture One.
While Lightroom offers RAW exposure adjustments of its own, the options are clunkier and less sophisticated compared to Capture One.
What’s one area where Capture One really beats Lightroom hands down? Color adjustments. The Capture One Color Editor doesn’t just offer Basic and Advanced options, but also a tool to fine-tune skin tones, plus an outstanding interface that serious color editors will love.
Color Editor in Capture One.
Capture One also offers the Color Balance tool with Master, 3-Way, Shadow, and Highlight options. If color grading is your thing, Capture One blows Lightroom out of the water; its sophisticated tools are capable of performing even the most demanding of color edits.
Color Balance tool in Capture One.
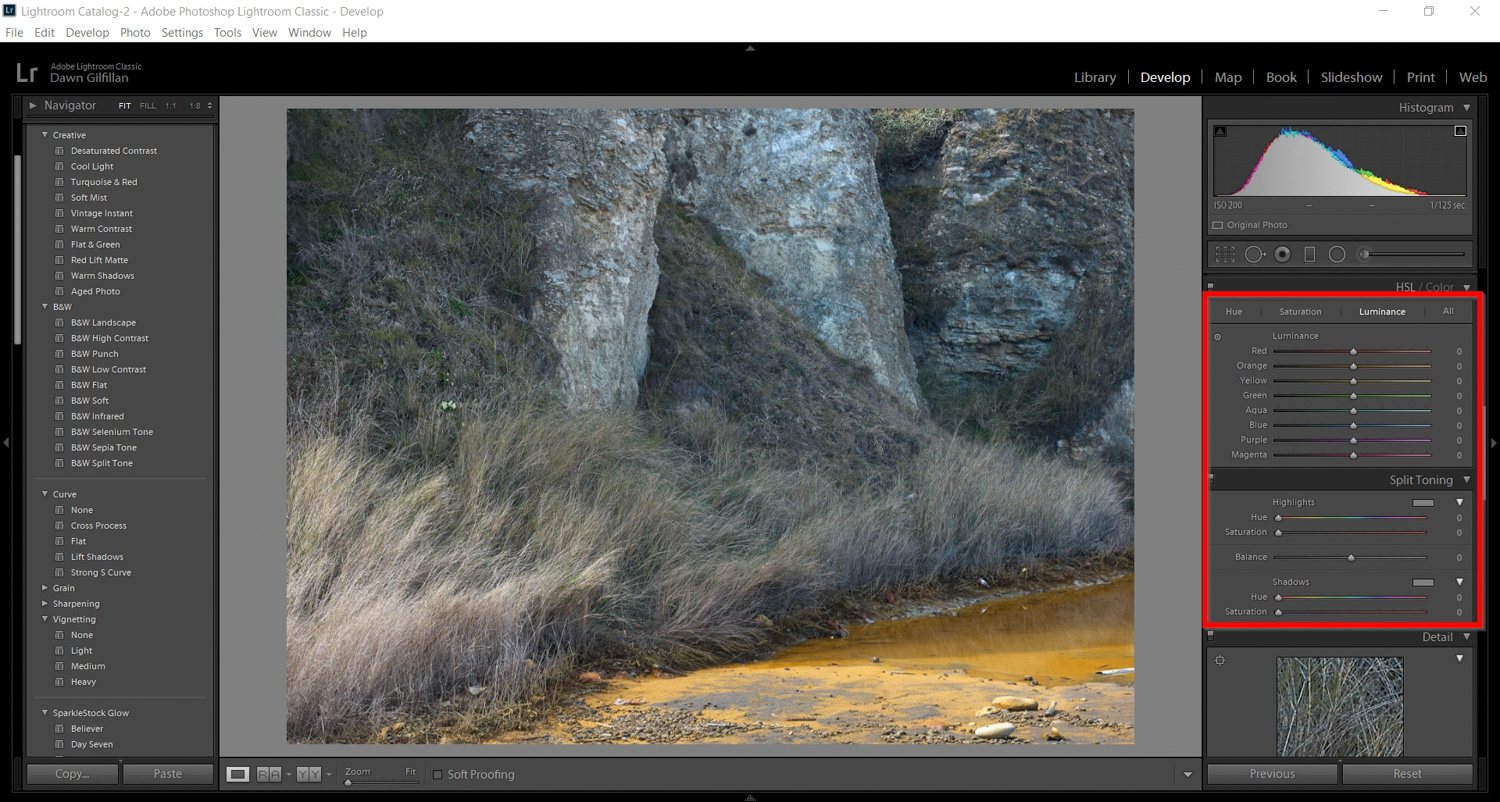
Lightroom does offer color adjustments, of course, but nothing comparable to Capture One:
HSL panel in Lightroom.
Tethered shooting is also where Capture One excels. I have used it extensively, and it’s fast and efficient. Although Lightroom does offer tethering, it’s not reliable, and it’s slow and glitchy at times. It just doesn’t cut the mustard for a pro photographer, especially one who has clients waiting to see the RAW shots during an in-progress session.
Ease of use
As far as I’m considered, Lightroom is much easier to use; the interface is simple, and you can view all the tools and features on one screen.
Capture One, on the other hand, uses a series of tabs, cursor tools, menus, and sub-menus, and it’s easy to get lost or spend ages hunting for something you need.
The Lightroom Library system is also clear and simple, while Capture One makes this unnecessarily complicated.
The Lightroom Library.
Using presets in Lightroom is easy. Download your presets, import them into Lightroom, and they’ll appear on the lefthand side of the Develop module. Hover your mouse over a preset to see how it will affect your image, click to select a favorite, and you’re done. Just look at the simplicity of Lightroom’s Preset panel:
Capture One doesn’t do presets – sort of. It does have preset equivalents, but they’re called Styles, and you’ll have to go into the Adjustments tab and follow the sub-menu to find and apply them:
Also, Styles packs are expensive, whereas there are plenty of free Lightroom presets on the market.
Supported file formats
Capture One supports the following file formats:
RAW
DNG
JPEG
TIFF
PNG
PSD (read-only)
HEIF/HEIC
DNG files are supported in Capture One Pro, but not in brand versions (e.g., Capture One for Fujifilm, Capture One for Sony, etc.)
Lightroom supports these file formats:
RAW
Digital Negative format (DNG)
HEIF/HEIC
TIFF
JPEG
Photoshop format (PSD)
Large Document format (PSB)
CMYK files
AVI
MP4
MOV
AVCHD
If you want to use PSD or PSB formats, then Lightroom will be your best choice. It’s also best for those who want to import the supported video files listed here. As noted with Capture One, DNG files from all cameras are only supported in the Pro version, whereas all DNG files are supported in Lightroom, regardless of which camera they came from.
Is there a mobile version?
Lightroom offers a totally free app for your device, downloadable from both iOS and Android app stores. You will need an Adobe subscription to access several advanced features, but once you’ve purchased Lightroom, this will take care of itself. Also, note that images and edits from your Lightroom app will sync across your Lightroom CC programs – so you can edit on your phone, then see the changes on your desktop (and vice versa).
Unfortunately, Capture One doesn’t currently offer any kind of mobile app. If you want to edit images taken on your smartphone, you’ll need to transfer them to your computer (and if you want to edit images on your phone, you’re out of luck, though you can always grab the free Lightroom app).
Pricing
As with all Adobe apps, Lightroom is only available as a monthly subscription. You can purchase Lightroom CC on its own – with 1 TB of cloud storage – for $ 9.99 USD per month, or you can grab Lightroom as part of Adobe’s Creative Cloud Photography Plan, which includes access to Lightroom CC, Lightroom Classic, and Photoshop CC and starts at $ 9.99 USD per month, though you can pay extra for additional cloud storage.
Unfortunately, Capture One is quite expensive, and the pricing structure can be confusing, too. You can buy the program outright or rent it via a monthly subscription, and you can buy plans for specific camera brands, such as Sony, Fujifilm, or Nikon (these camera-specific plans are cheaper, but can only be used on images from certain cameras).
Capture One Pro is $ 299 USD for a new perpetual license, and subscription plans start at $ 19 USD per month. An annual prepaid subscription for Capture One for Fujifilm, Nikon, or Sony is $ 149 USD (which comes to around $ 12.50 USD per month).
Capture One vs Lightroom: final thoughts
Ultimately, the software you choose will be a reflection of your preferences, your skill level, and your budget.
Therefore, if you are a professional photographer who requires an integrated workflow from tethered shooting through to finished images, then Capture One is the best choice. It’s also the program to choose if you like advanced editing and color grading on adjustment layers.
Lightroom, on the other hand, is great for beginners, intermediate, and pro photographers who don’t need the huge array of features and tools available in Capture One. Lightroom is also less expensive, plus it’s more pleasant to use.
I’ve used both programs extensively, and each has its own strong and weak points. If you’re still on the fence, I’d recommend you take the time to determine the features that are important to you in an image editor. That way, you can make an informed decision regarding the best program for your editing needs.
Now over to you:
Which program do you like better, Lightroom or Capture One? Which do you plan to purchase? Share your thoughts in the comments below!
The post Capture One vs Lightroom: Which Editing Program Is Best? (2021) appeared first on Digital Photography School. It was authored by Dawn Gilfillan.
LumaFusion, one of the most powerful video editing apps for iOS and iPadOS devices, has received a major 2.4 update that adds support for editing and exporting 10-bit HDR video, including footage captured with Apple’s new iPhone 12 Pro devices.
The version 2.4 update for LumaFusion, which is free for existing customers, now makes it possible to create projects for HLG, PQ P3 and Rec-709 10-bit color spaces. In addition to creating an end-to-end workflow for Apple’s new HDR-capable iPhone 12 Pro devices, this also opens the door for editing and exporting HDR footage captured on cameras such as Canon’s R5, Panasonic’s Lumix GH5, Sony’s a7S III and others.
The new color space options reside in the project settings menu and can be turned on by default so future projects start in whatever color space you tend to use. Exporting 10-bit footage is as simple as selecting it as the color space while going through the export dialog box.
LumaFusion has also added the option to export H.265 video with transparency if you’re making custom title cards or animations and a new automated project settings feature that will define the frame rate, aspect ratio and color space of the project based on the first clip imported into the timeline. Other features include an improved color picker, a new Chroma Keyer with automated key color detection and a new Luma Keyer the offers adjustments for luma range, roll-off, erosion distance and edge blur radius for fine-tuned edits.
LumaFusion version 2.4 is available to download in the iOS App Store for $ 30.
Google has released an updated version of the Google Photos app for Android, bringing with it a few new features, including an after-capture Portrait Light mode, a one-tap editing feature and a slightly revamped editing interface.
As Google briefly demonstrated during yesterday’s Pixel 5 event, the new Portrait Light mode will edit the image to appear as though there’s light coming from a light source not actually in the image. While limited to Google’s new Pixel 4a 5G and Pixel 5 devices for the time being, this feature lets you apply ‘lighting’ in post-production by editing the image to appear as though it’s coming from a specific direction.
As noted by PetaPixel, it’s possible this new adjustable lighting technology is derived from a research project Google participated in back in 2019. Google says this feature will be coming to other Pixel devices, but doesn’t specify which ones or a definitive timeframe.
Also included in this Google Photos update is a one-tap editing feature that uses ‘machine learning to give you suggestions that are tailored to the specific photo you’re editing.’ In its current form, only three suggestions are available: Black and White, color Pop and Enhance, but Google says more options for landscapes, portraits and more will be available ‘in the coming months.’
Google has also changed the user interface (UI) of the manual editing tools. There’s now a scrollable toolbar at the bottom with round buttons and icons, akin to the interface of Apple’s Photo app, VSCO and others. This updated interface, in theory, makes it easier to quickly find the settings you need and make the appropriate adjustments.
This update will go live in the Google Play Store this week. If you don’t already have the Google Photos app, you can download it for free; if you do, be sure to keep an eye out for updates. Google hasn’t specified whether or not we’ll see these new features and redesign make their way to the iOS version of the app.
The post Getting Started With Affinity Photo Editing Software appeared first on Digital Photography School. It was authored by Kevin Landwer-Johan.
Affinity Photo is a powerful image editing software. It’s both affordable and enjoyable to use.
But, as with any program for custom manipulation of photos, there is a reasonably steep learning curve involved. If you’re used to editing your images with Adobe Photoshop, you’ll find the interface is different. This will take only a little getting used to.
I haven’t been using Affinity Photo for very long and have found it to be well designed, allowing for intuitive use. Switching image editing programs is not something I choose to do lightly. When you’ve been used to a particular workflow within a computer program, there must be a reasonable motivation to change.
My motivation was partly price. Affinity Photo is a product you can purchase outright without any monthly subscription fees. It’s also discounted from time to time, making it even more affordable. Even still, at full price, it is very reasonable for the quality of the product you receive.
The Tone Mapping Persona interface in Affinity Photo
Opening files in Affinity Photo
The first step is to open a photo file you want to edit. This is pretty straightforward and there are a few options for making it happen.
For Windows users, you can right-click an image file in your file manager and choose Affinity Photo from the list. If Affinity Photo is not listed (and it probably won’t be the first time you use it), click Choose Another App. You’ll then need to locate Affinity Photo on your C:/ drive and select it. Here you can also check the box at the bottom of the panel to always use Affinity Photo to open the type of image file you have chosen.
Using a Mac, you can simply open Affinity Photo, navigate to File in the top menu, and click Open. This also works on a PC.
You can also drag and drop photos from your file manager onto Affinity Photo when it’s running.
Affinity Photo opens all standard image types, including RAW files. There is no need for two separate programs to open and edit RAW files. Affinity Photo combines functions that require both Lightroom and Photoshop. I am finding this makes for a great image editing workflow.
Opening a RAW file in Affinity Photo
Becoming familiar with the interface
Once you’ve opened your first photo, you have a massive number of options available to work with. Let’s walk through some of the most important features and where to locate them in the user interface.
Under the main menu at the top you have the Persona and Context toolbars. Here you’ll find buttons for various Personas such as:
Photo Persona (for photo editing)
Liquify Persona (for manipulating distortion)
Develop Persona (for developing RAW images)
Tone Mapping Persona (for mapping image tones)
Export Persona (for when you’re ready to export your image)
As you select a Persona, the Context toolbar changes to include only the tools you’ll need with that Persona.
With the Develop Persona selected, the Context menu shows a different set of tools.
These tools allow you to control how you see your photo as you’re working on it. You can view a single instance of your image. There’s also a split-screen and a mirrored option. The mirrored option is shown below.
Within this Persona, you have a set of adjustment tools in the right-hand panel. These allow you to make similar adjustments to your RAW files as you can in Lightroom.
Once you’ve finished making the adjustments to your RAW image, click the blue Develop button in the top left corner. The interface changes to the Photo Persona, where you can continue to refine the edits on your image.
Here is how the Context toolbar looks when you have the Photo Persona selected while you’re editing your photos:
You have buttons for making auto adjustments to levels, contrast, color, and white balance.
When editing photos in the Photo Persona, you also have a specific set of relevant panels open. These panel sets make up your Studio of editing tools. They are also highly customizable. To show or hide various panels, go to View in the top menu, then select Studio.
Here I have the panels for Layers and Adjustments open:
Getting a feel for Affinity Photo
As you can see, there are many similarities between Affinity Photo and other image editing software. I’ve found that working in the Photo Persona is very similar to my workflow in Photoshop.
The Develop Persona took a little more getting used to. But it offers a very well-designed interface and makes working on RAW images straightforward once you get used to how it functions.
Like anything new, getting used to Affinity Photo takes some commitment and practice. This is true whether you’re new to photo editing or have been using other software to manipulate your images.
Having everything you need to edit RAW images from start to finish, including the option to use multiple layers, has been very satisfying.
Not having an image organizer included means you need to work with your operating system’s file manager or use an additional program. There are many free and cheap digital asset management programs that you can use to organize your photos.
Conclusion
For any photographer with years of experience using a particular brand of editing software, changing is a big step. If you’re new to photo editing, learning to use any photo imaging software manually is a big step, too.
Affinity Photo provides an impressive set of photo editing tools all within one application. I find it to be well laid out and intuitive to use after using Adobe products for many years.
For people new to photo editing, take the time to learn Affinity Photo. You’ll be able to use it to edit your photos just as well as any other available software.
The post Getting Started With Affinity Photo Editing Software appeared first on Digital Photography School. It was authored by Kevin Landwer-Johan.
Apple has released its latest update to Final Cut Pro X, bringing with it a number of new features, including the ability to finally adjust ProRes Raw camera settings.
Although it’s listed under ‘Other new features,’ one of the most welcomed additions in the update is the ability to adjust ProRes Raw camera settings, such as ISO, color temperature and exposure compensation in the new controls within the inspector.
These new options address what was a big hole in the ProRes Raw workflow with FCPX. We asked our own Jordan Drake of DPReview TV for his thoughts on these new additions and he had the following to say:
’Working with ProRes Raw was initially jarring, as it did not respond like other photographic or cinematic raw formats. White balance and ISO were not directly adjustable, and attempting to use the built in tools to simulate those adjustments often led poor colors or noisy shadows. This new update allows adjustments to white balance, exposure and ISO and will hopefully allow ProRes Raw to behave more like R3D Raw, or Apple’s primary competition Blackmagic BRaw. Camera manufacturers aside from Blackmagic seem to be moving towards ProRes Raw, so this added functionality will be a big benefit for many current and future cameras.’
Also new is an improved proxy workflow with the ability to generate proxy media in custom frame sizes (1/8, 1/4, 1/2, or full resolution), the ability to create proxies in either ProRes Proxy or H.264 and the ability to create a proxy-only copy of a library to reduce the size of a project.
It’s now easier to compose footage for use in vertical-preferred platforms, such as Snapchat, Instagram TV, TikTok and others.
Apple has also added a number of new social media tools within FCPX, including automated project transformation for square of vertical delivery via the new ‘Smart Conform’ tool, the ability to view footage outside the viewer boundary for easier composing in non-traditional formats, as well as custom overlays for guides and a new ‘Duplicate Project As’ option that works with the new ‘Smart Conform’ tool to make creating videos for multiple platforms easier.
For other minor feature updates and bug fixes, head on over to Apple’s changelog for FCP 10.4.9. The update should be available as a free update in the macOS App Store if you’ve already purchased FCPX.
The post Anthropics Portrait Pro Editing Software Review appeared first on Digital Photography School. It was authored by Carl Spring.
Anthropics Portrait Pro 19 is the latest version of its incredibly popular retouching software. This piece of software allows users to create professional retouches without needing to spend hours learning several techniques. Instead, Portrait Pro uses a simple, user-friendly interface that allows advanced retouching in a simple to understand and time-saving manner.
What’s New in Portrait Pro 19
Anthropics Portrait Pro 19 brings a host of improvements that make this software better than ever before.
Clearskin 5
There is a big improvement in the skin detail over previous versions of Portrait Pro.
The first I must mention is the Clearskin 5 technology. Based on state-of-the-art A.I., Clearskin 5 intelligently maps the contours and features of the face and retouches skin accordingly. It also replicates the face’s natural skin texture, allowing users to subtly remove blemishes while maintaining the subject’s natural appearance. When combined with the improved Fix Lighting tool, this new technology makes it even easier for photographers to achieve amazing results.
When compared to previous versions (which themselves were very good) this is a subtle but noticeable difference. For me, this alone is enough to recommend this version, but there is a lot more under the hood.
Let’s look at what’s new in Portrait Pro 19.
Advance Hair Retouching
Hair detection has been improved and gives users more options than ever before. After choosing a base shade for the hair, you can tweak this to create a variety of styles, from a subtle improvement of natural color all the way through to more extremes of pink and blue hair.
A subtle tweak or a radical change? Both are possible in Portrait Pro.
Expression Sliders
This tool offers a variety of ways to subtly change the expression of your model, letting you get the perfect smile every time.
It’s easy to get your subjects smile just right when using this software.
Accurate Lens Correction
Utilizing 3D modeling, the software accurately corrects for lens distortions created by wide-angle lenses such as mobile phone cameras.
Optimized Plugin (Studio exclusive)
This plugin allows you to harness the power of Portrait Pro directly from Photoshop and start editing right away. By updating the technology, the plugin returns to Photoshop up to five times faster than previous versions, which means less time processing and more time creating great portraits.
Improved Automatic Batch Processing (Studio Max exclusive)
PortraitPro Studio Max 19 allows photographers to automatically process batches of images simultaneously. The software detects faces and features in the image, applies your chosen presets and automatically saves the result. Again, thanks to PortraitPro 19, the software handles images 2x faster than before, allowing you to retouch a batch of images quickly and easily yet achieving amazing, tailored results.
This tool (exclusive to the Studio Max edition of the software) is something that I can see being amazing for sending proofs from a headshot session. Imagine the ability to send all of the client images to select from, all retouched to your specific style. Not only will it wow your clients, but it is effortless for you to do this.
You do not need your subject to be looking directly at the camera. In this example, which was part of a batch, it still picked up the features quickly and easily saving me time.
Interactive Tutorials
These tutorials are some of the best I have seen for any software – allowing you to follow along and improve images with a guide to hold your hand.
The tutorials allow users to get to grips with the features of the software quickly and easily. By the time you get through the first couple of tutorials, you will be itching to use the software on your own images, but when you want to push your skills a little more (or just can’t quite figure something), there are more advanced tutorials to help you upgrade your skills.
There are various tutorials, from retouching skin and face shaping (which are the two tools you will probably use the most) through to a series of advanced tutorials that go into detail on things like applying makeup, hair, eyes, and many more. Thus, allowing you to take advantage of the massive feature set on offer with this software.
The built-in tutorials make it really easy to get started in Portrait Pro 19.
In Use
After going through the first two tutorials, I wanted to put some of my own images through the software. The feature detection on the tutorials was quick, simple, and incredibly accurate. I wanted to see if this was as good in real life as it was in the tutorials. I was amazed that my own images imported quickly and found the models’ features perfectly the first time.
Putting in my first image, I was surprised how quickly it found all the features of the face.
Presets
I thought I’d start by trying the built-in presets. I clicked the Standard Preset and almost instantly the image was good enough to give to a client. After trying the other presets, I found the Maximum Lighting worked really well for the shot below.
Within two clicks, I had an image that was retouched to a high standard. As someone who has spent hours learning retouching techniques in Photoshop, it was impressive. To those who are new to retouching, it will give you a set of tools that would normally take hours to master individually at the click of a button.
I’ll be honest, some of the presets were a little too much for me. However, I tend to go for a more natural look in my retouching. Yet, I can see that for some, they will be perfect. I think the presets have been created to give every style of photographer a great starting point that can be tweaked until they get their own style.
With a few clicks, you can get results like these. From L-R: Original image, Standard Preset and Max Light Preset
Starting From Scratch
It would have been easy for me to leave the review here, as the presets do a great job, but I wanted to dive deeper and see how the tools would work individually. I started over with the same image and worked my way through the panels.
The panels are laid out in a very logical order, starting with Sculpting the Face, which allows you to tweak everything from eye size to the length of the model’s neck. Everything is simple and uses a slider-based system.
I then worked through the skin smoothing (which looks a lot more natural than previous versions of the software) before continuing to work my way down the menu system.
I created my own preset for this shoot. Once I had it how I liked it, I could then save my style as a preset and apply it to more images from the shoot.
A small word of caution, though. Portrait Pro allows you to push the retouching levels to the extreme. You can get caught up in pushing all sliders to the max. This will not give you a great result and like adding salt to a meal, a sprinkle is always better than a handful.
Make use of the before and after function to check you have not pushed your image too far. I have heard complaints that Portrait Pro makes everything “Doll Like” or “Just Not Natural.” That is not true. Just like Photoshop, users can get carried away and push things too far in their edits.
It was amazing that only 30-minutes into using a brand new piece of software, I was able to fully retouch a portrait to this level without needing a YouTube tutorial. What’s even better is that with a couple of clicks, I now had my own preset that I could apply to other images. This is something that really does create a massive time-saving option.
I put my newly created preset to the test with another image from the same shoot. It literally took me 10-seconds to import and apply the preset and it was ready to export. If you are working with large amounts of images per shoot, this might just be a game-changer.
Within 10 seconds, I had created this edit, in my own style without needing to press more than one button.
By the time I had finished, I had added makeup, added lighting, and changed both hair and eye color quickly and easily. The feature that stood out for me was the advanced lighting tool.
For those who are new to working with light or those who don’t currently have a lighting system, you can add lighting effects that really enhance the image and make it pop.
Who’s it for?
Anthropics Portrait Pro is an amazing tool for those who are new to retouching portraits. It is simple, yet incredibly powerful and gives you pleasing results within seconds. However, it offers much more and encourages you to go back to the software and personalize your retouching.
For those who are more advanced photographers, it allows you to really speed up your workflow and create signature styles. The Photoshop Plugin (Studio Exclusive) means you can use Portrait Pro as part of a larger project.
For Pro’s, there is a real benefit from the batch processing options found in the Studio Max Edition. If you are shooting several images and want to send clients a selection, by using a preset (either one in-built or your own signature style), you can retouch all images with a few clicks. This saves you a lot of time and allows you to focus on your business.
If you retouch portraits, you really need to try this software out. Also, DPS has managed to get a special offer just for you.
How Do You Get Portrait Pro?
You can download your free trial at https://www.anthropics.com/portraitpro/download/
Currently there is a 50% OFF sale everything + DPS readers get an EXTRA 15% OFF when you use the coupon JW9682
I look forward to seeing what you create in the comments below.
The post Anthropics Portrait Pro Editing Software Review appeared first on Digital Photography School. It was authored by Carl Spring.
The post Photo Editing with Lightroom Mobile appeared first on Digital Photography School. It was authored by Simon Ringsmuth.
Lightroom Mobile has been around for many years, with the earliest version dating all the way back to 2014. While it is not as popular as its traditional desktop-based counterpart, Lightroom Mobile has grown into a capable and feature-packed editing tool that can hold its own against many other programs.
Editing with Lightroom Mobile isn’t quite the same as editing on Lightroom Classic. But if you take the time to learn, you’ll find that it is up to almost any task you can throw at it.
Nikon D750 | 200mm | 1/4000s | f/22 | ISO 100
The first thing to understand when working with Lightroom Mobile is that it’s not just a mobile version of Lightroom Classic. Lightroom Mobile was written from the ground up to work with phones and tablets, and that meant Adobe had to re-imagine the entire user interface.
Design considerations were also made for the types of edits that people are likely to do on a mobile device. Screen size, touch targets, editing, and navigation; no stone was left unturned when Lightroom Mobile was developed.
As such, using Lightroom Mobile involves a jarring transition for people used to the desktop version, though if you have a mobile-first workflow you might be used to it. Even so, understanding a few basic tips and techniques for editing with Lightroom Mobile can improve your workflow a great deal.
Understanding the interface
The first thing you will notice when editing a photo in Lightroom Mobile is that the interface is quite different from Lightroom Classic. Gone are the Library, Develop, and other modules. You will also not find the traditional panels like Basic, Detail, Effects, etc. In their place is a series of buttons and icons along with some words to tap on.
The basic editing interface for Lightroom Mobile. Most of the editing tools are on the right side and can be activated by touching and tapping.
All the icons may be a bit overwhelming at first, but if you start at the top left and work your way around clockwise things start to make sense. Tap the Edit button to switch between the different modes available to you.
Tap the Edit button to switch between modes. This is sort of like moving between the traditional Library, Develop, Print, and other modules in Lightroom Classic. However, these modes in Lightroom Mobile serve very different purposes.
These modes come in handy when you want to cull images, assign keywords, and otherwise speed up your workflow. They are not particularly useful for editing, but I do recommend familiarizing yourself with them by experimenting on your own.
Moving towards the top right you will see more icons. Tap the question mark to get help, the up arrow to share an image, and the cloud to see the sync status of your Lightroom Mobile images. The three dots inside a circle is where things start to get interesting, and where you can start to get an understanding of the depth of Lightroom Mobile.
The three-dots-in-a-circle icon lets you access some advanced features you might recognize from Lightroom Classic.
It’s important to keep your expectations in check; this is not Lightroom Classic. If you are looking for a mobile version of Lightroom that replicates the desktop version, you are in for a big disappointment. But if you want a solid tool that lets you do a lot of editing on your mobile device, this is where things start to get really interesting.
You can use the three-dot menu to copy/paste settings, create an editing preset, and even specify custom gestures by scrolling down and tapping the Settings button. You can also use the View Options button to toggle the histogram and show/hide photo information when editing.
Tablet vs phone
All the screenshots so far have been for Lightroom Mobile on a phone. The interface is similar on a tablet, but the added screen real estate puts a lot more information and options at your fingertips.
Lightroom Mobile on a tablet has all the same tools and options as on a phone. The added screen real estate allows for more information to be displayed, while editing tools are grouped slightly differently.
In terms of photo editing, the main difference between a phone and a tablet is that the global edits are grouped together in a single icon. The icon with three sliders in the top-right corner is where you tap to access global edits like Light, Color, Effects, Detail, Optics, and more. Tap any of these to get a series of sliders that you can adjust with your finger, and watch as your changes are instantly applied to the image.
The extra room on a tablet means you get a lot more information and options on the screen.
The larger size of a tablet means that you can see the entire photo as you apply your edits, with plenty of room to move sliders and adjust parameters. This is my preferred method of editing with Lightroom Mobile, though plenty of people like using a phone. Either way is fine, as long as you find an option that works for you.
Tapping to edit
The true depth of Lightroom Mobile is further revealed with the vertical column of icons on the right side. This is where you can dive deep into the editing tools and perform all manner of intricate adjustments similar to those in Lightroom Classic.
(Note that these same icons appear in a horizontal row at the bottom of your screen if you hold your phone in portrait mode.)
Already you can start to see the sheer volume of editing options available to you in Lightroom Mobile, but that’s not all. Tap and scroll on the vertical row of icons to reveal even more.
If the icons seem confusing, one trick you can use is to simply rotate your mobile device from landscape to portrait mode. This shows brief descriptions beneath each icon which helps if you ever start to feel overwhelmed.
The simplest way to learn more about these tools is to just start tapping them and experimenting. In true Lightroom fashion, none of your edits are permanent; the Undo button will always let you step back to your previous edit. The Reset button will erase all your changes entirely, and you can even step back in time to a specific version of your photo by using the clock icon just above the Reset button.
Selective and global editing
There are two basic types of edits in Lightroom Mobile: selective and global. Selective edits are adjustments applied to specific portions of an image. Global edits are applied to the entire image. If you were to compare it to Lightroom Classic, selective edits are tools such as the Graduated Filter, Radial Filter, and the Adjustment Brush. Global edits include any of the Basic Panel adjustments along with features such as Detail, Color, Effects, the Tone Curve, etc.
To illustrate the touch-based workflow inherent to Lightroom Mobile, my favorite example is the Selective Edit tool. Tap the round dot icon at the very top of the panel on the right side to bring up the Selective Edit interface.
Tap the blue “plus” icon in the top left corner to create a new brush or filter adjustment.
At this point, you might think you can start tapping on the photo. But, if you try it, nothing happens. Tapping on the icons on the right side doesn’t do anything either.
Why? Because before you can start editing, you have to create a new selective edit, which you can do by tapping the blue “plus” icon in the top left corner. This lets you select from three types of brushes: Adjustments, Radial Filter, and Graduated Filter. Tap to select one of these options.
After choosing a specific type of selective edit, tap and drag to apply it to your image.
Now you’re ready to start editing! Tap and drag your finger around the screen to see your brush or filter applied instantly with buttery smoothness. After your adjustment or filter is in place, tap one of the icons on the right side to add a specific edit: white balance, sharpness, etc. You might be surprised at how quickly you can do editing with Lightroom Mobile if you are used to the desktop interface, which can be a bit sluggish at times.
Use the icons on the right to choose what parameters are adjusted in the edit: white balance, exposure, etc.
At this point you might notice one common theme with all the pictures in this article: They are in landscape orientation. Lightroom Mobile lets you edit in either portrait or landscape, and the interface automatically adjusts according to how your phone is positioned.
Editing can be done in horizontal or vertical orientation, and the interface adjusts automatically based on how you hold your device.
After applying a selective edit, you will see a blue diamond appear on your image. Tap on that to bring up the selective edit, and also to see a red overlay which indicates where the edit was applied. As with Lightroom Classic, your selective edits can be altered at any time or removed altogether.
The key thing to remember about editing with Lightroom Mobile is that you can’t permanently mess anything up. Just like the standard desktop version of Lightroom, all your edits are nondestructive, which means you can revert to a previous state of your image at any time.
The Selective Edit tool is a great example of how the basic Lightroom Mobile workflow functions: You tap on an editing tool, and then tap to implement the edit or alter its parameters. Global edits function in the same manner, except they are applied to the whole photo and not just specific portions. It’s not too difficult once you get the hang of it, which for most people is a matter of mere minutes.
Fuji X100F | 23mm | 242s | f/16 | ISO 200
If you have an Adobe Creative Cloud subscription, Lightroom Mobile is included in the price, and I recommend giving it a try. Even if you just use it to speed up your workflow rather than in-depth editing, it’s still a powerful arrow to have in your photography quiver. Editing with Lightroom Mobile is a fun process that, while not quite on par with the in-depth options in Lightroom Classic, is certainly worth a look. Or a second look if it’s been a while since you last checked it out.
The post Photo Editing with Lightroom Mobile appeared first on Digital Photography School. It was authored by Simon Ringsmuth.
The post 8 Tips for Editing Stock Photos so they Pass Inspection appeared first on Digital Photography School. It was authored by Kevin Landwer-Johan.
Editing stock photos requires a little more attention to detail than you otherwise might give your photos. Stock photo agencies have standards to meet and rules to follow. If you want your photos accepted into their libraries, you must adhere to them.
You may have applied to a stock photo agency in the past and had your imaged rejected because they were not up to scratch. Each stock photo agency has its guidelines for what is acceptable and what is not. Learning what these are can save you a lot of wasted effort and time.
It’s easier than ever to upload to stock photo agencies
Over the years micro-stock photography requirements for image editing have shifted somewhat.
Camera technology has improved, so there are fewer imperfections caused in images when you take them. With the increase in megapixels and image quality, there’s less need for as much post-processing now.
With more and more stock photography sites coming online over the years, standards are not so tough as they used to be. Newer, smaller agencies want to attract photographers. Not being so strict on image quality makes it easier to meet requirements. Image libraries are populated more quickly because there are fewer rejections.
As stock photo libraries contain millions of photos, the parameters for what style of photo is accepted has changed. Many photo sales sites will accept photos for editorial licensing, whereas in the past most did not.
From one agency to another, the quality and style of photos they accept differ. In this article, I’ll go over some of the most common things to look for in your photos that might hinder them from being accepted.
When I started learning about stock photography, there were fewer agencies, and their quality standards were much higher. It was more challenging to have your photos accepted into the best agencies. And, when you had been welcomed as a contributor, you could not let your standards drop.
Each submitted photograph gets thoroughly checked. The team of inspectors works with a list of parameters and standards. Every photo must meet these before it’s included in the stock library. In some cases, inspectors will offer you feedback. There can be a provision made to resubmit rejected photos once they are fixed. But not all stock agencies do this. Sometimes if your photos are rejected, there is no opportunity to fix them and resubmit.
Learning to meet the standards will help you improve your image editing skills. The bar may not be so high anymore, but it’s always best to aim to present the highest quality possible.
Some of the most common things stock photography inspectors look for in photos that will get them rejected are:
Before you start editing, you can do a lot to ensure your photos will get accepted. For more of your photos to pass inspection, you need to think like a stock photographer as you are taking your photos.
1. Set your exposure well
Keep in mind the importance of attaining a good exposure. This is far more desirable than correcting your exposure during post-production. Start editing stock photos that are poorly exposed and you’ll run into other problems.
When your exposure is poor, correcting it during post-production can result in artifacts in your image. This is when the digital integrity of the image starts to break down. Stock agency photo inspectors usually reject photos with artifacts.
Modern cameras have an incredible capacity to take photos in low light. Raising your ISO too high can create an unacceptable amount of digital noise.
Cleaning up the noise is often not at all difficult. With the correct balance of noise reduction slider, you can eliminate it.
When you’ve used a high ISO setting, make sure you zoom into 100% and take a look at the level of digital noise. You may not see it clearly unless you enlarge your photo. Using the appropriate sliders, you will be able to reduce it significantly.
Chromatic aberration is sometimes called purple fringing. It’s a fault in digital images caused by contrast in a scene. When you’re editing stock photos, you must look carefully for this problem.
Check along the edges of objects in your photos where there’s a contrast with the background. When you notice a band of color along the edge you will need to correct this. The color is usually magenta or green. Sometimes it can be blue or yellow.
Most popular image processing software now has dedicated tools for eliminating this problem.
4. Clone out sensor spots and other blemishes
Sensor spots look ugly in photos. It’s best to keep your camera sensor clean, but this is not always possible. Other dust and blemishes also need to be removed so you can upload the cleanest photos possible.
Using clone tools is often the best way to clean these blemishes from your photos. Again, zoom into 100% so you can see these spots easily. Work methodically over the whole photo to make sure you don’t miss any.
Sensor spots are usually visible against a clear space in your photos. They are likely to show up in large areas of sky, snow, or other similar elements containing little or no detail.
Buildings, lamp posts, horizons, and other elements must look properly aligned. If you’ve taken your photo with your camera on a bit of an angle, the vertical and horizontal lines will not appear natural.
Cropping your photos, so elements in them are aligned correctly, will help them pass inspection.
6. Correct your white balance
Most of the time, I have my camera set to auto white balance. This produces the correct color in my photos most of the time. When the color in your photos looks odd, it must be tweaked so it looks natural.
Having your camera set to save RAW files makes all aspects of post-processing easier, especially color correction. If you have photos where the color looks too cool or too warm, use the eyedropper tool or color correction sliders to help you achieve the natural color.
7. Remove all copyrighted elements when you are editing stock photos
This is the most frustrating aspect of stock photography for many people. So many things are copyrighted and branded. It’s best to avoid anything with a logo or branding when you are taking your photos. Sometimes you can’t, so you need to remove any instances of copyrighted material from your images.
If you are only uploading your images to sell under an editorial license, the requirements for copyright are different. You’ll need to check the terms and conditions for each stock photo agency as they differ from one to another.
Sometimes copyrighted material is in plain sight. Branding on a coffee cup. An outdoor advertising banner. Logos on shoes and clothing. All these are unacceptable when submitting photos to royalty-free microstock photo agencies.
Some of the more elusive things that contain copyrighted material are:
Zips with branding
Clips on bags with branding
Buttons with branding
Watches
Phones
Artworks
Text written in a language the inspector does not read will also often be rejected as they have no way of knowing if it’s copyrighted.
Cloning out any logos or branding can take a long time, so it’s best to avoid including these things in your photos when you can.
What’s allowed and what is not allowed is different for regular and for editorial licensing.
Images submitted for sale under a standard royalty-free license can be edited freely. Editorial stock images must meet higher standards. The most important thing to know is you cannot generally make use of the clone tool.
Any alteration to the content, other than sensor spots is not allowed. You must check the rules for each stock agency you submit editorial images to.
Conclusion
Become familiar with the requirements of each stock photo agency you want to upload to. Understand what is acceptable and what is not. This can take some time but ultimately will save you time and stress.
Take your time when you are editing stock photos. Look carefully at each one. Zoom into 100% to ensure your image quality meets the standards required.
I hope you find these tips useful. Do you have any other tips for editing stock photos you’d like to share? Please do so in the comments!
The post 8 Tips for Editing Stock Photos so they Pass Inspection appeared first on Digital Photography School. It was authored by Kevin Landwer-Johan.
The post Lightroom Moon Editing Tips for Awesome Moon Photos appeared first on Digital Photography School. It was authored by Simon Ringsmuth.
One of the most fascinating photos you can take is a crystal-clear shot of the full moon. Pictures like this don’t require a lot of fancy gear, but you do have to be in the right place at the right time. To make matters even more tricky, you only have a handful of opportunities each year to even attempt a moon shot. Getting a picture is just the beginning, though. If you want to make your shot stand out, it helps to follow these simple Lightroom moon editing tips.
The benefits of RAW over lossy formats like JPG are well documented. While there are certainly times where JPG is useful, RAW is essential when taking shots of the moon. You need all the editing leeway you can get to adjust colors, exposure, and other parameters.
For example, the photo below might not look like much, but it’s fairly typical of the types of moon shots most people would get with some basic camera gear. I shot this with a crop-sensor camera, which is much more common than expensive full-frame models. I also only zoomed to 200mm, and a lot of kit zoom lenses can easily reach this far.
This is straight out the camera with no postprocessing applied. Nikon D500, Nikon 70-200mm f2.8, 200mm, 1/200 second, f/5.6, ISO 720.
At first glance, it probably looks like there’s not much that I can do here. The moon is overexposed and a little blurry. It’s way too small, and the power lines cut right through the frame. Also, the sky has a weird blue tint to it that’s a bit unnatural.
However, hope is not lost! Thanks to the power of RAW files, and a little bit of editing prowess in Lightroom, this photo can be turned into a frame-worthy image.
Crop
Back in the early days of digital photography, people often debated the importance of megapixels. A common, though incorrect perception was that more megapixels equal better photos. While that is not necessarily true, having a higher megapixel count does allow you to have significant room for cropping, which is great when your subject is far away – 239,000 miles, to be exact.
Most cameras today have upwards of 20 megapixels, which gives you a huge amount of freedom to crop your photos. If you don’t have a huge telephoto zoom lens to zoom into individual moon craters, use Lightroom instead. Crop your image until it’s nice and tight with the moon right in the center.
Go ahead and crop your photo. If you have a modern camera you have plenty of leeway.
In this example, I cropped the image tight enough to get rid of everything but the moon and the sky. Gone are the power lines and trees, and what’s left is just the moon in all its glory. Even cropped in this much, the resulting image is 4.3 megapixels – more than enough to get an 8×10″ print made.
There’s still a lot of work to do, but cropping already helped a great deal.
White Balance
At this point the picture is better, but still has a long way to go.
The next step is to adjust the white balance. The reason I recommend doing this after you crop your moon photo is that it helps you focus on just the important part of the image. If you adjust the white balance before cropping, you might be focusing your edits on parts of the image that you discard after cropping.
There’s no right or wrong way to adjust the white balance on a moon photo. It all depends on how you want the final image to look and what you want your viewers to feel when they see it. If you want a starting point, here are two options I recommend.
Use the Daylight preset
Use the Eyedropper and click on the moon.
Both of these produce vastly different results. You can also play around with the sliders until you get a look that you like. One thing to remember is that the moon itself produces no light. It’s just a ball of rock falling through the sky. The light you see is sunlight reflecting off the surface, which is why some people prefer to use a white balance suited for sunlight. The choice is yours, though, and you can set the white balance however you want.
Another option is to combine the best of both worlds. Click the eyedropper tool on the moon, but then use the Brush tool to change the white balance of the moon. This will give you rich, deep blues for the sky but a yellow tint for the moon. However, this can be a little tricky. If not done right, you will see a weird color halo around the moon. So just make sure to use the Brush tool as precisely as possible.
You can use the Brush tool to change the white balance of the moon, but not the rest of the image if you choose.
Exposure adjustments
Nailing the exposure when shooting the moon is tricky. It’s a giant bright ball against a dark sky, which means a lot of the conventional rules don’t apply. I usually prefer to under-expose the moon and then adjust it in Lightroom. That way you preserve your highlights, but even if your picture is a little overexposed you can still salvage it if you shoot in RAW.
In this example, my shot is overexposed by about one stop. To fix it, I entered a -0.75 value in the Exposure slider in the Basic panel. This darkens everything: the moon and the sky. If you want the sky to stay the same level of brightness but just adjust the moon, use the Highlights slider. Drag it left to lower the exposure of the brightest portions of your image – in this case, the moon.
Raise or lowering the exposure in Lightroom to get just the right appearance.
Adjusting the exposure isn’t one of the most mind-blowing moon editing tips, but it’s an essential step in the process of getting your final shot to look good.
Texture and Sharpening
When you take a picture of the moon, you have to contend with all sorts of variables that can lead to a soft or fuzzy appearance. From earth, we see the moon through miles of atmosphere, which often contains dust and other particles. Your lens might not be tack-sharp either, especially if you got your zoom lens as part of a camera kit. Lightroom can help fix these issues with a few simple sliders.
Normally, I would recommend starting with the Sharpening slider, but not when shooting the moon. In this case, you want to bring out the moon’s texture and surface details, so the texture slider is a great place to start. You can find it at the bottom of the Basic panel. Alternatively, you can use the Brush tool to adjust the texture if you want a little more precision in your editing.
Raising the texture slider makes the surface look clear and crisp. I used a value of +80 which is a bit extreme, but I wanted to illustrate the impact of the Texture slider.
The Sharpening slider is great for fine-tuning your image after adjusting the texture. However, I do not recommend using the Clarity slider. That will result in a false, unnatural look with moon shots and can show some unwanted noise in the sky as well.
Final touches
At this point, you have several options to polish your image. While you can use any number of editing tools, some that I recommend trying are:
Adding a vignette
Use the Brush tool to reduce noise in the sky
Adjust the tone curve to have a very slight S-shape
Raise and lower the blue saturation
Convert your picture to Black and White. Click “Black and White” in the top-right corner of the Basic panel
Final moon shot. I added a vignette and brushed some noise reduction in the sky.
When it comes to moon editing tips, the sky is quite literally the limit. These should be enough to get you started, but I recommend spending time just experimenting with some of the sliders in Lightroom to see what you can do.
Nikon D7100, 200mm, f/8, 1/180 second, ISO 640. I used the editing tips in this article to process this shot.
What about you? DO you have any other moon editing tips you’d like to share? Do you have any favorite shots of the moon? Share your favorites in the comments below!
The post Lightroom Moon Editing Tips for Awesome Moon Photos appeared first on Digital Photography School. It was authored by Simon Ringsmuth.


You must be logged in to post a comment.