RSS
 

Posts Tagged ‘Dust’

DPReview TV: How much do scratches, dust and fingerprints affect lens image quality?

18 Jun

We all know that damage to your lens is bad, but just how bad is bad? Chris and Jordan investigate the image quality impact of dust, water, fingerprints and cringe-inducing scratches on your lens. As you might imagine, the results range from ‘barely noticeable’ to, well, much worse than that.

Subscribe to our YouTube channel to get new episodes of DPReview TV every week.

  • Introduction
  • Fingerprints
  • Mist and water droplets
  • Dust
  • Light scratches
  • Deep scratches
  • What we learned

Sample images from this episode

$ (document).ready(function() { SampleGalleryV2({“containerId”:”embeddedSampleGallery_4393505357″,”galleryId”:”4393505357″,”isEmbeddedWidget”:true,”selectedImageIndex”:0,”isMobile”:false}) });

Articles: Digital Photography Review (dpreview.com)

 
Comments Off on DPReview TV: How much do scratches, dust and fingerprints affect lens image quality?

Posted in Uncategorized


Updated Panasonic Lumix G 14-140mm F3.5-5.6 lens is splash and dust resistant

06 Apr

Panasonic has updated its versatile 14-140mm F3.5-5.6 lens, adding a degree of splash and dust resistance. The Lumix G Vario 14-140mm F3.5-5.6 II ASPH Power OIS, which is equivalent to 28-280mm on a Micro Four Thirds body, has the same optics as its predecessor, with 14 elements, a seven-blade aperture and 240 fps AF control. The lens is remarkably compact given its focal range, with a length of 75mm (2.95″) and weight of 265g (9.4 oz).

The new 14-140mm F3.5-5.6 II will ship in May for $ 599.

Press Release

The LUMIX G 14-140mm* Telephoto Zoom Lens for Micro Four Thirds System Undergoes Update

LUMIX G VARIO 14-140mm* / F3.5-5.6 II ASPH. / POWER O.I.S. (H-FSA14140)
Featuring a Splash/Dust-Resistant Rugged Design
*35mm camera equivalent: 28-280mm

Newark, NJ (April 5, 2019) – Panasonic announced today that it has updated the LUMIX G telephoto zoom lens based on the Micro Four Thirds system standard. In addition to the versatile zoom range from wide-angle to telephoto, the new LUMIX G VARIO 14-140mm / F3.5-5.6 II ASPH. / POWER O.I.S. (H-FSA14140) features a splash/dust-resistant* construction for heavy field use yet retains its stylishly compact profile remains lightweight.

The Practical zoom range of 14-140mm (35mm camera equivalent: 28-280mm) suits a wide range of shooting situations. It can capture dynamic landscapes, bring subjects up close, or shoot impressive portraits with beautifully defocused backgrounds.

Comprised of 14 elements in 12 groups, the lens system features three aspherical lenses and two ED (Extra-low Dispersion) lenses to achieve dramatic downsizing of the powerful 10x optical zoom lens, while minimizing distortion and chromatic aberration.

The POWER O.I.S. (Optical Image Stabilizer) effectively compensates for not only small, fast movements, but also large, slow movements, making it easy to shoot super clear shots even in low-lit situations at nighttime or indoors.

Incorporating an inner focus drive system and stepping motor, the new LUMIX G VARIO 14-140mm / F3.5-5.6 II ASPH. / POWER O.I.S. is capable of smooth, silent operation to work with the camera’s high-speed, high-precision contrast AF system for both photo and video recording. It is also compatible with the sensor drive at max.240 fps to take maximum advantage of cameras with high-speed AF.

The LUMIX G VARIO 14-140mm / F3.5-5.6 II ASPH. / POWER O.I.S. (H-FSA14140) is built with a highly reliable metal mount, and uses multi-coated lens elements that minimize ghosts and flare. Seven blades give the aperture a rounded shape that produces an attractively smooth defocus effect in out-of-focus areas when shooting at larger aperture settings.

* Dust and Splash Resistant does not guarantee that damage will not occur if this lens is subjected to direct contact with dust and water.

* Design and specifications are subject to change without notice.

The LUMIX G VARIO 14-140mm will be available at valued channel partners in May for $ 599.99.

Panasonic Lumix G Vario 14-140mm F3.5-5.6 II ASPH Power OIS specifications

Principal specifications
Lens type Zoom lens
Max Format size FourThirds
Focal length 14–140 mm
Image stabilization Yes
Lens mount Micro Four Thirds
Aperture
Maximum aperture F3.5–5.6
Minimum aperture F22
Aperture ring No
Number of diaphragm blades 7
Optics
Elements 14
Groups 12
Special elements / coatings 2 ED, 3 aspherical elements
Focus
Minimum focus 0.30 m (11.81)
Maximum magnification 0.5×
Autofocus Yes
Motor type Stepper motor
Full time manual No
Focus method Internal
Distance scale No
DoF scale No
Physical
Weight 265 g (0.58 lb)
Diameter 67 mm (2.64)
Length 75 mm (2.95)
Sealing Yes
Zoom method Rotary (extending)
Power zoom No
Zoom lock No
Filter thread 58 mm
Hood supplied Yes
Tripod collar No

Articles: Digital Photography Review (dpreview.com)

 
Comments Off on Updated Panasonic Lumix G 14-140mm F3.5-5.6 lens is splash and dust resistant

Posted in Uncategorized


Man v Dust: video highlights trials of Leica’s in-house sensor cleaning service

12 Jan

The International Leica Society has posted a video of a camera sensor being cleaned at the Leica service centre in the Wetzlar factory in Germany.

The video, taken by member Hari Subramanyam on his iPhone, shows the process of checking for dust on the sensor of his M (Typ 240) and then its removal. Well, that was what it was supposed to show, but after 20 minutes and 25 seconds the video finishes with the dust victorious and the Leica service engineer frustrated and wishing he wasn’t being recorded.

The engineer starts by cleaning the mount of the camera before using a vacuum cleaner to suck dust and debris from the shutter blades. Once that is done the in-camera dust checking function is used to detect a number of dust spots. The rubber-on-a-stick Pentax Sensor Cleaning kit is used to remove the dust as the engineer explains the process needs patience and can take anything from ten minutes to an hour.

We don’t get to see the sensor finally dust-free, as it takes a few goes and the cameraman has less patience than the engineer, but the video shows some useful steps in the process.

Articles: Digital Photography Review (dpreview.com)

 
Comments Off on Man v Dust: video highlights trials of Leica’s in-house sensor cleaning service

Posted in Uncategorized


KUVRD Universal Lens Cap protects any lens from dust and water

19 Dec

$ (document).ready(function() { SampleGalleryV2({“containerId”:”embeddedSampleGallery_8206056277″,”galleryId”:”8206056277″,”isEmbeddedWidget”:true,”selectedImageIndex”:0,”isMobile”:false}) });

KUVRD has launched a one-size-fits-all Universal Lens Cap (ULC) designed to protect lenses from hazardous elements, including dirt and water, as well as minor drops. Simply called the KUVRD Universal Lens Cap, this ULC is made with silicone that can stretch to accommodate various lens shapes and sizes, including both the front and rear of the lens.

Here’s a quick intro, not that the concept isn’t pretty self-explanatory…

In addition to being water- and dust-proof, KUVRD explains that its ULC “never falls off” and helps absorb shocks.

One cap will absorb a little bit of a drop, but photographers who desire a greater degree of bump/drop protection can layer several KUVRD ULCs, placing one lens cover over another until you have several very snug layers of rubber between your lens and the elements. When not in use, KUVRD can be folded and stored in a compact area, such as a pocket or wallet.

KUVRD is seeking funding for its Universal Lens Cover on Kickstarter, where it has very quickly exceeded its $ 2,500 funding goal with about $ 72,000 in pledges. Backers who pledge at least $ 30 and share the campaign on social media are offered two Universal Lens Covers. Shipments will be available globally and are expected to start in March 2018.

Articles: Digital Photography Review (dpreview.com)

 
Comments Off on KUVRD Universal Lens Cap protects any lens from dust and water

Posted in Uncategorized


25 Speedy Images That May Leave You in the Dust

29 Jul

How you photograph a moving subject really depends on two things:

  1. Your intentions (to blur or freeze it)
  2. The lighting conditions (it may be low light)

You could decide to blur the object, adding a sense of motion to your image. Or make a complete abstract.

Diana Robinson

By Diana Robinson

Manfred Majer

By manfred majer

Or you could freeze motion using a fast shutter speed.

René Something Something

By René something something

Chris Chabot

By Chris Chabot

Here are 21 more images that show speed:

CLAUDIA DEA

By CLAUDIA DEA

Jasper Nance

By Jasper Nance

Marc Forrest

By Marc Forrest

Pierre Anquet

By Pierre Anquet

Elvin

By Elvin

Nikos Koutoulas

By Nikos Koutoulas

Curtis John

By Curtis John

Bryce Bradford

By Bryce Bradford

Houman_thebrave

By houman_thebrave

E01

By E01

Damianos  Chronakis

By Damianos Chronakis

Loïc Lagarde

By Loïc Lagarde

Sama093

By sama093

Lena Vasiljeva

By Lena Vasiljeva

SuperCar-RoadTrip.fr

By SuperCar-RoadTrip.fr

Howard Ignatius

By Howard Ignatius

Renato Carvalho

By Renato Carvalho

Photophilde

By photophilde

SuperCar-RoadTrip.fr

By SuperCar-RoadTrip.fr

Stephanie Wallace

By Stephanie Wallace

Greg Heo

By Greg Heo

googletag.cmd.push(function() {
tablet_slots.push( googletag.defineSlot( “/1005424/_dPSv4_tab-all-article-bottom_(300×250)”, [300, 250], “pb-ad-78623” ).addService( googletag.pubads() ) ); } );

googletag.cmd.push(function() {
mobile_slots.push( googletag.defineSlot( “/1005424/_dPSv4_mob-all-article-bottom_(300×250)”, [300, 250], “pb-ad-78158” ).addService( googletag.pubads() ) ); } );

The post 25 Speedy Images That May Leave You in the Dust by Darlene Hildebrandt appeared first on Digital Photography School.


Digital Photography School

 
Comments Off on 25 Speedy Images That May Leave You in the Dust

Posted in Photography


Creating a Lens Flare Effect and Dust Particles in Photoshop

07 May

This article isn’t about how to magically transform your images using Photoshop. The real magic of Photoshop is trying to convince the viewer that no effects were added at all, and that the image was captured in camera. Photoshop can add that little extra to your imagery. Conversely, it can also ruin an image if it’s overdone.

I shoot to capture the best possible image as I can get at the time, but more often than not, time is not on my side. If I am shooting for a client, time is money. Deadlines and strict schedules are uppermost when dealing with a client. When shooting outdoors, I am dealing with natural light which is constantly changing and weather conditions, which may force me to shoot faster or abandon the shoot completely.

So, when I get to look at my image(s) on the computer, I take the time to critically review them. As I shoot RAW, I need to apply basic post-processing to all my images. In some cases, I may need to add an extra enhancement, but that will depend on the image and what I need it to say.

Gorilla-with-lens-flare-and-dust-particles

Lens Flare and dust particles added using Photoshop

This is the power of post editing. To be able to add an enhancement to the image, to give it that extra drama or a desired effect that you wanted to convey in your image in the first place. It can be as subtle as adding dust particles, or a bit more dramatic such as a lens flare effect. Both of these effects, whether you use one or both together, can add that little bit of oomph!

When applying any Photoshop effects, It’s not just about technique, although the know-how is important, but it is the application which is key:

  • How to execute the technique – different methods to achieve the same end result
  • When to use it – some images suit this technique over others
  • By how much?
Before

Before

After

After

The above may sound quite obvious and fundamental, but I can’t stress it enough, especially if you are new to creating effects in Photoshop.

  • HOW = the technique. I will demonstrate how to create a lens flare effect non-destructively in Photoshop using the Lens Flare filter. I will also describe how to create your own simple custom dust particle brush. Plus, I’ll show you my own unique in-camera method to capture dust particles.
  • WHEN = you deciding if this technique will work on the particular image in question. Just because you know how to use a technique doesn’t mean you have to apply it to every image. Yes, by all means practice on your images until you have refined the process.
  • HOW MUCH = knowing how little of the technique to apply – less is more. Don’t be afraid to reduce the opacity on the layer that you have applied the technique on.

This is where beginners can get carried away when learning post-processing techniques in Photoshop, for the first time. As tempting as it is, you want to show off your new skill and see the effect on your image in a dramatic way, try and keep it subtle.

What is Lens Flare?

Flare is particularly caused by a very bright light sources either in the image – which produces visible artifacts – or shining into the lens but not in the image – which produces a haze. Most commonly, this occurs when shooting into the sun (when the sun is in frame or the lens is pointed in the direction of the sun), and is reduced by using a lens hood or other shade. – as seen in Wikipedia

If applied well, the lens flare effect really does convey that good-feeling summer shot.

The Lens Flare Filter in Photoshop

Filter-render-lens-flare

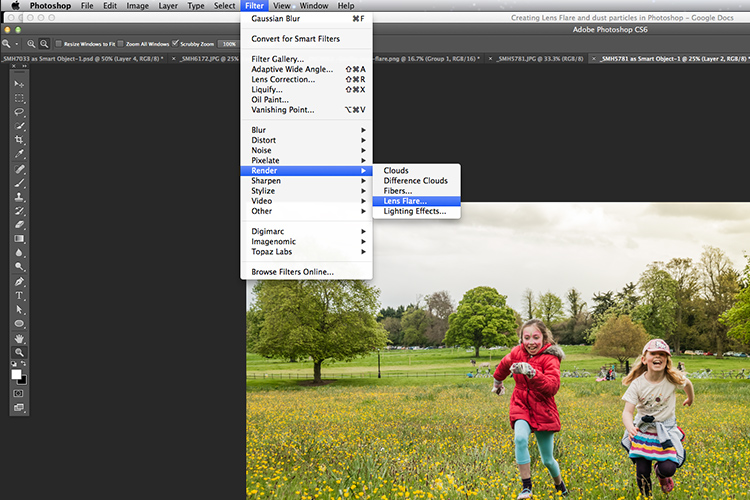
The Lens Flare filter is found under Filter > Render > Lens Flare.

The Lens Flare is found under Filter>Render>Lens Flare. However, this doesn’t work in the same way as an Adjustment Layer, as in non-destructively. The effect works directly on the image itself. It also won’t work on an empty layer. So, create a new layer above the image and fill it with black. Change the blend mode to Screen. Go up to the Menu Bar and go to Filter > Render > Lens Flare.

As you can see in the image below, a small pop up dialog box appears with a preview window, and shows the four different types of lens flare available. Click inside the preview window to move the Lens Flare to whatever position you want.

Filter-render-lens-flare

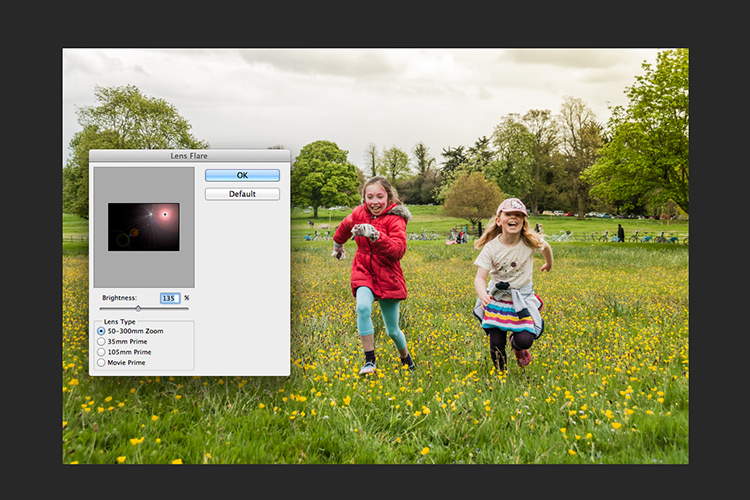
The Lens Flare dialog box.

50-300mm-zoom-lens-flare

This is the 50-300mm zoom Lens Flare effect on a layer filled with Black.

105m-prime-lens-flare

This is the 105mm Lens Flare effect on a layer filled with Black.
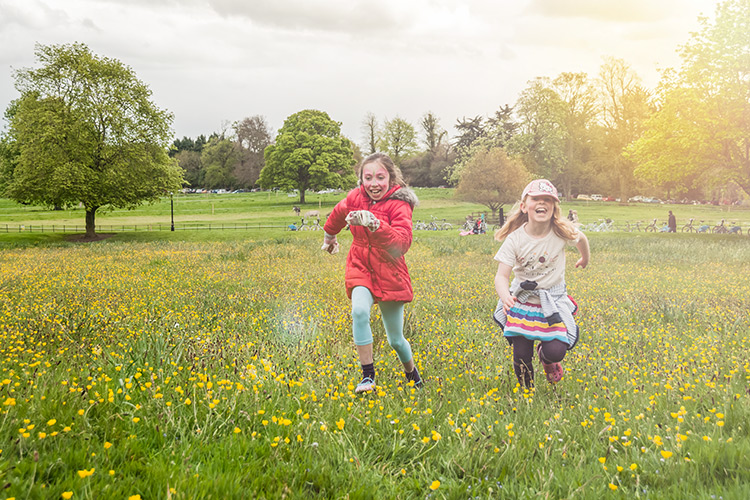
Becky-and-Amy-with-lens-flare-applied

Lens flare applied

Tip: To get a more precise position for the lens flare, bring up the Info Panel, and move your cursor over the spot on your image where you want the flare to be positioned. The x and y coordinates tell you the exact position in pixels. When you have the Lens Flare dialog box open, click on the preview window while holding down the Alt/Option button, and the precise Flare Center dialog box appears. Type in the x and y coordinates and click OK.

Gorilla-precise-flare-center

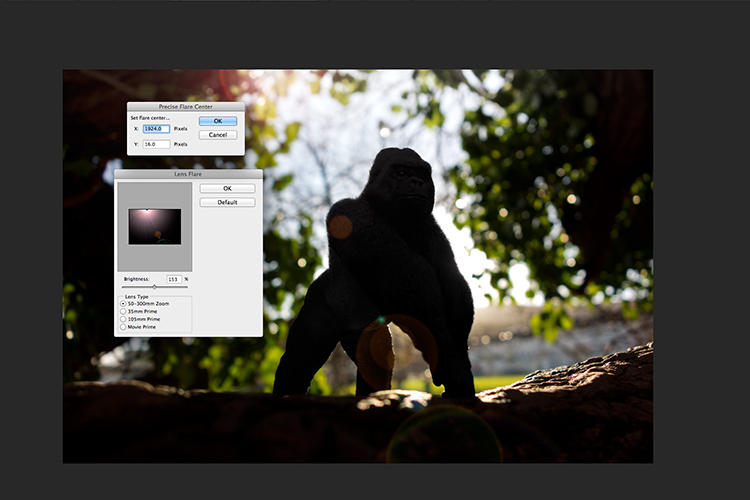
The precise Flare Center dialog box appears when you click on the preview window of the Lens Flare while holding down the Alt key on a Mac (Option on PC).

How to create your own custom dust particle brush in Photoshop

To create your own custom dust particle brush in Photoshop is relatively simple. Open a new document in Photoshop, I made mine 800×800 pixels on a white background, set the dpi to 240 or 300. Use a small brush, hardness set to 25%, and use the color black. Create random small dots on the canvas. Not too many. Go up to the Menu Bar > Edit > Define Brush Preset. Type the name of your new brush and click OK.

creating-new-document-custom-dust-particle-brush

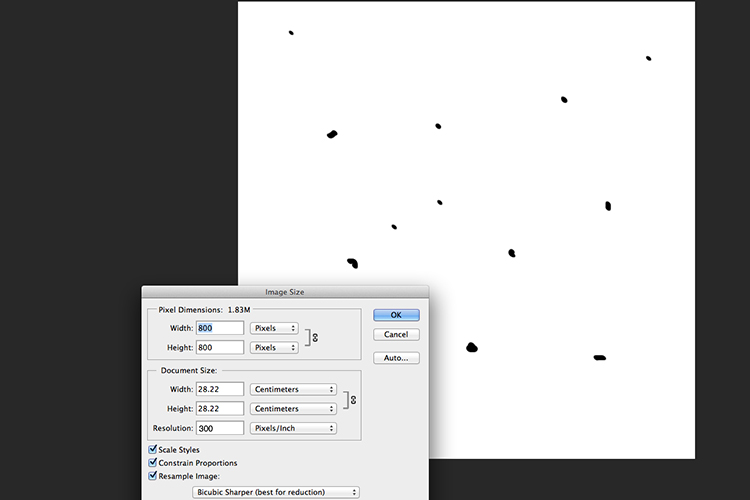
Create a new document with a white background 800px x 800px.

naming-dust-particle-custom-brush

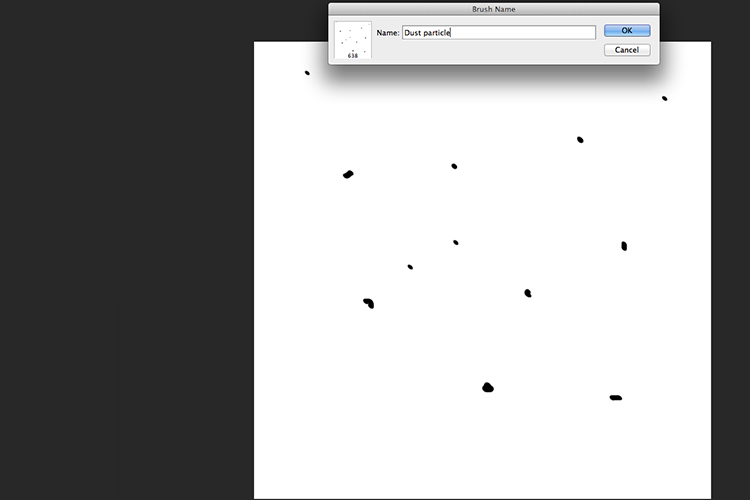
Go to Edit > Define Brush Preset and name your new custom brush.

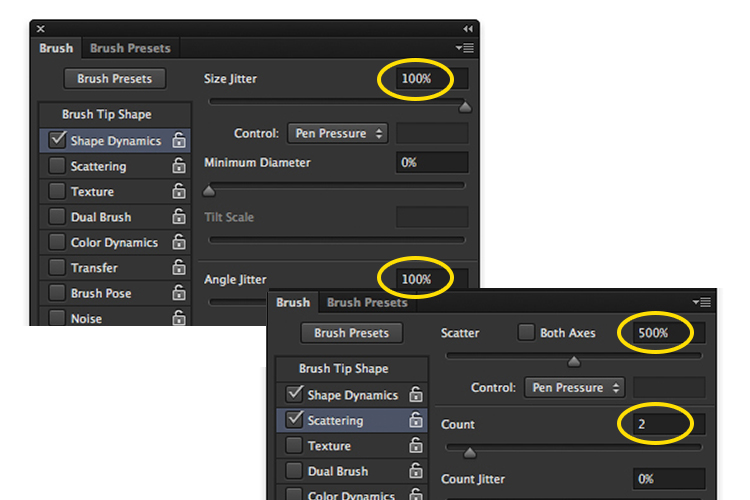
Before you start using your brush, you need to change a few properties of the brush so that it behaves like dust particles. Go up to Window > Brush. This brings up the brush dialog box. Use the following brush settings (see below screenshots also) Change the spacing to 100%, click on the Shape Dynamics box and move the Size Jitter and the Angle Jitter sliders to 100%. Next click on the Scattering tick box. I moved the Scatter slider over to 500%. Tick on Both Axes. Keep the Count Jitter at 2.

custom-brush-settings

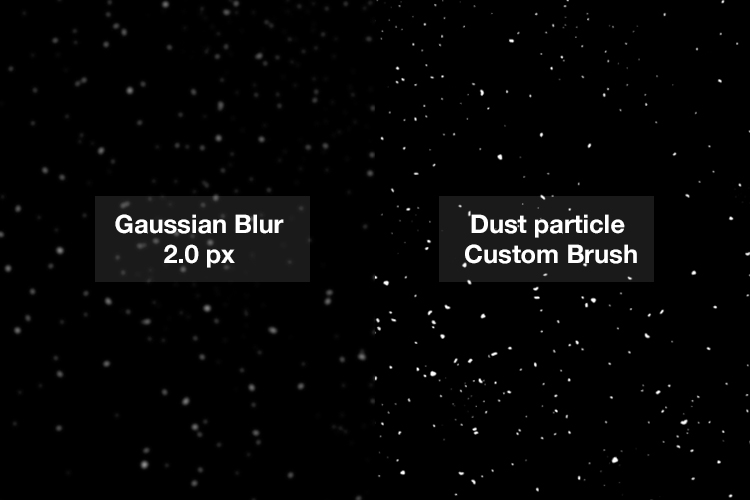
Create a new blank layer over your image and fill it with black. Using the custom brush, set to white, start creating dust particles across the canvas. Change the blend mode to Screen and now you can see the dust particles as white specks. Add some Gaussian Blur and reduce the opacity down to around 75%. You can always add a new layer to build up the effect too.

Dust-particles-with-custom-brush

How to create dust particles in-camera

I have to admit, this technique made me smile. I had been wracking my brains for a while for a possible solution to capture dust in-camera. The other morning, I got up early, as usual, to get my girls off to school. I looked out the kitchen window, the skyline was a lovely orange from the sun.

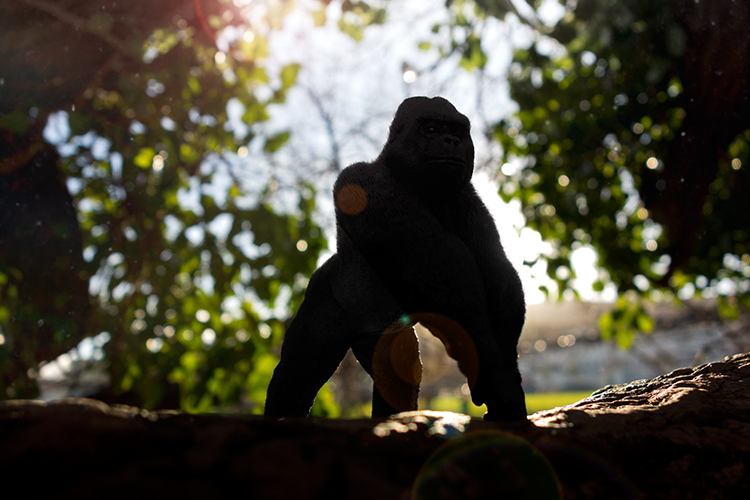
I then noticed all the specks (dirt) on the window and I had an eureka moment, I grabbed my camera and I focused on the specks using an aperture f/4. I also underexposed it by two stops. I wanted the specks to show through a dark background. I brought this image into Photoshop and applied a Levels Curve Adjustment to darken the image even more. I placed this image on the photo of the Gorilla. I then changed the blend mode to screen. I added some Gaussian Blur and reduced the opacity. Not bad for what is essentially dirt on a window.

Dust-particles-on-a-window

Dust and dirt particles on a window.

small-toy-plastic-gorilla

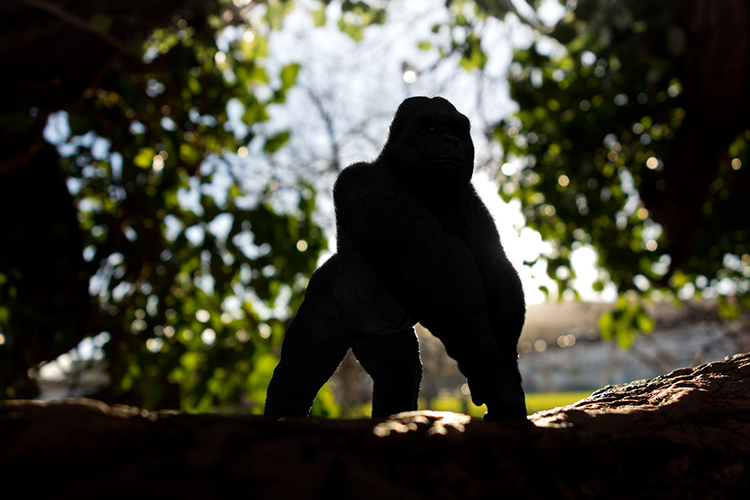
The image of the Gorilla without the Lens Flare effect and dust particles.

zoomed-in-dust-particles

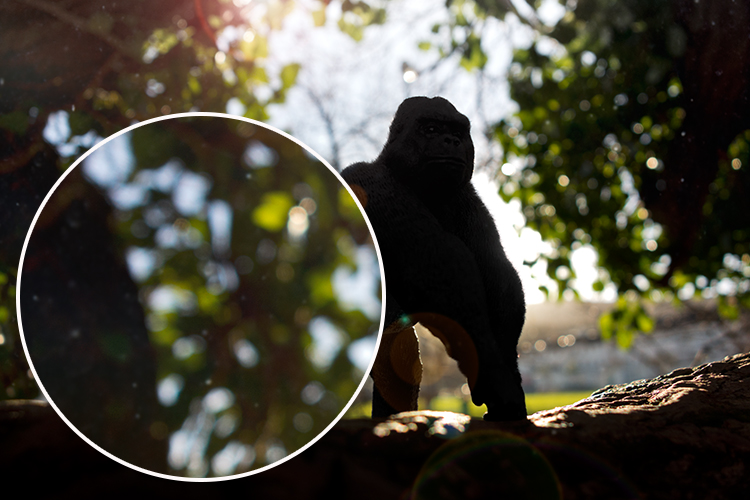
Zoomed in area to show the dust particles I took of my own window!

Disclaimer: I had to persist with dirty windows for weeks in the name of photography. That’s my story and I am sticking with it!

Have you got a technique for creating your own flare or dust particles in Photoshop? If so, please share in the comments below.

googletag.cmd.push(function() {
tablet_slots.push( googletag.defineSlot( “/1005424/_dPSv4_tab-all-article-bottom_(300×250)”, [300, 250], “pb-ad-78623” ).addService( googletag.pubads() ) ); } );

googletag.cmd.push(function() {
mobile_slots.push( googletag.defineSlot( “/1005424/_dPSv4_mob-all-article-bottom_(300×250)”, [300, 250], “pb-ad-78158” ).addService( googletag.pubads() ) ); } );

The post Creating a Lens Flare Effect and Dust Particles in Photoshop by Sarah Hipwell appeared first on Digital Photography School.


Digital Photography School

 
Comments Off on Creating a Lens Flare Effect and Dust Particles in Photoshop

Posted in Photography


Hoya uses antistatic coating to repel dust and water for new Fusion series

14 Dec

Japanese glass manufacturer Hoya says it has created a new coating that prevents dust, water and fingerprints from sticking to the surface of its filters. The company claims the coating acts like a ‘force field’ around its new Fusion series of filters, protecting them from stains as well as scratches. The idea of the coating is to make the filters easy to clean and to reduce the chance of damage while in use or storage. 

The coating is said to consist of nine layers that work to reduce reflections from the surfaces of the glass and which aim to allow as much light through to the lens as possible. Hoya says the coating has ‘virtually no effect’ on the color balance, contrast, clarity or exposure of the final image. 

The first Fusion filters will be for cutting UV, a circular polarizer and a plain protector glass. They are available in screw-in sizes from 37mm to 105mm (to 82mm in the UK) and come mounted in slim low-profile frames that are said to avoid interfering with the corners of images shot with wide angle lenses. 

Prices start from £26.99 for a 37mm protector filter. For more information visit the Hoya website. 


Press release:

Hoya introduces Fusion Filters

9 layers of Super Multi-coating make Hoya Fusion filters antistatic, waterproof, stain proof, scratch resistant and very easy to clean!

Hoya engineers have developed a new ANTISTATIC coating that acts like a force field around the filter to repel dust. Perfect for environments where dust is common, these filters require less frequent cleaning and maintenance than traditional filters. Additionally, the hardened, antistatic top-layer is water repellent, stain and scratch resistant and cleans easily when smudges or fingerprints are introduced to the surface. 

The new FUSION Antistatic professional filters are made in Japan using hand selected silicates that are carefully smelted and blended to yield high performance optical glass. Hoya then uses extreme care and precision to apply a new 9-layer Super Multi-coating formula that greatly reduces or eliminates reflections on the surface of the glass and yields very high light transmission rates. This means the filter has virtually no effect on the colour balance, contrast, or clarity of the final image. 

The filters feature a lightweight, low-profile aluminium frame to house the glass. The low-profile frame eliminates vignetting when used on ultra-wide-angle lenses. 

Fusion filters are available in UV, Circular Polariser and Protector and in sizes from 37mm through to 82mm. Prices start from £26.99 for a 37mm protector filter.

  • NEW Antistatic coating repels dust 
  • Scratch resistant – Hardened coating protects against everyday wear 
  • Stain resistant – Protects against exposure to ink, markers etc. 
  • Water repellent – Water beads up and wipes away easily 
  • Fingerprints and smudges wipe away cleanly 
  • Hoya’s Professional-grade optical glass

Articles: Digital Photography Review (dpreview.com)

 
Comments Off on Hoya uses antistatic coating to repel dust and water for new Fusion series

Posted in Uncategorized


Dust on the lens or a new planet? NASA reveals some of its inter-galactic Photoshop tricks

01 Oct

In an interview for Adobe’s blog, NASA has revealed some of the processes its scientists use to transform technical data into images that the rest of the world can appreciate and understand. From simple tasks, such as straightening and cropping, to compositing multiple layers of scientifically calculated color, the agency uses programs including Adobe Photoshop to interpret the sometimes quite abstract images sent back to Earth from devices such as the Hubble Space Telescope and the Mars rover. Read more

Articles: Digital Photography Review (dpreview.com)

 
Comments Off on Dust on the lens or a new planet? NASA reveals some of its inter-galactic Photoshop tricks

Posted in Uncategorized


Drawn in Dust: The Great Traveling Dirty Truck Art Exhibition

05 Sep

[ By WebUrbanist in Art & Street Art & Graffiti. ]

dirty car road art

Typical art travels inside, safely stowed in carefully-packed containers to prevent damage – these drawings do the opposite, playing up the folk-artsy practice of scribbling into built-up grime on vehicles.

dirty truck back travel

“Using his finger to scribe into the layer of dirt built-up from exhaust emissions,” Ben Long “creates elaborate drawings on the rear shutters of white haulage trucks. In this on-going series, collectively entitled The Great Travelling Art Exhibition, he expands upon the daubing and crude slogans that commonly adorn commercial freight vehicles.”

dirty truck art process

Some of the pieces will be rapidly wiped away by rain or vandals, but others have survived for as long as six months and on long cross-country road-trips made by their drivers. Like street art, these reverse graffiti works are susceptible to the elements and necessarily temporary.

dirty vehicle art city street

The artist’s motivations are various, but include a desire to make his work more accessible outside of traditional gallery spaces, reduce the costs of creative expression by using free materials and obviating the need for a studio space in which to create.

dirty truck road art

At the same time, there are a lot of artistic conventions still in play here – hallmarks of the ‘high art’ world, as it were. Long crafts these compositions within (and with reference to) a fixed frame, much like a canvass, and signs the pieces as well.

Share on Facebook


[ By WebUrbanist in Art & Street Art & Graffiti. ]

[ WebUrbanist | Archives | Galleries | Privacy | TOS ]


WebUrbanist

 
Comments Off on Drawn in Dust: The Great Traveling Dirty Truck Art Exhibition

Posted in Creativity


Nikon to offer D600 shutter replacement to address ‘dust’ issue

26 Feb

nikon_d600.png

Nikon has issued a worldwide technical service bulletin regarding ‘dust’ issues on its D600 DSLRs. Nikon says that it has evaluated user reports and has ‘determined’ that spots on the sensor are caused by dust particles which are visible in images taken in certain situations. The company will be offering all D600 owners a full inspection, cleaning, and replacement of the shutter mechanism in their cameras, free of charge and regardless of warrantee status.  Read more and find out how to get your camera serviced.

News: Digital Photography Review (dpreview.com)

 
Comments Off on Nikon to offer D600 shutter replacement to address ‘dust’ issue

Posted in Uncategorized