RSS
 

Posts Tagged ‘drawing’

How to Convert a Photo to a Drawing in Photoshop

12 Apr

The post How to Convert a Photo to a Drawing in Photoshop appeared first on Digital Photography School. It was authored by Mark C Hughes.

How to Convert a Photo to a Drawing in Photoshop

If you are anything like me, your artistic skills with a pencil are not great. I can, however, take pretty good photographs. So, this technique will show you how to convert a photo to a drawing in Photoshop.

The steps aren’t complicated, but we will use smart objects, filters and blend modes. If you are not familiar with these, check out the related links to learn more about them.

You will need to use Adobe Photoshop for this particular technique and I will be using the current 2020 CC version of Photoshop. Different versions of Photoshop may require slightly different approaches, particularly as it applies to smart objects.

Start with a portrait

To convert a photo to a drawing in Photoshop, I will start with a portrait of a writer I know, Jane Marshall. I photographed this during a recent portrait session. My version of Photoshop is windows-based, but the commands apply to Mac too.

Make sure you are working with an 8-bit image, or some of the filters will not be visible within Photoshop.

Converting a photo into a pencil sketch
Start with the image you want to convert into a pencil sketch

We will be converting the layers into Smart Objects. Converting them into a smart object will allow you to make modifications to each layer.

Before you do this, use the Quick Select tool on the left side. With that highlighted, you can look across the top of the bar (on Adobe Photoshop CC) and use the Select Subject.

How to Convert a Photo to a Drawing in Photoshop

This uses Adobe’s Sensei AI technology and selects the subject for you. It generally does a pretty good job.

Mask out the subject

How to Convert a Photo to a Drawing in Photoshop
Create a layer mask so you are only working on the portrait

Create a layer mask so that you are only working on the portrait.

To do this, with your selection still made, go to Layer > Layer Mask > Reveal Selection. Alternatively, select the little layer mask icon in the Layer palette.

Clean up the mask by either using a black brush on the layer mask or use the Select and Mask tool. The Select and Mask tool is similar to the prior versions Refine Mask function, but works much better now. Fundamentally, the mask doesn’t need to be perfect, just smooth.

Remember when working on the mask, white reveals and black conceals.

How to Convert a Photo to a Drawing in Photoshop
Refine the mask

Once you are happy with the mask, we need to invert the selection, so press Ctrl I or Command I (Windows/Mac) and select the background.

Press Delete and the background will disappear. We will proceed to convert the layer into a Smart Object by clicking on the layer. You can also do this from the Edit menu.

Convert the base image into a Smart Object

How to convert a photo into a pencil sketch
You can convert the image into a Smart Object by right-clicking on the layer or going to the edit menu

Duplicate the layers and rename the new layers.

Because the layer was already a smart image, all the duplicates will also be smart images and will be tied to the original layer (more about that later).

There will be four layers above the original layer.

The original layer should be called Original (it will change from “Background” when you convert it into a Smart Object). We will leave that one alone and only work on the layers above it.

Title the layer above the original “Base.” We can call the layer above Base, “Pencil Outline.” The layer above that, call “Shading” and the Layer above that, call “Lines” or “Edges.”

Naming layers makes adjustments easier to keep track of. Smart objects will make the files larger, but will make all the changes non-destructive and editable.

Create multiple Smart Object layers

How to convert a photo into a pencil sketch
Once you create the first Smart Object layer, you can create all the additional layers we will need. Turn off all the layers above the one you are working on at the time.

Create the Pencil Outline layer

Turn off all the layers bar the layer you are working on using the Eye icon next to the name of each layer in the Layers palette. In this case, we will start on the Pencil Outline layer. To start the conversion, press Ctrl I or Command I to invert the layer.

How to convert a photo into a pencil sketch
Only the layer we are working on should be visible and we need to invert it to create the initial colored pencil effect

Once you have inverted the image, we are going to use the blend mode, “Color Dodge” to create the initial colored pencil outline effect.

How to convert a photo into a pencil sketch
The blend mode has created the initial effect, but it is not strong enough

Add a Gaussian Blur

The next thing we need to do to convert a photo to a drawing in Photoshop is to add a Gaussian Blur. We will do this to improve the appearance of the initial colored pencil effect.

Select Gaussian Blur from the Menu bar, by going to Filter > Blur > Gaussian Blur. The amount of blur you add will affect how much of the underlying image appears.

How to convert a photo into a pencil sketch
Adding the Gaussian Blur creates the amount of the image that will be visible

Adjust the amount of Gaussian Blur you want, and a color version of the pencil sketch will start to appear.

However, we can improve the image by creating shading and emphasizing some lines.

Adjust the amount of Gaussian Blur to an amount you like, but you want to clearly see your subject.

How to convert a photo into a pencil sketch
With an appropriate amount of blur (the amount will vary depending upon your image and image size), the base becomes visible

Make the image black and white

While on the Pencil Outline layer, add a new Black and White Adjustment Layer from the Adjustments Panel. This will add a layer above the Pencil Outline layer.

If you cannot find your Adjustments Panel, go to the menu bar and select Window > Adjustments. You will then see the panel open. The Black and White Adjustment icon is a box with a positive and negative rectangle inside.

Remember that if you have the layers above the one you are working on turned on, you will not see any changes. So make sure only the layer you are working on and the ones below are turned on.

You don’t need to change anything from the default settings for the black and white adjustment layer for the purposes of this exercise.

How to convert a photo into a pencil sketch
A black and white adjustment layer creates the pencil image effect

Working on the shading

When you are converting a photo to a drawing in Photoshop, you want some shading to give depth. However, pencils are usually shaded with texture and blending.

You can create this appearance in Photoshop.

Select your Shading layer.

To improve the effect, we are going to change your brush color from pure black to a dark grey and leave the white as white. You want the foreground color to be the dark grey and the background to be white.

How to convert a photo into a pencil sketch
As this will be a pencil effect, we are looking for the pencil color to not be 100% black

With the shading layer selected, go to the Filter Gallery (Menu > Filter > Filter Gallery) and choose the Charcoal Filter under the Sketch Group. Set the Charcoal thickness to 1, Detail to 5 and Light/Dark balance to 50.

How to convert a photo into a pencil sketch
At 100% this become the new layer. But we want a pencil effect, not a charcoal effect.

On the Shading Layer, change the blend mode to “Multiply.” This allows the underlying layer to merge with the shading layer, creating some detail and some shading.

How to convert a photo into a pencil sketch
The multiply blend mode combines the two main layers

Change the Opacity

Change the Opacity of the Shading layer to a pleasing amount. This will add texture to the image and make it look a lot more like a pencil drawing with shading. For this example, I used 62% opacity for the shading layer. This allows the underlying layer to start showing through. Choose an amount that works for your image

How to convert a photo into a pencil sketch
Balance the shading and the pencil outlines

Improve the outer edges

Most pencil drawings have stronger edges emphasized. Because we are converting a photo to a drawing in Photoshop, the photograph has lots of details but the edges aren’t pronounced. To do this, we are going to work off the Lines layer (this is the top layer we created earlier).

How to convert a photo into a pencil sketch
Work on the Top Layer

Invert the image by pressing Ctrl I or Command I.

How to convert a photo into a pencil sketch
To get stronger edges we need to invert the image again

Once the image has been inverted, we need to go to Menu > Filter > Filter Gallery and chose “Glowing Edges.”

How to convert a photo into a pencil sketch
Use the Filter Gallery to Access the Glowing Edges Filter

With Glowing Edges chosen under the Stylize Folder, use this to create the lines. Don’t worry that they are color – we are just looking for stronger edges like an artist would draw.

How to convert a photo into a pencil sketch
Glowing Edges makes the image strong

Change the blending mode to “Multiply.”

How to convert a photo into a pencil sketch
Use the blend mode to enhance the edges

Convert it to black and white

This time, instead of adding another layer, we can convert this layer to black and white. Do this by going to Menu > Image > Adjustments > Black and White.

How to convert a photo into a pencil sketch
Convert this last layer to Black and White for finished effect

Any filter effects below other filter effects will not show up live until you move to a different layer (no live preview as you change).

How to convert a photo into a pencil sketch
The finished effect can be tweaked because each smart object can be re-edited

Because each layer is a Smart Object, you can go back and adjust each layer’s filter settings to your liking. Essentially, everything is non-destructive. You can even replace the original image and apply the same settings (but that is a more advanced topic).

The finished look

How to convert a photo into a pencil sketch
The Final Portrait

In conclusion, by following all these steps you get a lovely pencil drawing image with shading and definition all starting from a color portrait photo.

There are other ways to accomplish converting a photo to a drawing in Photoshop, but I like how this technique adds subtle shading. This is how a sketch artist would convert a photo into a pencil drawing sketch.

Try converting a photo to a drawing in Photoshop yourself at home, and share your results in the comments section!

The post How to Convert a Photo to a Drawing in Photoshop appeared first on Digital Photography School. It was authored by Mark C Hughes.


Digital Photography School

 
Comments Off on How to Convert a Photo to a Drawing in Photoshop

Posted in Photography


‘Back to the drawing board’: Sigma says full-frame Foveon camera won’t arrive this year

09 Feb
Sigma CEO Mr. Yamaki, pictured in the company’s factory in Aizu, Japan.

Development of Sigma’s full-frame Foveon camera has met considerable setbacks and the camera is no longer slated to arrive this year. In a letter to customers, CEO Kazuto Yamaki apologizes for the delay and says the decision comes after ‘careful and rigorous testing.’ No new release date is given at this time, and Mr. Yamaki says that the company has decided to start over with a ‘clean slate.’

The full-frame Foveon project was first announced to the public at CP+ in 2018. At the following year’s CP+, Sigma released more details about the camera and said it would reach market in 2020. Mr. Yamaki discussed with us some of the challenges of taking Foveon full-frame, describing the difficulty of improving interconnected aspects of sensor performance like high ISO performance and color gradation.

Press release:

Development status of the full-frame Foveon sensor camera

Dear Customers,

Thank you for being a valued customer.

At Photokina in September 2018, SIGMA announced the development of an L-mount mirrorless camera equipped with a full-frame Foveon sensor. Then, at CP+2019, we shared our plan to release the camera in 2020 and have worked diligently on the development to meet our commitment.

As a result of careful and rigorous testing based on the latest development information, however, it has become clear that the launch of such a camera would be infeasible within this year. Still at this point, we cannot say for certain when the full-frame Foveon X3 sensor will be put into mass production.

In light of current development progress, we are not in a position to offer any specific release plan at present. We have therefore decided that we should start over the project with a clean slate, putting the production plan for this new camera back to the drawing board and going back to the development of sensor technologies.

Since the earlier announcements, your excitement with the launch of a “full-frame Foveon” has been a tremendous source of inspiration and encouragement for us. Everyone involved in the project has pulled out all the stops to make it a reality. I would like to express my deepest apologies for failing to meet your expectations and having to share this disappointing news.

I would like to emphasize that Foveon sensors are in a class of their own and that they are part of the identity of SIGMA cameras that embodies our ideals and philosophies. We are determined to continue dedicating ourselves to technology development to bring better image sensors to life.

I would like to once again express my sincerest gratitude to our valued customers for the strong support you have offered to us. On behalf of all SIGMA employees, I commit myself to you that we continue striving to live up to your expectation and prove that we are worthy of your trust.

I truly appreciate your patience and understanding.

Warmest regards,

Kazuto Yamaki
Chief Executive Officer
SIGMA Corporation

Articles: Digital Photography Review (dpreview.com)

 
Comments Off on ‘Back to the drawing board’: Sigma says full-frame Foveon camera won’t arrive this year

Posted in Uncategorized


Composition Tips for Drawing the Viewer’s Eye Through Your Photographs

03 Sep

There are many different elements of photography that can affect how the viewer perceives an image. The more you learn to understand how various elements affect an image, the more you can learn to take control of them. Great photography doesn’t happen by chance, it’s crafted and pieced together. If you follow these composition tips they will have you do just that.

joshua tree at night brightness drawing the eye - Composition Tips for Drawing the Viewer's Eye Through Your Photographs

One of the most important elements of photography to understand is how the viewer’s eye is drawn through the image. You may think that when you view a photograph you see the whole picture as one. In one sense this is true, as you can absorb much of an image in a millisecond. At the same time, your eye moves through an image in a way that you’re usually completely unaware of.

The reason why it’s important to understand this concept is that if an image has a natural path for the eye to follow and a strong subject to focus on, it’s far more satisfying. An image that’s too busy and doesn’t have a clear subject isn’t as appealing and the viewer will not linger long.

As the photographer, you can be intentional about how you craft your image so that the viewer’s eye moves through it the way you want.

The Human Eye

Our eyes are bombarded by so many different sights every day that we have to be selective about what we look at and what we ignore. This is usually a subconscious decision that happens as our brains try to filter the information that is passed from our retinas. Much study has been done into what visual elements draw our attention, which is super helpful for those of us that create visual art.

Brightness

Controlling the brightness of various parts of your image is one of the most powerful ways to control the viewer’s eye. You can use this to your advantage in a couple of ways.

Including or adding brightness to areas of an image is a great way to draw the viewer’s eye to that element. The other side of this is to limit brightness or darken areas of an image where you don’t want to draw attention.

sunset over water - Composition Tips for Drawing the Viewer's Eye Through Your Photographs

How you add or subtract brightness to an image will depend a lot on your subject. If you have control of the light you can take control with the way you light the image. Even if you don’t have control of the light you may still be able to manipulate it somehow with neutral density filters or by framing the image differently.

Whatever your subject, you can always control brightness in post-production. Learning to dodge and burn is one of the most valuable skills you can have for controlling light in your photography. Even something as simple as a vignette can have a dramatic effect.

brick wall with birds in a window - Composition Tips for Drawing the Viewer's Eye Through Your Photographs

Contrast

Areas of high-contrast draw the eye more than anything else.

A dull, flat image with no contrast has very little visual appeal. If you really want to draw the attention of your viewers to a certain element of an image, try to find a way to add contrast to the element, or to the area surrounding it.

contrast lines drawing the eye in sand dunes - Composition Tips for Drawing the Viewer's Eye Through Your Photographs

There are many ways to do this. For example, you can overexpose the background to make it contrast with the foreground subject. Alternatively, you can underexpose the foreground to make a silhouette which contrasts with the background.

Again, you can also use post-processing techniques to further control contrast in your image to draw the eye. Adding contrast to areas where you want to draw attention, and removing contrast from areas that you don’t want to distract the viewer can go a long way to drawing the eye.

You can do this using basic tools in Lightroom like the Contrast and Clarity sliders. Control the areas you want to add or subtract contrast from others with the local adjustment tools.

contrast drawing the eye lady on a large sand dune - Composition Tips for Drawing the Viewer's Eye Through Your Photographs

Color

You’re probably aware of how powerful color can be in controlling the mood of an image. The feel of an image with bright colors is very different from an image with muted, desaturated colors.

But what you may not know is that the human eye is strongly attracted to bright colors. Have ever seen the old “selective color” images that convert an image to black and white while leaving one element in color? Fortunately, the trend is long-dead, but it shows how powerful color can be at drawing the eye.

color drawing the eye brightly colored parrots - Composition Tips for Drawing the Viewer's Eye Through Your Photographs

Adding color to an image isn’t always easy. You may be able to color elements of an image with colored gels if using flash.

Subtracting color from an image is often even more important if it’s distracting to the viewer. This is often the case when photographing people. Colorful clothing draws the eye away from the more subtle skin colors of faces. This is why portrait photographers often tell their subjects to wear plain black or white clothing.

Adding and subtracting color in post-production isn’t difficult, but takes practice and restraint. It’s easy to overdo it. You can do a lot with the local adjustment tools and the Vibrance/Saturation sliders in Lightroom. Remember, when it comes to adjusting the color or saturation of a photo, less is more, especially when skin tones are involved.

Sharpness

Have you ever noticed how a blurry image is very unpleasant to look at? Even if it’s only a little bit out of focus, your eye will detect it.

The human eye’s instinct is to adjust focus until what it’s looking at appears sharp. If it can’t find something sharp to rest on, you won’t like what you’re looking at.

sharpness drawing the eye small girl in colorful dress with blurry background - Composition Tips for Drawing the Viewer's Eye Through Your Photographs

You can use this to your advantage in your photography. You probably know that a shallow depth-of-field when photographing portraits creates a very pleasing look. This is because the eye is naturally drawn to the sharp face of the subject while avoiding the other elements that are out of focus. The most obvious way to control focus is using large apertures and a small depth-of-field, but it isn’t the only way.

You could try playing with slower shutter speeds and motion blur. Panning with a moving subject and a slow shutter speed can blur the background while keeping the subject acceptably sharp.

You can also add blur in post-production. Moving the Clarity slider to the left will soften the selected elements that you don’t want to draw attention to. You can also add sharpness to selected areas, but be careful about trying to save an out-of-focus image by increasing sharpness (it doesn’t work!).

sharp rocks in smooth water - Composition Tips for Drawing the Viewer's Eye Through Your Photographs

Take Control

As you learn these composition tips that can guide your viewers, you can start to take control of the process. Adding and subtracting these elements from your images can have a significant effect on how visually pleasing they are. Take some time to think about what you want your viewers to look at and then ask yourself what you can do to make that happen.

Although the way you process your images is very useful, try to think about controlling these elements in-camera first. It isn’t always possible, but taking control over the brightness, contrast, color, and sharpness in-camera will give you better images to work with in post-production. Also, trying to save an image by pushing Lightroom sliders to their extremes usually isn’t a good idea.

As you get more intentional about what you add and subtract from your photography, you’ll start producing more engaging images. Your photography will also become more appealing to the viewer and yourself.

The post Composition Tips for Drawing the Viewer’s Eye Through Your Photographs appeared first on Digital Photography School.


Digital Photography School

 
Comments Off on Composition Tips for Drawing the Viewer’s Eye Through Your Photographs

Posted in Photography


How to Turn Your Photo into a Cartoon Drawing Using Photoshop

17 Feb

Photography can be traced back all the way to the camera obscura; which was an aid for artists who could then draw their subjects from the projection created by the light passing through the pinhole. Following that tradition, in this tutorial, I’m going to show you how to create a drawing by outlining the subject from your digital photo to create a fun, cartoon-like image.

Deer cartoon - How to Turn Your Photo into a Cartoon Drawing Using Photoshop

Getting started

You can use this technique on any photo you want and apply it to any subject you like. However, I find it best, especially for your first attempt, that the subject is well defined or isolated so it’s easier for you to outline it. I also personally prefer and recommend that the image is not too busy. So, once you have chosen your photo, open it in Photoshop.

Outline the subject

To trace your subject you are going to use the Pen tool. The way it works is that you create anchor points with each click. A straight line then connects those points. Do this all around the subject.

Once you have this, change the Pen tool to the Convert Point Tool, which you can find by holding down on the Pen until the drop-down menu opens. With the Convert Point, you can curve the straight lines to make it fit the silhouette best. Just click on the anchor point and start dragging it. From each anchor point, you will have to handles, each one to control the line in each direction of the anchor.

Pen Outline - How to Turn Your Photo into a Cartoon Drawing Using Photoshop

This will help you get a smoother silhouette and avoiding unnecessary bumps that you would get if you only trace by adding anchor points.

Straight lines - How to Turn Your Photo into a Cartoon Drawing Using Photoshop

A straight line.

Curve - How to Turn Your Photo into a Cartoon Drawing Using Photoshop

Using curved lines.

Create your outline

Once you have outlined the silhouette of the subject, create a new layer. You can do this by going to the top Menu > Layer > New Layer. You can rename it as “silhouette” or “outline” just to keep things tidy, as you will be creating more layers further along.

What you’re going to do next is turn this path into a drawing, more precisely, the line that borders your drawing. Therefore, you can choose which color it will be and how thick you want it. To set it you need to go to the Brush tool and select a hard brush as thick as you want. I’m doing 8px in this case.

You can also choose the color by clicking on the foreground color at the bottom of the tool palette, for this example, I’m using black. Turn off the background layer (click the little eye icon) so you can see how it will look like and then choose your settings.

Silhouette - How to Turn Your Photo into a Cartoon Drawing Using Photoshop

Now that you have this ready, leave the new layer active go to the path palette. If it’s already opened you can open it by going to the top Menu > Windows > Path. In there you will see that a Work Path has been created, the icon will show the image as a grey rectangle and the path is the silhouette you traced.

Next, right-click on the Work Path and choose Stroke Path. A pop-up window will appear, make sure the Brush option is selected and click OK.

Stroke Path - How to Turn Your Photo into a Cartoon Drawing Using Photoshop

Adding details

You have a border or a silhouette now, but you still need details. Each one will be a new layer and a new path, that way you have it separated and can, therefore, control it more precisely.

If you want two details on the same layer, for example, to keep the two ears in one layer so that any changes apply equally, then you keep working in the same layer. But you do need to create a new path for each one.

Notice here that I have my background layer which is my original image; a Layer 1 that corresponds to the Work Path which is the outline; and a Layer 2 that contains Path 1 and Path 2 which are the two details of the ears. This is why I suggested earlier that you should rename the layers and the paths to keep track of them easier. Continue doing this as many times as you need to finish your drawing.

Layers and Paths - How to Turn Your Photo into a Cartoon Drawing Using Photoshop

Apply a filter

Once you’re finished with this, duplicate the background layer. With this new layer active, go to the Work Path (the one that has the outer line of the drawing) and right-click it. From the drop-down menu, choose Make Selection. This will select your subject so that the filter you’ll apply next doesn’t affect the background, otherwise the entire will turn into a cartoon.

Now go to the top Menu > Filter > Filter Gallery. A window will appear with all kind of filters that you can apply and a preview image. In this case, you’re going to select the one called Cutout from the Artistic Filters. On the right side there are sliders to refine the effect, just move them around until you are satisfied. I’m going to do it as Number of levels 7, Edge simplicity 5 and Edge fidelity 2. When you’re done just click OK.

Cutout - How to Turn Your Photo into a Cartoon Drawing Using Photoshop

Other tricks

You can also multiply your cartoons, apply modifying layers to change colors or saturation, and anything else you can think of! And the best part is that you can do this to any kind of photo, here are some other examples; share yours as well in the comments!

Three deers - How to Turn Your Photo into a Cartoon Drawing Using Photoshop


The post How to Turn Your Photo into a Cartoon Drawing Using Photoshop by Ana Mireles appeared first on Digital Photography School.


Digital Photography School

 
Comments Off on How to Turn Your Photo into a Cartoon Drawing Using Photoshop

Posted in Photography


Vanishing Points: Simple Architectural Drawing Hack Puts Art in Perspective

05 Jan

[ By WebUrbanist in Art & Drawing & Digital. ]

trickshot

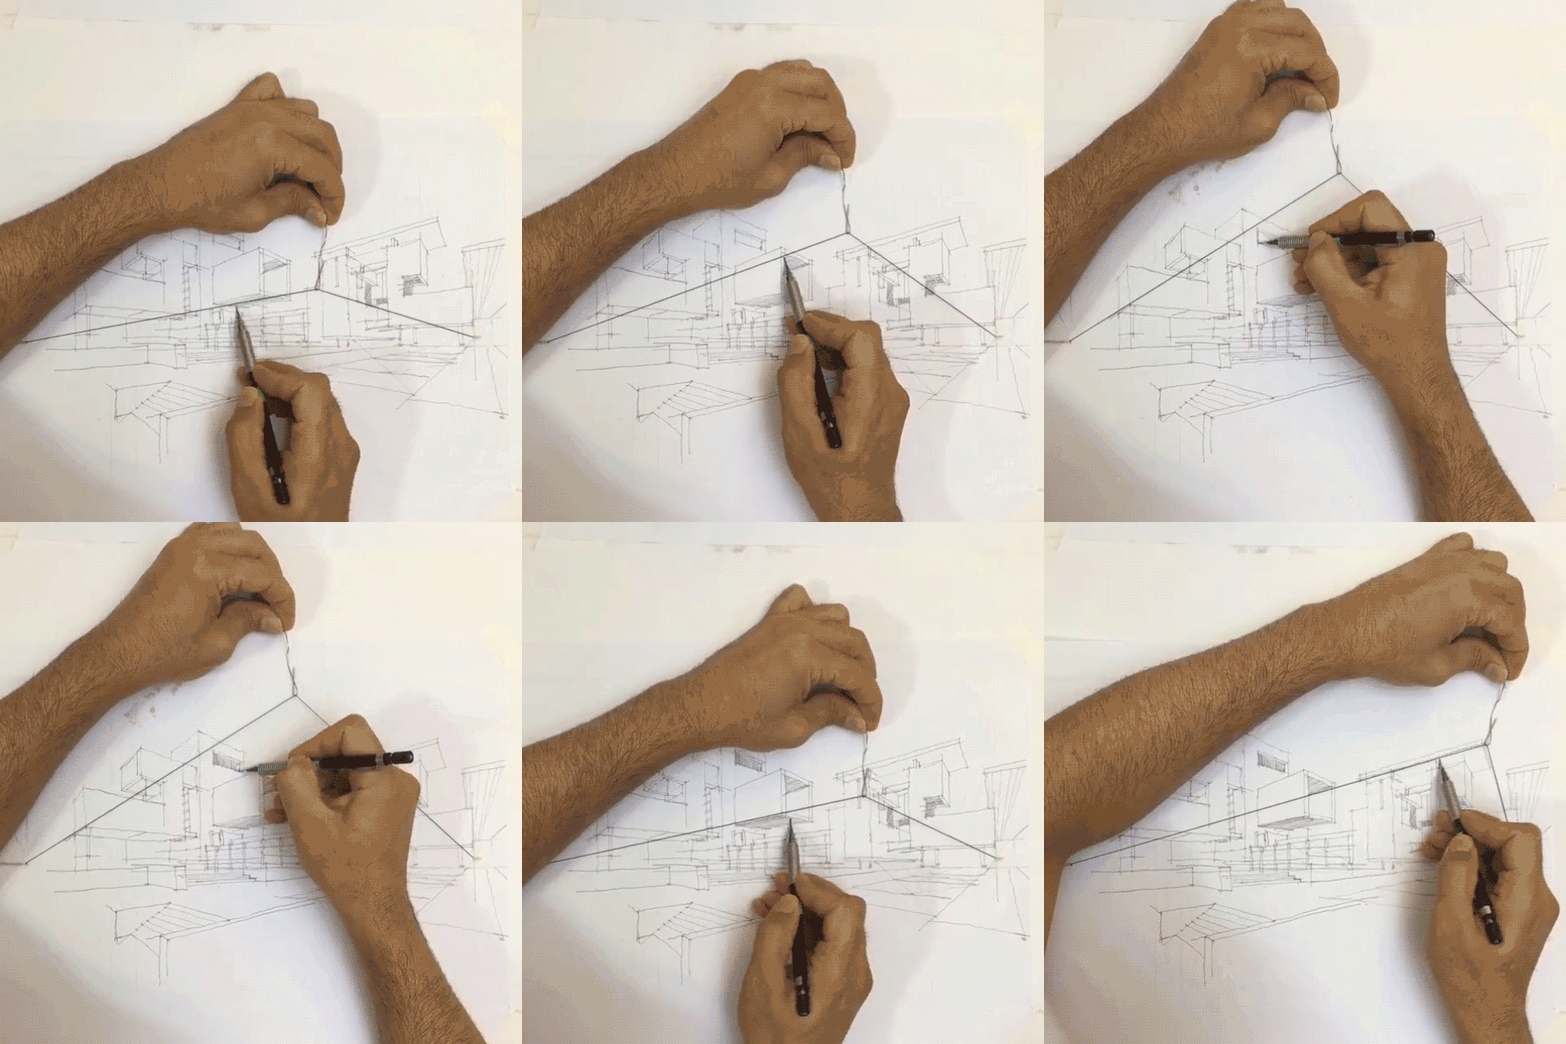
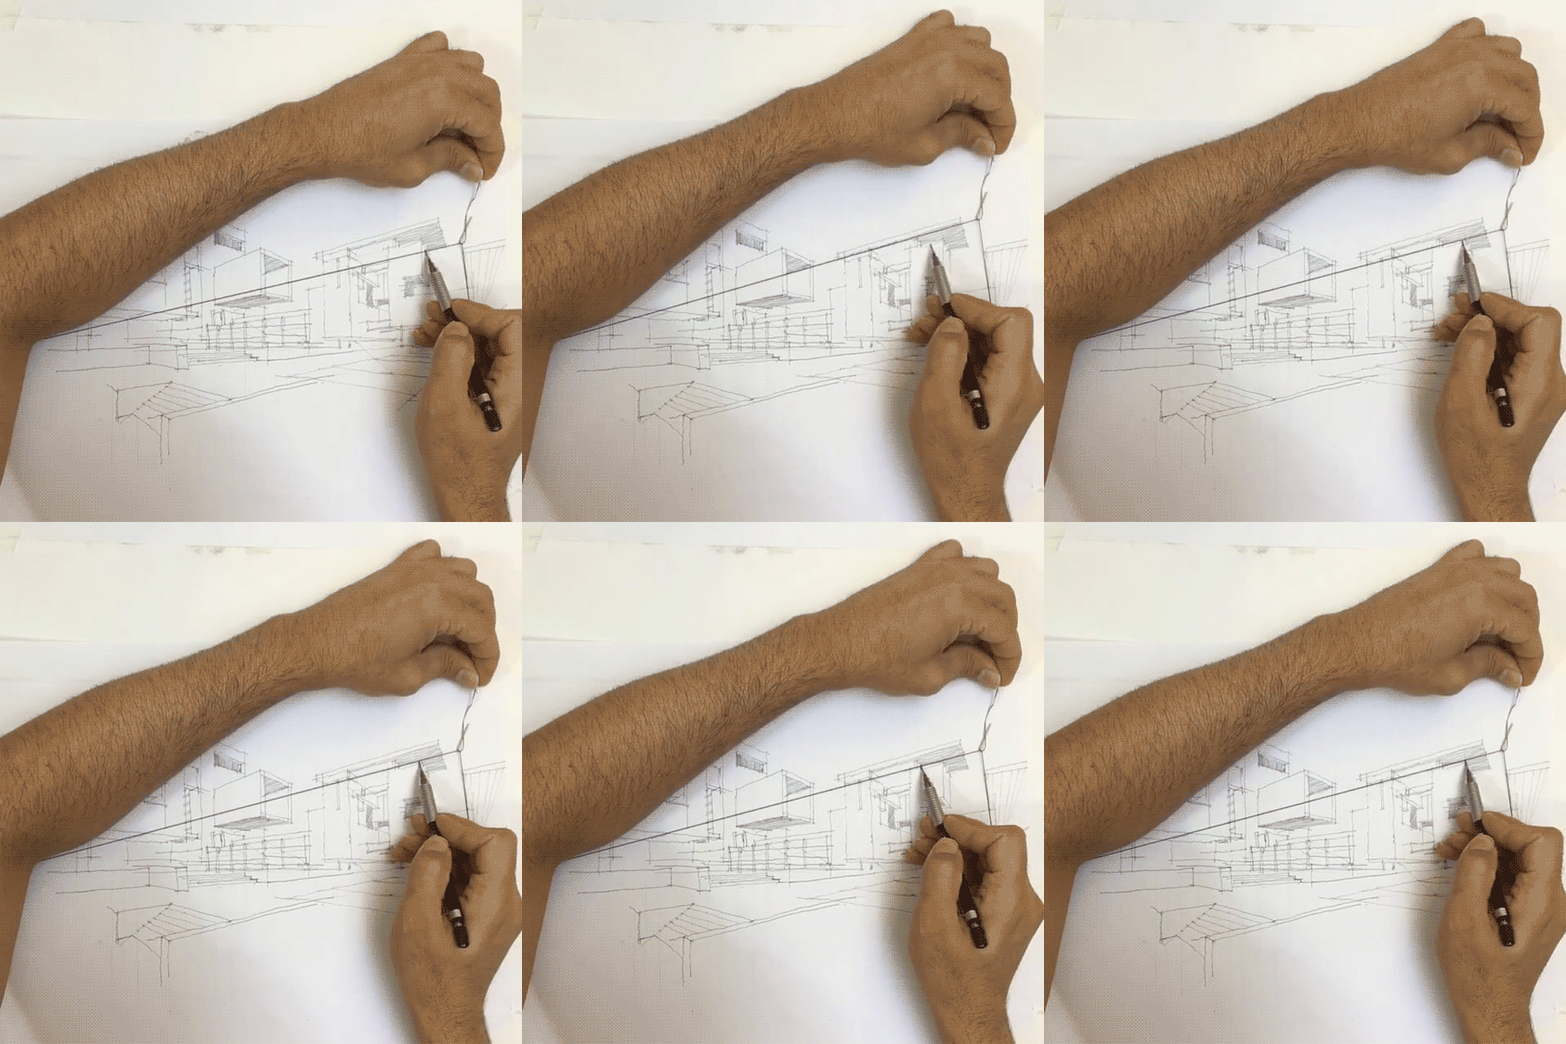
Architectural drawings have long used geometrical tricks to convey scale, depth, distance and other three-dimensional aspects of realities on two-dimensional surfaces. In a two-vanishing-point drawing, the artist aligns their ruler with a point on one side or the other and draws a line along the edge (or employs another modular straight-edging tool).

drawing-hack

The same came be accomplished much more quickly, however, using this simple technique: pin a flexible string to both points along the horizon line and slide a hook along the center. The results will naturally be a bit less than precisely linear, but for many architectural artists a wavy line is typical or even desired (it gives the piece a less rigorously complete look).

four-point-perspective

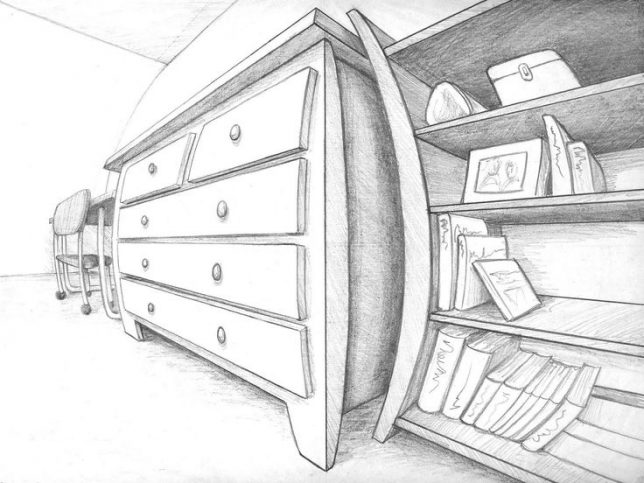
Of course, it will only work for a traditional two-point perspective – in cases where the artist wants to include a third vanishing point (for instance, to emphasize verticals in looking up at a skyscraper or create a fish-eye effect) a straight-edge is still required. That, or a free-handed approach based on a picture, presumably the basis of the drawing above.

Share on Facebook


[ By WebUrbanist in Art & Drawing & Digital. ]

[ WebUrbanist | Archives | Galleries | Privacy | TOS ]


WebUrbanist

 
Comments Off on Vanishing Points: Simple Architectural Drawing Hack Puts Art in Perspective

Posted in Creativity


Drawing Sculptures: 3D Architectural Art Styled After 2D Sketches

01 Dec

[ By WebUrbanist in Art & Sculpture & Craft. ]

stick-frame-drawing-sculpture

This ongoing series of sculptural floating cities and suspended towns could be mistaken for pencil drawings when glanced on a wall or seen in a two-dimensional medium like photography.

wall-drawing-art

white-on-dark

Spanish artist David Moreno sees it that was as well: at attempt to draw sculptures, but using steel rods lashed together with piano wire rather than a pen on a pad. Background depth, shadows and other slight dimensional clues cue viewers into what they are really seeing.

sticks-on-stilts

These stick-figure structures correspondingly look deceptively simple: what would normally be a single stroke is instead a meticulous assembly process, the rods tied together by hand and piano wire wrapped and clipped to support them.

chair-art

chair-sculpture

The Barcelona-based artist has also toyed with 3D-printing extrusion devices to shape similar works in more colorful formats, combining, for instance, a series of stylized chairs into a mass of interconnected hanging sculptures.

wall-art-process

stick-house-detail

In other cases, strings and wires are looped and stretched to form complex shapes or interact with other objects – stories and figures emerging from a combination of materials and forms.

wire-artwork

staircase-wall

While the specifics of his work shifts from one installation to the next, a common theme is clear: taking traditions of line art into the third dimension and seeing what can come of the process (via Colossal).

Share on Facebook


[ By WebUrbanist in Art & Sculpture & Craft. ]

[ WebUrbanist | Archives | Galleries | Privacy | TOS ]


WebUrbanist

 
Comments Off on Drawing Sculptures: 3D Architectural Art Styled After 2D Sketches

Posted in Creativity


Sketch in 3D: Remarkable Drawing App Gives Doodles Depth & Dimension

23 Nov

[ By WebUrbanist in Design & Graphics & Branding. ]

3dsketched

Programs like Sketchup have allowed amateur artists and architects to sculpt and design in three dimensions for years, but this app facilitates far more informal works that really look like sketches in 3D.

Mental Canvas is part of a suite of software for Microsoft Surface that takes more conventional sketched forms and allows users to navigate and expand them in three-dimensional space, retaining the character of rough drawings.

3d-drawing-tool

The infinite-depth approach of this digital canvas software lets users zoom in and rotate their view, adding layers along the way and inspecting their work from various angles. The effect is remarkable as these illustrations show.

drawing-tool-app

From its creators: CAD modelling “comes at a cost. The cost is that one, you have to have a fully resolved three-dimensional model, even if it’s just a cube; second it’s very hard to edit a CAD model, it’s not fast and fluid like a sketch. At any given moment when you’re sketching, the designer or artist has full control over everything in that representation, but with a CAD model, that’s defined by the computer.”

This clever approach liberates an artist from the ordinary constraints of a physical page or even a drawing tablet, letting them shape worlds that maintain the character of a sketch but can be used to tell and frame stories in new ways.

3ddrawing

As with programs like Sketchup, a bookmarking tool allows users to save and store various views then retrace their steps, creating potential for 3D storytelling. It also lets a user pick the perfect shot, navigating three-dimensional space to select an ideal perspective. A dynamic dial tool, meanwhile, lets the artist rotate between colors and line qualities without backing out of the drawing.

As any good architect knows, an unfinished-looking drawing can be an asset: “A sketch has a quality when it’s unfinished; there’s so much possibility, there’s so much room for interpretation, and [Mental Canvas] expands the idea of a sketch. It makes it less flat. In architecture you always want that “Wow” design that gets everyone excited in the room, and [Mental Canvas] enhances it.”

One can see a lot of similarities here between Mental Canvas and tools being developed for augmented and virtual reality platforms. In a way, this program closes the gap, allowing users with more ordinary tools, devices and interfaces to accomplish something wonderful in 3D space.

Share on Facebook


[ By WebUrbanist in Design & Graphics & Branding. ]

[ WebUrbanist | Archives | Galleries | Privacy | TOS ]


WebUrbanist

 
Comments Off on Sketch in 3D: Remarkable Drawing App Gives Doodles Depth & Dimension

Posted in Creativity


Pencil + Sharpener: Redesign Solves 3 Classic Drawing Tool Problems

27 Jun

[ By WebUrbanist in Design & Products & Packaging. ]

pencil plus sharpener

Pencils require sharpening, run out of eraser and turn into unusable stubs as they near the end of their lifespan, but this clever gadget aims to change all of that, solving all three issues at once.

demo

Even in today’s digital world, artists, designers, writers and musicians still fall back on this traditional tool. The Pencil+ helps on multiple fronts, but functions first as a pencil holder, enabling the user to tuck various lengths of pencil into a central void.

eraserhead

What keeps the pencil from slipping too far in? An adjustable eraser serves as a backstop, letting you move the pencil portion backward to fit and forward as the pencil gets shorter. Meanwhile, the back of the holder (normally where one would find an eraser) doubles as a sharpener, keeping it always on hand for reworking broken or worn tips.

remove and sharpen

“Worry no more because with pencil+,” say its creators, “you can now have a sharpener, extender, eraser holder and transporter for your favorite tool” which is available in Teak, Ebony, Wild Olive, African Padauk and Indonesian Redwood”

pencil sharpener combo

A few potential critiques come to mind: first, someone employing this device will have to deal with an additional step to access an eraser. Second, the holder is necessarily wider than a pencil, so it will require some getting used to in terms of grip and function. Third, the eraser length is a function of pencil length, so storing a lot of extra eraser could be an issue (though easily longer than a normal one). Still, one can be sure, at least, never to lose track of one’s sharpener, and also that a single pencil will last a lot longer.

Share on Facebook


[ By WebUrbanist in Design & Products & Packaging. ]

[ WebUrbanist | Archives | Galleries | Privacy | TOS ]


WebUrbanist

 
Comments Off on Pencil + Sharpener: Redesign Solves 3 Classic Drawing Tool Problems

Posted in Creativity


Drawing with Wire: Scribbled Sculptures Make Sketches 3D

07 Nov

[ By Steph in Art & Sculpture & Craft. ]

wire sketches 1

Scribbled sketches seem to leap off the page and hover in mid-air, filling out in three dimensions, in this impressive series of sculptures made from bent wire. Artist David Oliveira captures the essence of his subjects, whether they’re people or mountain lions, by studying their anatomy and translating their sense of vitality and movement into minimalist life-sized forms.

wire sketches 2

wire sketches 3

wire sketches 6

wire sketches 10

Oliveira sees his works as existing on some other plane, like an abstracted echo of the physical bodies that exist in our reality. Twisting, looping and curving black wires, he sketches in air, and the resulting sculptures look as if they’ve been peeled off a piece of paper, enlarged and skewed like skeletons that were hidden inside each subject all along.

wire sketches 11

wire sketches 5

wire sketches 7

wire sketches 9

As viewers, we look at these gestural impressions of living creatures and our minds fill in the blanks, suggesting to us what the real-life subjects must have looked like, how they must have moved. The sculptures are particularly effective when they’re hung from the ceiling in transparent thread, seeming to float.

Share on Facebook


[ By Steph in Art & Sculpture & Craft. ]

[ WebUrbanist | Archives | Galleries | Privacy | TOS ]


WebUrbanist

 
Comments Off on Drawing with Wire: Scribbled Sculptures Make Sketches 3D

Posted in Creativity