RSS
 

Posts Tagged ‘Dramatic’

How to Make Dramatic Photos with Backlight

24 Feb

The post How to Make Dramatic Photos with Backlight appeared first on Digital Photography School. It was authored by Mat Coker.

Most people don’t notice light. But visual artists do. Light is one of the essential ingredients in your photographs.

Light can be tricky to deal with until you understand camera settings. But once you’re familiar with your camera, light is wonderful to play with in your photos.

Personally, I love backlight. It adds a sense of drama and beauty to your photography.

I’ll show you examples of backlight with food, landscape, and portrait photography (studio and outdoors).

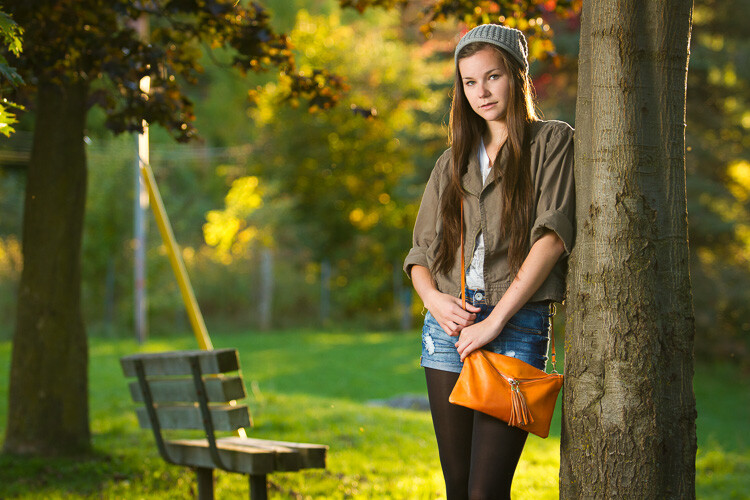
In order to achieve backlight in your photo, have the main light source behind your subject coming toward your camera. In this photo, you can actually see the warm setting sun as the source of backlight.

What is backlight good for?

I love backlight because it adds depth and drama to an otherwise flat, two-dimensional photo.

Backlight helps to bring out the texture of objects that you photograph (sidelight is good for this as well). Texture is created through a combination of highlights and shadows. Since photographs are two dimensional, texture adds depth to your photo.

A strong burst of backlight adds drama to your photo. Think about the bursts of light at a rock concert or other performances. The temperature of the backlight (warm or cool) adds to the drama of the photo.

The backlight source might be in your photo along with your subject (as with the sunset photo above). Or the light source can be outside of the frame (as long as it illuminates your subject).

Any source of backlight can be used creatively, but sunlight, windows, and strobes are among the most popular.

The principals of backlight are the same no matter what camera you’re using, even your phone.

This ice-covered tree is backlit by the sun. Without backlight shining through the branches, this tree would not have stood out so much.

Food

It’s great to begin practicing backlight with food. Backlight can be used to illuminate steam and bring out the texture of the food.

While any light source will work, many photographers love using window light to illuminate food.

The light source is not visible in this photo, but there is a window backlighting the food and making the steam visible.


This food was photographed while still in the oven. The warm backlight is coming from the oven light.


This is an example of soft backlight produced by a large window. I wanted to bring out the texture in the cookies. An iPhone 4s was used to capture the image and Lightroom was used to process it.

Your food photos will be less flat and have more pop to them when you use back (or side) light. Just look for a window or any other light source. Get creative and use the light from fridges, stoves, and lamps.

The great thing about practicing backlight with food is that if you can’t reposition the light source, you can easily reposition yourself and the food.

Landscape and Nature

Once you get the hang of backlight with food, use it to add drama to your landscape photos. In most cases, you won’t be able to reposition your backlight source since it will likely be the sun. However, you can always reposition yourself in relation to the sun and your subject.

I saw this scene as I looked in the rearview mirror. I couldn’t resist pulling over to take a photo. The setting sun is the light source for this scene. You can’t see it in the frame but it’s behind the trees to the left. Notice how the electricity wires are shining and standing out from the dark trees in the background.


The setting sun behind this crab apple tree caught my eye during a walk. I came back with my camera and found a perspective where the sun was visible filtering through the tree. An aperture of f/11 was used to create the starburst effect.


A combination of backlight and water droplets on the lens created this special effect. I don’t recommend letting your lens get wet, I was using a waterproof case. The case was still wet from using my camera underwater.

Portraits

I love to incorporate backlight into portraits to accent the emotion. Beautiful or intense moments are brought out even more with the use of backlight.

Studio

The best part about backlight in a studio is that you can position your light source any way you like.

Two off camera flashes were used to produce this dramatic backlight.


Superheros are dramatic characters by nature. Using harsh backlight instead of soft front light is better for bringing out the nature of the subject.


Natural light

When using natural light, you’ll have to position yourself and your subject according to the light source.

This little guy is backlit by the setting sun, while the big open sky in front of him illuminates his face.

Troubleshooting

One of the biggest problems about backlight is that your photo may turn out as a silhouette when you don’t want it to.

You’re likely using a semi-automatic setting such as aperture or shutter priority. Your camera sees the bright backlight and meters itself accordingly. You can use exposure compensation to help you avoid unwanted silhouettes. Try setting your exposure compensation to +1 or +2. You’ll need to experiment according to the light conditions.

If you’re experienced then manual mode might be the best option for you.

The main light source is the sky in the background. The sun has not risen over the horizon yet.

Practice backlight with everything

Once you get the hang of it, you can introduce backlight into all sorts of situations. Use it to bring out texture and to heighten dramatic moments.

Concerts are a wonderful place to have fun with backlight. The rapidly changing lights will create a challenge for you. Take lots of photos and be happy with the few that work out.

I love how golden hour can add a nostalgic feel to photos.

Use a combination of low angles and backlight to make your photo more exciting.

I always wait until evening to visit the beach. That way the sun isn’t shining straight down onto the sand. Instead it shines down at a lower angle, creating texture through shadow and highlight.


I love my little guy’s hair. There is a window just above him as the source of backlight.

The post How to Make Dramatic Photos with Backlight appeared first on Digital Photography School. It was authored by Mat Coker.


Digital Photography School

 
Comments Off on How to Make Dramatic Photos with Backlight

Posted in Photography


Luminar 2018 gets new AI Sky Enhancer tool for creating dramatic skies

02 Nov

Skylum has released a Luminar 2018 update that brings its new AI Sky Enhancer filter to the image editing software. The new tool works “almost instantly” to improve the sky in photos, only requiring the user to adjust a slider, according to the company. AI Sky Enhancer replaces the masks and filters that would otherwise be used to enhance skies.

The new tool was created by Skylum’s AI Lab and is powered by a deep neural network that was trained using hundreds of thousands of images. Luminar uses the enhancer to detect and adjust only the skies in images, including ones that are cloudy, partly sunny, bright blue, and more.

Skylum offers a long look at how AI Sky Enhancer works in a new blog post, where it explains that the tool relies on semantic segmentation, in part, to separate an image into layers based on detected objects. By doing this, AI Sky Enhancer is able to adjust the sky independent of other image elements while keeping issues like noise and halos to a minimum.

The software automatically applies a mask to the sky in these images, working to selectively adjust elements like brightness and contrast as the user moves the tool’s slider. “Every parameter is applied selectively, as if you were doing it yourself using masking and layers,” the company explains in its post.

The AI Sky Enhancer update is free for Luminar 2018 and arrives ahead of Luminar 3 with Libraries, which will be available starting December 18. Skylum will offer all of its new Luminar features for free to current Luminar 2018 owners until “late 2019,” it explains on its website. The application is available to purchase through Skylum for $ 59/€59/£53.

Articles: Digital Photography Review (dpreview.com)

 
Comments Off on Luminar 2018 gets new AI Sky Enhancer tool for creating dramatic skies

Posted in Uncategorized


How to Create Dark and Dramatic Backgrounds Using High-Speed Sync

30 Oct

The Usefulness of High-Speed Sync

Among other things, high-speed sync lets you underexpose your backgrounds for dramatic images.

High-speed sync (HSS) is easily one of the most useful features in lighting. Not only does it let you overpower the sun for more flattering light in the middle of the day, it also lets you use your largest apertures in broad daylight.

It also lets you use another useful technique – underexposing your backgrounds by several stops. With a powerful enough light you can even underexpose the sun by three or four stops, thus making it a compositional element in your frame. This lets you create dark, dramatic backgrounds for visual impact. It also brings your subject forward in the frame, ensuring they’re the dominant aspect of your image.

Fortunately, using HSS to create dark backgrounds like this is easy. And in this short tutorial, I’ll show you how to do it using both E-TTL and manual exposure modes.

Why Darken Your Backgrounds?

While you won’t want to darken the background in every situation, dark backgrounds in scenes that would normally be very bright look great. It may be a stylised affair, but it’s a cool style.

Darkening the background brings your subject forward in the frame(providing they’re well lit), and emphasizes them as the focal point of the background. And the inherent contrast added by putting extremely dark tones in the frame helps to make things pop.

This shot was taken without a flash and is all natural light. You can see the background shares a similar tonality to the subject, reducing the subject’s impact within the frame.


By intentionally underexposing the background with HSS, the subject now dominates the frame.

What Do You Need?

To get started with this technique you’ll need:

  • A flash with HSS capability (and TTL capability if you don’t want to use manual).

Some studios strobes (such as the Pixapro Citi600) now come with HSS functionality built in.

  • A trigger or some other means to fire your flash. (You’ll need a TTL-compatible trigger if you want to use TTL.)

If you want to use manual mode, a PC Sync cable will do the job. But for E-TTL you’ll need a compatible trigger. (The icon circled in red is the HSS icon.)

E-TTL Mode

To use this technique with TTL metering, turn on the flash, trigger, and camera of whatever system you’re using. Set your flash mode to HSS and E-TTL. (If you don’t know how to do this, refer to your manual.) You should also zero out the flash exposure compensation settings on your flash.

Switch your camera to ‘Aperture Priority‘ mode and choose the desired aperture. I’m fond of f/4 and f/5.6 for this technique, but it’s not a rule.

Now dial between -1 and -3 stops of exposure compensation into your camera. What this does is underexpose all the ambient light in your scene. It’s how you achieve the dark backgrounds – everything that isn’t properly exposed by your flash will be darkened.

Backgrounds that are already in shadow (such as the one in this photo) may only need one stop of underexposure.

For dark backgrounds already in shadow, -1 stop of exposure compensation will be enough. For bright backgrounds or backgrounds in direct sunlight, you’ll need to underexpose more. To overpower the sun, you’ll need to underexpose by at least three stops.

Backgrounds lit by direct sunlight (such as the one in this image) may need up to four stops of underexposure.

Take a test shot, evaluate the image and the histogram on your camera, and adjust the flash exposure compensation as needed.

That’s all there is to it.

Manual Mode

HSS is great for overpowering the sun. Here, three stops of underexposure controlled the appearance of the sun in the frame. Notice how dark the rest of frame (lit in broad daylight) appears.

The steps for manual mode are almost identical to using E-TTL mode.

  1. Set up the flash, trigger, and camera of your system.
  2. Set the camera to aperture priority mode.
  3. Set the camera to your desired aperture.
  4. Dial in -1 to -3 stops of exposure compensation.
  5. Take a test shot.
  6. Adjust your flash power as needed.

However, in manual mode, the meter in your camera doesn’t relay any exposure information to your flash as it does in E-TTL mode. That means you’ll need to set your flash power yourself by evaluating your test shot and turning the flash power up or down as needed. You may need to alter the flash power a lot more than you would with E-TTL. Just keep taking tests shots and evaluating the exposure until it’s where you want it.

Adjusting the power in manual mode means dialing through all the increments on your flash. This isn’t a problem, but it’s harder than E-TTL.

As an aside, light meters are now available that can measure HSS such as the Sekonic L-858D. However, they’re very expensive. A Slovenian company called Lumu also makes a light meter that plugs into an iPhone to measures HSS. I saw these being demoed at a trade show and was very impressed with the results. They’re less expensive, but they currently work only with iPhones.

That’s It

Provided you have the necessary equipment, the technique is quite easy. And it can give you a variety of results, so make sure you experiment with different amounts of exposure compensation.

Though limited by your access to the equipment, this HSS technique is easy to employ and can result in bold, dramatic imagery.

Other Considerations

Here are a few things to keep in mind while using this technique:

ISO. Generally speaking, you should keep your ISO as low as possible. Of course, if you have a particularly low-powered flash you may need to bring it up.

Flash Meters. Most flash meters can’t meter for HSS exposures. There are specialist meters that can, but be prepared to pay through the nose for them.

Daylight Conditions. This technique works in all sorts of lighting conditions, from direct midday sun to diffused light on a cloudy day. You’ll need a powerful light to overpower the sun on a bright day, but if you do the technique works really well.

This HSS technique works well in all lighting conditions. The image on the left was created in overcast conditions, while the image on the right was taken in direct sunlight.

Flashguns / Speedlights. Many flashguns have HSS functionality built in and are capable of great results. If you have a flashgun, consider using them for this technique.

Give it a try

Now that you’ve seen what can be accomplished with this relatively easy technique, I encourage you to get out and try it for yourself. And let us know how you went in the comments.

The post How to Create Dark and Dramatic Backgrounds Using High-Speed Sync appeared first on Digital Photography School.


Digital Photography School

 
Comments Off on How to Create Dark and Dramatic Backgrounds Using High-Speed Sync

Posted in Photography


5 Tips How to Set Up a Home Studio for Dramatic Portraits

07 Jun

Having a brick and mortar studio when you are a photographer is such a huge and daunting step. There are so many overhead costs to consider such as rent, electricity, insurance and various other bills. It’s a worry to cover all these before you pay staff and yourself and still make enough profit to make a living. This thought can make one feel that having a studio is an impossible dream or is too of a big a step to take. But you can always start somewhere, so let’s look at some tips for how to setup a home studio.

portrait of 2 girls - 5 Tips How to Set Up a Home Studio for Dramatic Portraits

How to set up a home studio

If you have a spare room in your home or a basement, that is a good place to consider as a home studio. You may be surprised at just how much space is needed to start a portrait studio. Not that much at all! In this article, I will show you how I have set up my little home studio which I have recently revamped to make into a dedicated portrait studio.

I live in London in a narrow Victorian house. These houses have a typical 2-up 2-down rectangular layout, short side across and long side from front to back, with a narrow corridor that runs on one side of the house all the way to the back. My house has two reception rooms (living rooms) and a dining room and kitchen at the back. I decided to make the first reception room (the front room of the house) into my studio. It has a bay window at the front which juts out of the house and provides nice ample natural light.

At first, I set up my backdrop on the opposite side of the window so it was facing the window directly. The reason for this was so that I could get a much wider area for shooting. However, this is not great for dramatic lighting with natural light flooding from the window, with the camera right in between the backdrop and the window. This lends itself to flat lighting instead which isn’t what I wanted for my studio.

In order to achieve a more versatile directional lighting and avoid flat lighting from the window, I use strobes at 45-degree angles to the backdrop to get the lighting setup that I like.

Recently, I have moved things around so that I can use dramatic natural light if I want without the need for strobes, although I still have the flexibility to add strobes and artificial light if needed. This is how I’ve done it.

#1 Make sure your backdrop is at 90-degrees to the window

lighting diagram 5 Tips How to Set Up a Home Studio for Dramatic Portraits

This angle gives you a lighting that is more dramatic as it is only coming from one side. If you position your subject so that the far side of the face is unlit, you could achieve lighting similar to the Rembrandt style or low-key portraits.

#2 It is ideal to have an L-shaped corner connecting your window light to your backdrop or wall

lighting diagram corner - 5 Tips How to Set Up a Home Studio for Dramatic Portraits

Having this little dark, unlit corner between your backdrop and the window gives you a 45-degree angle lighting setup which is one of my favorite set-ups. The corner minimizes the light for you to be able to create a moodier image with only the front left of the face illuminated rather than full light flooding from the side.

In terms of artificial light, this is similar to controlling the amount of light hitting your subject either by the use of grids, a strip light or a snoot. You don’t want your subject awash with light as that would make for a rather flat lighting.

My personal preference is for having both light and shadows in my images so I can sculpt my subjects using directional light. If you don’t have such a corner, you can use a V-flat (two black pieces of mountboard taped together to form a V) positioned in the corner as shown in the diagram above.

#3 Paint your wall dark or use a dark backdrop

portrait of a happy girl on a dark background - 5 Tips How to Set Up a Home Studio for Dramatic Portraits

You will be astonished at the difference a dark backdrop makes! It brings focus to the subject far more than a light backdrop can. It also lends itself to more artistic photos.

#4 Diffuse your window light

portrait of a girl in black - 5 Tips How to Set Up a Home Studio for Dramatic Portraits

Window light, albeit coming from an angle, can still be a bit harsh. You can further soften this light by diffusing it with some white sheer curtains or voile or any fabric that can diffuse the light. The bottom half of my windows are frosted which means they are already perfectly diffused. I cover the top half with pieces of diffusion fabric to cut out the light.

#5 Use a reflector or light opposite the window

lighting diagram with reflector - 5 Tips How to Set Up a Home Studio for Dramatic Portraits

Much like in a painted portrait, reflected light is a pleasing detail found at the edge of the unlit side of the face. A silver reflector can achieve this very well with a stronger reflective light result as compared to a white reflector. I find that the gold reflectors can make the skin too warm so I stick with the silver and warm up the overall image in post-production.

The reflector does have to be positioned really close to the subject to make it more effective. If you don’t have an assistant who can hold it in place for you, get a free-standing reflector arm that you clip the reflector into thus making it easy for you to position it as needed.

two different portraits of girls - 5 Tips How to Set Up a Home Studio for Dramatic Portraits

dps-portrait-home-studio-tips_0000

Using strobes

If you want to use or add artificial light such as strobes or continuous lighting, consider a portable studio kit that you can fold and hide away when not in use. Here you can find suggestions of equipment to use for your portable studio kit.

There are many possibilities and things that you can do with this type of setup. Even with just one flash (like this tutorial), you can create dramatic home studio lighting. Another fun thing you can do with flash is creating double exposures.

These images below were taken in exactly the same spot as those above. But this time a gridded softbox was placed on the right as the main light instead of using the natural light coming from the window on the left.

dps-portrait-home-studio-tips_0000

I hope you found this article helpful. Please share images taken in your home studio, and if you have one or more tips on how to create portraits in a small studio space please share those too.

The post 5 Tips How to Set Up a Home Studio for Dramatic Portraits appeared first on Digital Photography School.


Digital Photography School

 
Comments Off on 5 Tips How to Set Up a Home Studio for Dramatic Portraits

Posted in Photography


8 Ways to Create More Dramatic Flower Photos

27 May

Do you think flower photography is boring? Or even too easy and obvious? I mean, of course, when you point your camera at a pretty flower you’re going to get a pretty photograph. Right?

But a subject that you feel is boring and easy is actually the perfect one to challenge yourself with. Can you make a flower image that is creative and dramatic somehow?

Here are a few ideas to get you started making more dramatic flower photos.

1. Dramatic light

Often flower photos are made under soft lighting conditions, either in the shade or on an overcast day. This is because of the soft and delicate nature of a flower which lends itself to that type of light.

But it doesn’t have to be that way. For a more dramatic image, try to find a flower that has direct light on it and shade behind it. High contrast scenes feel more dramatic and your flower will stand out against a darker background.

Flowers in the Light - 8 Ways to Create More Dramatic Flower Photos

2. Change your perspective

Most flower photos are made from a perspective looking right into the open flower. Try other perspectives for more interesting compositions. You can look at the flower from above, from the side, or from underneath.

To make the image below, my camera was on the ground looking directly up at the flower. Because the sky was so much brighter than the flower, it created a more high-key type of image with light shining through the petals making them appear to glow.

Looking Up flower - 8 Ways to Create More Dramatic Flower Photos

When I made the next image, I was interested in the lines created by the petals of a dahlia the size of a dinner plate. Most photos would include the whole flower, but I only included a small portion of the huge flower taken from a side angle.

Giant Dahlia - 8 Ways to Create More Dramatic Flower Photos

3. Focus through

In one of my favorite techniques for flower photography, I use a telephoto lens and focus on a flower that is around five feet away. Then I position the lens so that another flower is right in front of it. Because the close flower is extremely out of focus, it creates a soft area of color in front of the main subject.

This is especially effective if you can find two flowers that are complementary colors (opposite) on the color wheel.

Focus Through Poppy - 8 Ways to Create More Dramatic Flower Photos

4. Let the wind blow

One of the most frustrating things you encounter when photographing flowers is wind. A little bit of wind you can handle with a faster shutter speed, but sometimes the wind is just too much and your flower is blowing all over the place.

When this happens, just go with the flow! Instead of trying to get a sharp image, go with a slow shutter speed and capture the motion of the flower moving in front of your lens.

Flowers in the Wind- 8 Ways to Create More Dramatic Flower Photos

5. Environmental portrait

Most flower photos contain only the flower with no context. But you can also make an environmental portrait that shows the flower and its surrounding environment, like the one below.

Storm Flowers - 8 Ways to Create More Dramatic Flower Photos

6. Echo

Another of my favorite techniques I refer to as an echo. For your main subject, find a flower that has another virtually identical flower behind it. Use a shallow depth of field and focus on your main subject letting the flower behind fall out of focus. This creates a sort of echo of the main subject.

Yellow flowers - 8 Ways to Create More Dramatic Flower Photos

7. Less than perfect flowers

When photographing flowers, most photographers search for perfect specimens to be the main subject. But perhaps more interesting subjects are the less than perfect flowers. They can be dead flowers, ones with flaws, or even flowers that have fallen over.

In the image below, I was attracted to the raindrops that were on the side of this fallen tulip. Flowers with raindrops are not uncommon, but the tulip on its side is a bit more unusual.

Fallen Tulip - 8 Ways to Create More Dramatic Flower Photos

8. Emphasize edges in post-processing

You can also introduce effects in post-processing to make unique and dramatic flower photos. Try experimenting with textures or edge effects.

For the image below, I added an edge effect in post-processing to draw the viewer’s attention to the shape of the petals.

pink Dahlia - 8 Ways to Create More Dramatic Flower Photos

What else can you think of? Flower photography doesn’t have to be boring or predictable. In fact, any subject that you find boring and predictable is a challenge waiting for you to unleash your own unique perspective. How do you make more dramatic flower photos?

The post 8 Ways to Create More Dramatic Flower Photos appeared first on Digital Photography School.


Digital Photography School

 
Comments Off on 8 Ways to Create More Dramatic Flower Photos

Posted in Photography


How to Make a Dramatic Portrait with Light Painting Using Items Found in Your Home

28 Feb

In this article, I’ll show you how to do a fun project you can do with friends and a little light painting. You can do this, using things you likely already have in the house.

It’s always fun to experiment with different and creative ways of using light in photographs. It’s also a lot of fun to take some risks and experiment with a technique that may or may not produce good results. The reality is you can learn from every photographic experience. It doesn’t matter if the results are perfect or not. Each time you pull out a camera you create something that adds to your knowledge base and helps you to grow as a photographer.

Learning lessons

In the case of a project I did recently with light painting and live models, several lessons were learned. The first was the importance of finding enthusiastic people to assist with my projects. The second was the importance of a reflector in adding light to a photograph.

Lastly, the third lesson involved pushing the limits of human abilities. I asked my friends to hold very still for these images, sometimes in some slightly awkward poses. How much was too much for my models?

How to Make Dramatic Light Painting Effects with Items Found in Your Home

This was our final image of the evening. It took a lot of trial and error to reach this point.


The light painting project

The whole concept for the photo project was inspired by the light painting of Eric Pare. He creates dramatic images in stunning locations with the help of dancer Kim Henry. Eric uses an easily created light tube and a strong flashlight. It’s winter here in Canada, and at -30c it’s not reasonable to ask a friend to pose outside in a landscape while wearing skimpy clothing.

So using his idea of long shutter speeds, it was time to craft a different project. The goal was to create dramatic images that you could easily reproduce within your home at a fairly low cost.

The following images were created in my kitchen using a large piece of black velvet (a black sheet will also work) draped across my portable backdrop stand, a reflector, an extension cord, and a string of Christmas lights. Of course, three friends were also recruited to assist with the project. They were more than willing to participate in the fun. In the end, there were a lot of laughs, and everyone was quite dedicated to the effort to get the images correct.

How to Make Dramatic Light Painting Effects with Items Found in Your Home

A terrible grainy image but my friend was having so much fun she needed to take a quick selfie.

The Setup

Setting up was very easy. A backdrop was attached to the narrow walls of my kitchen. Black velvet is a lovely fabric for absorbing light and creating true black in photographs. I love black velvet and I’ve used it to create some very dramatic still life images and portraits in the past.

Wait until the fabric is on sale or pick remnants. The only trick to black velvet is to use a lint brush to remove white fuzzy bits. These show up quite easily in images, and it’s a pain to clone out all those little white spots.

How to Make Dramatic Light Painting Effects with Items Found in Your Home

Here we set the lights and the background. The kitchen is pretty narrow so it was a challenge to set up the backdrop. In the end, part of the backdrop was taped to the wall.

How to Make Dramatic Light Painting Effects with Items Found in Your Home

A shot from above. My friend stood on the countertop to spin the lights. As you can see they were loosely draped over the fan.

How to Make Dramatic Light Painting Effects with Items Found in Your Home

The reflector was placed just below the model’s belly button and the light was directed up towards the face.

After setting up the backdrop using tape and the cross piece from my backdrop kit, we then hung the Christmas lights from the ceiling fan.

In the original plan, we intended to turn on the fan and let it spin. It’s a good thing we realized that the lights would tangle around the fan and cause an issue. So it then became the job of one person to spin the fan 340 degrees during the exposure manually.

The Camera Gear

We used a Canon 5D Mark III mounted on a tripod and the 2-second self-timer. That allowed the person manning the fan to begin spinning the lights.

How to Make Dramatic Light Painting Effects with Items Found in Your Home

This image is getting better. It’s still soft. My exposure time wasn’t quite correct yet here.

The Procedure

It was time to establish the proper exposure for the whole project.  The trick here was to balance the exposure so that there was a long enough shutter speed (exposure time) to blur the lights but we also needed to keep the models in focus.

It’s awfully hard to stay still for even just a few seconds. In fact, it’s almost impossible. After several experiments and through trial and error the final exposure used was 0.8 of a second at f/3.2 with an ISO of 100. We also used a large reflector to bounce the light back up towards the models face.

How to Make Dramatic Light Painting Effects with Items Found in Your Home

This one is a little better. I ran it through a sharpening editor to help. It’s not perfect but I love the way the lights curved around their hair.

The whole experiment required us to use two people to create the photo and one or two people as models in each shot. The photographer triggered the camera timer as well as held the reflector, while the fan operator stood on the countertop and spun the fan at the proper moment.

How to Make Dramatic Light Painting Effects with Items Found in Your Home

This image didn’t turn out as planned. You can see how important timing and communication are to this kind of project.

The Keys to Success

The keys to a successful photograph were quite simply communication and timing. The lights had to be spun at exactly the right moment, and the photographer needed to communicate timing to everyone else.

It took a lot of tries to get the whole thing correct, but in the end, we were able to produce the desired images.

How to Make Dramatic Light Painting Effects with Items Found in Your Home

The creative person in me is able to ignore the slight ghosting from motion because I love how the lights spin above and below her eyes.

The goal was to create dramatic images with a neat light painting effect. I wanted to encircle the model with light, almost as if she were standing within a light tube. There were many failed attempts.

Sometimes our timing was off, and the lights did not spin around the model or got caught in her hair. Other times the lights moved too slowly and didn’t make it all the way through the image. Other times the issue was the lights themselves. Sometimes the lights spun right across the model’s eyes. I like a few of these images, but at the same time, some ran across the face in a way that was not attractive.

Have fun with it

The whole experiment was a lot of fun. It made for a great night out and some fun pics to post on social media. My friends were happy to post the pics to show their friends. As an artist and a professional photographer I also wanted to see if I could use the technique for other purposes.

Is it possible to use this technique to create some interesting fine art images or perhaps for some interesting portraits? The answer is yes! There’s a lot that can be done with this technique. It’s well worth experimenting with and seeing what kind of results can be created.

How to Make Dramatic Light Painting Effects with Items Found in Your Home

In this one, we achieved exactly what I was hoping to do. She is standing in a circle of lights.

The post How to Make a Dramatic Portrait with Light Painting Using Items Found in Your Home by Erin Fitzgibbon appeared first on Digital Photography School.


Digital Photography School

 
Comments Off on How to Make a Dramatic Portrait with Light Painting Using Items Found in Your Home

Posted in Photography


How to Make Brilliant Black and White Photos with Dramatic Composition

27 Feb

It’s hard to beat the power and drama of good black and white photography. There’s a reason that monochrome has survived and prospered as an artistic medium despite the arrival of color photos. But how do you harness the power of black and white for yourself? The key is in your composition.

The problem with composition is that it’s such a vast topic it’s easy to lose track of the various principles and the ways you can put them into the practice. So let’s keep it simple – I’m going to give you three things you can concentrate on. Put these into practice and you’ll see a dramatic improvement in the composition of your black and white photos!

#1 – Simplicity

Simplified composition helps give your black and white photos more power by focusing attention on the main subject.

How to Make Brilliant Black and White Photos with Dramatic Composition

The above landscape photo is a great example. The composition is about as simple as you can get. It works because I used a neutral density filter and a long shutter speed of 90 seconds to blur the water and clouds. The result is a black and white landscape photo with a minimalist style composition.

This principle also applies to portraiture. Keep the composition simple to focus attention on your model. An easy way to do this is to use a short telephoto lens with an aperture of around f/2.8. Get in close and make sure there are no distractions in the background to pull attention away from the person you’re photographing.

How to Make Brilliant Black and White Photos with Dramatic Composition

#2 – Texture

One of the interesting things about black and white is that it brings out the interesting textures in your subject. You can use this characteristic to make your black and white photos more interesting.

This photo of some old wooden boxes is a good example.

How to Make Brilliant Black and White Photos with Dramatic Composition

There are two interesting things about the composition of this image. First is the pattern created by the repeating shapes of the boxes. Second is the texture of the wood.

The absence of color in black and white helps emphasize texture. You can take it further in post-processing by applying Clarity or other tools designed to bring out texture (such as the Structure sliders in Silver Efex Pro 2).

Texture and contrast

You can take this idea further by using the contrast between smooth and rough surfaces. Some objects are more tactile than others and have lots of texture. Others have very little.

You’ll see this technique used a lot in long exposure photography, where you can take advantage of the juxtaposition between a subject with lots of texture, such as a concrete jetty, and one that has very little, like water blurred by using a neutral density filter and a long exposure. The earlier photo of two rocks is a good example.

Here’s another. I used a shutter speed of 3-minutes to blur the clouds and the water. As a result, there’s a strong contrast between the concrete in the foreground, the jetty in the distance, and the surrounding water and clouds.

How to Make Brilliant Black and White Photos with Dramatic Composition

#3 – Tonal Contrast

Tonal contrast is where you have light tones and dark tones next to each other. Now we’re getting to the heart of black and white photography! This technique is not nearly as effective in color because of the way that colors that are similar in tone, such as red and green, still create a powerful contrast. Tonal contrast is the main factor that separates black and white photography from color.

The easiest way to explain how tonal contrast works is with some examples.

In the first (below) there’s a strong tonal contrast between the white and black stones. Your eyes go to the white stones because they are in the center of the frame and because they provide a strong contrast against the black stones underneath them.

How to Make Brilliant Black and White Photos with Dramatic Composition

Another subject where tonal contrast is used to good effect is portraiture. In the portrait below the model’s light-toned skin contrasts with the dark background. The key to making this technique work is to make sure the background is in shade and that it contains no distracting highlights.

How to Make Brilliant Black and White Photos with Dramatic Composition

So far both examples have shown a light toned subject against a dark background. But you can turn it around by placing a dark subject against a white background.

That’s the technique I used in the following portrait. I photographed the man during carnival in Spain. He was dressed for the occasion and had even painted his face. I placed him against a bright, sunlit building to take advantage of the tonal contrast between his dark skin and the white wall.

How to Make Brilliant Black and White Photos with Dramatic Composition

Conclusion

There are many factors that make up a good black and white photo, but the composition is one of the most important. If you want to make a strong black and white photo, then focusing on these three key factors – simplicity, texture, and tonal contrast – is a great place to start.


Mastering Composition Book Two

Want to learn more about composition? Then check out my wildly popular ebook Mastering Composition Book Two. It contains 20 lessons that will help you get better at composition, no matter what your skill level!

The post How to Make Brilliant Black and White Photos with Dramatic Composition by Andrew S. Gibson appeared first on Digital Photography School.


Digital Photography School

 
Comments Off on How to Make Brilliant Black and White Photos with Dramatic Composition

Posted in Photography


How to Backlight Translucent Objects for Dramatic Effect

22 Dec

Incorporating translucent elements into your compositions can add an interesting dynamic of luminosity to your photographs. Especially if you can backlight them.

How to Backlight Translucent Objects for Dramatic Effect

Water spray, smoke, steam, and things such as flags, flowers, and fabric when backlit can take on an almost surreal quality because of the way the light refracts as it passes through these types of semi-transparent elements. In this article, I want to share with you some ideas and examples of how to make the most of backlighting translucent objects.

Front light versus backlight

How to Backlight Translucent Objects for Dramatic Effect

If you light a translucent element from the front it will look pretty normal as the light will reflect naturally. Lighting translucency from behind means the light is refracted, (bent,) and scattered before your camera’s sensor records it.

As you can see from the two example photos of the mad scientist with the red liquid in the flask. Notice how the color of the liquid appears very different in the two photos. See how dark it is above, compared to the bright red color in the image below where it has backlighting.

How to Backlight Translucent Objects for Dramatic Effect

Any colored liquid in a glass, or even any colored glass containing no liquid, will take on a dramatically different quality when it’s backlit. The colors will appear lighter than if they are lit from the front.

Position yourself to create backlight

Water spray, steam and smoke all provide you with great opportunities to produce creative photos. Backlighting and photographing any of these elements will return very different results than if you position yourself so the light is behind you and the camera.

As the light passes through these elements, (or anything translucent,) the rays are bent and the light is diffused before your camera records it. Backlit semitransparent things tend to glow because of this.

How to Backlight Translucent Objects for Dramatic Effect

In the image above, I found a good location where the sun was in front of me to photograph during the Song Khran festival in Chaing Mai, Thailand, (which is one huge water fight). This lit up the water spray as buckets were thrown and hoses sprayed on revelers.

Seeing the monk sweeping leaves and burning them in the temple grounds (below) I carefully positioned myself to photograph the sun coming through from behind the smoke.

How to Backlight Translucent Objects for Dramatic Effect

Good subjects for backlighting

Flags and flowers are two of my other favorite translucent things to photograph. If you can find an angle where the sun is coming from behind a flag or row of flags the resulting photos can be far more colorful and interesting than if the flag is front-lit.

How to Backlight Translucent Objects for Dramatic Effect

Photographing flowers where you have the opportunity to light them from behind, or even part of them from behind, (as in this image of the purple orchids,) can really make them pop. However, if you are wanting to get clear and realistic correct color of flowers you are photographing it is probably better to light them from the front.

How to Backlight Translucent Objects for Dramatic Effect

Exposure notes

When you are photographing any backlit element take care to expose well. Don’t be too concerned about getting a “correct” exposure as often slightly overexposing will enhance the effect. Expose to create a feeling or mood rather than to achieve a technically precise result.

Your camera’s exposure meters measure reflected light. When you photograph refracted light passing through a translucent element your camera may not give you an acceptable result if you are using any of the automatic modes. Being in control of your exposure manually will allow you to experiment and set it to give you the result that you think looks best.

How to Backlight Translucent Objects for Dramatic Effect - colorful drinks

The background matters

If you are able to include a dark background in this style of photograph this can often enhance your pictures as well. The glow of a backlit semitransparent element can really stand out from a dark background where the light is three or more stops lower.

This photo of a Lahu man smoking against the dark background of my outdoor studio is a good example of this.

How to Backlight Translucent Objects for Dramatic Effect

Processing

Taking a little more time to post-process photos you have made using this technique is advisable. Because of the unusual nature of the lighting and the subject your camera may not always record the photo exactly how you want it. Manipulating the contrast levels, blacks, highlights and using the dehaze feature will allow you to enhance your photos of translucent backlit subjects.

How to Backlight Translucent Objects for Dramatic Effect

Please share your photos in the comments below of smoke, spray, steam or any other translucent elements with backlighting that you’ve enjoyed making.

The post How to Backlight Translucent Objects for Dramatic Effect by Kevin Landwer-Johan appeared first on Digital Photography School.


Digital Photography School

 
Comments Off on How to Backlight Translucent Objects for Dramatic Effect

Posted in Photography


How to use Off-Camera Flash to Create Dramatic Images with Cross Lighting

01 Dec

Learning to use off-camera flash allows you to create and shape light, giving you plenty of new opportunities for dramatic photography.

But for many photographers, starting up with flash can be intimidating. It’s not just a matter of aiming a flash at your subject and hoping for the best. Choosing the wrong angle or positioning for your flash can have a negative effect, casting unflattering or irregular shadows.

A tennis player lit by off-camera flash cross lighting

A tennis player lit by off-camera flash cross lighting

I remember when I was starting out with off-camera flash I would sometimes get images where the light simply didn’t look right. But when it’s used effectively, flash adds to an image – it shouldn’t make the lighting seem unnatural or otherworldly (unless, of course, that’s the effect you’re going for – to each their own!).

But where’s a good place to start? Where should you put your flash in order to get good light? This article will show you one method you can use called cross lighting that you can use to create dramatic images with off-camera flash.

What is cross lighting?

For both beginners and pros alike, cross lighting is a very quick and simple setup that results in a dramatic, well-lit shot.

Like the name implies, this setup features two light sources on opposite sides of the subject. Hitting your subject from both sides adds a sense of depth to the image, while still producing natural-looking light.

An example showing an off-camera flash cross lighting setup for a portrait of a tennis player.

An example showing an off-camera flash cross lighting setup for a portrait of a tennis player.

The key or main light

Typically you want your light that will provide the most illumination, also know as the key light, placed in front of the subject and a bit to one side. For portraits, you will typically want to use a modifier on your light, such as a softbox or umbrella. This isn’t a requirement – but it will help soften the shadows and create more flattering light on the subject.

The purpose of this key flash is to light up the subject’s features and put a sparkle of catch light in their eyes.

A demonstration of the key light only in a cross lighting setup - How to do Cross Lighting to Create Dramatic Off-Camera Flash Images

We convinced this model to act as our stand-in for a few quick portrait shots. Here is an image with only the key light, an off-camera flash positioned to the right of the camera.

Add a second flash as a rim or separation light

The second light is placed behind the subject on the opposite side as the first one. The purpose of this light is to create an “edge” of light around your subject. This is traditionally called a “rim light” or a “separation light” since it helps to separate the subject from the background.

Demonstration of cross lighting on a subject

By adding a second light to the left of the camera and behind our model, we’ve created a rim of light that separates him from the background for a much more pleasing and dynamic image. Notice the highlight on his hat and hand on the left side.

Voila! This quick setup is an easy way to get started and start exploring the creative potential of a shoot. As you begin to snap pictures, you may find something about your setup that you want to change, but the cross lighting gives you a solid foundation from which to build.

An alternate setup of the previous cross lighting example with the off- camera flash locations reversed

We’ve flipped the orientation of the lights for this shot – while keeping the same cross-lighting style. Now our key light is on the left, and the rim light is provided from the right.

Quick to set up

One of the reasons I love using this setup for off-camera flash is that it takes away the guesswork and provides a solid foundation of light that you can then begin to work with and modify.

And also that it takes only moments to set up! When you start lugging around multiple flash units, light stands, and modifiers, it’s nice to have a consistent starting position that provides even lighting.

An example image showing the setup of flash units for cross lighting - How to do Cross Lighting to Create Dramatic Off-Camera Flash Images

An overview of our setup, with the flashes oriented for cross-lighting and our subject right in between.

The final image of a carpenter, photographed using cross lighting - How to do Cross Lighting to Create Dramatic Off-Camera Flash Images

The final shot, where the light has given a sense of depth to make the subject stand out from the clutter behind him.

It’s a good idea to get the correct flash power for your key light dialed in before adding your second flash. Trying to figure out the correct outputs for two lights at the same time and adjusting in your camera on the fly is a recipe for a headache.

Cross lighting with a single flash

One of the reasons this setup is so easy and versatile is because you don’t necessarily need to use two flash units – the sun can step in as either your key or secondary light.

This approach is particularly effective at golden hour. As evening falls and soft, warm light floods across the fields, you have a ready-made separation light. Many natural light photographers are already familiar with this and use this rim light in their shots.

Example of a portrait shot with cross lighting using a single off-camera flash as a key light and the sun as a secondary light

The key light here is an off-camera flash fired into an umbrella just outside the left edge of the image. The sun, coming from the right, acts as the secondary light. The key here is in balancing the flash with the natural light.

The benefit of adding an off-camera flash as a key light is that you can create a much more dramatic image with dark, rich colors. Colors lose their vibrancy as they get brighter. By keeping the exposure low and using your off-camera flash to light up your subject, your background can be full of vivid contrast and color.

Using the sun as your key light

The sun doesn’t always have to play second fiddle to your flash. You can create the same effect by using the sun as your key light – coming in at your subject from a slight angle – and then using your off-camera flash as the rim or separation light.

The biggest drawback here is that you can’t adjust the power of the sun quite as easily as you can on the back of your flash! However, taking the time to learn how your camera settings can make a picture darker or lighter, and how you can use this skills in conjunction with your off-camera flash, will give you allow you to build the shot you want.

Cross lighting with a flash and a reflector

Here’s the last variation of this setup. By setting up your off-camera flash on one side of the subject and angling a reflector just right on the other, you can mimic the effect of two light sources. This approach might take a bit of practice and a steady hand, but it’s a fun way to learn what you can accomplish as you learn how to control light.

An example of a portrait using a reflector and sunlight to create cross light

Here we used a reflector to provide the key light from the left side of the shot, while the sun comes from the back right.

Give it a shot

Learning to maneuver and shape light is a fun challenge. Being able to quickly and reliably get top-notch results with flash is an important aspect of photography – especially if your model or clients are waiting impatiently for you to get your lighting figured out.

By starting with cross lighting and working from there, you have a reliable method for nailing some great shots. Please share your comments, questions and cross lighting images in the comments section below.

The post How to use Off-Camera Flash to Create Dramatic Images with Cross Lighting by Frank Myrland appeared first on Digital Photography School.


Digital Photography School

 
Comments Off on How to use Off-Camera Flash to Create Dramatic Images with Cross Lighting

Posted in Photography


Video Tutorial – Tips for Making Dramatic Black and White Landscape Photos

21 Oct

Shooting for black and white requires you to see a scene and think a little differently. You’re looking for a contrast of tones, not color, and it can be hard to “see” in black and white if you’re new to shooting in monochrome.

Here is a short video with some practical tips you can apply to create more dramatic black and white landscape photos.

If you want more help with your black and white here are a few more dPS articles on the topic:

  • How to Enhance your Black and White images with Infrared Photography
  • 3 Simple Steps to Craft Better Black and White Photos
  • 6 Tips to Help You Make Better Black and White Landscape Photos
  • Avoid These 5 Common Mistakes in Black and White Photography
  • A Guide to Black and White Conversion in Photoshop

The post Video Tutorial – Tips for Making Dramatic Black and White Landscape Photos by Darlene Hildebrandt appeared first on Digital Photography School.


Digital Photography School

 
Comments Off on Video Tutorial – Tips for Making Dramatic Black and White Landscape Photos

Posted in Photography