RSS
 

Posts Tagged ‘doing’

Tips for Doing Digital Painting with the Mixer Brush in Photoshop

26 Jan

If you have ever felt the need to be a bit more creative with your photos, then Photoshop contains a multitude of ways to make that happen. In fact, it offers such a variety of options it can be a bit overwhelming to figure out which one might be the right one for you in a given situation. In this article, I will go over a method of digital painting using Photoshop to give you one technique you can add to your toolbox.

Mostly you can get some great effects without having to purchase any other software or features, but those options are available and can extend your portfolio of choices.

Perhaps you might want to create a birthday card or give someone an extra special present. This digital painting technique is ideal for use on an image which is not 100% in focus. Everything else might be perfect but if it’s a tiny bit blurry, apply a painting technique and no one will notice.

Tips for Doing Digital Painting Techniques with Photoshop

NOTE: Please be advised I am using CS6 so things may be in different places if you are using the CC subscription model.

Mixer Brush

The Mixer Brush is a very effective way of getting a painted look for your image because you actually paint over your image in Photoshop. It can be quite fiddly and time-consuming but the end result can look really good. My recommendation would be to do this with a graphics tablet and a pen, otherwise, you will get a cramp in your hand from the mouse. Plus you have more control in areas of fine detail with a tablet.

Any image can be used, but because the mixer brush picks up colors from your image and adds paint texture, you need to keep that in mind. All the brush strokes will be visible so the direction in which you paint may affect the final visual outcome. It took me 2-3 goes before I finally got the hang of this, so stick with it.

STEPS

Step #1. Open your image, add a new layer and select that one as your active layer. You can delete this later if you need to without affecting the original image.

Step #2. The Mixer Brush is found on the toolbar, left mouse click on the Brush icon, it should be in the drop-down box.

Mixer Brush open, showing settings on Adjustment Tool Bar

Step #3. On the top toolbar, you can make adjustments to the settings. Set them up as follows (as a starting point):

  • The drop-down box set to Custom.
  • Wet: 100%.
  • Load: 1% (this sets the paint color load on the brush to a minimal setting).
  • Mix: 100% (this uses the color from the original file – Load and Mix work opposite each other that way).
  • Flow: 50% (medium pressure on the brush).
  • Airbrush set to OFF.
  • Sample All Layers must be ticked – this is important as it allows us to pick up the color from the original image.

NOTE – all these settings are adjustable depending on what works for you, so feel free to experiment.

Choose your brush, make sure you are working on the new layer, and begin to paint.

Tips

  • Start with the dark areas of the image first.
  • Use the textures in the image to help direct the flow of the brush strokes.
  • The paint is very wet and colors will mix and blend readily which can be used to your advantage where colors change in the image. It can be a bit tricky to get the hang of at first.
  • Adjust your Flow value to get harder or softer strokes.
  • You may want to use a layer mask to show fine details like eyes or whiskers after painting to bring back a bit of sharpness in those areas.
  • Adjust the brush size to suit the areas you are working in, fine detail needs a smaller brush, and larger areas may support bigger brush strokes (a bigger brush covers more area quicker which is an added bonus).
  • If the background is not ideal, you can also replace it with a painterly texture instead. This is a great treatment for when you have a really good shot but not the cleanest background. So do a background replacement, add the painting and it becomes artistic instead.

Image results using the Mixer Brush

Tips for Doing Digital Painting Techniques with Photoshop

Photo of a Jabiru bird, with digital painting done over the feathers.

This image of a Jabiru I quickly painted for this article. The lovely colors in the feathers, plus all the different directions they lay in made it a good choice for digital painting.

Tips for Doing Digital Painting Techniques with Photoshop - Jabiru bird

Original Jabiru image

This is the original photo for comparison. You can see how the feathers around the eyes are much smaller and finer and you can see the different directions in which the feathers lie. In the painted image where the rainbow colors are on the top of the head, it’s visible how they have blended in softly, even picking up the hints of gold in the purple feathers at the top.

Tips for Doing Digital Painting Techniques with Photoshop

When you view the digitally painted layer by itself, you can see all the brush strokes, plus the areas that might have been missed. This is a useful step to check and make sure you have enough coverage. Additionally, this layer can have its opacity adjusted down if you wanted to bring back some of the original feather detail.

I tend to adjust the flow down to around 30% and fill in the gaps. It can also help to soften the transitions in direction as well. Also useful for extra blending across areas where colors change.

My first experiment with using the Mixer Brush was this portrait of my cat Cognac. You will notice I have left the whiskers, eyelashes and fine hairs around his ears unpainted as I felt it looked better that way. I was careful to follow the flow of the fur so it looked natural and picked up the subtle color differences.

This was probably my third go at this technique – so be patient with yourself if you aren’t happy with the first one you try. Keep at it.

Summary

This technique isn’t complicated, is fully contained within Photoshop and requires only one extra layer. A graphics tablet will make it much more comfortable to do as it is a lot easier to use than a mouse. The thing you need most is time and a careful steady hand. With those things you can elevate your photo to a new creative level, perhaps print it out on canvas as a gift.

Have you tried this method of digital painting before? Please share your results in the comments below.

The post Tips for Doing Digital Painting with the Mixer Brush in Photoshop by Stacey Hill appeared first on Digital Photography School.


Digital Photography School

 
Comments Off on Tips for Doing Digital Painting with the Mixer Brush in Photoshop

Posted in Photography


Five Essentials of Doing Dark Food Photography

23 Jan

Over the last several years, several identifiable trends have developed in the world of food photography, including one towards dark, moody images, often with a rustic feel. These photographs call to mind the interplay of light and shadow in the paintings of the Old Masters, such as those by Vermeer and Rembrandt.

The style is often referred to “chiaroscuro” photography, a painting term borrowed from the art world. It means “light-dark” and refers to the contrast between the shadows and light in an image. The technique guides the viewer’s eye to a specific area in the frame and creates a dramatic mood. Mystic Light is another phrase used to describe this dark and moody style.

However, a dark style won’t necessarily suit every image. Sometimes a dark, shadowy approach is not appropriate to your subject. Developing strong food photography requires thinking about the purpose of your image. Your lighting, props, styling, and camera settings all work together in service of the story you are trying to convey.

Chili - dark food photography

For example, in the image above, I imagined someone sitting down at a farmhouse to eat a bowl of chilli on a cold winter’s day. I envisioned that the light was spilling in from a window onto my scene. This food story is one that I often use in my work, in one form or another, and chiaroscuro is the perfect style to bring it to life, as it arouses the emotions of the viewer.

So let’s take a closer look at how you can apply the chiaroscuro style to your food photography.

Dark Props and Backgrounds

The idea in dark food photography is to keep the background in shadow and draw the viewer’s attention to the main subject—what in food photography we call the “hero”. Therefore, a selection of dark or muted props, surfaces, and backgrounds is vital. White or light dishes and props will draw the eye away from the food and create too much contrast, which is distracting and can also be difficult to expose correctly.

Utensils - Five Essentials of Doing Dark Food Photography

When sourcing props, look for vintage utensils with a patina, which will not reflect the light as much as new ones. Matte dishes will also be less reflective, and are best in darker, neutral tones. Reflections can be hard to manage and cause a lot of problems in food photography.

Some good places to look for these items are thrift shops and vintage or flea markets, where you can find them for a fraction of the price you would pay for them new. Many food photographers use old, mottled cookie sheets in their work, which create a stunning surface or background, which subtly reflects the light without being to bright.

Wood is also a great material to utilize, both in the background and as props. It is easy to work with and lends a rustic feel. You can use weathered items such as an old cabinet door or tabletop. Ensure that whichever wood you use isn’t too warm toned. It will look quite orange in the final images and therefore unflattering to the food. A deep espresso color always looks great.

Charcuterie - Five Essentials of Doing Dark Food Photography

Food Styling

You will most often find the dark food photography style in editorial as opposed to advertising work. Advertising photography is meant to look perfect, with highly stylized food. Anyone who has ever seen a fast food burger ad and compared it to a real burger knows what I’m talking about.

But editorial food photography, such as that found in cookbooks and foodie magazines, has a looser, more candid style. The food is often perfectly imperfect, with scattered crumbs or artfully placed smears and drips, as if it has been freshly prepared or someone has just begun to tuck in.

This is not to say there is no deliberate effort in the styling because there is. The line between rustic and real and downright sloppy is a fine one. It takes a practiced hand to make food styling look casual and random.

Carrot Ginger Soup - Five Essentials of Doing Dark Food Photography

In the image of carrot ginger soup above, I gently swirled cream on the surface and carefully placed the croutons off-center to create a focal point. I garnished it with pepper and thyme leaves, which I also scattered on my surface with a thought to the composition.

In reality, one’s dinner table would hardly look like this, but for the purposes of food photography, such extra touches give an honest, storytelling quality and enhance the main subject, which in this case is the soup.

When approaching styling, think about the ingredients used in the recipe you are shooting. Ask yourself how you can incorporate some of them into your image in a way that makes sense and complements your hero.

Lentil Soup

Carving the Light

When producing darker images, it is imperative to carve and shape the light to bring attention to your main subject. You will need to determine how you want to light your image and where you want the shadows to fall. For moody images, I often use side and backlighting. My light placement is at about 10:00 if I am imagining the face of an analog clock as my set.

It’s best to use indirect lighting so no lights pointing directly at the set or food. In the case of natural light, placing the surface at an angle to the window.

Use small black reflector cards, like black cardboard or poster board cut into squares, to kick in shadows where you want them, and place them around your set depending on where you want to cut down the light. Alternatively, you can roll up pieces of black poster board and staple the ends together; these rolls can stand on their own and do not need to be propped up against anything.

Mushroom Toast - Five Essentials of Doing Dark Food Photography

In the images above, I wanted the mushrooms to be bright and catch some of the light, especially as the look was monochromatic, yet I wanted shadows to fall on the plate. I used side backlighting and a black card from the front, angled into my scene to create shadows in the front and absorb some of the light that was coming directly into my scene.

You will have to play around with different sizes and placements of the reflector cards to get the shadows where they work with your story.

Exposure

Typically, with chiaroscuro food photography, you want to slightly underexpose the image in the camera. Chiaroscuro can have very bright treatment of food with very deep shadows, or the image can be low key with not a lot of contrast. Whichever approach you choose, the main subjects should be placed in the brightest part of the frame, which attracts the eye first. Make sure the highlights are not blown out and the shadows are not too black with no detail.

Olive Oil -Five Essentials of Doing Dark Food Photography

It is best to work with a tripod, especially if you are shooting in natural light in less than ideal conditions. Instead of boosting the ISO and risking a high amount of noise, you can increase the exposure time when using a tripod. As long as you have some light, a long exposure allows you to take a properly exposed picture.

Using the timer or a remote shutter trigger will prevent camera shake and an image that is less than sharp. The focus should be on the main subject, however, the image needs to be exposed for the concept, mood, and story.

Post-Processing

The right post-processing for dark food photography will really make your image pop.

Using the luminance sliders in Lightroom or Camera RAW to brighten colors individually. Use global and local adjustments to bring out the best in the food, instead of bumping up the exposure in the whole image, which can cause your shadows to fall flat.

Lentil Soup - Five Essentials of Doing Dark Food Photography

And remember, warm colors bring elements forward, whereas cool colors recede. The best food photography has a balance of both, as it gives a three-dimensional feel to your image. With chiaroscuro food photography, white balance and tint can be used creatively, since you are not using white dishes and backgrounds. Split-toning can also be used to great effect, as long as it is done with subtlety.

Finally, no matter how you carve the light, a bit of a vignette adds a bit more mystery. It also prevents the eye from wandering out of the frame by bringing you back to the brightest part of the image — the food.

Conclusion

So there you have it, my top tips for making dark and moody food photography images!

I’d love to hear if you’ve had a chance to experiment with this approach to food photography. What were your struggles? Please share your experience and images in the comments below.

The post Five Essentials of Doing Dark Food Photography by Darina Kopcok appeared first on Digital Photography School.


Digital Photography School

 
Comments Off on Five Essentials of Doing Dark Food Photography

Posted in Photography


Tips for Selecting and Doing a Successful Photography Project

19 Jan

If you find yourself stuck in a rut, can’t find anything to shoot, or just need to get shooting – here are some videos to help you select an idea and get started doing a personal photography project.

The importance of doing a photography project

Photographer Matt Day talks about the importance of doing a personal photography project and gives you some ideas and direction to get started in this video.

5 Reasons why you should do a photography project

Adam from First Man Photography has five good reasons why you should start a photography project:

    1. Find direction – break out of a rut.
    2. Improve your photography.
    3. Build a social media following.
    4. Challenge yourself – get out of your comfort zone.
    5. It’s fun!

The most important ASPECT of doing a photography project

In this short video, COOPH founder Ulrich Grill shows you five things you need for a successful photo shoot or project. They follow the acronym A.S.P.E.C.T. – can you guess what they are? If not, go ahead and watch the video now.

  • A – atmosphere
  • S – shadows
  • P – positioning
  • E – energy
  • C – contrast
  • T – timing

Still need some help starting a photography project? Try these dPS articles for more tips.

  • 12 Creative Photography Project Ideas to Get You Motivated
  • How to do a Photography Alphabet Project
  • Tips for Doing a Successful Picture-a-Day Photography Project
  • How to Start and Finish a Photography Project
  • 6 Tips for How to Build a Story and Shoot a Photo Project
  • Tips for Creating a Personal Photography Project

The post Tips for Selecting and Doing a Successful Photography Project by Darlene Hildebrandt appeared first on Digital Photography School.


Digital Photography School

 
Comments Off on Tips for Selecting and Doing a Successful Photography Project

Posted in Photography


Practical Tips for Doing Commercial Product Photography

17 Jan

If you’re like me, you may be wondering, “What exactly is commercial photography?” Well simply put, it is taking photos for commercial use. Common uses include ad space, websites, product placement, and items for sale. As you can imagine, having a working understanding of the essential elements of product photography can be extremely beneficial. Commercial shots influence consumers immensely. You can spruce up a client’s Etsy store, eBay listing, or even personal website with well done commercial shots.

Practical Tips for Doing Commercial Product Photography

Commercial photography is a great way to sell your prints to businesses as well. Many businesses love to have nice, professional shots of their product hanging in their office space, hallways, or lobbies. Have fun shooting products you enjoy, and you never know if the business will be interested in buying and displaying the print.

Practical Tips for Doing Commercial Product Photography

Practical Tips for Doing Commercial Product Photography

In this article, I’m going to talk about some essential tips for nailing commercial work. We’ll talk about how to set up a lightbox, selecting gear that’s right for the shoot, placing the product in flattering light, and how to touch up the image once it’s shot.

Equipment for commercial photography

First, it is highly beneficial to have a lightbox or light tent to use. The particular model I use folds and snaps together using magnets. You will first assemble your lightbox into its standing shape and then select the backdrop. Commonly used backdrop colors are black and white, and you will see that these are the ones I prefer to shoot against.

Feel free to have fun with the colors though! After all, you are the one behind the camera, so you call the shots. The use of a small stand may also be very beneficial for you. One tip though – be sure to position your camera in a way that the product will obscure the stand in the shot.

Practical Tips for Doing Commercial Product Photography

Lens choice

My all-time favorite lens for commercial work is the Nikon 105mm f/2.8 macro. In fact, all of the images included in this article were shot with this lens. Macro lenses are great, in particular for small objects, to reveal extreme detail in the item.

Remember, that is a core component of shooting product photography – you want to advertise how great the item is to the audience of consumers! All the details matter, and all the resolving power of the lens counts. One thing to be wary of is that exact resolving power.

The magnification of macro lenses can become a heavy problem because they will make things like dust, scratches, and fingerprints appear clearly prevalent. Thankfully, I will share my tips to help edit these things out in Lightroom and Photoshop later.

Practical Tips for Doing Commercial Product Photography

Lighting

Most light boxes, like mine, come equipped with a set of LEDs that are programmable or can be dimmed to various ratios of light. You will want to position the item you’re photographing so that the LEDs can light it in a flattering and dynamic way. Depending on what you’re shooting, you may want softer lighting or something that will really pop.

Be careful to avoid things like glare when positioning the item, as this problem will only become a headache in the touching up part of the job. In terms of positioning, I love to mess around with the shadows that are cast against the backdrop of my lightbox.

Practical Tips for Doing Commercial Product Photography

Get ready to shoot

Now, it’s almost time to shoot! I would recommend canned air to blast some dust and dirt off the subject if it needs it. A tripod is also a MUST for this sort of work.

I generally shoot at small apertures to keep the images as sharp as possible, with as much in focus as possible. However, sometimes it can be nice to shoot wide to create a nice depth of field perspectives with the shots. There is a delicate balance between showing artistic intent and making the shot distracting when advertising a product, so be sure to keep the client’s intent in mind when shooting.

Here you can see a real-world example of what the setup could look like when using a lightbox to shoot a product.

Practical Tips for Doing Commercial Product Photography

A remote trigger is also very helpful, as commercial work necessitates eliminating camera shake. If you don’t have a remote trigger, my advice is to use the delayed-timer on your camera. Simply set the camera (mounted to the tripod) on self-timer for 10 seconds or so, focus the shot, depress the shutter release, and wait. Naturally, this method can add time to the process, so it isn’t a bad idea for you to invest in a remote trigger.

Post-processing

Now that you have the shots you want, it’s time to touch them up. This part can be long and tedious, but it makes a huge difference in the end product. I generally lean toward Lightroom when touching up shots, but for commercial macro work, in particular, I gravitate to Photoshop. I will explain the process for each.

In Lightroom: I normally boost highlights and whites to blow out the backdrop and create a nice glow to the product. You can do this by sliding the adjustment sliders for both highlights and whites to the right. The amount really varies shot to shot, but don’t be afraid to experiment! Exposure can also be adjusted by moving the exposure slider to the right, however, make sure to not clip the highlights! I also may adjust clarity and make slight contrast adjustments. The real work comes in with spot removal on the dust specks, which I generally do in Photoshop.

Here you can see the lightbox shown with unattractive shadows and blacks, which can be boosted as explained above, to white out the background as shown in the image below.

Edits are done in Lighroom showing the effect on the image.

In Photoshop: You should always clean your product before shooting, but some dust will not be avoided. Luckily, with Photoshop, you can select Filter > Noise > Dust and Scratches. From here, you can select the radius in pixels to target the dust specks. You will have a tendency to lose some sharpness since the filter isn’t perfect. It can have a tendency to smooth out sharp edges or features you intended to remain in the shot.

For this reason, I always create new layers of areas I want to filter and then re-stack the layers to show the changes while leaving sharp edges unaffected. Select certain areas to target with the lasso tool, then copy those layers, run the filter, and restack the layers.

Original image showing the dust specks.

The masked image with the dust specks removed.

Restacked layers with the dust removed.

Outside of this dust removal, I generally reopen the image in Lightroom and do any other necessary edits there. Generally the discussed touch ups I talked about for Lightroom in conjunction with the dust/scratch removal in Photoshop is enough for my taste as long as I shot the frame with correct exposure and settings.


Conclusion

While commercial photography can be intimidating at first, I find that it can be extremely rewarding and versatile alongside other ventures. I’ve found it to be on the lucrative end of the photographic spectrum in terms of genres, and I definitely recommend it as a skill set to add to your photographic tool belt.

Be sure to pay attention to details when shooting product work, and also pay attention to how you market these images to organizations and businesses to ensure the highest possible level of success within the genre. Above all else, go out, purchase a small light box and shoot! You may find that you love commercial work as much as I do!

I hope these tips help you with your commercial product photography. Please share your images and thoughts in the comments below.

The post Practical Tips for Doing Commercial Product Photography by Michael Neal appeared first on Digital Photography School.


Digital Photography School

 
Comments Off on Practical Tips for Doing Commercial Product Photography

Posted in Photography


5 Lessons I Learned by Doing Still Life Photography

22 Dec

Still life is a particular style of photography that slowly lured me into its clutches. The gateway drug was, of course, food photography, and before I knew it, my weekends were spent combing secondhand shops for props and buying up linen in all different shades.

5 Lessons I Learned by Doing Still Life Photography

The popularity of Instagram has given rise to images of every different kind of food, drink, dessert, cake, and cocktail. You name it, someone is shooting it, adding a filter and posting online before they even taste it. Except for the one thing it really shows, is how hard it is to compose and take a good still life image, especially with a cell phone. There are a lot of really awful shots out there. Someone even made a hilarious video about the effort needed to get a good shot.

Of all of the techniques I have learned in my photography journey, none has taught me as much as doing still life work.

5 Lessons I Learned by Doing Still Life Photography

My first venture into still life – an Easter challenge that needed your hands in the image. This was before I had a wireless remote.

 #1 – Slow Down, Breathe and Take Your Time

You need three things for a good still life shot – light, good composition and a subject. Pretty much the same as for any photographic image really. But one of the best things about still life is you can take as much time as you like. Usually shot inside with some control over the conditions and with a static subject, this gives you the freedom to be really present and experiment.

As seen in the video link above, the composition is a key element. Do you shoot the subject isolated? Will props help you tell more of a story? Is there a particular mood you are going for? How can you achieve that?

5 Lessons I Learned by Doing Still Life Photography

I bought these gerberas and shot them every day for a week until they were past their best. Each flower had its own distinct shape and character that needed time to bring out its best

What angle is most effective? Close-up or include more environment? Will flat lay (overhead) or side on be best?

Because you have more control over the conditions you can allow a lot of time and shoot the same subject in many different ways in one shoot. You may come out with one great shot or several good ones. It will certainly teach you a lot about how difficult it is to get a good shot.

5 Lessons I Learned by Doing Still Life Photography

My studio is my spare bedroom, one window, and a fold away craft table. Of course, a cat getting in the way!

2 – Composition is Key

Being a nature and landscape photographer originally, I am used to shooting things on a big scale. Lots of pretty mountains, lakes or sea, cloud-filled skies, and so on. A handy foreground element like a rock or driftwood or tussock is included for scale and to ground the image.

So when I tried to shoot much smaller things up close it was a bit of a shock to find how difficult it was to compose those images well.

5 Lessons I Learned by Doing Still Life Photography

One black background, one silver spoon, and some raspberries.

It is interesting to learn how a subtle difference in angle can affect the outcome of the image. How close or far away your camera is can completely change the balance of the subject within the frame. How scale becomes really important and a tool to be leveraged for the most effective images.

I spent hours taking so many shots, discarding nearly all of them over and over again until I figured out my problem. Complexity. I made the rookie mistake of trying to include too many elements, which threw off the balance of the composition. It was crowded and messy and the subject was overpowered by all the extra stuff I was shoving in the frame.

5 Lessons I Learned by Doing Still Life Photography

A black background, a silver spoon, and some raspberries. Taken at a different angle, closer up, more intimate and inviting. Subtle differences.

This is where lesson one really started to make sense. By taking the time to slow down, breathe and see my subject, see the possibilities, feel the story it was trying to tell me, I shot a lot less, but my keeper rate vastly improved.

The trick was keeping it simple and strong.

3 –  See the Possibilities

This step naturally emerges after steps one and two. Once you take time to be in the moment with your subject, position it within the lighting you have, turn it this way and that, then it will show you its best side.

If you give yourself and your subject time to get to know each other, then its secrets will be revealed. It might be an onion, or it could even be a portrait, the same rule applies. If you take the time to get to know your subject, you begin to see different possibilities. Perhaps this background over here is less cluttered, maybe this plate enhances the natural color better, that rustic board gives a great farmhouse appeal.

5 Lessons I Learned by Doing Still Life Photography

Be the garlic clove! Feel the garlic clove! Hear its story.

I know, it sounds a bit zen and probably a bit corny, but it doesn’t make it any less true. Yes, you can take two seconds to position a shiny red apple and shoot it and have a perfectly acceptable image.

But what else might you end up with if you took 20 minutes, positioning the apple at different angles, on different surfaces? Maybe you cut it open or take a big bite out of it? Pose it with a glass of cider? Maybe you have a handful that looks great arranged in a decorative bowl?

5 Lessons I Learned by Doing Still Life Photography

The focus of this shot is the funny squiggle of butter on the bagel, but the story is Sunday Morning Brunch. Yes, it was delicious too!

Unless you give yourself time to relax and let the possibilities make themselves known to you, rather than focussing on one outcome, taking that shot and moving on, you will miss out on lots of opportunities. Plus you limit your chances to learn and grow as well.

I failed consistently when starting out with still life photography and it was really frustrating, but it made me work even harder. Once I did get it, the quality of my work improved faster than expected, which was a nice bonus.

4 –  Go Abstract

It is easier to shoot something whole and give it obvious context so that the viewer doesn’t have to think about what they are seeing.

But how much more intriguing would your work become if the viewer did have to take some time to think about what they were seeing? Where it teased at the edge of their consciousness that they should know what the object is but couldn’t quite figure it out? What if your image stuck with them and niggled away in the back of their mind? Where they actually remember it out of the many hundreds of images seen that day scrolling past on their phone?

5 Lessons I Learned by Doing Still Life Photography

A metal bench in the city but taken side on and obvious context removed with the focus on the lines and the circles instead.

Don’t be afraid to go abstract. To shoot something in a way that hides its original shape, form, or purpose. Be as obscure as you like so long as it’s interesting and arresting. Obscurity for the sake of it may put people off rather than engaging them.

5 Lessons I Learned by Doing Still Life Photography

A piece of glacier iceberg taken up close from a boat to capture the intense blue color and the texture of the bubbles froze within the ice.

Again taking the time to look at your subject, seeing its possibilities and angles, and being creative all apply here. This tip you can easily take out into the world. There are many small intricate elements adorning the world if you take time to see them, interesting shapes revealed when you hide the obvious context. The devil is in the details, have fun finding them.

5 Lessons I Learned by Doing Still Life Photography

A wonderful art deco stairwell.

5 – Props

Props are an essential part of still life photography. They set the scene, the color tone, the mood and the feel of the image you are creating. Learning to prop and style a shot well was the hardest thing for me about still life. It’s difficult to do well without enough options to work with.

This doesn’t mean you need hundreds of dishes and bowls and towels and fabric and cutlery (though it’s easy to end up with them). But a few carefully chosen options that give you flexibility are a good choice.

5 Lessons I Learned by Doing Still Life Photography

Most of my still life prop collection. Enough variety to be useful and flexible.

This is not the only style of photography that benefits from props: portraits, engagement, wedding, children, pets, and family photography all benefit from the use of props. Anytime you have people in your image, having something for them to interact with can help engage them better.

What about the color and style of clothing they are wearing? Hair color or style? Makeup? Shoes? How much fun can be had just with a brightly colored umbrella?

5 Lessons I Learned by Doing Still Life Photography

A model dressed as Red Riding Hood, wearing a bright red velvet hooded cloak and faux medieval outfit. Shot at an old estate using a broken wooden gate as a prop.

These are all elements that can enhance or cause distractions in your image. What is the story you are telling? What mood are you trying to evoke? Therefore what style or color clothing is going to work best? This is something to think about and discuss with any clients in advance.

Conclusion

Before I started shooting still life photography I used to be in too much of a hurry. I would settle for the obvious shot and leave frustrated because it was boring, predictable and not different enough. Now I take time to prepare properly and give myself plenty of time to shoot. Looking for creative options and being prepared to experiment is fun and exciting.

Now I shoot a lot less, but the quality of my work has improved and I know when I have achieved a keeper shot. My ability to compose and style an image has improved. Including other elements to tell a story has added depth and nuance to my images that was previously lacking.

5 Lessons I Learned by Doing Still Life Photography

The good thing is that these benefits apply to almost any form of photography, some more than others, obviously. Do you just want a quick snap or do you want to engage your viewer fully? What is the story you are trying to tell? What emotion do you want to share? How can you connect with the viewer and make your image stand out from the Instagram or Facebook crowd? What sets your work apart from the millions of images posted online every day?

It does actually matter how much work and thought you put into crafting your image. Like any new skill, it will take time to learn. I challenge you to give it a go for a few months and then compare your new work to your older stuff and see the difference.

The post 5 Lessons I Learned by Doing Still Life Photography by Stacey Hill appeared first on Digital Photography School.


Digital Photography School

 
Comments Off on 5 Lessons I Learned by Doing Still Life Photography

Posted in Photography


5 Tips for Doing Portrait Photography in Busy Locations

18 Dec

I live in London and it’s a pretty big city with an array of location choices when it comes to portrait photography. There are beautiful parks, many are vast and rolling, dotted around the city; you almost feel like the country is never more than an hour away. There are canals and rivers with boats and ships within easy reach. There are hilltops offering astounding views of the rising skyline and various parts of the city. And of course, there’s architecture that’s so impressive weaving itself across the city, the fabric of London life with a culturally diverse population traversing the criss-cross of alleys and roads. It’s a fast and busy place.

Some of my couples prefer such busy locations that remind them of the hustle and bustle of the place or of icons and landmarks that they love. Here are 5 tips for you on how to photograph a portrait while walking through a busy city. Embrace the buzz of activity, the age-old structures and new glass skyscrapers that loom over you as you go about your daily business of life, work, and play.

#1 Scout out the location and look for pockets of photo spots

5 Tips for Doing Portrait Photography in Busy Locations

Communicate with your portrait clients and give them some location ideas and options from which they can choose. Get them involved in the process as this helps them get excited, look forward to the photoshoot and own it too!

This is also a good opportunity to discuss outfits, as clothing is really important to the overall look and feel of the images. For this photoshoot, we had an area in mind, but with two very different locations in terms of ambiance and style.

Originally the couple wanted an old ruined church which has stunning walls and old architecture and some greenery. This also gave a really cozy country feel, soft light, and almost enchanting ambiance. However, they had already decided on their outfits and had bought them specifically. I felt that these outfits would work better in a fun city walk photoshoot rather than the old church ruins.

5 Tips for Doing Portrait Photography in Busy Locations

Match the location to the subjects

Just a stone’s throw away was the Leadenhall Market. It is built-up, old, colorful, busy and with a very city-feel, yet smart too. I suggested to them this would be the perfect location and after thinking about it they agreed. The forecast was also rainy and the market is a covered area so that was a good option for shelter.

The main idea was to walk the streets in this part of town and find pockets of photo spots that appealed to them. I know the area well as I shoot quite a few weddings in the city, so I was able to lead them to areas where I thought there were interesting spots to make portraits.

It’s a nice experience walking the streets, being part of the everyday goings-on, the mundane and the special alike.

5 Tips for Doing Portrait Photography in Busy Locations

We were also specifically on the lookout for British icons and landmarks as the couple was visiting from America. So we asked Waterstones, a British book retailer if we could take some pictures inside. They agreed. This leads me on nicely to my next tip…

#2 Incorporate icons and landmarks

We chose boutique shops and food stops that were traditional and well-known in the area and used their shop windows as backdrops. Incidentally, the guy’s name is Tom and we passed this quaint Bar called Old Tom’s Bar – just a perfect location for him.

It’s important that you know a little about what your couple likes so you keep your eyes peeled for anything that appeals to them. In this case, Tom is English and he likes his beer so we stopped by the Tavern for a drink!

5 Tips for Doing Portrait Photography in Busy Locations

5 Tips for Doing Portrait Photography in Busy Locations5 Tips for Doing Portrait Photography in Busy Locations

Get permission

There are places where it would be wise for you to ask permission first before going in for some photos. Usually, the shopkeepers are helpful and allow you to do so if you are quiet, non-disruptive and quick. However, others refuse and that is perfectly fine – don’t take it personally.

In the market, there was a lady shining shoes. She had a traditional shoe-shine set-up which would have been perfect for some photos, but she refused consent so we didn’t push. Other places are public and open and you can take snaps, just like any tourist would, to your heart’s content. The spot on the left is one such place. The photo on the right was taken from across the road, a fair distance to the building as permission is needed if you go too close!

5 Tips for Doing Portrait Photography in Busy Locations

#3 Leverage the busy-ness

There is just no getting away from people on crowded, busy streets. Often, it’s a waiting and asking game. You either wait for people to walk past and clear your space, or you ask them to move away. Again, politely and with great gratitude, if they happily oblige.

You can leverage this busy-ness by incorporating motion into your images such as this one below. It could take several attempts to get it right as this can be a very difficult setup with no planning ahead or anticipation of what is to come.

Of course, if things don’t go to plan in shots such as this, there is always Photoshop!

5 Tips for Doing Portrait Photography in Busy Locations

Adding motion with a long exposure and blurred moving objects can add a sense of the hustle and bustle of the city to your images.

#4 Do something fun and quirky

Keep the photoshoot lighthearted and fun by finding some unusual spots and asking your couple to do some quirky things if they are open to that. Like this image below standing in between the huge exhaust installations with the BEL-AIR sign in the background pretending to get blown away! Don’t forget to capture some safe, normal shots too like the one below it, just in case.

5 Tips for Doing Portrait Photography in Busy Locations

5 Tips for Doing Portrait Photography in Busy Locations

We found this old chapel with sculptures (below) and thought it would be funny if they copied the poses of the sculptures as another quirky shot. This turned out to be one of their favorite spots from the day too.

The photoshoot is more than just taking pictures, it is an experience as well, so aim to make it easy and fun.

5 Tips for Doing Portrait Photography in Busy Locations

#5 End on a high note

As you are shooting, don’t forget to include “indicators” in your conversations as to how far you are into your photoshoot, what other plans you may have in terms of location or shots such as individuals, action, walking away, etc. Tell them how far along you are into your plan, if you are are already nearing the end of the shoot, whether this is this your last location and your last shots, and when it’s a wrap.

Couples appreciate knowing where the markers are in the photoshoot. Some people just cannot handle more than half an hour so markers and indicators help them through it. Others like long photoshoots that could well run beyond the agreed duration and you need to keep tabs on your time so these markers work well for you too. As much as possible though, do not look at your watch!!!

Lastly, end on a high note with lots of laughter if possible. If you achieve this, it greatly helps in reinforcing good photoshoot memories so that there will be a “next time” for another photoshoot with you! Your couple will look back at this day and remember good vibes, not so much the other trying parts like the weather, how cold it was, the hassle of waiting for people to get out of the way, and so forth. When you show your couples their image gallery, end with happy photos too! And that’s a wrap!!

5 Tips for Doing Portrait Photography in Busy Locations

5 Tips for Doing Portrait Photography in Busy Locations

I hope you enjoyed this little article and do share any tips you may have which have not been covered above!

The post 5 Tips for Doing Portrait Photography in Busy Locations by Lily Sawyer appeared first on Digital Photography School.


Digital Photography School

 
Comments Off on 5 Tips for Doing Portrait Photography in Busy Locations

Posted in Photography


Doing Our Dirty Work: Crows Trained to Clean Up Cigarette Butts

10 Oct

[ By SA Rogers in Gadgets & Geekery & Technology. ]

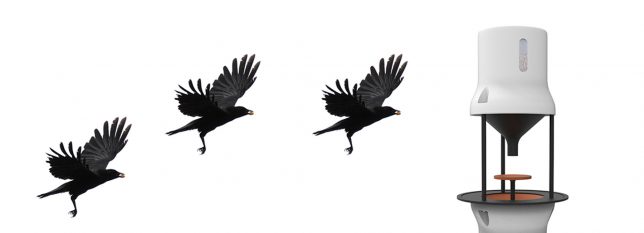
Should we really be training ultra-smart birds to do our dirty work for us, picking up cigarette butts all over our cities in exchange for treats? One Dutch start-up hopes their clever ‘Crowbar’ will be an easy and mutually beneficial way to deal with the ongoing problem of this specific kind of urban litter, making use of the corvid’s unusual intelligence. Crowded Cities proposes hanging smart machines around the city that train the birds to clean up butts.

‘Crowbar’ is based on the ‘Crow Box,’ an open-source project that gives crows peanuts in exchange for coins. The birds learned that they only get rewarded for inserting a particular kind of object. The Crow Box is just one example of humans testing crows’ ability to understand cause and effect and documenting the results.  They explain the process as follows:

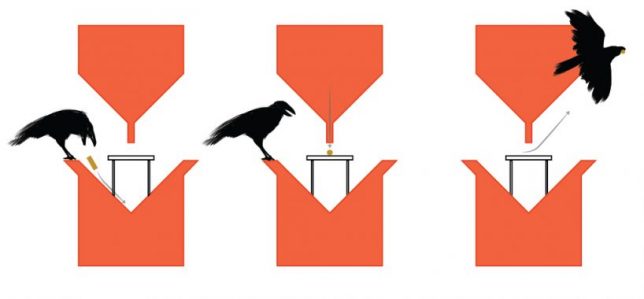
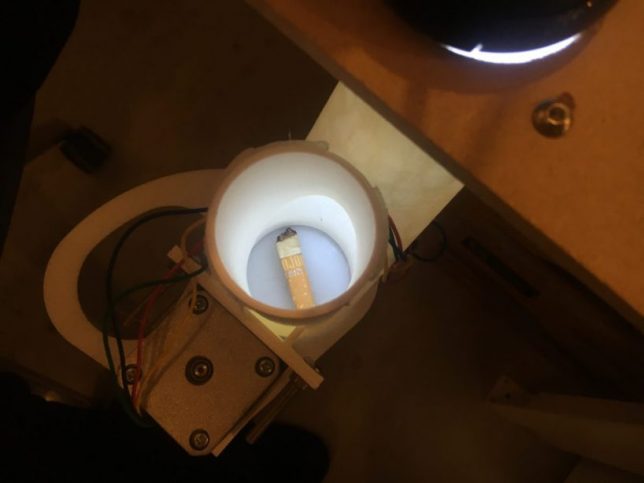
“The crows bring a cigarette filter to the Crowbar, where they drop it into the bottom funnel to get it checked. After the camera has recognized the cigarette filter as  a filter, it returns a bit of food to the table in front of the crow. The crow goes out telling others, or keeps his secret to himself – we are not sure.”

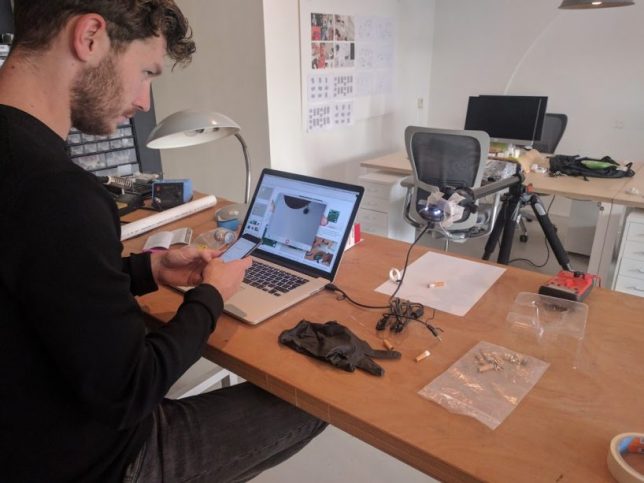
Apparently we’ll find out, as the team finishes assembling the CrowBar and puts it out into the world. In the Netherlands, more than 6 billion cigarette filters are tossed onto the street each year, and each one takes 12 years to degrade. It’s not hard to imagine this project seeing some kind of success – have you ever had a crow drop a nut right in front of your car while you’re driving, in the hopes that your tires will act as giant nutcrackers? They’re incredibly smart.

But it’s a bit disturbing to imagine crows being repeatedly exposed to the carcinogens present in cigarette butts, potentially punishing them in the long term for a stupid human behavior. Plus, it’s only a matter of time before the crows start snatching lit cigarettes right out of people’s hands.

Share on Facebook


[ By SA Rogers in Gadgets & Geekery & Technology. ]

[ WebUrbanist | Archives | Galleries | Privacy | TOS ]


WebUrbanist

 
Comments Off on Doing Our Dirty Work: Crows Trained to Clean Up Cigarette Butts

Posted in Creativity


Tips for Doing Concert Photography like a Pro

21 Aug

Imagine being a concert photographer and getting the chance to cover loads of concerts. Imagine standing just feet away from your favourite artists as you capture so many shots of them. Doesn’t that just sound like the best thing? As opposed to other genres of photography like portraiture, fashion, etc., we have little to no control over lighting, the artists, and tons of other factors in concert photography.

So what are some of the best settings and tricks to capture those perfect shots at concerts? Images which will make you proud, make the artists and the viewers sat “Wow that is indeed one brilliant capture.”?

Tips to capture concert photos 7

Use a fast lens and shoot wide open

Using a fast lens is highly important and is a basic requirement for concert photography. Almost all concerts happen during evenings or night, or indoors under low lighting, which is why your camera sensor requires more light to enter through the lens opening. Moreover, the performers keep moving around the stage so you need to use faster shutter speeds to freeze their motion.

A fast lens is one which allows shooting at wider apertures such as f/2.8, f/1.8, etc. By using lenses like the 50mm f/1.8 or 135mm f/1.8 at the smallest aperture value, you can capture a well exposed shot by keeping the shutter speed fast enough. Another reason for using a fast lens is because usually the distance between the backdrop and the subject is minimal, so to create a shallow depth of field with a bokeh effect, a smaller aperture value would have to be used.

Tips to capture concert photography 5

Shoot in Aperture Priority Mode

Using Aperture Priority Mode to shoot concerts allows for more stress-free shooting. You simply tell your camera the aperture you want to use and it automatically sets the corresponding shutter speed. For many newbies shooting their first few concerts and even for many pros, using aperture priority allows for hassle free shooting.

Also, since the your mind is not all occupied by technical settings, you have freedom to look around at the artists, the crowd, etc., and end up shooting something really creative.

Shoot in aperture priority, with your f-number set to the smallest available on your lens, usually f/1.8 or f/2.8.

Crank up the ISO

Tips to capture concert photos 1

Concerts usually take place in low light settings and for many reasons, using a tripod is not possible. So you can resort to the one setting which you have control over and can easily use, the ISO.

Before the concert really gets going, fire off a series of test shots at different ISO values to judge after what point the noise becomes unacceptable. (Usually ISO 3200 or 6400). Some noise is actually okay and is far better than having a totally underexposed or blurry shot simply because you didn’t increase your ISO value.

The noise generated by the high ISO values can be used creatively to capture something unique. A monochrome shot with some noise would lend a really cool film grain effect to your shot. High noise can be fixed later on in post-processing too. So don’t think twice before cranking up that ISO, it’s far better than having no photo to show.

Avoid using your flash

Tips to capture concert photography 2

MOST important- Avoid using your flash at concerts. It is looked down on and frowned upon a lot. Imagine that you are firing your flash towards the performer(s), and there are 10 others doing the very same. That is surely going to annoy the artists, not to mention almost blind them.

Another important aspect of concert photography is photographing the audience, and no photographer would like to distract the audience from the artist who is performing for them. Repeatedly firing the flash at their faces while capturing their photos can easily annoy audience members.

Also, if we are aiming to capture candid photos of either the artists or the crowd, then firing a flash at them surely is not the right way to do that. And yes, a majority of photos using the built-in pop-up flash simply aren’t worth it. They look flat and uninspiring.

Move around

Tips to capture concert photography 4

You are not there to stand at one place and shoot the same picture 10 times. As a concert photographer it goes without saying that you will have to move around. Move with the artists, move as the lighting changes, etc., to capture those standout moments. (Note: unless, of course, the venue or artist has put restrictions on photographers moving around.)

If you find people blocking your view, you have to move. After all, they have paid to watch their favourite artists perform. If the lead singer moves to one side of the stage, then you have to follow him over there.

The lights too will change from time to time, and it is important to know when which area of the stage will be illuminated to capture the performers properly with adequate lighting.

Tips to capture concert photos 6

Moving around will always get you some really creative shots. You could capture a shot of the lead guitarist under the spotlight, a shot of the lead singer standing isolated from everyone else, etc. The possibilities are endless.

Wait and anticipate

Waiting for that perfect moment is as important as learning to anticipate it. This is a habit which can be developed easily, and is only fine tuned over time. Observe the artists and you will notice certain habits of theirs.

Moments such as a guitarist bending backwards during a particularly intense moment, a DJ waving his arms in the air, a singer grabbing the mic in a particular manner, etc., are all moments which would make for a perfect shot. It is important to know when these moments are around the corner so that you are ready to fire your camera when they come.

Tips to capture concert photography 3

Conclusion

These are just a few tips to help you do better concert photography. Please share any others you’ve learned as well as your concert photos, in the comments below.

The post Tips for Doing Concert Photography like a Pro by Kunal Malhotra appeared first on Digital Photography School.


Digital Photography School

 
Comments Off on Tips for Doing Concert Photography like a Pro

Posted in Photography


Recommended Gear for Doing Long Exposure Photography at Twilight and Dusk

03 Aug

Have you ever come across beautiful cityscape photos captured at twilight and dusk (the so-called “blue hour”) with silky smooth water, like this Marina Bay (Singapore) photo below, and wonder how you could do that yourself? Assuming that you’ve already got your camera (a body and lens), let me go through some of the other gear that is required to do stunning long exposure photography at twilight and dusk.

Recommended Gear for Doing Long Exposure Photography at Twilight and Dusk

Marina Bay (Singapore), shot at 35mm, f/11, for 194 seconds (just over a 3-minute exposure).

Use a Tripod

A tripod is the single-most important piece of gear for photographers shooting at twilight and dusk. Photos shot at these hours require long exposures sometimes lasting for many seconds or even minutes. Therefore, a sturdy tripod is absolutely essential for keeping photos blur-free.

Unlike your camera body, a tripod isn’t something you will upgrade often. So, try to get the best possible tripod within your budget. A good tripod could last a lifetime! I own a Manfrotto MT190CXPRO3 Carbon Fibre Tripod (supports up to 7kg). If your tripod doesn’t come with a tripod head (like mine), get yourself a steady ball-head or 3-way style, whichever you prefer (I own Sirui K-20X Ballhead that supports 25kg).

Tripod - Recommended Gear for Doing Long Exposure Photography at Twilight and Dusk

Mini-Tripods

Mini tripods come in handy at locations where a full-size tripod isn’t allowed inside (e.g. The observation deck of a tower). I own a Joby Gorillapod Focus for DSLRs which supports up to 5kg. It has a dedicated ball head (Joby GorillaPod Ballhead X for Focus) that you can buy as a bundle, but I’m using my own ball-head (aforementioned Sirui K-20X Ballhead) as I feel it’s redundant to have two.

Mini tripod - Recommended Gear for Doing Long Exposure Photography at Twilight and Dusk

Clamp Tripod

A clamp tripod is another tool that comes in extremely handy when there is no appropriate space to set up a tripod. I own the Manfrotto 035 Super Clamp without Stud (supports up to 15kg). Into that, I plug the separately-sold Manfrotto 208HEX 3/8-Inch Camera Mounting Platform Adapter (or a cheaper alternative Manfrotto 037 Reversible Short Stud) into the socket in order to firmly mount a tripod head and camera on top of that. Then I clamp the whole setup onto handrails, etc. This setup is rock solid and is a game changer for us cityscape photographers aiming to take very sharp photos at twilight and dusk without using a full-sized tripod.

Clamp infographic - Recommended Gear for Doing Long Exposure Photography at Twilight and Dusk

This graphic shows how to mount a DSLR on Manfrotto Super Clamp by using a camera mounting platform adapter.

Steps:

  1. Plug a camera mounting platform adapter into a Super Clamp socket and secure it with the double lock system.
  2. Mount a tripod head with DSLR on the mounting platform adapter, just like you do with your regular tripod.

Clamp - Recommended Gear for Doing Long Exposure Photography at Twilight and Dusk

Neutral Density Filters

Neutral density (ND) filters help reduce the light that is coming through the lens, allowing your shutter speed to be extended much longer. This is a must have tool if you want to create the silky smooth water effect typically seen in long exposure photography.

ND filters come in different strengths such as; 3-stop, 6-stop or 10-stop. The bigger the number, the darker the filter and the less light that is let through. My favorite is 6-stop ND filter (I own a B+W 6-Stop ND Filter). With this attached to my lens, a base exposure of 2 seconds (i.e. when no filter is attached) can be extended to 128 seconds. Each “stop” of the ND filter doubles the required exposure time (2 seconds > 4 seconds [1 stop] > 8 seconds [2 stops] > 16 seconds [3 stops] > 32 seconds [4 stops] > 64 seconds [5 stops] > 128 seconds [6 stops]), which is long enough to create silky smooth water effects.

Filters come in two types, screw-on and square filters. If you’re getting screw-on filters, be careful with the size of filter you’re purchasing. It depends on the filter thread size of your lens (e.g. 77mm for Nikon 12-24mm, 67mm for Canon 10-18mm, etc. – look inside your lens cap for the filter size of that lens). If you have two or more lenses with different filter thread sizes that you’d like to use an ND filter on, get one that fits your largest lens (i.e. lens with the largest filter thread size). Then purchase a step-up adapter ring to make the single filter fit into other lenses with smaller thread sizes.

Filters - Recommended Gear for Doing Long Exposure Photography at Twilight and Dusk

Left: Screw-on ND filter. Right: Drop-in square filter (image courtesy of Tiffen).

Or, you can get a square ND drop-in filter instead, along with a holder and adapters (check out at these options we’ve reviewed and featured here on dPS). The advantage of square filters is that you only need one filter to fit all of your lenses. That said, I still prefer screw-on filters because they take up less space in my camera bag and I only own one lens that takes front filters (my trusty Nikon 18-35mm with 77mm filter thread), anyway.

Wireless Remote or Cable Shutter Release

This is another essential tool, as it lets you take photos without touching the camera and helps keep your photos sharp. No need to get a pricey one, though. I’m still using a Phottix IR-Nikon (wireless remote) that I bought years ago for $ 20 (it is available for Canon as well).

Wireless remote - Recommended Gear for Doing Long Exposure Photography at Twilight and Dusk

Long Exposure Calculator App

When you use a semi-manual mode (e.g. Aperture Priority), the shutter speed cannot exceed 30 seconds on most DSLRs. With a 6-stop ND filter used at twilight and dusk, much longer than a 30-second exposure is required. So this is where you’ll need to switch to Manual Mode and take the full control of the camera yourself.

But, how will you know the correct exposure time (shutter speed) to use when your camera no longer assists you? Well, there are a number of free phone apps that help you determine a correct shutter speed. I’m using Long Exposure Calculator app by Junel Corales (get it here for iOS devices or here for Android).

Long exposure calculator - Recommended Gear for Doing Long Exposure Photography at Twilight and Dusk

By setting your filter density (e.g. 6-stop) and base shutter speed (e.g. 2-seconds), the Long Exposure Calculator app automatically calculates the required shutter speed you will need to use (2 minutes and 8 seconds [128 seconds] in this case).

Lenskirt

A lenskirt is a handy tool when shooting through the glass window of an observation deck, hotel room window, etc., as it helps eliminate reflections (such as yourself, room lights) off of the glass window. It might catch the unwanted attention of other visitors due to its odd shape but it has worked quite well for me and has found a permanent place in my camera bag when I’m traveling.

Lenskirt - Recommended Gear for Doing Long Exposure Photography at Twilight and Dusk

Lenskirt in use on the 100th-floor observation deck of the Shanghai World Financial Center. By attaching it to the lens and its pushing suction cups onto the window, it shades the front element of the lens and cuts reflections from the glass window, leaving no chance for any stray light to get into the camera.

Conclusion

That’s all about it. I hope this will get you started with long exposure photography at twilight and dusk. For me, dusk is the most beautiful moment of the day. It ends in the blink of an eye, and that’s what makes it even more special. Try to capture the beauty of long exposure photography at twilight and dusk with this gear.

If you have any other pieces of gear you use for long exposures that you find indispensable, please share them in the comments below.

The post Recommended Gear for Doing Long Exposure Photography at Twilight and Dusk by Joey J appeared first on Digital Photography School.


Digital Photography School

 
Comments Off on Recommended Gear for Doing Long Exposure Photography at Twilight and Dusk

Posted in Photography


6 Helpful Tips for Doing Interior Architecture Photography

28 Jul

Shooting interior architecture photography can be challenging to get just right. Here are six tips to help you have more success with this type of photography.

Interior architecture tips 01

21mm focal length, f/11, ISO 100, 1/200th. One off-camera flash used.

1) Always use a tripod

There are two main reasons why you always want to use a tripod for architecture photography.

First, a tripod will perfectly stabilize your camera/lens setup, which fully mitigates any possibility of motion blur from hand-holding the camera. Additionally, if you’re on a tripod, it’s much easier to make sure your camera is level (I’ll discuss the importance of a level camera later in this article).

Secondly, there’s no good reason NOT to use a tripod (I follow the general rule that, unless there’s a good reason not to have a tripod, I always use one). If you were tracking subjects which required quick movement and recomposition, then a tripod would be a hindrance. But, for architecture photography, your composition will always sit nice and still for you, giving you all the time in the world to set the shot up right. The ideal situation for a tripod.

Interior architecture tips 02

21mm focal length, f/11, ISO 100, 1/120th. One off-camera flash used.

2) Whenever possible, use a flash

If you shoot a room indoors without a flash, you will typically get shadows scattered around the room. Using a flash for interior architecture will help balance the exposure across the entire frame.

This is how I typically use a flash. Put the flash on a tripod or a stand, and place it a few feet away from the camera (on each side of the camera if you use two flashes for larger rooms), and a foot or so behind the camera. Aim the flashes so they are pointing up at the ceiling, but also slightly away from the room you’re shooting. At this angle, the light from the flashes will illuminate the room indirectly (i.e. bouncing off the ceiling and walls), creating a soft, even, fill-in light for the room you’re shooting. Set the flashes manually at half power (one stop below full power) and fire away!

Interior architecture tips 03

This was a tricky shot because my flash was reflecting off the windows no matter where I positioned it. So I took two shots (one with flash and one without) and masked them together in Photoshop. The windows you see in this image are from the shot without a flash, while the rest of the room is from the shot with the flash.

3) When shooting whole rooms, don’t get too wide

When I first started taking practice photos of architectural photography, I used the widest angle lens I could get my hands on to shoot entire rooms. My thinking was that with an ultra-wide lens, I could get more of the room in the frame. But more isn’t always better. I quickly noticed the high level of distortion towards the edges of the frame, especially in smaller rooms where the edges of the frame were at wide angles to the camera.

So, I experimented with different focal lengths and came to the conclusion that between 21mm and 28mm gives you the most practical balance between limited distortion and a wide enough frame to capture the character and presence of the scene. Ultra-wide lenses (i.e. 14 or 15mm) will make the sides of the frame look oddly stretched and off the horizontal plane, even when corrected in post-production.

If you’re in a situation where 21mm won’t capture enough of the scene, a panorama is always an option – which segues nicely into the next tip:

Interior architecture tips 04

This was an extremely dark room, even with all the lights on. So, like the previous image, I stacked two shots: one exposed for the room, and one exposed for the windows, and combined them in Photoshop.

4) Try panoramas for ultra-wide shots

Set up your camera vertically on the tripod (which creates a taller pano). Then, making sure you adequately overlap the scene in each shot, do your best to make the camera rotate on a perfectly level, horizontal plane, with the pivot point being roughly where the lens meets the camera.

If the pivot point is too far forward (i.e. somewhere on the lens), or too far backward (i.e. on the body of the camera), the panorama will appear distorted. For example, in the picture below, the pivot point was on the body of the camera (behind the ideal spot where the lens meets the camera). As a result, the panorama has a weird sort of convex distortion.

Interior architecture tips 05

This is a seven image panorama. See how artificially “rounded” the walls are? This will happen when shooting a panorama if your camera/lens are not properly situated on the tripod.

5) Whenever possible, try to shoot only one or two walls

Two wall shots typically give the viewer the most geometrically pleasant image to view. When three (or more) walls are introduced, the photograph can have a tendency to appear somewhat awkward-looking if you aren’t careful with the composition.

Interior architecture tips 06

21mm focal length, f/11, ISO 100, 1/120th. One off-camera flash used.

The above shot is a generic two-wall scene, with the walls meeting at a standard 90 degree angle. The image below is the same room, except I backed up several feet to purposely include the third wall on the left edge of the frame.

Interior architecture tips 07

The “third wall” on the left side of this shot creates an unnatural and visually-displeasing scene.

I don’t know about you, but to me, the photo above looks compositionally awkward and disorienting because of the third wall on the left. All of that said, just like the Rule of Thirds can occasionally be broken to make a photo work, sometimes getting three walls in the shot is okay – provided everything is geometrically aligned.

Interior architecture tips 08

A properly-aligned three-wall shot. 21mm focal length, f/11, ISO 100, 1/200th.

6) Make sure your camera is perfectly level

Last, but definitely not least, you will want to make sure your camera isn’t tilted up or down, or tilted to the left or right. Doing so, even slightly, will require post-production cleanup. Here’s an example of what I’m talking about:

Interior architecture tips 09

In this shot, the camera/lens were not level on the tripod. They were slightly slanted down towards the ground, creating the artificially slanted walls.

See how slanted the windows are? Clearly, this is not an accurate depiction of the room, it’s the result of the camera being tilted ever-so-slightly down. Now, see what a difference makes if we get the camera nice and level.

Interior architecture tips 10

Camera/lens properly level on the tripod. 21mm focal length, f/8, ISO 100, 1/120th. No flash (this room had plenty of sunlight to illuminate it without artificial help).

Being level makes a HUGE difference. There are several ways to help you get the camera perfectly level when you compose your shot. Most cameras these days have a built-in level, so when you look into the viewfinder, there are lines across the focusing screen that will tilt when the camera tilts. When these lines are level, you know the camera is level.

You can also use a bubble level that slides onto the camera’s hot shoe. When the little bubble is centered, the camera is level. You can buy a hot shoe bubble level at any photography store for just a few bucks. I use a bubble level because they tend to be more accurate than the lines inside the viewfinder.


Interior architecture tips 11

In this shot, I used Photoshop to remove the camera, lens, and tripod, which were all reflected in the mirror. Sometimes shooting into a mirror is inevitable, and when you do, cloning in Photoshop is a requirement.

Conclusion

As is the case with any type of photography, the most important aspect of getting the shot right is to take your time, and make sure your composition and exposure are exactly what you want. One good thing about architectural photography is that the composition and subject will never move (unless you move it), so there’s no need to rush the photograph.

The post 6 Helpful Tips for Doing Interior Architecture Photography by Jeb Buchman appeared first on Digital Photography School.


Digital Photography School

 
Comments Off on 6 Helpful Tips for Doing Interior Architecture Photography

Posted in Photography