Do you want a camera lens without distortion? If you are like me, unwanted distortions in your photos really bother you. But what causes lens distortions and how can you prevent them? Is there anything you can do with your existing equipment or do you need to go out and buy new? Let me explain distortions and answer all these Continue Reading
Photodoto
Posts Tagged ‘distortion’
Want A Camera Lens Without Distortion? Check This Out
How to Correct Perspective Distortion in Photoshop
The post How to Correct Perspective Distortion in Photoshop appeared first on Digital Photography School. It was authored by Ana Mireles.
When talking about perspective, you step into a deep and somewhat complicated subject. It has to do with geometry, history of art, viewpoint and so on. However, solving that big issue won’t be the point of this tutorial. Instead, it focuses on solving perspective issues in your photography using photoshop. So keep reading to learn which Photoshop tools can help you out.

Because perspective can be a broad term, in this article, I’m going to narrow it down to one aspect, and that is the way straight lines seem to converge as they get further away. This can be used as a creative element of the picture, or it can help convey a sense of depth and tridimensionality as per this example:

You may be familiar with this effect, such as when you’re walking on the street, and you tilt your camera up to photograph a building. Now, this might be your intention, but sometimes you don’t want or need this distortion. Of course, you can correct this issue by using tilt and shift lenses, or with a large format camera. However, many of us don’t have access to that equipment. This is where Photoshop is handy to fix perspective in post-production.

As usual, Photoshop has different ways of dealing with the same problem. One may work better than others in different cases. However, I find that more often than not, you need to combine them to get the job done. So here’s an introduction to some different approaches:
Lens correction and transformation
One way to correct perspective distortion is by using the Lens Correction Filter. You can find it under the Filter Menu. When you choose this, a new window pops up. To start working on it, ensure you’re in the Custom tab to access the settings and set your grid with the bottom slider so that you can have it as a reference.

For this exercise, you’re only going to need the Transform part of the panel that you’ll find in the bottom right. I find that starting with the center point saves time as the changes you make after happen on both sides simultaneously. So I zoomed in to the center and rotated the angle so that the central line aligned with the grid. Remember, you can make the grill tighter if you need to.
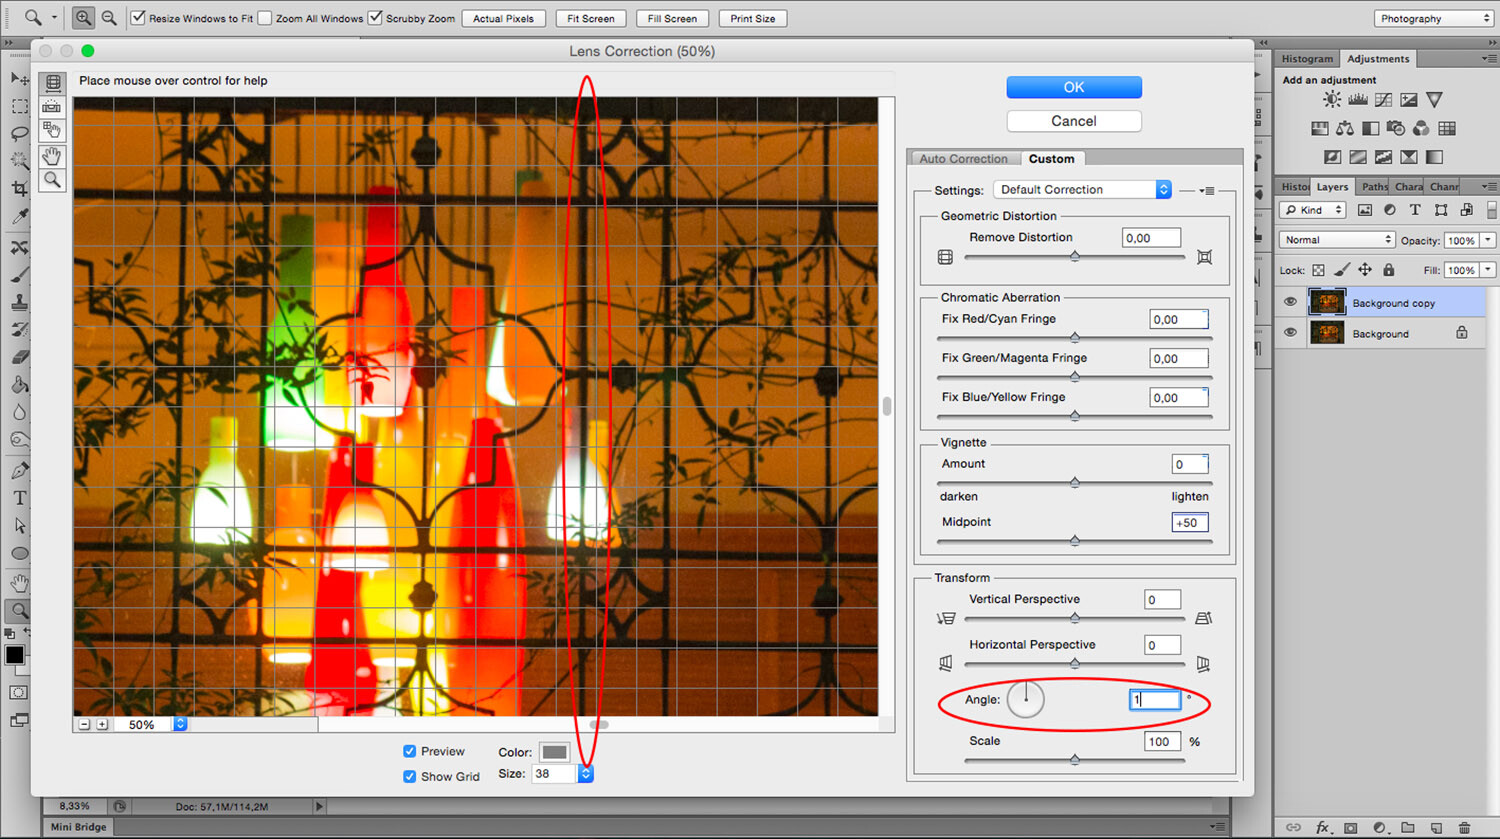
Now you can start fixing the vertical and horizontal lines with the sliders. On the sides of each slider, you can see an icon showing the way the image gets affected. If you pull the vertical slider to the left, the top part gets wider or sliding to the right the bottom part is the one that becomes wider and so on.

As you move the lines around, you may be losing part of the image towards the edges. To bring everything back in, use the scale slider. After you’re done, you’ll have to crop out the blank pixels.

As you can see the Lens Correction Tool can be handy, but sometimes you still have to make some adjustments here and there. For this step, you can use the different Transform tools found under the Edit menu.

In this case, I’m using the Skew tool which allows me to move all the corners and middle points independently. Whenever you’re using any of these tools, you can pull out Guide Lines by clicking on the ruler and dragging. That way you can work more precisely without leaving the transform mode.

For this image that’s all I needed to do. However, remember that all the transformation tools can help to correct perspective, so experiment with them to find the one that works best for you and your image. Here, you can see on the left how I started, and on the right, is the new corrected version.

Perspective Tool Crop
Another way of fixing the problem is with the Perspective Tool Crop. This feature corrects the lines almost automatically. However, I wanted to give you the option of doing it manually first so that you have more control over the perspective. If you want to try it out, draw a rectangle around the image with the Perspective Tool Crop active and then drag the corners to match the grid with the distorted lines.

It usually does a good job, but you might still need to tweak it a little bit with the transform tools. Be aware that the Perspective Tool Crop, as the name says, crops your image. You might lose some information from the borders. In any case, you can give it a try and decide which method is best for you.
If you have any other tips to correct perspective distortion, share them with us in the comment section.
The post How to Correct Perspective Distortion in Photoshop appeared first on Digital Photography School. It was authored by Ana Mireles.
IRIX announces 150mm F2.8 Macro 1:1 lens with near-zero distortion
 |
IRIX has announced a new full-frame telephoto macro lens, the 150mm F2.8 Macro 1:1.
The 1:1 reproduction lens will be available for Nikon F, Canon EF and Pentax K mounts and claims to have ‘close to zero distortion,’ according to IRIX — just 0.1 percent, thanks to the optical construction consisting of twelve elements in nine groups.
 |
IRIX touts the telephoto focal length as a benefit noting ‘the possibility of being able to move away from the photographed object […] makes the operation more convenient than using lenses with a shorter focal length. No shadows are cast on the object and it is also possible to use lamps dedicated to this type of photography.’ Its internal focusing mechanism means the lens won’t shrink or expand when focusing.
 |
| Illustration showing the location of the weather-sealing gaskets. |
The lens features select weather-sealing at various areas on the lens and has a rubberized focus grip with 270-degrees of rotation. There’s also Focus Lock and a removable Arca Swiss lens collar for easy shooting on a tripod.
 |
The construction of the lens features IRIX’s new ‘Dragonfly finish.’ In Irix’s own words, ‘the aluminium frame has been enclosed in an external structure made of aluminium-magnesium alloys and composite elements. The combination of Firefly and Blackstone features gave the lens lightness and solidity while maintaining high mechanical strength and resistance in difficult weather conditions.’
 |
| Sample image captured on the 150mm F2.9 Macro 1:1, provided by IRIX. |
Pricing and availability is yet to be determined.
Articles: Digital Photography Review (dpreview.com)
Fujifilm X-T3 firmware update fixes distortion, memory card lock issues
 |
Fujifilm released a firmware upgrade (v1.01) for its X-T3 mirrorless camera that addresses issues with distortion compensation when using the electronic shutter in continuous high shooting mode. A bug where the mechanical lock on SD cards was ignored has also been fixed, along with unspecified ‘slight defects’.
The update can be downloaded here.
Read our Fujifilm X-T3 First Impressions Review
Articles: Digital Photography Review (dpreview.com)
Video: There’s no such thing as lens compression, it’s just perspective distortion
We’ve been saying for years that the term “lens compression” is misleading, but Lee Morris over at Fstoppers has put together a useful video that explains exactly why this is the case, and demonstrates it with two easy-to-understand examples.
The main issue with the term “lens compression” is that the distortion the term refers to has nothing to do with the lens itself. The issue is simply perspective distortion, caused by the distance between your camera and your subject, as well as the distance between your camera and the background.
Put another way: if your subject is 1 meter away (or feet: it doesn’t really matter), and your background is 50 meters away, moving back 1 meter will double the distance between you and your subject, while barely changing the distance between you and the background—the perspective on your subject changes drastically, while the perspective on your background barely shifts at all.
 |
|
| This diagram, from the FStoppers video, shows why changing your perspective appears to compress the background… | When you double the distance to your subject you halve its size, but you’ve barely moved in relation to the background, so it remains roughly the same size in your image. |
To show this concept in action, Morris uses two examples. First, he shows you how you can get the exact same perspective using a 24mm lens that you can with a 400mm lens by simply cropping the wide-angle shot. Then, he does the opposite, creating the same perspective as a 15mm shot by stitching multiple shots taken at 70mm.
Of course, that doesn’t mean you should go throw out all of your lenses and just pick one focal length to either crop or stitch with. Physical limitations apply: like how much room you have to back up, how much resolution you’re willing to sacrifice by cropping, and how much sanity you have to spare if you’re trying to create a 15mm shot by taking a thousand shots with an 800mm lens.
The demonstration is just that: a demonstration of a concept that is often misunderstood because of the language we use to describe it. The compression you get using a long lens isn’t a result of the lens, so much as the distance between your subject, your background, and the camera.
Articles: Digital Photography Review (dpreview.com)
DxO ViewPoint 3 adds automatic distortion correction
 |
| A new ‘miniature’ tool allows for application of a tilt-shift type effect. |
DxO ViewPoint 3 is available today, adding automatic horizon and distortion correction to DxO’s wide-angle lens correction software. The existing manual distortion correction tools are now complemented by an all-auto option to correct geometric distortion while automatically cropping the image. A new ‘miniature’ look is also added, providing a tilt-shift effect that can be adjusted by the user – you can adjust the direction of the blur gradients, and even modify the look of the bokeh by specifying the shape of the ‘virtual iris’.
DxO ViewPoint 3 is available now for Mac and Windows. Through December 4 it’s offered for $ 50/£39, a discount off the usual $ 79/£59 price.
Press release
DxO announces DxO ViewPoint 3, a major update to its industry-leading wide-angle lens correction software
New automatic perspective and horizon correction tools are complemented by a miniature effect that perfectly mimics tilt shift lenses
Special discounts on all DxO software through December 4, 2016
PARIS—November 16, 2016—DxO, a world leader in digital imaging technologies, announces a major update to DxO ViewPoint, its simple but powerful software that automatically corrects problems inherent in photographs taken with wide-angle lenses. DxO ViewPoint 3 leverages DxO’s advanced image science to automatically correct skewed perspectives and horizons with a single click, making the process quick and easy. The update also introduces a brand new tool that produces a remarkable miniature effect, the first software of its kind to perfectly replicate the popular look made famous by tilt shift lenses.
DxO ViewPoint is simple, but powerful image processing software for Mac and Windows that thousands of photographers rely on for photos taken with their wide-angle lenses because of its ability to fix even the most complex perspective problems, as well as restore the natural shape to subjects situated on the edges of photos. DxO ViewPoint benefits from the automatic corrections provided by DxO Optics Modules, developed by exacting laboratory analysis of thousands of camera and lens combinations.
The existing perspective correction tools have been dramatically enhanced with an innovative, fully automatic mode that can instantly correct geometric distortion, straighten both horizontal and vertical lines, and automatically crop images, effectively eliminating keystoning while preserving the maximum information in the picture. The new auto horizon correction tool is equally efficient at correcting skewed landscape and architectural images. A single click detects the most relevant straight lines in the image, which are analyzed to determine the correct horizon.
“DxO ViewPoint has become an essential tool for me when photographing with my wide-angle lenses, which by their very nature induce all manner of odd deformations,” said architectural photographer, Luca Nicolao. “Its tools let me easily correct for distortions and keystoning, allowing me to achieve a much more natural composition in my images.”
DxO ViewPoint 3 also adds an innovative and useful new tool that perfectly simulates the depth-of-field reduction that’s identical to the type of creative looks that previously required the purchase of costly and tricky tilt shift lenses. To replicate the miniature look, DxO ViewPoint 3 displays the location and intensity of two blur gradients which the user can adjust symmetrically or asymmetrically. The application even enables photographers to simulate a precise type of bokeh.
With just one license, DxO ViewPoint works as both a stand-alone app, and as a plug-in for DxO OpticsPro, Adobe Lightroom, Photoshop and Photoshop Elements. DxO ViewPoint 3 can be used as a plugin for DxO OpticsPro starting with version 11.3 (also available).
Pricing & Availability
DxO ViewPoint 3 for Mac and Windows is immediately available in the DxO online store (shop.dxo.com) and at photo resellers at a special discount through December 4, 2016:
- USD: $ 49 instead of $ 79
- GBP: £39 instead of £59
- EUR: 49€ instead of 79€ (Suggested retail prices, including VAT)
Photographers who acquired a DxO ViewPoint license on or after September 1, 2016 are entitled to a free upgrade to version 3.
A fully-functional trial version of DxO ViewPoint 3, good for one month, is available on the DxO website: http://www.dxo.com/us/photography/download.
Articles: Digital Photography Review (dpreview.com)
Use Photoshop to Correct Perspective Distortion of Buildings in Your Images
Shooting buildings can be tricky. The main reason is that they are tall, and you need to get far away from them if you want to fit them into the frame. If you are shooting in the city, you don’t have the luxury of getting really far away, the best you may be able to do is get farther down the street. What you have to do then, is tilt your camera upwards to get the whole building in, and that’s when it happens – perspective distortion.
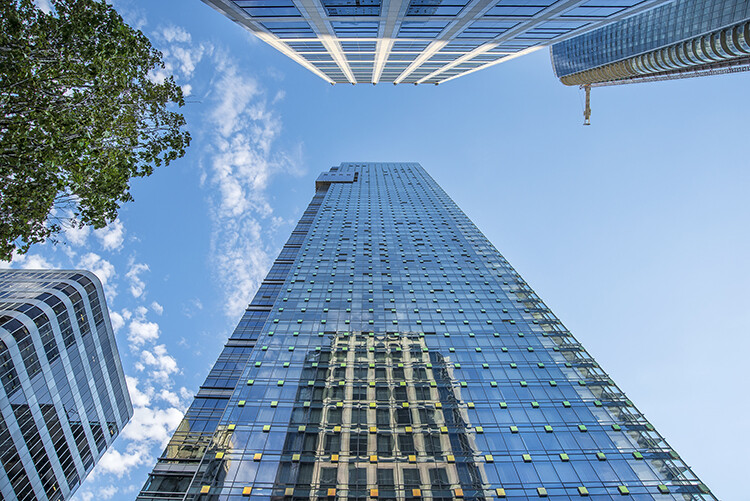
City scenes can be difficult to photograph because of the risk of distortion
When you are using a wide angle lens (which you probably will be when shooting architecture) and you tilt your lens up or down, your image will distort. Architectural photographers would use a tilt-shift lens to counteract this distortion, which can make a really big difference in your image. The only problem is that it is a specialist lens, and it is expensive.
Until a few years ago, that was the only solution for fixing perspective distortion, but in the latest versions of Photoshop, there are a few truly amazing tools that can fix it painlessly. Sometimes the distortion may work well in the image, but if you need to fix it, these techniques can help. To learn more about getting better architectural photos read: Tips for Different Approaches to Architecture Photography
1. Working with distortion
The definition of distortion is: when the straight lines of a subject are either curved in a particular direction, or they converge or diverge. This happens when the focal plane of your camera is pointed upward or downward. This is called perspective distortion. The second most common type of warping is barrel distortion, this type is dependent on the type of lens you are using. Barrel distortion make the image look like it has been inflated in the middle of the scene so it looks like a barrel – wider in the middle, and narrower at the top and bottom. Wide angle lenses tend to distort a fair amount when pointing up or down, and in some cases, you may get barrel distortion in the image too. So, how do we fix this?
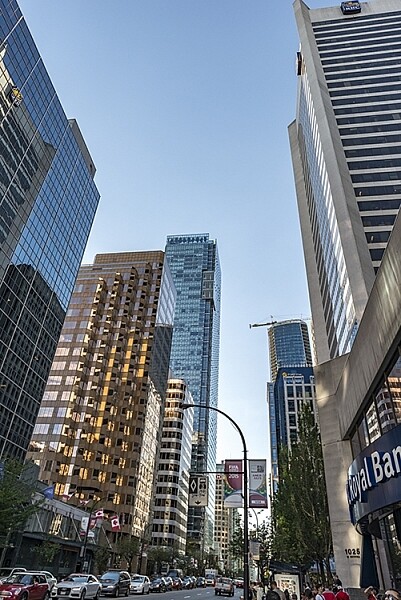
Tall buildings distort easily with a wide angle lens.
2. Fixing distortion in camera
If you want to avoid perspective distortion, then you will need to keep your focal plane at 90 degrees to your subject. In other words, don’t tilt your camera up or down when you are shooting. This may work well for landscape photography, but when you are shooting tall buildings, it may be very difficult to get that right. Sometimes there is no way to avoid perspective distortion in camera.
Thankfully Photoshop can help you out here. Barrel distortion is a function of the lens you are using, wide angle lenses can make the middle of the image seem bloated or inflated. You can try and fix this by zooming in a little, as wide angles tend to suffer from barrel distortion when they are at their widest focal length. Zooming in is not always possible, so we will fix the bulk of the issues in Photoshop.
3. Fixing distortion in Photoshop
Photoshop has a few functions that can help you fix both perspective and barrel distortion. One of the best tools that has been included with recent versions is the Adaptive Wide Angle Tool. This tool is intuitive and easy to use, but takes a little practice initially. In the past, I would use the transform tools (i.e., Distort, Skew, Perspective and Warp). While these worked really well, it took a fair amount of time to get the corrections to look realistic.
In the examples below, you can see that the building looks shorter and more squat. Some further adjustments would need to be made to correct this, but overall, the buildings are vertical and look correct architecturally. With the Adaptive Wide Angle tool, this process is easily done, in some cases with only three or four mouse clicks.
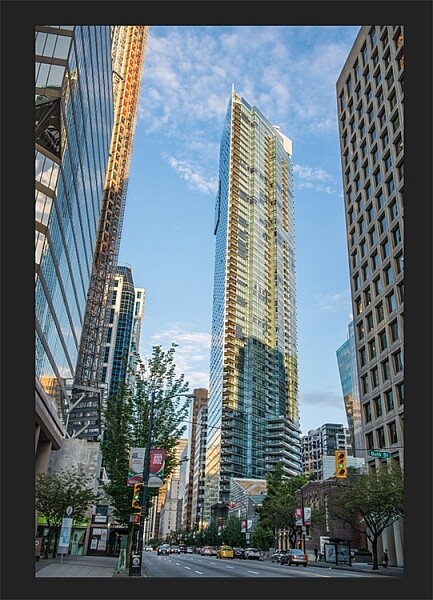
Image of a building before the distortion tool was applied in Photoshop
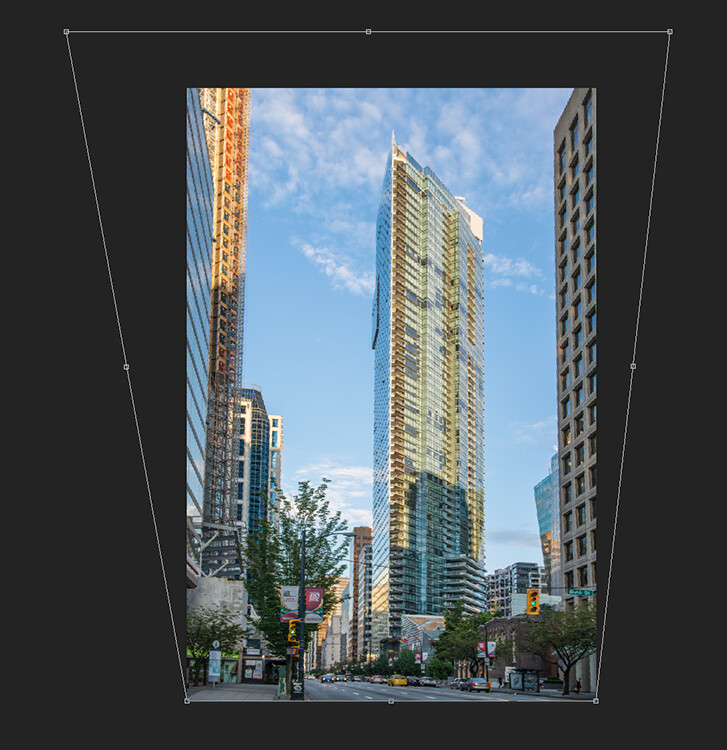
Same image after the distortion tool was applied
4. Adaptive Wide Angle tool
The Adaptive Wide Angle tool sits under the filter menu. Open the image you want to correct (with skew buildings or walls) click on FILTER>ADAPTIVE WIDE ANGLE, and a new box will open up with your image inside it.
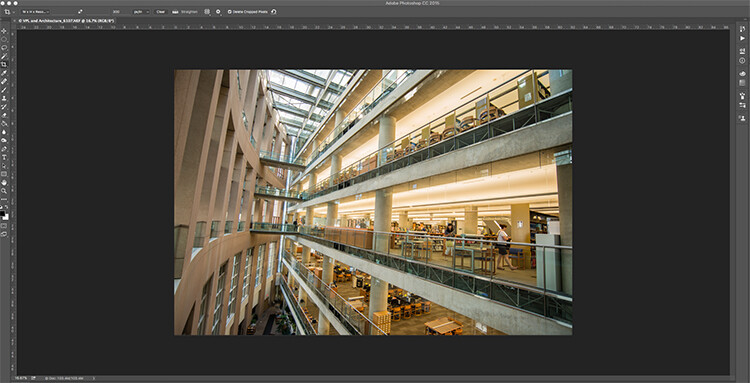
Image to be corrected, you can see the vertical lines are pretty skew
Depending on how your image is displayed in the box, you may need to scale it to see the whole thing. On the right hand side you will see a box that says Correction. Underneath that you will see a scale slider, adjust it until you can see your whole image in the box. There is a dropdown box in there with other options such as perspective, fisheye, etc., – I find leaving it on Auto seems to work best. The other functions within that box may work in some cases, but by leaving it on Auto and making specific adjustments to the verticals and horizontals in your image, you will get the best results.
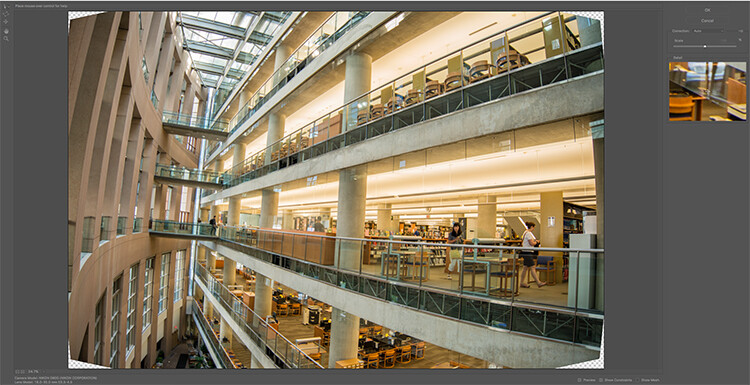
Adaptive Wide angle tool screen
You will then need to identify the walls of the building that are converging or diverging. On the left hand side of the dialogue box, you will see some constraint tools. The tool that is first in the row is simply called the Constraint Tool, this is the one I use most often.
Click on that and move your mouse over to one of the vertical lines of the building, and draw a line down the wall. Start at the top of the building and drag the line down to the bottom, along a vertical wall that should be straight. Click at the bottom of the line when you are done and Photoshop will drop a line down exactly where you dragged. As you click, Photoshop will correct any barrel distortion, but the line will still be skew.
At the bottom of the line you will see a square, right click on the square and three options will pop up: Horizontal, Vertical, and Arbitrary. These are the three ways you have to correct that line. If it is a vertical wall, then click on Vertical. Immediately, Photoshop will bring that wall into a perfect upright position. What you will notice is that it may distort other lines now. That’s okay, find a second vertical that is not correct and repeat this process, once you have done three or four verticals, your building should be perfectly straight, as should the rest of the building. Sometimes what may happen is that the horizontal alignment may shift with all these vertical changes. You can then select a horizontal line in the image and repeat the same process you did for the verticals, just use a line that you know should be horizontal. Also, when you right click, select the Horizontal option in the popup box.
To make sure you are making a precise selection when you draw your line, there is a 100% zoom window on the right hand side. This is really useful, as it can be difficult to be zoomed in to the image, and drag the line down at the same time. This box really helps make sure that you start and finish at the right places on the building.
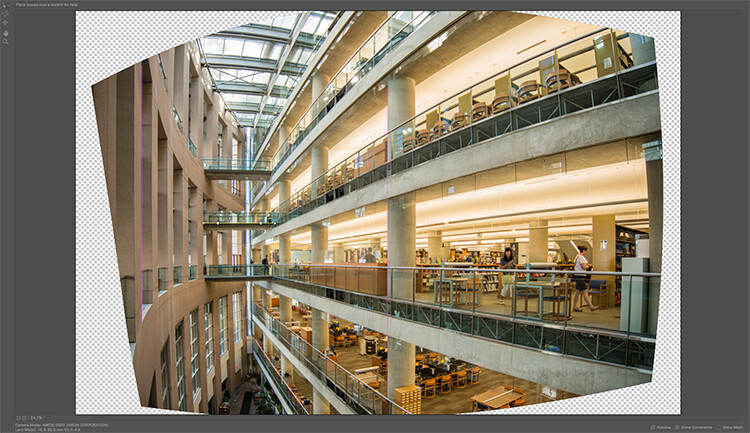
Adaptive Wide Angle tool and image after 3 adjustments have been made
Once you have straightened some of the more skewed verticals, and one or two horizontals, your image should be looking pretty close to perfect. Once you are done, click ok and your image will open up in Photoshop. From there you can edit the rest of the image with all the lines being straight and aligned.
A new tool has recently been launched by Adobe Photoshop for CC users called Guided Upright and you can find it in Camera RAW of the latest version.
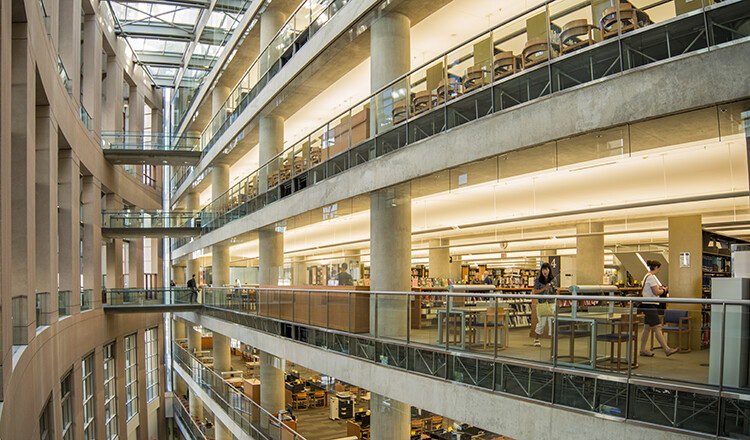
Final image after being edited in the Adaptive Wide Angle tool and cropped.
Here is a great short minute video that Adobe has released, take a look, this could also be a useful tool to use.
What’s your go-to method of correcting perspective distortion? Please share in the comments below.
googletag.cmd.push(function() {
tablet_slots.push( googletag.defineSlot( “/1005424/_dPSv4_tab-all-article-bottom_(300×250)”, [300, 250], “pb-ad-78623” ).addService( googletag.pubads() ) ); } );
googletag.cmd.push(function() {
mobile_slots.push( googletag.defineSlot( “/1005424/_dPSv4_mob-all-article-bottom_(300×250)”, [300, 250], “pb-ad-78158” ).addService( googletag.pubads() ) ); } );
The post Use Photoshop to Correct Perspective Distortion of Buildings in Your Images by Barry J Brady appeared first on Digital Photography School.
How to Correct Lens Distortion with the Adaptive Wide Angle Filter in Photoshop
The issue
When photographing subjects with a wide-angle lens, it’s pretty common for perspective problems to present themselves in the form of lines that should be straight, but appear curved and distorted. This is commonly referred to as barrel distortion, which occurs mostly in wide-angle lenses because the magnification of the image decreases the farther the subject is from the optical axis of the lens. In plain speech, it means that when looking through a wide-angle lens, anything that is at the edge of the frame will be prone to appearing curved.
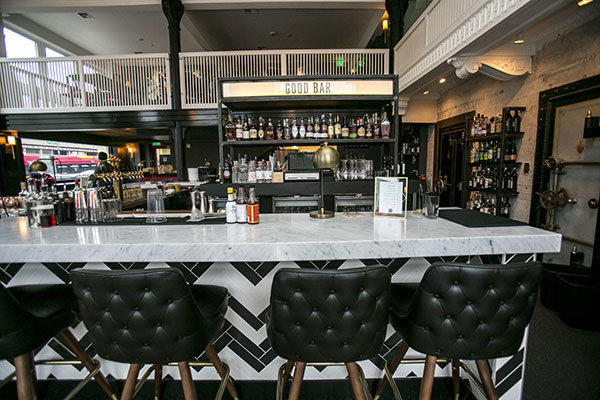
Some lenses such as fisheyes take full advantage of barrel distortion by purposely capturing images that are heavily curved and spherical. However, there are times when other wide-angle lenses such as the Canon 16-35mm, or even mid-range zooms like the 24-70mm, might produce unwanted barrel distortion effects.
The solution
Perhaps the two easiest ways to correct this problem are to either use a tilt-shift lens or to change your perspective and zoom magnification while photographing the subject. But tilt-shift lenses are expensive, and sometimes, such as when photographing a large building, there aren’t a ton of different perspective options. In these cases, the easiest solution to correct correct lens distortion is to do so in post-processing using a unique tool in Photoshop known as the Adaptive Wide Angle filter.
Introduced in PhotoShop CS6, the Adaptive Wide Angle filter removes lens distortions in one of two ways: it either automatically detects the camera and lens model using pre-programmed details to straighten the images, or you can manually set constraints to tell the it which areas of the photo need to be straightened. In this tutorial, I’ll walk you through the manual use of the Adaptive Wide Angle filter.
The example below was photographed in a beautiful brand new bar and restaurant using a Canon 16-35mm f/2.8 at a focal length of 16mm. It was a tight space, so there wasn’t room to back up or shoot the bar from a higher angle, so the resulting image sees quite a few horizontal lines such as the upstairs white railings and granite countertop that clearly should be straight, but aren’t.
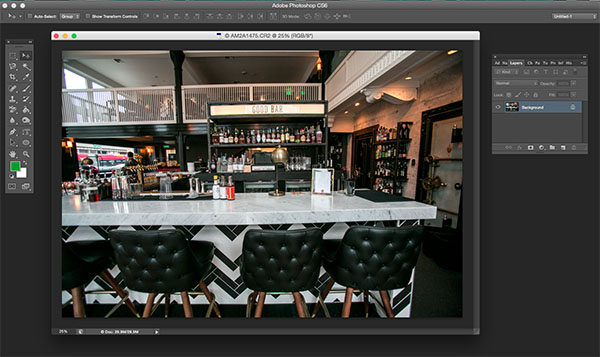
To begin correcting these distortions, click on Filter in the upper drop down menu and select Adaptive Wide Angle Filter.
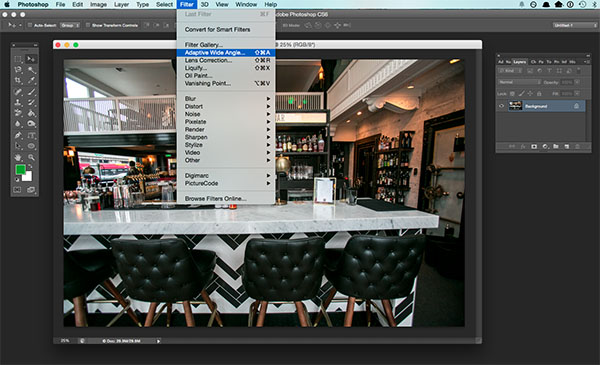
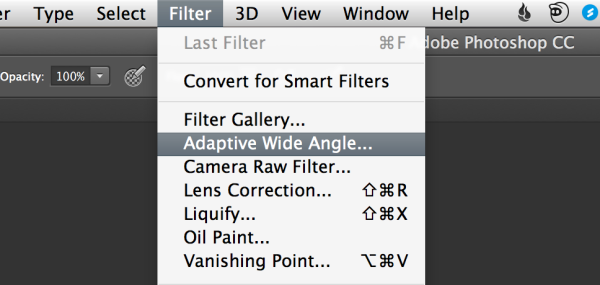
A large dialogue box will then appear with a host of options (see below).
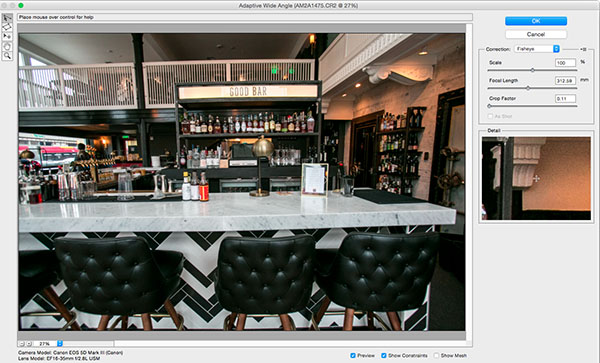
Begin with the right hand panel and choose a correction type from the drop down menu. Typically, I start with Auto, which will attempt for an automatic correction based on lens detection.
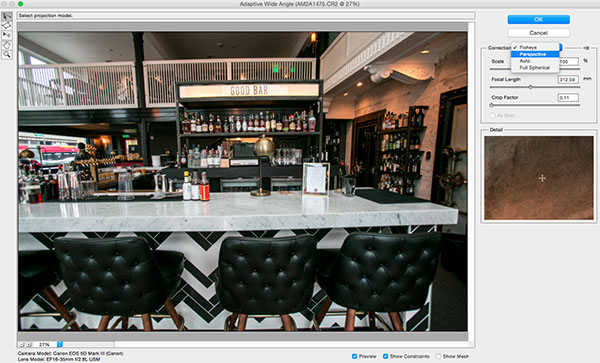
In this case, when I select Auto, another pop up window appears saying, “No matching lens profile found.” This means I need to manually adjust the image. Hit the OK button and turn your attention back to the box in the right hand corner.

Besides Auto, the drop-down menu has three other options to choose from. If Auto doesn’t work, I’ll typically choose Perspective as my next correction type.
- Fisheye will correct the aforementioned extreme curves that fisheye lenses purposely cause.
- Perspective will target converging lines typically causes by the tilt and angle of the camera.
- Panorama corrects for distortions caused by photo merging for panos.
- Full Spherical corrects distortions in 360 panoramas shot with a 2:1 aspect ratio.
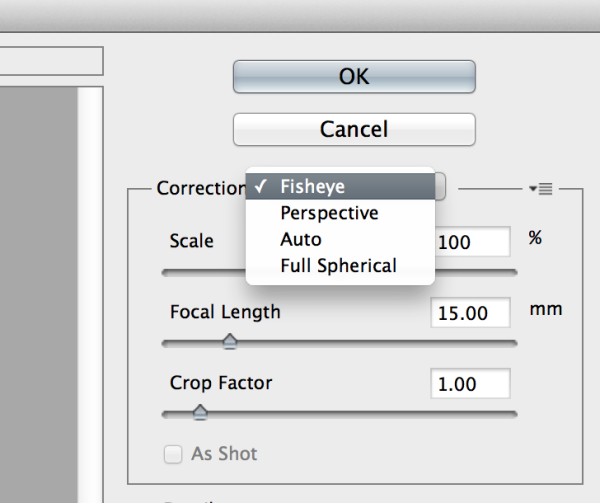
Other options below the drop down menu include more settings that you can fiddle with to help correct distortions.
- Scale: A value entered here will scale the image to best minimize the blank spots that may be present after the wide angle filter is applied.
- Focal Length: Specify the focal length of the lens that created the image.
- Crop Factor: This can be used in combination with Scale to minimize and compensate for blank areas produced by the filter.
- As Shot: This box can be checked if your lens profile can be detected; if not, this option will be greyed out and you will need to manually specify the values of Scale, Focal Length, and Crop Factor.
Next, turn your attention to the little vertical toolbar in the top left corner. These are the tools you’ll use to define the constraints that indicate which lines in your image ought to be straight. The primary tools to be familiar with are the first two:
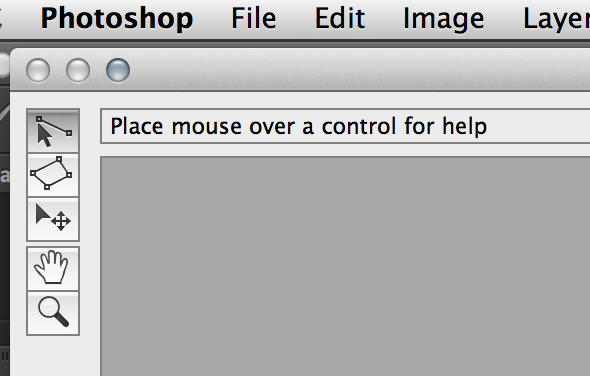
- Constraint Tool: This tool is used to draw lines over the areas of the image that you wish to straighten. Simply click once to establish a desired starting point, and click again to close the line, holding down the shift key as well if you wish to add a constraint with a vertical or horizontal orientation.
- Polygon Constraint Tool: This tool functions in the same way as the regular Constraint Tool except it allows you to draw a polygon instead of a single line.
For example, let’s look at the horizontal line of the granite countertop in the image below.
Begin by clicking once on the left end of the line to set one constraint point, then click once on the right end of the countertop to close it. After you set the line, right-click on it and you’ll see a small menu appear allowing you to assign either a Horizontal, Vertical, or Arbitrary constraint to the line. The default constraint is Unfixed, but in this case we want to assign a Horizontal constraint to straighten the line width-wise. In order to automatically assign a constraint to a line, hold down the shift key while in the process of creating the line. In between the two constraint points, there will be a yellow line (if you held down the shift key) or a blue one if you didn’t, indicating where the straightening occurred.
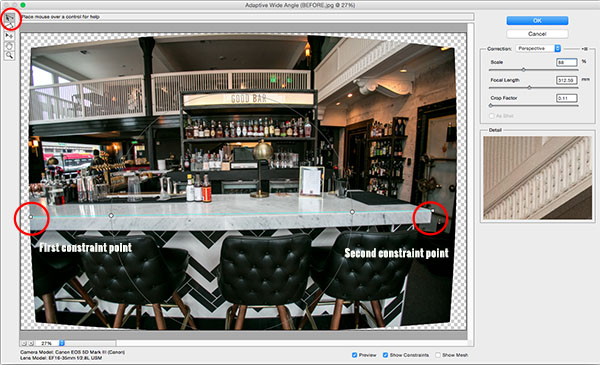
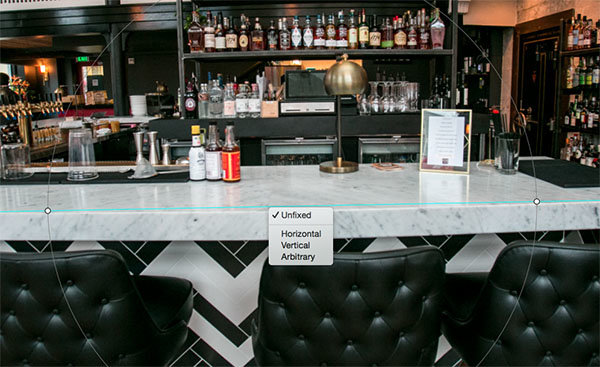
You can set as many constraint lines as needed until your image is corrected to your satisfaction. Constraint lines typically should be vertical and/or horizontal. Some other tools in the toolbar that can help with this are the Move, Hand, and Zoom tools that allow you move the image around to make the adjustments needed. Additionally, there is the Magnification of the preview in the lower left corner that allows you to zoom in and help you see where to plant constraints.
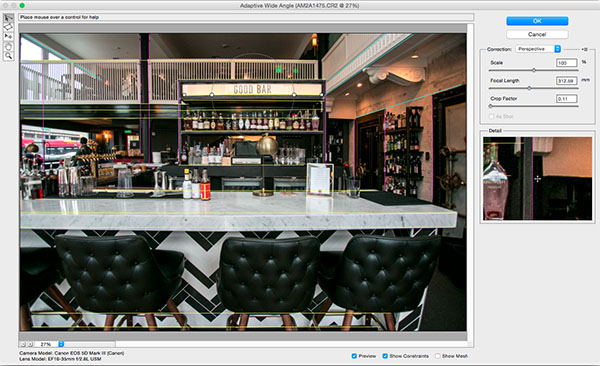
After you have corrected the image to your liking, hit the blue OK button to apply the filter.


BEFORE
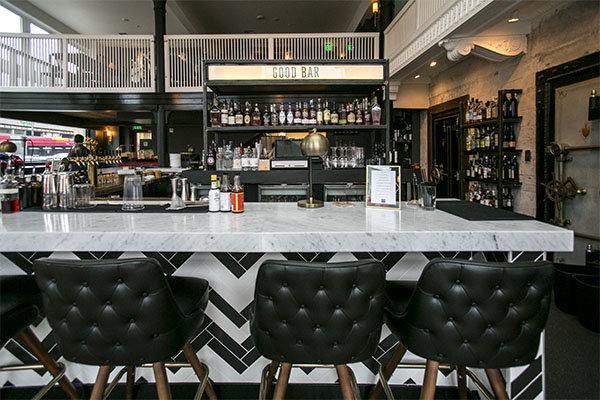
AFTER
How do you correct distortion for your wide-angle images? Share in the comments section below.
googletag.cmd.push(function() {
tablet_slots.push( googletag.defineSlot( “/1005424/_dPSv4_tab-all-article-bottom_(300×250)”, [300, 250], “pb-ad-78623” ).addService( googletag.pubads() ) ); } );
googletag.cmd.push(function() {
mobile_slots.push( googletag.defineSlot( “/1005424/_dPSv4_mob-all-article-bottom_(300×250)”, [300, 250], “pb-ad-78158” ).addService( googletag.pubads() ) ); } );
The post How to Correct Lens Distortion with the Adaptive Wide Angle Filter in Photoshop by Suzi Pratt appeared first on Digital Photography School.
Zeiss introduces ‘no distortion’ Otus 1.4/85mm
Zeiss has announced a new fast mid-telephoto prime to join last year’s widely acclaimed 1.4/55 lens in the Otus range. Due out in the middle of this month in Canon EF (ZE) and Nikon F (ZF.2) mounts, the new Zeiss Otus 1.4/85 is a manual focus lens claimed to offer exceptional performance even when used wide open on full frame cameras. Read more
Articles: Digital Photography Review (dpreview.com)
Why are my Buildings Falling Over? A Short Guide to Perspective Distortion and Correction in Photography
A guest contribution by Misho Baranovic, co-developer of the Perspective Correct app and author of the iPhone Photography DPS eBook .

I’ve read a lot of perspective correction articles over the past few days and my head is spinning from the technical explanations, illustrations and equations. In this article, I’m going to keep it simple and talk about the role that perspective plays in photography.
What is Perspective?
Perspective is one of the many ways that the human eye can judge depth within a scene. Perspective is something that we can see with one eye (monocular) rather than two (binocular). It refers to the angle and location of parallel lines within a scene. The eye registers depth when parallel lines start moving towards each other (converging). An example would be standing on a straight road, looking down the road, and noticing how the road narrows as it gets further away from you.
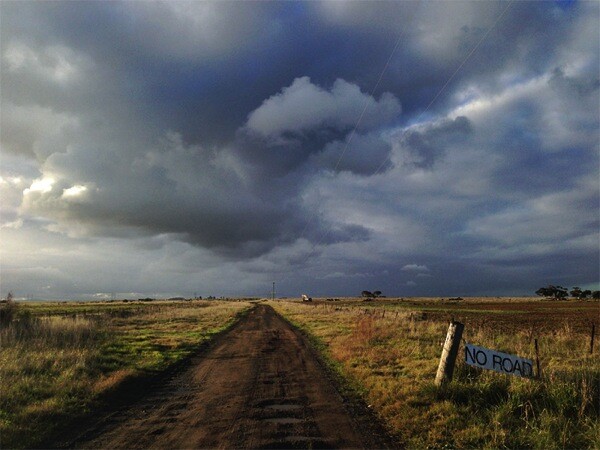
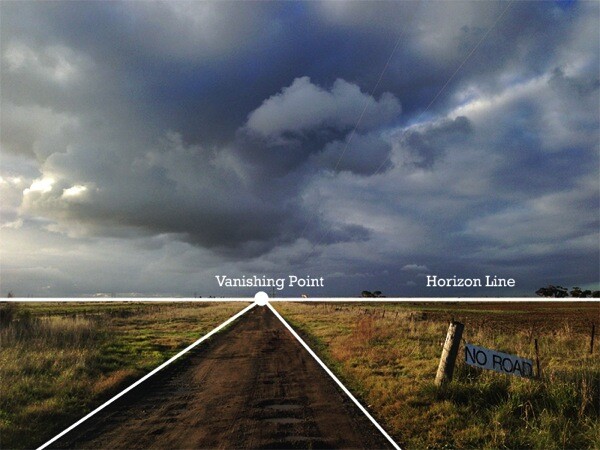
In art and photography, Linear Perspective refers to the way lines are drawn and captured to show an objects perceived size within space. In short, how we translate real world depth into a flat picture. Linear Perspective is made up of two basic concepts, the horizon line and vanishing point. The horizon line represents the viewing angle of the observer. Vanishing points are the point (on a horizon line) where parallel lines meet (converge). For example, the point where the two sides of the straight road meet (as shown below).
One of the key visual cues in Linear Perspective is that vertical lines and edges remain vertical in the scene. The only time you would have vertical lines coming together is if you are trying to show a triangular or pyramid shape within the scene, like the angle of a building’s roof or the shape of the Eiffel Tower.
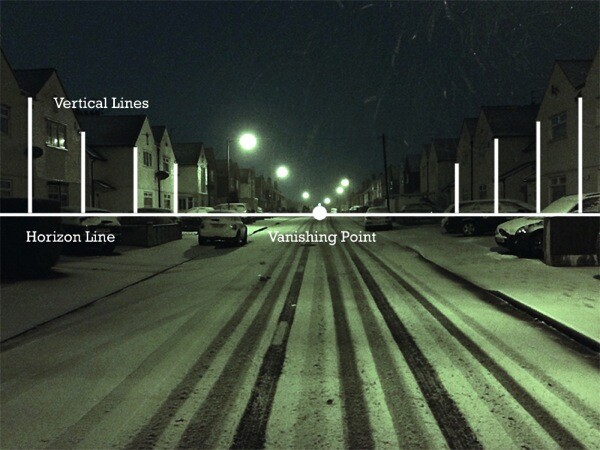
Since the start of photography, camera and lens makers have focused on replicating the visual cues of Linear Perspective in order to make photos look as ‘true to life’ as possible. Nearly all modern lenses are rectilinear – they capture straight lines in a scene as straight lines in a photograph. Whether wide angle or zoom, DSLR or iPhone, lenses are designed to keep lines straight, which helps the eye judge depth within a two dimensional scene. The fisheye is the most popular non rectilinear lens as straight lines are shown as curved from the extreme field of view.
Perspective Distortion
For this article I’m going to focus on only one form of photographic perspective distortion – perspective convergence or keystoning. This form of distortion is very common across architectural, street and travel photography. It’s most often seen when tall buildings ‘fall’ or ‘lean’ within a picture. This distortion has become so common that most people have stopped noticing it within their pictures or just think it has something to do with the focal length of their lens. For example, you can see the extent of the vertical convergence below when the verticals are outlined in white.
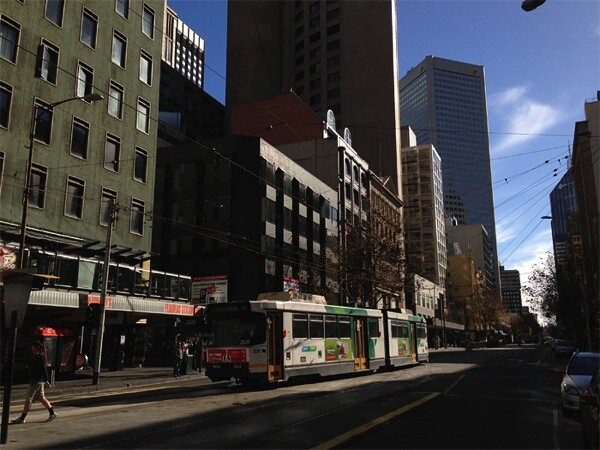
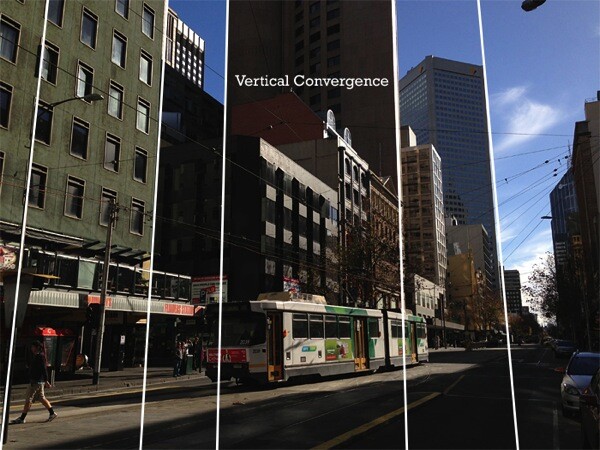
For a number of photographers, vertical convergence and distortion are unpleasant and unwanted because they don’t conform to Linear Perspective cues where vertical lines remain vertical. This makes the scene look different to how we think it should look. While this distortion can be used creatively, corrected photos often look ‘right’ to the viewer (see below).
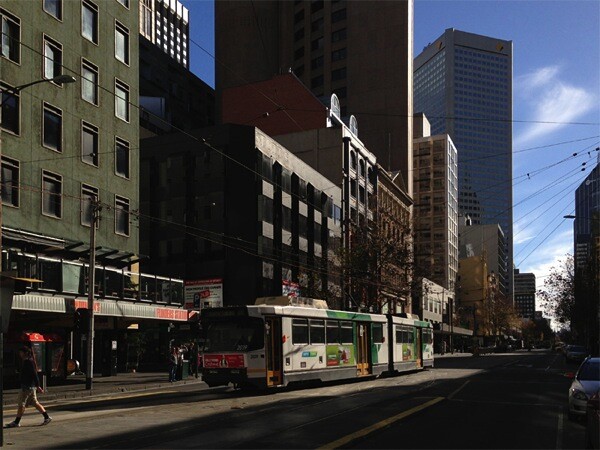
Why does Distortion Happen?
It’s actually pretty simple. As mentioned, modern lenses are designed to show straight lines. However, this only works when we the camera is pointed straight at (in line) with the object that is being photographed. This is because the distance between the camera and object remains the same. As soon as the camera is titled then the distance changes. Let me explain, if I’m trying to capture a tall building straight on with my camera I can only get the bottom section – vertical lines are straight but I’m missing the rest of the building. Now if I angle the camera higher I can get the whole building into the frame but now the vertical lines (sides of the building) are converging. Why? It’s because the top of the building is now further away from the lens than the bottom – just like the road receding into the distance.
So how do you take a photograph of a tall building without this happening? There are a few ways. The most obvious is by changing your viewpoint. You need to get higher to shoot more of the building front on, with the mid-point being the best place to capture the maximum amount of the structure. You could shoot out the window of a neighbouring building, or if there is nothing around you could spend some money on a crane!
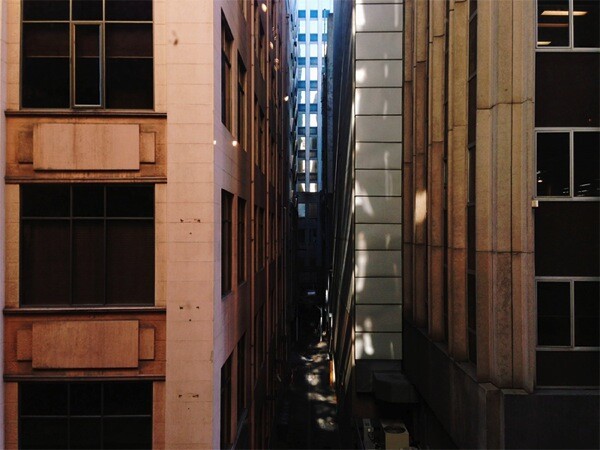
This photo was taken from the third floor of a neighbouring block. You can see that all the verticals in the photo are straight.
If you can’t physically get higher then you can change your viewpoint in two other ways. One is with the help of shift lenses the other is through perspective correction software.
Shift Lenses
The ability to shift the position of the lens has been around since the beginning of photography. The original view cameras (created in the 1840s) used a bellows system which let photographers change the position (shift) the lens in relation to the film. The shifting mechanism acted like a mini elevator, moving the photographer’s viewpoint higher and lower. Historically, shifting in order to correct perspective convergence was seen as an important part of the capture process, just like focus, shutter speed and aperture. Shifting was possible because the lens captured a much larger (circular) field of view than the film. The same way that modern shift lenses work. Modern shift lenses are commonly used by architecture photographers to limit vertical convergence on large buildings. However, these lenses can only be used on DSLR or medium format cameras and can also be very expensive (upwards of $ 1,000).
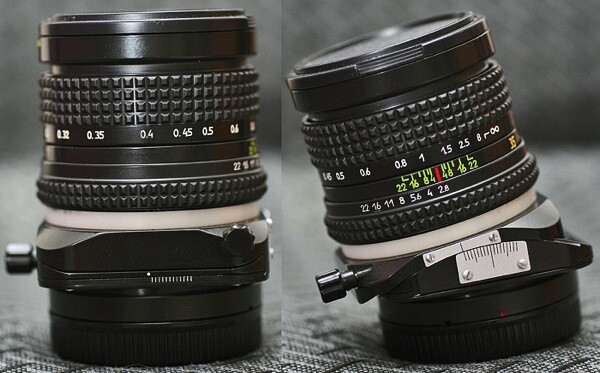
Here you can see the mechanical shift mechanism on an SLR lens – Photos by Bengt-Re
Software Correction
In recent years, digital technology has been able to replicate this shifting process, artificially changing the photographer’s viewpoint. Software like Photoshop, Lightroom or Gimp reworks the pixels in an image in order to straighten vertical lines in turn reducing distortion. Most of these programs allow you force the image back into a ‘correct’ position through either sliders or by selecting and dragging a corner. One of the downsides of the software is that significant adjustments require resampling of the image, often reducing sharpness in parts of the photograph.
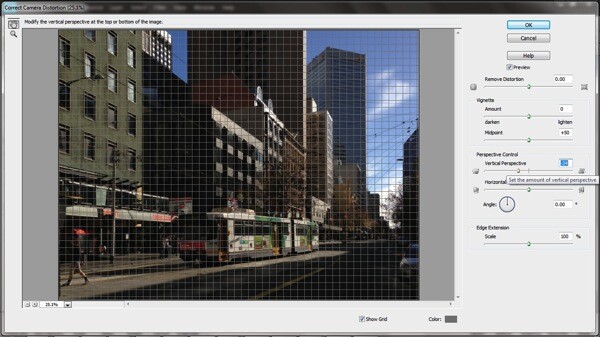
Camera Distortion Correction with Photoshop Elements 11
For photographers that either shoot or edit photos on their mobile phones, the Perspective Correct app for iPhone uses the touch interface to adjust both vertical and horizontal convergence within an image. For example, an up/down swipe on the screen represents the same movement as the shift mechanism on a lens.
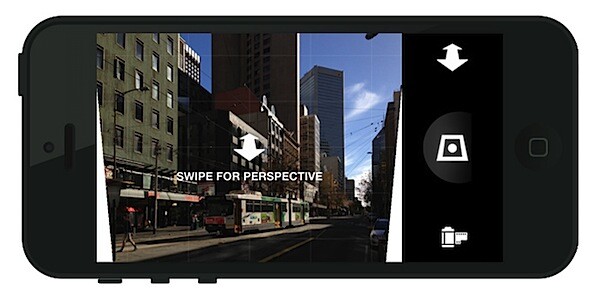
While it’s easy to overlook, small perspective adjustments can often be the difference between good and great urban and architectural photographs.
…………………………………….
Perspective Correct is the first app to offer live perspective adjustment of your photos and is available for download from the Apple App Store for US $ 1.99
Post originally from: Digital Photography Tips.
Check out our more Photography Tips at Photography Tips for Beginners, Portrait Photography Tips and Wedding Photography Tips.
Why are my Buildings Falling Over? A Short Guide to Perspective Distortion and Correction in Photography
You must be logged in to post a comment.