RSS
 

Posts Tagged ‘Directly’

You can now upload images directly to Google Photos with select Canon cameras

28 Aug

Google has teamed up with Canon to release a new integration for Google Photos that makes it possible to automatically back up your photos over Wi-Fi.

The integration works through Canon’s image.canon app for Android and iOS. Inside the app, you can connect your Google account and have images automatically upload to Google Photos when they’re transferred from your compatible Canon DSLR or mirrorless camera.

A full list of the cameras supported by image.canon

Unfortunately, this integration doesn’t come free. In order to wirelessly upload images to Google Photos, you must have a Google One subscription, which starts at $ 20/year ($ 2/month) for the 100GB plan and goes up to $ 100/year ($ 10/month) for the 2TB plan. Google is offering a free month to Canon users interested in testing out the new feature.

Articles: Digital Photography Review (dpreview.com)

 
Comments Off on You can now upload images directly to Google Photos with select Canon cameras

Posted in Uncategorized


You will soon be able to import into Lightroom on iOS directly from external storage

14 Nov

Adobe has given the public a new sneak peek at a future update for Lightroom on iOS that will simplify the process of importing images into the app. As demonstrated in the above video, Adobe will enable users to directly import images from card readers into Lightroom on iOS, after which point the content is uploaded to the cloud and added to the app’s photo library.

The ‘seamless importing experience’ will arrive in a future Lightroom update starting with iOS 13.2, according to Adobe’s Tom Hogarty. The company doesn’t provide an exact release date for this update, but says that it will arrive ‘soon.’

Articles: Digital Photography Review (dpreview.com)

 
Comments Off on You will soon be able to import into Lightroom on iOS directly from external storage

Posted in Uncategorized


You can now order photo books, prints and more directly through Flickr

31 Aug

Flickr has announced a new printing service that allows members to order prints, wall art, frames and printed mugs directly from their photostream. Developed in conjunction with SmugMug the service uses print houses in Minnesota, California and Scotland to fulfill the orders, as well as Blurb and Chatbooks for the photo book services.

The new service appears on the user’s photostream, image viewing and home pages as a Print menu item at the top of the page and/or a shopping cart at the bottom. Clicking either of these icons opens a new dialogue with product choices that include paper prints, wall art, desk art and keepsakes. The paper print section is divided into regular print sizes that fit standard frames, ‘other sizes’, panoramic prints and square sizes. The smallest print is 5 x 3.5in and the largest on offer is 20 x 30in.

When choosing canvases the site shows the area of the image that will be lost to the wrap. Print previews also show when the proportions of the image don’t match that of the paper

The wall art section contains options for canvas prints, framed images as well as printing on to metal and acrylic. Clicking on the photobook option takes you into a Flickr dedicated section of the Blurb website.

As a guide, 6x4in prints cost $ 0.76 each – with no apparent discount for multiple copies of the same image – and a 30x20in print will cost $ 22.80. Postage for print orders seems to be $ 14.59 however many you order, whether one or a hundred.

For more information see the Flickr prints information page.

{pressrelease}

Print Boldly with photo prints on Flickr

We’re thrilled to bring every photographer on Flickr a new professional-quality printing experience. Whether you’re a passionate beginner or a seasoned Pro, you can now order prints from the best pro labs around the world, capturing the beauty of the images that mean the most to you.

How does it work?

Whether you want to order a statement piece for a space you’re decorating or paper prints to share with family and friends, you can shop print products with just a few clicks.
Log in to your Flickr account and select the brand new Prints menu item in the upper navigation. You’ll be able to select the photo you want to print, choose the product style, size, and finish and add to cart. When you’re done making your selection, go to your cart and check out.

Or, while you’re browsing through your Photostream, choose a photo, click the new shopping cart icon, and select the product (we love the metal prints) to add it to your cart. Simply repeat this step to add more photos and items to your cart. When you’re done shopping, head back to your cart (accessible through the Prints menu item in the upper navigation) and check out.

Why print through Flickr?

We’re committed to making Flickr your be-all home for photography and this is just one more step to giving photographers better ways to let their photos live beyond the pixel. We are partnering with some of the best photo labs on the planet (Bay Photo, Loxley Colour, and White House Custom Colour) to make sure that no matter what size or shape your print, you’re getting professional quality prints each and every time.

What kind of prints can I get?

Metal prints: When you want to stand out.
Metal prints deliver unparalleled color and vibrance to produce a depth and clarity unlike any other photographic wall art. If you want a print as bold as your most epic photo, look no further than metal prints.

Paper prints: Big or small print them all.
Paper prints are a time-honored way to show off and share your favorite photos. From stacks of 4x6s to frameable statement pieces, you’ll be able to find the perfect size and paper finish for your favorite photos.

Canvas prints: Add a little class to your casa.
Add a little class to your home, office, or whatever other space needs the finesse of a classic canvas print. With shapes and sizes perfect for wherever you want to hang your photos, your images will look outstanding.

While you’re at it, come join the new Flickr group: Print Boldly. There will be lots of discussions and conversation around preparing your photos for printing, finding inspiration around what to print, and exclusives and deals for all members.

We’ve been lucky enough to lean on our friends at SmugMug to develop this new feature. This has been an awesome opportunity to take advantage of our sister product teams’ skills to build something new while most of the core Flickr team was consumed by the migration including getting Camera Roll up and running again. It was a team effort!

Have fun and #printboldly!

{/pressrelease}

Articles: Digital Photography Review (dpreview.com)

 
Comments Off on You can now order photo books, prints and more directly through Flickr

Posted in Uncategorized


Timelapse+ Studio makes it easier than ever to create timelapses directly in Lightroom

02 May

Timelapse+ has introduced a new plug-in for Adobe Lightroom that promises to make editing and constructing timelapse videos significantly easier. Timelapse+ Studio can identify timelapse sequences in your library and form them into collections. It will then automatically mark what it thinks are key frames in the sequence and allow users to edit those key frames in Lightroom as normal. Users can add more key frames and then have the software blend transitions to balance for adjustments across all the images in the sequence.

The software also allows users to zoom in to areas of the scene and to pan across the frame to create a sense of camera movement even in situations in which the camera and lens were stationary during recording.

Exposure differences between frames, or different parts of the sequence, can be ironed out to avoid abrupt changes, and the result can be previewed in a window within Lightroom once the sequence is complete. The company says all the automated tasks the software performs can be undone and redone by those that need manual control of the way the timelapse is created.

The astro timelapse below was created by Adrien Mauduit using Timelapse+ Studio.

Timelapse+ Studio is available now and costs $ 49. For more information see the Timelapse+ website.

Articles: Digital Photography Review (dpreview.com)

 
Comments Off on Timelapse+ Studio makes it easier than ever to create timelapses directly in Lightroom

Posted in Uncategorized


Report: iOS 13 will be able to import photos directly into apps from external storage

25 Apr

As powerful as iPads have become over the past few years, one of the most limiting factors of the device is its operating system. Apple has incrementally updated iOS, but overall has left much to be desired from the creative world, most notably in the area of storage. That might just change, however, according to the latest reports from 9to5Mac.

At its World Wide Developer’s Conference (WWDC19) in June, Apple is expected to announce iOS 13, which 9to5Mac says will finally include the ability for third-party applications, such as Adobe Lightroom CC and Affinity Photo, to import photos directly from external storage.

Until now, it was only possible to import photos into Lightroom CC and other post-production apps after the photos had been imported to the iOS Camera Roll. This not only effectively doubled the time it took to start processing photos, but also doubled the amount of space the images took up, at least until the photos were entirely imported to Lightroom CC and deleted from the Camera Roll.

According to the reports, which 9to5Mac has had a solid history of getting right on the iOS front, it will now be possible to plug in a memory card via the iPad Pro’s USB-C port and skip the Photos app altogether. Combined with the ability to now add various docks and hubs to the iPad Pro via its USB-C port, it could make for a pretty capable mobile setup.

There’s no definitive word on whether or not external HDDs and SSDs will be supported in terms of storing Lightroom CC libraries and other media elsewhere, but that too is one area that needs to be addressed for many photo professionals and hobbyists alike to make the jump to working off an iPad Pro exclusively.

Articles: Digital Photography Review (dpreview.com)

 
Comments Off on Report: iOS 13 will be able to import photos directly into apps from external storage

Posted in Uncategorized


Reckless drone video under investigation for flying directly above passenger jet

08 Feb

A drone pilot has enraged the entire UAV community after sharing a video in which he flew his drone directly above a passenger jet flying out of Las Vegas’ McCarran International Airport. The stunt was captured in a video by the camera drone, which shows it facing the jet before turning to fly in the same direction and quickly dropping altitude to get closer to the aircraft. The drone then chases after the plane but quickly falls behind.

The video was first shared privately on the Facebook group 1% FPV by someone posting under the name “James Jayo Older.” Some concerned members took a screen capture of the video and shared it outside of the Facebook group to bring attention to the dangerous stunt.

The FAA has since confirmed that it is investigating the flight, which has been heavily condemned by drone enthusiasts and the general public alike. Federal regulations prohibit drones from being operated above 400ft, near airports, and around aircraft—this pilot seems to have blatantly violated all three rules. Operating a UAV at such a close distance to an aircraft could put the entire flight at risk.

According to the FAA’s website, recreational drone pilots are required to alert air traffic control towers (when present) and airport operators ahead of time about flights happening within a 5 mile radius of an airport. “However,” the FAA notes, “recreational operations are not permitted in Class B airspace around most major airports without specific air traffic permission and coordination.”

The FAA has an online system where anyone can report a drone violation.

Articles: Digital Photography Review (dpreview.com)

 
Comments Off on Reckless drone video under investigation for flying directly above passenger jet

Posted in Uncategorized


Instagram will soon let you book photographers and other services directly in the app

23 Mar

Photographers with a strong presence on Instagram might soon be able to monetize their accounts in a more tangible way than has been possible so far. In an interview with Bloomberg, James Quarles, Instagram’s head of business, has confirmed that Instagram will soon add a function to book a business or service directly from the mobile app. The feature is expected to be launched within the next couple of months. 

In practice, business accounts will be able to add a booking option, allowing potential customers to schedule appointments through the app, without the need to use other means of communication. The Bloomberg article gives the example of booking an appointment in a hair salon but the new feature could be especially interesting for commercial photographers, many of whom maintain a strong presence on the image sharing platform.  

The move will put Instagram into direct competition with services such as Yelp or OpenTable. Quarles also said that currently about 8 million businesses use profiles on Instagram and 80% of users follow a business. The company may eventually add more tools, such as reviews. If you are a photographer offering commercial services, now seems like a good time to brush up your profile. 

Articles: Digital Photography Review (dpreview.com)

 
Comments Off on Instagram will soon let you book photographers and other services directly in the app

Posted in Uncategorized


How to Publish Images Directly to Instagram From Lightroom

29 Nov

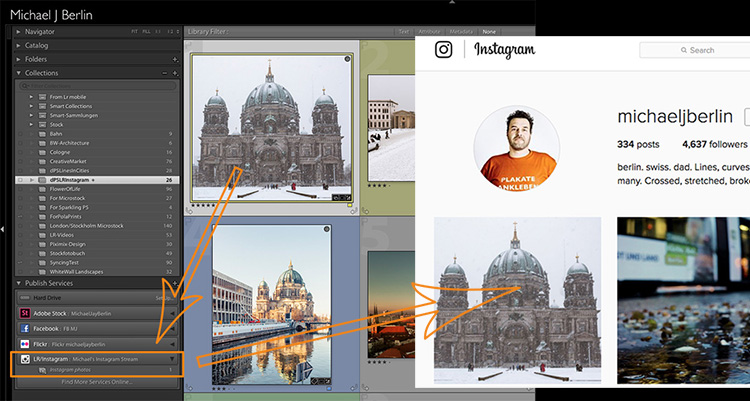
The Lightroom Library module offers more than just the option to organize your images. With its Publish Services, it allows uploading content to online services from within its interface. The best known Publish Services might be connections to Facebook or Flickr built into the software by Adobe. Since the summer of 2016, you can add Instagram to this list. The LR/Instagram plugin allows publishing on the popular sharing platform through a direct connection from the Library module.

From Lightroom to Instagram

This comes in pretty handy since Instagram does not allow uploads from desktop computers directly. Until now you had to find ways to export images from Lightroom and transfer them to your smartphone before being able to publish them on Instagram.

Installation of the LR/Instagram plugin

The plugin is free to download and try, and there is no time or volume limit to the usage. The publisher, however, asks for a $ 10 payment if you like it. The payment can be done through the plugin manager in Lightroom with a PayPal transaction.

Please also note that this plugin is programmed by a third party, neither Adobe nor Instagram can offer any support, and the plugin may fail at times when either Lightroom or Instagram change their code. So keep yourself updated through the author’s website.

The LR/Instagram plugin acts as a publishing service within the Lightroom Library module. To install the plugin, you first need to download a ZIP file from the website and unpack that to your hard drive.

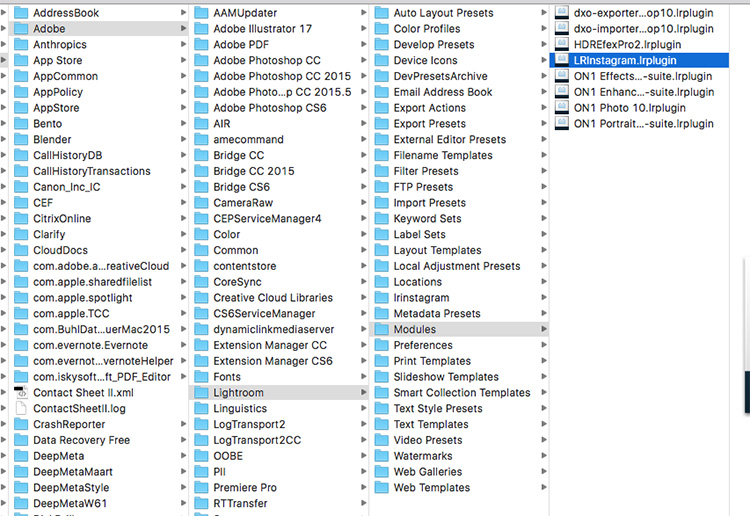
Lightroom Module folder

While Lightroom allows you to install the plugin from that location, I recommend first moving it from your download folder or desktop to a more permanent location. I use the “Modules” subfolder in the Application Library structure on my hard drive to store my LR plugins. But as your system may vary, make sure it is located in a folder that is related to your Lightroom installation.

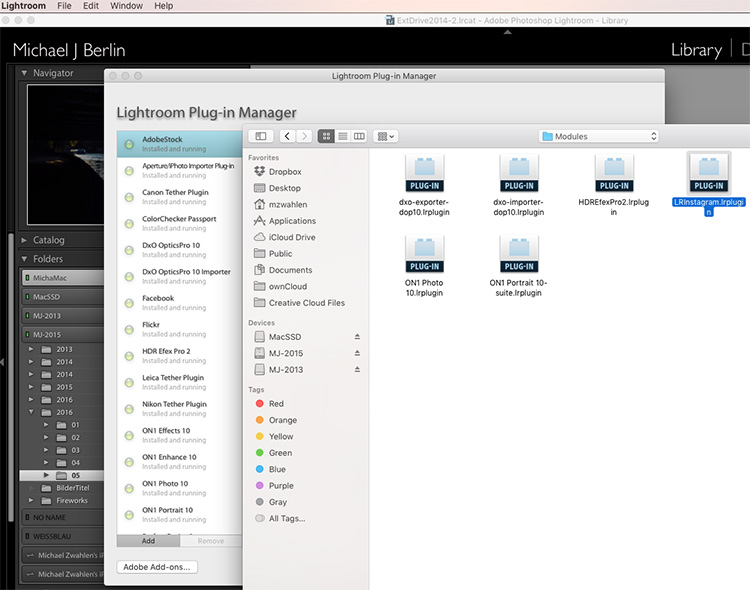
Now in Lightroom, open the Plug-In Manager through the File menu structure. Below the list of existing plugins you can find an “Add” button. Point Lightroom to the location of the plugin and tell it to “Add Plug-In”.

Add LR/Instagram Plug-In

How to set up your Instagram Publish Service in Lightroom

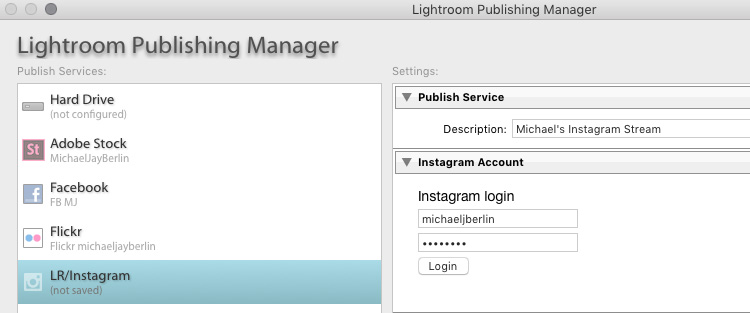
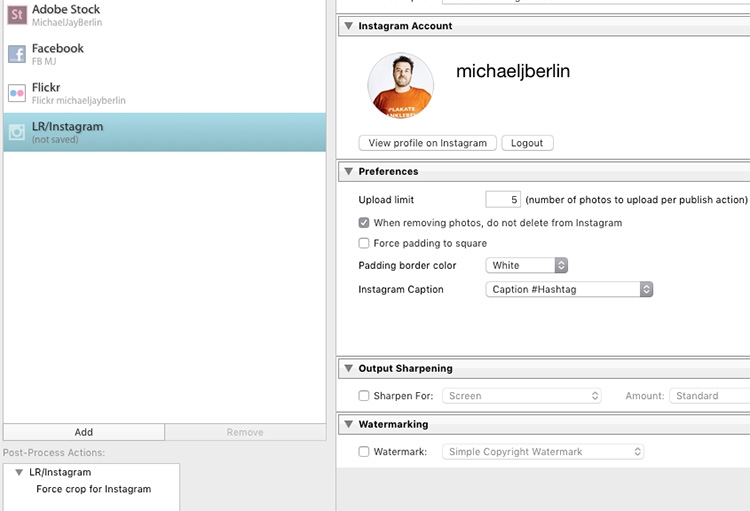
Once it is installed, you have to set up a Publish Service using that plugin. For this, press the Plus button on top of the Publish Services section in Lightroom’s Library module. The Publishing Manager will show up and offer LR/Instagram as an additional service. You can name the new service and enter your Instagram username and password.

Please note that the plugin does not work with a Facebook connection login, you need to have a password directly on the Instagram site.

Setting up the LR/Instagram Plug-In

If you now press the Login button, the plugin will show your Instagram profile picture if successful.

Configure settings

In the Preference section, you can limit the number of images published at once. As Instagram and its users might react negatively to one user filling up pages of images at once, it is recommended to set this to a value of around five.

Since Instagram changed their platform to also allow non-square images, you could upload portrait or landscape oriented images to the platform. Still, some users prefer to make their images all appear in the commonly known square format. For this, you can have the plugin add a white or black padding border for images that are not natively in square format.

However, I prefer to crop my images to square format before uploading them to Instagram. For this, I usually create a Virtual Copy of my image in Lightroom before making the Instagram crop. I might upload the original format to other platforms like Facebook and want to avoid going back and forth between different formats.

As Instagram widely relies on #hashtags for users to find content outside of their followings, the LR/Instagram plugin offers a separate metadata field with the option to add these hashtags within the Lightroom interface. You can find the hashtag field in the Metadata section through the drop down menu selecting the LR/Instagram section.

LR/Instagram Preferences

In the preferences area of the Publishing Manager, you can choose to “Caption #Hashtag” as an option to publish the image on Instagram using your caption and add the hashtags from that separate field. If preferred, you can also just publish the image using Title or Caption from your metadata as you also could enter hashtags in a second stage on the Instagram platform directly.

Publishing images to Instagram from Lightroom

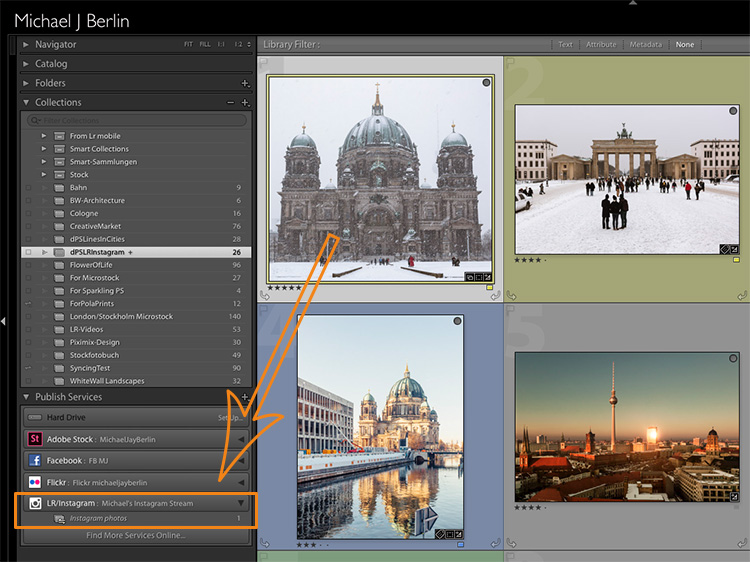
Once set up, the new Publish Service will appear in your Library module. You can now simply drag the image you want to publish to the “Instagram photos” collection. This serves as a collection like all others in Lightroom. If you prefer, you can also set this as your Target Collection which allows you to use the B shortcut to directly add images from anywhere in your library into it.

Drag and drop images in Lightroom

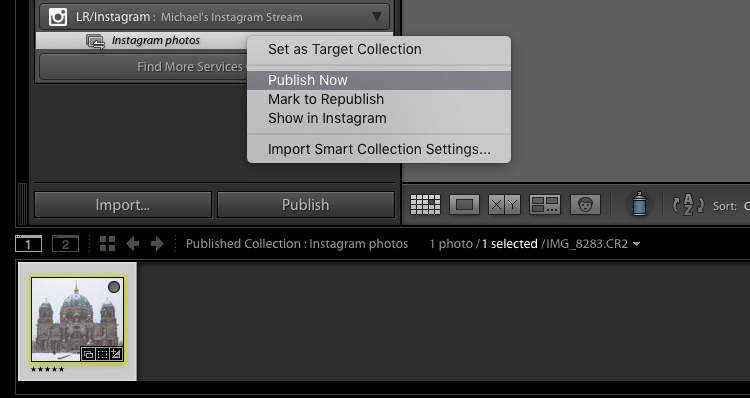
When you are finished adding images, you can now tell Lightroom to publish those images. Personally, I try to limit myself to one new image each time. But if preferred, the plugin will now publish as many images as you have recently added to its collection or the limit you have set in the Preferences as explained above. The Publish Service will now run in the background and use Instagram’s API to publish your image.

Publishing from Lightroom to Instagram

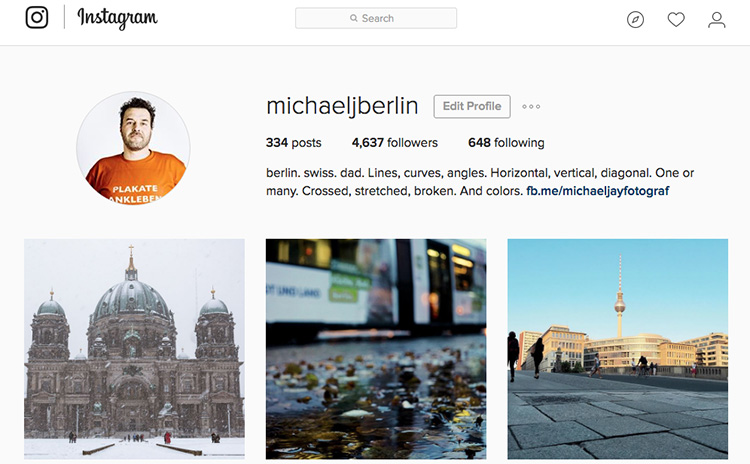
Instagram Stream with photo from Lightroom

If you ever want to change the settings you have originally entered, just press the Plus button on the Publish Services section in the Library module and open the Publishing Manager again.

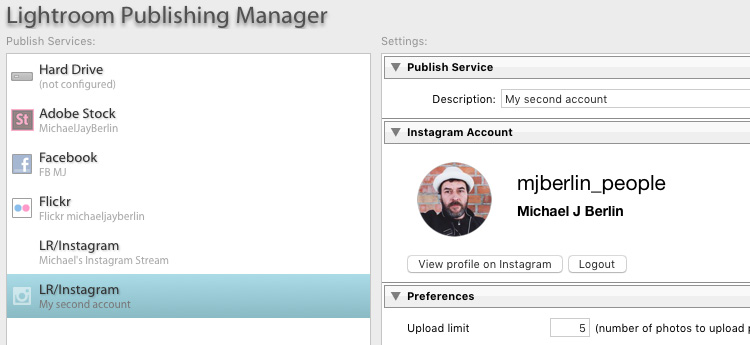
You can also set up multiple different publishing streams, either with different settings or even for a separate Instagram account.

Multiple Publishing Streams for second account

Give it a go

So if you’re on Instagram you might want to have a look this the LR/Instagram plugin. If you’ve used it tell us about your experience. Please share your profile so others can see your work, and follow dPS on Instagram as well.

Read this on how to get more Instagram followers too.

googletag.cmd.push(function() {
tablet_slots.push( googletag.defineSlot( “/1005424/_dPSv4_tab-all-article-bottom_(300×250)”, [300, 250], “pb-ad-78623” ).addService( googletag.pubads() ) ); } );

googletag.cmd.push(function() {
mobile_slots.push( googletag.defineSlot( “/1005424/_dPSv4_mob-all-article-bottom_(300×250)”, [300, 250], “pb-ad-78158” ).addService( googletag.pubads() ) ); } );

The post How to Publish Images Directly to Instagram From Lightroom by Michael Zwahlen appeared first on Digital Photography School.


Digital Photography School

 
Comments Off on How to Publish Images Directly to Instagram From Lightroom

Posted in Photography


STG Uploader app allows Sony cameras to upload directly to Google Photos

14 Jun

A new unofficial app called STG Uploader enables Sony cameras compatible with PlayMemories Camera Apps to upload content directly to Google Photos. Running the application will prompt the user to set up a Wi-Fi access point, after which the user will authorize the app to place an oAuth token on the camera’s SD card, a safer alternative to saving the user’s Google username and password on the camera.

Full instructions on installing the app are located on the Sony-PMCA-RE Github. Once installed and set up, users are presented with a simple screen that shows how many photos are ready to be uploaded to Google Photos and how many have already been uploaded. An upload status bar is provided, as well as an option for erasing the upload database.

According to a user at SonyAlpha Rumors, the app uploads photos in full resolution. Images uploaded directly will appear in Google Photos with the name ‘SonyUpload’ followed by the date. Note that formatting the SD card will cause the oAuth token to be erased and the app setup process will have to be repeated.

Via: SonyAlpha Rumors

Articles: Digital Photography Review (dpreview.com)

 
Comments Off on STG Uploader app allows Sony cameras to upload directly to Google Photos

Posted in Uncategorized


5 Tips to Take Better Sunset Photos – and Why Not to Photograph the Sunset Directly

31 Mar

As a landscape photographer, I participate in many online groups, and I also teach classes where I get the opportunity to see less experienced photographers’ work. I often see some very good work, but many times I also see missed opportunities. Newer photographers just getting started photographing landscapes often times become so enamored by the colors in the sky, that they neglect other areas of the image. I often see images with weak, underexposed foregrounds, and poor compositions that keep them from being good photos and relegates them to being just pretty snapshots.
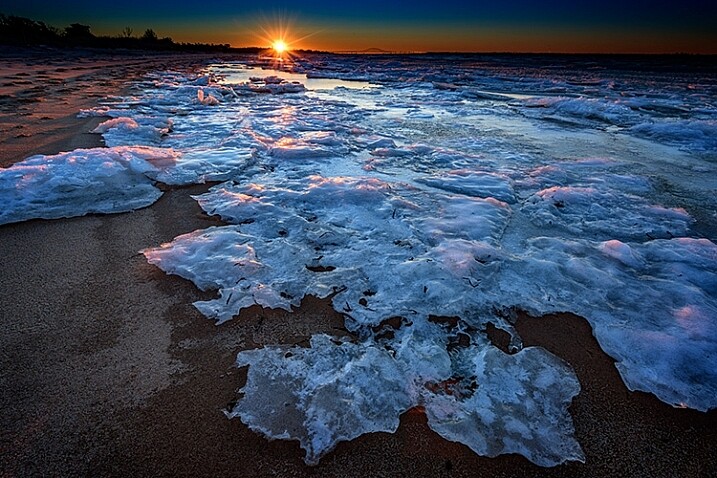
Sunset in the background with a starburst

Don’t get the wrong idea. I often photograph at sunrise or sunset. But, the sun or sky is rarely the subject of the photo. It may be an element in the image, but the subject is generally something else. In many ways, it can be more difficult to make a great image at sunset or sunrise, because there is a tendency to be drawn to the pretty colors in the sky. But as photographers, we really need to pay attention to the other elements in the image to ensure we’re creating a complete composition. So below are a few tips to help improve your sunset or sunrise photos.

1- Put the sun in the background

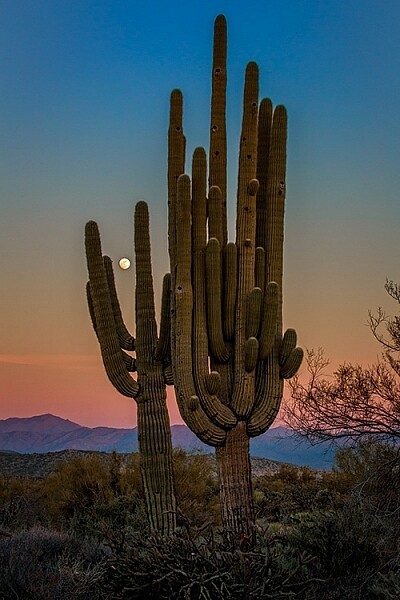
This tip is the most obvious. Sunsets make great backgrounds, but rarely do they make great subjects. You need to find a good foreground. The gorgeous colors in the sky can be so vibrant that they really allow us to see our surroundings differently. The play of light and shadow over objects in the foreground, due to that great directional light given off when the sun is lower in the sky, helps create interest that might not be there in the middle of the day when the sun is higher.
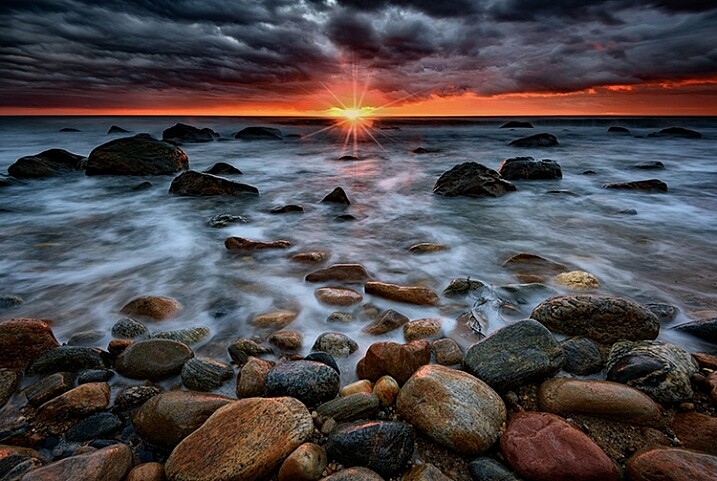
A sunrise in the background adds interest

The best way to do this is to find something of interest right in front of you. Use a wide angle lens, such as the 16-35mm or something around that range, zoom out to as wide as you can, and put your foreground object a few feet in front of you. Stop down and set your aperture to f/11 or smaller, and focus on your foreground object to ensure that it’s sharp. If you want to add some extra interest, try stopping your lens down as far as you can. This will help create a starburst where the sun is, which will add a little extra interest in your scene.

One thing to keep in mind, is that the exposure for your foreground subject and the background exposure, are likely going to be very different. You have a few options here. The first would be to expose once for the foreground, and once for the background, and then blend them together in Photoshop. A great article on blending exposures is 5 Easy Steps To Exposure Blending for High Contrast Landscapes. Next, and generally my preferred method, is to use a graduated neutral density filter to try and darken the bright sky in the background, so that it is more balanced with the foreground subject. Read Using Graduated Neutral Density Filters for Landscape Photography for more on ND Grads.  The last, and easiest option, is to create a silhouette of the foreground objects, while properly exposing the colorful sky and sun in the background.  This works best with a singular object with a distinctive form, such as a bridge, a tree, a distinctive building, or a person in a distinctive pose.

2 – Photograph with the sun at your side
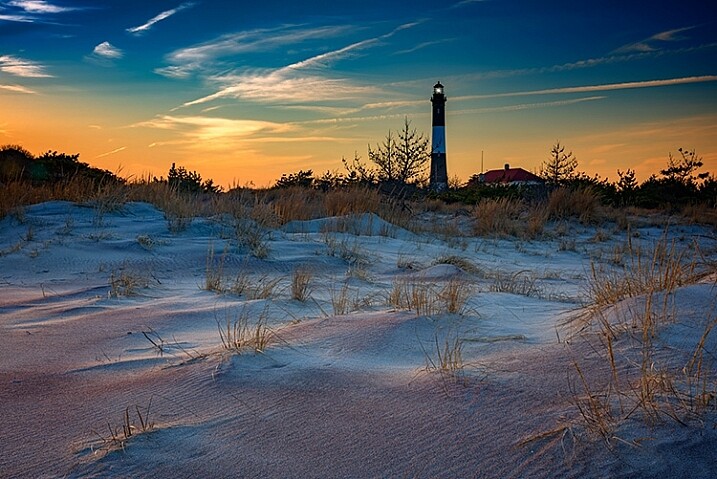
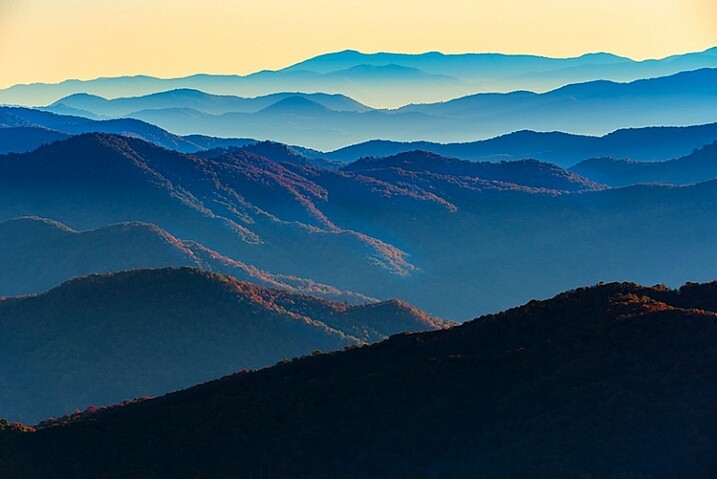
Photograph with the sun at the side

In this case, the sun itself won’t be in your scene at all. The magic of sunsets or sunrises is the soft, warm, directional light they offer. This light can create tremendous light and shadow play within the scene, making textures in your foreground especially desirable. Rocks, logs, trees, grasses, and undulations or patterns on the ground, will create interesting shadows and highlights that draw your viewer’s eye into the scene. In this case, it’s often best to put the sun to your side, so that it rakes across the scene, letting the shadows and highlights play from one side to the other.
Use-Textures-To-Catch-light

With a scene like this, a polarizing filter may help as well, as they are most effective when the camera is aimed 90° from the sun. This will help deepen blue areas of the sky, enhance other colors, and reduce any haze that may be in the scene. You may need to make some choices about exposure, if the contrast between highlight and shadow in the foreground is too great. A graduated neutral density filter can help keep the sky under control if it is still too bright against the foreground.

3 – Keep the sun at your back
Put the sun behind you

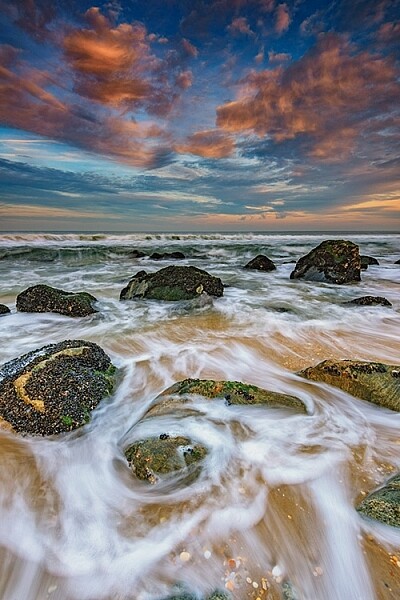
At sunrise or sunset, that soft warm light that I mentioned as being great from the side, is also great from behind you. This will help create a soft frontal light on your scene, illuminating all of the details. This is likely to be the easiest exposure of the three situations, in that the light will be very even, with no bright highlight or deep shadow areas in the scene. You’ll likely get soft, warm pastel colors if there are any clouds or haze in the sky to reflect the sun’s light.

Be careful when composing your image, as the sun behind you will cast a long shadow, and you may end up with your own shadow in the photo. To minimize this, try crouching down low, and setting your tripod as low as possible to help shorten the shadow. Also, if using filters for longer exposures, on DSLRs with optical viewfinders, the sun can enter the camera from the rear, affecting your exposure. Take care to cover your viewfinder in these instances.
Sun-At-Your-Back

4 – Arrive early, stay late

You’ll want to get there early for sunrise. The color in the sky can start half an hour, or more, before the sun actually rises, with clouds first showing subtle traces of pink and purple before the red, orange, and yellows appear as the sun breaks the horizon. You’ll want to be set up and ready when that happens, which means trekking through the dark to your location. Advance scouting can be helpful for this.
Stay Late

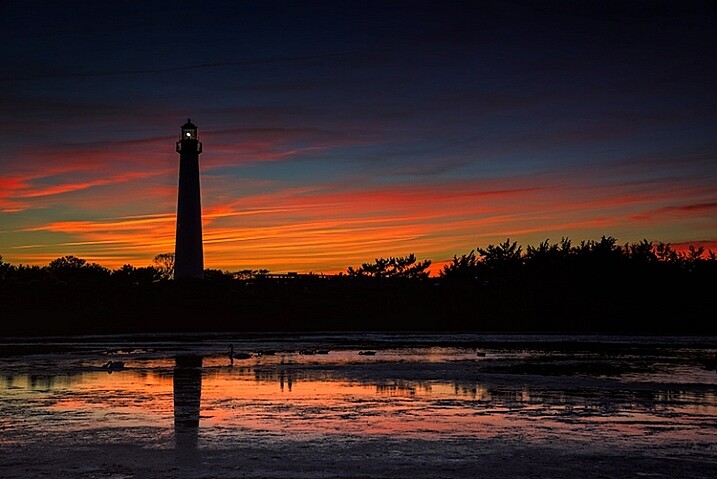
The same is true at sunset, but in reverse. Just because the sun has gone down, doesn’t mean that the show is over. Generally speaking, the sky will continue to light up, and colors will continue to change for about 30 minutes after the sun goes down. Many photographers have packed up and gone before this happens. Patience will reward you with more subtle color changes, such as reds going to purples and blues, rather than the vibrant yellows and oranges you get during the initial phases of the sunset.

5 – Shoot RAW

More than any other time to shoot, sunset or sunrise creates dramatic colors and fantastic play between light and shadow. Because of that, it can be difficult to try and capture the detail in the shadows or highlights, depending on which way you bias your exposure. A RAW file contains much more information than a JPEG, which will allow you to bring out the details in shadow and highlight areas that may be lost if shooting JPEG files. In addition, shooting RAW files allows you to adjust your white balance in processing to give you better control over the overall tone of the image.

For more on processing RAW files, check out Understanding the Basic Sliders in Adobe Camera RAW, and for more on why you might want to consider photographing in the RAW format, see 5 Reasons To Shoot Your Landscape Images in RAW.

What’s your favorite sunrise or sunset photography tip? Please post your tips and images in the comments below!

googletag.cmd.push(function() {
tablet_slots.push( googletag.defineSlot( “/1005424/_dPSv4_tab-all-article-bottom_(300×250)”, [300, 250], “pb-ad-78623” ).addService( googletag.pubads() ) ); } );

googletag.cmd.push(function() {
mobile_slots.push( googletag.defineSlot( “/1005424/_dPSv4_mob-all-article-bottom_(300×250)”, [300, 250], “pb-ad-78158” ).addService( googletag.pubads() ) ); } );

The post 5 Tips to Take Better Sunset Photos – and Why Not to Photograph the Sunset Directly by Rick Berk appeared first on Digital Photography School.


Digital Photography School

 
Comments Off on 5 Tips to Take Better Sunset Photos – and Why Not to Photograph the Sunset Directly

Posted in Photography