RSS
 

Posts Tagged ‘Delete’

Adobe issues fix for Creative Cloud Mac update that could delete files

16 Feb

Last week, Adobe rolled out a Creative Cloud update with a harmful bug that, for some Mac users, deleted files from the system root directory. Once the bug was discovered with the help of backup platform Backblaze, Creative Cloud version 3.5.0.206 was pulled from release and was replaced Sunday with an update that promises to fix the issue.

The bug appears to have deleted the first file in the root directory for users who downloaded the update, whatever that file might have been. Backblaze users noticed problems because alphabetically, the service’s .bzvol folder sits at the top of their root directory. When Creative Cloud deleted the folder, Backblaze alerted the user that something was wrong.

In a blog post on Friday, Adobe acknowledged the issue, saying that ‘the updater may incorrectly remove some files from the system root directory with user writeable permissions.’ Version 3.5.1.209 was released Sunday with a fix for the problem.

Adobe directs users who experienced problems with the Creative Cloud update to contact customer service. The latest update is available now for Mac and Windows.

Articles: Digital Photography Review (dpreview.com)

 
Comments Off on Adobe issues fix for Creative Cloud Mac update that could delete files

Posted in Uncategorized


The Best Way to Delete Photos From Your Memory Card

01 Mar

When it comes to photography, we spend most of our time thinking about taking photos – lighting, composition, exposure, and posing. Then, once the photo is taken, we may start to think about post-processing, gently nudging the photo along until it becomes exactly what we’ve pictured in our mind’s eye. Once that’s accomplished, we do it all over again.

MeredithClark6.jpg

Back in high school and college, I shot film. I can vividly remember running out of film, and sometimes having to wait weeks until I was able to buy more. Our public high school relied heavily on donations of film, and sometimes when there wasn’t any left, our teacher would have us walk around campus with our pointer fingers and thumbs shaped into a rectangle, pretending to take photographs. Now that digital cameras are on the scene and we’re using memory cards in lieu of film, with the capability to erase images and write over them again, the number of photographs that we can take in any given week or month is nearly endless.

You may have noticed that I said, “nearly” endless, and that’s because memory cards do have a lifespan, and will not last indefinitely. That said, there are a few things that we can do to maximize the lifespan of our memory cards, including making sure that we are deleting our photos off the memory card in the most efficient manner possible. This isn’t something that’s talked about all that often, but when it comes down to it, it is really simple:

Less Desirable Ways to Delete

Deleting each photo individually through the camera by using the “Delete” or Trashcan Button
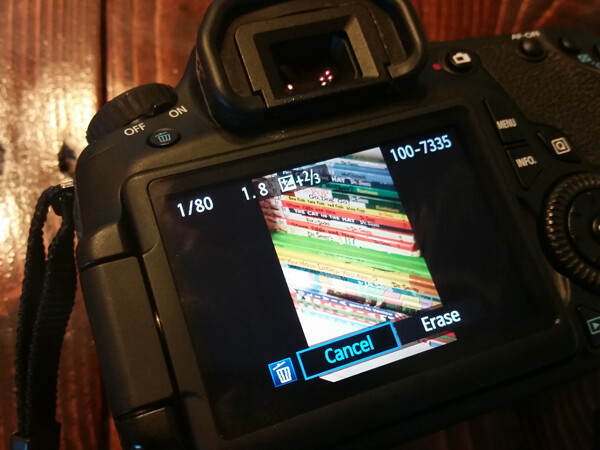
Del3

Deleting all photos through the camera by using the “Delete All” option
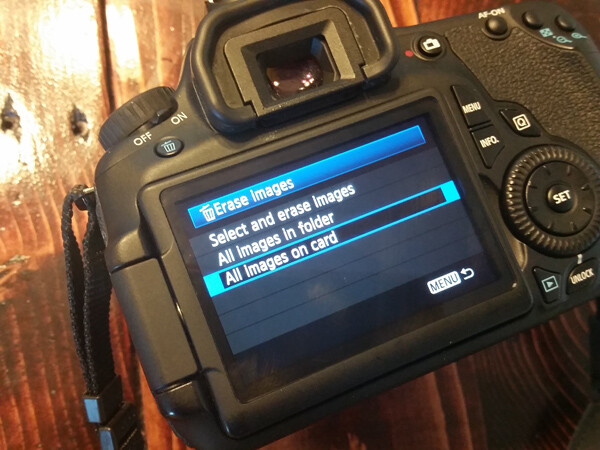
Del2

Plugging the camera into the computer, and dragging photos into the computer’s recycle bin and/or allowing your import software to delete the files from the card once they’re uploaded.
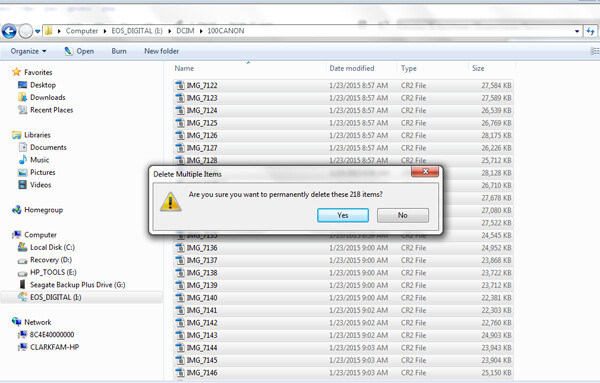
Del1

Most Desirable Way to Delete

Using your camera’s Format function
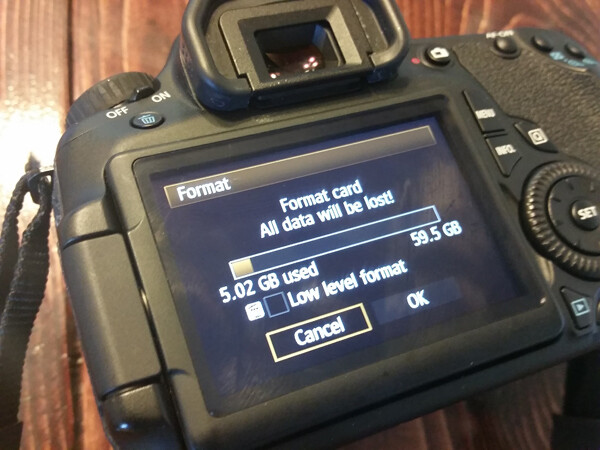
Del4

In the end, all of the  above methods work toward the same end, in that they remove the images from your card. However, the first three ways to delete are actually more taxing to the memory card than using the card’s Format function. I’ve heard it explained like this:

Let’s pretend for a moment that your memory card has a shelf-life of 1,000 uses. Let’s say that you go out and take 500 photos, that’s 500 uses on your memory card. You then upload the photos to your computer, and then individually delete each photo using the delete button on your camera. Deleting each photo individually counts as another 500 uses on your card. So in all, you’ve just spent 1,000 uses of your memory card, leaving you with no uses left on that card.

Now, let’s pretend that you’ve uploaded your 500 photos, but instead of deleting them with your delete button, you use your camera’s Format function. Formatting works in a different way than deleting, and only deletes the directory files rather than the images themselves. This then allows the images to be overwritten the next time you take a picture. Because of this, formatting only counts as ONE use of your memory card, regardless of how many photos you’re deleting. So, in the scenario above, you’d have used only 501 of your memory card’s uses, as opposed to 1,000 with deleting manually. Certainly,  memory cards available today will be able to handle far more than 1,000 uses, but the illustration still rings true – formatting your card causes less wear and tear on your memory card than other ways of deleting images.

Additionally, because formatting only deletes the directory file instead of the images themselves, images on a card that has been formatted are typically much easier to recover (if needed) than those that are deleted manually, assuming that you did not overwrite them by taking more photos. Not a bad trick to have up your sleeve in case of emergencies, am I right?

I’d also like to add that I have personally seen a difference in both buffering time of the card, and also a decrease in the amount of corrupted images/cards that I’ve come across since I’ve been formatting cards rather than deleting in some other way. I’m not sure whether there’s an actual scientific basis there, but it definitely seems related in my book, and it is now pretty rare that I delete even a single image in any way other than formatting.

So, how often should you format? Some people like to wait until their card is totally full, and then format. Personally, I like to format my card before each new photo session. It just makes sense to me to start fresh each time, and be able to upload everything on the card to one location. This is really a matter of personal preference as far as I’m concerned. The one hard and fast suggestion that I do have when it comes to formatting cards is simply to be sure to format the card in whichever camera body you plan to use it in next.

How do you typically delete images, and why?

googletag.cmd.push(function() {
tablet_slots.push( googletag.defineSlot( “/1005424/_dPSv4_tab-all-article-bottom_(300×250)”, [300, 250], “pb-ad-78623” ).addService( googletag.pubads() ) ); } );

googletag.cmd.push(function() {
mobile_slots.push( googletag.defineSlot( “/1005424/_dPSv4_mob-all-article-bottom_(300×250)”, [300, 250], “pb-ad-78158” ).addService( googletag.pubads() ) ); } );

The post The Best Way to Delete Photos From Your Memory Card by Meredith Clark appeared first on Digital Photography School.


Digital Photography School

 
Comments Off on The Best Way to Delete Photos From Your Memory Card

Posted in Photography


Delete Images?? NEVER!!

11 Dec

Recently, Russel Masters wrote that deleting images was good for you.  While I agree there is a reason to delete some images- those clearly out of focus, poorly exposed, or with fatal composition flaws, I’m not a fan of wholesale deletion of images from a set.  This rule applies to portraits, landscapes, and anything else I shoot.

Sand Harbor

This image of Sand Harbor at Lake Tahoe, Nevada, languished on a hard drive for 3 years before I got around to editing it. It wasn't even in the folder I designated for the "keepers" I shot that day. The technical details: ISO 100, 1/25, f/16. EOS 5D Mark II with EF 14mm f/2.8L II.

Here’s the deal.  I go through all of my images and immediately begin processing the ones that immediately strike me as being worthy.  Eventually I get through those, and then tend to walk away.  At this point, it seems Mr. Masters is content to keep the ones he’s deemed as “keepers” and deleting everything else in the name of hard disk space.

I emphatically disagree with this philosophy.  First off, disk space in this day and age is relatively cheap. A 1TB external hard drive can be had for less than $ 100USD. I try to maintain redundancy with regards to hard drives, keeping two identical drives to store the files.  One is my working copy, while the other is simply a backup of RAW files, moved offsite to my office for safe keeping.

Second, and more importantly, sometimes the emotion from the shoot gets in the way.   Several times, I’ve come home from a trip or a shoot and immediately worked on the images that struck me as keepers as soon as I shot them.  And those images still strike me as keepers, even years later. But I’ve had several times where I went back through images years after the originals were shot, and found gems that for whatever reason I didn’t even mark as a potential keeper.

The above shot of Sand Harbor, Lake Tahoe is one example.  I shot this image, along with others that day, in 2009. I had several nice sunset shots and dusk shots that really popped for me. This shot was taken as I waited for the light to get more dramatic, and then was apparently forgotten in the heat of the moment as other images jumped ahead of it in my mind.  Fast forward to 2012.  I was going through old images on this hard drive, just basically looking for images I hadn’t yet processed and might want to.  I was bored and was looking for something to do.  I went through the images shot that evening and saw this one and wondered what I had been thinking in not processing the file.  Truth be told, it was a lot easier to process than some of the images I immediately worked on.  I simply tweaked the saturation and contrast and was done. Posted it to my website minutes after I completed the processing.  Within two hours, I sold a 20×30 print on acrylic for $ 225USD. Well worth the time and effort to edit.

Boston Skyline

This is another image, taken the same month as the Lake Tahoe shot. This was an exceptional shooting day for me. I went into Boston in search of this spot, found parking, and was thrilled to see all the sailboats on the Charles River, making for an excellent foreground. I used every lens in my bag this day, getting salable shots with each- everything from a 14mm f/2.8 to the 70-200 f2.8L IS. This shot was taken with the EF 24-105 f/4L IS, at 47mm. But due to the number of good shots captured that day, I just ignored it as being too blah. Since I finally edited it, it has sold 5 times!.

Another such image is this one, of the Boston skyline. I’d shot this image in August 2009 as well. I’d had several shots I absolutely loved from this set.  For some reason, I find some of my best selling images are from in and around Boston.  I had decided to see what else I hadn’t posted to my website to see if I had anything worth posting that I thought might sell.  This image was one.   It’s less dramatic than some of the keepers I immediately edited that day.  In fact, it’s a fairly standard shot. But I had a great sky and good light that evening.  I felt it was worth working this image and posting it.  I’m glad I did.  In the 3 months since it was posted, the image has sold 5 times! Between the two images, I’ve made enough to purchase five 1TB hard drives- making Mr. Master’s argument about saving disk space moot.

This shot was instantly deemed a keeper in my eyes, and edited immediately. I loved the effect the 14mm lens had on the clouds, and the interest added by the sailboats in the foreground. I had deemed the other shot, Boston Skyline, a bit too blah at the time of the initial edit. Three years later, I edited it, and within a few months has become one my best selling images.

The bottom line is, I would be VERY careful of what I delete in terms of images.  Yes, get rid of those clearly flawed images. But the rest, even the ones that don’t strike you as worth processing?  Give them some time to age.  You may find they are a fine wine just waiting to be uncorked.


Post originally from: Digital Photography Tips.

Check out our more Photography Tips at Photography Tips for Beginners, Portrait Photography Tips and Wedding Photography Tips.

Delete Images?? NEVER!!


Digital Photography School

 
Comments Off on Delete Images?? NEVER!!

Posted in Photography


[MODIFIED] Google Chrome – View, Search, Delete Browsing History

02 Sep

View and search through the list of websites recently browsed with Google Chrome, or delete selected or all items.

Want to view the most recently-viewed websites browsed with Google Chrome? Pull up the History and see where you have been on the Internet. Each History item is hyperlinked so you can go back to sites with one click. Plus, you can search through your History items to find a particular site.

To view the History, either:…

Read more at MalekTips.
New Computer and Technology Help and Tips – MalekTips.Com

 
Comments Off on [MODIFIED] Google Chrome – View, Search, Delete Browsing History

Posted in Technology


How Delete Womens Roots In Photoshop Lesson 17

30 Aug

www.1stoptutorials.com – In this tutorial we are going to do some funky things. We are going to learn how to remove womens hair roots by using a few different techniques. We will learn how to use hue and saturation plus we will also learn how to clip our hue and saturation to our image.Let me know if you get any problems
Video Rating: 5 / 5


How Delete Womens Roots In Photoshop Lesson 17

29 Aug

www.1stoptutorials.com – In this tutorial we are going to do some funky things. We are going to learn how to remove womens hair roots by using a few different techniques. We will learn how to use hue and saturation plus we will also learn how to clip our hue and saturation to our image.Let me know if you get any problems
Video Rating: 5 / 5

 
Comments Off on How Delete Womens Roots In Photoshop Lesson 17

Posted in Retouching in Photoshop