RSS
 

Posts Tagged ‘dehaze’

Capture One 21 Review: Dehaze, Speed Edit, and More

03 Mar

The post Capture One 21 Review: Dehaze, Speed Edit, and More appeared first on Digital Photography School. It was authored by Carl Spring.

Capture One 21 Review

In this comprehensive Capture One 21 review, I’m going to take you through everything you need to know about Capture One’s latest editing software.

In fact, as a beta tester for the newest release, I’ve spent plenty of time working with Capture One 21 behind the scenes (and I have used Capture One as my main editing software going all the way back to version 12!).

So let’s take a closer look at this software program – and determine whether it’s the perfect editor for you.

Starting with…

What’s new in Capture One 21?

The list of new features is a little lighter than in other major upgrades.

It includes:

  • A new import design
  • Dehaze
  • Speed Edit
  • ProStandard profiles
  • General speed upgrades and bug fixes
  • New tooltips and hints
Editing a portrait in Capture One 21 software
The familiar Capture One layout with a few new additions. Are these enough to make it worth the upgrade?

Dehaze

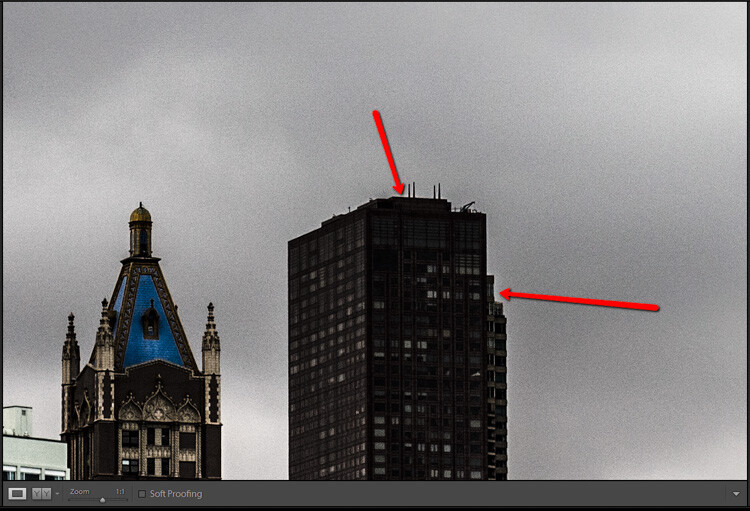
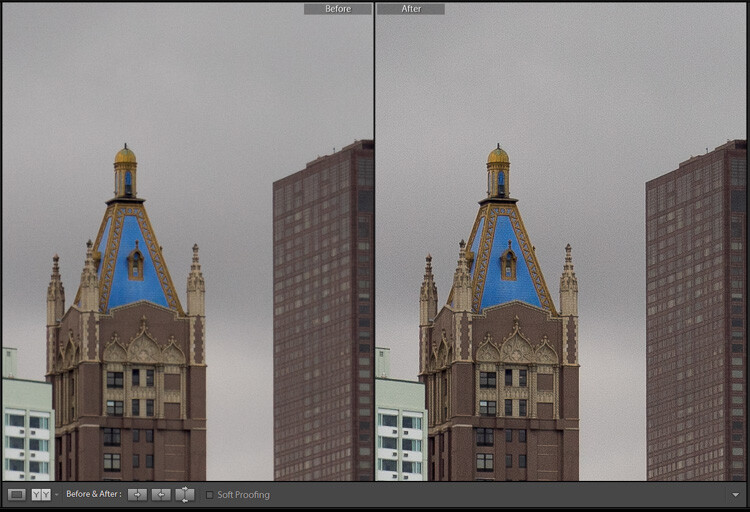
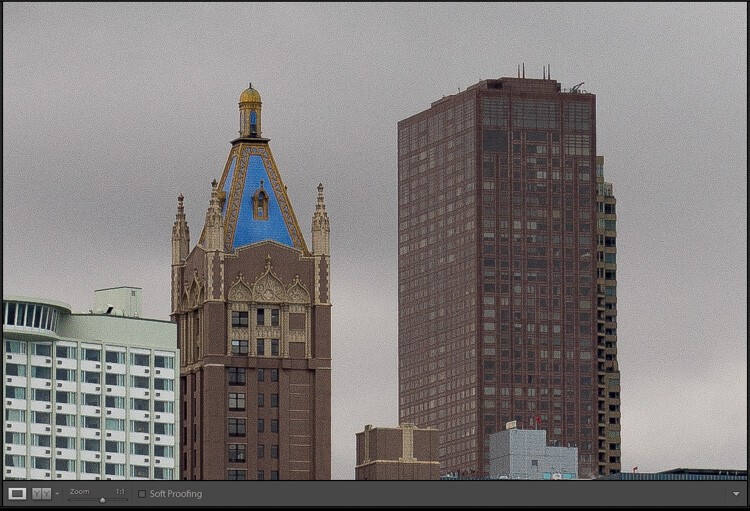
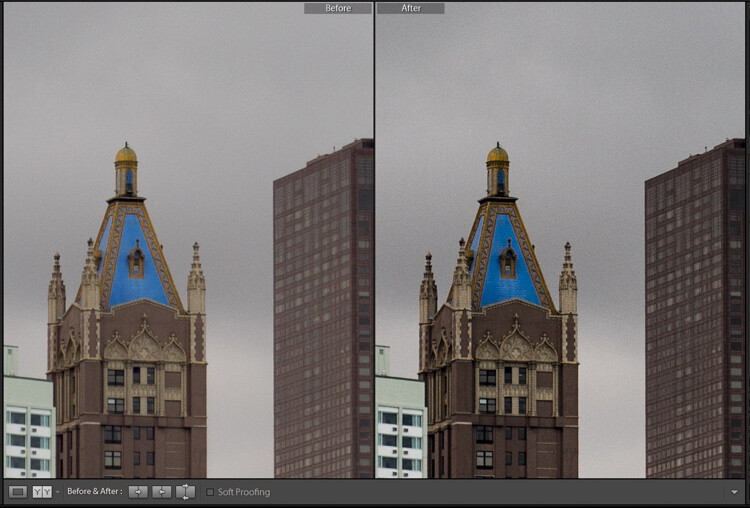
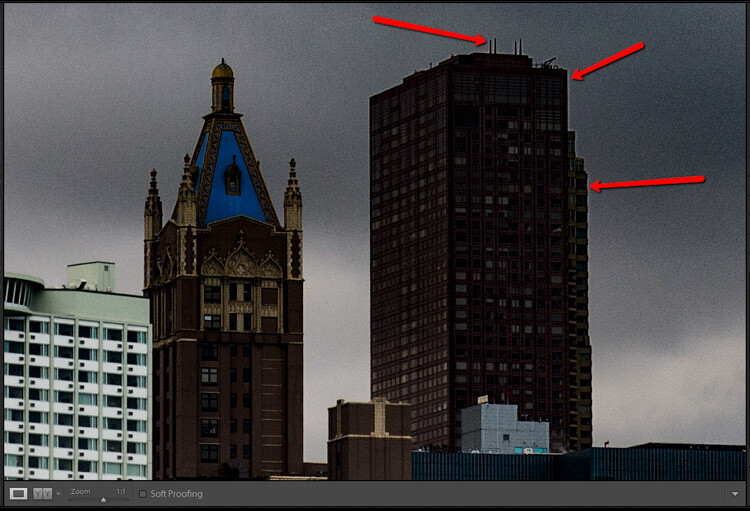
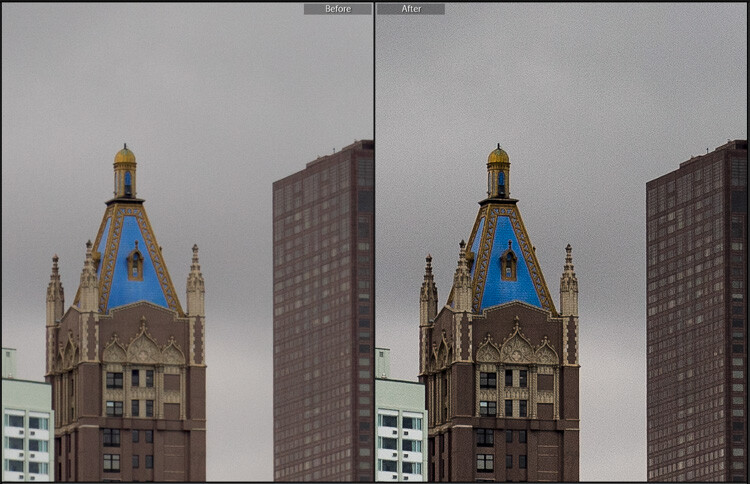
Capture One’s new Dehaze tool is a welcome addition for landscape photographers. Dehaze has been in Lightroom for some time now, and it’s nice to finally see it in Capture One.

Basically, the Dehaze tool is there to reduce the amount of atmospheric haze in images and improve the saturation in low-contrast photos. 

Dehaze is most commonly associated with removing fog or smog from an image, but you can also increase the haze – an effect that can add atmosphere. The tool can also be applied selectively via layers. To my eye, it seems to work quite well, but I’m a non-landscape shooter and have little to compare it to.

Now, I have seen this tool used to dodge and burn portraits, and it can subtly enhance faces if used sparingly. 

However, while the Dehaze tool is good (and many claim it’s better than Lightroom’s), it’s not really the tool that landscape photographers desperately wanted. And for those of you who are not landscape photographers (like me), it’s a tool you will rarely use.

Testing the Dehaze feature
As a non-landscape photographer, I will rarely use the Dehaze tool. I had to search through my archive for a landscape shot.

Speed Edit

Wow! Just wow! Capture One 21’s new Speed Edit feature is really good. I am a huge Loupedeck fan, but I may be moving away from it for editing in Capture One. The Speed Edit tool really is the next best thing.

In basic terms, Speed Edit is a set of keyboard shortcuts you use with your mouse to edit images. Simply hold down the key associated with the edit, then drag the mouse to make the adjustment.

The process works incredibly well in practice and, within a few minutes, becomes second nature. The ability to edit images in a full-screen layout with no distractions is amazing. The only thing you will see is an unobtrusive slider at the bottom of the screen showing which edit you are carrying out. 

Capture One 21 comes with the most common Speed Edit keys mapped for you, but these can be customized to suit your preferences. You can also adjust the sensitivity of your mouse. This can be changed easily, so if you are looking to get a set of rough edits done, you may want to leave the sensitivity quite low. Then, when you go back to complete final edits, you can fine-tune the sensitivity for precise control of the sliders. 

The speed edit keyboard shortcuts in Capture One 21
The main editing tools come with corresponding keys, but you can easily change these and add other shortcuts.

The adjustments you can make to an image with Speed Edit are:

  • Exposure
  • High Dynamic Range
  • White Balance
  • Dehaze
  • Clarity
  • Levels
  • Vignetting
  • Sharpening
  • Lens Correction

You can also use these shortcuts to quickly and easily alter the size, opacity, and hardness of brushes. I’ve heard some people comparing Speed Edit to PC gaming, and while I’m not a gamer, it feels natural to use the keyboard and mouse in harmony like this while editing.

Speed Edit is a serious timesaver and brilliantly implemented. It will save a lot of people a lot of time when editing – especially if you edit hundreds of files at once. Also, the ability to edit without toolbars allows you to focus solely on the image. 

using the speed edit function
The Speed Edit tool allows you to edit your images with no visual distractions, and it works perfectly in practice.

ProStandard profiles

This feature is currently only available for a selection of the most popular cameras, but Capture One is working on profiles for more cameras, and ProStandard looks like it will be the default profile for new cameras going forward. 

Capture One states that these “ProStandard” profiles have been completely reworked to give much greater color accuracy while protecting hues and color shifts. For people doing work such as product photography or reproduction of artworks, this is a massive improvement. 

But for those who are not in need of such accuracy, do the ProStandard profiles really make a difference?

The answer is yes – but it is subtle.

When I compared some files shot on a Canon 5D Mark IV, the unedited photo simply looked better with the ProStandard profile applied. Colors seemed a little richer and more lifelike, and it felt like a better starting point.

However, the difference is not night and day. So while ProStandard profiles are nice, they’re not an essential feature for most photographers.

A comparison of profiles
One of these is the standard profile, and one is ProStandard. Can you tell which is which?

Import and speed improvements

The Capture One import process had a facelift.

It is now easier to pick and unpick selects before you import images into the system, and while I haven’t run tests, the actual import feels much faster.

Improvements continue under the hood. Capture One feels snappier. It’s hard to quantify this, but it’s something I noticed, and no doubt a lot of long-term Capture One users will, too.

The import window in Capture One Pro 21
The import is improved in Capture One 21. It’s faster overall, though many will not notice or need this.

Enhanced tooltips

When a software company lists new and improved tooltips and tutorials as a key feature, it really does make you question how significant the new version is. 

Yes, the tooltips are improved, but they aren’t really needed past the first few weeks of using the software.

Then again, I am a long-term Capture One user. So I spent some time thinking about those who are coming across from Lightroom or other software, and here’s what I concluded:

The tooltips and tutorials will be useful while you get accustomed to the software. The tutorials are short, meaning you don’t have to wait too long before you can dive back into your edit. And the tutorials are well done. The tooltips, while annoying for longer-term users (you can switch them off!), will help you get to grips with Capture One 21 – so that mastering the software will not take you that long.

tooltips on HDR
As a seasoned user, I forget that tips like this can be really useful when learning software.

Is Capture One 21 worth it?

Capture One marketed their software release with an approach of buy now, discover later. They ran a series of online events showcasing new features, each time promising there was much more to come.

However, there wasn’t much more to come, and many customers who either purchased or upgraded came out en masse to make their voices heard. Feedback was decidedly mixed, and many were not very happy with the new feature set.

And I’ll be honest:

It really doesn’t feel like a full-blown release to me. 

A saving grace for the Capture One team is that they have upgraded Capture One 20 to run on the latest Mac OS X. This is a welcome gesture, one that will make the decision of whether to upgrade easier for many.

Capture One is working on an Apple silicon adaption, but this is not yet ready (though I’m sure it will be here sooner rather than later). Again, this is only useful for some users but worth pointing out, especially if you are tempted by one of the new Macs that Apple has already released or is bringing out in 2021.

I hope there is a large update within a few months that adds ProStandard profiles for many more cameras, and maybe even some more tools that make this version more of a must-have.

The fact that cameras like the Nikon Z7 II will only be supported in version 21 means that some users will have no choice but to upgrade, although I feel some may be headed back to Lightroom. 

There was also a price increase that doesn’t sit well with me. At the time of launch, Capture One for Sony, Nikon, and Fujifilm cost $ 129, but the price was quickly boosted to $ 199 (and the price to upgrade increased, as well). Photographers (especially professionals) have had an awful 12 months, business-wise. While this price increase may bring in some extra cash in the short term, it feels like the Capture One team failing to read the room. The way this release has been so aggressively marketed will, in my opinion, see many moving back to Lightroom.

However, Capture One is still my choice of editing software, so would I recommend you upgrade?

Capture One 21 review editing a full screen image
I love how Capture One makes my images look. For new users, there is an obvious conclusion; for those upgrading, it’s a little different.

For new users

I always tell those who use Lightroom to try Capture One. And when doing a Capture One 21 review, it’s easy to get caught up thinking about upgrades for existing users.

However, Capture One 21 is the best version of this software yet. So for those who are exploring software alternatives, I would strongly suggest taking a look. Especially those of you who have cameras compatible with the ProStandard profiles. 

If you shoot with one camera brand, you can even get a brand-specific version of Capture One 21, which will save you money. 

Here’s the bottom line:

RAW processing is where Capture One excels, and this release proves no different. Capture One images simply look better compared to Lightroom. I still feel Capture One is the best RAW editor out there. 

For existing users

The new tools in Capture One 21 feel aimed at a specific niche of photographers. The Dehaze tool has no real appeal to someone like me who rarely shoots landscapes. Yes, it is fun to experiment with Dehaze on portraits, but I will use this tool infrequently at best. And I’m sure this is true for any non-landscape photographer. 

The ProStandard profiles are nice, but not yet available for many cameras. And the need for incredibly accurate colors caters to a select group of photographers. 

The new tool I love is Speed Edit. It’s beautifully executed and removes the need for a workflow tool such as a Loupedeck for many users. The ability to edit images in full screen without distraction is simply amazing. For those (like myself) who shoot weddings or events, this tool will be a huge timesaver.

Lastly, there is the new importer. It’s nice, but honestly, most won’t notice the difference. And those who need the speed will continue to use Photo Mechanic.

So my Capture One 21 review boils down to this:

Which new tools will you use? And do they justify the price increase? Personally, I am not able to justify the upgrade price just for the Speed Edit tool. Like many other photographers, my work has been drastically affected in the past 12 months, and I cannot justify the price of the upgrade right now. I am sure many other working professionals are in the same boat.

That said, for a small section of photographers, the upgrade is a no-brainer. Capture One 21 is the fastest version of the program, and it has features some will welcome with open arms. If you are yet to try Capture One, you really should test it out and see what all the fuss is about.

However, I will wait for Capture One 22. 

You can download a 30-day trial of Capture One 21 on the Capture One website.

The post Capture One 21 Review: Dehaze, Speed Edit, and More appeared first on Digital Photography School. It was authored by Carl Spring.


Digital Photography School

 
Comments Off on Capture One 21 Review: Dehaze, Speed Edit, and More

Posted in Photography


How to Make Your Photos Shine Using Clarity, Sharpening, and Dehaze in Lightroom

01 May

The goal of any photographer is to make each and every photo stand out from the crowd. Making an image that pops is something that we all strive to achieve, but it’s not always easy to do. Luckily, there are tools at our disposal in Adobe Lightroom that can go a long way to help us achieve an image that we can be proud of, and that catches the attention of the viewer. What are these tools? They are many and varied, but there are three central processing techniques that can make your images transcend the average, and reach the potential you intended. They are Clarity, Sharpness, and Dehaze.

These three tools are deceptively simple and subtle. When used properly, the enhancements they will make to your photos will be nearly imperceivable. They can take your image from good to great, with just a few simple clicks of the mouse. In this tutorial, I will show you how each one of these processing tools affect your photos, and how they can be put to best use, so that your photographs really stand out from the rest. Let’s get started!

After CSD

Clarity

The clarity slider has been around virtually since the inception of Lightroom. You can find it in the Basic panel of the Develop module. It functions to add definition and well, clarity, to your images. It accomplishes this by darkening the lines surrounding the perimeter of objects within your photo. Think of it as contrast on steroids. The clarity slider can really add a lot of punch to your photos, and add drama.

Clarity

Tips for Using the Clarity Slider

  • Don’t add too much. If you push the clarity slider too far to the right, you can begin to see unattractive halos around objects within the frame, resulting in a fake or unnatural looking photograph. If using it globally (applies to the entire image), do so judiciously. Be careful when applying the clarity slider to an entire image, most areas of your photo probably won’t need to be clarified.
  • It’s best to apply clarity after everything else. Since the clarity tool will add a good amount of contrast to your photo, it’s best to apply it towards the end of your workflow. While this is not always true, it is a good guideline to follow in order to avoid the need to backtrack.
  • Use the Adjustment Brush or Graduated Filter tools to apply it to select areas of your image that need clarity. This will enable you to apply clarity only to foregrounds or backgrounds and to specific points you want to emphasize in the image.

Clarity Adjustment

Clarity applied, viewing at 1:1

Clarity applied at +30, viewing at 1:1

Clarity slider taken too far, viewed at 1:1 (100%)

Clarity slider taken too far, viewed at 1:1 (100%)

Sharpness

The art of sharpening an image can often make or break the composition. Sharpening is one of those awesome features of Lightroom which has been around from the beginning, and it only seems to be getting better with time.

Sharpening

The sharpening tool is located under the Details panel in the Develop module. Basically, sharpening is accomplished by adding contrast between pixels so that the area being sharpened appears to have more definition, compared to its surroundings. There are a few key tweaks that you can perform in order to get the most from the sharpening panel.

Make use of the radius slider. The radius controls how many pixels around the perimeter of objects are affected by the sharpening. Think of this as the halo of sharpness. The greater the radius, the more apparent the sharpening will become. Don’t over do the details. You might think the more details you preserve in your sharpening, the better quality your image will be. This is not true. Usually, the farther you move the detail slider to the right, the more grainy and gaudy the image will be. Find a happy medium here and you will be happy in turn.

Global sharpen at +50

Global sharpen at +50

Over sharpened

Over sharpened – this is what too much sharpening looks like at 1:1

Apply sharpening only to the areas you need to sharpen. It’s easy to simply sharpen an entire image instead of taking the time to selectively apply the edit. Rest assured though, if you apply your sharpening using the Adjustment Brush tool you will have a much more aesthetically pleasing result. Much like clarity, you usually do not need to sharpen the whole photograph.

Use the masking slider with the Alt key (Option key on Mac). The masking slider can be considered the most underrated asset in the sharpening panel. It dictates what areas will be sharpened. However, by itself the masking slider is rather lacklustre. This is where the Alt key comes into play. Hold down the Alt key while you adjust the masking slider.

Sharpening Mask

You will see that the image is transformed into a black and white relief image. The areas in white are where the sharpening will be applied; the areas in black will not be sharpened. This is a great way to fine tune your sharpening when adjusting globally. (Note: to keep people’s skin from becoming overly sharp and showing every pore and bump, move the masking slider until the skin areas are black and therefore unaffected by the sharpening adjustment)

Dehaze

This is a feature that was introduced very recently in Lightroom CC. It is a magical little function that people seem to either hate or love.

Dehaze Slider

I for one love this little guy. It’s located under the Effects panel. The explanation of how exactly it works is somewhat cryptic. Here is an answer pulled directly from Adobe Blog:

The Dehaze technology is based on a physical model of how light is transmitted, and it tries to estimate light that is lost due to absorption and scattering through the atmosphere.

Simply put, the dehaze slider can reduce haze within your images. It can also add a mystical fogginess as well if you choose (just slide it the other way).

Dehaze

Basically, it will make an otherwise hazy photo more clear. This comes in handy for photographs of the night sky when your want to make the stars more pronounced, or when you have to deal with physically dense atmospheric conditions.

Tips for Using the Dehaze Slider

  • Keep an eye on your black points within the image. The dehaze slider can cause loss of shadow detail if you push it too far. Use the J key to show highlight and shadow clipping in order to preserve details.
  • Perform your white balance adjustments BEFORE you apply dehaze. The dehaze tool can do some incredible things for your photo, but it can also cause some funky color distortions if you adjust white balance after the fact. As always, strive to obtain optimal white balance before you ever begin to post-process an image.
  • Sometimes an image will benefit from added haze instead of dehazing. Experiment with adding a small amount of haze by moving the dehaze slider to the left. This can add an ethereal glow to some landscapes and even portraits.
Dehaze +20 at 1:10 view

Dehaze +20 at 1:10 view

Dehaze pulled too far

Dehaze pulled too far

As with all post-processing, the less you have to adjust after the image has been made, the better off you will be. The tools in Lightroom are a fantastic way to bring out the true power of your photographs, if you use them deliberately, and with good judgment.

Before clarity, sharpening and dehaze

Before clarity, sharpening and dehaze

After

After

After clarity, sharpening and dehaze were applied

After clarity, sharpening and dehaze were applied

Any adjustments you make to the clarity and sharpness of your photo should never make them appear unrealistic (with exceptions) or detract from your original vision. Even the dehaze tool should be used sparingly and only when required. Just as the saying goes that one brush stroke can ruin a painting, so too can one more click of the slider. The goal of post-processing is to enhance a photograph to the point of meeting your pre-visualzation. No more and no less. Experiment with the tips you’ve learned here and witness the hidden potential within your own photographs!

googletag.cmd.push(function() {
tablet_slots.push( googletag.defineSlot( “/1005424/_dPSv4_tab-all-article-bottom_(300×250)”, [300, 250], “pb-ad-78623” ).addService( googletag.pubads() ) ); } );

googletag.cmd.push(function() {
mobile_slots.push( googletag.defineSlot( “/1005424/_dPSv4_mob-all-article-bottom_(300×250)”, [300, 250], “pb-ad-78158” ).addService( googletag.pubads() ) ); } );

The post How to Make Your Photos Shine Using Clarity, Sharpening, and Dehaze in Lightroom by Adam Welch appeared first on Digital Photography School.


Digital Photography School

 
Comments Off on How to Make Your Photos Shine Using Clarity, Sharpening, and Dehaze in Lightroom

Posted in Photography


Adobe Camera Raw 9.2 adds local dehaze

07 Oct

Adobe has released Camera Raw 9.2, introducing a local version of its new dehaze adjustment. ACR 9.2 also adds support for the DxO ONE, though not for the camera’s SuperRAW files. Other cameras supported by the update are the Olympus OM-D E-M10 II, Sony Alpha 7S II and Leica S (Typ 007). Read more

Articles: Digital Photography Review (dpreview.com)

 
Comments Off on Adobe Camera Raw 9.2 adds local dehaze

Posted in Uncategorized


Adobe Camera Raw 9.1 adds Dehaze feature and improves X-Trans support

17 Jun

Adobe has released the latest iterations of its Camera Raw plug-in and DNG converter software. In addition to adding support for more cameras and lenses, this update also adds Dehaze correction as well as local B&W adjustment sliders. Adobe has also reduced ‘color blur’ artifacts in Raw images from Fujifilm X-Trans cameras. More details

Articles: Digital Photography Review (dpreview.com)

 
Comments Off on Adobe Camera Raw 9.1 adds Dehaze feature and improves X-Trans support

Posted in Uncategorized


Adobe Creative Cloud update introduces de-haze feature and speedier healing brush

16 Jun

Adobe has announced a number of updates to its Creative Cloud suite, including some feature enhancements and additions to Photoshop CC and Lightroom CC. A previously demonstrated de-haze tool has been added to CC versions of Photoshop and Lightroom, and the effects of Photoshop’s popular healing brush will now be displayed in real time as the tool is used. Read more

Articles: Digital Photography Review (dpreview.com)

 
Comments Off on Adobe Creative Cloud update introduces de-haze feature and speedier healing brush

Posted in Uncategorized