RSS
 

Posts Tagged ‘damaged’

Disk Drill 4 makes it easier to recover Raw image, video files from damaged drives and memory cards

08 Oct

The macOS version of disk recovery software Disk Drill has received a major 4.0 update that adds, amongst other features, a dramatically improved ability to recover RAW image formats from drives and memory cards.

Disk Drill for macOS 4.0 is now ready for the latest versions of Apple’s desktop and mobile operating systems, macOS Big Sur and iOS 14. Using ‘state-of-the-art scanning methods and updated recovery algorithms,’ Disk Drill 4 can recover more than 400 different file types from drives with FAT32, NTFS, HFS+, and APFS file systems.

CleverFiles, the team that develops Disk Drill, says it’s ‘invested a lot of resources into researching and implementing unique search and recovery algorithms aiming bring back many raw images.’ Specifically, CleverFiles says it’s dramatically improved the ability to recover Raw image and video formats, including 3FR (Hasselblad), ARW (Sony), CR2 and CR3 (Canon), DNG (multiple mobile devices and cameras), GPR (GoPRO), HEIC (Apple), RLE (QuickTime videos), CVID (Cinepak), H263 and H264, MP4V, BRAW (Blackmagic RAW), CinemaDNG, Canon CRM, multiple MOV-container-based formats and many others.

CleverFiles specifically notes the success rate of being able to reconstruct Raw photo and video files has increased to 99% and 96%, respectively, compared to the respective 68% and 51% success rates with Disk Drill 3.8.

A breakdown of the success rate for recovering Raw image and video files from disks and memory cards compared to its previous version and competing products.

Other benefits of Disk Drill includes the ability to browse recovered files in real-time as they’re reconstructed, rather than having to wait for the entire disk to be scanned, and a secure ‘data shredder’ option for ensuring no data can be recovered from drives you’re looking to get rid of.

You can download Disk Drill 4 for free to try out basic functionality and to get familiarized with all the recovery methods, but if you actually need to recover files from a drive, you can pick up the ‘Pro’ version for $ 89. A single purchase is good for activation on up to three computers. Disk Drill has a great overview of all the new features on its website.

Articles: Digital Photography Review (dpreview.com)

 
Comments Off on Disk Drill 4 makes it easier to recover Raw image, video files from damaged drives and memory cards

Posted in Uncategorized


Recovery Toolbox for Photoshop: Rescue Your Damaged Adobe Photoshop Files

02 Oct

The post Recovery Toolbox for Photoshop: Rescue Your Damaged Adobe Photoshop Files appeared first on Digital Photography School. It was authored by Kevin Landwer-Johan.

Have you ever endured the stress of dealing with a corrupted Photoshop PSD file? It’s not such a common problem, but when it happens it can invoke serious mental and emotional hardship. Let me introduce you to a little software tool that can be of great help to photographers, designers, and anyone else who uses Adobe Photoshop – the Recovery Toolbox for Photoshop.
Recovery-Toolbox-for-Photoshop

Fully recovered corrupted PSD file

How PSD files become corrupt

Imagine spending hours post-processing a photo you’ve captured or graphic you have created. It’s one of your best. You’ve worked through some tutorials, and been inspired to create a masterpiece of digital art.
 
You’ve put the final touches to it and hit Save, and then the power goes out. Your file has not saved correctly. Or you’ve saved it to a hard drive with bad sectors. Even when you revive the drive, the PSD file will not open. These are events that create nightmares.
 
There are other ways PSD files become corrupted and Photoshop won’t open them. At times, all you’ll see is an error message.
 
Recovery-Toolbox-for-Photoshop
 
Other times the file will open but will be incomplete. Layers may be missing, or the file may have been flattened. Maybe all you’ll see is digital noise.
 
Recovery Toolbox for Photoshop: Rescue Your Damaged Adobe Photoshop Files
 
You may have encountered similar file retrieval problems with bad memory cards or hard drives. These situations require specialized software that can recover files and rebuild them.

Adobe Photoshop Repair Tool

Adobe Photoshop Repair Tool from Recovery Toolbox is specifically designed to reclaim and repair damaged Photoshop PSD files. It’s not a tool you will use every day (hopefully), but when you do need to, it can save you considerable stress and maybe hours of work.

This small piece of dedicated software opens and restores PSD files. Often it will manage to completely restore a file which Photoshop refuses to open. Other times it will work partially. You might get most of your layers back, but not all of them. At this stage, however, it is only available for users of Windows 98 and above.

How it works

Step 1:

Open Recovery Toolbox for Photoshop and select the file you are having issues with. Click ‘Next’.
 
Recovery-Toolbox-for-Photoshop

Step 2:

The ‘View Data’ window will open. Here you have a breakdown of what the Recovery Toolbox for Photoshop can see in the corrupted file. If the file has multiple layers, click on the ‘Layers’ drop-down in the left-hand panel to view them.
 
In the right-hand panel, there are two tabs. Click on the ‘Picture’ tab for a preview of each layer.
 
Recovery-Toolbox-for-Photoshop

Step 3:

Choose your target file and the layers you want to recover. In this step, you can also select or deselect certain layers you want to recover.
 
Recovery Toolbox for Photoshop: Rescue Your Damaged Adobe Photoshop Files

Step 4:

Click ‘Recover’ and the software will work its magic. Once the recovery process is completed, click the ‘Show Result’ button to open the recovered file in Photoshop. It’s as easy as that.
 
Recovery Toolbox for Photoshop: Rescue Your Damaged Adobe Photoshop Files

Salvaged

Whether you’re a keen amateur or a professional photographer, this software will help you out when Photoshop fails to open a file. This might mean the difference in saving time rebuilding an image, or it might save your skin and keep a valuable client.
 
This Recovery Toolbox for Photoshop works on any PSD file saved from Photoshop version three or later, and recovers files with .psd and .8bps extensions.

Working through the easy steps is fast and allows for some control in the layers you choose to repair. I found that when testing this software, it was not necessary to do this, but the feature allows for flexibility with more problematic files.

This software is specifically designed to read, analyze, and recover your PSD files.

When testing this software, I purposefully produced a series of damaged PSD files, corrupting them in different ways. While saving a multi-layered PSD file, I rebooted my computer while the file was in the process of writing to a hard drive. I also saved the file to a thumb drive which I removed before fully saving the image. I did this at various stages in the process of saving. In these instances, the Recovery Toolbox for Photoshop was not able to restore my files even when they’d been nearly through the saving process.

 
Recovery Toolbox for Photoshop: Rescue Your Damaged Adobe Photoshop Files
 
The software was sent to me with a number of test files. Each of these appeared to be corrupted in different ways. Some of them opened with Photoshop, but incompletely. Others failed to open and Photoshop displayed an error message.

Pros

  • Dedicated to repairing PSD files.
  • Easy to use.
  • Well laid out user interface.
  • Detailed information and controls.
  • Price.

Cons

  • Doesn’t repair all damaged PSD files.
  • Only available for Windows Users
recovery-tool-box-for-photoshop-online
If you don’t like the idea of installing software onto your computer, Recovery Toolbox for Photoshop also has an online repair service where you simply upload your damaged file. The benefits of using the online version include:

  • Helps to repair Photoshop files on all Operation Systems: macOS, iOS, Android, Windows and so on
  • Work on any devices: PC, tablet, phones
  • Affordable price: $ 10
  • No need to install any software

In this review, the online version was not tested.

Conclusion

Recovery Toolbox for Photoshop is a great tool and will help you out where Photoshop fails to. However, there is never any substitute for having a disciplined backup routine. Saving your work often and backing it up on a separate drive, device or in the cloud is the most sure-fire way to ensure your precious files are safe and usable.
Disclaimer: Recovery Toolbox for Photoshop is a paid dPS partner.

recovery-toolbox-for-photoshop

The post Recovery Toolbox for Photoshop: Rescue Your Damaged Adobe Photoshop Files appeared first on Digital Photography School. It was authored by Kevin Landwer-Johan.


Digital Photography School

 
Comments Off on Recovery Toolbox for Photoshop: Rescue Your Damaged Adobe Photoshop Files

Posted in Photography


Photogenic Death Valley salt flats damaged by driver who abandoned van

15 Mar

An abandoned van found on Death Valley National Park’s protected salt flats has been towed away, but tracks remain – and may be there for years. The park posted photos of the van to its Facebook page and says that the vehicle went into the salt flats at Badwater Basin on Wednesday last week. It was towed out on Friday by a small track vehicle, leaving more (unavoidable) damage to the salt crust.

It’s not the first time these flats have been damaged by drivers ignoring signs to stay on roadways. According to the Las Vegas Review-Journal, the park is prosecuting three cases of vandalism. It has also applied for a grant that would fund restoration of the site. This case also calls to mind the recent vandalism of the Racetrack Playa, where someone drove a vehicle over the dry lake bed.

According to the National Park Service website, the Badwater Basin salt flats are among the largest such flats in the world. The damage isn’t irreparable, but it does require some work smoothing the tracks over and spraying them with water to encourage salt to regrow.

The delicate salt flats are a photographer favorite. Photo by Rajesh Bhattacharjee

Responding to comments on its Facebook post, a park representative said that the driver of the van has not been charged yet, but could face a fine of up to $ 5,000 and up to 6 months in jail.

Articles: Digital Photography Review (dpreview.com)

 
Comments Off on Photogenic Death Valley salt flats damaged by driver who abandoned van

Posted in Uncategorized


Pictures show how badly earthquakes damaged Sony’s Kumamoto sensor factory

28 Jan
Photo via Sony

If you wondered why it took Sony so long to get back on its feet after an earthquake hit its sensor fabrication plant in Kumamoto, this picture taken in the aftermath might give you a clue. The halt in production at the factory had a devastating effect on large sections of the camera industry in 2016 as it was the provider of sensors for a huge range of products – from the Nikon DL cameras to the 100MP backs for Phase One and Hasselblad medium-format bodies.

This picture of the chaos inside the plant emerged in October last year as Sony announced plans to ensure such natural disasters would only knock out production for a maximum of two months. The earthquake that hit in April 2016 kept the Kumamoto business silent for over three and a half months, and it took until September for production to return to pre-quake levels. According to a report by the Nikkei Asian Review Sony estimates the event cost the company $ 776 million in lost operating profit. 

Tragically, at least fifty deaths are attributed to the earthquakes and around tens of thousands were forced from their homes in the prefecture. Recovery continues as displaced residents have begun moving back into the region.

More dramatic pictures of the quake-hit plant can be seen in this article on the Apple Daily website.

Articles: Digital Photography Review (dpreview.com)

 
Comments Off on Pictures show how badly earthquakes damaged Sony’s Kumamoto sensor factory

Posted in Uncategorized


How to Restore Old, Damaged Photos

22 Aug

Perhaps one of the most important things we do as portrait photographers is preserve memories.  While the digital era and its ever-evolving technology have made it easier to ensure that the photos we take today will last longer than their analog counterparts, there are still things we can do to help preserve memories captured before the advent of the pixel.  Several years ago, I came across a sizable collection of very old family photos and started scanning them.  Unfortunately, some had already been damaged to one degree or another.  Fading, creasing, staining, and tearing had all left their marks, and the fact that some of these photos were close to 100 years old did not help their cause.  At first I wasn’t sure what to do about them, but closer inspection made it clear that restoring many of these photos would not be as difficult as I initially thought.  With the help of only three or four Photoshop tools, I was able to bring this photo of my great grandparents back to life.

STEP 1 – ASSESS THE DAMAGE

Once the image has been scanned, open it in Photoshop to assess the damage and formulate a plan.  A good rule of thumb when editing any sort of photo is to tackle your global edits first, before worrying about specific target areas.  I like to make overall tonal adjustments first.  If I clean up dust, rips, and creases first, I run the high risk of those imperfections reappearing later when I adjust tone and contrast to the entire image.

Step 1.  Open the image in Photoshop and assess the damage.

Open the image in Photoshop and assess the damage.

STEP 2 – LEVELS & CURVES

As with almost everything in Photoshop, there are so many ways of doing just about everything.  When I first started doing this kind of work I used the Levels adjustment.  I prefer using the Curves adjustment, though, because it lets me set the levels and adjust the contrast from within the same dialog.  By using the droppers below the graph, you can do a quick Levels adjustment, bringing the tone of the image back under control.  Using the black dropper, I click on what I see as one of the darkest points in the image.  You’ll see an immediate improvement in the overall appearance of the photo.  For purposes of fixing this photo, I don’t need the white or gray droppers.   Once I’ve adjusted the levels by setting the black point, I tweak the contrast of the entire image by creating a slight “S” curve.  Don’t panic if you push the adjustment too far.  You can turn the “Cancel” button into a “Reset” button in any Photoshop dialog box by holding down the ALT/OPTION key.

Select the black dropper on the left and click on the darkest part of the image to adjust the levels.

Select the black dropper on the left and click on the darkest part of the image to adjust the levels.

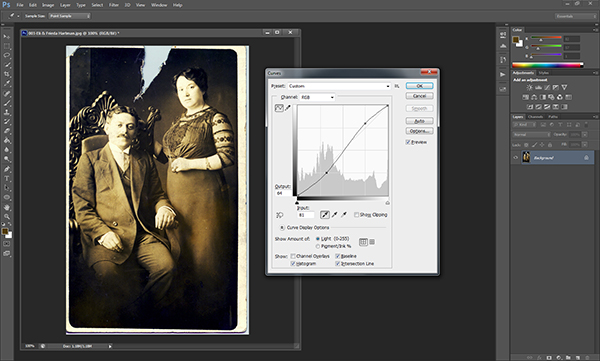
Adding a slight “S” curve will add some needed contrast.

STEP 3 – TACKLE THE DETAILS

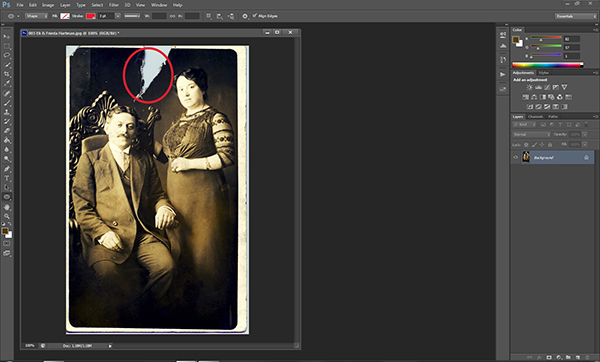
As far as global adjustments go, this particular image really only needed a small levels and curves adjustment.  Once that’s been addressed, we can zoom in on the image and start addressing the details.  For this photo, the next step is dealing with that big tear at the top.  For this part of the repair I’m relying on the Clone Stamp tool (keyboard shortcut: S).  Be sure to zoom in kind of tight to make sure you have a good view of the area.  You’ll be using the tool to sample similar nearby pixels to copy and fill in the damaged area.  Start with the edges and work your way in towards the middle and then up towards the top.  Be sure to change your sample area as you cover more of the tear in order to ensure that the tones and shading are consistent.  Don’t worry about keeping a straight edge at the top of the photo.  We’ll be cropping that out later.

006-Repair Rip1007-Repair Rip2

Now it’s time to zoom in really tight and deal with small things like dust, scratches, stains, and creases.  In earlier versions of Photoshop, the best tool for this part of the job was the Clone Stamp, and in some situations that might still be your best bet.  Ever since the introduction of the Spot Healing Brush, however, cleaning up dust and scratches has never been easier.  The spot healing brush reads the surrounding pixels and uses that information to cover up and repair minor damage.  As with all detail adjustments, be sure to zoom in pretty tight.  This will let you make the repair with fewer and– more importantly– less noticeable clicks.

Use the zoom tool to make sure you get rid of the small imperfections.

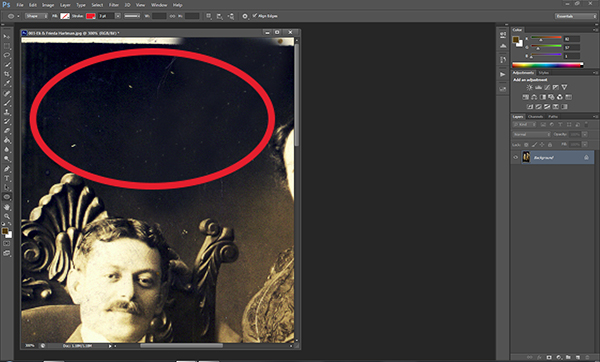
Use the zoom tool to make sure you catch all of the small imperfections.

010-Dust Cleanup

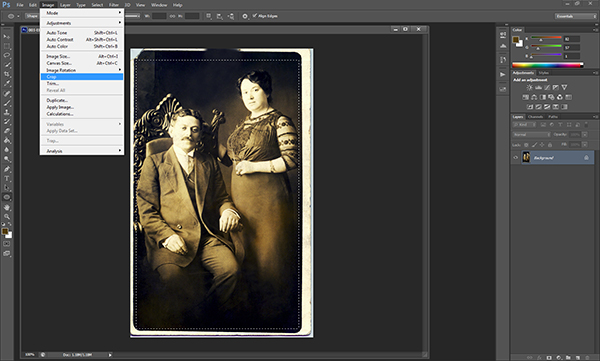
STEP 4 – CROP FOR A CLEAN EDGE

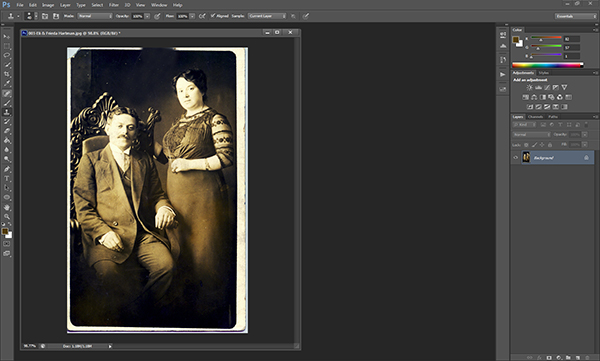
Once we’ve addressed the damage we’ll zoom back out and use the Marquee tool to crop out the extraneous edges of the original scanned photo, creating new, clean edges.

013-Crop Image

STEP 5 – ADMIRE YOUR RESULTS

Rescuing a memory is always gratifying.  I never knew the people in this photo, but I know that without them I wouldn’t be here.  That alone makes the time spent restoring this photo well worth it.  With a little practice, edits like this will become a streamlined process.  Don’t be afraid to try it.

015-Before & Aftercopy

Post originally from: Digital Photography Tips.

Check out our more Photography Tips at Photography Tips for Beginners, Portrait Photography Tips and Wedding Photography Tips.

How to Restore Old, Damaged Photos


Digital Photography School

 
Comments Off on How to Restore Old, Damaged Photos

Posted in Photography


Tutorial for Healing & Enhancing EXTREMELY damaged skin with Photoshop CS3 [HD]

21 Mar

A tutorial that’ll teach you how to fix & heal skin using the Patch tool in Photoshop. Sorry for the poor sound quality. The picture of the infected person can be found from wikipedia (wikimedia).
Video Rating: 5 / 5

Chris Orwig – Enhancing Digital Photography with Photoshop CS – 2. Color Management – The Foundation 1/4 – ThExperts.freei.me
Video Rating: 0 / 5