RSS
 

Posts Tagged ‘Crystal’

This lens only existed for a minute and was made from a crystal clear iceberg

24 Oct

French photographer and YouTuber Mathieu Stern is known for his look at rare, vintage glass, but his latest lens might just top it all. While on Iceland’s famous “iceberg beach,” Stern fulfilled his dream of shooting photos and videos with a lens made of ice.

“Shooting photos using an ice lens [has been] my dream for almost 2 years. After some research I saw that almost no one ever tried this crazy idea, mainly because it’s hard as hell to find pure ice, and even harder to get a clear image,” says Stern in the video’s description. “So I had the choice to give up on my idea because it was too hard, or to just level up in the craziness […] If it’s hard to find pure ice in my city, maybe I should go where I could find some 10 000 year old pure ice — Iceland’s famous iceberg beach.”

The night before Stern and his friends were supposed to go to the beach, a “huge” storm went through and took all of the icebergs away from shore. So, they waited a few days and eventually went back three days later at 5am in the morning to get a chunk from one of the icebergs that had made its way to shore.

Stern says it took nearly six hours to create a single working ice lens, after four of them had broken inside of the housing. Every iteration, each of which took 45 minutes to make, was done so with the help of a Japanese cocktail ice ball maker, which Stern had hacked to form the piece of iceberg into a half-sphere.

The housing of the lens he created was 3D-printed, which held the continuously-melting piece of ice in place in front of Stern’s camera. As you could imagine, shooting with the lens was less than ideal. The lens lasted only a minute or so after it was completed and trying to focus as it was melting proved to be a challenge.

According to Stern, no cameras were harmed in the making of the video. As to whether or not he was happy with the result, Stern says “This project is a scientific, artistic and poetic project — I never imagined the result would look like the photos that comes from an ultra modern lens, but I was amazed by the strange beauty of the images I made with the first ever 10,000 year old lens.”

You can read Stern’s detailed account on the creation of the lens and see more of his work on his website.

Articles: Digital Photography Review (dpreview.com)

 
Comments Off on This lens only existed for a minute and was made from a crystal clear iceberg

Posted in Uncategorized


Which Size Lensball is Best for Crystal Ball Photography?

06 May

The world is in your hands, well it can certainly seem that way when you do crystal ball photography. The crystal ball allows you to take refraction photos, which reveal the background scene within the ball. It’s a great technique, with which many people are having a lot of fun.

The photographic technique has now become so popular that photographers have re-branded the crystal ball as a lensball! So the question that’s often asked is which lensball size is the correct one to buy? Let’s take a look at the various options available when buying a crystal ball, and decide which is the best for you.

Which Size Lensball is Best for Crystal Ball Photography? - 3 sizes

Which size of the lensball is the best? There are three here, an 80, a 120 and a 60mm ball.

Small Lensball

The small size lensball is anything less than 60mm, so all the way down to a marble. These balls are the easiest to pack and are considerably lighter than the other balls. So what are the strengths and weaknesses of this particular size?

Strengths

  • Weight – These add almost no weight to your bag at all, and this also makes them easier to use for handheld photos.
  • Size – Again owing to their small size they’ll be easier to pack, giving you more space for other items. The smaller size also allows you to place the ball in gaps where the larger balls won’t fit.
  • Handheld – This size makes it easier to hold the ball between your finger and thumb, which becomes more difficult at larger sizes.
Which Size Lensball is Best for Crystal Ball Photography?

This position to rest the ball is only possible with a small lensball.

Weaknesses

  • Weight – This is also a weakness. Once a heavy ball is in place it usually stays there. The problem comes on a windy day, where the wind can move a lighter ball much more easily.
  • Focus and distortion – This lensball size will have a smaller sweet spot for focus, and a greater proportion of the ball will be distorted. Using a smaller aperture can help, as more of the ball will be focused.
  • Lens required – You will need a macro lens when using a small lensball if you wish to fill the frame with the ball.
Which Size Lensball is Best for Crystal Ball Photography?

The small size is perfect to hold between your index finger and thumb.

Medium Lensball size

This refers to balls at 80mm in diameter. Many photographers see this as the ideal size for their refraction photography. There are a lot of good reasons why you should also use this size of lensball. Let’s break it down, as this is the crystal ball you’ll likely be using.

Strengths

  • Weight – This is a little heavier, but still not noticeable. So it’s a nice thing to carry in your camera bag to add a bit more creativity to your work.
  • Size – This is a decent size, though you might not fit this ball into a small space. The ball will fill a nice portion of your frame with a standard lens, using a macro is optional at this size.
  • Focus and distortion – By this size, the sweet spot area of focus within the ball dominates the scene inside the ball, and distortions at the edge are much less noticeable.

Weaknesses

  • Size – There are very few weaknesses in this size of a lensball. However, if you wish to take a photo where you frame just the edge of the ball this is more difficult. Likewise using the ball to eclipse a background object is also more difficult, as the ball is that much smaller.
Which Size Lensball is Best for Crystal Ball Photography?

The lensball is ideal for many kinds of creative takes on typical scenes. Here it’s used to capture a road lined with cherry blossom trees.

Large Lensball

The large size refers to those balls that are 100mm or over in diameter. This size is not common amongst most photographers, though this is the size I cut my teeth on for crystal ball photography.

Even with the extra weight, this is often the preferred size for me personally, it just gives better quality images in my opinion. Whether this is the size for you will come down to if you want to carry the extra weight or not.

Strengths

  • Optics – This size offers the best in optics, a larger proportion of the ball will be in sharp focus.
  • Handheld – This is a much more natural size to fit in the palm of your hand or someone else’s palm. One classic crystal ball composition is that of a hand cupping the ball.
  • Size – This makes it far easier to fill the frame with your ball, and even hide some background elements behind the ball.
Which Size Lensball is Best for Crystal Ball Photography?

A larger size ball will both fill the frame more easily and cover up the background when it’s close to the camera.

Weaknesses

  • Weight – The obvious weakness here is weight. Those not used to carrying a heavy camera bag should avoid this crystal ball size. The weight is equivalent to an extra lens in your camera bag. It comes down to whether you want an extra lens or the larger crystal ball in your bag.
  • Size – While optics are better when photographing this size, the larger size is not so good for storage. This will take up a large space in your bag.
Which Size Lensball is Best for Crystal Ball Photography?

This particular way of holding the crystal ball is one of the classics. It’s not so natural looking with a smaller sized ball.

Safety

The crystal ball is a really great photographic tool to play with, though there are some safety issues you need to be aware of. You will also find that staff in the airport may consider the crystal ball a lethal weapon! This means you will have to put it in your checked luggage, hand luggage is not an option.

So what are these safety concerns then?

  • Fire hazard – Keep the crystal ball stored somewhere out of the sun. The glass will act in the same way a magnifying glass does, and while this will usually only result in smoke it can lead to a fire as well. Oh not to mention, it can burn your hand when you are holding it as well!
  • Gravity – Due to its spherical nature the ball is liable to roll. If it rolls off the edge of a tall building it can cause damage to whatever it hits. Take care with the ball in such situations.
Which Size Lensball is Best for Crystal Ball Photography?

Having a small crystal ball with me enabled me to fit it in the gap of this fence.

Conclusion

Asking which size if crystal ball you should buy is a little like asking which is the best tripod. Everyone knows the sturdiest tripod is best, but that it’s impractical to carry around for the whole day.

The same is true of the crystal ball, the 80mm medium sized ball then is probably the best choice. There is certainly a case for the smaller or larger size of balls though, so if you decide to get a second ball how about a different size?

Using more than one ball at a time can also be fun!

As mentioned in this article, the 80mm is both not too heavy, yet doesn’t sacrifice the image within the ball making this a good size.

Have you bought a crystal ball, or are you thinking of doing so? We’d love to see your comments, and images – please share below.

The post Which Size Lensball is Best for Crystal Ball Photography? appeared first on Digital Photography School.


Digital Photography School

 
Comments Off on Which Size Lensball is Best for Crystal Ball Photography?

Posted in Photography


Crystal clear: Inside Nikon’s Hikari Glass factory

03 May

Inside Nikon’s Hikari Glass factory

Located about 375 miles north of Tokyo in the Akita Prefecture, the Hikari Glass factory is a special place. Opened back in the 1970s, Hikari Glass has been a wholly owned subsidiary of Nikon since 2004. If you shoot with Nikon lenses, the chances are good that they started life right here – as raw powdered glass.

The Akita Prefecture, home of Hikari Glass, lies around 375 miles north of Tokyo.

Nikon invited us to visit Hikari Glass following the CP+ 2018 show in Yokohama, and along with our friends Dave Etchells and William Brawley of Imaging Resource, we were among the first journalists ever allowed inside the facility. During our visit we saw virtually the entire process of glass-making, from raw powder to finished glass ‘blanks’, ready for shaping and polishing in Nikon’s other facilities.

Click through this slideshow for a detailed look – please note that some areas of certain images are blurred at Nikon’s request.

Inside Nikon’s Hikari Glass factory

Akita and the surrounding area is blanketed with snow for several months a year. We visited on a relatively mild day, but as you can probably tell from the ice buildup on this building, ‘mild’ is a relative term.

Our tour guide, Akio Arai is the Corporate Vice President and Production General Manager of the Akita factory and has been with the company for 11 years. At present, almost all of the Hikari factory’s output goes to satisfying Nikon’s requirements for high-quality glass, but Mr Arai hopes that in future his facility will be in a position to supply even more glass to companies other than Nikon.

Inside Nikon’s Hikari Glass factory

This powder contains several different ingredients (the biggest portion being quartz, but the exact mix is secret) which are mixed, melted, and eventually turned into finished glass.

The combining of the raw material happens in batches of around 500kg (~1100 lb) in a pair of very large mixers. The precision achieved in the mixing process is somewhere in the region of 1 part to 50,000. It’s vitally important that the mixture is exactly right, because Hikari is aiming for glass with a very specific refractive index.

Inside Nikon’s Hikari Glass factory

This tub of powder (roughly the size of a small hotel bathtub) is the raw material for Nikon’s famed ED glass, used in a great many of the company’s high-performance lenses. Hikari makes 125 different kinds of optical glass, including 20 types of ‘specialty glass’ for molded lens elements.

Once the powder has been mixed, it is melted. There are two types of melting process, depending on the types of glass. The simpler of the two is called ‘direct melting’, and the more complex is called ‘pre-melting’ and ‘fine melting’. We watched the latter.

Inside Nikon’s Hikari Glass factory

The pre-melting process begins with the raw powder being heated inside a quartz or platinum crucible (depending on the exact type of glass), in a furnace at a temperature of more than 1000 degrees Celsius. The furnaces are on platforms raised several feet above the factory floor. The mixture is added to the crucibles by machines very gradually. If all the powder were dumped in at once, only the surface of the mixture would melt.

With quartz crucibles, some of the quartz inevitably melts into the mixture. This is accounted for in the formula, but since they become thinner over time as the quartz melts, the crucibles have a limited lifespan – in some cases, this can be as short as two days. We weren’t allowed to show the crucibles in this article, but the ones we were shown were roughly the size of a small domestic water boiler.

Once the glass is fully melted, a hole is opened into the bottom of the crucible to allow the molten glass to escape into a large tank of water, positioned underneath the furnace at floor level. That’s what you can see in the image above.

Inside Nikon’s Hikari Glass factory

As the glass continues to drain, eventually the water that it’s draining into becomes so hot that it starts to boil.

The remainder of the heated glass is drained into the tank, and once everything is cooled down, workers will assess whether or not the crucible in the furnace can be used again, or needs to be retired. In the old days, glass used to be melted in clay crucibles, and for every 2,500 kilos of glass, only about 500 kilos was usable. The modern method is far less wasteful.

A small water jet to the right of the stream of molten glass helps break the stream up into small droplets which cool to form what are called ‘frit’.

Inside Nikon’s Hikari Glass factory

And here is the frit – they look like little flakes of snow, but that’s where the similarity ends. In the pre-melting process, the frit aren’t meant to have exactly the exact refractive qualities of the finished glass – it’s still basically a raw material. And there’s some variation in the flakes of frit, too. Depending on where the glass was positioned inside the crucible, the makeup of each frit might be slightly different (i.e., it might contain more or less quartz, thanks to the melting of the crucibles during the process).

Inside Nikon’s Hikari Glass factory

The frit is mixed in these giant machines (it’s hard to get a sense of scale, but the fan on the far right is basically just a domestic room fan if that helps). If these look like modified and repurposed cement mixers, that’s because they are.

One of the major modifications over a standard cement mixer is inside the drums, which are lined with natural rubber to prevent any metal particles from the mixer contaminating the glass.

Inside Nikon’s Hikari Glass factory

Here’s a closer view of the rubberized interior of the mixing drum. Any rubber particles that make it into the mix will burn off harmlessly in the next major process – ‘fine melting’.

In order to hit exactly the right target refractive index for a particular kind of glass, Hikari prepares two batches of frit, one batch with a refractive index deliberately on one side of the target value, and one with a refractive index on the other. The two batches are then remixed and fine-melted together in just the right way to produce glass with the exact target refractive index value.

The direct melting process skips this pre-melting step, making it less time-consuming. The difficult part is that the glass must have exactly the right refractive index from the get-go, which requires absolute purity of the raw materials, and gives much less margin for fine-tuning.

Inside Nikon’s Hikari Glass factory

The fine melting process is one of the two most critical stages in the entire glass-making process, and takes place in platinum crucibles inside very high-tech furnaces. The exact details of the fine melting furnaces (even their external appearance) are highly protected by Hikari Glass, and we weren’t allowed to take photographs of them.

That’s OK, because to the untrained eye they don’t look like much anyway. More interesting is what they produce – long, long bars of glass, called ingots, which roll out from the machines very, very slowly on a very, very long conveyor belt in a process called ‘casting’.

Inside Nikon’s Hikari Glass factory

A skilled worker marks and precisely breaks the cast ingot at specific intervals. This particular ingot is destined for use in Nikon lenses, while glass for prisms and other purposes are processed in a different building.

Inside Nikon’s Hikari Glass factory

Once the ingot has been broken up into bars, each bar undergoes a quick inspection for any obvious major flaws or defects. If there is an apparent defect, these extruded glass bars are either recycled, if possible, or rejected.

Inside Nikon’s Hikari Glass factory

The glass bars are further checked for any bubbles or unevenness in an adjoining room. This is most often done visually, using a lightbox. Bubbles show up as bright specs, and ‘distortions’ (areas of substantially different refractive index) show up as wrinkles in the image projected onto the screen (left).

Inside Nikon’s Hikari Glass factory

Here, a worker points out a defect in a demonstration bar of glass.

During the decades that Hikari Glass has been operating, optical technology has changed a lot, and so has the legislation governing substances like lead and arsenic, which used to be commonly used in glass manufacturing. Over the years, Hikari Glass has refined its processes accordingly.

Inside Nikon’s Hikari Glass factory

To ascertain the exact refractive qualities of a piece of glass, Hikari Glass technicians turn to machines. To measure refractive index, a small test block of glass is cut, and a special liquid with the expected refractive index is then painted onto the glass. Technicians then load the painted cube of glass into this machine and look for variations in light transmission as light is shone through.

As well as the ‘final’ glass cast from the fine-melting furnaces, these machines are used to establish the refractive index of test batches of glass made from the frit we saw earlier.

Inside Nikon’s Hikari Glass factory

Once they’ve passed this quality control step, the bars of glass are split into slim rods, using heat. A heating coil warms the bar, and after a predetermined period of time, a small drop of cold water applied to the end of the bar causes it to split neatly in two with a very satisfying “pink” sound.

This bar has just been split into two rods – the bars to the right, in the background are awaiting their turn.

Inside Nikon’s Hikari Glass factory

The glass rods are then cut into smaller…

Inside Nikon’s Hikari Glass factory

…and smaller cubes, called ‘dice’ using a circular saw. You’ll notice there’s no glass dust anywhere to be seen in these images and that’s because the ‘saw’ doesn’t have a cutting surface (you could put your hand right on it, without any fear of injury). It works by friction – the spinning disc heats the glass at the point of contact, creating a clean break.

Each cube is slightly bigger than it ultimately needs to be, so that there’s scope for its weight to be precisely adjusted in the next stage of the process – grinding.

Inside Nikon’s Hikari Glass factory

The cubes of glass are weighed and placed into four categories, according to their approximate target weight. Their weight is then adjusted by grinding stones, in a very noisy machine called a tumbler (pictured above, and there’s a video of it in operation, below).

The cubes of glass that are heaviest are added to the tumbler first, followed by the second-heaviest cubes, then the third and finally the fourth. In this way, the cubes of glass that need most weight shaved from them are processed for longer, and they all come out weighing roughly the same.

Inside Nikon’s Hikari Glass factory

After hanging out in the tumbler for a while, the cubes look like pieces of beach glass.

A skilled employee then inspects each one by hand and performs any necessary additional grinding to make sure that any small chips are smoothed out, and the weight falls within the desired parameters.

This particular piece has a chip (marked in red), which is big enough that unfortunately it’s reached the end of the line and will be rejected.

Inside Nikon’s Hikari Glass factory

Several areas of the Hikari factory are dusted with white powder, but it isn’t glass dust, it’s boron nitride – a heat-resistant compound of boron and nitrogen which is used in several industries, including cosmetics. At the Hikari factory, it’s used to stop the cakes of glass from sticking to their casts when they’re pressed into shape.

A welcome effect of the roughening of the glass surface in the tumblers is that it makes the boron nitride adhere more effectively.

Inside Nikon’s Hikari Glass factory

And now the pressing begins!

The blocks of glass, covered in boron nitride, are placed into their ceramic trays and sent on a conveyer belt through a furnace – which not coincidentally, makes this area one of the warmer sections of the Hikari facility. The aim is to soften the glass, but not quite to melting point.

Inside Nikon’s Hikari Glass factory

The very, very hot piece of glass is moved by hand (well, by tongs) and tipped into a heated mold. The molds for lens elements like these are pretty simple, but we’re told that it takes much longer to prepare the molds for glass destined for DSLR and binocular prisms.

Inside Nikon’s Hikari Glass factory

Once the glass is in the mold, a worker then activates a foot pedal to press the cake of glass into shape. A clock serves as a rough point of reference for the length of time each cake of glass is pressed, but an experienced press operator can also make this call by assessing the hardness of the glass based on how the mold feels in his hands.

Inside Nikon’s Hikari Glass factory

After pressing, and cooling, the cakes of glass (which are now in their puck-shaped final form) are collected for inspection.

Inside Nikon’s Hikari Glass factory

Each cake of glass is inspected by hands for any obvious defects resulting from pressing.

This large piece of glass is destined for one of Nikon’s high-end telephoto lenses, and pieces like this go through extra inspection steps because they’re produced in a lower volume.

Inside Nikon’s Hikari Glass factory

Last but not least is the annealing process – the second most critical phase in the glass-making process, after fine melting. Like fine melting, the exact details of the annealing process are highly confidential. Essentially, annealing is a precisely-regulated heating and cooling process, which takes place over a long period of time – often several days. The goal is to make the internal density of the glass blanks completely consistent, and to eliminate any remaining bubbles and to adjust the refractive index. Generally speaking, lengthier cooling cycles result in denser glass with a higher refractive index, and shorter cycles produce less dense, higher RI glass.

The specific temperature brackets – and the period of time over which those temperatures are sustained – is critical (and secret) and depends on the exact type of glass. The huge plates of glass used in industrial steppers might spend up to two months in the annealing furnace.

The green chalkboard on the front of this furnace is used by workers to record the ‘recipe’ for the particular trays of glass blanks that have been loaded in. This furnace isn’t being used, which is why there’s nothing written on the board (and why we were allowed to take pictures of it).

Inside Nikon’s Hikari Glass factory

After all that, at long last, we have a finished ‘blank.’ These blanks are packaged and sent off to other Nikon facilities in Japan, China and Thailand for polishing and coating, before finally making their way into NIKKOR lenses.

Inside Nikon’s Hikari Glass factory

And that’s it! Here, finished blanks of glass are placed into plastic pallets ready for dispatch.

To recap, here are the major stages in the entire process from beginning to end, with links:

  1. Initial mixing of the raw materials to make glass powder LINK
  2. Pre-melting of the glass to make ‘frits’, which are intentionally created to have either a positive or negative R.I. (direct melting is a simpler process, that we did not observe) LINK
  3. Mixing the frits LINK
  4. Fine melting of the frits (not pictured) to achieve the target refractive index, and extrusion and cutting of the glass ingots into bars LINK
  5. Inspection of the glass for defects LINK
  6. Cutting into blocks into rods and dice LINK
  7. Adjusting the weight of the glass dice in the grinding machine LINK
  8. Heating and pressing the glass dice into molds LINK
  9. Annealing of the resulting blanks, to eliminate distortions in the glass and fine-tune the refractive index LINK
  10. Inspection and measurement of the finished glass blanks

We hope you enjoyed this look inside Nikon’s Hikari glass factory. If you’re eager to learn even more, our friend Dave Etchells over at Imaging Resource has published an even more detailed account of our visit here.

Articles: Digital Photography Review (dpreview.com)

 
Comments Off on Crystal clear: Inside Nikon’s Hikari Glass factory

Posted in Uncategorized


How to Take Unique Crystal Ball Portraits

23 Jan

The search is always on to try something new in photography. That process is often about taking a technique and applying it in a new way. A crystal ball is a great addition to any landscape photographer’s camera bag. In this article, you’ll see why this is also true for portrait photographers.

You’ll learn to take the perfect crystal ball portrait. There are some special characteristics of refraction photography to consider. You will learn the technical side of refraction photography, and how to use this for your portraits.

How to Take Perfect Crystal Ball Portraits

In this photo, the model is seated, with her legs near her body. This made it easier to “eclipse” her behind the ball.

What is refraction photography?

Refractions is an effect that is produced when the light is bent upon passing through an object of denser mass. In the case of a crystal ball, this has the effect of inverting the background image inside the ball. This can be great to use for photography, as the ball becomes an external optic for your camera. You can read more about refraction photography in one of my previous articles.

This effect is mostly used for photographing landscapes, as it creates a super wide-angle scene within the glass ball. However, there are occasions you’d use a wide angle lens for portrait work, and the same is true with the crystal ball.

As with all crystal ball photos, try to ensure your subject is well lit, this will enhance the image coming through the ball. If you try to use strobes for this you need to position yourself carefully, the ball will pick up the light from the flash as a reflection very easily. The best advice I can offer is to position the strobes in a parallel line with the glass ball.

How to Take Perfect Crystal Ball Portraits

In this, photo the model is silhouetted against the dawn sky. The distance from the model to the crystal ball is quite far, so the person appears small in the ball.

How to create your crystal ball portrait

Now you know what refraction photography is and how to do it, the next step is to apply this to a portrait.

There are three main types of crystal ball portraits you can make, each uses the ball in a slightly different way. The three types of photo are shooting close to the ball, photographing the ball in the scene, and using the ball as a prop. Let’s take a look at each one.

1 – Fill the frame with the crystal ball

This composition type has the crystal ball fill the entire frame, or become the dominant part of the frame. In this photo, your model will be the main subject inside the glass ball, which means they’ll need to be quite close to the ball itself. To succeed with this type of photo look at the following points, and apply them to your portraits.

How to Take Perfect Crystal Ball Portraits

You can avoid distortion by placing the model in the center of the ball.

Center the model

  • The model needs to be in the center of the ball so that you avoid ugly distortion of the face on the edges of the ball. To do this consider the following steps.
  • Don’t have your model standing up strait, a sitting position where there body is more compressed will fit better inside the ball.
  • Take the portrait from the chest up, and center the composition on the eyes.

Compress your scene

Use a long focal length to hide the model behind the glass ball, essentially eclipsing the model. The larger the glass ball the easier this will be.

Position the ball

The ball should be level, or a little higher than the model. This will avoid distortions on the edge of the ball, and by having the ball higher than the model, it will focus the viewer’s eye more on the face.

Avoid bad bokeh

The background in a crystal ball photograph can make or break your image. With your model close to the ball, the background is likely to contain some bokeh. Use an appropriate aperture to blur them out, or consider using post-processing to remove them.

How to Take Perfect Crystal Ball Portraits

You can enhance your crystal ball portrait by using good light on the model.

A photo of this type is best achieved with a macro lens, or a long telephoto lens. Both these lenses will allow you to fill the frame with the crystal ball, and then it’s simply about avoiding a bad background.

2 – Use the crystal ball as part of the overall picture

The next option for incorporating the crystal ball into your portrait shoot is to include much more of the background, and make the ball a smaller part of the frame. In this type of photo the focus will be on the ball, but the background bokeh will be equally important in telling the story.

How to Take Perfect Crystal Ball Portraits

Use the bokeh in the image to create your crystal ball portrait.

  • The ball is smaller – The ball will be more of an accent within the overall frame. It’s likely the ball will be placed on the ground, or perhaps on a wall and will take up between 10-25% of the frame.
  • The background will be bolder – The shape of your model is important, so have them strike an interesting pose. As the focus is on the ball, the focus on the model will be soft.
  • Use the correct aperture – Adjust the aperture to a suitable level, so defined shapes can be seen in the background. The background should be neither to blurred nor too sharp. An aperture of around f/4 is a good place to start.
  • Wider focal length – Now that you are including a large amount of the background a wider lens will be needed to achieve this.

3 – Use it as a prop in your crystal ball portrait

You can also use the ball in the more traditional way, as a prop for your model. In this type of crystal ball portrait your model will be directly interacting with the ball. This will mean that the refraction effect inside the ball may or may not be seen, depending on the way you arrange your photo.

How to Take Perfect Crystal Ball Portraits

Have your model hold the ball, and interact with it.

  • Tell the story – As a prop, the ball will be a focal point for your photo. You can use the crystal ball to show tropes like fortunetelling and magic. Use these ideas when composing your photo.
  • Do you refract? –  When using the ball as a prop you don’t have to show it producing refraction; however, it will add more interest if you do so.
  • Using strobes – A glass ball is a very reflective surface. When using strobes you need to decide if you want your strobe light reflecting on the surface of the ball. Moving your strobe to a side light position will eliminate most of the reflection on the ball, so this is a solution.
How to Take Perfect Crystal Ball Portraits

Using more than one ball gives you more storytelling potential.

Go out and create your magical crystal ball portrait!

Have you ever tried using a crystal ball in portrait work? Let’s see your results if you have. What difficulties did you encounter when you tried this style?

If you bought the ball primarily for landscape photography, how about trying your hand at a portrait?  Give it a go and let us know how it turns out.

How to Take Perfect Crystal Ball Portraits

The ball can help you make some unusual portraits.

How to Take Perfect Crystal Ball Portraits

Experiment with your crystal ball portrait, how about using other techniques like light painting?

How to Take Perfect Crystal Ball Portraits

When your model looks into a crystal ball, there is a story to that photo.

The post How to Take Unique Crystal Ball Portraits by Simon Bond appeared first on Digital Photography School.


Digital Photography School

 
Comments Off on How to Take Unique Crystal Ball Portraits

Posted in Photography


7 Tips for Doing Crystal Ball Refraction Photography

15 Nov

You’ve have heard of reflections in photography, but have you have tried refraction? When used well, refraction creates compelling images that will leave your audience both wowed and curious. I’ve been approached many times by strangers who are curious about how I photograph with a glass ball. Once you’ve mastered this type of photograph you’ll likely get the same audience. Here are some tips to help you do crystal ball refraction photography.

Doing Crystal Ball Refraction Photography - house inside glass ball

The subject shows prominently in the ball, and around the ball is bokeh.

So what is refraction?

Refraction happens when light passes through an object of denser mass, such as water or glass. When this occurs, light is bent, and there is a distortion. When refraction occurs with a transparent spherical object something magical happens. An inverted image of the scene behind the ball is seen. The lens elements in your camera actually work this way as well. You can use a glass ball as an extra lens element, one you can move around your scene.

Doing Crystal Ball Refraction Photography

How to do refraction photography

Now you know what refraction is, it’s time to learn how to apply it to your photography. If you follow the guide below you won’t go far wrong with this type of photography.

#1 – Dealing with the upside down image

There are instances where it works to have an upside down image in the background or inside the ball. If you want to avoid this, the best way to deal with an upside down background is to blur it out using bokeh. An alternative to blurring out the background is to use reflection since the reflected image will be the right way up inside the ball.

Doing Crystal Ball Refraction Photography - The image inside the ball will be upside down.

The image inside the ball will be upside down.

#2 – Get above your subject

You should get the ball off the ground so it’s level with the subject you’re photographing. A centered subject in the ball will have less distortion and more impact in the frame. There are always exceptions, of course, as leaf beds or puddles work well when the ball is placed right in them.

#3 – Fill the glass ball with your subject

You have to get close to your subject, or it (they) will appear very small inside the ball. The best advice I can give here is to see if your scene would fill a wide angle lens. If so you’re gold.

Doing Crystal Ball Refraction Photography

In this photo, the cityscape is captured inside the ball, and a closer framing was employed.

#4 – Choose the correct lens

The best option here is to use a macro lens or a telephoto lens with macro capability. The macro lens will allow you to get close to the ball, making it easier to create bokeh around the ball. Using a wider angle lens can also work if your scene allows it.

#5 – Choose the correct aperture

You need to get the correct aperture for your scene. An aperture that’s too small won’t blur out the background. One that’s too large will make it hard to get a sharp image inside the ball. I would choose an aperture of around f/4, it depends on the scene you are photographing, though.

Doing Crystal Ball Refraction Photography

One of the best ways of dealing with the upside down image is to use reflection in the photo.

#6 – Find a safe place to position the ball

This is very important, especially if you are photographing from a high vantage point. The ball needs to sit on a flat surface, finding a crevice to sit the ball on is better. Once you have placed the ball ensure it isn’t going to fall and keep your hands near it during this time.

If there is no place to rest the ball you can ask a friend if they’ll hold the ball for you. You need to be especially careful on a windy day, a strong gust of wind can move the ball if it’s not in a secure position.

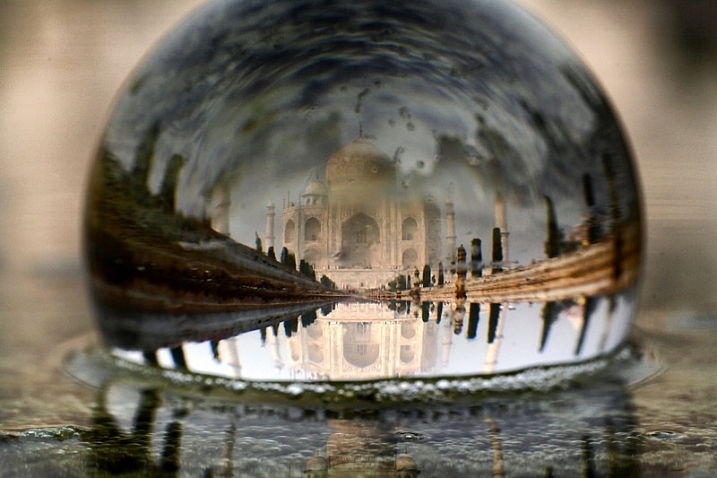
In this photo of the Taj Mahal there is reflection in the background, and this reflected image is in fact upside down.

In this photo of the Taj Mahal, there is a reflection in the background, and this reflected image is in fact upside down.

#7 – Lighting the subject in front of the ball

You should have a well-lit subject in any kind of photo, but it’s even more important with refraction photographs. A strongly lit subject will shine through the ball with less reflection appearing on the ball. Look to photograph when the sun is behind you or during blue hour shooting towards lit buildings.

Refraction photography versus a standard landscape

A lot of locations that suit refraction photography with a glass ball will also be good for regular landscapes. The question is why photograph a refraction photo when you could take a wide-angle shot of the same scene? Let’s take a look at some of the pros and cons of crystal ball refraction photography.

Pros of refraction

  • A glass ball is cheaper than a lens and allows you to create a fish-eye like effect.
  • You can move the ball to different positions in your scene.
  • Using a large aperture in conjunction with the ball to create bokeh, is great for minimalism.
  • Scenes created with a crystal ball often have a more artistic feel.
  • The ball creates a natural frame for your photo.
Images that work well as a wide angle photo also work well inside a crystal ball.

Scenes that are well suited for a wide-angle photo also often work well inside a crystal ball.

Cons of refraction

  • The larger glass balls are heavy to carry, in an already heavy camera bag.
  • You need a macro lens, something a landscape photographer may not normally carry.
  • Distortion on the edge of the ball.
  • It’s difficult to get a sharp image inside the ball.
  • The image in the ball is upside down.
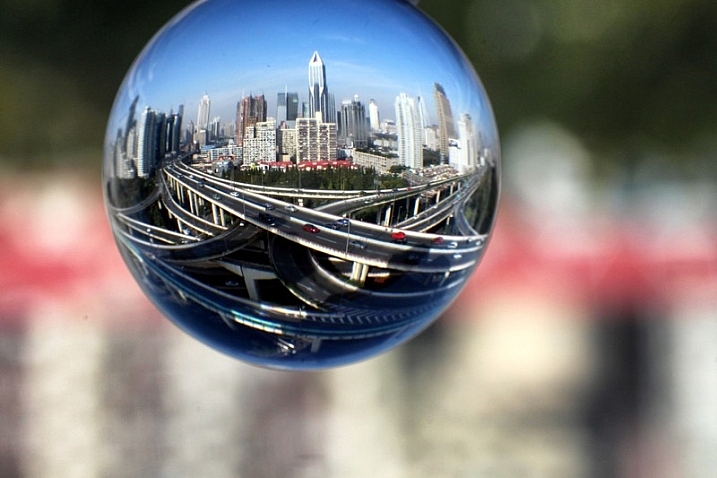
This is a wide angle photo of a famous road junction in Shanghai.

This is a wide angle photo of a famous road junction in Shanghai.

The choice of taking a glass ball is yours to make, I highly recommend experimenting with it, though.  The pros really outweigh the cons, and following the tips in this article will help. You may also find weight an issue, so I recommend scouting a location before shooting with the ball. Then return for a second visit with just the equipment you need to take the photo, this will reduce the weight somewhat.

Experiment with the ball

The first thing you’ll need of course is a crystal ball, you can buy them easily through amazon for 27$ . While you wait you can try filling a wine glass with water, you’ll get the refraction effect this way too.

Now you’re ready to get started, so head to a local landmark and start experimenting. The list of subjects is really endless; you can start with a lone tree, a church, or a cityscape scene. If you have any photos that show refraction please add them to the comments below, it would be great to see them.

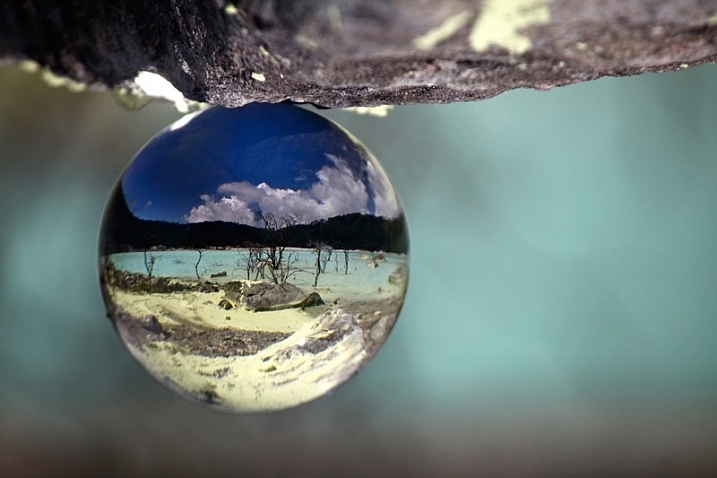
Natural landscape look great inside the ball. This is a volcanic lake found in Indonesia.

Natural landscapes look great inside the ball. This is a volcanic lake found in Indonesia.

googletag.cmd.push(function() {
tablet_slots.push( googletag.defineSlot( “/1005424/_dPSv4_tab-all-article-bottom_(300×250)”, [300, 250], “pb-ad-78623” ).addService( googletag.pubads() ) ); } );

googletag.cmd.push(function() {
mobile_slots.push( googletag.defineSlot( “/1005424/_dPSv4_mob-all-article-bottom_(300×250)”, [300, 250], “pb-ad-78158” ).addService( googletag.pubads() ) ); } );

The post 7 Tips for Doing Crystal Ball Refraction Photography by Simon Bond appeared first on Digital Photography School.


Digital Photography School

 
Comments Off on 7 Tips for Doing Crystal Ball Refraction Photography

Posted in Photography


Crystal Universe: Digital Maze Invites You to Immerse Yourself in Light

14 Jul

[ By SA Rogers in Art & Installation & Sound. ]

Screen Shot 2016-07-13 at 5.05.53 PM

A kaleidoscopic space filled with reflected and refracted light in all shades of the rainbow makes you feel like you’ve somehow immersed yourself inside a crystal at the DMMPLANETS exhibition in Odaiba, Tokyo. Dreamed up by the art collective teamLab, ‘Wander through the Crystal Universe’ is one of three major interactive installations in place through the end of August for the inaugural show. The work uses accumulated light points to create a sculptural body, “similar to the way distinct dots of color form an image in a pointillist painting.”

crystal universe 2

crystal universe 4


As you walk through the three-dimensional light space, your movement affects the light particles, creating changes in the installation. Each person’s action or change affects the way everyone present experiences the space. The lights are constantly moving and shimmering, going dark to mimic the effect of floating in space and then shifting into new color palettes. Visitors can further interact with the exhibit using their smartphones, selecting certain elements and enhancing them.

crystal universe 3

Screen Shot 2016-07-13 at 5.05.53 PM

crystal universe main

“In Crystal Universe, the particles of light are digitally controlled, and change based on the viewer’s interactivity with the work. The result is an installation consisting of an accumulation of lights, forming a sculpture that expresses the universe.”

floating

floating 2

Equally enchanting is ‘Drawing on the Water Surface Created by the Dance of Koi and People – Infinity.’ In this case, visitors are walking into a pool of water, influencing the movement of projected koi.

floating 3

“When the fish collide with people they turn into flowers and scatter. The trajectory of the koi is determined by the presence of people and these trajectories trace lines on the surface of the water. The work is rendered in real time by a computer program, it is neither a pre-recorded animation nor on loop. The interaction between the viewer and the installation causes continuous change in the artwork. Previous visual states can never be replicated, and will never reoccur.”

Share on Facebook


[ By SA Rogers in Art & Installation & Sound. ]

[ WebUrbanist | Archives | Galleries | Privacy | TOS ]


WebUrbanist

 
Comments Off on Crystal Universe: Digital Maze Invites You to Immerse Yourself in Light

Posted in Creativity


Fuji Crystal Archive Deep Matte Paper is Freaking Amazing

04 Apr

That’s me, above, in 2013. I made a trip to Japan for some meetings with Fuji. It was me, three other photogs and a room of Fuji engineers for two solid days of “How can we make our cameras better?” discussions. Because that’s how they do.

One of the highlights of the trip was seeing my work displayed at Corporate HQ at Fujifilm Square in Tokyo. (Pic, above, by Zack Arias.) One of the lowlights was realizing how much better these prints were than anything I could get done in the US.

Sigh.

I just assumed it was some sort of Fuji in-house magic file tweaking or something. Or more likely, Fuji’s continuous custody of the whole vertical process, right back to the film SIM.

Then it happened again in the 5th Anniversary event in Tokyo earlier this year: Gorgeous print, followed by the instant pang of sadness that I cannot get it done to this quality in the US.

An Import You’ll Wanna Drive

Well, it turns out that you can. I found it while auditioning several labs for printing of an image of mine that is to be sold be sold at a local gallery. Short version: I have found the paper I am gonna marry, and it is Fujicolor Crystal Archive Deep Matte.

The prints are hard to describe. They are beautiful and painterly; somehow muted and saturated at the same time. If you want a mental picture, it feels like a Gregory Crewdson image. As for the paper itself, the substrate is quite substantial and the surface is beautifully non-reflective.

Here’s the file/framed mock-up. The thing is, the print looks significantly better than the file. And I can’t remember ever thinking that before — other than those two times in Japan.

I have not tried it with anything subtle yet as far as the files go. But on my color-drenched citiscapes, it looks phenomenal. So much so that I am getting several of my existing prints reprinted on this paper.

They tell me at the lab that it is great for B&W, too. You’d better believe I am gonna be trying that.

The paper is silver halide based, and designed for large format and Frontier laser printers, according to Fuji’s poop sheet.

It uses CP-RA (or RA-4) process, and is said to be archivally stable for 100 years on display, 200 in storage. (Okay, I’ll be dead by then. But this print will still be beautiful.)

Do yourself a favor and try this stuff. You just need two things: A really competent lab, and Fuji Deep Matte paper. I’m using AdoramaPix and letting them drive on the color correction. (New paper, new printer, what do I know, right?) And I was super happy with the result.

Pick your favorite file and go big, as in 16×20 or larger. Because the beauty of this paper is that it somehow seems to both accentuate detail and mask noise. I don’t know how it does that. But holy crap.

$ 5 to Try It

And here’s something cool: if you want to try it as a one-off, AdoramaPix has a refer-a-friend special that’ll get you $ 5 off on $ 15 or more if you are a new member. And since a 16×20 print there is $ 16.99, it qualifies and drops this little experiment to $ 11.99. Not bad.

If you give it a try at this link, the referral code should auto-populate. And a quick heads-up, some folks are saying they can’t find the “deep matte” option. Here’s how to do it:

Sign up using the code. Go to ->Photo Prints, ->Upload Photos Now (upload your image) ->#3 Paper Finish and ->”Deep Matte Finish”.

It’s only available for 16×20 and up. And these guys being a pro lab, I suggest you let them color correct for you. (If you want to marry them later, you can easily download their ICC profiles and drive the car yourself then.)

So that’s my Epiphany of The Day, if you will. Suffice to say I am done auditioning prints.

Try it and let me know what you think.

Strobist

 
Comments Off on Fuji Crystal Archive Deep Matte Paper is Freaking Amazing

Posted in Photography


Novo to produce filter range using sapphire crystal and Gorilla Glass

18 Mar

A new filter manufacturer called Novo is promising a range of filters that will be made from super-durable sapphire crystal and Gorilla Glass, which should have enhanced scratch resistance. The company also claims its filters will have extremely thin brass frames, and will feature ‘superior coatings’. Read more

Articles: Digital Photography Review (dpreview.com)

 
Comments Off on Novo to produce filter range using sapphire crystal and Gorilla Glass

Posted in Uncategorized


See-Through Solar: Crystal Clear Panels Are 100% Transparent

25 Aug

[ By WebUrbanist in Conceptual & Futuristic & Technology. ]

clear transparent solar energy

Applied to anything from the surface of your smartphone to the the sides of a skyscraper, the possible uses of this innovation for everyday surfaces are incredibly wide-ranging.

clear solar material scientists

Developed by a team of chemical engineers and material scientists from the University of Michigan’s School of Engineering, this solar concentrator leaves a clear surface while collecting energy.

clear solar power panel

Unlike similar previous attempts, this project avoids coloration and distortion entirely behind: “The solar harvesting system uses small organic molecules developed by Lunt and his team to absorb specific nonvisible wavelengths of sunlight.” The goal now is to iterate on the design, continuing to improve its efficiency, scale and cost-effectiveness toward eventual mass-production on surfaces both small and large.

solar energy see through

Operating out of the normally-visible spectrum, they look effectively transparent to a human viewer. The captured power is redirected to and collected at the edges of the panel, out of sight and out of mind, leaving in the center a transparent surface that could cover (or even replace) windows on a building or the surfaces of smartphones. The goal is for energy generation to disappear entirely – in the near future, you might never know that homes and phones are creating, collecting and deploying clean power passively all around you.

Share on Facebook


[ By WebUrbanist in Conceptual & Futuristic & Technology. ]

[ WebUrbanist | Archives | Galleries | Privacy | TOS ]


WebUrbanist

 
Comments Off on See-Through Solar: Crystal Clear Panels Are 100% Transparent

Posted in Creativity


Kirby 64: The Crystal Shards in 3D

13 Nov

Yay Kirby. 😀 Liked it? Subscribe! Wanna request a game? Tell me at youtube.com See me and many other Nintendo 3DS fans at the 3DS Forums! 3dsforums.com

More 3D goo.gl This is a 3D video of when i went kayaking down a river.this is in 3d so use ONE of the following 3d glasses, 3d tv. evo 3d a 3d smart phone or 3d shutter glasses. 3D LINKS 3D SHOP: www.the3dshop.net FREE 3D Glasses www.3dn3d.com 3D Facebook: www.facebook.com View cool 3D Photos: www.3dn3d.com LIKE ME: www.facebook.com Follow ME: twitter.com BEST 3D EVER: www.youtube.com
Video Rating: 4 / 5

 
Comments Off on Kirby 64: The Crystal Shards in 3D

Posted in 3D Videos