RSS
 

Posts Tagged ‘Crossing’

Crossing the Bridge: Canon XC10 Review

09 Apr

Canon XC10 key features

  • 12 Megapixel 1″ CMOS sensor
  • DIGIC DV5 image processor
  • Fixed 10x (24 – 240mm equivalent) zoom lens with image stabilizer
  • Face Detection/Tracking auto-focus mode
  • Records 4K XF-AVC UHD (3840 x 2160) video to CFast 2.0 cards
  • 305Mbps video codec (4K)
  • Canon Log (12 stops of dynamic range)
  • Slow and Fast motion capture
  • 12 Megapixel stills (JPEG only, no Raw)

Hybrid cameras are those capable of capturing both high-quality stills and video. Although they have been around since the release of the Nikon D90 and Canon 5D Mark II, a professional mirrorless hybrid camera is a new category for Canon. When Canon announced the XC10 at NAB 2015, there was some confusion as to what kind of camera it was. Was it a system targeted towards Canon DSLR shooters or Vixia shooters? A drone camera? Or a micro ENG camera? The only thing that was certain was that Canon positioned the camera as one that could credibly be used for both video and still photography work.

The XC10 is an all-in-one compact hybrid camera that features both 4K and Full HD video capture as well as 12 Megapixel stills. It has great ergonomics for handheld shooting, is built around a 1″-type sensor, and includes the ability to record Canon Log, providing up to 12 stops of dynamic range. Optically, it uses a fixed zoom with a 2x Digital Teleconverter and Optical Image Stabilization, as well as a built-in ND filter.

The XC10’s lens gives you a focal range of 27.3-273mm equivalent for video capture and 24.1-241mm equiv. for stills. For monitoring, the camera features a touchscreen with Vari-Angle LCD monitor and an included loupe to mount to the LCD for viewing in bright environments. Unlike the 1080p EOS 5D Mark III, the XC10’s video workflow options should meet the standards for professional video shooters, offering H.264 4:2:2/8-bit MXF 4K UHD (3840 x 2160) files (up to 305Mbps) to internal CFast 2.0 cards, or Full HD (1920 x 1080) to SD cards.

Its form factor sets the XC10 apart from typical DSLR and compact mirrorless cameras like the Sony a7R II or Panasonic GH4. With its adjustable side grip and loupe attached for continuous run-and-gun video shooting, the XC10 slightly resembles Canon’s Cinema EOS cameras, such as the C300 Mark II and the C100 Mark II. With its side grip and adjustable LCD, you can comfortably shoot and monitor your shots at any angle.

Though probably intended for slightly different audiences, on paper the XC10 has a couple of competitors in this space: Sony RX10 II/III and Panasonic FZ1000. All three cameras contain 1″-type sensors and capture 4K video. The RX10 II/III also give you cinematic picture profiles, including S-Log2 which, like Canon Log, extends the cameras’ latitude. Unlike the RX10 II/III and FZ1000, which are aimed at stills photographers, the XC10 does not support Raw image capture. Also, the XC10 is by far the most expensive of the three with a retail price of $ 2,499 (though street prices hover around $ 1,999).

And if video is your primary format, the XC10 could well be a solid replacement for your DSLR, especially if you need to capture 4K. So the question becomes, can the XC10 be a credible stills camera for people who primarily shoot video but need high quality stills in certain situations? Let’s find out.

Articles: Digital Photography Review (dpreview.com)

 
Comments Off on Crossing the Bridge: Canon XC10 Review

Posted in Uncategorized


Animal Overpass: LA Wildlife Crossing to Be Largest in US

09 Sep

[ By WebUrbanist in Architecture & Cities & Urbanism. ]

la crossing proposal

Set in urban Los Angeles over a calculated spot along the 101 Freeway, an audacious freeway overpass has been designed to reduce deaths among mountain lions, pumas and other wild species populating the area. While such wildlife crossing exist in various forms around the world, this would be the biggest of its kind in North America at 165 by 200 feet, and perhaps the largest urban example on the planet.

wildlife crossing example

ecoduct bridge wildlife crossing

The crossing is set to connect two areas of protected public land, in the Santa Monica Mountains to the south and the Santa Susana Mountains to the north, stitching a fragmented habitat back together. Covered in native greenery, it would provide a safe passage for animals across the busy freeway below and could double as a crossing for hikers and mountain bikers as well.

wildlife crossing in bamf

Backed by local politicians and wildlife protection organizations, the project was vetted for feasibility by the Mountains Recreation and Conservation Authority and is set to be funded with public money. It is intended primarily to protect animals, but also benefits motorists who can also be harmed in wildlife-related accidents.

animal crossing design

There are smaller-scale precedents around the US and the globe, variously set above or below roads help animals both large and small. Some are larger, including tunnels or bridges for bears, cougars, deer, elk but others are smaller and species-specific, like the above aerial trellis for mice and squirrels in Australia. In some cases, as with a certain species of crab (below, also: Down Under), the crossings are essential to maintaining balanced ecosystems and supporting local economies.

crab crossing

Many of these kinds of structures can be found in more rural states around the country, while very few bridge metropolitan highways. “I don’t know anywhere where people have tried to put such a large wildlife crossing over such a busy highway in such an urban landscape,” said Seth Riley, a wildlife ecologist with the Santa Monica Mountains National Recreation Area, a unit of the National Park Service (additional images via Wikipedia).

Share on Facebook


[ By WebUrbanist in Architecture & Cities & Urbanism. ]

[ WebUrbanist | Archives | Galleries | Privacy | TOS ]


WebUrbanist

 
Comments Off on Animal Overpass: LA Wildlife Crossing to Be Largest in US

Posted in Creativity


Crossing the Divide: 10 Totally Atypical Bridge Designs

26 Aug

[ By Steph in Architecture & Public & Institutional. ]

bridges infinite

Bridges aren’t just a means of passing from one place to another along a linear path; they might offer a place for strangers to converge, provide a mostly decorative function or go nowhere at all. These highly unusual bridge designs aren’t packed with cities or vertical gardens, but they do turn conventional bridge typologies on their heads, whether they’re made entirely of compressed glass sheets, built by robots or held aloft by helium balloons.

3D-Printed Steel Bridge for Amsterdam

bridges 3d 1

bridges 3d 2

bridges 3d 3

Amsterdam startup MX3D aims to build a 3D-printed metal bridge for the center of the city, incorporating complex geometries and employing the help of multi-axis industrial robots equipped with 3D printing tools and developed software. Designer Joris Laarman says, “I strongly believe in the future of digital production and local production, in ‘the new craft,’ This bridge will show how 3d printing finally enters the world of large-scale, functional objects and sustainable materials while allowing unprecedented freedom of form. The symbolism of the bridge is a beautiful metaphor to connect the technology of the future with the old city, in a way that brings out the best of both worlds.”

Cirkelbroen Bridge by Olafur Eliasson

bridges circkelbroen 1

bridges cirkelbroen 2

bridges cirkelbroen 3

Stretching across a canal in Copenhagen, the new Cirkelbroen Bridge by Olafur Eliasson provides a vantage point and meeting place for pedestrians. Five posts echo the masts of ships above circular platforms, honoring the location’s nautical history. “In my art, I work with transient materials – such as wind, fog or flowing water,” says Eliasson. “It has been wonderful to have the opportunity to make a structure such as the Cirkelbroen Bridge, which embodies this transience – the changing of the weather and how this helps to create the waterfront atmosphere – but a bridge which has a long, stable life ahead of it at the same time.”

Nomanslanding Bridge

bridges mobile domed

bridges mobile domed 2

bridges mobile domed 3

A dome on a fenced platform in the middle of the Rhine, this structure looks nothing like a conventional bridge, and it doesn’t work like one, either. A collaboration between five artists for an annual festival, ‘nomanslanding’ wasn’t made for the purpose of crossing the water, but rather uniting visitors from opposite shores in a symbolic gesture. The two halves retract into separate spaces or come together to form a united, chapel-like space of contemplation. “This walk-on installation is an attempt to bridge the divide separating us from strangers and to facilitate a meeting on common ground,” say the artists. “A space is created with a unique atmosphere in which people may reflect with each other on history, memories and experiences.

The Infinite Bridge

bridges infinite

bridges infinite 2

bridges infinite 3

Created for this year’s Sculpture by the Sea festival, the ‘Infinite Bridge’ by Danish practice Gjøde & Povisgaard Arkitekter offers an entirely new way to experience the coastal landscape, jutting out over the surface of the water. Positioned just barely above the surface, the bridge has the potential to either stand several meters over the water or disappear in it altogether depending on the tide.

Helium Balloon Bridge

bridges balloon 2

bridges balloon

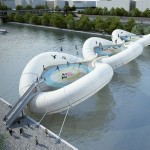
If crossing this bridge makes you feel nervous that the whole thing might suddenly fly away, you’re not being paranoid. Held aloft by three massive helium balloons, the only thing keeping it from drifting into the sky are a few tethers. Artist Olivier Grossetête installed the surreal featherweight attraction in Tatton’s Japanese Garden in the UK. A previous work, ‘Pont Suspendu,’ actually elevated the bridge into the air above Château Ferry Lacombe in France.

Next Page – Click Below to Read More:
Crossing The Divide 10 Totally Atypical Bridge Designs

Share on Facebook


[ By Steph in Architecture & Public & Institutional. ]

[ WebUrbanist | Archives | Galleries | Privacy | TOS ]


WebUrbanist

 
Comments Off on Crossing the Divide: 10 Totally Atypical Bridge Designs

Posted in Creativity


Dancing Traffic Signal Makes Crossing the Street More Fun

18 Sep

[ By Steph in Art & Installation & Sound. ]

dancing-traffic-signals

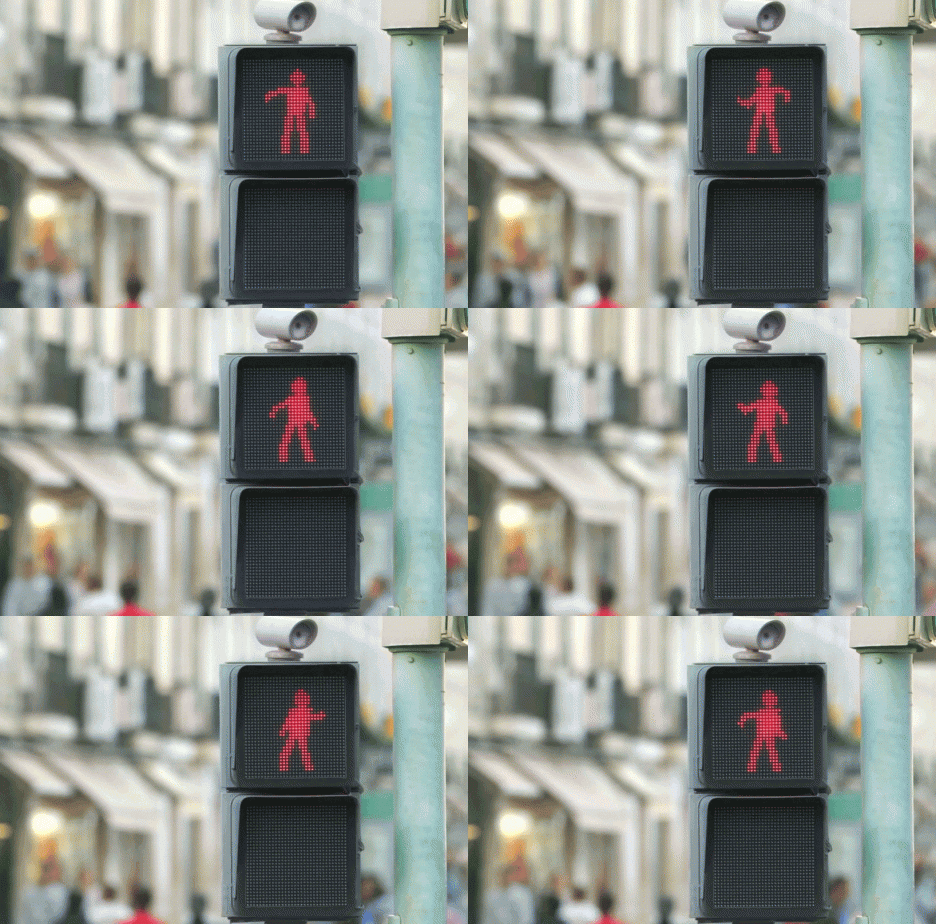
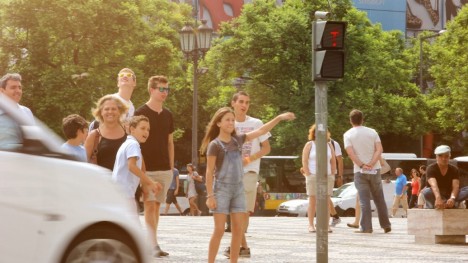
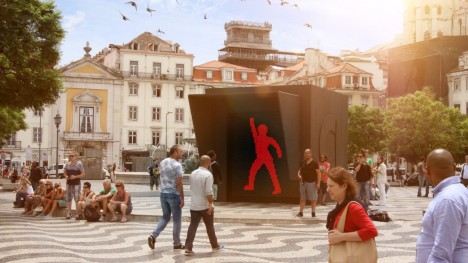
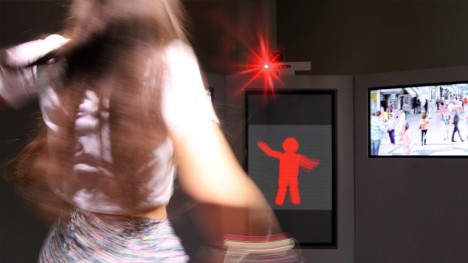
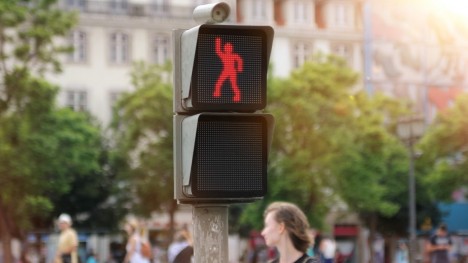
Impatient pedestrians eager to get across the street stop, point and laugh when they realize that the usually-static human figure in the crosswalk signal is dancing maniacally, waving its arms and legs. Not only is the figure dancing, it’s mimicking the real-time movements of passersby in a nearby booth.

Dancing-traffic-signals-5

Dancing-traffic-signals-4

The ‘WhatAreYouFOR’ campaign by Smart aims to make intersections safer by providing some attention-getting entertainment.


The people waiting to cross often can’t help dancing right along with the little figure, unaware that a real person is busting moves in an adjacent plaza, their dancing captured on camera and translated into the red pixelated silhouette.

Dancing-traffic-signals-2

Dancing-traffic-signals-3

dancing-traffic-signals

As a result, according to the creators, 81% more people stopped at the red light, increasing safety all around. “And they even had more fun doing so.”

Share on Facebook


[ By Steph in Art & Installation & Sound. ]

[ WebUrbanist | Archives | Galleries | Privacy | TOS ]


WebUrbanist

 
Comments Off on Dancing Traffic Signal Makes Crossing the Street More Fun

Posted in Creativity


How I shot and edited it: The Second Severn Crossing

24 Mar

Second Severn Crossing - how I shot and edited

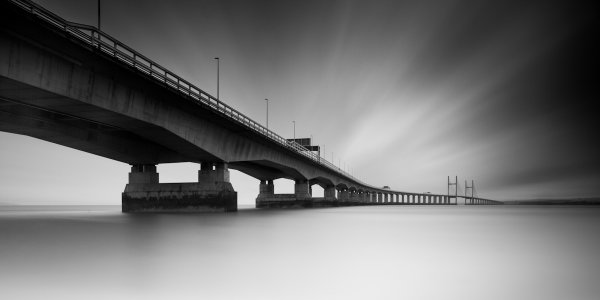
The image above is a long exposure taken of the Second Severn Crossing, a motorway bridge that crosses the River Severn, just outside Bristol, England.  I have been asked a number of times how this image was processed, what software/plug-ins were used, so I thought it would be a useful exercise to explain it here.

Shooting the image

I had been thinking about this shot for a while and I knew that there were a couple of important elements that I needed to consider when trying to capture the image:

  • I was really keen to get low, relative to the bridge, and shoot a wide-aspect image across the river.   Fortunately, there is a footpath that runs along the river bank, under the bridge, that is easily accessible by car (Google maps link).
  • I wanted to capture a long exposure so I could contrast the movement of the clouds against the static structure of the bridge.  Therefore, there was no special planning in terms of weather or time of day, as I was happy with a cloudy sky in the middle of the day, as long as there was a strong wind – fortunately, over the 2012 Christmas period, the UK offered those conditions in abundance.
  • I wanted to fill the frame with silky-smooth water, so as the River Severn is a tidal river with one of the largest tidal ranges in the world, I ensured that I would arrive at the location around high tide.

The image, as captured straight out of the camera, is shown below:

How I shot and edited - second severn crossing - image 1

The image was taken at ISO100, 12 mm, f/10, with a 5 minute exposure (299 seconds to be precise).  I used a 2-stop graduated neutral density filter to evenly match the exposure of the sky with the river, and used a 10-stop neutral density filter to produce the long exposure.   As the highlights of the scene were easily contained, I over-exposed the image to ensure that I captured the maximum amount of movement in the clouds, knowing I would be able to correct the exposure/contrast during post processing.

Processing the image

The processing of this image was performed in Adobe Lightroom 4.

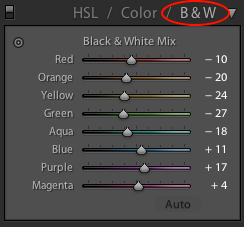
The first step was to convert the image to black and white using the B&W selector in the colour panel (on the development pane).

lightroom BandW selection

How I shot and edited - second severn crossing - image2

The initial image after a straight B&W conversion, lacking in contrast

Given the significant amount of foreground, I decided to crop the image at this point, using a 2:1 aspect ratio, to give the wide-aspect image I was after and to stop the foreground being a distraction during the rest of the processing.

How I shot and edited - second severn crossing - image3

Cropped to a 2:1 aspect ratio

I then needed to address the lack of contrast and over-exposure of the initial image.  Therefore, I set the white (+33) and black (-40) points and adjusted the contrast (+40) to set the overall exposure for the image.
How I shot and edited - second severn crossing - image3-1

Initial exposure adjustments made

I then applied a graduated filter to the sky (shown below) to adjust the exposure (-1.74), contrast (+100), clarity (+100) and highlights (+12).  I wouldn’t usually increase either the contrast or the clarity to +100, let alone both, but in this instance doing so acts to bring out a full range of tones within they sky and so emphasise the movement captured in the clouds (the increase in contrast/clarity is also a very good way of highlighting any dust spots present in an image!).

How I shot and edited - second severn crossing - image4

Showing the graduated filter being applied to give impact to the cloud movement in the sky

Next, I applied a graduated filter, from the bottom of the frame, to the water (shown below).  I used it to increase the exposure (+0.80) and reduce clarity (-100) in order to brighten the water and reduce the local contrast to give that bright, smooth water effect that can be key to an image such as this.

How I shot and edited - second severn crossing - image5

Showing the graduated filter being applied to the lower section of the image to smooth out the water

When applying the graduated filter to the sky, it also acted on the bridge in the top left corner of the frame, making it overly dark, losing detail.  Therefore, I used the adjustment brush to paint a mask over the affected portion of the bridge, using a low flow, in order to be able to build up the desired effect gradually.

How I shot and edited - second severn crossing - image6

The mask drawn with the adjustment brush is shown in red

To the adjustment mask, I applied an increase in the exposure (+1.08) and shadows (+18) to bring out some of the detail in the bridge that was lost after applying the graduated filter over the sky.

How I shot and edited - second severn crossing - image7

Nitce the extra detail now visible in the upper left portion of the bridge after application of the adjustment mask

I then applied a graduated filter to each corner on the right hand side of the image, shown below.  The top graduated filter was required to subtly blend a vignette caused by me stacking the 10-stop filter and the ND filter holder.  The bottom graduated filter was required to tone down the water at the edge of the frame.  The exposure was reduced in both instances.

How I shot and edited - second severn crossing - image8

The two final graduated filters shown merged into the same image here)

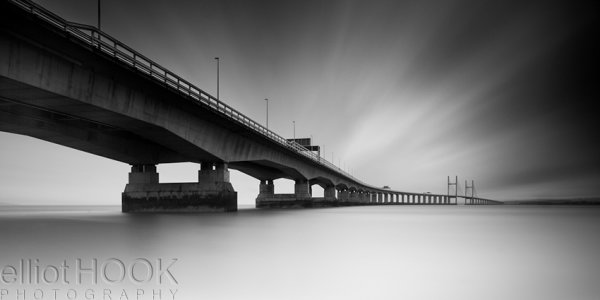
The final edit that needed to be made to the image was to remove all of the dust spots (you’ll be glad to know I’ve since had my sensor cleaned) and hot pixels (the bright white pixels that result from the extreme exposure time) to give the final image:

How I shot and edited - the second severn crossing - final image

The final image (click to enlarge)

So there you go, using a few relatively simple edits, it was possible to produce this high-contrast black and white long exposure without the need for any additional plug-ins or software packages outside of Lightroom 4.  The initial image may have lacked impact and that can often be the case with long exposure shots, however by shooting in raw, you can exploit the captured detail to create the image you had envisioned.

If you would like some tips to help you take long exposure images, such as the one above, please check out this earlier post.


Post originally from: Digital Photography Tips.

Check out our more Photography Tips at Photography Tips for Beginners, Portrait Photography Tips and Wedding Photography Tips.

How I shot and edited it: The Second Severn Crossing


Digital Photography School

 
Comments Off on How I shot and edited it: The Second Severn Crossing

Posted in Photography


Crossing The Lines: Nadia’s Story

19 Dec

For nearly two years, WDET has been exploring what unites and divides us as people and as a region in a series we call “Crossing the Lines”. While you’re watching, think about what makes YOU a Detroiter. Share your response and your story with us in the comments section below or at wdet.org Digital Director: Michelle Srbinovich Digital Producer: Matt Elliott Reporter: Rob St. Mary Assistant Digital Producer: Stephanie Zerweck Photographer/Videographer: Matt Elliott Additional Photography: Nick Hagen Special Thanks to The Dearborn Historical Museum
Video Rating: 0 / 5

Short behind the scenes video shot with a Nikon D600 in Yellowstone, USA by adventure photographers and videographers Florian and Salomon Schulz.
Video Rating: 4 / 5


Animal Crossing KK Lament

01 Dec

Animal Crossing KK Lament music aircheck
Video Rating: 4 / 5