RSS
 

Posts Tagged ‘Correctly’

How to Correctly Resize Photos to Print Images Big

26 Mar

The post How to Correctly Resize Photos to Print Images Big appeared first on Digital Photography School. It was authored by Mark C Hughes.

How to correctly resize photos to print images big feature

In this digital age, fewer people are printing their images, missing out on what can be an amazing experience with their images. Many images only exist in the ether (or the internet, if you want to be more literal), or on people’s hard drives.  However, there is nothing more impressive than to print images big.

Viewing images on phones and tablets means that the resolution is generally pretty forgiving. However, when you actually take photos and print images big, you need to resize them. Doing so will tend to expose problems related to resolution and color. 

When you print images big, your images become even more impressive, with more vibrant colors and detail being visible, which can work for or against you.

Landscape image of Moraine Lake
Printing big always starts with a great image (f/6.3, 1/800, ISO 320).

Practical and technical issues to enlarging images

Beyond simply printing, there is a question of size.

What if that phenomenal image you took with your camera is so memorable, or of such a decisive moment, that you want to make it big?

There are practical and technical issues you need to address if you want to print those images, particularly when making images that are growing in size.

Questions like, for a given image resolution…how big a print is too big for the camera (or phone) that you used?  What are the limiting factors? How do you properly resize your images to make them bigger and appropriate for the size of the print you are looking for?

How to Correctly Resize Photos to Print Images Big - Image on a cell phone and printed
Printing from a cell phone is typically limited in size.

Camera limits

In this day and age, even cameras on smartphones tend to produce at least 12 MP images. You should be able to print them if the image is good enough (sharp/well lit), to produce a 10 x 13 inch image natively.

With a little help from image processing software, you can improve this to some extent. There are some newer software techniques available to boost those images size, both internally from the cameras (such as high resolution mode and HDR), and externally from image processing software that uses sophisticated algorithms to boost the image size by interpolation.

The back of a cell phone showing the cameras
Cell phones use multiple cameras and computational photography to make images better.

Understanding the fundamentals

The size of digital images is measured in megapixels. Each pixel is a single-colored individual group of photosites that are sensitive to particular colors of light (red, green or blue).

A pixel is the smallest dot that makes up an image. The combining photosites from your sensor produce each pixel. As you add more and more pixels, you eventually get an image.

A megapixel is 1 million pixels (give or take, depending on how it is calculated) for the entire image. When you have a camera with a certain number of pixels (i.e. 16 MP), that tells you how many individual pixels there are within the image.  Camera sensors generally come in two flavors (3:2 or 4:3 ratios).

The ratio will affect the overall size relationship. What this also means is the megapixel count tells you how many individual pixels are in each direction.

How to Correctly Resize Photos to Print Images Big - Illustration showing different sensor sizes
Crop sensor relative sizes.

Basic math

Megapixels just provides you with the total number of pixels. In order to actually print it, you need to figure out how big you want your print and then do some very basic math to figure out what works best for your image.

When you print, typically, you are looking at print resolution, in dots-per-inch (dpi) rather than megapixels, that is appropriate for the medium and the size of print you are going to make. 

For most print media you might hold in your hands, you need a minimum of 300 dpi. This means that megapixels divided by dpi will give you the maximum dimensions natively produced by your sensor.

If you simply use pixels, there is no weird conversion. For example, a 12-megapixel image (common cell phone resolution) on a 3:2 sensor translates into pixels that are roughly 4290 x 2800 on the sensor. If you use 300 dpi to give you a print, the maximum size is 14.3″ x 9.3″ (this is not overly large).  Even for a 36-megapixel image, you only end up with printable dimensions of 24.5″ x 16.4″.

How to Correctly Resize Photos to Print Images Big - Rough comparison of image resolution to native printed format
Native resolution to size of images.

Hold the Phone

Wait a second, isn’t a 36-megapixel camera a pretty high-resolution camera?

If a 36-megapixel image only corresponds to 24.5″ x 16.4″ that seems really small, how do they print billboards? How do you print something larger than that?

There are two answers to that.  First, you don’t hold a billboard in your hands, and you view if from a distance, so the resolution to print can go down. Secondly, to enlarge an image, you use a process called interpolation. Interpolation is the process of how you create new pixels to fill the gaps between the existing pixels so you can enlarge the image.

Image of a Nikon D8100 (from NikonUSA website)
Nikon D810 (from NikonUSA site) is a 36 megapixel camera.

Confusion in figuring out size

Sometimes, image processing software will tell you the dimensions of your image are 60″ x 39″ at 72 dpi.  That seems so much larger. So where does this number come from? 

There was a time where it was thought that the resolution you needed for monitors was only 72 dpi (this has changed with technology and time), but the early number of 72 dpi stuck and made the images seem pretty large. The reality is, all you really need to know is that the total number of pixels in each direction will define your image size, not theoretical inches and dpi combined.

Comparison of two image same absolute pixel size but different DPI and theoretical size
The difference between 72 dpi and 300 dpi for the same image (hint: there is no difference) – (f/6.3, 1/800, ISO 200).

Viewing distance matters

To make matters worse, the image resolution of your print is also dependent on how big your image is.  A magazine will need a minimum of 300 dpi, whereas a billboard in a subway station may only need 40 dpi.  What really matters is how far away from the image you are standing when you view it. 

As a general rule of thumb, you need to have a minimum printed resolution of 300 dots per inch (dpi) for most prints.

How to Correctly Resize Photos to Print Images Big - Black and White print on display
Printing wall sized images (24″ x 36″ Print).

Real-world example

To make things more clear, let’s start with a simple 20-megapixel image taken on a micro 4/3’s sensor (the proportions are 4:3) and work through the process of printing an image for a wall, say a 36″ x 24″. 

The image was taken by an Olympus EM1 mark II, 20-megapixel sensor. The image out of the camera is 5184 pixels wide and 3888 pixels.  If you open it with image editing software, it may say that the image is 17.28″ x 12.96″ at 300 dpi (the software has done some simple math).  The problem is, this is smaller than the image you actually want to print. I want to print an image that is 36″ x 24″

Image of icicles that will be resized for printing
Sample image for printing big (f/5.6, 1/1250, ISO200).

Interpolation… the magic of resizing

The problem with resizing is that each pixel in an image is discrete. In order to make bigger images to print, we need to create new pixels to fill in the gaps between the existing ones.  This sounds much simpler than it is in practice.

The classic example is a sharp edge. 

As you enlarge the image, the pixels get jagged. It makes it look like something out of Minecraft. This is called pixelation.

Very early versions of photo imaging software would simply average the color and luminance, and put that new pixel in between the existing pixels.  This just made the images soft and mushy. 

Currently, Photoshop CC 2020 provides 7 different and discrete ways of changing the size of the image. Plus, it has an automatic setting (that selects from the other 7) to make 8 ways. However, it is limited by the content that is already there. 

Each algorithm does something slightly different in its approach to interpolating between pixels. Depending on the type of image, each has varying degrees of success.

Close up of pixels in an image showing pixelation
As you get close into the image, you can see the pixelation.

Although Photoshop has improved much of its algorithms for image size changes, these work reasonably well for smaller changes in size.  However, significant changes in size of images can be particularly problematic.

For scaling larger, I have found the best way to increase the size of an image, as of the beginning of 2020, is to use a product from Topaz called Gigapixel AI. 

Gigapixel AI uses artificial intelligence to look at the image compared to millions of similar images and creates new pixels with this algorithm.

This is a slow process and CPU intensive. That is because it uses AI to create the missing pixels to come up with a proper scaling that interpolates new pixels that work with the image. It really does work quite well.  Each image can take up to 5 minutes, depending upon size.

The process using Gigapixel AI

To scale the images, here is the process I follow.

I shoot micro 4/3s (MFT), so my image sensor is a 20.1-megapixel sensor that produces raw files that average in size around 17 to 18 megabytes.  The resolution of the image is 5184 x 3888 pixels. 

Doing the math, for a print at 300 dpi, the largest size for the native image (not resized) is 17.28 inches x 12.96 inches.  A fair size, but not a huge image. 

Suppose we want to print a 36″ x 24″ image.  We need to resize it. 

In addition, the proportions are not exactly the same. 36 x 24 is a 3:2 ratio and my image is at a 4:3 ratio. Ideally, to get the 300 dpi, we will want to print an image that is 10,800 x 7200 pixels.

Before you start

Before I start, I always use a RAW file from the camera, not a JPEG. JPEG is a lossy format, so you never want any of your intermediate steps to use JPEG images. Even the final one should be a non-lossy image format like PSD or TIF.  You can read more about file formats here.

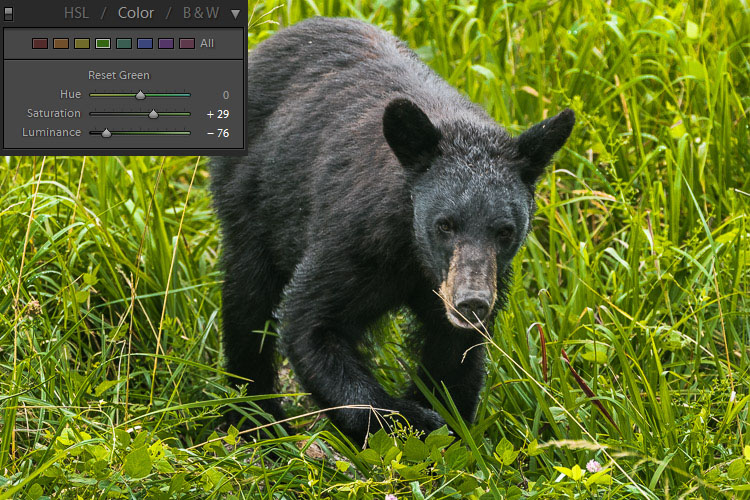
Image sensors record light, not dark.  The dark areas are the absence of light. 

That seems obvious, but there are ramifications of this. In general, the majority of the image data is located on the right side of the histogram.  This means that to have a successful image it must be properly exposed or slightly underexposed and brought back in a raw editor.

Image sensor from an Olympus EM1X
Close up of an image sensor

Calibration

Finally, before you start, you will need to ensure your monitor is calibrated.

Calibration of your monitor will ensure that the printed version of our image will be closer to the version you see on your monitor.  In general, uncalibrated monitors are too bright. Using an uncalibrated monitor will result in prints that are much darker than what you see on your monitor.

This can sometimes happen even with a calibrated monitor too, but test prints will help assess how far off your monitor is from your prints.

How to Correctly Resize Photos to Print Images Big- Tool for calibrating monitos
Color Calibration tool for monitors

Noise

When you enlarge an image, you need to ensure that the noise levels are under control before you start.

Enlarging an image with a lot of noise will only increase the amount of noise present. All resizing programs will do their best to examine the underlying data of your image and use it to scale upward, but the noise on an image will only get worse.

High ISO image
High ISO image ISO 6400 (f/2.8, 1/13, ISO 6400)

Sharpening

The sharpening of your image should only happen at the end of the process of resizing an image. Sharpening is a process of looking at areas of high contrast (these are typically edges) and emphasizing the transition to make those transitions seem more distinct. If you do this early in your editing process or during resizing, the scale of the sharpening will create halos or bizarre artifacts that will be really obvious.

Sharpened image, details are crisp and crunchy
Sharpening can cause a crunchy appearance (f/5.6, 1/250, ISO 200)

Photoshop versus Topaz Gigapixel AI

Although many people use Photoshop to resize, as of 2020, I have found that it does not do as good a job as Topaz’s Gigapixel AI. 

Larger scale resizing through Gigapixel AI takes longer, but the results are substantially better.  All you need to do is to launch the application and tell it how big you want the new image to be. Press Start and go have a coffee, as it takes a little while. However, the results are really good.

Splash page from Topaz Gigapixel AI
Topaz Gigapixel AI is a tool for resizing images large

Making the Big Print

Finally, once you have resized the image to a larger size you need to print the image.  There are basically two main methods to print images big. Chromogenic (C-prints) or Giclee (inkjet) prints. 

Both can produce big, high-quality images, but the processes are quite different as is the look of each.  I generally prefer inkjet-based, but there are lots of people who still use C-print techniques.

How to Correctly Resize Photos to Print Images Big - Printed result on the wall after resizing
Final product printed and on a wall

Conclusion

When you print images big, there are lots of things to consider when resizing your images and then getting them ready to go to print. However, the results are truly breathtaking.

If you have a great image and you take the proper steps to resize the image and print it big, you will be incredibly satisfied with the result. Moreover, you will create a lot of interest in your images, particularly now that few images get printed anymore.

Do you have any other tips to print images big that you’d like to share? Please do so in the comments.

The post How to Correctly Resize Photos to Print Images Big appeared first on Digital Photography School. It was authored by Mark C Hughes.


Digital Photography School

 
Comments Off on How to Correctly Resize Photos to Print Images Big

Posted in Photography


How to Understand Pixels, Resolution, and Resize Your in Photoshop Correctly

19 Nov

Size, resolution, and formats… What do pixels have to do with it?

Do you buy your camera based on its number of megapixels? Are you having problems sharing your photos online? Does your print look low quality even if it looks great on the screen? There seems to be a lot of confusion between pixels and bytes (image size and file size), quality and quantity, size, and resolution.

So let’s review some basics to make your life easier, your workflow more efficient, and your images the correct size for the intended usage.

How to Understand Pixels, Resolution, and Resize Your in Photoshop Correctly

This image is sized to 750×500 pixels at 72 dpi, saved as a compressed JPG which is 174kb. Let’s look at what all that means.

Is resolution the same as size?

One of the biggest misunderstandings comes from the concept of resolution. If this is your case, believe me you’re not alone.

The problem is that resolution can refer to many things, two of them relate to the problem at hand. Further on I’ll explain these two resolution concepts, however, they have one thing in common that I need to clarify first. They both have to do with pixels.

You’ve probably heard a lot about pixels, at least when you bought your camera. This is one of the most available and “valued” specs on the market so I’ll start there.

What is a pixel?

A digital photo is not one non-dividable thing. If you zoom in far enough you’ll see that your image is like a mosaic formed by small tiles, which in photography are called pixels.

Pixel grid - How to Understand Pixels, Resolution, and Resize Your in Photoshop Correctly

The amount of these pixels and the way they are distributed are the two factors that you need to consider to understand resolution.

Pixel count

The first kind of resolution refers to the pixel count which is the number of pixels that form your photo. In order to calculate this resolution you just use the same formula you would use for the area of any rectangle; multiply the length by the height. For example, if you have a photo that has 4,500 pixels on the horizontal side, and 3,000 on the vertical size it gives you a total of 13,500,000. Because this number is very unpractical to use, you can just divide it by a million to convert it into megapixels. So 13,500,000 / 1,000000 = 13.5 Megapixels.

Pixel density

The other kind of resolution is about how you distribute the total amount of pixels that you have, which is commonly referred as pixel density.

Now, the resolution is expressed in dpi (or ppi), which is the acronym for dots (or pixels) per inch. So, if you see 72 dpi it means that the image will have 72 pixels per inch; if you see 300 dpi means 300 pixels per inch, and so on.

The final size of your image depends on the resolution that you choose. If an image is 4500 x 3000 pixels it means that it will print at 15 x 10 inches if you set the resolution to 300 dpi, but it will be 62.5 x 41.6 inches at 72 dpi. While the size of your print does change, you are not resizing your photo (image file), you are just reorganizing the existing pixels.

Imagine a rubber band, you can stretch it or shrink it but you’re not changing the composition of the band, you’re not adding or cutting any of the rubber.

Pixel Density 72dpi - How to Understand Pixels, Resolution, and Resize Your in Photoshop Correctly

Pixel Density 300dpi - How to Understand Pixels, Resolution, and Resize Your in Photoshop Correctly

In summary, no resolution is not the same as size, but they are related.

So quantity equals quality?

Because of the aforementioned correlation between size and resolution, a lot of people think that megapixels equal quality. And in a sense it does because the more pixels you have to spread out, the higher the pixel density will be.

However, on top of the quantity you should also consider the depth of the pixels, this is what determines the amount of tonal values that your image will have. In other words it is the number of colors per pixel. For example, a 2-bit depth can store only black, white and two shades of grey, but the more common value is 8-bit. The values grows exponentially so for example with an 8-bit photo (2 to the power of 8 = 256) you’ll have 256 tones of green, 256 tones of blue, and 256 tones of red, which means about 16 million colors.

This is already more that the eye can distinguish which means that 16-bit or 32-bit will look relatively similar to us. Of course, this means that your image will be heavier even of the size is the same, because there is more information contained in each pixel. This is also why quality and quantity are not necessarily the same.

Therefore quantity helps, but also the size and depth of each pixel determine the quality. This is why you should look all the specs of the camera and its sensor and not just the amount of Megapixels. After all, there’s a limit to the size you can print or view your image, more than that it will only result in extra file size (megabytes) and no impact in the image size (megapixels) or the quality.

How to choose and control image size and file size?

First of all, you need to choose the outlet for your photo, there is a maximum density that you need. If you are going to post your image online you can do great with only 72 dpi, but that is too little for printing a photo. If you are going to print it you need between 300 and 350 dpi.

Of course, we are talking about generalizations because each monitor and each printer will have slightly different resolutions as well. For example, if you want to print your photo to 8×10 inches you need your image to have 300dpi x 8″ = 2400 pixels by 300dpi x 10″ = 3000 pixels (so 2400×3000 to print an 8×10 at 300dpi). Anything bigger than that will only be taking up space on your hard drive.

How to resize in Photoshop

Open the menu for the image size and in the popup window, you need to tick the Resample Image box. If you don’t activate “resample” you will only be redistributing the pixels like I explained at the beginning of the article.

You can also choose to tick the Constrain Proportion if you want the measure to adjust according to the changes you make. So the width adjusts when you change the height and vice versa.

How to Understand Pixels, Resolution, and Resize Your in Photoshop Correctly

8×10 inches at 300 ppi, this is the size needed for printing an 8×10. Notice the pixel size is 3000 x 2400.

750×500 pixels at 72 ppi. This is web resolution and is the exact size of all the images in this article. The size in inches is irrelevant when posting online – only the pixel size matters.

On the top of the window, you’ll also see how the file size changes. This is an uncompressed version of your image, it’s the direct relationship I explained in the first part of the article: fewer pixels means less information.

How to Understand Pixels, Resolution, and Resize Your in Photoshop Correctly

Now, if you still want to change the file size without resizing anymore, you have to do it when you save the image. Before saving your photo you can choose the format you want:

Formats - How to Understand Pixels, Resolution, and Resize Your in Photoshop Correctly

If you don’t want to loose any information you need to save an uncompressed format. The most common, and therefore easier to share is TIFF.

Tiff - How to Understand Pixels, Resolution, and Resize Your in Photoshop Correctly

If you don’t mind losing a little information as long as you have a lighter file, then go for a JPEG and choose how small you want it. Obviously the smaller you set it, the more information you will lose. Fortunately, it has a preview button so you can see the impact of your compression.

JPG high quality.

JPG low quality. Notice how it’s pixelated and breaking down? If you crunch it too much or go too low quality you risk degrading the image too far.

Conclusion

So there you have it. So quality, quantity, size and resolution explained and they all have to do with pixels, as they are the basic units that constitute your image. Now that you know you can make the best choices to print, share and save your photos.

The post How to Understand Pixels, Resolution, and Resize Your in Photoshop Correctly by Ana Mireles appeared first on Digital Photography School.


Digital Photography School

 
Comments Off on How to Understand Pixels, Resolution, and Resize Your in Photoshop Correctly

Posted in Photography


How to Expose Correctly for High Contrast Wildlife

25 Oct

Photographing wildlife of deeply contrasting colors, such as black bears or white waterfowl, can present certain challenges setting up shots that are properly exposed for the wildlife and also the surroundings. Harsh lighting also makes exposing for these subjects especially difficult. The hurdle to overcome in these cases is to expose for the subject animal(s) properly and still capture a scene that is pleasing to the viewer. What often results are images where the exposure is correct for the surroundings, but the creature is either under or overexposed.

Getting the subject wildlife exposed correctly is a more important aspect because the background can be dealt with later in post-production. In some cases, the background just doesn’t really matter in comparison to the photo capture of the often elusive wildlife in the scene.What follows are methods to use in stark color-contrasting situations. One is for dark colored wildlife such as black bears or ravens, and another for light colored wildlife such as egrets or swans.

What follows are methods to use in stark color-contrasting situations. One is for dark colored wildlife such as black bears or ravens, and another for light colored wildlife such as egrets or swans.

Exposure Details

A reality of photographing wildlife is that when things happen, they happen fast. Lighting may change very quickly and there may not always be time to make adjustments while shooting the action of the wildlife in view.

Most experienced photographers want control of all camera settings and don’t generally choose to shoot in auto modes for shutter speed and aperture in order to control movement and depth of field. So is there was a way to set the shutter speed and aperture and still get the correct exposure without the hassle of continually changing settings as the light changes?

There are many ways of shooting wildlife resulting in a desirable exposure, but probably one of the most overlooked ways is using the Auto ISO setting in Manual mode. To use this method, set the camera in Manual mode, adjust shutter speed and aperture to the settings desired, and then set the ISO to auto-ISO. Most cameras will allow you to set a maximum ISO, so it’s helpful to know at what ISO the images become unacceptably grainy with your camera. However, this still doesn’t entirely solve the problem of correctly exposing for those dark and light animal subjects. To solve these problems you can fine-tune the exposure by using exposure compensation.

Correcting the background in post-production

As in any image, if editing is planned it is important that the image be shot in RAW mode. When opening an image in Adobe Raw Converter (ARC) (or Lightroom) and if the exposure for the animal is correct in camera, then only the background may benefit from corrections in post. In most cases for wildlife images, the background hues are green, yellow or blue. To enhance or balance these colors in ARC, go to HSL/Grayscale panel and simply darken or lighten the luminance for green, yellow or blue until the background exposure appears to match the exposure of the animal. A little saturation may also be added. If a little punch or contrast would improve any background flatness, one may use an adjustment brush to add some contrast and clarity to the background. It’s that simple!

Dark Colored Wildlife

In this image the correct exposure for the black bear over-exposes the green background.

The luminance of the green has been adjusted to decrease the background exposure.

The dark hues of some wildlife will absorb more light than the scene around them, so it becomes necessary to increase the light taken in by the camera by using exposure compensation as mentioned above. For wildlife with dark colored coats or feathers, use exposure compensation and adjust by adding light (+value). This will suffice in most cases, depending on the amount of natural light available.

Keep in mind that the wild subject is the most important component in the image, so if any aspect of the image should be sacrificed in the moment, make it the background. For really dark creatures, such as bears, start out by using a compensation of +1. Remember, don’t worry about the background. The animal is the important exposure!

The exposure is correct for the black bird, but the background is washed out and boring.

Again, the luminance of the green has been adjusted. Then an adjustment brush has been used to add contrast, creating a vibrant background.

Light Colored Wildlife

Conversely, for light colored animals, use exposure compensation and adjust by subtracting light (- value). The whiter color of many beautiful creatures will reflect much more light than the background will, so it helps to decrease the light the camera takes in so as not to overexpose the animal.

In keeping the white egret from being overexposed, the background appears dull and dark.

The green and yellow hues were adjusted to add life to the background. Notice that in every case the exposure of the subject is unchanged.

Why can’t I just correct the exposure of the wildlife in post-production?

Of course, this is an option. But there at least two reasons for not correcting the exposure of the subject later on the computer.

  1. Any time a major exposure correction is undertaken, there is a certain amount of digital data of the image that is lost. Therefore, it is best to get the main subject of the image captured as closely as possible in camera. (This is true of any image, not only wildlife subjects.)
  2. When photographing extremely light colored animals, if the white is over-exposed to absolute white there is nothing that can be done in post-production to pull out any detail. Darkening the subject will not bring back any nuance in the creatures coloring, and the image will lose desirable texture. Again, conversely, if the black-coated bear or bird is underexposed to absolute black there is no way to lighten the subject and pull out interesting details from the fur or feathers.

What about the Eagle?

Some animals are doubly challenging as in the case of the American Bald Eagle, with its white head and dark body. These magnificent creatures are almost impossible to photograph in harsh light. If choosing which end of your histogram to sacrifice, my opinion is to expose for the white head.  Again, avoid harsh lighting if at all possible.

Conclusion

Remember, when you’re faced with a choice of settings for an extreme exposure while photographing wildlife, never sacrifice your subject. Whether a light or dark-coated bird or animal, intentionally set up the shot to capture the creature and its distinctive features and keep the background as a secondary consideration. To make sure the subject will be correctly exposed, use a 3-shot bracketed exposure, with an exposure one stop over and another exposure one stop under the setting.

Do you have any wildlife exposure tips? Please leave them in the comments below.

googletag.cmd.push(function() {
tablet_slots.push( googletag.defineSlot( “/1005424/_dPSv4_tab-all-article-bottom_(300×250)”, [300, 250], “pb-ad-78623” ).addService( googletag.pubads() ) ); } );

googletag.cmd.push(function() {
mobile_slots.push( googletag.defineSlot( “/1005424/_dPSv4_mob-all-article-bottom_(300×250)”, [300, 250], “pb-ad-78158” ).addService( googletag.pubads() ) ); } );

The post How to Expose Correctly for High Contrast Wildlife by Bruce Wunderlich appeared first on Digital Photography School.


Digital Photography School

 
Comments Off on How to Expose Correctly for High Contrast Wildlife

Posted in Photography