RSS
 

Posts Tagged ‘correction’

DxO Labs introduces OpticsPro 10 with atmospheric haze correction feature

31 Oct

DxO has taken the wraps off its OpticsPro 10, the latest software version that brings with it, among other things, DxO ClearView for correcting atmospheric haze. Joining the new feature are some improvements to the software, not the least of which is enhanced noise reduction promised to trump competing products, as well as interface changes. Read more

Articles: Digital Photography Review (dpreview.com)

 
Comments Off on DxO Labs introduces OpticsPro 10 with atmospheric haze correction feature

Posted in Uncategorized


Tamron develops full-frame 15-30 f/2.8 ultra-wide zoom with vibration correction

12 Sep

Tamron has announced the development of its new SP 15-30mm f/2.8 DI VC USD ultra-wide zoom lens. This full-frame lens is the first in its class to offer image stabilization according to Tamron. The lens has an ultrasonic focusing motor, ‘eBAND’ and fluorine coatings, and a 9-blade diaphragm. The lens will be available for Canon, Nikon, and Sony mounts and will be displayed at Photokina next week. 

Articles: Digital Photography Review (dpreview.com)

 
Comments Off on Tamron develops full-frame 15-30 f/2.8 ultra-wide zoom with vibration correction

Posted in Uncategorized


Four Under-Used Tools in Lightroom’s Lens Correction Module

30 Aug

hacking photography, mike newton, architecture,

Almost every lens changes the way your image looks by warping it in some way. Each lens can create barrel distortion, vignetting at big apertures, chromatic aberration, and more.

Some lenses have more distortion than others. Let’s look at four tools in Lightroom’s lens correction module that are a lifesaver

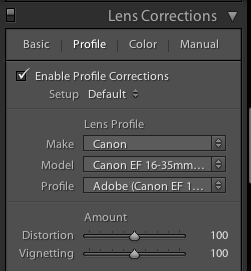
1. The easy button – lens profile corrections in one click

Before lens corrections:

lens corrections, lightroom

Brick wall at 16mm, f/2.8, ISO 1250. You can see the ‘bulge’ in the middle because the horizontal lines are not parallel. Also notice the dark corner vignetting from shooting wide open at f/2.8

After one-click lens correction:

hacking photography, brick wall, lens correction, barrel distortion

Same settings as above but with lens profile correction applied. Note the parallel horizontal lines and no more dark corners.

I shot this wall on a 16-35mm f/2.8 lens at f/2.8 to illustrate the ‘bulge’ in the middle and vignetted corners. These are distortions from the Canon 16-35mm f/2.8L II lens.lightroom 5 lens profile corrections,

Lightroom is already loaded with profile corrections for this specific lens! Just click “enable profile corrections” in the “Profile” section of the Lens Correction module and Lightroom will fix the distortion for the lens you used!

Finding your lens profiles on older versions of Lightroom

As Lightroom keeps rolling out newer versions, it rolls out profiles from newly released lenses. If you are using Lightroom 3 from 2010 but have a lens that hit the market in 2012, Lightroom won’t have it in there.

You can go download Adobe Lens Profile Creator to look up your lenses, grab their profiles, and manually add them to Lightroom.

I use the profile corrections on almost all of my images

Unless you have a very specific reason to manually deal with it, I suggest that you just use Lightroom’s built-in profile corrections most of the time.

While you can certainly change all these lens corrections manually, in most cases it makes more sense to let Lightroom do the hard work for you.

2. The vertical slider

Pizzeria Mozza San Diego, architecture photography, keystoning, hacking photography

The problem

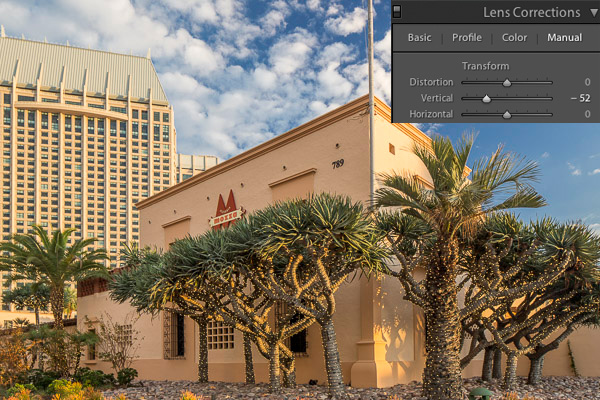
I photographed this shot above for a commercial builder. Notice how the building in the back is falling over, and the one in front has vertical lines that aren’t parallel? Rather than repeat this excellent DPS article (Why are my Buildings Falling Over? A Short Guide to Perspective Distortion and Correction in Photography) that describes why this happens, I’ll show you how to correct it.

The solution

I pull the vertical slider to the left until the lines are parallel.

hacking photography, architecture photography, pizzeria mozza, lens correction, lightroom 5

Crop it

Notice anything weird? When you shift the vertical axis you lose some of the image. Architecture photographers use tilt-shift lenses to correct this in camera without losing any of the image.

Since I didn’t have one at the time, I corrected it in Lightroom by cropping the white part out.

tilt-shift, hacking photography,

3. The horizontal slider

Sometimes you might be in a hurry and shoot a photo that needs to be slightly shifted horizontally in post. I did this during a fashion shoot.

Hacking Photography, model, horizontal shift

The problem

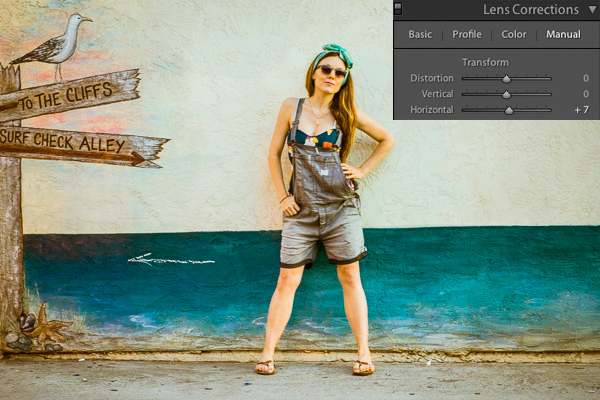
I took the photograph without realizing I was slightly positioned to the side of the wall vs. straight on. If you look closely, you can see the line where the wall hits the ground, and that it slightly angles from bottom left to top right.

The solution

Using the horizontal slider and shifting it slightly to the right will tilt this photo so the right side appears to come closer to the viewer and the left side moves further away from the viewer. The result is that now the photo is perfectly square with the wall and the line along the bottom is level.

hacking photography, lens corrections

4. Vignette slider

The problem

When shooting at big apertures most lenses create some form of vignette, meaning dark corners in the photo. Sometimes these can be attractive, but sometimes you don’t want them.

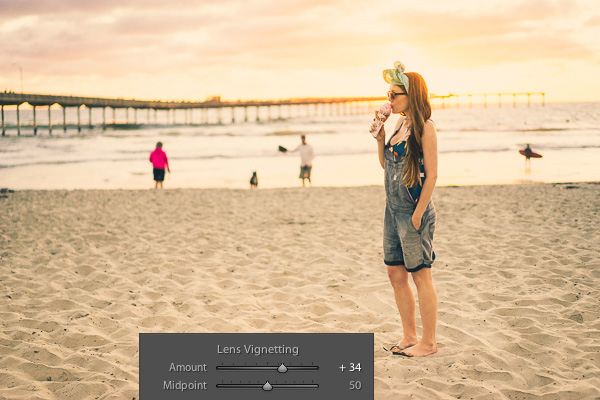
I shot this photo at f/1.8. Do you see the dark corners? I want to remove those.

hacking photography

The solution

Simply pull the vignette slider in the Lens Correction manual module to the right to reduce a vignette.

vignette, hackingphotography.com

Vignettes are a matter of personal preference. I don’t think the first photo looks bad with the vignette, I just wanted it without it. You can use the vignette slider to create or enhance a vignette by pulling the slider to the left.

Pro tip: if you’ve cropped the image at all, you will want to use the post-crop vignetting tool in the “effects” dialog box. The vignette slider in the lens corrections module affects the original image size, regardless if you’ve cropped it.

If you want to see these tools in action, check out the video below:

I hope you found this helpful – happy editing!

The post Four Under-Used Tools in Lightroom’s Lens Correction Module by Mike Newton appeared first on Digital Photography School.


Digital Photography School

 
Comments Off on Four Under-Used Tools in Lightroom’s Lens Correction Module

Posted in Photography


Pentax firmware v1.10 for K-3 adds diffraction correction

23 Jul

Pentax has released new firmware for its flagship K-3 DSLR, adding a new function – diffraction correction to the lens corrections menu. Firmware v1.10 also improves processing times when Digital Filters and Color Fringe Correction are applied, tweaks exposure bracketing in TAv mode, offers improved AWB performance and the usual ‘improved stability for general performance’. Click through for more details and a download link.

Articles: Digital Photography Review (dpreview.com)

 
Comments Off on Pentax firmware v1.10 for K-3 adds diffraction correction

Posted in Uncategorized


Why are my Buildings Falling Over? A Short Guide to Perspective Distortion and Correction in Photography

07 Aug

A guest contribution by Misho Baranovic, co-developer of the Perspective Correct app and author of the iPhone Photography DPS eBook .

Perspective Photo1

I’ve read a lot of perspective correction articles over the past few days and my head is spinning from the technical explanations, illustrations and equations.   In this article, I’m going to keep it simple and talk about the role that perspective plays in photography.  

What is Perspective?

Perspective is one of the many ways that the human eye can judge depth within a scene.  Perspective is something that we can see with one eye (monocular) rather than two (binocular).  It refers to the angle and location of parallel lines within a scene.  The eye registers depth when parallel lines start moving towards each other (converging).  An example would be standing on a straight road, looking down the road, and noticing how the road narrows as it gets further away from you.
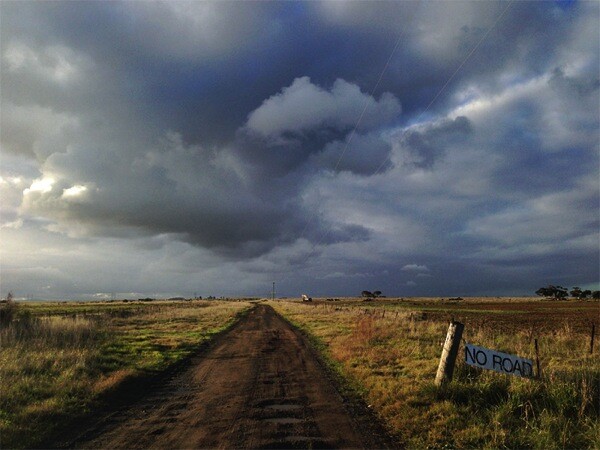
Perspective Photo2

In art and photography, Linear Perspective refers to the way lines are drawn and captured to show an objects perceived size within space. In short, how we translate real world depth into a flat picture. Linear Perspective is made up of two basic concepts, the horizon line and vanishing point.  The horizon line represents the viewing angle of the observer.  Vanishing points are the point (on a horizon line) where parallel lines meet (converge). For example, the point where the two sides of the straight road meet (as shown below).
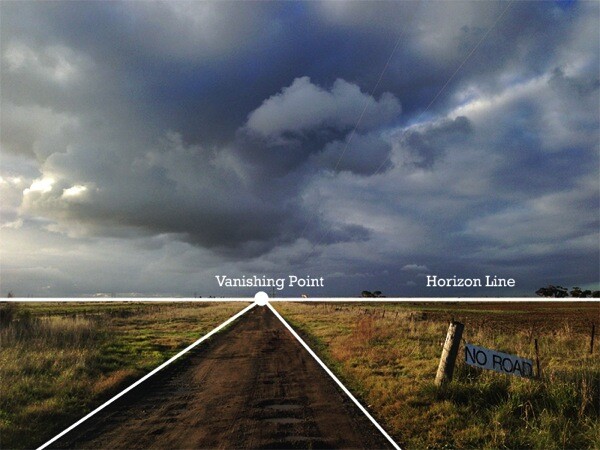
Perspective Photo3

One of the key visual cues in Linear Perspective is that vertical lines and edges remain vertical in the scene. The only time you would have vertical lines coming together is if you are trying to show a triangular or pyramid shape within the scene, like the angle of a building’s roof or the shape of the Eiffel Tower.
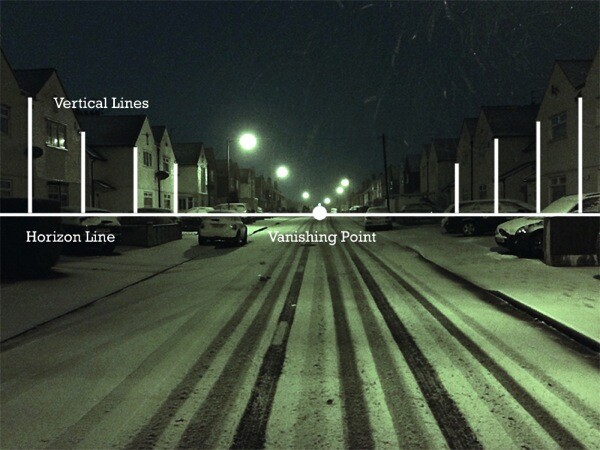
Perspective Photo4

Since the start of photography, camera and lens makers have focused on replicating the visual cues of Linear Perspective in order to make photos look as ‘true to life’ as possible. Nearly all modern lenses are rectilinear – they capture straight lines in a scene as straight lines in a photograph.  Whether wide angle or zoom, DSLR or iPhone, lenses are designed to keep lines straight, which helps the eye judge depth within a two dimensional scene. The fisheye is the most popular non rectilinear lens as straight lines are shown as curved from the extreme field of view.

Perspective Distortion

For this article I’m going to focus on only one form of photographic perspective distortion – perspective convergence or keystoning.  This form of distortion is very common across architectural, street and travel photography.  It’s most often seen when tall buildings ‘fall’ or ‘lean’ within a picture. This distortion has become so common that most people have stopped noticing it within their pictures or just think it has something to do with the focal length of their lens. For example, you can see the extent of the vertical convergence below when the verticals are outlined in white.
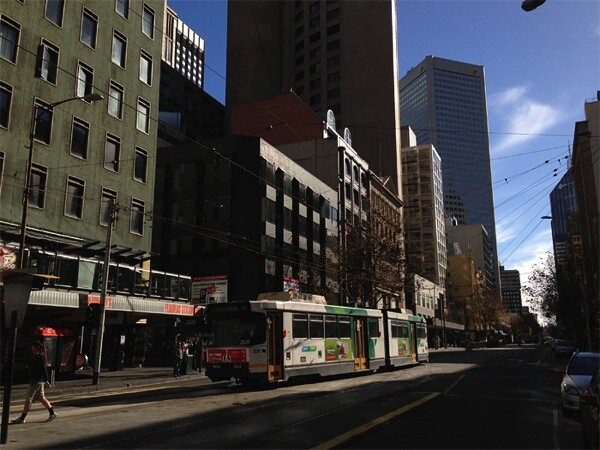
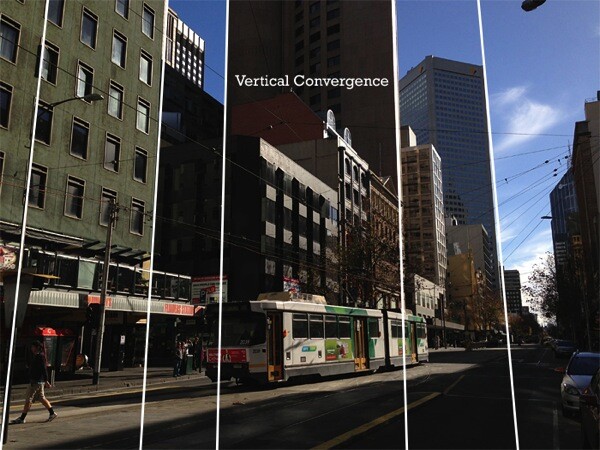
Perspective Photo5

Perspective Photo6

For a number of photographers, vertical convergence and distortion are unpleasant and unwanted because they don’t conform to Linear Perspective cues where vertical lines remain vertical.  This makes the scene look different to how we think it should look.  While this distortion can be used creatively, corrected photos often look ‘right’ to the viewer (see below).
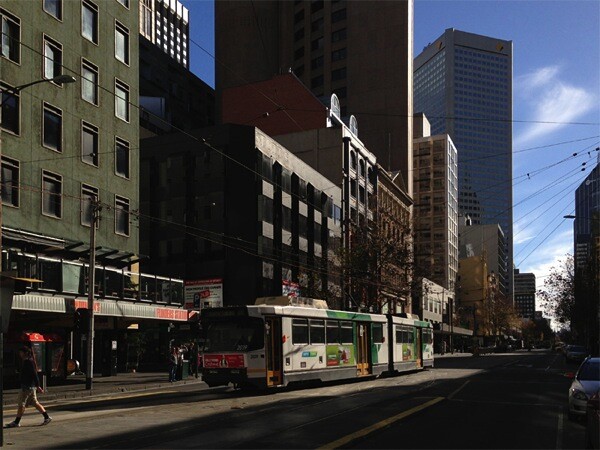
Perspective Photo7

Why does Distortion Happen?

It’s actually pretty simple.  As mentioned, modern lenses are designed to show straight lines.  However, this only works when we the camera is pointed straight at (in line) with the object that is being photographed. This is because the distance between the camera and object remains the same.  As soon as the camera is titled then the distance changes.  Let me explain, if I’m trying to capture a tall building straight on with my camera I can only get the bottom section – vertical lines are straight but I’m missing the rest of the building. Now if I angle the camera higher I can get the whole building into the frame but now the vertical lines (sides of the building) are converging.  Why?  It’s because the top of the building is now further away from the lens than the bottom – just like the road receding into the distance.

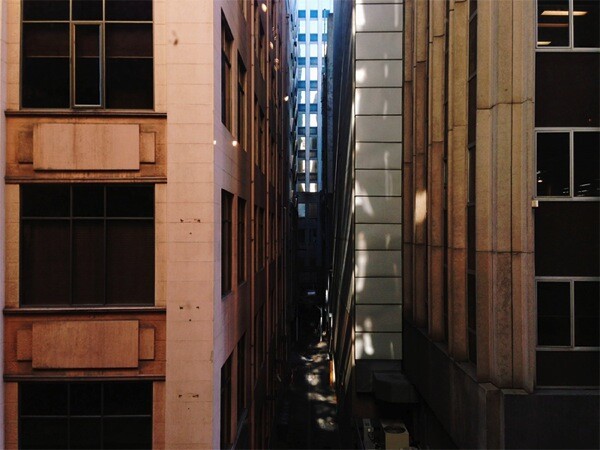
So how do you take a photograph of a tall building without this happening?  There are a few ways.  The most obvious is by changing your viewpoint.  You need to get higher to shoot more of the building front on, with the mid-point being the best place to capture the maximum amount of the structure.  You could shoot out the window of a neighbouring building, or if there is nothing around you could spend some money on a crane!
Perspective Photo8

This photo was taken from the third floor of a neighbouring block. You can see that all the verticals in the photo are straight.

If you can’t physically get higher then you can change your viewpoint in two other ways.  One is with the help of shift lenses the other is through perspective correction software.

Shift Lenses

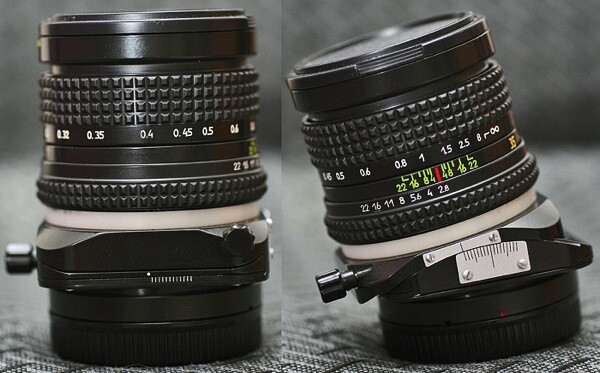
The ability to shift the position of the lens has been around since the beginning of photography.  The original view cameras (created in the 1840s) used a bellows system which let photographers change the position (shift) the lens in relation to the film. The shifting mechanism acted like a mini elevator, moving the photographer’s viewpoint higher and lower. Historically, shifting in order to correct perspective convergence was seen as an important part of the capture process, just like focus, shutter speed and aperture. Shifting was possible because the lens captured a much larger (circular) field of view than the film. The same way that modern shift lenses work.  Modern shift lenses are commonly used by architecture photographers to limit vertical convergence on large buildings. However, these lenses can only be used on DSLR or medium format cameras and can also be very expensive (upwards of $ 1,000).
Perspective Photo9

Here you can see the mechanical shift mechanism on an SLR lens – Photos by Bengt-Re

Software Correction

In recent years, digital technology has been able to replicate this shifting process, artificially changing the photographer’s viewpoint.  Software like Photoshop, Lightroom or Gimp reworks the pixels in an image in order to straighten vertical lines in turn reducing distortion.  Most of these programs allow you force the image back into a ‘correct’ position through either sliders or by selecting and dragging a corner.  One of the downsides of the software is that significant adjustments require resampling of the image, often reducing sharpness in parts of the photograph.  
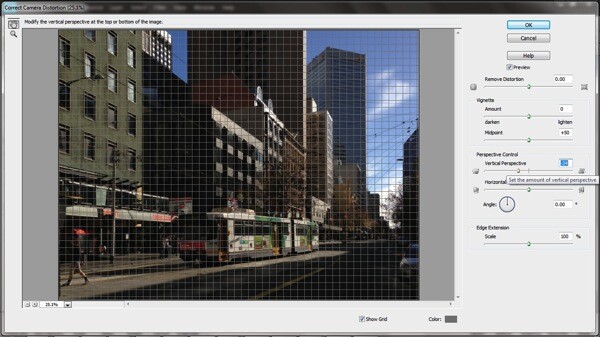
Perspective Photo10

Camera Distortion Correction with Photoshop Elements 11

For photographers that either shoot or edit photos on their mobile phones, the Perspective Correct app for iPhone uses the touch interface to adjust both vertical and horizontal convergence within an image.  For example, an up/down swipe on the screen represents the same movement as the shift mechanism on a lens. 
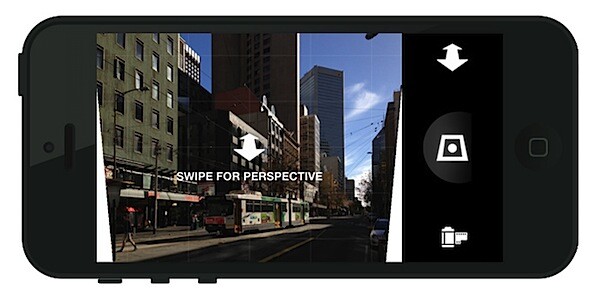
201308011644.jpg
While it’s easy to overlook, small perspective adjustments can often be the difference between good and great urban and architectural photographs.

…………………………………….

Perspective Correct is the first app to offer live perspective adjustment of your photos and is available for download from the Apple App Store for US $ 1.99

Post originally from: Digital Photography Tips.

Check out our more Photography Tips at Photography Tips for Beginners, Portrait Photography Tips and Wedding Photography Tips.

Why are my Buildings Falling Over? A Short Guide to Perspective Distortion and Correction in Photography


Digital Photography School

 
Comments Off on Why are my Buildings Falling Over? A Short Guide to Perspective Distortion and Correction in Photography

Posted in Photography


Nikon updates distortion correction data for DSLRs, adding latest lenses

20 Jul

AFS_Nikkor_18_35_ED.png

Nikon has released distortion correction data v1.009, adding support for additional lenses for the D4, D90, D600, D800, D800E, D3100, D3200, D5000, D5100, D5200, D7000 and D7100. The latest update means these cameras can now correct distortion in 107 Nikkor lenses. The latest update includes recent launches such as the Nikon AF-S Nikkor 18-35mm f/3.5-4.5G ED and can be downloaded from Nikon’s global website.

News: Digital Photography Review (dpreview.com)

 
Comments Off on Nikon updates distortion correction data for DSLRs, adding latest lenses

Posted in Uncategorized


Color Correction: How to Salvage An Image With Defective Color in 10 Minutes

23 Mar

Have you ever taken a photograph of something beautiful only to later find that the resulting image lacks the vivid colors and energy that were present in-person? Fortunately, Photoshop offers a plethora of color correction tools that can help you salvage images with defective color. This guide will teach you how to utilize Photoshop’s color correction tools so that you Continue Reading

The post Color Correction: How to Salvage An Image With Defective Color in 10 Minutes appeared first on Photodoto.


Photodoto

 
Comments Off on Color Correction: How to Salvage An Image With Defective Color in 10 Minutes

Posted in Photography


Perfectly Clear for iPad — Photo Correction (Automatic) App Review

06 Feb

Perfectly Clear for iPad — Photo Correction (Automatic) itunes.apple.com Description ???Special Promo??? Get Perfectly Clear for iPad this week only for .99! ?????? Your skin… flawless Your memories… perfectly preserved Perfectly Clear for iPad — Correct your iPad pictures in 1 click! Our lab-quality corrections make sure your photos are perfect… with just 1 click! We’ve taken all the amazing features and functionality from our award winning Perfectly Clear iPhone app, re-designed it and optimized the workflow for the iPad, and added even more powerful automatic corrections and functionality to create the ultimate iPad correction app! No effort is required to create and then share beautiful looking images with this fun-to-use app. Watch as the Perfectly Clear automatic corrections peel off your original photo to reveal a bright, color corrected, crisp photo with flawless skin and details you didn’t see in your original. Perfectly Clear also provides the ability to fine tune the automatic corrections with easy to use sliders and presets. Behind the scenes the Perfectly Clear app applies various patented corrections (from 10 years of scientific research), automatically delivering you a beautiful photo you can’t wait to share. Perfectly Clear for iPhone is powered by the same robust correction technology licensed to many of the largest photography companies, retailers, and labs around the world. To learn more about what sets our digital corrections
Video Rating: 2 / 5

 
Comments Off on Perfectly Clear for iPad — Photo Correction (Automatic) App Review

Posted in Nikon Videos


DxO Labs announces v1.1 of its ViewPoint distortion correction software

13 Dec

Logo.png

DxO Labs has announced version 1.1 of its ViewPoint distortion correction software, promising more accurate tools and faster operation. Viewpoint is designed to correct keystone distortions (converging verticals and horizontals), and restore more natural proportions to objects towards the edge of the frame when using wide-angle lenses. It is available either as a stand-alone tool or as a plugin for Adobe PhotoShop (CS3 or newer) or Lightroom (version 3 or newer), and for both Mac and PC.

News: Digital Photography Review (dpreview.com)

 
Comments Off on DxO Labs announces v1.1 of its ViewPoint distortion correction software

Posted in Uncategorized


DxO Labs announces v1.1 of its ViewPoint distortion correction software

11 Dec

Logo.png

DxO Labs has announced version 1.1 of its ViewPoint distortion correction software, promising more accurate tools and faster operation. Viewpoint is designed to correct keystone distortions (converging verticals and horizontals), and restore more natural proportions to objects towards the edge of the frame when using wide-angle lenses. It is available either as a stand-alone tool or as a plugin for Adobe PhotoShop (CS3 or newer) or Lightroom (version 3 or newer), and for both Mac and PC.

News: Digital Photography Review (dpreview.com)

 
Comments Off on DxO Labs announces v1.1 of its ViewPoint distortion correction software

Posted in Uncategorized