RSS
 

Posts Tagged ‘Correct’

How to Correct White Balance in Photoshop: A Guide

04 Aug

The post How to Correct White Balance in Photoshop: A Guide appeared first on Digital Photography School. It was authored by John McIntire.

how to correct white balance in Photoshop

When you think of white balance corrections, Photoshop probably isn’t the first program that comes to mind. In most cases, white balance is dealt with early in the workflow. And because the tools in Lightroom and other RAW processing suites do a great job, Photoshop isn’t necessary.

That said, there are occasions when you might need to alter your white balance in Photoshop – which is where this article will come in handy.

Specifically, I’m going to share four non-destructive methods of correcting the white balance.

And by the time you’re done, you’ll be able to adjust white balance in Photoshop like a pro.

Let’s dive right in.

Disclaimer: As you are no longer working on a RAW file in Photoshop, when you use these tools, you are technically not altering the white balance data in your images. Instead, you are altering the colors and tones of a PSD, JPEG, etc. Even so, the end result will appear the same as a white balance adjustment, and I will refer to it as such for the purposes of this article.

white balance adjustment example

Why correct the white balance in Photoshop

There are many reasons you may want to alter the white balance in Photoshop, rather than in a standard RAW processor (such as Lightroom).

Perhaps you’re halfway through your workflow and you change your mind about some of the choices you made at the RAW stage.

layers in Photoshop
One reason you might want to alter your white balance in Photoshop is if you need to make changes in the middle of a workflow. Instead of heading back to your RAW processor and starting from scratch, you can make the adjustments in Photoshop.

Perhaps another adjustment altered the image colors in a way that you don’t like, and you want to make white balance corrections.

Perhaps you don’t shoot in RAW at all, so you only edit your files in Photoshop.

Whatever the reason, Photoshop offers a huge variety of tools that will let you deal with this task easily and without needing to scrap any of your previous edits.

Four (non-destructive) ways to adjust the white balance in Photoshop

non-destructive adjustments in Photoshop
All of the techniques mentioned in this article are non-destructive – three by way of adjustment layers and one by making use of Smart Objects.

Below, I outline four simple techniques to correct the white balance in Photoshop.

Note that every technique is non-destructive – or it can be, as long as you use layers and Smart Objects.

Starting with your very first option:

1. Camera Raw filter

Let’s get this one out of the way right off the bat.

After all, when it comes to altering your white balance in Photoshop, the Camera Raw filter might be the most obvious option. Why? The filter opens an interface that allows you to use Adobe Camera Raw inside of Photoshop.

If you use ACR or even Lightroom, you’re already familiar with the filter interface, and it should be a piece of cake to work with.

the Camera Raw filter in Photoshop
If you’re already familiar with Lightroom, finding your way around the Camera Raw Filter is going to be easy.

To get started with the Camera Raw filter, create a new layer, then use Ctrl+Alt+Shift+E (Cmd+Alt+Shift+E on a Mac) to copy all of your previous layers and place them into your just-created layer. If you want this adjustment to be non-destructive, right-click the new layer and select Convert to Smart Object.

Now, from the filter menu, select Filter>Camera Raw Filter.

selecting the Camera Raw filter from the menu

This will open the Camera Raw filter window:

the Camera Raw filter window in Photoshop

From here, all you have to do is locate the sliders labeled Temperature and Tint:

adjusting the Temperature and Tint
Assuming the white balance was close to accurate, any changes you make at this point will be quite minor.

Adjust these sliders as you see fit – this is your opportunity to make white balance corrections – then press OK. Job done!

a white balance adjustment in Photoshop before and after
Easy and intuitive, the Camera Raw Filter might be all you need for a quick white balance adjustment in Photoshop.

Note: The Temperature slider in Camera Raw does not correspond to the white balance Kelvin scale. Remember, as you are not using a RAW file, there is no white balance data for you to manipulate at this stage of your workflow.

2. Color Balance

The Color Balance adjustment is the least intuitive option in this article, and its sensitivity takes some time to get used to. Once you get your head around it, however, it can be a quick and powerful way to make changes to white balance in Photoshop. 

To get started, create a new Color Balance adjustment layer:

Photoshop Color Balance adjustment layer

You’ll see a selection of sliders, like so:

Color Balance in Photoshop
Although the Color Balance sliders seem intuitive, they can cause massive changes to your images with minor tweaks.

There is also a dialogue box labeled Tone; by clicking the box, you can switch between altering the shadow, midtone, and highlight colors.

Now, to warm up your image, select a tonal range and move your sliders toward the reds, magentas, and yellows. To cool down your image, push the sliders toward the cyans, greens, and blues. Adjust the shadows, midtones, and highlights until you’re happy with the results.

Color Balance sliders in action
Here, you can see how small changes make a huge difference. I barely moved the sliders, and yet look at the effect on the image below.
before and after Photoshop Color Balance
Color balance: before and after.

Tip: The sliders in the Color Balance adjustment are very sensitive. To get your desired effect, you may only need to move them a tiny amount. Also, because of this sensitivity, altering the midtones can lead to drastic results very quickly. Keep a close eye on your image and don’t be afraid to dial it back if you go too far. Also, don’t forget: if the effect does seem too strong, you can always lower the opacity of the adjustment layer when you’ve finished.

3. Photo Filter

The Photo Filter adjustment is a bit of a wild card and you may never choose it over the other options outlined here, but it’s a good example of Photoshop’s incredible versatility. Plus, who knows? Maybe you’ll like the effect.

The Photo Filter tool aims to replicate the effect of various filters used in film photography to manipulate white balance in camera. Common examples of these filters are warm-up and cool-down filters (which add warm and cool tones to your images, respectively). 

To get started, create a new Photo Filter adjustment layer:

Photo Filter adjustment layer in Photoshop

Then, in the Filter dialog box, you will find several options, including warming and cooling filters:

Photo Filter in Photoshop
Altering the Photo Filter settings can change your results drastically. Apart from the Filter presets and the density, you can also choose a custom color to apply as a filter.

In this example, I chose a warming filter to (you guessed it!) warm up the image. Note that the photo was taken during the blue hour, and that’s deliberate – I want to show you just how powerful the Photo Filter adjustment can be.

The initial effect will almost always require some adjustment; move the Density slider left to reduce the filter’s impact, and move the Density slider right to strengthen the filter.

adjusting the white balance on a mountain landscape
Here you can see a dramatic result from the Photo Filter; this blue hour shot instantly became far more neutral.

That’s pretty much all there is to it.

4. Curves

The Curves adjustment layer is one of the most powerful tools that Photoshop offers. You can use a Curves layer to adjust exposure, contrast, dodge and burn, color grade, and adjust your white balance in Photoshop.

In short, if you are not yet familiar with the Curves adjustment, I recommend taking the time to learn it in depth.

Using Curves to alter white balance is fairly straightforward. To start, create a new Curves adjustment layer:

Curves adjustment layer in Photoshop

Click the box labeled RGB to see options for Red, Green, and Blue:

adjusting Curves in Photoshop

To warm up your images, select the Red curve. Drag it slightly upward to increase the red tones in your images. Do the same to the Green curve. Then drag the Blue curve downward to de-emphasize any cool tones:

Curves RGB adjustments
Although these adjustments seem slight, they’ve had a huge impact on the image. This should show you just how powerful the Curves adjustment can be.

This process can be finicky, so keep adjusting each curve by small amounts until you get your desired effect.

If you want to cool down your image, the process is the same, but you will simply move each of the three curves in the opposite directions.

before and after Curves adjustment
The original image (left) was cooled down a bit with some minor tweaks in a Curves layer.

Correcting white balance in Photoshop: conclusion

Now that you’ve finished this article, you should be able to see that altering the white balance in Photoshop needn’t be a complicated process.

You now know four simple ways to make white balance adjustments, and while Photoshop probably shouldn’t be your first choice when working with white balance, it’s good to have a few tricks up your sleeve just in case.

Now over to you:

Which of these methods of adjusting white balance in Photoshop do you plan to try first? Do you have a favorite? Share your thoughts in the comments below!

White balance in Photoshop FAQs

Can you use Photoshop to change the white balance for an image that isn’t a RAW file?

Yes and no. Technically speaking, only RAW files grant you the ability to change white balance settings. However, you can use Photoshop tools such as the Camera Raw filter, Curves, Photo Filter, and Color Balance to alter the colors of your images – and the effect is similar to a white balance adjustment.

What’s the easiest tool for altering the white balance in Photoshop?

The Camera Raw filter. This tool offers an interface similar to Lightroom and features easy-to-use sliders.

How do I use Curves to correct colors in my images?

Work on the Red, Green, and Blue curves individually. Drag each curve until your colors look exactly as you want them.

Why would I want to use Photoshop to correct my white balance?

Maybe you’ve already started post-processing an image and only later decide you want to alter the white balance. Instead of starting over, you can use tools in Photoshop to get the job done in the middle of your workflow.

The post How to Correct White Balance in Photoshop: A Guide appeared first on Digital Photography School. It was authored by John McIntire.


Digital Photography School

 
Comments Off on How to Correct White Balance in Photoshop: A Guide

Posted in Photography


Video: Panasonic demonstrates viewfinder to correct color-blindness

20 Feb

Panasonic has developed a special electronic viewfinder that corrects color-blindness as part of a campaign to promote equality of vision. The viewfinder, built into a Lumix DC-G95, has adjusted color saturation and color-shifted pixels to enable color-blind people to see in the same way as those with regular vision.

The company, in partnership with Indian marketing company Dentsu Aegis Network, created the new viewfinder specifically to help Indian photographer Hizol Chodhury see colors accurately for the first time. Previously Chodhury had needed assistants to explain the hues he was looking at and to ensure colors were correct in his images, but the new viewfinder compensates for the chromatic defects in his vision so he can see color clearly – through the camera.

It isn’t clear exactly how this has been achieved, though we might assume his color vision was tested and the viewfinder designed to present more strongly the colors he has trouble seeing. The press release only mentions that they used a ‘Lumix camera fitted with a customized viewfinder that saturates and balances pixels to allow colorblind photographers to see colors just like everyone else.’

It is also unclear whether this technology will become more widely available in the future to help other color impaired people. Presumably, the degree of correction would vary person to person so the solution created for Chodhury probably wouldn’t suit everyone.

Press release:

This Republic Day, Panasonic Lumix and C Lab give #RightToColour by empowering Colourblind Photographers!

Celebrating India’s 71st Republic Day, Panasonic Lumix and C Lab, the entertainment and sports marketing arm of Dentsu Aegis Network India has empowered colourblind photographers with the #RightToColour through a specially designed viewfinder lens that helps to saturate and balance colour. Bringing the gift of colour, the digital campaign #RightToColour aims to promote equality by making everyone able to experience colours in the same way.

About 300 million people worldwide and around 8% of the country’s population suffers from some degree of colour blindness and this impacts their everyday life depending on the severity. While somebody with normal vision can identify 150 hues, a colour blind aspirant can distinguish only as many as 20 hues. However, in recent times, technology has created innovations that can transform the everyday experiences of the physically challenged. The #RightToColour campaign showcases the struggles of colour blind photographers while narrating true life experiences of an Assam-based photographer, Hizol Chodhury who wishes to see his photographs as the world sees them. The film highlights how Hizol has to rely on his team for colour correction and saturation of his work and the challenges he faces in the personal and professional life. Panasonic Lumix and C Lab makes his wish come true by giving him the right to colour through a Lumix camera fitted with a customized viewfinder that saturates and balances pixels to allow colourblind photographers to see colours just like everyone else. The film captures the sheer happiness and confidence that this innovation has given Hizol, as he feels connected to his work like never before.

Talking about the campaign, Shirish Agarwal, Head, Brand and Marketing Communications, Panasonic India said, “Nearly 8% of people in India suffer from some degree of colour-blindness, there only dream is to be able to see the world as we all see it. Through this campaign we wanted to bring alive the spirit of Republic Day by enabling those affected with the right to colours. Technology has always been at the core of our business and #RightToColour serves as a remarkable example of how innovative solutions can improve the lives of our customers.”

Haresh Nayak, Group MD, Posterscope – South Asia said, “At C Lab we believe in creating solutions that enhance a consumer’s experience and subsequently, their lives. This builds brand advocacy and loyalty. Every time we work on a project, we are enthralled to see how technology is bringing solutions that one could only dream of. Our effort to bring colour back into the lives of colourblind photographers is an example of what technology can do.”

Adding to this Gurbaksh Singh, Chief Creative Technologist, Dentsu Webchutney said, “We researched around the deficiency and found a simple solution to solve this problem – a special viewfinder for the camera. This allows a colourblind photographer to see the frame in rich vibrant colours before the shot is captured, subsequently boosting the confidence to capture the subject being photographed. There’s a huge community of colourblind photographers in India and this technology is a testament to their dedication and passion.”

Talking about the Lumix, Sandeep Sehgal, Business Chief, Imaging Business Group, Panasonic India & SAARC said, “Lumix as a brand celebrates photography as a medium to enable both the photographer and the subject to break away from any limitation and express themselves freely. Through this campaign, we are delighted to bring the gift of colour to colour-blind photographers. We are committed to making a difference by empowering people through our technologically advanced offerings and this is a testament to the same.”

Articles: Digital Photography Review (dpreview.com)

 
Comments Off on Video: Panasonic demonstrates viewfinder to correct color-blindness

Posted in Uncategorized


Ways to Correct Perspective in Photography

29 Jan

The post Ways to Correct Perspective in Photography appeared first on Digital Photography School. It was authored by Glenn Harper.

correct-perspective-in-photography

Back in pre-digital days, the only way to correct perspective in architectural pictures was with a tilt-shift lens. Using such a lens remedies the “keystoning” effect you get when pointing a lens upwards at a building, where all verticals in the picture converge.

Nikon 19mm f/4 PC-E tilt-shift lens

A Nikon 19mm f/4 PC-E tilt-shift lens. Photo: Jeffrey M Dean at English Wikipedia [CC BY-SA]
The main disadvantage of a tilt-shift lens has always been its price, especially if you stick to marque brands like Canon or Nikon. That hasn’t changed. With perspective correction now being widely available in editing software, why would you even think of buying such a lens today?

Tilt-shift lens vs digital perspective correction

Two benefits spring to mind when comparing a tilt-shift lens to digital perspective correction:

  • Image quality suffers when you digitally alter perspective in editing software. The degree to which this is noticeable varies and is likely to be trivial for most purposes. But, you’ll often notice mild degradation at 100%.
  • Most digital perspective tools crop the image, effectively reducing the resolution of the image sensor. And because the image is cropped, you lose WYSIWYG (what you see is what you get) predictability when taking photos.

These factors are serious if you’re a pro photographer creating architectural photos for commercial clients. A tilt-shift lens maintains image quality and full resolution. You’d normally use a tripod with such a lens.

Using Adobe software to correct perspective

Correcting perspective has been possible in Photoshop for a long time, but it became easier from CS2 onwards. That edition introduced the Lens Correction tool.

Image: Fixing perspective using the Lens Correction tool of 13-year-old Adobe Photoshop CS3.

Fixing perspective using the Lens Correction tool of 13-year-old Adobe Photoshop CS3.

In 2013, Adobe introduced automatic perspective correction, which saved considerable time compared to manual adjustments. Even today, many of Adobe’s competitors do not offer this luxury. You can fix the perspective in ACR or Lightroom within seconds.

If this feature is important to you but you don’t necessarily want to sign up for Adobe software, what else is out there?

Correct Perspective in Other Software

The idea for this article came about when I decided to break away from my Adobe subscription. I take a lot of building photos, so perspective-correction tools are useful to me. Programs vary a lot in what they offer in this regard. (In fact, a lot of the stuff you take for granted with Adobe goes AWOL if you go-a-wandering.)

DxO Viewpoint

I was using DxO Viewpoint a decade or more ago. It’s been around a while. At that time, it seemed quicker to use than Photoshop for perspective correction. Then, as now, ViewPoint worked as either a plugin or a standalone app.

ViewPoint 3 - correcting perspective

I shot this from below, so there was keystoning in the original image. The auto controls in ViewPoint 3 have fixed it, making it look like I shot the Art Nouveau sign from directly in front.

DxO Viewpoint also blends seamlessly into DxO PhotoLab as a module. It’s a little controversial that DxO makes you pay extra for perspective correction, but maybe that modular system helps keep the entry price down.

A short time ago, I upgraded from ViewPoint 1 to ViewPoint 3. The latter offers automatic corrections, so I no longer have to place anchor points on each image. Sometimes it’s necessary to correct perspective manually, but the auto function saves a lot of time.

Paintshop Pro 2020

Paintshop Pro has a good perspective tool that is akin to perspective cropping in Photoshop. While it’s not a one-click solution, it’s still quick and easy to use. A grid inside the crop area lets you check all the lines as you work. This is like using ViewPoint manually, where you force parallelism by setting the position of vertical and/or horizontal lines.

Paintshop Pro perspective tool

If you’re only fixing verticals with the Paintshop Pro perspective tool, you must keep the horizontal lines in the grid level (or vice-versa).

By checking the “crop image” box before applying your adjustment, Paintshop Pro will automatically crop the image to its largest usable dimensions. One thing you can’t do is adjust the intensity of the effect after applying it. You’d have to go back and redo it if you weren’t happy with the result.

ACDSee Photo Studio Ultimate 2020

I’m fond of ACDSee Photo Studio Ultimate for its comprehensive dual-set of editing tools and its DAM capabilities. But how is it for perspective control? Like many photo editors, the tools are all manual whether you’re in Develop or Edit mode.

If you’re only looking to correct verticals, you can achieve that easily with the vertical slider in Develop mode. This mode is really meant for raw files, but you can run rendered files through it just like you can with ACR.

ACDSee Photo Studio Ultimate - fixing keystoning

An adjustment of the vertical slider in ACDSee’s Develop mode has fixed some mild keystoning here.

In ACDSee’s Edit mode, you get perspective cropping like that of Photoshop, but it differs in one notable way. As you drag the corner points, the perspective changes in real-time, so you get to preview the result before saving it. A downside is the lack of auto-cropping. That means you need to crop separately if you drag points inside of the image frame.

Hugin

The main purpose of Hugin is to stitch photos together for panoramas, but it also corrects perspective. And, it’s free!

There are downsides.

You have to go through the motions of creating project files, the software doesn’t preserve aspect ratio, and it strips out EXIF data. You also lose a chunk of the image to cropping, but that’s normal. Hugin will give you the largest usable area after the correction.

Correcting converging verticals in Hugin.

I fix verticals in Hugin by creating a fake one-image panoramic.

If you’re familiar with Hugin and know ways around the problems mentioned above, please let me know. Since auto perspective correction is absent from many high-end photo editors, this program is worth knowing about. Although its chief role is creating panoramic photos, perspective correction is an inherent part of that process. Hugin is good at it.

Below is a quick summary of the Hugin process (or the one I use) to correct verticals:

  • Open the panorama editor, then open the simple interface
  • Click on “Load Images” and load the file you want to correct
  • Agree to add image to current project if a dialogue box pops up
  • Click on “Align”
  • Click on “Create panorama” even though you’re not creating one
  • Set output parameters
  • Save project
  • Hugin says it is stitching – it isn’t, but it is processing the file. You’ll see “batch successfully completed” in another window.

That’s it. Your corrected image awaits.

You can also perform vertical and horizontal perspective corrections as per this article. I tend not to make drastic corrections because they have a negative effect on image quality. If you shift the subject a lot, a large part of the image will look soft.

Hugin perspective correction

A final Hugin corrected image with original in the inset.

Darktable

Darktable is a raw processor of amazing depth. Its learning curve is steep, but it deserves a place in this article for its perspective correction module. You can correct perspective with one click, which is rare in free editing software. It might be unique. As well, there’s automatic cropping with “original aspect ratio” or “largest area” options.

A “get structure” button color codes lines in the image and tells you what the software has concluded about them. For example, a green line is a relevant vertical converging line, while a red line is vertical but not included as one of the converging verticals. You can adjust the status of these lines if you think the software has made a bad call.

Perspective correction in Darktable - get structure.

This is what appears if you hit “get structure” in Darktable. You can see the software is pretty good at telling true verticals (green) from false angled or curving verticals (red).

The only thing you can’t do in Darktable is back off the auto adjustment if you want a slightly converging result. You’d have to edit manually for that. But still, this feature is superb.

Honorable mentions

Naturally, other photo editors also include perspective correction. Capture One is one of the most evolved pieces of photo software I’ve seen. Its perspective control is like that of ViewPoint in manual mode, where you line up verticals or horizontals by hand to correct the image.

Programs like ON1 Photo Raw, Luminar and Exposure allow perspective control via a familiar system of sliders. You align the architectural lines of a photo with the lines of a grid. It works, but there’s no auto mode.

Am I obsessed with auto mode? Kind of, because it’s fast and does a good job. If you can tweak the result, so much the better.

Luminar 4 perspective sliders

The clean interface and “Canvas” toolset of Luminar 4, including perspective sliders.

Bottom Line

If you’re straying from Adobe and need perspective correction, I’ve gotta give top prize to DxO ViewPoint 3.

You can manually adjust perspective to your heart’s content or have the software swiftly do it for you. Importantly, you can back up a bit from auto results if the verticals look too forced.

The standalone ViewPoint 3 also includes an attractive browser, corrects for volume deformation and offers a tilt-shift “miniature effect”. What’s not to like?

Viewpoint 3 image browser

The ViewPoint 3 browser.

For those that don’t want to pay extra for this functionality, look at Darktable. You might be scratching your head at its vast array of modules, but persistence pays off. Its perspective control is great at this price point!

All the software mentioned is eminently usable, so it’s a question of how valuable one-click corrections and versatility are to you. I hope I’ve helped in a few decisions.

Do you know any other software that helps correct perspective in photography? Share with us in the comments!

The post Ways to Correct Perspective in Photography appeared first on Digital Photography School. It was authored by Glenn Harper.


Digital Photography School

 
Comments Off on Ways to Correct Perspective in Photography

Posted in Photography


How to Correct Perspective Distortion in Photoshop

02 Mar

The post How to Correct Perspective Distortion in Photoshop appeared first on Digital Photography School. It was authored by Ana Mireles.

When talking about perspective, you step into a deep and somewhat complicated subject. It has to do with geometry, history of art, viewpoint and so on. However, solving that big issue won’t be the point of this tutorial. Instead, it focuses on solving perspective issues in your photography using photoshop. So keep reading to learn which Photoshop tools can help you out.

Because perspective can be a broad term, in this article, I’m going to narrow it down to one aspect, and that is the way straight lines seem to converge as they get further away. This can be used as a creative element of the picture, or it can help convey a sense of depth and tridimensionality as per this example:

You may be familiar with this effect, such as when you’re walking on the street, and you tilt your camera up to photograph a building. Now, this might be your intention, but sometimes you don’t want or need this distortion. Of course, you can correct this issue by using tilt and shift lenses, or with a large format camera. However, many of us don’t have access to that equipment. This is where Photoshop is handy to fix perspective in post-production.

As usual, Photoshop has different ways of dealing with the same problem. One may work better than others in different cases. However, I find that more often than not, you need to combine them to get the job done. So here’s an introduction to some different approaches:

Lens correction and transformation

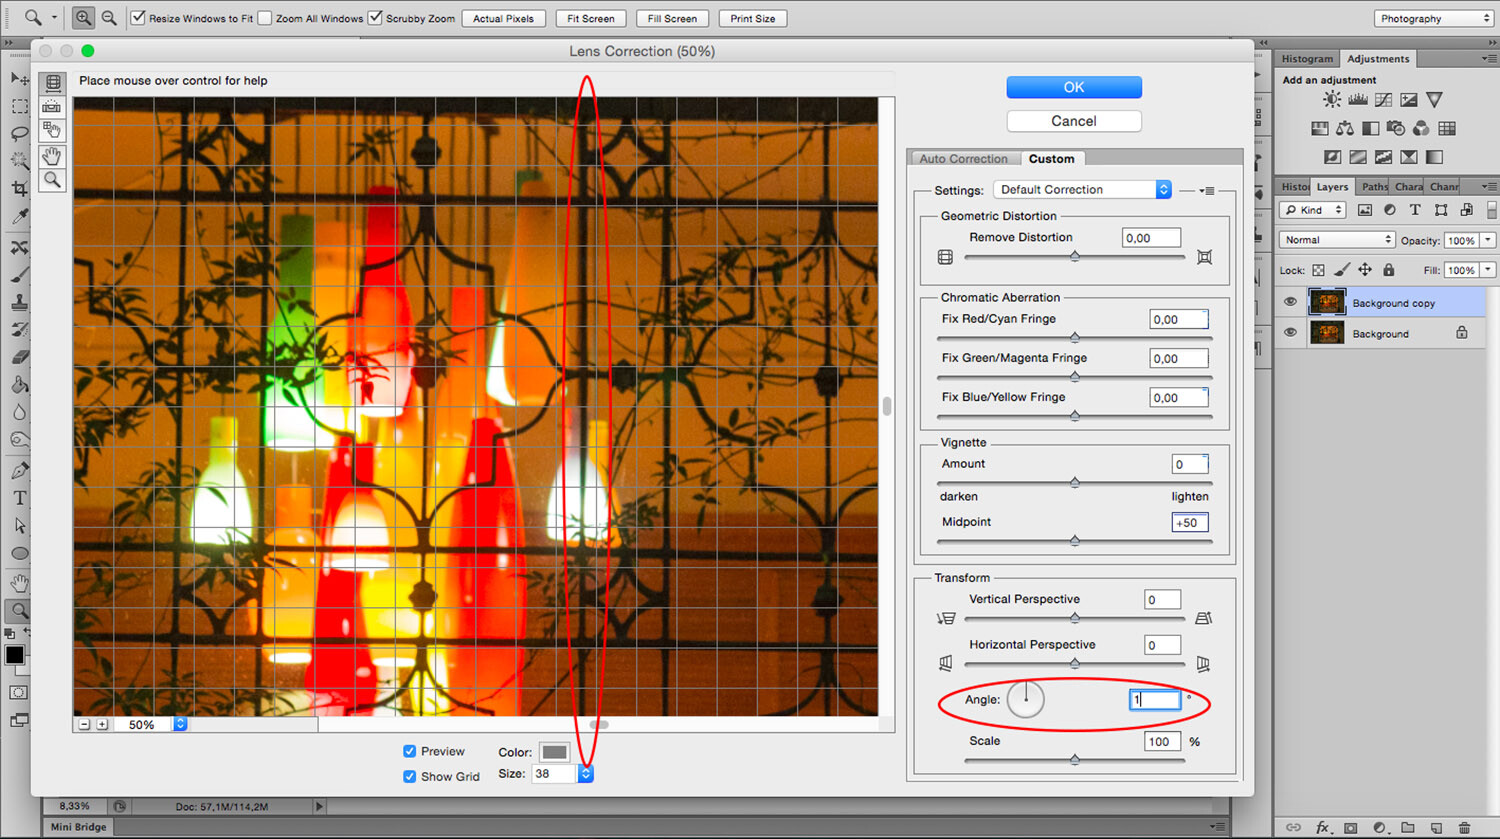
One way to correct perspective distortion is by using the Lens Correction Filter. You can find it under the Filter Menu. When you choose this, a new window pops up. To start working on it, ensure you’re in the Custom tab to access the settings and set your grid with the bottom slider so that you can have it as a reference.

For this exercise, you’re only going to need the Transform part of the panel that you’ll find in the bottom right. I find that starting with the center point saves time as the changes you make after happen on both sides simultaneously. So I zoomed in to the center and rotated the angle so that the central line aligned with the grid. Remember, you can make the grill tighter if you need to.

Now you can start fixing the vertical and horizontal lines with the sliders. On the sides of each slider, you can see an icon showing the way the image gets affected. If you pull the vertical slider to the left, the top part gets wider or sliding to the right the bottom part is the one that becomes wider and so on.

As you move the lines around, you may be losing part of the image towards the edges. To bring everything back in, use the scale slider. After you’re done, you’ll have to crop out the blank pixels.

As you can see the Lens Correction Tool can be handy, but sometimes you still have to make some adjustments here and there. For this step, you can use the different Transform tools found under the Edit menu.

In this case, I’m using the Skew tool which allows me to move all the corners and middle points independently. Whenever you’re using any of these tools, you can pull out Guide Lines by clicking on the ruler and dragging. That way you can work more precisely without leaving the transform mode.

For this image that’s all I needed to do. However, remember that all the transformation tools can help to correct perspective, so experiment with them to find the one that works best for you and your image. Here, you can see on the left how I started, and on the right, is the new corrected version.

Perspective Tool Crop

Another way of fixing the problem is with the Perspective Tool Crop. This feature corrects the lines almost automatically. However, I wanted to give you the option of doing it manually first so that you have more control over the perspective. If you want to try it out, draw a rectangle around the image with the Perspective Tool Crop active and then drag the corners to match the grid with the distorted lines.

It usually does a good job, but you might still need to tweak it a little bit with the transform tools. Be aware that the Perspective Tool Crop, as the name says, crops your image. You might lose some information from the borders. In any case, you can give it a try and decide which method is best for you.

If you have any other tips to correct perspective distortion, share them with us in the comment section.

The post How to Correct Perspective Distortion in Photoshop appeared first on Digital Photography School. It was authored by Ana Mireles.


Digital Photography School

 
Comments Off on How to Correct Perspective Distortion in Photoshop

Posted in Photography


Using Photoshop Filters During Post-Processing to Correct and Enhance Images

24 Nov

When you think of filters in photography, your first thought might be those specialized glass pieces you affix to the end of your lens. Most of these filters serve a specific purpose (e.g. a polarizing filter to reduce glare), although some are for artistic effects (e.g. colored filters).

But if you want to apply artistic/special effects in post-processing, Photoshop has a number of filters you can apply during this stage of your workflow. They can also be used to clean up or retouch images.

Recommendation

When working with an image, it’s good practice to work non-destructively (i.e. you don’t change the pixels). Using Photoshop filters directly on a pixel layer will change the pixels, so wherever possible you should use Smart Filters.

A Smart Filter is a filter that’s applied to a Smart Object – a layer that saves the image’s source information with its original characteristics and allows you to edit non-destructively. So before you start applying filters, convert the layer you’re working on to a Smart Object.

Note: Depending on your version of Photoshop, you may not be able to apply some filters as Smart Filters.

Filter Gallery

The filter gallery in Photoshop gives you quick access to a number of filters. From the menu choose Filter, and then Filter Gallery to view them on the screen. It’s an easy way to see the effect a filter would have without changing the original image. Here you can apply one or a combination of filters to your image.

The easiest way to understand what they all do is to select each one and look at the preview. It’s a simple artistic edit that can come in handy when used selectively.

The Filter Gallery showing the options that can be applied.

Adaptive Wide Angle Filter

This is also available in the Filter menu and can be useful for correcting distortion issues resulting from wide-angle or fisheye lenses. These lenses sometimes introduce curves that weren’t actually there. You can also use the adaptive wide angle filter to straighten lines that appear curved in panoramic shots.

To straighten a curved horizon, click and drag from the left side of the horizon to the right. This adds a blue line (called a constraint) around the area of distortion. The constraint marks the area and straightens it.

An image taken with a fish-eye lens

This filter has a number of correction types:

  • Fisheye corrects those extreme curves made with a fisheye lens
  • Perspective corrects converging lines resulting from your angle of view or camera tilt
  • Full Spherical corrects 360-degree panoramas with a 1:2 aspect ratio
  • Auto applies what Photoshop deems an appropriate correction

Image adjusted using Adaptive Wide Angle filter

Note: The Panorama correction type is also available if you apply this filter to a photomerged panorama.

Lens Correction

The Lens Correction filter fixes different kinds of distortions. Similar to the Adaptive Wide Angle filter, it remedies distortion created by wide-angle and fisheye lenses. It can also straighten images taken at an angle and make them appear as if shot straight on. One of the great things with this filter is you can choose to either manually correct the image or have Photoshop correct it automatically.

Angled image.

  • Geometric Distortion is another easy way to remove a fish-eye effect.
  • Chromatic Aberration can remove any colored fringes around your subjects on high contrast edges.
  • Vignette does a good job of adding a vignette.
  • Transform gives you sliders to help you correct perspectives, with options for vertical and horizontal perspectives, as well as rotating to compensate for camera tilt.

Edited with the Lens Correction filter.

Liquify

The Liquify filter can be used to push and pull pixels around and is one of the most powerful filters under the Filter menu. You may associate liquify with body transformations, but it can do much more than that.

Within the liquify filter menu, the forward warp tool (at the top left) is the most popular. The key to using this tool successfully is to use a brush size slightly larger than you think you need. You should also use a lower pressure brush (for more subtlety) and increase your density (to affect a bigger area within your brush circle).

The Liquify Tool used to reshape a piece of fruit.

Vanishing Point

The Vanishing Point filter brings an image in line with the perspective of another. For example, if you want to composite a picture frame into a room, this filter will help you match the perspective of the frame to any wall in the right perspective.

Third-Party Filters

Photoshop lets you easily add hundreds of third-party filters (available via plugins) to your arsenal.

These can help you make the most of your images or get super creative. Many simplify the steps Photoshop is capable of achieving so you can perform them in a shorter time. Some of these include the Nik Collection, Topaz and ON1.

Above Image with two Nik filters applied: Paper Toner and Vignette

Conclusion

Using Photoshop Filters is an easy option if you want to get creative. Photoshop has a few standard ones you can experiment with, and stacking them can create a unique image.

Which filters do you use? Share some of your results with us.

The post Using Photoshop Filters During Post-Processing to Correct and Enhance Images appeared first on Digital Photography School.


Digital Photography School

 
Comments Off on Using Photoshop Filters During Post-Processing to Correct and Enhance Images

Posted in Photography


DPReview TV: How to get correct exposure when shooting video

27 May

Have you experienced frustration when using your camera to shoot video? Confused about T-stops, ND filters and the right shutter speed to use? This week, Chris and Jordan take a break from gear reviews to discuss the things you should know to get proper exposure when shooting video. Get some practical tips and learn about Chris and Jordan’s exposure square… or is that an exposure trapezoid? Tune in to find out.

You may also want to read our article, A photographer’s intro to the world of video, for more useful tips.

A photographer’s intro to the world of video

Finally, make sure to subscribe to our YouTube channel to get new episodes of DPReview TV every week.

Subscribe to our YouTube channel

Articles: Digital Photography Review (dpreview.com)

 
Comments Off on DPReview TV: How to get correct exposure when shooting video

Posted in Uncategorized


Choosing the Correct ND Filter for Your Desired Long Exposure Photography Effects

25 Oct

Long exposure photography has quickly grown to become one of my favorite styles of photography and it’s quite clear by looking through the images I’ve captured the last few years. More and more images use a shutter speed slower than half a second and it’s further between the handheld shots.

Which ND Filter to use?

One of the reasons I’ve grown to become such a big fan of long exposure photography is that it opens so many doors. You’re much less limited in your work and you have endless of options when it comes to how you want your image to look. However, it’s exactly this benefit which also becomes a challenge for many: how do you choose the right shutter speed and ND Filter? 

Choosing the Correct ND Filter for Long Exposure Photography Effects

I don’t believe that there’s one correct shutter speed or filter when it comes to landscape photography. A big part of the creative process is to do what you prefer and go for the look you want to achieve. However, if you want to be able to achieve the look you want, you’ll also need to know how to get there and that’s why it’s important to understand how each of the different ND filters will affect your image.

In this article, we’ll look at how each of three different (three, six and 10-stop) ND filters will affect your image and in what scenarios they are each most beneficial.

3-Stop ND Filter

If you’re familiar with Neutral Density filters you may already know that a 3-stop filter won’t have a huge impact during brighter hours. Compared to the six and 10-stop filters, the 3-stop is not particularly dark and it won’t allow you to use those extremely slow shutter speeds of several minutes.

That being said, the 3sStop ND Filter remains one of my personal favorites. I particularly enjoy working with it when photographing waves from a low perspective.

Choosing the Correct ND Filter for Long Exposure Photography Effects

The picture above was taken a couple hours after sunrise but due to the sun’s low position on the Arctic sky, it still wasn’t daytime-bright outside. However, without using a filter, the shutter speed would have been too quick to capture the motion I wanted in the water. So I knew that a 3-stop ND filter would do the job. Using it allowed me to lengthen the exposure time to 1/3rd of a second, which was just enough the get some motion in the rushing waves and to achieve the look that I wanted for this shot.

Had I used a 6-stop ND filter instead, the image would look quite different since the longer shutter speed would blur the water and lose the texture that I was aiming for.

6-Stop ND Filter

As the name indicates, a 6-stop ND filter lets you lengthen the exposure time by six stops (not six times – six stops is 2x2x2x2x2x2 = 64 times). If you’re already using a relatively slow shutter speed due to the sun’s low position in the sky, this means that you can achieve a very slow shutter speed when using this filter.

Choosing the Correct ND Filter for Long Exposure Photography Effects

For the image above, I used a 6-stop ND filter to blur the water and create an overall softer feel to the scene. Using the filter allowed me to lengthen the exposure time to 15 seconds, which was just enough to blur the water and create some motion in the sky. As you can see, however, the iceberg in the foreground is already blurring out when using a 15-second shutter speed.

Had I instead used a 10-stop ND filter and an exposure time of a few minutes, all the ice would be blurry due to them constantly moving. On the other hand, a 3-stop ND filter wouldn’t have allowed me to slow down the shutter speed enough to blur the water and I wouldn’t be able to achieve the look I wanted.

10-Stop ND Filter

The 10-stop ND filter is perhaps the most popular filter for many who are just getting started with long exposure photography. The effect is extremely visible and the images created with it can grab attention right away. Even though there are darker filters available (such as a 16 and 20-stop), the 10-stop filter is often what people think of when talking about long exposure photography.

Choosing the Correct ND Filter for Long Exposure Photography Effects

The image above is a typical example of how a 10-stop ND filter can create a surreal look to the image. With the filter placed in front of my lens, I was able to use a shutter speed of four minutes to completely blur the lake and get a soft, dramatic look in the sky as the clouds were dragged out.

While it does require some more planning and patience than the other two filters, it is also the one that has the biggest visual impact straight out of the camera.

Choosing the Right One

As I mentioned earlier in this article, there isn’t necessarily one correct filter that you should use. Instead, you should be aware of how the different filters will affect your image and then choose the one which will get you closest to your envisioned image.

Choosing the Correct ND Filter for Long Exposure Photography Effects

Conclusion

Long exposure photography opens many doors and gives you several new creative elements to work with. As with anything else, a big part of this technique is trial and error but as you continue learning you’ll also begin seeing what you need to do in order to capture the images you want.


If you want to learn more about Long Exposure Photography I’ve shared everything I know in my eBook The Ultimate Guide to Long Exposure Photography. This eBook is for those who are ready to take their images to the next level and expand their creative vision.

The post Choosing the Correct ND Filter for Your Desired Long Exposure Photography Effects by Christian Hoiberg appeared first on Digital Photography School.


Digital Photography School

 
Comments Off on Choosing the Correct ND Filter for Your Desired Long Exposure Photography Effects

Posted in Photography


Lighting 103: Using Gelled Flash to Correct Ambient Light

07 Apr

Abstract: You can alter your camera's white balance and gel your flash to "correct" nearly any ambient light color shift. But should you?Read more »
Strobist

 
Comments Off on Lighting 103: Using Gelled Flash to Correct Ambient Light

Posted in Photography


3 Photoshop Elements Tutorials to Help You Correct and Enhance Your Images

14 Dec

We’ve noticed on our current reader survey (if you haven’t filled it out already, please do so here) that many of you are using Photoshop Elements. So I rounded up some video tutorials to help you use Elements (15 or any older version) to help you make corrections and enhancements to your images.

#1 How to brighten and improve a dull photo

George Peirson from How To Gurus walks you through several steps you can apply to make a dull photo more exciting. He covers things like working with adjustment layers so you can work non-destructively, adding more color in certain areas, layer blending modes, and more.

#2 How to remove people using the clone stamp tool

Sometimes you can get unwanted people in your shots. In this video you can learn how to remove them using just the clone stamp tool in Photoshop Elements.

#3 How to create a motion blur effect using Elements

In this final video learn the steps to add motion to an image using different blur effects in Photoshop Elements. The example used is a race car that was frozen with a fast shutter speed.

If you use Photoshop Elements I hope these videos have helped you out, and you have learned a couple new things. Many things that you can do in Photoshop, can also be done in Elements. Some of the tools and menus are a bit different but many of the features are similar. Elements also offers a “guided” user experience to help you walk through doing some common things.

If you want to learn more try the Adobe website where they have more tutorials and articles on Elements.

For more Photoshop help try these dPS articles:

  • How to Add a Sun Flare to Your Images Using Photoshop
  • How to do Non-Destructive Editing in Photoshop
  • An Introduction to Photoshop Layers Possibilities and Properties
  • Tips for Using the Blur Filters in Photoshop
  • 2 Simple Methods for Adding Color to Your Images Using Photoshop
  • A Guide to Black and White Conversion in Photoshop

googletag.cmd.push(function() {
tablet_slots.push( googletag.defineSlot( “/1005424/_dPSv4_tab-all-article-bottom_(300×250)”, [300, 250], “pb-ad-78623” ).addService( googletag.pubads() ) ); } );

googletag.cmd.push(function() {
mobile_slots.push( googletag.defineSlot( “/1005424/_dPSv4_mob-all-article-bottom_(300×250)”, [300, 250], “pb-ad-78158” ).addService( googletag.pubads() ) ); } );

The post 3 Photoshop Elements Tutorials to Help You Correct and Enhance Your Images by Darlene Hildebrandt appeared first on Digital Photography School.


Digital Photography School

 
Comments Off on 3 Photoshop Elements Tutorials to Help You Correct and Enhance Your Images

Posted in Photography


Canon releases new firmware for EOS 5D IV to correct varying flash color

30 Nov

Canon has introduced an update for its EOS 5D Mark IV DSLR that corrects a color issue when using flash, and improves the camera’s performance when the company’s new tele-converters are in use.

Firmware version 1.0.3 fixes an issue that created different color temperatures in flash output according to the metering mode in use at the time, and makes communication between camera and lens more reliable with the EF1.4x III and EF2x III tele-converters. The company says an additional fix corrects the way the level gauge is displayed when the camera is held in portrait orientation with the grip below the lens.

For more information visit the Canon website.

Manufacturer’s release notes

Changes in the Firmware

Firmware Version 1.0.3 incorporates the following fixes and improvements:

1. Corrects a phenomenon in which the color of images varies depending on the metering mode selected during flash shooting.

2. Improves the reliability of communication when using the EF1.4X III or EF2X III extender.

3. Corrects the level display when the camera is held in the vertical orientation with the hand grip pointing downward.

4. Improves the reliability of communication via USB cable when using the Lens Data Registration function with EOS Utility 3.

Firmware Version 1.0.3 is for cameras with firmware Version 1.0.2 or earlier. If your camera’s firmware is already Version 1.0.3, it is not necessary to update the firmware.
When updating the firmware of your camera, please review the instructions thoroughly before you update the firmware.

The firmware update takes approximately 4 minutes.

Articles: Digital Photography Review (dpreview.com)

 
Comments Off on Canon releases new firmware for EOS 5D IV to correct varying flash color

Posted in Uncategorized