RSS
 

Posts Tagged ‘Copy’

Roger Cicala: the difference between sample variation and a ‘bad copy’ (Part 2)

13 Nov
I compare a lot of lenses. They aren’t all exactly the same.

In today’s article we’ll look at variation versus bad copies a bit differently to last time. Plus, I’ll explain how people get three ‘bad copies’ of a lens in a row.

Variation versus bad copy frequency

Imatest type graphs are easier to visualize so I’m going to use those today. These graphs allow us to visualize center resolution (toward the top on the y-axis of the graph) and overall resolution (toward the right on the x-axis), with individual lenses plotted as dots. Don’t worry about the numbers on the X and Y axes, all you need to know is that the sharpest lenses are plotted up and to the right, and the softest are lower and to the left.

The graph below shows plots from multiple copies of two prime lenses. Let’s call them ‘Red’ and ‘Green’. The Green lens is a fairly expensive, pro-grade optic. The Red lens is a cheaper, consumer-level prime. You’ll see that there’s one copy of each in roughly the middle of this graph, away from the main cluster at upper-right. I’d return both of these samples to the manufacturer. So would you – they’re awful.

Multiple copies of two lenses, the ‘Red’ lens and the ‘Green’ lens, plotted by center and overall sharpness. Two bad copies of each are obvious at the lower left.

But could you tell the difference between the best and the worst of the other copies, in that big cluster at upper-right? That would depend on the resolution of your camera, how carefully you pixel-peeped, which lens we are talking about, and honestly, how much you cared.

The Green lens shows less variation, which is about what we expect (but don’t always get) from a fairly expensive, high-quality lens. A perfectionist with a high resolution camera, some testing skill and enough time could tell the top third from the bottom third, but it would take effort.

The Red lens has more variation, which is typical for a consumer-grade lens. A reasonably picky photographer could tell the difference from the top third and the bottom third. None of the bottom third are awful; they’re a little fuzzier, a little more tilted, not quite as good when viewed at 100% magnification, and you might see issues if you made a large print.

With more variation, you get more ‘not as good’ lenses, but they’re still not ‘bad copies’

If you look carefully, though, the top third of the Green and Red samples are about the same. With more variation, you get more ‘not as good’ lenses, but they’re still clearly not ‘bad copies’; they’re just ‘not quite as good’ copies.

So why would we argue about these two lenses on the Internet? Because based on a graph like this, a lot of testing sites might say “Red is as good as Green and costs a lot less.” The truth is simply that the Red lens has more variation. Sure – a good copy of the Red lens might match a good copy of the Green lens. But you’re not guaranteed to get one.

A word about that yellow line and worse variation

There’s obviously a point when large variation means the lower end of the ‘acceptable group’ is unacceptable. Where that line lies is of course arbitrary, so I put an arbitrary yellow line in the graph above, to illustrate the point. Where the yellow line is for you depends on your expectations and your requirements.

The Subjective Quality Factor can theoretically decide when the low end of variation is not OK, and it can be used as a guide to where to place the yellow line. The key words, though, are ‘subjective quality’. Things like print size, camera resolution, even subject matter are variables when it comes to deciding when SQF is not OK. For example, the SQF needed for online display or 4K video is a lot lower than for a 24″ print of a detailed landscape taken with a 40 megapixel camera.

Every one of us has our own SQF; call it your PQF (Personal Quality Factor) and your yellow line might be higher or lower than the one in the graph above. Manufacturers have a Manufacturer’s Quality Factor (MQF) for each of their lenses, which is the famous ‘in spec’.

When your PQF is higher than the MQF, those lower lenses are not OK for you. They might be fine for someone else. Wherever a person’s yellow line is, that’s their demarkation line. These days, if they get a lens below the line, they go on an Internet rant. So now, as promised, I have explained the cause of 8.2% of Ranting On Online Forums (ROOFing). It’s the difference between MQF and PQF.

Put another way, it’s the difference between expectations and reality.

If you test a set of $ 5,000 lenses carefully enough, you may find some differences in image quality. The technical term for this phenomenon is ‘reality’.

It should be pretty obvious that people could screen three or four copies of the Red lens and end up with a copy that’s as good as any Green lens. I don’t find it worth my time, but I’m not judging; testing lenses is what I do.

Unfortunately, though, people don’t post online “I was willing to spend a lot of time to save some money, so I spent 20 hours comparing three copies and got a really good Red lens.” They say “I went through three bad copies before I got a good one.”

The frequency of bad copies and variation

Just so we get it out of the way, the actual, genuine ‘bad copy’ rate is way lower than I showed in the graph above. For high-quality lenses it’s about 1% out-of-the-box. This explains why I roll my eyes every time I hear “I’ve owned 14 Wonderbar lenses and they’re all perfect.” Statistics suggest you’d need to buy over 50 lenses to get a single bad one. The worst lenses we’ve ever seen have a bad copy rate of maybe 3% so even then, the chances are good you wouldn’t get a bad one out of 14.

Most of these ‘those lenses suck / I’ve never had a bad copy’ arguments are just a different way of saying ‘I have different standards than you’

What about the forum warrior ROOFing about getting several bad copies in a row? He’s probably screening his way through sample variation looking for a better than average copy. If he exchanges it, there’s a good chance he won’t get a better one, but after two or three, he’ll get a good one. So he’s really saying “I had to try three copies to find one that was better than average.” Or close to average. Something like that.

Semantics are important. Most of these “those lenses suck / I’ve never had a bad copy” arguments are just a different way of saying “I have different standards than you”. I get asked all the time what happens to the two lenses John Doe returned when he kept the third? Well, they got re-sold, and the new owners are probably happy with them.

Why are there actual bad copies?

In short – inadequate testing. Most photographers greatly overestimate the amount and quality of testing that’s actually done at the factory, particularly at the end of the assembly line.

Many companies use a test target of thick bars to set AF and give a cursory pass-fail evaluation. A target of thick bars is low-resolution; equivalent to the 10 lp/mm on an MTF bench. Some use a 20 lp/mm target to test, and 20 is higher than 10, so that’s good. The trouble is that most modern sensors with a good lens can resolve 50 lp/mm easily. This is what I mean when I say (as I do often) that you and your camera are testing to a higher standard than most manufacturers.

Why is there high variation?

Usually, it’s the manufacturer’s choice, and usually for cost reasons. Occasionally it’s because the manufacturer is living on the cutting edge of technology. I know of a couple cases where a lens had high variation because the manufacturer wanted it to be spectacularly good. They designed-in tolerances that turned out to be too tight to practically produce, but convinced themselves they could produce it. Lenses like this tend to deliver amazing test results, but then attract a whole lot of complaints from some owners and a whole lot of love from others.

What’s that? You want some examples?

This is not the bookcase mentioned below; that one is under nondisclosure. This is my bookcase. My bookcase has better optical books.

Service center testing

Years ago, we had in our possession a $ 4,000 lens that was simply optically bad. It went to the service center twice with no improvement. Finally, the manufacturer insisted I send ‘my’ camera overseas with it for adjusting. The lens and camera came back six weeks later. The lens was no better, but the camera contained a memory card with 27 pictures on it. Those pictures were of a bookshelf full of books, and each image was slightly different as the technician took test shots while they optically adjusted the lens.

This, my friends, is why we decided to start adjusting lenses ourselves. And yes – after offering to share those bookshelf images – I was eventually sent a replacement lens.

Non-adjustable lenses

Many lenses have no optical adjustments. They’re assembled, and then what you get is what you get. If in-factory QC detects a really bad one, it might be disassembled and the parts reused, in the hope that random reassortment gives a better result next time. Or it may just get thrown away; the cost of disassembling and reassembling may be greater than the saved parts.

A common type of non-adjustable lens called a stacked lens; ‘element – spacer – element – spacer, etc’ with a front and rear retaining ring holding everything together. The usual method of correcting it is to loosen the retaining rings, bang the lens on a table a few times, and tighten it back up. That probably sounds ridiculously crude, but it sometimes works.

Many fully manual lenses (not those made by Zeiss or Leica) are non-adjustable, as are some less expensive manufacturer and third-party lenses.

Minimally-adjustable lenses

A number of prime lenses have only one or two adjustable elements. This is not necessarily a bad thing; adjusting one or two elements is a lot easier than adjusting six, so the technician is more likely to get things right.

One of my favorite lenses, both to shoot with and to adjust, is the venerable Zeiss 21mm F2.8 Distagon / Milvus. The front element of this lens is adjustable for centering and we’ve done hundreds of these adjustments over the years. The fun part is doing this adjustment lets you choose what type of lens you want. You can have razor sharp in the center with soft corners or you can let the center be a little softer and the corners much sharper. It’s a great example of adjustment being a trade-off, even for relatively simple adjustments.

MTF graphs of a Zeiss 21mm F2.8 Distagon, adjusted for best center sharpness (above), and optimal edge sharpness (below).

Consumer-grade zoom lenses (manufacturer or third-party) and prime lenses with apertures smaller than F1.4 tend to be minimally or non-adjustable. A fair number of better zooms and primes are minimally adjustable, too.

Lenses with many adjustable elements

More adjustments means less variation, at least in theory. It also, however, means when something is wrong it’s far more complex and time consuming to get the adjustments right. Time, as they say, is money and complex lenses can be rather hard to adjust.

I think the most we’ve seen is nine adjustable elements. These are usually top-of the line zooms, but we’ve seen six adjustable elements in some top-end primes. That’s something we never saw even five or six years ago.

So, what’s the key takeaway?

Let’s start with my definitions. A bad copy of a lens has one or more elements so out of adjustment that its images are obviously bad at a glance. Such a lens (assuming it is optically adjustable) can usually be made as good as the rest.

Variance, on the other hand, means some lenses aren’t as good as others, usually as a result of a number of small imperfections. A simple optical adjustment isn’t likely to make them as good as average. All lenses have a little variance. Some have more. A few have a lot. How much is too much depends on the photographer who’s shooting with them.

The Canon 70-200mm F2.8 RF has (give or take one, I’m not certain I recall all of them) 8 or 9 different adjustable elements.

Reducing variation costs money. The reality is the manufacturers are doing what works for them (or at least they think they are). There is a place for $ 500 lenses with higher variation and good image quality, just like there’s a market for $ 2,000 lenses with better image quality and less variation.

Roger


Roger Cicala is the founder of Lensrentals.com. He started by writing about the history of photography a decade ago, but now mostly writes about the testing, construction and repair of lenses and cameras. He follows Josh Billings’ philosophy: “It’s better to know nothing than to know what ain’t so.”

Articles: Digital Photography Review (dpreview.com)

 
Comments Off on Roger Cicala: the difference between sample variation and a ‘bad copy’ (Part 2)

Posted in Uncategorized


Roger Cicala: the difference between sample variation and a ‘bad copy’ (Part 1)

03 Nov
We fix a lot of lenses, but not all lenses can be fixed.

With the next two posts, I hope to end the seventh most common forum war; the ‘lens variation is a big problem!’ vs ‘I don’t believe it exists!’ argument. Like a lot of forum wars, it comes down to semantics: Variation and bad copies aren’t the same thing (actually they’re not really related at all), but people tend to use the terms interchangeably.

Even $ 2,000 lenses must have variation

Note that I said ‘must’. I didn’t say ‘might’ or ‘could’. I certainly didn’t say ‘shouldn’t at this price’. If you expect every copy of a lens to be perfect, then a dose of reality is in order – unreasonable expectations are a down payment on disappointment.

The key point is what amount of variation is acceptable.

Of course, I define ‘unacceptable’ by my standards. My standards are probably similar to 90% of your standards (and they’re higher than most manufacturer’s standards). A few of you will consider my standards either too low or too high. That’s reasonable. You and I might be looking at the same lens, but we’re doing different things with it, and probably doing them on different cameras. Later on, we’ll talk about the difference between ‘acceptable variation’ and a genuinely bad copy that I would consider unacceptable.

Why lenses must vary

Any manufactured part, from a washer on your kitchen faucet to a component in the Hubble telescope has some variation. Generally (up to a certain point – limited by the state of the technology) you can lower the variation of a part if you are willing to pay more. Why? Because entirely new machines or manufacturing processes may be required, and all of that costs money.

But just ordering more units means you can save money, right? Well yes – in very general terms, ordering larger quantities lowers per-unit costs, but in a fairly linear fashion. Doubling your order of something usually reduces the per-unit cost by some percentage, but certainly not by half. There is never a point where if you order a large enough quantity of an item you get it for free.

This is a 15 cm diameter, 1/10 wavelength optical flat, eyeglasses for scale.

As an example, we use optical flats to calibrate our test benches. The flats come in different accuracies: 1/4 , 1/10, or 1/20 wavelength of flatness. All of those are very flat indeed, and those accuracies cost $ 800, $ 2,200, and $ 3,800 respectively. There is no quantity I could buy that would let me get the 1/20 wavelength plates for the 1/4 wavelength price. And I can’t get 1/40 wavelength of flatness at any price. The technology simply isn’t available.

What varies in a lens? Everything. The screws, helicoids, plates, and spacers vary. Every glass melt is very slightly different, giving elements a very slightly different refractive index. Lens grinding introduces variation, as does the coating process. Even the shims that we use to adjust variance, they vary. And shims don’t come in infinite thicknesses, so if your thinnest shim is 0.01mm then +/- 0.01mm is your maximum attainable accuracy.

What can manufacturers do about this?

The first thing is tolerancing the design. Optical programs let the designers punch in various tolerances for parts, showing how a given variation will affect the overall performance of the lens. For the sake of argument, let’s say that one particular glass element is very critical and even a slight variation makes a big difference in how the lens resolves, while variation among other elements matters less. The manufacturer can pay to have that critical element made more accurately. They can also change the design to make the part less critical, but often only by sacrificing performance.

In addition, manufacturers can (notice I said ‘can’, not ‘always do’) place compensating elements in the lens, allowing for slight adjustments in tilt, spacing, and centering. Emphasis is on ‘compensating’, though: These adjustments compensate for the inevitable errors that accumulate in any manufactured device. They are not called ‘adjusted for absolute perfection’ elements.

The two most common types of lens adjustments: shims and eccentric collars.

Not all lenses are equally adjustable. Some modern lenses may have five to eight different adjustable elements. Many have two or three. A fair number have none at all; what you get is what you get. Here’s a thought experiment for you: imagine you’re an optical engineer and you’ve been tasked with making an inexpensive lens. Knowing that adjustable elements are an expensive thing to put in a lens, what would you do?

I want to emphasize that optical adjustments in a modern lens are not there so that the lens can be tweaked to perfection; the adjustments are compensatory. There are trade-offs. Imagine you’re a technician working on a lens. You can correct the tilt on this element, but maybe that messes up the spacing here. Correcting the spacing issue changes centering there. Correcting the centering messes up tilt again. Eventually, in this hypothetical case, after a lot of back-and-forth you would arrive at a combination of trade-offs; you made the tilt a lot better, but not perfect. That’s the best compromise you can get.

Because many people think of distributions as the classic ‘bell curve’ or ‘normal distribution’ let’s get that particular wrongness out of the way. If you evaluate a group of lenses for resolution and graph the results it does NOT come out to be a normal distribution with a nice bell curve.

Frequency graph of two lenses. For those of you tired of reading already, this graph sums up the rest of the article. The black lens is going to have more variation than the green one. Neither the black nor green graphs are at zero over there on the softest end, bad copies happen to either one, but not frequently.

As common sense tells you it should be, lenses have a very skewed distribution. No lens is manufactured better than the perfection of theoretical design. Most come out fairly close to this theoretic perfection, and some a little less close. Some lenses are fairly tightly grouped around the sharpest area like the green curve in the graph above, others more spread out, like the black one. The big takeaway from that is you can’t say things like ‘95% of copies will be within 2 standard deviations of the mean.’

The Math of Variation

Don’t freak out, it’s not hard math and there’s no test. Plus, it has real world implications; it will explain why there’s a difference between ‘expected variation – up to spec’ and ‘unacceptable copy – out of spec’.

There are several ways to look at the math but the Root Sum Square method is the one I find easiest to understand: you square all the errors of whatever type you’re considering, add all the squares together, then take the square root of the total.

The total gives you an idea of how far off from the perfect, theoretical design a given lens is. Let’s use a simple example, a hypothetical lens with ten elements and we’ll just look at the spacing of each element in nm. (If you want to skip the math, the summary is in bold words a couple of paragraphs down.)

If we say each element has a 2 micron variation, then the formula is ?10 X 22 = 6.32. If I make a sloppier lens, say each element varies by 3 microns, then ?10 X 32 = 9.48. Nothing dramatic here, looser control of variation makes higher root sum square.

The important thing happens if everything isn’t smooth and even. Instead of 10 elements worse by 1 micron, let’s make 1 element worse by 10 microns. I’ll do the math in two steps:

? (9 X 22) + (1 X 10²) = ? (36 + 100) = ?136 = 11.66

The summary is this: If you vary one element a lot you get a huge increase in root sum square. If you spread that same total variation over several elements, you get only a moderate increase in root sum square. That is basically the difference between a bad copy and higher variation.

If you have just one really bad element the performance of the lens goes all to hell

The math reflects what we see in the real world. If you let all the elements in a lens vary a little bit, some copies are a little softer than others. Pixel peepers might tell, but most people won’t care. But if you have one really bad element (it can be more than one, but one is enough) the performance of the lens goes all to hell and you’re looking at a bad copy that nobody wants.

More real world: if one element is way out of wack, we can usually find it and fix it. If ten elements are a little bit out, not so much. In fact, trying to make it better usually makes it worse. (I know this from a lot of painful experience.)

What does this look like in the lab?

If you want to look at what I do when I set standards, here are the MTF graphs of multiple copies of two different 35mm F1.4 lenses. The dotted lines show the mean of all the samples; these are the numbers I give you when I publish the MTF of a lens. The colored area shows the range of acceptability. If the actual MTF of a lens falls within that range, it meets my standards.

Mean (lines) and range (area) for two 35mm lenses. The mean is pretty similar, but the lens on the right has more variation.

For those of you who noted the number of samples, 15 samples means 60 test runs, since each lens is tested at four rotations. The calculations for variation range include things about how much a lens varies itself (how different is the right upper quadrant from the left lower, etc.) as well as how much lenses vary between themselves and some other stuff that’s beyond the scope of this article.

So, in my lab, once we get these numbers we test all lenses over and over. If it falls in the expected range, it meets our standards. The range is variation; it’s what is basically inevitable for multiple copies of that lens. You can tell me I should only keep the ones that are above average if you want. Think about that for a bit, before you say it in the comments, though.

The math suggests a bad copy, one with something really out of whack, doesn’t fall in the range. That’s correct and usually it’s not even close. When a lens doesn’t make it, it REALLY doesn’t make it.

A copy that obviously doesn’t meet standards. The vast majority of the time, one of these can be adjusted to return to expected range.

We took that copy above, optically adjusted it, and afterwards it was right back in the expected range. So an out-of-spec copy can be fixed and brought back into range; we do that several times every day.

But we can’t optically adjust a lens that’s in the lower 1/3 of the range and put it into the upper 1/3, at least not often. Trust me, we’ve tried. That makes sense; if one thing is way out of line we can put it back. If a dozen things are a tiny bit out of line, well, not so much.

I know what you’re thinking

You’re thinking, ‘Roger, you’re obviously geeking out on this stuff, but does it make one damned bit of difference to me, a real photographer who gives zero shirts about your lab stuff? I want to see something real world’. OK, fine. here you go.

A Nikon 70-200mm F2.8 VR II lens is a really good lens with very low (for a zoom) variation. But if you drop it just right, the 9th element can actually pop out of its molded plastic holder a tiny bit without causing any obvious external damage. It doesn’t happen very often, but when it does, it always pops out about 0.5mm, which, in optical terms, is a huge amount. This is the ‘one bad element’ scenario outlined in our mathematical experiment earlier.

Below are images of the element popped out (left) and popped back in (right) and below each image is the picture taken by the lens in that condition. Any questions?

On top you see the 9th element ‘popped out’ (left) and replaced (right). Below each is the picture of a test chart made with the lens in that condition.

So, what did we learn today?

We learned that variation among lenses is not the same thing as ‘good’ and ‘bad’ copies. Some of you who’ve read my stuff for a long time might remember I used to put out a Variation Number on those graphs, but I stopped doing that years ago, because people kept assuming that the higher the variation, the higher their chances were of getting a bad copy, which isn’t true. You see, bad copies are – well, bad. Variation just causes slight differences.

I’m going to do a part II that will go into detail with examples about how much you should expect lenses to vary, what the difference is between variation and a genuinely bad copy, and why some people act like jerks on forums. Well, maybe just the first two.

As a bonus, I will tell you the horrifying story of how manufacturers optically adjust a lens that’s really not optically adjustable. And for a double bonus I will show how variation means that there are actually two versions of the classic Zeiss 21mm F2.8 Distagon.

In other words, if you struggled through this article, hopefully the next one will be enough fun that you think it’s worth it. Delayed gratification and all that…

Roger


Roger Cicala is the founder of Lensrentals.com. He started by writing about the history of photography a decade ago, but now mostly writes about the testing, construction and repair of lenses and cameras. He follows Josh Billings’ philosophy: “It’s better to know nothing than to know what ain’t so.”

Articles: Digital Photography Review (dpreview.com)

 
Comments Off on Roger Cicala: the difference between sample variation and a ‘bad copy’ (Part 1)

Posted in Uncategorized


New Instagram tool lets you download a copy of all your data

26 Apr

Instagram announced plans to offer a data download tool a while ago, and today the Facebook-owned image sharing network delivered.

The driving force behind the project has been the requirement to comply with the EU General Data Protection Regulation (GDPR) privacy law, which requires organizations to let individuals download any data that’s been gathered on them. The tool is now available on the Instagram website, ahead of the May 25th deadline.

To use the tool, simply enter your email and Instagram password, and Instagram will send you a “link to a file with your photos, comments, profile information and more.” The page says the process may take up to 48 hours, but I received the download link almost instantaneously when trying the feature.

Data is provided in a zip-file that includes all your photos and videos, neatly sorted into folders by upload month. Comments, settings, messages and other non-image information is packed in the JavaScript Object Notation (json) format, so you’ll need a suitable app for viewing.

According to the Instagram help pages, you should also be able able to download your data file through the “Account Data” option in the app settings but, at least in the case of my Android app, the required update has not made it through to my device yet at this point.

Articles: Digital Photography Review (dpreview.com)

 
Comments Off on New Instagram tool lets you download a copy of all your data

Posted in Uncategorized


This Copy of the Book ‘Fahrenheit 451’ Can Only Be Read When Heated

19 Oct

[ By SA Rogers in Design & Graphics & Branding. ]

Science, art and dystopian fiction come together in a fascinating new project that puts a highly appropriate heat-sensitive twist on Ray Bradbury’s classic novel, Fahrenheit 451. Charles Nypels Laboratory, which is part of Holland’s Jan van Eyck Academie, an institute for fine art and design, collaborated with graphic design collective Super Terrain to create a very special edition of the book. Check out the effect in their video below.

This week our colleagues from Super Terrain are working in the Lab as a last stop on their all-over-Europe printing adventures. They showed us this remarkable book they made "Fahrenheit 451". — @superterrain #printingadventures #heatsensitive #fire #experimental #artistsbook #allblack #screenprint

A post shared by Jo Frenken (@charlesnypelslab) on

Made in a lab, the pages are coated in thermochromic pigment, which disappears when a flame is held close to it (but not too close – you don’t want to actually reenact a major plot point of Fahrenheit 451, in which all books are contraband, and any that are found must be burned by ‘firemen.’) In the comments on the Instagram post, the designers note that the book will turn black again once it cools down, so you’d use a whole lot of lighter fluid (or matches) to read the whole thing.

This week our colleagues from Super Terrain are working in the Lab as a last stop on their all-over-Europe printing adventures,” says the Charles Nypel Lab on Instagram. “They showed us this remarkable book they made ‘Fahrenheit 451.’”

(h/t My Modern Met)

Share on Facebook


[ By SA Rogers in Design & Graphics & Branding. ]

[ WebUrbanist | Archives | Galleries | Privacy | TOS ]


WebUrbanist

 
Comments Off on This Copy of the Book ‘Fahrenheit 451’ Can Only Be Read When Heated

Posted in Creativity


Grab a free copy of DxO OpticsPro 9 while you can

04 Feb

DxO is running a promotion through February giving away free licenses for OpticsPro 9, its Raw processing software. You’ll miss out on the latest camera/lens support and features offered by OpticsPro 11, but hey, it’s free.

To get in on the offer you’ll just need to provide DxO with an email address to which you’ll be sent an activation code. Unfortunately, you won’t be able to upgrade the license, so you’ll have to buy the latest version outright if you want support for the most recent cameras and lenses. You can check DxO’s list of supported cameras and lenses here.

Articles: Digital Photography Review (dpreview.com)

 
Comments Off on Grab a free copy of DxO OpticsPro 9 while you can

Posted in Uncategorized


LensRentals applies copy variation test to short telephoto primes

22 Jul

LensRentals has embarked on a quest to investigate the complicated topic of sample variation among copies of the same lens. It’s the kind of fascinating, geeky stuff we’ve come to know and love from LensRentals, and in the latest round of tests they’ve taken a look at a group of short telephoto primes ranging from 85mm to 150mm. Read more

Articles: Digital Photography Review (dpreview.com)

 
Comments Off on LensRentals applies copy variation test to short telephoto primes

Posted in Uncategorized


Successfully Copy Photos from Your Memory Card to your Computer

02 May

Before you can begin editing your photos you need to get them safely off your camera and onto your computer. Unfortunately this process is often hijacked by (well-meaning if misguided) software which purports to do the work for you but leaves you wondering just where your photos really are! So, to help you understand your options for getting your photos onto your computer, here’s what I recommend.

First of all: Take Charge!

The first thing to understand about getting photos from your camera card or camera onto your computer is that you’re in charge. Any application that opens and tries to grab your photos for you can be closed down. If it is not the application you want to use then do just that – close it.

Now you can take charge and manage the process in a way that makes sense for you.

Choose your application

If you’re using Photoshop then you can use Bridge to import your photos. If you are using Lightroom then you can launch Lightroom and import your photos using it. If you don’t have either program, or if you prefer to manage the process yourself, you can do so using Finder on the Mac or Windows Explorer on a PC. I’ll cover this process first, then look at Bridge and Lightroom.

Importing using Finder or Windows Explorer

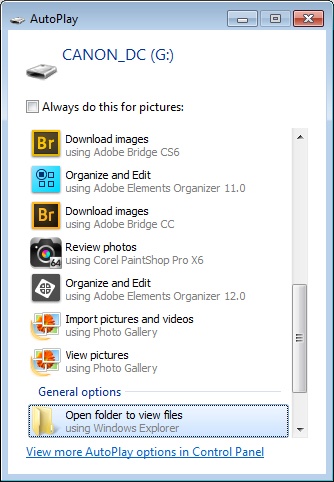
import-photos-using-Windows-1When attached to your computer, a camera or memory card works like any drive, so you can view its contents. You can also copy photos from the memory card onto your computer’s hard drive manually using Explorer or Finder.

On a PC, if the AutoPlay dialog appears when you insert your camera card or attach your camera, choose the Open Folder to View Files option.

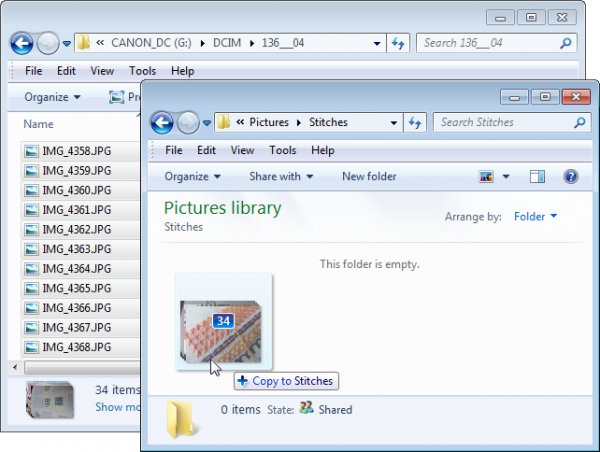
If the dialog doesn’t appear, simply launch Windows Explorer and select the drive that represents your camera or memory card.

Navigate to the folder that contains your photos – there may be multiple folders depending on how your camera stores images on the card. You can select the photos, then drag and drop them to the folder of your choice. It’s often easier if you first open the target folder in a second Windows Explorer window so you can drag from one to the other.

import-photos-using-Windows-2

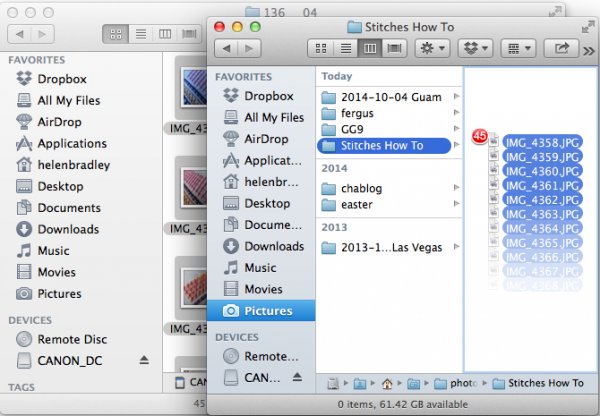
The process is similar using Finder on the Mac. If iPhoto launches – stop it from downloading any photos and close it. Then you can drag photos from your camera card open in one Finder window, to a folder of your choice open in a second window.

import-photos-using-finder-on-the-mac

Importing Photos using Bridge

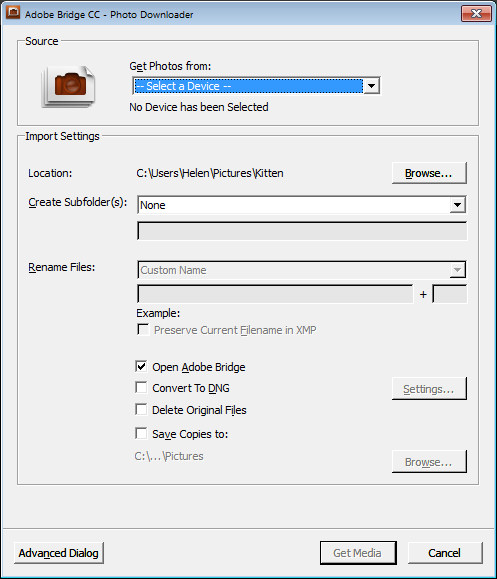
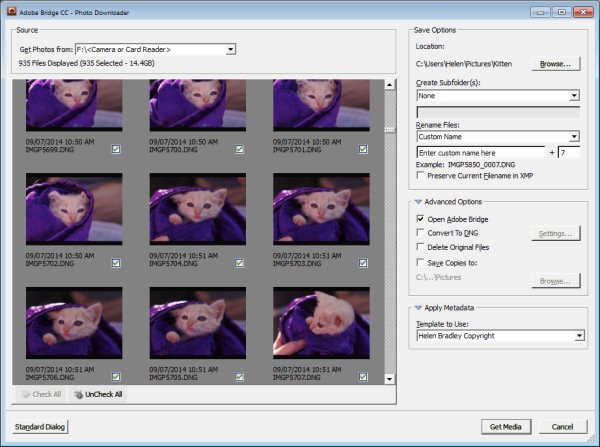
If you are using Photoshop, launch Adobe Bridge and choose File > Get Photos from Camera. Click the button to open the Advanced Dialog.

import-photos-using-bridge-1

From the “Get Photos from” drop down list select the drive letter that corresponds to your camera or card.

import-photos-using-bridge-2

You can now see and select the photos to import. This is one benefit of using Bridge over Windows Explorer – you will see thumbnail images of your raw files so you can see what you are importing.

On the right of the dialog select the folder in which to place the images. Typically this will be inside your My Pictures folder on your computer but you can choose any location that makes sense to you. However, if you want to find your photos later, on it is essential that you pay attention to the choices you make here.

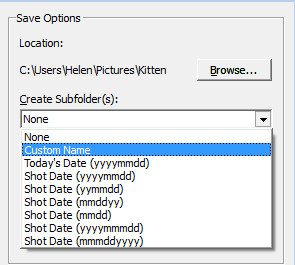
import-photos-using-bridge-3Once you have selected the folder to import the images into, you can, if desired, select a subfolder. In this way you can group photos by shoot, date or something that makes sense to you.  Bridge will create the folder for you if it doesn’t exist, so choose an option from the Create Subfolder(s) list and, if required, type a name for it or choose the date to use – either the capture date or today’s date. If you don’t want to organize photos in a subfolder then click None.

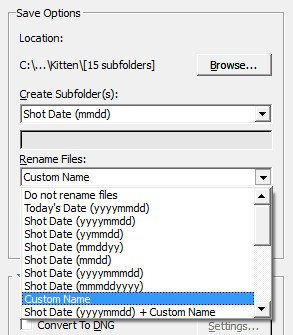
import-photos-using-bridge-4You can also select to rename files on import, or not. Choose Do not rename files if you don’t want them renamed or alternatively select a naming convention from the list.

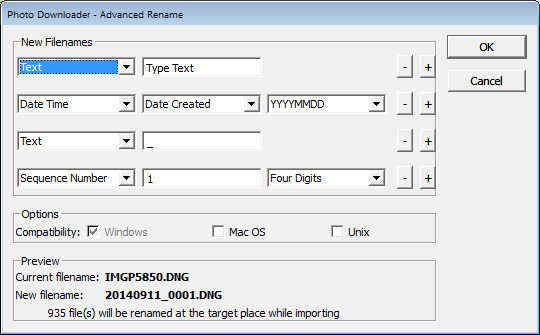
If you have advanced naming requirements for which the dialog does not provide an appropriate choice, scroll to the bottom of the list and click Advanced Rename to open the Advanced Rename dialog where you can create quite complex naming conventions. Whatever choice you make check the entry just below the dialog where Bridge shows you an example of the naming convention in place so you can check to see if it is what you want.

import-photos-using-bridge-5

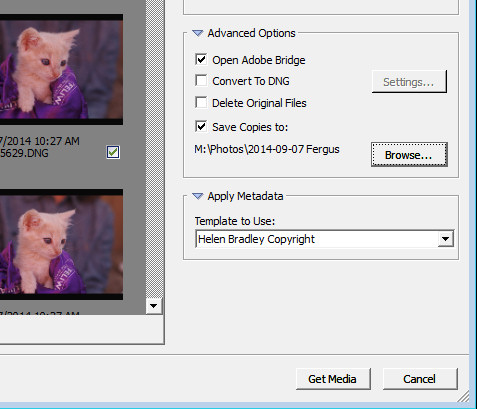
In the Advanced Options area you can choose other options including Convert to DNG – which is handy if your camera captures in a manufacturer specific format such as CRW, NEF, PEF and so on, but you prefer to work with DNG files. Select this option and Bridge will do the conversion for you.

You can also select Delete Original Files although this is not recommended. It’s best to make sure that the images are correctly copied onto your computer before the originals are deleted so I suggest you leave this option disabled.

Bridge offers a backup option so it will make a copy of your photos on import. To do this, click the “Save Copies To:” checkbox and select an alternate location (such as an external drive) in which to save a copy of your photos.

import-photos-using-bridge-6

If you have a metadata template already created you can select this from the Apply Metadata drop down list.

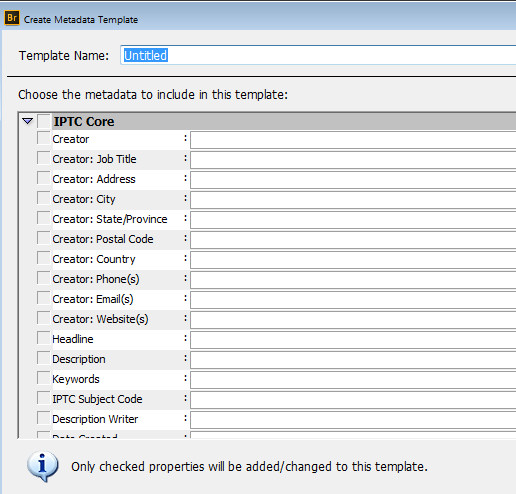
In future you can create such a metadata template in Bridge by selecting Tools > Create Metadata Template. I suggest that you complete the IPTC Core Data for Creator as well as Copyright Notice, Copyright Status and Rights Usage Terms. Also complete the Type Of Source entry in the IPTC Extension group. When completed this will give you a good all round metadata preset to apply to all your images. For more information on IPTC Copyright Metadata check out this article: Lightroom: Add your IPTC metadata on Import.

import-photos-using-bridge-7

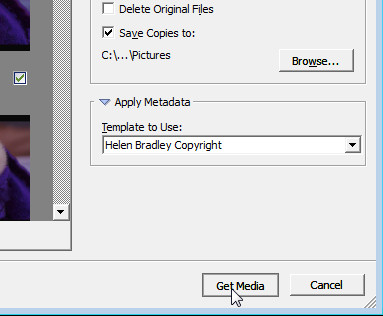
When you have your import settings selected and configured to meet your needs click Get Media to import the images.

import-photos-using-bridge-8

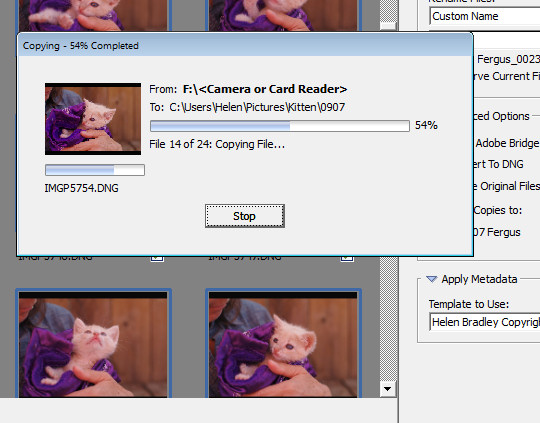
You will see a dialog showing you the progress of the import process.

import-photos-using-bridge-9

Importing Photos using Lightroom

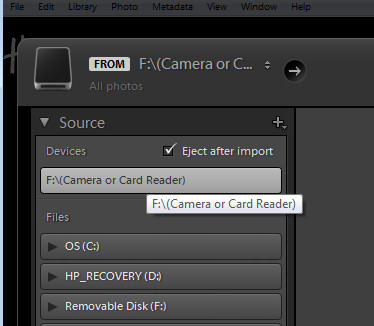
If you’re using Lightroom then it is the obvious choice for managing the process of importing photos from your camera or memory card. From the Library module click Import, then select the source in the top left corner of the Import dialog.

import-photos-using-lightroom-1

Across the top of the screen you will see only two choices, Copy as DNG and Copy. This reflects the fact that you’re importing images from a camera card or camera – the options Move and Add are not available for this process (if you do see Move and Add as available options, it appears that Lightroom isn’t recognizing your camera or camera card correctly and even though they may be available you should not use either of these choices).

import-photos-using-lightroom-2

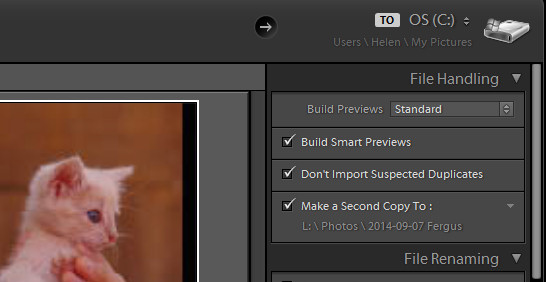
Next, open the File Handling panel on the right of the screen and select the kind of preview to create – Standard is a good choice. You can choose Build Smart Previews or not (if you’re unsure, check Build Smart Previews).

Checking Don’t Import Suspected Duplicates will ensure that Lightroom doesn’t import images again, that you’ve already previously imported. This is one feature available in Lightroom which is not also available in Bridge.

In Lightroom you can also choose to make a backup by making a second copy of your photos to an alternate location as you import them.

import-photos-using-lightroom-3

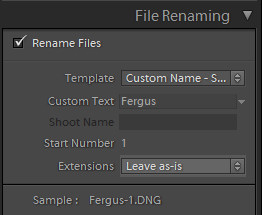
File Renaming panel allows you to rename images on import – you can select from a range of naming templates and even create your own. Here I’ve chosen to use the Custom Name – Sequence template so I’ve typed the Custom name and the sequence is set to start at 1:

import-photos-using-lightroom-4

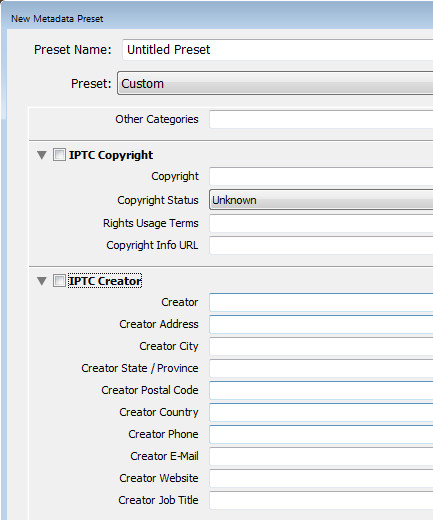
The Apply During Import panel has an option for applying metadata to the image upon import. Unlike Bridge the drop down list for Metadata presets also includes an option New which you can use to create your own metadata preset. I suggest you complete the IPTC Copyright and IPTC Creator details, and in the IPTC Extension Administrative select Original digital capture from a real live scene from the Digital Source Type drop down list. Type a name for the preset and from the Present drop down list click Save current settings as new preset.

import-photos-using-lightroom-5

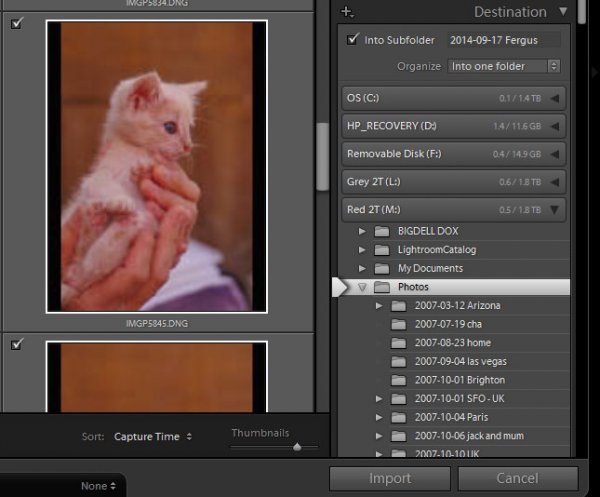
In the Destination panel you’ll need to select the location into which the images are to be copied. If you’re copying them to your hard drive then typically you’ll select your C drive, then your My Pictures folder which should be in your Users area.

If you save your images to an external drive then select the external drive and the folder into which the images should be imported.

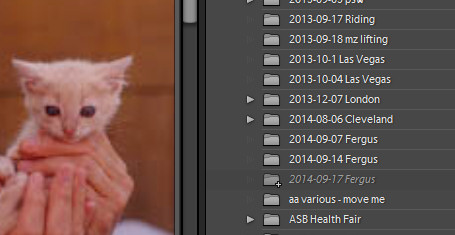
If the folder does not exist you can create a subfolder on import by selecting the Into Subfolder checkbox and type a name for the folder that Lightroom should create to import the images into.

import-photos-using-lightroom-6

From the Organize drop down list you can select to put the images into this folder (Into one Folder) or to organize them by date. Whichever choice you make you can see a preview of what’s going to happen in the folder list, allowing you to check and make sure that everything is going to be imported and arranged to your requirements before you go ahead and complete the import process.

import-photos-using-lightroom-7

When you’re ready to import the images click Import.

Whatever process you choose to use for getting images off your camera card onto your computer the acid test for whether it is a good system or not will be if you can find your images later on. Also be aware that it’s advisable to make a backup copy of your images in case your computer is stolen, damaged or your hard disk crashes. For this reason a backup on a removable external drive is a sensible choice.

Having an import routine that you understand, and can reliably execute, is a necessary first step for any photographer. The worst possible scenario is to have copied your images from your camera card to your computer and erased them from your card, only to discover that you cannot find the images. It’s a scenario that way too many users have encountered – don’t let it happen to you!

Find a video version of this blog post here:

Do you have any other copy and import tips? Please share in the comments below.

googletag.cmd.push(function() {
tablet_slots.push( googletag.defineSlot( “/1005424/_dPSv4_tab-all-article-bottom_(300×250)”, [300, 250], “pb-ad-78623” ).addService( googletag.pubads() ) ); } );

googletag.cmd.push(function() {
mobile_slots.push( googletag.defineSlot( “/1005424/_dPSv4_mob-all-article-bottom_(300×250)”, [300, 250], “pb-ad-78158” ).addService( googletag.pubads() ) ); } );

The post Successfully Copy Photos from Your Memory Card to your Computer by Helen Bradley appeared first on Digital Photography School.


Digital Photography School

 
Comments Off on Successfully Copy Photos from Your Memory Card to your Computer

Posted in Photography


Microsoft Outlook 2010 – Where is the Blind Carbon Copy Feature?

16 Oct

Send a copy of an e-mail via Blind Carbon Copy so all recipients are not shown.

Have you ever sent an e-mail to someone and needed to send a copy to their supervisor, coworker, or family member, and did not want the original recipient to know everyone to whom you are sending a copy? Or do you need to send e-mail to dozens or hundreds of people, such as an ad hoc mailing list you manage, and do not wish everyone to see each other’s e-mail address?

Most e-mail programs support a feature called BCC, or Blind Carbon Copy, allowing you to send e-mail to a person or group of people and keep those recipient addresses hidden. Microsoft Outlook 2010 has such a feature as well, but you need to know where to look……

Read more at MalekTips.
New Computer and Technology Help and Tips – MalekTips.Com

 
Comments Off on Microsoft Outlook 2010 – Where is the Blind Carbon Copy Feature?

Posted in Technology


Roger Cicala looks at lens variation and getting a ‘good copy’

26 Nov

lensrentals.png?v=1238?v=1238?v=1238?v=1238

Roger Cicala of LensRentals has written an article about why ‘soft’ lenses occur and how you’ll know if you have one. The article summarises his experience and testing of the phenomenon and explains how the persuit of a ‘perfect’ lens is a fool’s errand.

News: Digital Photography Review (dpreview.com)

 
Comments Off on Roger Cicala looks at lens variation and getting a ‘good copy’

Posted in Uncategorized


Miscellaneous Software – Freeware to Copy Files and Verify

20 May

TeraCopy integrates with Windows Explorer to perform file copying with a verify option, and you can pause and resume large copies.

TeraCopy is a freeware (for personal or educational use) file copy utility for Windows. Besides performing high speed copying, other features include file verification via source and target CRC checks which you can manually run or configure to activate after every copy.

Other features include the ability to pause and resume file copying, integration with Windows Explorer, and playing a sound to alert you when file copying is complete, useful when performing a large copy operation….

Read more at MalekTips.
New Computer and Technology Help and Tips – MalekTips.Com

 
Comments Off on Miscellaneous Software – Freeware to Copy Files and Verify

Posted in Technology