RSS
 

Posts Tagged ‘Cool’

How to Create Cool Effects Using Displacement Maps in Affinity Photo

17 Feb

The post How to Create Cool Effects Using Displacement Maps in Affinity Photo appeared first on Digital Photography School. It was authored by Kevin Landwer-Johan.

create cool effects with displacement maps in Affinity Photo

Adding natural-looking text to a photo can be challenging. But with displacement maps in Affinity Photo, you can easily produce awesome-looking text blends.

In fact, it takes just a few clicks to merge text with a second photo, so that it looks like the text was there all along.

There are a couple of different ways to achieve this look in Affinity Photo. If you’re used to other image manipulation software, you may be familiar with some of the steps. And if you’re new to Affinity Photo, you may not be aware of the features that make creating cool effects using displacement maps even easier.

So let’s dive right in!

Blend overlay example of displacement maps in Affinity

What are displacement maps in Affinity Photo?

Displacement maps in Affinity Photo allow the texture of an image to be mapped onto another layer.

Displacement maps are commonly used to add natural-looking text to an image. You can use them when you want to place a logo or text on a t-shirt or make text look like a natural part of a scene.

example of displacement maps in Affinity

How to create a displacement map: Step-by-step instructions

As with pretty much any editing effect, there is more than one way to reach your end goal.

In this article, I will show you a simple, step-by-step method I use to create displacement maps in Affinity Photo.

Specifically, I’ll use Affinity Photo’s Displace filter.

Using the Displace filter is a great way to work with displacement maps. It’s quick, easy, and non-destructive.

This means you have a great deal of control. You can apply your Displace filter and tweak it as much as you like – without permanently altering the underlying photo.

Step 1: Open your mapping image

Select the image you plan to modify. Open it in Affinity Photo.

Locate the file with your text or logo, then drag and drop it onto the underlying image file.

You can use a TIFF or PNG file with transparency. Alternatively, type in the text you want to use, as I’ve done in my example file (below).

Position your image or text where you want it to appear. If you’ve chosen to type your text, pick the font and color you think will best suit your needs.
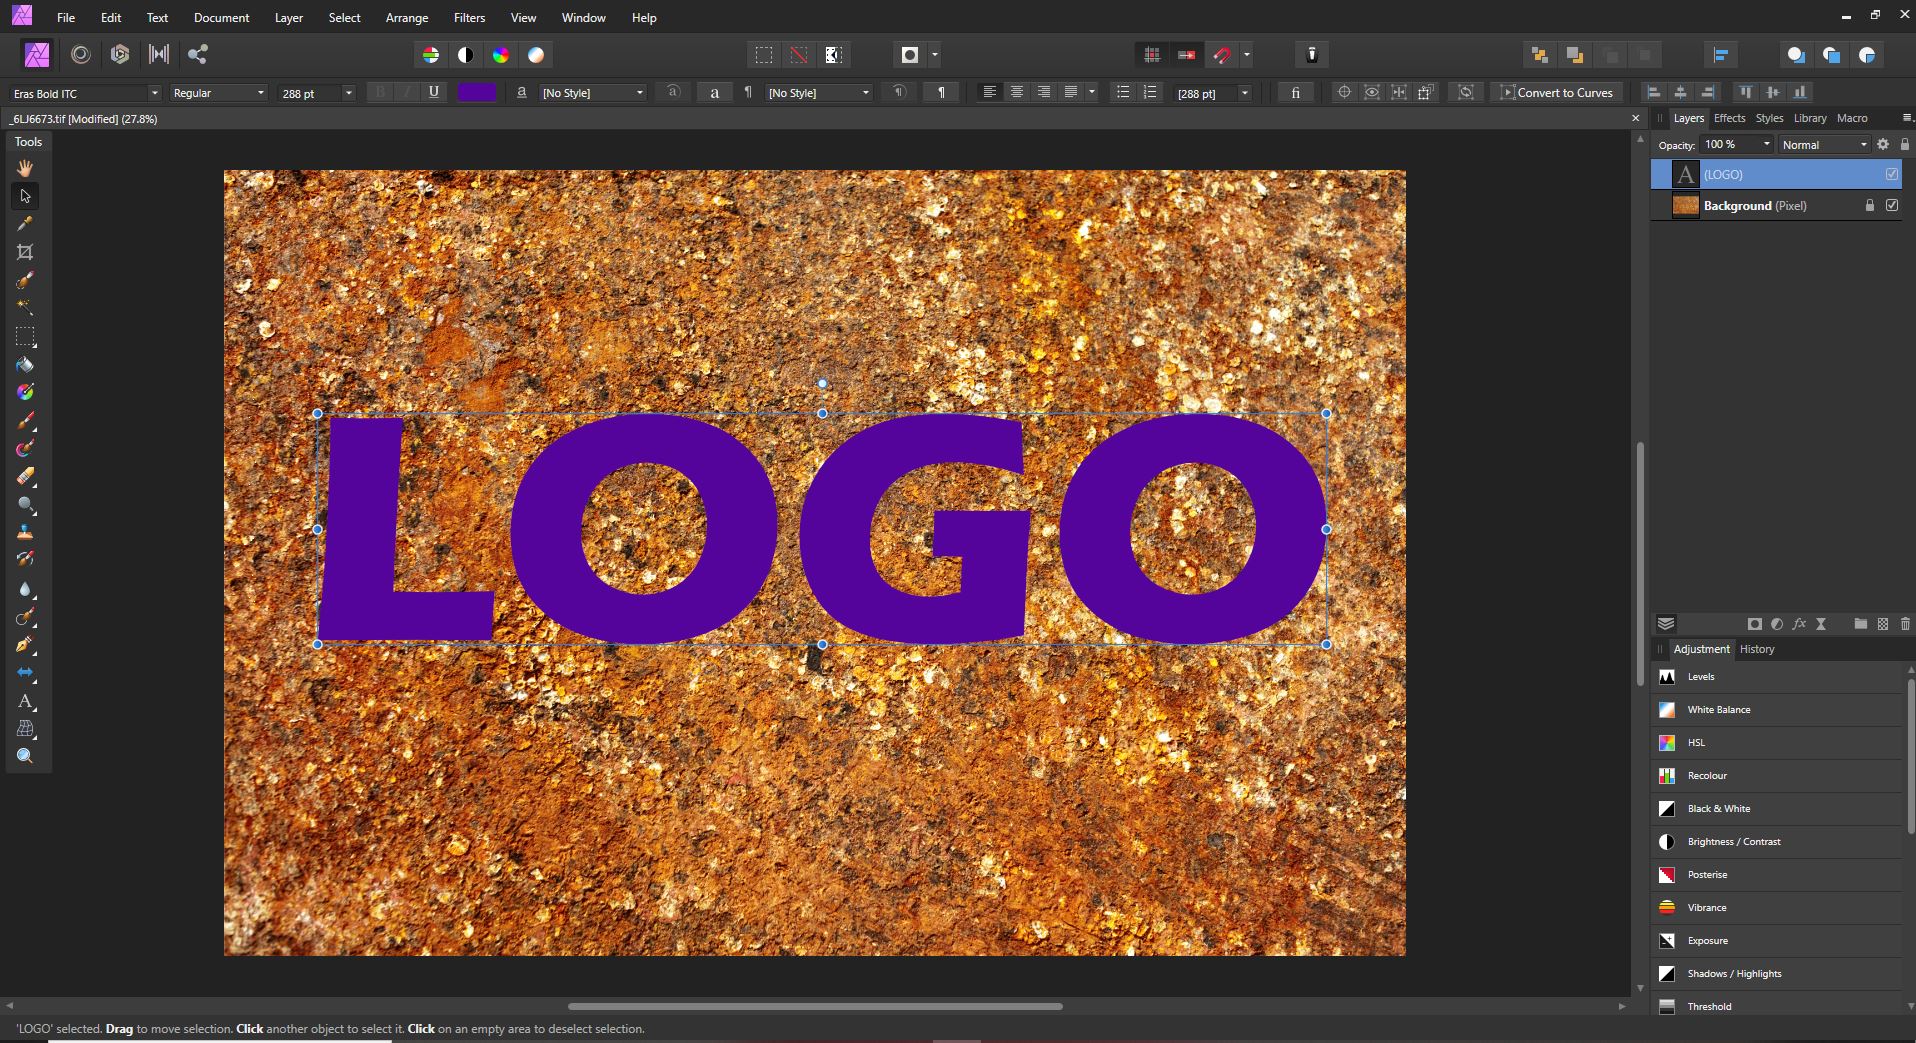
Screen grab from Affinity Photo showing displacement maps in Affinity

Step 3: Create a live filter layer

In the top menu, choose Layer.

Then go down to New Live Filter Layer>Distort>Displace Filter

Screen grab from Affinity Photo

In the Layers panel, you will now see a live displacement map filter added to your logo or text layer. 

Screen grab from Affinity Photo showing displacement maps in Affinity

Step 4: Choose a displacement map

In the displacement map dialog box, you will have the option of loading a map from a file or loading it from other layers. Sometimes you may have a separate image you want to use as your mapping layer. In this example, I will show you how to use the lower layer to create a displacement map, because this is what will typically provide you with a great result.

Click on the option to Load Map From Layers Beneath. At this point, depending on the resolution of the photo you are working with, you may begin to see the effects of the mapping filter.

(But don’t worry if you can’t yet see this; we’ll work on the effect in the next steps.)

Step 5: Adjust the displacement strength

Use the slider in the Displace filter dialog box to increase or decrease the strength of the filter.

Adjust the filter intensity until your top layer merges naturally with the image below.

Note that this is just the first level of adjustment. In the next steps, you’ll discover how to fine-tune the result, so don’t be concerned if you can’t yet get your image looking exactly how you want.

Screen grab from Affinity Photo

Step 6: Rasterize the text layer

At this point, if you are working with a text layer or some other non-rasterized layer, you need to rasterize it so the next step will work.

Right-click on the text layer and select Rasterize.

Step 7: Control your blending options

Now it’s time to further adjust how your text or logo blends with the layer beneath it.

Click on the cog icon in the Layers panel. (It’s between the blend mode drop-down and the padlock icon.)

A new dialog box will appear; this lets you control the blending options for your layer. Note the two curves graphs:

Screen grab from Affinity Photo

You’ll want to use the rightmost curve, labeled Underlying Composition Ranges. But before you start, make sure to uncheck the Linear box below it. 

Now click and drag from the top left of this curve. Watch as your text or logo further blends with the layer beneath. Continue to click and drag on the curve until you have a look you’re happy with.

Step 8: Tweak the displacement amount

If you’ve merged an image rather than text, you can now go back and tweak the Displace filter.

(If you merged text, this option won’t be available, because the filter is combined with the text layer when it’s rasterized.)

Step 9: Change the blend mode

For further control, you can select a different blend mode for your text or logo layer.

Scroll through the options in the blend mode drop-down box until you find one that best fits the look you want.

You can also decrease the opacity of the top layer so the underlying texture shows through more.

displacement maps in Affinity example

Using displacement maps in Affinity Photo: Conclusion

The key to success in all photo manipulation is experimentation.

So if you want to create a stunning result, use these steps as guidelines, but don’t be afraid to play around. Push the boundaries!

Using displacement maps in Affinity Photo is fun and non-destructive. This means you can try as many options as you like without permanently affecting your images!

Now over to you:

How do you plan to use displacement maps? Share your thoughts (and images) in the comments below!

The post How to Create Cool Effects Using Displacement Maps in Affinity Photo appeared first on Digital Photography School. It was authored by Kevin Landwer-Johan.


Digital Photography School

 
Comments Off on How to Create Cool Effects Using Displacement Maps in Affinity Photo

Posted in Photography


DIY Photography: How to Make Your Own DIY Lightstick for Cool Photos!

21 Jan

The post DIY Photography: How to Make Your Own DIY Lightstick for Cool Photos! appeared first on Digital Photography School. It was authored by Simon Bond.

diy-lightstick

In this article, you’ll learn how to make your own DIY lightstick.

You’ll be able to use this to create fascinating light paintings, and the best thing is, you can do it on a budget!

The simple DIY lightstick is made with easily available household objects and a set of fairy lights. Once it’s made, you’ll be able to create beautiful light patterns during long exposure photos.

DIY-Lightstick

Using a light stick for light painting can transform a scene.

What is light painting

Light painting is a long exposure technique.

To achieve this kind of photo, you’ll need a camera on a tripod, and usually, the photo will be taken at night. The exception to this would be a studio that is completely dark – this too can be used for light painting.

Most people will know light painting as simply spelling something in the sky with a torch.

There are two main forms of light painting, kinetic light painting, and regular light painting. In this article, you’ll learn about using a light stick to create regular light paintings.

Image: There are light sticks out there you can buy. This photo was taken using a pixelstick.

There are light sticks out there you can buy. This photo was taken using a pixelstick.

Lightsticks you can buy

You can buy a ready-made lightstick.

Indeed, some of these are already quite cheap and will give you the chance to practice some of the ideas presented in this article. There are also those sticks that are more expensive.

It’s worth keeping the more expensive sticks in mind, as they will give you more options when compared to a stick like the one you’ll be shown how to make in this article.

  • LED light sticks – The creme of the crop are the LED light sticks made by pixelstick and magilight.
  • Glow sticks – The glow sticks often seen at parties and festivals. They’re cheap, and can be used for light painting.
  • Toy light stick – Head down to your local toy shop and pick up a light saber. Indulge your inner child, and it also makes some great photos!
  • Light painting swords – These are similar to kids’ toys, but are made specifically with photographers’ needs in mind. They are available through this site.
DIY-Lightstick

You’ll use tie straps to attach the wire to the tube.

How to make a DIY light stick

There are some very good cheap options when it comes to light sticks, and you might decide to pursue one of those instead of making a DIY lightstick. If you want a little challenge, then read on and see what you can make.

The supplies you’ll need

First of all, let’s gather the supplies you’ll need. You can find most at home, however, you may need to visit your local DIY store or look online for some too.

  • Battery operated fairy lights.
  • A piece of plumbing pipe. Around one meter long, and 2cm in diameter.
  • A plumbing pipe connection piece. A t-shape variety is best, and also 2cm in diameter.
  • A set of tie straps.
  • A copper piping half-circle bracket.
  • Wire cutters.
  • A saw.
  • Solder and soldering iron.
  • Electrical tape.
  • Glue gun.
  • Bungee cord.
Image: The battery pack needs to be glued onto the stick as well.

The battery pack needs to be glued onto the stick as well.

Putting the whole thing together

Now you have everything you need, take the following steps to put it all together.

The task is fairly simple. It’s really just attaching some fairy lights to a stick. Why the plumbing tube? That’s so you can break it down to a stick that’s half of its size in an easy way.

Attaching the fairy lights

  1. Take your length of plumbing tube and use the saw to cut it in half. The length of the 2 halves is optional. In my case, I went with 50cm.
  2. Attach the two pieces together using the connection piece.
  3. Now Attach the end of the fairy light wire to the end of your tube use a tie strap.
  4. Pull out the fairy lights to the length of the tube. Then give a little slack to allow the tube to be detached at the connection point.
  5. Use another tie strap to attach the fairy light wire to the other end of the tube.
  6. Run the wire back down the length of tubing again, and then attach the wire to the tube using another tie strap.
  7. You’ll now have excess wire and fairy lights left over. You could repeat steps 4,5 and 6 if you wish, or continue to the next part.
DIY-Lightstick

This stick divides into two. This makes it easier to carry around and gives you the option of using the stick at half its full length.

Putting the battery pack on, and finishing the stick.

  1. Use the wire cutters to cut away the excess wire, leaving around 20cm to the battery pack.
  2. Strip away some of the plastic coatings on the wire on the side with the battery pack, and the side attached to the piping.
  3. Solder the two pieces of wire back together again. Make sure the correct wire is soldered together or the lights won’t work. When you cut the wire, two wires will be revealed on each side of the wiring. You need to solder this back together to re-complete the circuit.
  4. Use the electrical tape to cover up the soldered wire, or if you have it, plastic that shrinks when heated to cover the join.
  5. Test the lights, they should now work, and you should now have a light stick!
  6. Take the copper bracket and hoop it around the pipe, and touch it to the battery pack to ensure it connects.
  7. Use the glue gun and add glue to the joining section on the battery pack, the pipe, and the copper bracket.
  8. Hold everything in place until the glue has dried hard.
  9. Finally, run the length of the bungee cord through the piping, and knot it at both ends. The cord should be tight enough to hold the pipe together, but loose enough that you can easily detach the two halves of the stick.
DIY-Lightstick

The stick is now ready, it just needs the bungee cord put through the middle.

Light painting with a lightstick

Now you have a DIY lightstick you can use to create interesting light paintings.

Lightsticks work because of the repetition factor – lots of lights moving altogether in a uniform pattern. It’s best to keep your light paintings relatively simple. Use defined movements, like spinning around, to create light cones. Spin the stick around to create circles, or simply walking along with the stick to create light ribbons.

What you do creatively with the stick is now up to you, but enjoy experimenting!

Image: It’s usually a good idea to keep light paintings simple, with a defined message.

It’s usually a good idea to keep light paintings simple, with a defined message.

Conclusion

It’s always fun to make something for your photography. Have you ever tried to make an accessory yourself? Maybe it was for flash photography, something like a snoot?

Here at digital photography school, we love to hear from you, so please share your experiences. If you have any light painting photos taken with a light stick that you would like to share, that would also be great!

You may also like:

  • DIY Photography Backdrops for Still Life and Product Photography
  • 5 DIY Macro Photography Hacks for Stunning Macro Photos (on a Budget)
  • How to Make a DIY Photography Softbox
  • Try this DIY Neutral Density Filter for Long Exposure Photos
  • DIY Food Photography Props on a Budget
  • DIY Photography Backlighting for Beginners
  • How to Make a DIY Lens Hood to Eliminate Lens Flare
  • How to Make Easy and Affordable DIY Food Photography Backdrops


The post DIY Photography: How to Make Your Own DIY Lightstick for Cool Photos! appeared first on Digital Photography School. It was authored by Simon Bond.


Digital Photography School

 
Comments Off on DIY Photography: How to Make Your Own DIY Lightstick for Cool Photos!

Posted in Photography


How to Make a Cool David Hockney-Inspired Photomontage in Photoshop

27 Sep

The post How to Make a Cool David Hockney-Inspired Photomontage in Photoshop appeared first on Digital Photography School. It was authored by Megan Kennedy.

David Hockney’s approach to art has made him one of the most influential British artists of the 20th century. Exploring the nature of photographic representation, Hockney’s distinctive method of photography is both thought provoking and physically engaging. In this tutorial, we’ll have a look at creating a simple David Hockney-inspired Photomontage in Photoshop.

photomontage-in-photoshop

The photography of David Hockney

David Hockney once said, “photography is all right if you don’t mind looking at the world from the point of view of a paralyzed cyclops-for a split second.”

However, in the 1980s, Hockney began to experiment with the photographic medium. Taking numerous Polaroid or 35mm photographs of a scene from a variety of perspectives, Hockney would then arrange the collection of images into a cohesive body, creating an almost Cubist rendering of visual reality. He called these collages and photo montages joiners.

This distinctive approach to image making was a reflection of Hockney’s dislike for photographs executed with a wide-angle lens. By creating his joiners, Hockney sought to reflect the process of seeing, creating a narrative based around visual experience.

How to make a simple Hockney-inspired Joiner

Step 1: Select an image

Image: Our source image

Our source image

For this tutorial, I’ll be using a photo I took of clouds. The photo is made up of strong shapes, forms and tones. When converted into a joiner, these elements are pulled apart to create a mangled scene that is consolidated by the overall character of the source image.

Step 2: Cutting

With your chosen image open, select the Rectangular Marquee Tool from the left toolbar (or type the letter M).

Select a small section of your image and right-click within the selected area.

Click on Layer Via Cut. The selection will be severed from the source image to create a new layer.

Image: Use the rectangular Marquee Tool to select and cut portions of your image

Use the rectangular Marquee Tool to select and cut portions of your image

Step 3 – Open a New File

Open a new file by selecting File -> New. Name the new canvas Joiner and select an image size that mirrors the dimensions of your source photograph.

Click OK, and a new canvas will open. This is the canvas we will create our joiner on.

photomontage-in-photoshop

Opening a new canvas. Set the height and width to the same dimensions of the source file.

Step 4: Drag and drop

Return to your source image.

With the Move Tool (V), select the recently cut section of the source image and drag it onto the tab of Joiner. The Joiner canvas will open.

Drag the cut selection onto the Joiner canvas. Place the selection in roughly the same location that it is on the source image. It doesn’t need to be exact.

Image: Dropping portions of the source image onto the Joiner canvas. Feel free to overlap the differ...

Dropping portions of the source image onto the Joiner canvas. Feel free to overlap the different layers, as this will contribute to the joiner aesthetic!

Step 5: Creating the Joiner Effect

Continue to cut selections from the source image, dragging and dropping them onto the Joiner canvas. You can cut similarly or randomly sized pieces – it’s up to you.

Once you’ve cut and transferred most of your source image to the Joiner canvas, it’s time to emphasize the joiner effect.

You want to cultivate a disjointed aesthetic, like misaligned puzzle pieces.

You can overlap, duplicate, stretch and rotate each piece to exaggerate this disjointed effect.

Make the edges of the joiner correspond, or allow components to poke out of the overall composition like a messy collage.

Be expressive with your perspectives, experiment with different combinations and don’t worry too much about neatness.

You can even place Curves adjustment layers among the image layers on Joiner to alter the exposure of individual pieces.

And that’s it! Once you are happy with your joiner, make sure to save it as a .PSD file in case you want to alter the arrangement later.

Image: A simple joiner effect created by overlapping the segmented portions of the source image.

A simple joiner effect created by overlapping the segmented portions of the source image.

When you’ve got the technique down, the sky’s the limit! In the image below, I cut my source image into much smaller pieces before placing them on the canvas. I also duplicated a lot of the layers to create repetition within the layout. The smaller the pieces, the more disjointed the image becomes, creating a greater sense of movement and altered perspective.

photomontage-in-photoshop

Conclusion

David Hockney is a man of many artistic talents. As a photographer, Hockney developed a distinctive style that plays with our sense of narrative and perception.

Experimenting with the joiner effect to create a Photomontage in Photoshop isn’t quite the same as taking a whole bunch of photos and arranging them together manually.

However, with a basic process that involves cutting, pasting, arranging and a little experimentation, we can get close to a Hockney-inspired effect.

Here is another of my own creations – I’d love to see yours! Post them in the comments below!photomontage-in-photoshop

photomontage-in-photoshop

The post How to Make a Cool David Hockney-Inspired Photomontage in Photoshop appeared first on Digital Photography School. It was authored by Megan Kennedy.


Digital Photography School

 
Comments Off on How to Make a Cool David Hockney-Inspired Photomontage in Photoshop

Posted in Photography


How to Make a Cool Double Exposure Effect Using Photoshop [video]

07 Sep

The post How to Make a Cool Double Exposure Effect Using Photoshop appeared first on Digital Photography School. It was authored by Caz Nowaczyk.

In this video from tutvid, you’ll learn to make a cool double exposure effect using photoshop.

?

Some of the things that you will learn while going through this double exposure effect in Photoshop tutorial include:

  • How to isolate an image from its background using the magic wand tool and the Select and Mask Tool.
  • Fine-tuning your selection in the Select and Mask Window using the paintbrush.
  • How to output your mask selection to a new Photoshop layer – so that you save your original image.
  • Making a new Layer and fill it with a solid color.
  • Using the pen tool to create a path you can then make a selection from.
  • Making your image Monochromatic.
  • Using the Channel Mixer, Curves and Levels to fine-tune your monochrome image.
  • Turning your image Monochrome using the Black and White Adjustment Layer.
  • Working with contrast.
  • Merging multiple Layers.
  • How to choose images that will work together.
  • Adding your second image to your original as a new layer.
  • Using Photoshop Blend Modes.
  • Saving and loading selections.
  • Dragging Layer Masks to new Layers to create your double exposure.
  • Fine-tuning your double exposure by painting out parts of your layer mask.
  • Using the High Pass Filter to add more detail to your image.
  • Using Camera Raw to fine-tune your image.
  • Working with Gradient Maps.

Try this out for yourself, and share your creations with us in the comments section below!

cool-double-exposure-effect-using-photoshop

The post How to Make a Cool Double Exposure Effect Using Photoshop appeared first on Digital Photography School. It was authored by Caz Nowaczyk.


Digital Photography School

 
Comments Off on How to Make a Cool Double Exposure Effect Using Photoshop [video]

Posted in Photography


How to Achieve Cool Urban Cityscapes

14 May

The post How to Achieve Cool Urban Cityscapes appeared first on Digital Photography School. It was authored by Mark C Hughes.

Cool Urban Landscapes through post-processing

Creating an emotional response

How you present your images can really affect one’s emotional response to them. Certain styles of image lend themselves to stylistic changes because they can create a specific emotional response when the viewer sees them. For example, film-based black and white images, when done well, present a sense of timelessness and can make things seem more serious. Similarly, high dynamic range images (HDR), when done well, can add “pop” to landscape photography. One particular style of image that lends itself to stylized treatments through post-processing is urban landscapes. Particularly if you are trying to make an already interesting image look more appealing based upon the lighting already present.

Crushed black and blown highlights on a street scene

Gritting and moody

Similar to black and white images, a high-contrast, selectively saturated look works well to create urban landscapes with a gritty and moody feel.

Using filters for effect

Nowadays, smartphone and some consumer cameras, have a great deal of pre-packaged stylistic treatments available that you can apply to photographs to try to evoke an emotional response. Someone, somewhere, has spent a great deal of time creating those filters to make your images feel as though they are from a different time or place.

For example, the classic 1970s snapshot look is full of color shifts and light leaks. They were common at that time because of the use of unstable film stocks and cheap cameras. Digital cameras don’t suffer the same issues that were present at that time. So, to simulate these conditions, adding light leaks and color shifts can make images feel vintage. There are many filters out there – each with their own effects.

Lit up Las Vegas

Make your own filters

To put the idea of emotional response to images in context, think about a familiar treatment that you are probably already aware of: black and white images. These photographs are rarely just images with the color drained. Good black and white images are contrast-rich with deep blacks and bright whites. The grey middle ground of many images can lose their impact when drained of color. Many black and white films had specific response curves that created the contrast-rich images. So now, with digitally-captured images that are black and white, they can appear a little sterile and plain. Adding high-contrast effects and grain to simulate film black and white tends to create an emotional response and mood.

To improve as a photographer, most people start, at some point, to try to take a more artistic approach to their images. Many newer photographers may start with simple prepackaged filters and presets, and apply them to their images. Currently, there is no end to the filters available in pretty much any photo sharing application and many cameras. From terms like “cool,” “50s,” “vintage,” and “grunge,” all these filters are stylizing the image for an emotional effect. Instagram was built on filters. People are very used to stylized images.

Old Montreal

Creating your own style

Becoming a better photographer involves the deliberate use of styles to create your desired effect. You may find there are particular filters you gravitate towards; styles that evoke an emotional response you like.

This is the beginning of finding your own style of image making. As you advance, you might explore manipulating images with Adobe Lightroom, Adobe Photoshop, Skylum Luminar or some similar program.

When you get to the point where you are working with and creating your own filters, you create your style. You can start by playing with filters or dissect other photographer’s images that you really like to see if you can recreate that style.

Surprisingly, creating set styles in many photo imaging software packages is quite easy. It allows you to recreate your style and apply it repeatedly to multiple images.

Notre Dame in Montreal

Create your filter

Let’s consider the urban, gritty look for urban landscapes.

Here are two treatments of the same image, split for comparison. On the right is the Straight Out Of the Camera (SOOC) jpeg and on the right is the treatment with the blacks crushed, highlights blown, oranges highlighted and an almost selective color approach.

It is easy to create for yourself with whatever tweaks you like to create a style for yourself.

Comparison of straight out of the camera to the final product

A word of warning is necessary at this point. When you start stylizing your images with intentionally weird effects, you may generate some negative comments from people who don’t like the look you create. This does not mean you have failed to create something interesting. However, it means you have generated an emotional response to your image by someone who doesn’t care for that look.

Remember that some people find that they can only validate their work by diminishing others. Whereas, most find growth in encouraging others to take risks with their art. A true artist picks their vision and follows it. Sometimes it can be a bumpy road if you are only expecting validation from others.

It is important at some time for you to consider yourself an artist and not just a recorder of images.

All art is about creating an emotional response. Beyond capturing a moment, it is how that moment makes you feel. Emotional responses can be positive or negative.

Atwater Market in Montreal

It turns out this crushed-blacks, blown highlights, contrasty, desaturated, and the almost selective color look isn’t that tough to create for yourself. However, for this particular effect, you may do some damage to your photos by intentionally making some parts too black and other parts too bright.

So let’s look at the images I think work for this type of treatment. Shots typically taken at dusk/night, with artificial illumination present, add interesting artistic character for the urban landscapes shot.

Use a Raw Image Processor or Lightroom

I use Adobe Camera Raw to do most of the edits to these images, but you can use Lightroom or any image processing software to create a similar style. My suggestion is you modify and tweak it to your liking to get the desired effect.  The tools are similar, but just in different places. Also, even though I process these images with a raw converter, you don’t have to use a RAW image (although that is always the best starting point) and can use a JPEG or DNG file.  The treatment will look very similar.

To start, open your image with the raw converter.

Opening up the Raw Processor


With your raw converter, you have access to many parameters that act globally on your image.

Change the sliders as shown on the panel below.

Specifically, you want to make sure you have the desired white balance (it may be fine from what your camera selected, or you may want to resample).  You want to up the Contrast hard, more than you probably have done previously to make those hard edges at the light and dark parts of your image. You then do two things that seem contrary – you are going to pull the details out of the shadows (increase the Shadow slider) and make the Blacks blacker (crushing the blacks).

Finally, boosting the Clarity increases the midtone contrasts, boosting the Vibrance boosts the midtone colors and toning down the Saturation prevents them from looking too candy-colored.

Here’s my panel for example:


Adjustments for the effect

Once you have made a look that you like the effect of, you can make this a repeatable look by creating a user preset.

Switch to the presets tab and then make a new preset.

You will be prompted to add a preset name. Pick something relevant to your style and save it. Next time you pull up an image (or multiple images) in your raw processor, you can simply highlight them all and apply the presets at once.

How to save the effect

A lot of these settings may cause parts of your image to clip. The crushed blacks mean that much of the detail in the blacks disappear. The boosted colors lead to clipped highlights. However, in the end, that’s okay because that is the desired effect.

Here’s a Pro-Tip: All those presets you can buy for Lightroom and Photoshop essentially do a version of this. You can create those presets if you have the time and the inclination to do it yourself. By doing it yourself, you create an image style that appeals to you.

Edmonton Skyline

Conclusion

Art is about evoking an emotion. Sometimes photographers try too hard to make an image that looks too lifelike and loses emotional impact. You can create urban landscape images that are moody and gritty by making them dark with blasted colors and blown highlights. It also opens doors to other types of manipulations used for images warranting other types of emotional reactions.

Old building in the Westmount area of Montreal


The post How to Achieve Cool Urban Cityscapes appeared first on Digital Photography School. It was authored by Mark C Hughes.


Digital Photography School

 
Comments Off on How to Achieve Cool Urban Cityscapes

Posted in Photography


DPReview TV: 10 cool things you may have missed about the Panasonic S1 and S1R

01 Feb

By now you’ve seen plenty of information about Panasonic’s new S-series cameras, but after shooting with them at Panasonic’s launch event in Barcelona, Chris and Jordan tell us about some important things you might have overlooked from the spec sheet.

Get new episodes of DPReview TV every week by subscribing to our YouTube channel!

  • Introduction
  • Stability monitor
  • Focus clutch and linear focus
  • New menus
  • S1R 4K crop options
  • HLG photos
  • XLR1 support
  • 4K/6K photo
  • V-Log and 10-bit 4:2:2
  • Face + eye + body + animal detect autofocus
  • Recording time limits
  • Initial impressions of pre-production cameras

DPReview TV’s pre-production SR1 gallery from Barcelona

$ (document).ready(function() { SampleGalleryV2({“containerId”:”embeddedSampleGallery_9910170872″,”galleryId”:”9910170872″,”isEmbeddedWidget”:true,”selectedImageIndex”:0,”isMobile”:false}) });
Articles: Digital Photography Review (dpreview.com)

 
Comments Off on DPReview TV: 10 cool things you may have missed about the Panasonic S1 and S1R

Posted in Uncategorized


Insect Photography Tips – How to Capture Cool Critters

13 Sep

Do you find creepy crawlies fascinating? Or maybe a bit scary? Insects can be many things, and they are many! From a photographer’s perspective, they offer countless opportunities to learn about photography, your gear, and the critters themselves. In this article, I hope to share some of my love of these critters and some insect photography tips to inspire you to enjoy this buzzing, chirping, stridulating treasure trove.

Mantis in morning light. Insect Photography Tips

Morning mantis.

Why on Earth Should I Photograph Insects?

Insects are the most diverse and numerous animals on the planet. While this may not seem like the most wonderful fact in the world to everyone, it’s a boon for people who like photographing insects.

As I’ll try to demonstrate, it’s not only incorrigible insect chasers who can benefit from this abundance. Anyone who enjoys or wants to learn macro photography, who is looking for inspiration in nature, or who likes to tell a story with their photography is in luck.

Damselfly and ant. Insect Photography Tips

Insects come in many sizes and all colors.

Opportunity is everywhere

Anyone can photograph insects. Not only are they easy subjects to find, they are also amazingly diverse in appearance, behavior, and habitat. You never have to go far to find something interesting to photograph.

Insects offer a great opportunity for different kinds of photography, from scientific documentation to abstract art. So if you’re ever running out of photography ideas, insects are a great way to get back into it.

Photographing them can reveal whole new worlds: you might find unexpected beauty in a grasshopper’s patterns and new perspectives in an ant colony’s activities.

Black and white insect photo of a lacewing - Insect Photography Tips

The delicate lacewing.

On top of being a very varied group of animals, insects also have a lot of variety in their individual lives. Fluffy, colorful caterpillars turn into stunning butterflies; chubby grubs turn into formidable beetles; alien underwater nymphs turn into whirring dragonflies.

The possibilities for the eager photographer are virtually endless. So are you ready to try it out? All you need is your camera, some time, and a big bucket of patience.

Insect development: dragonfly with old nymph skin and mantis ootheca. - Insect Photography Tips

Insect life cycles are fascinating! To the left is a dragonfly next to its old nymphal skin, to the right the ootheca (egg mass) of a mantis.

How to Photograph Insects

I’m going to focus specifically on how to photograph insects. There are a lot of great articles about macro photography in general and other relevant aspects of photography, like natural lighting vs. flash photography, good settings to know about for macro, and nature photography.

Abstract insect photography: dragonfly. - Insect Photography Tips

A close view of a dragonfly’s back.

First, you need to find them

The first step is to find the insects. If you’re happy with just any insect, this is very easy. You just need to go outdoors and wait for a while – some insects will even come to you!

It’s a good idea to spend some time thinking about when and where you want to take photographs. Both location and timing will affect not only the quality of light, but also the kinds of insects you’re likely to find, and their activity levels.

Mantis by swimming pool. Insect Photography Tips

This mantis came to hang out with me next to the swimming pool.

In terms of timing, a good general rule is to aim for a time when it’s cool and the sun isn’t out since the cold will make insects slow. This can be early in the morning or around sunset, in spring or fall, or on an overcast day.

The light conditions may not be optimal at this time, but this is when you want to be out shooting if you don’t want your subject to fly off or run away immediately. Of course, only photographing insects when it’s cold outside means you’ll miss out on normal parts of their life, like flight, mating, feeding, and pollination.

Wasps. Insect Photography Tips

Some insects really are nicer when they’re a bit sluggish, like these wasps.

The location depends a lot on what you want to photograph. You can find a lot of different insects in a garden, field, or forest, but if you’re hoping for something specific you’ll need to learn about that insect and its behavior.

Remember to also think about the background and how it will look in the picture!

Insect photography: locust and mantis. Insect Photography Tips

Locust and mantis.

If you’re really eager about photographing insects, there are many methods you can experiment with.

For instance, the easiest way to photograph nocturnal insects like moths is to set up a light outdoors, next to a white or light-gray wall or sheet. Turn on the light in the evening before you go to bed, and wake up around 2 or 3 am to see all the fun creatures that have appeared. Remember not to do this too often so you don’t disturb them too much.

Larva on net and moth. Insect Photography Tips

The larva on the left found the net before I found it. The moth on the right was photographed in the middle of the night during a biology field course.

You can also catch insects with a net, put them in a glass jar and photograph them there, or even put them in the fridge for a little while to slow them down. I only recommend doing this if you know what you’re doing and you feel it’s worth it.

The insects would probably rather be somewhere else than your fridge. Remember to release them afterward!

Tools of the trade

The camera equipment needed really depends on what kind of photos you’re after. Insect photography can definitely be done with expensive tools in complicated ways, but it doesn’t have to be.

Since insects are generally small, it’s helpful to have a good macro lens or something comparable. But you can also make a great start without any special equipment. Some insects are pretty big and insect photos don’t always have to be close-ups!

Butterfly on cactus. Insect Photography Tips

Here, the insect is not the only subject, but it’s still essential to the photo.

What to focus on

So you’ve chosen the time and location, found your subject, and you have everything you need; all that’s left is to actually make the photo.

No matter what kind of photo you want – a portrait, an action photo, something abstract – there are a few things you should know about insects before photographing them.

Poisonous caterpillar. Insect Photography Tips

This caterpillar is covered in hairs that can cause irritation when they come in contact with skin (or lungs!).

Insects’ behavior and senses are as variable as the insects themselves. Some of them may notice you way before you see them and flee. Some may not notice that you exist, Others may become aggressive if you behave a certain way.

Some insects see much more and more accurately than we do, while some barely see at all. Some smell with their antennae and some of them have ears on their knees.

They are as alien to us as we are to them, which is why you need a lot of patience, some knowledge of what you’re photographing, and an open mind.

Black and white locust. Insect Photography Tips

Locusts have ears on their knees.

It depends on what kind of photo you want, of course, but a few things that are usually good to keep in mind are:

  1. Use a fast shutter speed if you want a sharp photo – insects can be very fast and they move a lot.
  2. Aim for a small aperture (large f-number) if you want to have more than just a tiny part of the insect in focus.
  3. If you’re photographing an insect in flight, try manual focus.
  4. Focus on the eyes, like with any other animal. You might find yourself mesmerized!
Fly with stripey eyes. Insect Photography Tips

Even flies can have beautiful eyes!

Conclusion

Insect photography is such a broad topic that I had to leave many things out of this article, but I hope this basic introduction was able to provide you with some tips.

What do you think about insects? Have you ever photographed them? Feel free to share your best or most interesting insect photos as well as your tips in the comments below.

The post Insect Photography Tips – How to Capture Cool Critters appeared first on Digital Photography School.


Digital Photography School

 
Comments Off on Insect Photography Tips – How to Capture Cool Critters

Posted in Photography


Some Cool Tools For Editing Your Photos Inside ACDSee Photo Studio Ultimate 2018

17 Jul

In this third installment of articles on ACDSee Photo Studio Ultimate 2018, we look at some of the Cool Tools – either new features or ones that are particularly useful. Read my first two articles here:

  • ACDSee Photo Studio Ultimate 2018 Guide for Beginners
  • How to do Creative Editing with Layers in ACDSee Ultimate Photo Studio 2018

New Features

1. ACTIONS

Newly implemented in the latest release of the software, Actions are a range of predefined edits that you can apply to your image to achieve a specific look or effect. To assist you with this, there is an Actions Browser that lets you see the effect applied in advance, which is extremely useful.

Some Cool Tools For Editing Your Photos Inside ACDSee Photo Studio Ultimate 2018

Image with the Actions Browser open.

There are 16 different categories covering color, black and white, workflow, editing, special effects, portrait and landscape options, and more. Once you decide on the desired Action, click PLAY and it is applied.

Some Cool Tools For Editing Your Photos Inside ACDSee Photo Studio Ultimate 2018

Example of a Split-tone Action.

Some Cool Tools For Editing Your Photos Inside ACDSee Photo Studio Ultimate 2018

A black and white conversion Action applied.

To apply an Action, you need to open your image in Edit mode. On the top menu bar, look for Tools > Browse Actions.

2. LIQUIFY

Liquify is often used in fashion and portrait editing to change the shape of people or parts of their bodies. It is a new feature in this release of ACDSee Photo Studio Ultimate 2018. This tool needs to be applied with a large soft brush and a delicate touch or it can look overly obvious.

I found the Liquify tool very easy to use. It worked quickly (i.e. there was no lag on processing the change) and had a gentler effect than I was expecting.

Some Cool Tools For Editing Your Photos Inside ACDSee Photo Studio Ultimate 2018 - liquify

This is the before image for comparison.

Some Cool Tools For Editing Your Photos Inside ACDSee Photo Studio Ultimate 2018

Showing where the effect had been applied.

Some Cool Tools For Editing Your Photos Inside ACDSee Photo Studio Ultimate 2018 - liquify

Image after Liquify applied to the arch and bowl of the spoon, and the dark side of the main blueberry.

Using the Liquify Tool

Liquify is a function in Edit mode, so you need to open your image up in there. On the top menu bar, select Filter > Geometry > Liquify.

There are four different Liquify modes:

  1. Shift – This moves pixels from one area to another in the direction you move the brush.
  2. Pinch – This moves the pixels towards the center of the brush (making things smaller).
  3. Brush – This moves pixels away from the center of the brush (making things bigger).
  4. Restore – Undo mode for any of the three options above.

Once Liquify mode is active, check that your brush is the correct size and softness (a larger and softer brush is recommended) and very gently click and nudge the area you want to adjust a tiny amount. It is much easier to do lots of little adjustments as you can undo one if you go too far.

Also be mindful that when you use Liquify it moves all the pixels within the brush, so if you have any lines or other elements, they can be affected too. This can make it obvious that you have used Liquify, so be careful about the backgrounds and surrounding elements in the area you’re using it.

3. FREQUENCY SEPARATION

This is a function used a lot in portrait and fashion photography – anywhere there is a lot of skin visible, especially faces and close-ups. Frequency separation allows you to smooth out blemishes and imperfections, to even out the skin tones, and provide a polished outcome in the image.

While it can be done manually, it is time-consuming to set up. Now with a few clicks, the software does all the layers for you, making it easy to apply the effect where necessary. I don’t photograph people or close up portraits so have never had the need to use this functionality, but for those who want to access this advanced technique, ACDSee has included it.

Using the Tool

Open your image in Edit mode and in the Layers pane, duplicate the layer. Frequency Separation is a destructive edit, so it is recommended that you work on a duplicated layer to maintain image integrity.

Select the top layer (the duplicate), then right-click and select Frequency Separation from the drop-down box. It will then create two layers – one will be grey and have (HF) in the layer description. The other one will be in color, but will be all blurry and have (LF) in the layer description.

On the LF layer, use a brush to work on any skin imperfections. On the HF layer, use the Repair tool to clone clear skin over top of the blemish areas.

4. PIXEL TARGETING

The Pixel Targeting tool allows you to select specific areas in your image based on a combination of tone and color selection. It works in conjunction with an adjustment layer.

In Edit mode, open up your image and select an adjustment layer (any of them seem to be fine). Here I am using a shot of some bright red raspberries and a Vibrance adjustment layer.

Right-click on the top layer and select Pixel Targeting and a panel will open up. The top sliders allow you to select the tones and the bottom sliders allow you to select the colors.

Some Cool Tools For Editing Your Photos Inside ACDSee Photo Studio Ultimate 2018

Adjust the tone and the color sliders to suit. It creates a mask of the subject that you want to adjust.

Save a preset for future use (use the Save option at the top of the screen) and click OK.  The mask you have just created in the Pixel Targeting window is now applied to your adjustment layer, and it will only apply the adjustment to the light areas of the mask.

Here I have turned the raspberries blue simply by adjusting the Hue sliders in the Vibrance layer.

Some Cool Tools For Editing Your Photos Inside ACDSee Photo Studio Ultimate 2018

Useful Features

While learning how to use ACDSee Photo Studio Ultimate 2018, there were several things about it that I found particularly useful. These are either the small things that don’t get used a lot but work really well when you do need to use them, or something that makes it much easier to do a really common task.

These are things I appreciate, especially when something you do a lot is made easier, or offers a clever alternative.

1 – Add a File as a Layer

Some Cool Tools For Editing Your Photos Inside ACDSee Photo Studio Ultimate 2018

At the bottom of the Layers pane are a whole lot of quick access icons for different layer features. The one circled here is the “Add a File as a Layer” option.

I do a couple of specific tasks that require the addition of outside images as extra layers, such as adding texture overlays and compositing.

There are lots of other instances when this could be useful – focus stacking, blending panorama or astrophotography images, time-lapse stacking, and so on.

This is a particularly common function and the way Photoshop does it is really NOT user-friendly. I have always gotten around it by using a second monitor and dragging my image in that way.

But if you are working on a laptop or only have one layer, that isn’t an option, so this feature becomes worth knowing about.

It’s really simple. Click on the Add a File as a Layer icon and a dialog box opens up asking you to select the location of the image you want to add. Even better, you can switch your view to Thumbnail and see examples of the images so you can select the right one.

Click on the desired file and select Open. The file will then open up as a new layer. It will probably need to be resized and the program has that mode already activated for you as well. Drag the yellow handles to the right size, select Commit, and you are done!

Some Cool Tools For Editing Your Photos Inside ACDSee Photo Studio Ultimate 2018

2. Heal Tool

Sometimes you might have a mark, a blemish, or a stray hair or twig in the way on your shot, and you don’t notice until you see it on the big screen when you are editing. Technology has improved so much these days that software can often take care of those issues for you, but it can still be a less than polished outcome.

When editing my blueberry shots, I was dismayed to find that I hadn’t noticed my main berry had a scratch down the front of it. Great chance to give the Heal tool inside ACDSee Photo Studio Ultimate a go.

I was quite impressed with how well it works. Just right-click on a good area and then paint over the blemish area. I find doing lots of small selections gives a more natural effect usually, but ACDSee did a really good job.

Some Cool Tools For Editing Your Photos Inside ACDSee Photo Studio Ultimate 2018

After the Heal tool was applied.

Some Cool Tools For Editing Your Photos Inside ACDSee Photo Studio Ultimate 2018

Before Heal tool applied – you can clearly see the big scratch on the front of the berry.

Conclusion

Before writing these articles, I had never used ACDSee software at all. My background was with PaintShop Pro, Photoshop, and Lightroom. Learning about the full range and capabilities of this ACDSee program has been interesting. There are some really exciting new features and useful tools included, particularly in Edit mode.

Overall I have been impressed at the depth and capability of ACDSee Photo Studio Ultimate. For a beginner wanting a one-stop-shop program at a cost-effective price (and no subscription model), it has a lot of benefits.

For anyone looking to get started in managing their photo files, processing RAW images, and more in-depth editing, this is a good place to start. If you’re looking for a non-subscription option, it is worth considering as well.

Disclaimer: ACDSee is a dPS advertising partner.

The post Some Cool Tools For Editing Your Photos Inside ACDSee Photo Studio Ultimate 2018 appeared first on Digital Photography School.


Digital Photography School

 
Comments Off on Some Cool Tools For Editing Your Photos Inside ACDSee Photo Studio Ultimate 2018

Posted in Photography


19 Cool Images of Blue Subjects

13 Aug

A while back we took a look at images with the primary color of summer, green. Now let’s have a peek at the color of the night time – blue.

Of course, there are many other things which are blue as well, as you can see below.

By StudioTempura

By Albert Vuvu Konde

By O. R.G.

By Joao Clerigo

By Maarten Takens

By Bill Dickinson

By Roy Cheung

By nathan_gamble

By Mirai Takahashi

By Stanley Zimny (Thank You for 24 Million views)

By Neil Tackaberry

By Javier Díaz Barrera

By Neal Fowler

By Stanley Zimny (Thank You for 24 Million views)

By Maria Eklind

By Tom Roeleveld

By Michiel van Nimwegen

By Ivan Rigamonti

The post 19 Cool Images of Blue Subjects by Darlene Hildebrandt appeared first on Digital Photography School.


Digital Photography School

 
Comments Off on 19 Cool Images of Blue Subjects

Posted in Photography


Acclaim for the Reclaimed: 14 Cool Upcycled Architecture Projects

11 Jul

[ By SA Rogers in Architecture & Houses & Residential. ]

Going beyond simple stacks of shipping crates and ripped-apart pallets, these creative upcycled architecture projects reclaim stuff like corrugated iron, 5-gallon water bottles, old doors and even junk left over from the London Olympics as building materials and truly elevate them to new heights. These projects offer some fresh ideas, use the materials in new ways or demonstrate how recycled and upcycled architecture integrate into modern designs.

Stedsans in the Woods: Upcycled Permaculture Farm in Sweden

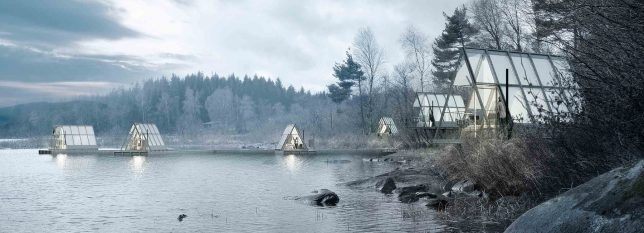
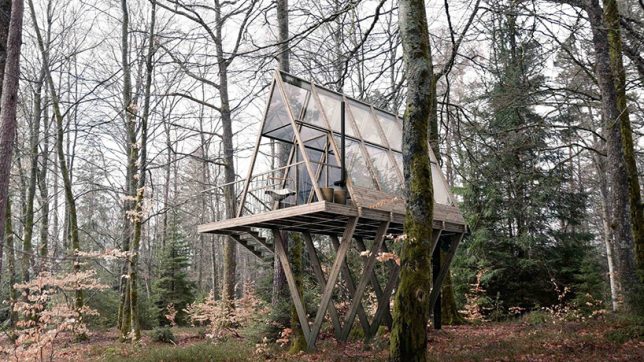
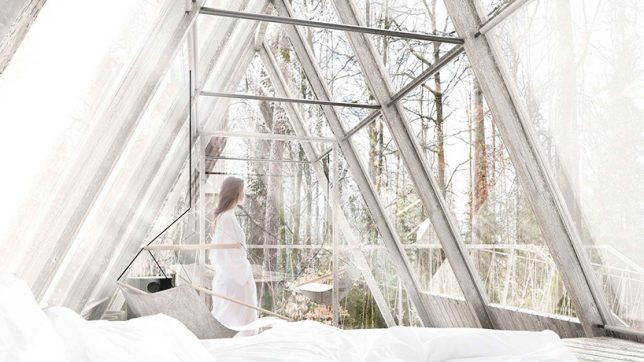
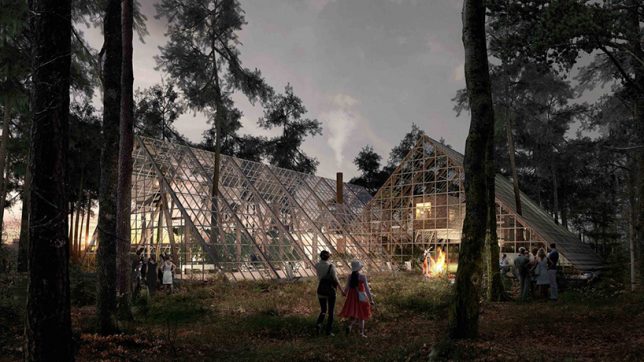
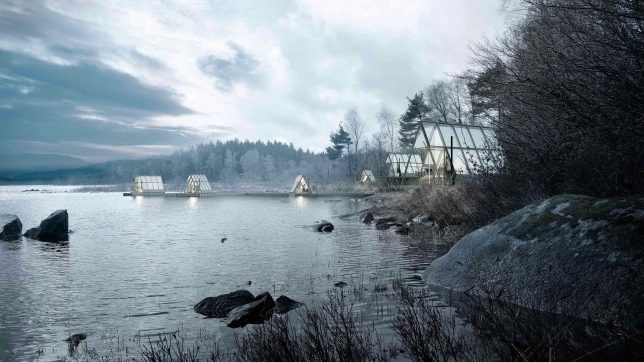
This permaculture farm and retreat nestled in the woods of southern Sweden will function as a “lab for discovering better ways to eat, live and connect with nature,” including a farm-to-table restaurant and a collection of beautiful treehouse-like cabins made of waste wood, fragments of old barns and glass from abandoned greenhouses.

Rising Moon Pavilion Made of Recycled Water Bottles

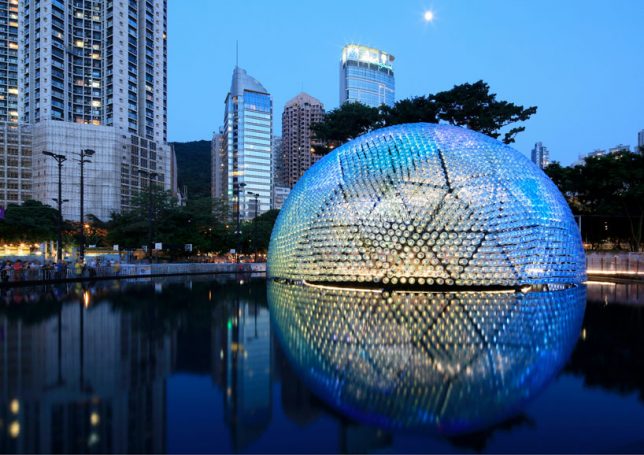
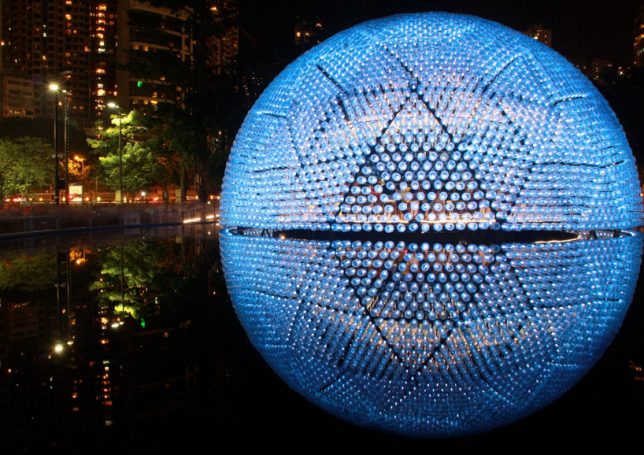
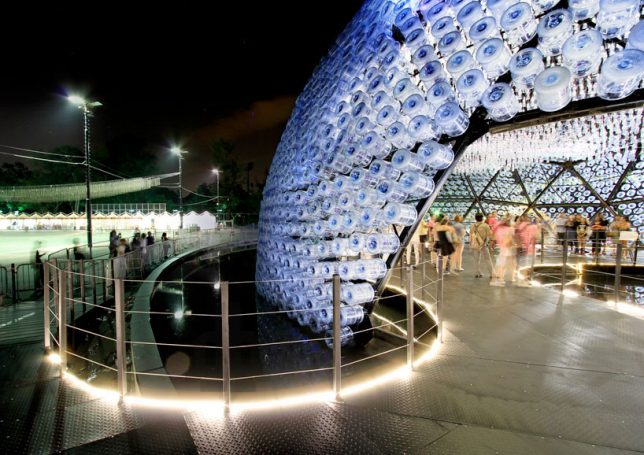
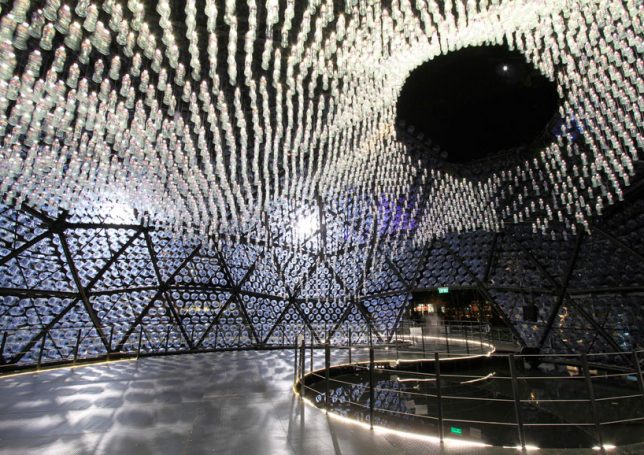
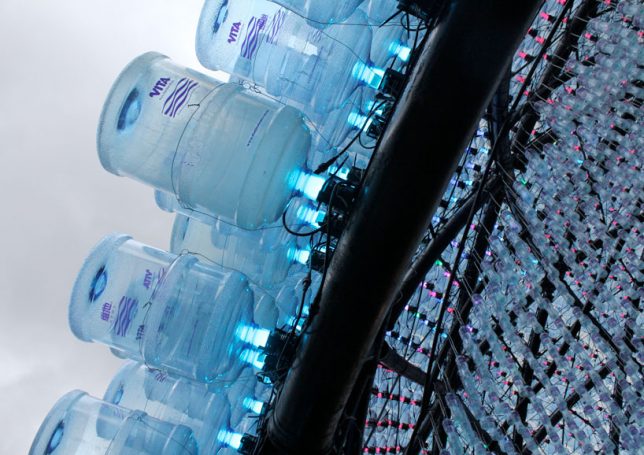
Reflecting itself into a perfect sphere on the surface of a still pool, ‘Rising Moon’ by Hong Kong-based studio Daydreamers Design is a geodesic dome fitted with 4,800 five-gallon polycarbonate water bottles, each acting as a lantern to help the structure glow. At night, they transmit light from inside out, while during the day, the interior is illuminated by the sun. LED torches are attached to pre-fabricated triangular modules with the bottles fitted over them, and an additional 2,300 bottles hang from the ceiling.

Parasitic Student Residences Made of Pallets for Paris

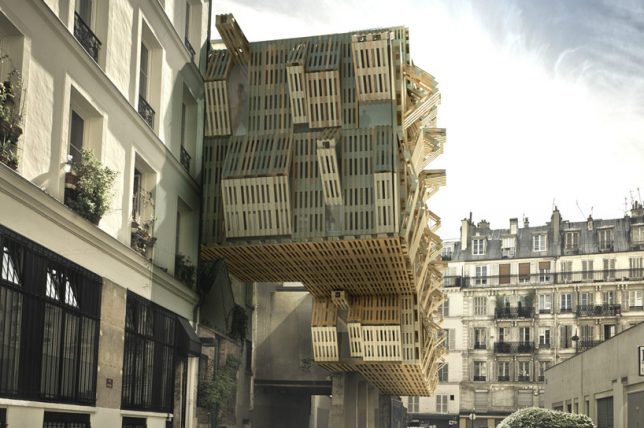
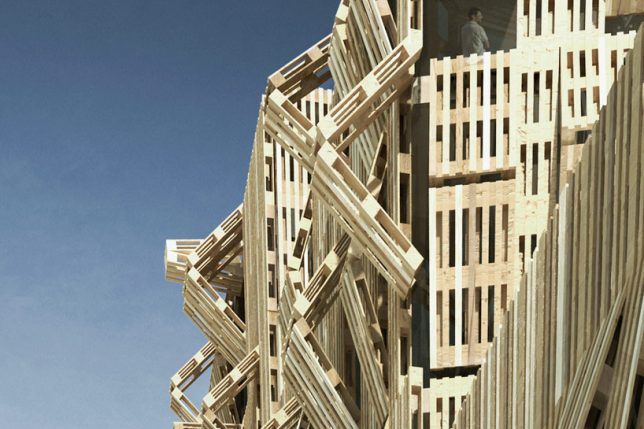
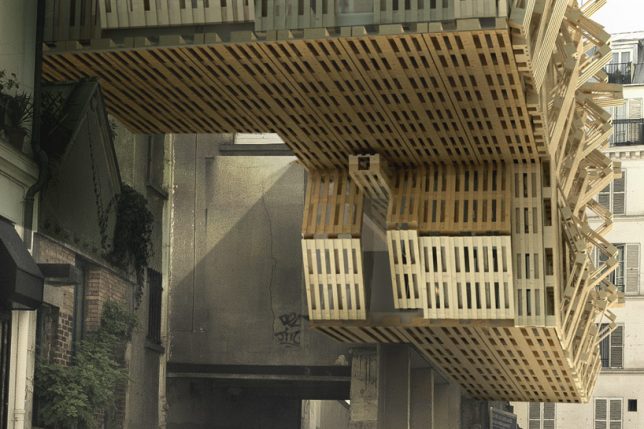
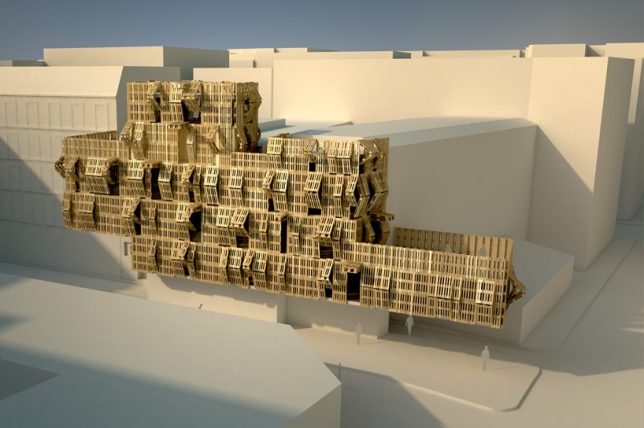
French architect and graffiti artist Stephane Malka proposes ‘Ame-Lot,’ a series of parasitic structures made of upcycled pallets and other reclaimed materials that attach to existing architecture. The pallets fold and unfold to let more light into the interior, and the structures can be constantly rearranged and added to as necessary for growth, becoming a visual meter of consumption in the city.

Collage House Made of Recycled Doors by S+PS Architects

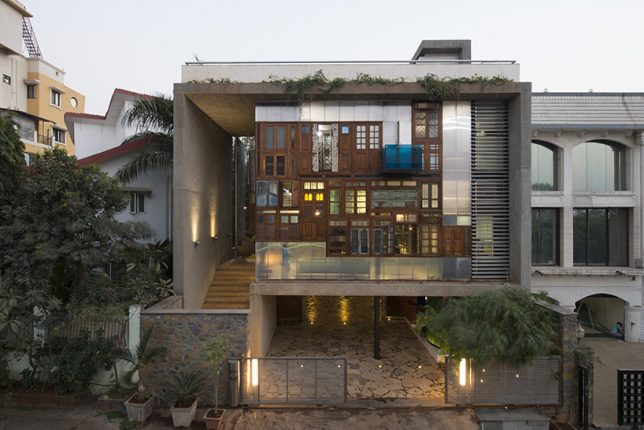
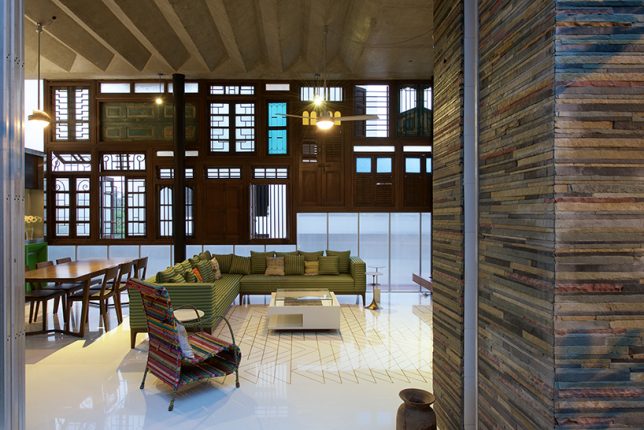
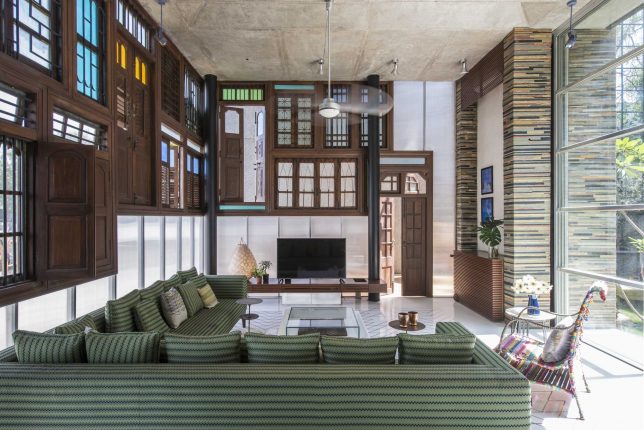
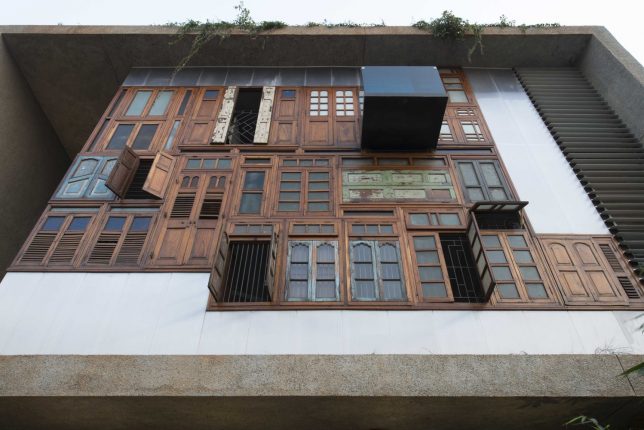
Over a dozen reclaimed doors and windows salvaged from demolished houses in the city make up a highly unusual and creative collage-style facade for a Mumbai residence by S+PS Architects. This double-height curtain wall makes for some seriously striking curb appeal, and sets the tone for the living room as well. The architects also incorporated other found materials into the home, like metal pipe leftovers pieced together like bamboo to form a ‘pipe wall,’

K Valley House Clad in Reclaimed Iron by Herbst Architects

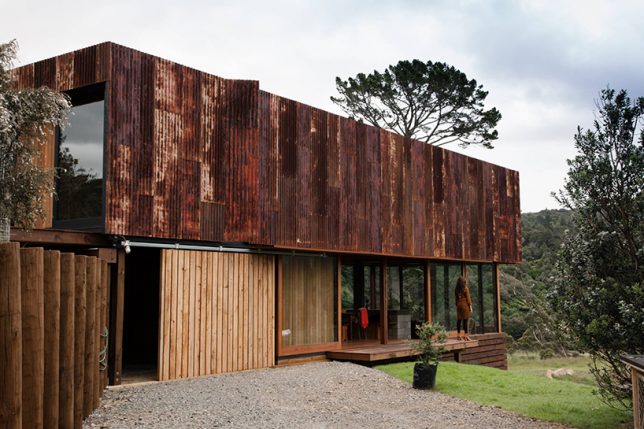
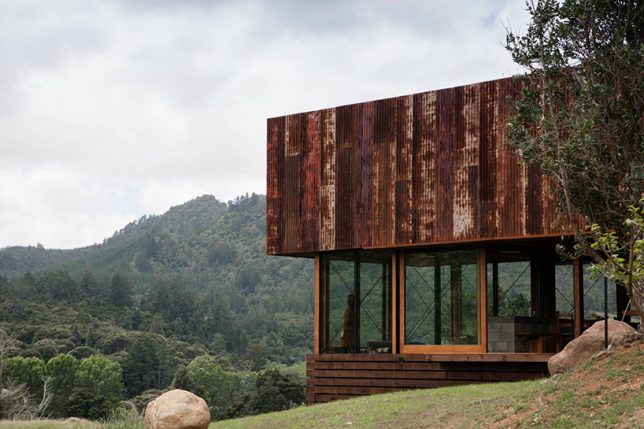
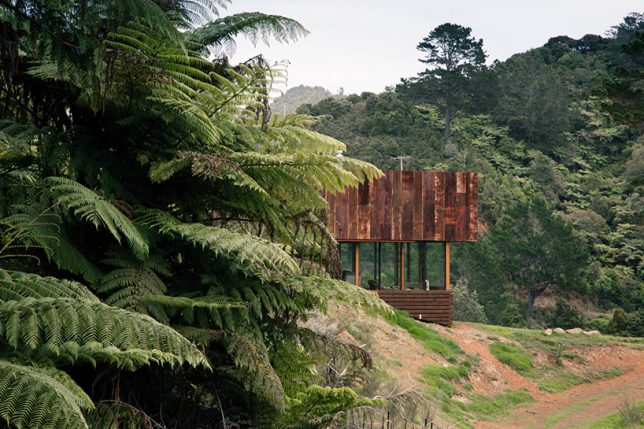
Rusted corrugated iron sheets resembling the sheds often seen in the New Zealand countryside contrast beautifully with the greenery of the Kauaeranga Valley in ‘K Valley House’ by Herbst Architects. “We positioned the form straddling the ridgeline, engaged with the slope at the high end and floating above the land as it falls away,” they say.

Next Page – Click Below to Read More:
Acclaim For The Reclaimed 14 Cool Upcycled Architecture Projects

Share on Facebook


[ By SA Rogers in Architecture & Houses & Residential. ]

[ WebUrbanist | Archives | Galleries | Privacy | TOS ]


WebUrbanist

 
Comments Off on Acclaim for the Reclaimed: 14 Cool Upcycled Architecture Projects

Posted in Creativity