RSS
 

Posts Tagged ‘continuous’

Aputure’s Light Storm system gets adjustable color with the new LS 300X continuous light

24 Apr

Lighting company Aputure has announced a new studio light for still and movie shooters that offers color temperature settings of between 2700 and 6500K. The LS 300X joins a system of lights in the Light Storm range, but is the first to offer bi-color controls as the other lights in the series are designed with a daylight color balance.

The LS 300X uses both cool and warm balanced LEDs in its head and mixes the two sources to achieve the desired color temperature. As such the head is at its brightest in the 4000-5500K temperature range, and the company claims that when combined with its Fresnel 2X lens adapter an output of 65,000 LUX can be reached. The output is a little below that of the company’s daylight-only LS 300d ll, which can produce 80,000 LUX at 1m with the same adapter.

The LS 300X has two modes for color adjustment that allow users to prioritize color accuracy or maximum output, and oft used color temperature can be pre-set into the main control wheel to make switching easier and quicker. Dimming is possible between 0-100% and color temperature can be adjusted in 50K increments. Nine special effects are built-in to the head, including flicker to emulate flash bulbs, fireworks and a TV.

A series of lenses can be used over the LED, as with the other LS series heads, to modify the light and a Bowens S mount fitting around the front panel allows softboxes and accessories to be used. Power comes from either V-Lock or Gold Mount battery on the control box and mains electricity, and a smartphone app can be used to control the head’s settings.

The Aputure LS 300X retails at $ 1199 and is available now. For more information see the Aputure website.

Articles: Digital Photography Review (dpreview.com)

 
Comments Off on Aputure’s Light Storm system gets adjustable color with the new LS 300X continuous light

Posted in Uncategorized


Elinchrom launches ELM8 portable continuous LED light from Light & Motion

06 Aug

Elinchrom has launched its new ELM8, a continuous LED light that it claims is the ‘most portable, powerful and progressive modular system’ of its kind. The ELM8 was made in partnership with LED light manufacturer Light & Motion and is fully integrated with Elinchrom’s existing lighting system.

The ELM8 is battery-powered and compact, measuring 20.5 x 9.6 x 9.6cm (8 x 3.7 x 3.7in) and weighing only 1.2 kg (2.6 lbs). When fully charged, Elinchrom says the light can run for between 50 and 245 minutes (around 4 hours) before needing recharged, a process that takes two hours.

The ELM8’s specifications include:

  • CRI: 93
  • TLCI: 94
  • Color Temp: 5600 K
  • LUX: 16320 (at 1m w/Fresnel)
  • Light Output: 8000 Lumens
  • Native Beam Angle: 120°
  • Water Resistance: IP54
  • Impact Resistance: 1m (3.2ft)
  • Charge Time: 2hrs
  • Radio Control: Skyport Protocol
  • Distance Range: up to 100m
  • Skyport: 20 Frequencies / 4 Groups
  • Phottix: Phottix Odin II Transmitter

Elinchrom has a number of accessories that work with the ELM8, including multiple reflectors, diffusers, the company’s micro USB charger kit and a remote control. The ELM8 continuous LED light is available now for €1379 ($ 1699 USD).

Articles: Digital Photography Review (dpreview.com)

 
Comments Off on Elinchrom launches ELM8 portable continuous LED light from Light & Motion

Posted in Uncategorized


Canon could put continuous LED lights inside pop-up flash units according to patent application

15 Apr

Canon is looking into putting continuous LED lights into the pop-up flash of its cameras, according a recent patent application.

Japanese patent application 2019-056787 (translated) details how Canon could put continuous LED lights inside the pop-up flash alongside the conventional xenon tubes used for still photography. This combo would not only provide a modeling light function, but also serve as a continuous lighting source for video.

An illustration from the patent application highlights the LED lights (part 15) attached to the heat-dissipating substrate (part 16a), which would then be reflected off the aluminum substrate (part 14) through the fresnel lens (part 11) at the front of the flash unit.

According to the patent text, the LED array would lay flat at the bottom part of the flash housing with the diodes facing upwards. When turned on, the LED light is then reflected off a specialized aluminum substrate through the fresnel lens on the front of the flash unit. This arrangement not only allows space for the standard Xenon tube to operate, but also helps to dissipate the intense heat the LEDs will put out when used for extended periods of time. Canon does note, however, that the exact arrangement is still ‘flexible’ to account for any overheating and alignment issues.

A profile shot of the flash unit showing the LED lights (part 15) attached to the heat-dissipating substrate (part 16), which would then be reflected off the aluminum substrate (part 14) through the fresnel lens (part 11, 11a) at the front of the flash unit.

Canon also addresses the spread of light from the LED units, saying it can narrow or widen the spread of light through alteration of the fresnel lens and limiting the throw of the LEDs, but notes it also has to balance the throw of the xenon tube as well.

An illustration showing the pop-up unit open (left) and closed (right). Note the illustration shows a DSLR, not a mirrorless camera, although that could be because Canon hadn’t yet launched the EOS R at the time of this patent application’s development and didn’t want to give away any hints.

As with all patent applications and patents, there’s no way of knowing whether or not this technology will make it into future cameras, but it’s interesting to see what Canon is cooking up behind the scenes regardless.

Articles: Digital Photography Review (dpreview.com)

 
Comments Off on Canon could put continuous LED lights inside pop-up flash units according to patent application

Posted in Uncategorized


A Beginners Guide to Exposure When Mixing Flash and Continuous Lights

14 Apr

The post A Beginners Guide to Exposure When Mixing Flash and Continuous Lights appeared first on Digital Photography School. It was authored by Ana Mireles.

Have you ever struggled with high contrast situations? Perhaps you’ve encountered shadows so dark or big that they steal the attention from the subject? That’s because sometimes you need to add a second light to your images. However, if they are different types of light, it can be difficult. Keep reading for a beginners guide on how to expose when you’re mixing flash and continuous lights.

Taking a photograph means to capture and register the light, so understanding how to do that is key to obtaining a good result. In this tutorial, I want to talk about continuous light and flash lighting, and how you can set your exposure to register both. First, I’ll explain what I mean by these terms.

Types of lighting

Continuous lighting

Continuous light (also called constant light) is the light that is on for the entire duration of the photo. This can be natural light when you’re outside, but can also be window light when you are inside. It can also be artificial light such as a table lamp or even professional photography lighting. Basically, it ranges from the sun to a candle – as long as it is continuous.

Flash lighting

Then there is flash lighting, which is only available for a quick moment when triggered. It can be from a professional strobe light, an off-camera flash, or the flash integrated into your camera. You can use these two different lights exclusively or together to complement your lighting. You can use them to create a special ambience or to achieve a particular effect. In this tutorial, I’ll explain how you can set your exposure when you use both continuous and flash lighting in the same shot.

Mixing the lighting styles together

I want to show you a situation in which I used continuous natural light as the main light and then filled in the shadows with an off-camera flash.

This first shot I took with only sunlight coming in from a window on the left and behind the camera. The camera settings used were ISO 2OO, f/8, and 0.3 sec. It’s enough to light the bowl of fruit; however, the dark shadows it has cast on the wall are not appealing.

Photography is about representing our tridimensional world in bidimensional ways. To do this, we make use of different things. One of them is shadows because they give depth. So we don’t want to eliminate all of the shadows – we want to control how many there are, how dark they look and their direction. If I slow the shutter speed to let in more light and try to ‘fill in’ the dark shadows to soften them, it overexposes the main subject.

If I slow the shutter speed to let in more light and try to ‘fill in’ the dark shadows to soften them, it overexposes the main subject. It happens here at ISO 2OO, f/8, and 2 seconds.

Therefore, it needs another source of light from the right. You can add this light source using either another continuous light or with a flash. I did this image with ISO 200, f/8, 0.3 seconds – the same settings I used for the correct exposure using only the continuous light. This solved the problem of one set of shadows but ended up creating new ones on the opposite side, so I need to fix the exposure again.

Since the flash is just a shot of light that lasts for a fraction of a second, it doesn’t make a difference how long your shutter speed is open like it does when shooting with continuous light. You can set your shutter speed as slow as you want or as fast as the synchronization limit allows you (in my case is 1/250 sec). The flash lighting exposure needs to be regulated by the aperture.

I used ISO 200, 1 sec, f/11 for this image.

In this image, I used ISO 200, 1 sec, f/16.

If you set the shutter speed to the light coming in from the left, meaning the continuous sunlight coming from the window, and set the aperture according to the light coming from the flash on the right side, you can control the complete illumination of the scene.

Conclusion

You can decide which shadows are good to keep and which ones to fill and by how much. In summary, have an image with depth and enough information both in the highlights and the shadows to either keep as shot or post-produce to your liking.

Exposure ISO 200, 1/250, f/8

*Extra tip

As you may have noticed on the examples, every light has a different color temperature, that’s why some photos have warmer or colder tones. This is a broad topic that I can’t manage to cover in this one article, but I did want to mention it. When you’re mixing different types of lighting you may need to deal with this. Sometimes the auto-white balance of the camera does a good enough job. However, if it doesn’t, I advise you to do some more research about it.

The post A Beginners Guide to Exposure When Mixing Flash and Continuous Lights appeared first on Digital Photography School. It was authored by Ana Mireles.


Digital Photography School

 
Comments Off on A Beginners Guide to Exposure When Mixing Flash and Continuous Lights

Posted in Photography


5 Tips for Using Continuous Lights in Your Photography

31 Oct

Lighting is an essential building block of photography. Learning how to use light to your advantage can transform an ordinary photo into an extraordinary one. Many photographers begin their journey working with natural light and I firmly believe this is is a great place to start. But depending on the circumstance, artificial light may be needed.

When it comes to artificial light, there are many options to choose from. Speedlights, strobe lights and continuous lights are all at your disposal, not to mention the various light modifiers. But while it’s nice to have this variety, trying to work out which light source is best for your shoot can become overwhelming.

Tips for using continuous lights in your photography

The Difference Between Speedlights, Strobe Lights and Continuous Lights

Tips for using continuous lights in your photographySpeedlights are portable, battery operated lights that can attach to most cameras through the hot shoe mount. They can also be used off-camera by attaching them to a light stand and then activating them via wireless triggers.

Strobes are larger (and typically more powerful) lights that are attached to light stands and activated through wireless triggers. Both speedlights and strobe lights emit a powerful burst of light when fired.

Continuous lights emit light the entire time you have them on. Years ago these lights were commonly used in video production. After using them they’d be physically hot, and you had to wear special gloves to break them down. (I remember those days.)

Thankfully, continuous lights are now more powerful, more portable, and cool to the touch.


When to Use Continuous Lights

Tips for using continuous lights in your photography

Continuous lights are often overlooked in the world of photography. But sometimes they’re the best choice. If you’re an event photographer, you may find yourself shooting in a venue that doesn’t allow flash photography. In these cases, continuous lights may be permitted. Even if flash photography is allowed, you may still opt for continuous lights to avoid being a distraction. If it’s a sensitive event, setting continuous lights and leaving them on may be a better option.

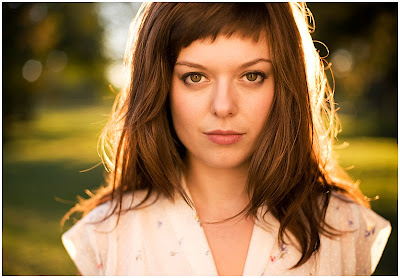
Continuous lights are also a viable option for portrait photography, especially for beginners. When using strobe lights, you can’t truly evaluate your lighting situation until they’re fired. Because of this, they often take more time to set up and adjust. (You need to keep taking photos of your subject and adjusting the lights until they’re right.)

With continuous lights, you can see the lighting situation in real time, which helps you learn to see the best lighting situations and achieve your aesthetic goal. They generally emit an even stream of light onto your subject, allowing you to set them up once and then forget them.

And many strobe lights need a moment to power up between shoots. Those few seconds could bethe difference between a perfect shot and a mediocre one. If you’re taking photos of a subject that might move around a lot such as children or pets, continuous lights may be the answer.

Here are five photography tips to make using continuous lights easier and more effective.

1. Get stronger lights

Because of their design, continuous lights generally aren’t as powerful as strobe lights. To ensure you get a nice light source, opt for more powerful lights. I recommend an LED with at least 1000 bulbs. If it’s too strong, you can always dial it back. Better to have more than you need in these situations.

2. Soften the light

Tips for using continuous lights in your photography

We want a soft light on our subject to avoid unwanted harsh shadows. Continuous lighting is no different. Use light modifiers to soften your light as much as possible, especially if you’re taking portraits. Whether you use softboxes or umbrellas is up to you. (I like using softboxes or scrims.)

3. Check the color temperature

Unlike most photography lights, some continuous lights let you change color temperature. In most cases you’ll want to make sure they’re set to daylight (around 5600k), which will give you the most natural look. Check your lights to make sure they’re set to the right color temperature.

4. Turn off all other available lighting

Because color temperature is so important, chances are the current lighting in the space will interfere and mix the color temperatures. Turn off all other light sources in the space to ensure the only light your camera is working with is the light you’ve provided.

5. Use a three-point light system

If you’re taking portrait, I suggest using a three-point light system, especially with continuous lights as they aren’t as powerful. The two front lights will be your key and fill, while the back light can serve as a hair light or be used to separate your subject from the background.

Ready to Try Continuous Lights?

I hope you consider using continuous lights next time you’re in the studio. The results may surprise you.

The post 5 Tips for Using Continuous Lights in Your Photography appeared first on Digital Photography School.


Digital Photography School

 
Comments Off on 5 Tips for Using Continuous Lights in Your Photography

Posted in Photography


Samsung’s PRO Endurance microSD cards can handle 43,800 hours of continuous recording

03 May

Samsung Electronics has unveiled a new line of microSDHC/SDXC cards called PRO Endurance. The lineup features 32GB ($ 30), 64GB ($ 50), and 128GB ($ 100) options, each with up to 100MB/s read speeds and 30MB/s write speeds. The South Korean company says the new lineup features “industry-leading endurance” capable of handling up to 43,800 hours of continuous video recording.

Samsung created the PRO Endurance line for video-centric applications, such as security, dash, and body cameras, though they can also be used with drones and other video camera products. In addition to its recording endurance, the PRO Endurance cards are water, temperature, x-ray, and magnetic-proof. Overall, Samsung explains this lineup has 25 times the endurance of its past speed-focused cards.

The PRO Endurance microSDHC/SDXC cards are available from Samsung now.

Press Release

Samsung Electronics Redefines High Endurance Memory Card Market with New PRO Endurance Card

Built for intensive video monitoring applications, PRO Endurance delivers industry-best 43,800 hours of continuous video recording in 128GB capacity

Samsung Electronics introduced today the Samsung PRO Endurance microSDHC™/microSDXC™ card, which offers industry-leading endurance and up to 43,8001 hours of continuous video recording2. Designed for consumers and B2B channel customers who use intensive video monitoring applications such as surveillance and security cameras, body cameras and dash cams, the PRO Endurance makes continuous video monitoring fast and stable. It delivers read speeds of up to 100 MB/s and provides FHD recording and 4K support via write speeds of up to 30 MB/s3.

“Consumers want to feel assured with their video surveillance solutions, and the need for longer-lasting, higher performing memory cards that can withstand extreme conditions and capture critical moments is at an all-time high,” said Un-Soo Kim, senior vice president of Brand Product Marketing, Memory Business at Samsung Electronics. “Samsung is proud to again advance what is possible in memory card technology with the introduction of the PRO Endurance, which offers security-minded consumers the industry’s highest levels of endurance and optimized read/write speeds for immediate access to critical surveillance content.”

The Samsung PRO Endurance offers 25 times higher endurance4 than previous speed-focused cards5. It also comes with an industry-leading limited warranty up to five years6, and sets a new standard for capacity with its 128GB7 of storage.

The Samsung PRO Endurance is built to withstand harsh environments and features Samsung’s 4-Proof8 protection, making it water, temperature, magnetic and x-ray-proof. In times of emergencies, accidents or crisis, the PRO Endurance is the reliable solution to capture the crucial moments without the risk of compromised or lost data.

The PRO Endurance memory cards are now available for purchase with manufacturer’s suggested retail prices starting at $ 89.99 for 128GB, $ 44.99 for 64GB and $ 24.99 for 32GB. For more information, please visit www.samsung.com/memorycard.

Key Specifications for PRO Endurance

Category Samsung PRO Endurance
Capacity 128GB 64GB 32GB
FHD Recording 43,800 hours 26,280 hours 17,520 hours
Form Factor microSDHC™ and microSDXC™
Read/Write Speeds Sequential read speeds up to 100MB/s,
Sequential write speeds up to 30MB/s
Bus Speed Mode UHS-I
4-Proof Features Waterproof (IEC 60529, IPX7), Temperature proof, X-ray proof, Magnetic proof
Warranty Five (5) Year Limited Warranty Three (3) Year Limited Warranty Two (2) Year Limited Warranty
Operating Temperatures From -25ºC to 85ºC9
1 Varies by capacity; 64GB model up to 26,280 hours, 32GB model up to 17,520 hours.
2 Based on Full HD (1920×1080) video content recorded at 26 Mbps video support.
3 Performance results are based on internal testing conditions. Read/write speeds may vary by host device.
4 Based on continuous recording capability.
5 Based on internal tests comparing different Samsung cards.
6 Varies by capacity; 64GB model up to 3-years, 32GB model up to 2-years. Warranty for SD adapter is limited to one year. For specific details, please visit www.samsung.com/support.
7 Actual usable storage capacity is measured with SD Formatter 3.1 tool with FAT file system and may be less than labeled capacity.
8 Waterproof: IEC 60529, IPX7; Temperature: from -25ºC to 85ºC (-13°F to 185°F) operating; magnetic: up to 15,000 gauss (equal to MRI); X-rays: up to 50 Roentgen (equal to airport X-ray machines).
9 Withstands -25°C to 85°C (-13°F to 185°F) operating, -40°C to 85°C (-40°F to 185°F) non-operating.

Articles: Digital Photography Review (dpreview.com)

 
Comments Off on Samsung’s PRO Endurance microSD cards can handle 43,800 hours of continuous recording

Posted in Uncategorized


SLC-0L-01: Flash or Continuous, Light is Light

06 Mar

In Lighting 101, 102 and 103, we learned to control our flashes. In the Strobist Lighting Cookbook, we're expanding that approach to learn to move in a fluid way between flash and continuous light. Read more »
Strobist

 
Comments Off on SLC-0L-01: Flash or Continuous, Light is Light

Posted in Photography


Sony a9 firmware 2.00 brings improvements to continuous AF and more

12 Jan

Sony has released firmware version 2.00 for its flagship a9 mirrorless camera. The most notable improvements are to continuous AF, with the company claiming enhanced performance while tracking as well as more stability when zooming.

Speaking of stability, the firmware should bring general bug fixes and reliability enhancements, and the overheating warning function is more accurate, according to Sony.

There are also a number of improvements related to metadata which you can find in the press release below. The firmware update is now available for download.

Press Release

Firmware version 2.00 provides the following benefits:

Continuous AF Enhancements:

  • Enhanced performance of continuous auto focus on moving subjects
  • Enhanced stability of the AF-C when zooming

Added Functions:

  • Adds the function to assign Protecting images to custom Key
  • Adds the function to transfer (FTP) protected files at once
    Note: Only for images protected using version 2.00 or higher.
  • Displays wired LAN MAC address
  • Inputs IPTC metadata to files
    Note: IPTC information must be created beforehand using the IPTC Metadata Preset software.
  • Inputs camera serial number to metadata

Other Improvements:

  • Improves operational stability
  • Improves accuracy of the overheating warning function

Articles: Digital Photography Review (dpreview.com)

 
Comments Off on Sony a9 firmware 2.00 brings improvements to continuous AF and more

Posted in Uncategorized


Frame by frame: ‘live view’ continuous shooting with the Sony a6300

13 Apr

One of the features we were excited by when the a6300 was announced was the promise of ‘live view’ while shooting continuous bursts of shots. Now we’ve used and tested it, what do we think?

What’s the big deal?

Autofocus systems on mirrorless cameras have been getting better and better with each generation of cameras, to the point that the best of them match (and in some circumstances, exceed) the performance we expect from similarly priced DSLRs.

However, many models still lag behind DSLRs in their ability to show you what’s going on while in continuous shooting mode. The common trick of showing a playback of the last captured image makes it hard to keep up with a moving subject, especially if it moves unpredictably, so that you can’t just compensate for the lag.

The a6300 isn’t the first mirrorless camera to try to offer a live view while continuous shooting (several Nikon 1 models, which use comparatively small sensors to allow fast read-out, even manage to give an uninterrupted feed), but it’s still a rare enough feature to make it worth investigating.

What did we find?

We shot the a6300 side-by-side with the Canon EOS 7D (a DSLR that offers the same 8 fps frame rate as the Sony) and found something interesting. The a6300 has a shorter blackout period than the Canon but turns out to only be showing a single updated frame between each capture. At lower, 5 fps shooting rate, we saw two or three frames on display between captures.

That sounds terrible. It sounds like cheating. but it’s not quite the end of the story. Watch the beginning of the video again – the real-time playback – it looks pretty convincing, doesn’t it?

The fact that it looks so convincing left us wondering: why does the screen ever black out? Why doesn’t the camera just continue to show the ‘live’ image until the next one is available? We think we know the answer.

Note the way that the image doesn’t just cut to black – it fades to black then abruptly cuts to the next update. We believe this is trying to achieve something like the ‘black frame insertion’ technology used in some modern TVs: inserting a black frame prompts your brain to imagine what’s happened between the two frames it’s seen, rather than being distracted by the contradiction between perceiving a sense of movement but seeing static images.

Does it work?

In real-world shooting this is pretty convincing: we only discovered the camera was just showing single images when we recorded it at 240 fps, and even then it took us a while to convince ourselves that we weren’t looking at an error stemming from a clash in display and capture frequencies (temporal aliasing).

So, while the display is only showing you eight frames per second (one between each capture), it’s doing so in a way that gives your brain a convincing sense of motion. The question we wanted to answer was: ‘if the blackout between frames is short enough, and the motion looks fairly convincing, is it as easy to follow action as with a DSLR?’

We spent some time trying to shoot rugby with the a6300 to see how easy it was to follow the game’s fast and unpredictable action. The results were mixed – the camera gave enough information for you to be able to follow the action to a reasonable degree, but not as much as you might want.

The a6300’s live view provided enough information to let us follow the action, but not as much as a high-end DSLR, which meant we reacted more slowly to anything unexpected.

Alongside the a6300 we were also shooting with the Nikon D5, not as direct comparison but because we also need to shoot sports with it. As you might expect, the $ 1000 mass-market a6300 wasn’t as good as Nikon’s $ 6500 professional sports-oriented camera, but it’s the way that it fell short that was interesting.

Although the video further up the page shows that the a6300’s live view looks a lot like real motion and its blackout is shorter than the EOS 7D’s, in use it becomes clear that your brain actually can make use of the extra information the 7D gives you about the subject’s movement.

For example, at the rugby we found that we could keep pace with the action when shooting with the Sony but it would take us longer to react if we made the mistake of believing a player’s dummy-pass and started moving in the wrong direction. With the DSLR we’d spot our mistake sooner and turn back to the real action faster. 

At set pieces, where you have a good idea of what’s going to happen next, the a6300 could shoot with confidence.

Having looked at what the camera’s doing and then put to real-world use, we’d conclude that the a6300’s continuous shooting live view more successful than its single frame update makes it sound. It’s convincing enough to let you keep up with fast action, but there’s still room for improvement as soon as anything unexpected happens.

Articles: Digital Photography Review (dpreview.com)

 
Comments Off on Frame by frame: ‘live view’ continuous shooting with the Sony a6300

Posted in Uncategorized


Tether Tools’ Case Relay provides continuous power for many DSLR and mirrorless cameras

26 Feb

$ (document).ready(function() { SampleGalleryV2({“containerId”:”embeddedSampleGallery_2699575917″,”galleryId”:”2699575917″,”isEmbeddedWidget”:true,”standalone”:false,”selectedImageIndex”:0,”startInCommentsView”:false,”isMobile”:false}) });

The Case Relay Camera Power System from Tether Tools offers ‘infinite camera power’ for most DSLR and mirrorless cameras from Canon, Nikon, Sony and Panasonic. The system works via a DC coupler that plugs into both the camera’s battery port and the Case Relay. The Relay plugs into either a 5V USB external battery or a wall outlet.

Tether Tools says Case Relay, which includes a secondary 1200mAh battery, is a solution for time-lapse photography and other tasks that require uninterrupted, long-lasting power. External battery packs can be swapped without interrupting power, as the Relay’s battery will continue to power the camera while the external source is unplugged. 

The Relay Camera Coupler is available from $ 29.99 to $ 34.99, depending on camera, and the Case Relay is available now for $ 99.99. Tether Tools also offers an external 5V USB battery for $ 49.99 USD. Many Nikon and Canon DSLRs are compatible, as well as mirrorless models from Fujifilm, Sony, Olympus and Panasonic. For a full list of compatible cameras check tethertools.com/relay.

Via: PetaPixel

Articles: Digital Photography Review (dpreview.com)

 
Comments Off on Tether Tools’ Case Relay provides continuous power for many DSLR and mirrorless cameras

Posted in Uncategorized