RSS
 

Posts Tagged ‘Consider’

Important Things to Consider When Photographing Winter Scenes

08 Dec

The post Important Things to Consider When Photographing Winter Scenes appeared first on Digital Photography School. It was authored by Jeremy Flint.

photographing-winter-scenes

Winter is a great season for photography and a magical time of year to be outdoors. Photographing winter scenes can be an exciting opportunity to capture some unique and wonderful images, particularly when a familiar scene is covered in a blanket of snow and takes on an entirely different perspective. Here are some considerations on how to photograph winter scenes:

1. Make the most of winter’s longer dusks and dawns

In spite of the colder temperatures, one of the joys of winter is that the sun tends to linger longer at dusk and dawn. It also remains lower in the sky throughout the day, providing great light.

If you can brave the elements and venture outside to capture these magical moments during the winter, you are more likely to have a productive shoot and be rewarded for your efforts. One advantage of photographing at dusk and dawn in the winter is that sunrise is much later than in the summer, and sunset is earlier.

photographing-winter-scenes-01

Winter landscape, Oxfordshire

2. Find contrast

When photographing winter scenes such as snow, there are usually displays of strong contrast between subjects and colors that can make for striking images. For example, the whiteness of snow stands out really well against the darkness of a tree silhouette and combines beautifully with a colorful sun.

Alternatively, warm winter skies work really well with the cooler tones of snow. Look to find and photograph these types of contrast in your images, and the results will be more visually stunning.

photographing-winter-scenes-02

Oxfordshire, England

3. Shoot bright and colorful scenes

Make the most of the winter light and shoot brightly-lit scenes. The bright white snow adds a certain beauty to a winter scene and can make a dull subject more interesting. A great time to shoot colorful winter scenes is when the sun is shining.

Image: Yosemite, USA

Yosemite, USA

Seek out colorful vistas that may include an animal, a tree, people, a house, a building, or even a snowman. Capture their warm colors in the glowing light. You may find you will need to overexpose a touch if your pictures are coming out slightly dark to make your images slightly lighter.

photographing-winter-scenes-04

Iceland

4. Bring plenty of batteries

Batteries tend to lose power and run out faster in colder weather, especially when photographing winter scenes.

Be sure to fully charge them before you set off to maximize your shooting time and keep spares in a warm place, such as an inner pocket.

5. Keep warm

One of the most important challenges with photographing winter scenes is keeping warm. It is amazing how quickly your body temperature can fall when standing still photographing in the cold.

Wear layers to keep the heat in (thermal and wool base layers work really well). Wrap up warm with gloves and a hat and consider hand (heat) warmers. These are great for heating your hands after they have exposed them to the elements, especially if you have to remove your gloves to navigate the camera buttons when taking photos.

There are winter gloves designed specifically for photographers. The thumb and forefinger flip back so you can keep your hands warm while photographing. Consider investing in a pair if you will be in snow and cold a lot.

Also, bring snacks and water to stay energized and hydrated.

6. How to photograph snow:

Snow brightens the landscape and makes everything outdoors look amazing. However, photographing snow does come with its challenges. Here are some useful tips worth considering when photographing snow:

  • Setting White Balance to “Cloudy White Balance” or setting your Kelvins to the warmer spectrum will help to make up for the bluish-tinge snow gets. This is particularly evident on overcast or cloudy days when you may get a blue cast to the snow in your images.
photographing-winter-scenes-05

Iceland

  • Overexpose when shooting snow so that the snow is white rather than “grey”.

Snow can trick your camera meter into underexposing when using your camera’s automatic metering system.

In order to achieve the correct exposure, you will need to compensate for this by adding positive exposure compensation (overexposure) of 1 to 2 stops. The raised exposure value (EV) will help the snow to appear whiter rather than a dull grey. Then your images will be more accurate and a better representation of the snow-covered scene that you see as a result of this.

This applies whether you are capturing falling snow or after it has settled on the ground.

Also, consider using a polarizer filter – this can cut glare and reflections off the snow when it is sunny. It can also help you to see through streams of water better because it cuts through the reflections on top of the water.

Image: Yellowstone, USA

Yellowstone, USA

Conclusion

Winter can be a brilliant season for photography, whether you are capturing photos close to home or at more distant exotic locations. Don’t be deterred by the challenges faced when photographing winter scenes. Get out there and have some fun with your camera this winter, and use these tips to capture some great photos you can be proud of.

Share your winter images with us below and any further tips you may have.


The post Important Things to Consider When Photographing Winter Scenes appeared first on Digital Photography School. It was authored by Jeremy Flint.


Digital Photography School

 
Comments Off on Important Things to Consider When Photographing Winter Scenes

Posted in Photography


6 Important Compositional Elements to Consider When Shooting Landscapes

25 Jun

The post 6 Important Compositional Elements to Consider When Shooting Landscapes appeared first on Digital Photography School. It was authored by Jeremy Flint.

There are many pleasures associated with photographing landscapes; from being in the great outdoors, to breathing in the fresh air and taking in the attractive views whilst capturing nature’s beauty all around you.

Taking good landscape photos is more challenging than you may think. People often tell me when they return home from capturing landscapes that they are often disappointed with their results. Part of this may be due to the subject, the weather, the photographer, or most likely the composition. To help you improve your composition, here are 6 fundamental elements worth considering when you next venture out with your camera to shoot landscapes.

1. Diagonal lines

Firstly, it is worth considering the term ‘composition’. Composition refers to “the nature of something’s ingredients or constituents” such as the formation and contents that make-up an image. When it comes to photography, there are many theories and factors that constitute what makes a good composition. One major component worth acknowledging is diagonal lines.

Landscape composition 01

© Jeremy Flint

Diagonal lines can be a useful tool to use in your images. Carefully consider how you might use diagonal lines in your images. One proven way is to lead a viewer’s eye through the frame along a diagonal. These can go from left to right or right to left. They can be slightly horizontal or vertical and can be individual or repeated throughout the image. Leading diagonal lines can be a great way to naturally point towards an interesting part of your landscape, such as rows of flowers navigating towards a tree or a building.

2. Geometric shapes

Landscape composition 02

© Jeremy Flint

When it comes to shapes and patterns, there are no hard and fast rules as to what works well together. Whilst seeing the landscape as a whole, be conscious of what geometric shapes you want to include in the frame. You may look for shapes that complement each other or that are opposite to one another. Consider their relationship and how they may be used together to bring balance to the image.

3. The rule of thirds

Landscape composition 03

© Jeremy Flint

Have you ever produced pictures of landscapes that you were not pleased with and wondered why this could be? Well, one reason could be to do with the rule of thirds. The rule of thirds is an essential technique that can be applied to improve the composition and harmony of your landscape images. In essence, it involves dividing your image by thirds using 2 horizontal and 2 vertical lines. The idea is that you then place the important elements of your scene along those lines or at the point where they intersect.

In your landscape shots, try placing the horizon on the lower third and top third of the image and see which makes a more pleasing composition. You can also include an interesting object such as a tree where the lines meet. This gives a natural focal point for the scene.

Rule of Thirds Grid

4. Framing images

Landscape composition 04

© Jeremy Flint

How you frame your images of nature can make the difference between a good and a great photograph. When framing your shots, create a visually effective image that communicates with the viewer in the way you envisaged. Overhanging leaves or branches can be used to form a natural frame to shape your picture. This helps to emphasize the subject and mask unwanted elements in the scene.

5. Foreground elements

Foreground elements can add more dynamism to your landscape images. Placing features in the foreground can give a sense of receding distance. For example, a rock, flowers, or snow are individual components that can be used to provide scale. Find an interesting subject to show in the lower part of your frame and see how this changes the composition of your landscape images.

6. Break the rules

Landscape composition 05

© Jeremy Flint

Don’t feel you have to stick to the rules of composition outlined above. As with all rules, they don’t always give the best result and you can break them. Sometimes positioning the horizon along the center of the frame can produce a much more eye-catching photo. In addition, you can even place your main subject in the center of your frame. Don’t be afraid to try out different compositions and experiment to see which looks best.

Conclusion

While you can break the rules, it is worth learning the rules of composition effectively before you try to break them. They were introduced to benefit your photos in the first place, so remember to put them to good use. Diagonal lines, the rule of thirds, foreground details, and framing your images can all be used to enhance your landscape photos.

Now it’s over to you to put these tips into practice! Share the images you take and any comments with us below.

6 Important Compositional Elements to Consider When Shooting Landscapes

The post 6 Important Compositional Elements to Consider When Shooting Landscapes appeared first on Digital Photography School. It was authored by Jeremy Flint.


Digital Photography School

 
Comments Off on 6 Important Compositional Elements to Consider When Shooting Landscapes

Posted in Photography


5 Reasons to Consider Aperture Priority Over Manual Mode

13 Jun

The post 5 Reasons to Consider Aperture Priority Over Manual Mode appeared first on Digital Photography School. It was authored by John McIntire.

Choosing aperture priority mode in difficult lighting situations can free your mind up to deal with the things that matter most to the photo, like timing, rather than messing around with the dials to get the same result.

There’s a lot to be said for the manual exposure mode on your camera. When you’re starting out, learning how to shoot in manual will help you to learn the relationship between shutter speed and aperture. This ensures that you learn what the camera is doing every time you make an exposure. It also builds the basis for you to take what you learn about exposure and correct for the camera’s inability to cope with extreme exposure situations as well as to make creative choices for your images.

After you’ve learned the ins and outs of manual mode, however, there are a few reasons why you might want to forego your hard-learned manual skills for Aperture Priority mode. This article outlines five of these reasons and details what Aperture Priority mode might offer you and your photography in some situations.

1. Aperture priority does the same job as manual mode

In manual mode, the meter in your camera is taking a reading based on your set ISO (provided you’re not using auto ISO). The chances are likely that you’ve picked a deliberate aperture setting before you even lifted the camera up. To get your exposure, you now have to alter the shutter speed so that the indicator on your camera lines up with what the meter dictates is a correct exposure.

Aperture priority does the exact same thing, except that the camera sets up the shutter speed for you.

In instances where you are trusting your camera’s light meter (let’s be honest, that’s most of the time), this will result in the same exposure every single time whether you are shooting in manual mode or aperture priority mode.

What aperture priority mode does is remove the need for you to set the shutter speed yourself. It frees you to concentrate on things like composition without having to constantly keep an eye on the meter.

Exposing for the meter in manual mode resulted in an exposure of f/11 at 1/50th of a second.

Exposing the scene in aperture priority mode just a second later resulted in the exact same exposure. f/11 at 1/50th of a second.

In situations where you need to compensate for dark or light subjects, aperture priority mode still gives you full manual control of the exposure through exposure compensation. Are you taking photos of a dark subject like a black dog? Dial in -1 stop of exposure compensation just one time and keep shooting without having to constantly adjust your settings to get to the same result. Are you taking photos of a fluffy white dog? Same again. This time, add +1 stop of exposure compensation and away you go.

Dark subjects will require you to underexpose them. In Aperture priority mode, this is easily done with exposure compensation. Once you dial in exposure compensation, you are set to go until it has to be changed again. With light-toned subjects, you will have to overexpose them to maintain the correct exposure.

High contrast subjects, like this sheep’s white face lit directly by the setting sun, will also have to be underexposed by at least a few stops.

The only difference between aperture priority mode and manual mode in these circumstances is that you will be spending more time focusing on the creation of the photos than you will be on the dials on your camera.

To be clear, I am not advocating for not learning how to use manual mode. For the best results, it is important for you to understand how your camera works in relation to exposure. Using manual mode is the best and fastest way to do that. So, please, don’t skip over manual altogether. However, once you have it down, using other modes alongside your knowledge of exposure and how it works will help you and your photos in the long run.

2. Speed

The backlighting in this image created an extremely high contrast situation. By dialing in -3 stops of exposure compensation, I was able to ensure that the issues were dealt with in a series of images with one turn of the dial.

As mentioned, using aperture priority reduces the amount of time you have to spend watching the camera’s meter. Because the camera is now setting the shutter speed for you, the only thing you have to worry about in most situations is exposure compensation. Once you set your camera to aperture priority mode, it takes only one finger (on all modern cameras that I’ve used) to adjust the exposure compensation settings.

Need to underexpose by a stop? Just turn the one (relevant) dial three clicks. Done.

The only other thing you might have to worry about is if you have the need, or want, to change your ISO. But that is going to be more uncommon.

3. Aperture priority still gives full manual control

At the risk of repeating myself, but I feel this point really needs to be driven home. Aperture priority mode gives you full manual control over your exposure. It is not automatic, or an auto mode, in any way more than it allows the camera to set the shutter speed based on the meter you are already using.  At any time while in aperture priority mode, you will still have full manual input on what exposure the camera is recording. You just have less physical steps to go through before you get there.

4. Helps to create a constant exposure in changing lighting conditions

One scenario in which aperture priority mode really shines is in changing lighting conditions. For example, if you’re out on a windy and cloudy day, the light levels can constantly shift. In aperture priority mode, your camera changes the shutter speed for correct exposure (already taking into account any exposure compensation that you might have set). Thus, helping you to achieve a consistent look for all of the images in a sequence. This is most useful in terms of shooting a sequence of images to later stitch into a panorama.

When creating a sequence of images for a panorama, aperture priority can help to ensure a consistent exposure throughout the frames.

If you were shooting this sequence in manual mode, it would require you to be constantly looking at the meter and changing your shutter speed settings as required. This isn’t a big deal, but using aperture priority mode allows you to get the same results without constant fetter over the settings.

At sunset, the light rapidly changes. Add a moving subject to that high contrast scene and you have an exposure nightmare. Aperture priority can help to maintain a fairly consistent exposure between frames.

This isn’t perfect, and extreme shifts in lighting can have drastic effects on your images and your exposure. You will still have to pay attention to the details to ensure nothing is going wrong. On normal days, however, it will work just fine.

5. TTL and HSS enabled flashes

Using aperture priority with TTL and HSS enabled flashes might just be the perfect match.

When you are using a flash with TTL (through the lens metering) and HSS (High-Speed Sync) enabled, the chances are that you are going to be working with a fixed aperture anyway.

Remember, shutter speed does not affect flash exposure, only ambient exposure. Aperture priority mode will give you the freedom to set your desired aperture and then let the camera do what it needs to match the meter.

Not only will you still have full control over the exposure compensation for the ambient, but you will also have full control over exposure compensation with the flash unit.

Again, this allows you to get the exposure where you want it one time, and then you are free to concentrate on the actual photos.

That’s it

Aperture priority can be a fantastic tool for any photographer. At the end of the day, it does the exact same thing that manual mode does. It just takes away some physical steps that you have to go through in manual mode to set the exposure.

That said, like just about everything else in photography, it is not perfect, and it won’t always be a solution.

If you take only one thing away from this article, let it be this: shooting only in manual mode does not make you a better photographer. Aperture priority and shutter priority modes do the exact same thing, just in a different way. Use whichever works for the situation you’re in.

Do you use Aperture or Shutter Priority? Share with us your thoughts in the comments below.


5 Reasons to Consider Aperture Priority Over Manual Mode

The post 5 Reasons to Consider Aperture Priority Over Manual Mode appeared first on Digital Photography School. It was authored by John McIntire.


Digital Photography School

 
Comments Off on 5 Reasons to Consider Aperture Priority Over Manual Mode

Posted in Photography


4 Essential Things to Consider When Styling a Photoshoot

09 Mar

The post 4 Essential Things to Consider When Styling a Photoshoot appeared first on Digital Photography School. It was authored by Lily Sawyer.

A successful photoshoot doesn’t just happen by itself. Perhaps there are times when everything lines up and an impromptu photoshoot happens. But that is often the exception. From my experience, much planning goes into a successful photoshoot. Whether you are doing a family, newborn, or portrait shoot, formal, informal, indoor or outdoors, styled or casual shoots, there are common factors that are crucial to its success. Here are some essential things to consider when styling a photoshoot.

4-things-consider-styling-photoshoot-dps-tips-lily-sawyer-photo

1. Location

Location dictates equipment

Deciding on your location beforehand is necessary as that dictates the equipment you’ll need. If shooting in a studio, you need to think of the lenses you would use for the amount of space available in your studio. If you have a small studio, you may only be able to use a 35mm or a 50mm lens for portraits. A 24-70mm would be ideal for a small space, but you need to consider any distortions if you’re shooting portraits at close range using a short focal length.

4-things-consider-styling-photoshoot-dps-tips-lily-sawyer-photo

If you are relying on natural light indoors, then you would need to think of the time of day you are shooting and the available ambient and natural light at those time to give you ample light that you need for your shoot. It would also be a good idea to have a reflector handy for both shoot, but most especially for indoor shoots. Their are various types of reflectors, that create different effects.

4-things-consider-styling-photoshoot-dps-tips-lily-sawyer-photo

Backdrops

Another thing to consider when shooting indoors is your background or backdrop. If it’s in a client’s home, you may need to ask them for photos of an idea of walls, windows, possible backdrops you can use if you haven’t been there before. If shooting in your own home or studio, then you have more control and can prepare the space beforehand. You can go for a light or dark backdrop, fabric or walls, wallpaper or painting, or just the available surfaces in the home. You may need to declutter a bit so unnecessary objects are in the shot.

4-things-consider-styling-photoshoot-dps-tips-lily-sawyer-photo

Weather – Plan B

If shooting outdoors, you need a plan B in case the weather doesn’t cooperate on the day. A plan B could be a cafe nearby or a sheltered area such as a gazebo. Generally, when shooting outdoors during the day, the opposite problem occurs. There is often too much light. The first thing to decide on is the time of day to shoot. Will it be golden hour? Middle of the day? Early morning? Dusk? Evening? Understand the needs for these different times of the day.

Best times of day to shoot

Early and late and golden hour are great times to shoot because the light comes from an angle. Golden hour gives a nice warm glow to your images but light during early morning shoots are often quite cold. Midday light, when the sun is high up in the sky, gives harsh light. You need to mitigate this by using reflectors, so you don’t get dark shadows under the eyes. They can be a natural reflector like concrete paths, white walls, floors or the usual photography reflectors available.

4-things-consider-styling-photoshoot-dps-tips-lily-sawyer-photo

Urban or country? Each has a very different vibe. If shooting in a busy city location where you have to walk around and have nowhere to park, you may need to pare down your equipment. If going to the country, then you can fill your car with equipment and props to your heart’s content and make a shoot logistically easier.

If shooting with artificial light either indoors or outdoors, you have more control over the amount of light available for your shoot and natural lighting is not so much a factor. However, this would require more equipment such as light stands, softboxes, electronic flashes, triggers and receivers, batteries, and diffusers.

You can read more about equipment you would need for a home or portable studio here.

4-things-consider-styling-photoshoot-dps-tips-lily-sawyer-photo

2. Overall colour scheme

Details matter when it comes to the outcome. For an image to be pleasing and successful, it involves more than just lighting. It involves tones and color schemes. When planning your shoot, it may help to think of a theme like vintage, bold, contemporary, simple, maximal or busy. Also think of a seasonal feeling; summer, spring, autumnal, or winter. Considering these things helps you eliminate ideas that won’t be fitting and narrows them down to a few essentials.

You can then decide on the colors. Winter would call for cool white, grey and blue tones and you may decide on a pop of color. Spring may have a combination of pastel colors with dominant greens. Summer may be bursting with saturation and light, blue skies, and warmth. Autumn can have burnt orange, red, purples and verdant greens.

Feeling your shoot while mentally preparing for it helps in streamlining everything to achieve the desired outcome. You could go for a rainbow shoot where you want the colors to pop against a plain white or dark backdrop.

4-things-consider-styling-photoshoot-dps-tips-lily-sawyer-photo

3. Props

Props are optional, but they are useful. My preference is minimal props, but I would suggest having them as tools during the shoot rather than items to be necessary in the shoot. Let me explain.

If I am photographing young children, I would often ask the parents to bring a bag of favorite toys without the knowledge of their children. During the shoot, I may need to use them to entertain, comfort, use during breaks and even to make them look at the camera. However, only one of those may make it into the shot, usually a soft comfort toy.

For engagement shoots, I’d ask the couple to choose one or two props they want to be in the shot but that these props must mean something to them. We’ve had picnic baskets, bikes, guitars, books and flowers amongst others. Sometimes, couples can’t think of props or don’t want any, and that is fine too. Often I’d say pick up a bunch of flowers just in case. Many couples, especially those who haven’t had a photoshoot yet may feel awkward and holding something like flowers helps.

A piece of outfit or accessory can be used as a prop too. A hat, bag or a special pair of shoes can work. This leads us nicely to the next factor…

4-things-consider-styling-photoshoot-dps-tips-lily-sawyer-photo

4. Outfits

Even when you have your lighting and location all planned perfectly, sometimes your photoshoot can still get ruined. Okay, ruined may be a bit too harsh but there is still one thing that can make or break your shoot – It’s the outfit.

I give my clients a guide on what to wear before their photoshoot in the hope that they plan their outfits beforehand and, even better, share them with me so we can discuss them. Often they send me options to choose from, and together we agree on one or two final outfits.

I once had a couple whose location was in the most beautiful country setting – it was a totally dreamy scene. Unfortunately, their outfits were not in keeping with the location. Although they were happy with the images and the shots were beautiful, their shoot could potentially have been published in many places but were let down by the outfits.

4-things-consider-styling-photoshoot-dps-tips-lily-sawyer-photo

Encourage your clients to treat the photoshoot as a special event that they plan and prepare for. If they can afford it, even buy new clothes for the shoot. With regards to matching outfits, like all white shorts and jeans, that’s down to personal preference. Mine is more towards classic complementary colors and patterns than matching or uniform outfits. Discussing this with your client is important. The one big no-no I always tell my clients is to avoid big logos, cartoon characters, numbers or letters, or anything that is trend-based that dates quickly.

I hope the above has helped with styling a photoshoot and what you can prepare in advance to ensure its success. If you have any more ideas, do share them here in the comments below.

The post 4 Essential Things to Consider When Styling a Photoshoot appeared first on Digital Photography School. It was authored by Lily Sawyer.


Digital Photography School

 
Comments Off on 4 Essential Things to Consider When Styling a Photoshoot

Posted in Photography


How to Quote Commercial Photography Jobs: A Few Important Line Items to Consider

19 Feb

The post How to Quote Commercial Photography Jobs: A Few Important Line Items to Consider appeared first on Digital Photography School. It was authored by Darina Kopcok.

There are a variety of ways to quote on a commercial photography job. Every photographer has their own approach.

If you’re new to working with clients, or even if you’ve been at it for a little while, putting together a formal estimate can be a daunting process. The bigger the scope, the more variables there are to consider.

Here are some line items to consider.

Quoting Commercial Photography-Darina Kopcok-DPS

Creative fee

When you’re putting together an estimate for a commercial photography job, I recommend charging a Creative Fee for your labor. This creative fee is the time you spend shooting, but it can also include some post-processing.

Some photographers charge a day rate or a half-day rate. I don’t advise charging by the hours, but I determine how many hours you think you may need to execute a job and multiply it by the hourly rate you would like to receive for it. You may want to top that up by up to 25%, as you’ll find most jobs take longer than you think they will.

As a new photographer, I tried a variety of ways of estimating jobs. When I charged a half-day rate, I often found that there was no such thing. By the time I set up, did all the project management to pull the shoot together and hire the help I needed, it was a full day of work and then some.

Think about how much work you have to do behind the scenes and factor that into your creative fee as well.

One thing I don’t recommend is lumping all your expenses together and presenting it to the client. Giving them one big total can lead to sticker shock and confuse your potential client. They won’t know what they’re paying for exactly.

Breaking it down for them is a good business practice and helps the less experienced clients – say, those with a small business – understand all the work that goes into producing a commercial photo shoot.

Equipment

Quoting Commercial Photography-Darina Kopcok-DPS

Some photographers like to have their own equipment they bring to photo shoots. This not only means a couple of cameras and Speedlites, but it can also mean monoheads, stands, and a variety of other gear.

You may have everything you need to bring to smaller shoots, but on bigger productions, you may need to rent extra gear, like several lights and lighting modifiers. You should not absorb this cost. It goes into the estimate.

Therefore, you need to get all the pertinent information up front about what the shot entails, so you know what to take. Make sure you get a shot list and ask all the necessary questions up front.

If you do have your own gear, you can include it in your creative fee and mention it as a footnote on the estimate that it’s included. Alternatively, you may decide to separate it.

You should charge at least a nominal fee for the use of your equipment. This way you can put money aside for any replacements and upgrades you need to do over time.

If a client were to go to a rental house and rent the equipment needed to pull off a commercial production, they would pay hundreds of dollars. And that is just for the tools. What about the skill of the person to handle those tools?

Don’t be afraid to charge appropriately for your services.

Studio rental

Photo shoots can take place in a variety of locations, but if you need to shoot in a studio, make sure that you put a cost for the studio rental in your estimate.

Be familiar with at least three studios in your area that can be rented out and what they charge per hour or day. If at the time that you write your estimate you’re not sure which one you’d be shooting in, put the most expensive one as the cost.

Once you get the go-ahead you can see what is available on the date you’ll be shooting and book the available studio.

Editing & post-production

Quoting Commercial Photography-Darina Kopcok-DPS

When working on a commercial level, you may not be the person responsible for editing the photos. If you’re working with an ad agency or sometimes even a magazine, they may have someone in-house to do editing according to specific parameters.

Alternatively, you may be expected to do the basic editing, but someone else may be responsible for further refinement. Be clear on the outset about the expectations around post-production.

The Photoshop required may be complex and require the expertise of a professional retoucher. In this case, you must get a quote from a retoucher and put that as a line item in your estimate.

Quoting Commercial Photography-Darina Kopcok-DPS

Archiving fee

Some photographers charge an archiving fee as part of their post-production process.

There is the time associated with uploading and storing images and the process required to back them up. Since you should be charging for all the time you spend on a project, it makes sense to include it in the scope. You can have it as a line item or include it in your creative fee.

Digital Imaging Technician

Depending on the genre of photography you shoot and the nature of the production, you might want to hire a Digital Imaging Technician. Also known as a DIT, they are responsible for backing up everything as you shoot, and for doing quick color treatments or composites on set.

For example, as a food and still life photographer, I always shoot tethered to my computer so I can see a large, more accurate rendition of my image than I can get on the back of my LCD screen. I also sometimes have to work with overlays if I’m doing product packaging, so I can see how the image fits with any text or artwork. A DIT can help with this process.

Photo assistant

I have used a photo assistant since the day I started shooting professionally.

A good photo assistant is indispensable and worth every penny. A photo assistant can help you carry all your gear, work your lighting and run out on errands. Having one on hand saves you time, which in the end is saving you money.

There are professional photo assistants whose sole work is assisting other photographers. However, there are plenty of photography school grads that start their careers assisting and have a lot to offer in terms of technical knowledge and eagerness to gain experience.

Many of them are not even that expensive, so if you can’t get the extra expense approved, I suggest taking a cut for yourself to have one help you out.

Stylists and makeup artists

Estimating Commercial Photography-Darina Kopcok-DPS

Depending on the niche you’re shooting in, you may need a stylist. This may be a wardrobe or fashion stylist, or a food stylist.

Food stylists are responsible for shopping for the food and ingredients required for any food shoot and preparing it for the set. Food styling requires particular skills and are an essential part of any team producing food photography. It is not the photographer’s job, as it’s a different occupation and should be treated as such.

Food stylists usually charge by the hour or a day rate, as well as for prep, and often have their own assistants.

Similarly, wardrobe stylists are responsible for the clothing and related props on fashion shoots.

Makeup artists are required for fashion shoots as well, and sometimes on commercial portrait shoots.

Image usage

Image usage is the trickiest part of a photography estimate.

There is no right or wrong answer for how much you should be charging for usage.

When you are hired to shoot for a brand, you still own the copyright to those images. The client does not own them. The creative fee is for the labor to execute the commission, the usage fee is a license that allows them to use the image in a defined way for a specific time period.

How much you should charge is dependent on your market, the visibility of the brand, and how they want to use them.

The Getty Pricing Calculator is a free tool that can give you some idea of what to charge for usage.

However, I have found that there is what photographers should charge, and then there is reality. There is no point in charging a client hundreds of dollars per image if the client is small and cannot pay that.

I always recommend separating image usage from the creative fee. However, often you need to educate the client up front about copyright and what usage refers to. This can be tough if you’re dealing with a small business owner who thinks they own the images because they hired you to shoot them.

Give them an agreement that outlines the usage and make sure they are clear on how and where they can use the images.

In Conclusion

If you’ve been struggling with how to price your photographic services, hopefully, you now have a better idea of the types of things you can charge for.

The post How to Quote Commercial Photography Jobs: A Few Important Line Items to Consider appeared first on Digital Photography School. It was authored by Darina Kopcok.


Digital Photography School

 
Comments Off on How to Quote Commercial Photography Jobs: A Few Important Line Items to Consider

Posted in Photography


5 Reasons to Consider Concert Photography with a Wide Open Aperture (and the Secret to Perfecting it)

21 Oct

Concert photography is arguably one of the most adrenaline-filled niches you can engage in as an image maker. Musicians, magazines, fans, and record labels alike turn to skilled concert photographers to tell a story for the momentous performance. For most music photographers (due to venue constraints) there is less than ten minutes to capture enough great images to populate a full gallery. Partner this with tumultuous circumstances such as sporadic lighting and an excitable audience and you have effectively created a photographic situation that is unlike any other.

As such, shooting with a very wide open aperture might appear to be too daunting of a task! There are common misunderstandings of how to use and work with a wide open aperture! If your inner aesthete drools over soft, dreamy photographs and creamy bokeh, then you better get ready to play with some low, low, low numbers. We are here to tell you how to photograph concerts at f/1.2, f/1.4, and f/1.8!

Wide aperture concert photography tips

Why Use an Ultra Wide Aperture?

Here are 5 reasons you may want to consider shooting concert photography with a wide open aperture.

1. Aesthetic and Style

To preface, a lot of the quality and final image look is based on the type of lens used. In the past several years, photography fans are gravitating towards the shallow depth of field aesthetic. If you’re in the business of producing commercial music photography (like myself), you’re going to want to keep following the trends and adapting to what is sought after in the industry.

Aesthetic and Style with Wide Aperture Concert Photography

An added bonus is being able to niche yourself a bit in an industry that has a lot of competition, many photographers are wary of shooting fast paced events with a wide aperture due to potential focusing issues. If you can master this art, you have something that will separate you from others.


2. Low Light Capability

Low light concert photography with wide aperture

Unless you’re shooting a big name at an amphitheater, a lot of smaller venues will have very poor lighting. You’ll need to use equipment that will illuminate the frame with whatever limited lighting is available. In these low light scenarios you need a lens with a wide enough aperture to let in more light. Using a lens that goes down to f/1.2, for example, is a great way to let enough light in and make the frame bright. Remember, the aperture is the hole the light passes through in your lens. The wider the aperture, the more light that enters the camera.


3. Shallow Depth of Field

Shoot concert photography with shallow depth of field

The wider the aperture, the shallower the depth of field. Shallow depth of field is great for live concerts because the stage can be rather cluttered compositionally. From instruments to cables, background props, and other band members, there can be a lot going on in the frame at once. Only having one subject in focus with the rest blending into a creamy bokeh makes for a much more visually pleasing and simplified image. With the depth-of-field being so shallow, whatever troubles you about the background can easily melt into a beautiful creamy bokeh.


4. Detail Shots

Capture detail in your concert photography with wide aperture

On the topic of shallow depth of field, if you are photographing for an instrument company, an aperture of f/1.8 will likely become your best friend. This is because photographs taken with a large aperture allow all of the focus to lie on the subject, and the background ceases to remain a distraction. Many instrument companies love to have their products captured in a natural usable setting, such as musicians at a live show.A shallow depth of field will keep the interest solely on your single subject.


5. Sharpness

How to achieve sharpness in your concert photography with wide aperture

Due to technological constraints, lenses that open their aperture below f/2.8 are fixed millimeter lenses (they do not zoom). As a general rule, fixed millimeter lenses tend to be sharper than lenses with a range.


Let’s Talk About the Elephant in the Room: Focusing with a Wide Open Aperture

Right where all of the benefits of an f-stop of 1.2 start to break down is the focusing. The wider the aperture and the shallower the depth of field, the more difficult it can be to focus on what you want. Pair that with a live show in which the lighting is a bit of a mess, and the subjects move spontaneously in various directions, and it sounds like the perfect recipe for a photographer migraine. However, focusing with a wider aperture doesn’t have to be so difficult- it’s just a different thought process.

The Concept of Sharpness

Sharp concert photography through composition

Really, the focus stems from a desire to have an image that is sharp. But what is sharpness? Sharpness is an interesting concept. How sharp a subject appears is a matter of two things: the focus the camera captures and the amount of contrast on your subject. The term “sharpness” is, in fact, an illusion. You see, for an image to be considered sharp, it needs to have contrast. If the there is little contrast in the image, the subject will not look three-dimensional regardless of whether the focus is perfect or not. Biologically, the way that our eyes work, our vision naturally detects edges to register sharpness, and shadows and highlights in order to record the depth in a subject. This is a very important concept to understand when answering the question of how to make images look sharp. When editing your concert photography images, be attentive to the shadows and highlights. And add contrast to define your subject.


Perfect Focus

Sharp concert photography through perfect focus and wide aperture

In terms of getting your image to actually be sharp (from being in perfect focus), here is the basic concept of how focus works in a camera. When you focus your camera on a subject, it establishes a focal plane. To get your subject in focus, it has to be on the focal plane. Focal planes happen on an x (horizontal) and y (vertical) axis. This means anything along either of those axes will be in focus, and anything not on them will be out of focus. The concern with a wide open aperture is that your focal plane is quite small. As you decrease your aperture number and make the opening wider, the invisible area in front and behind the plane of focus will get smaller and smaller, leaving you with much less wiggle-room. As such, distance from the subject plays a key role in your focus.

When shooting wide open, even the smallest diversion from either of the focal plane axes will cause your subject to be out-of-focus. You cannot take a step forward or back without the need to refocus when shooting at a wide aperture. But by keeping this in mind, you can adjust your photography technique to better accommodate the small focal plane.

Single Point Autofocus

Using single point focus and wide aperture in concert photography

A trick to help make sure that what you want in focus is indeed sharp, is to use single point autofocus. By default, your camera will probably select either the object that’s closest to the camera or what’s in the center of the frame. By using single point autofocus, you tell the camera exactly where to focus, which is extremely helpful with low aperture numbers. Refer to your camera model’s manual to find how to change the focus setting!

The Real Secret

The real secret to wide aperture concert photography

Keeping in mind how the focal plane works, this is the big trick to shooting wide open at a concert: The farther away you are from the subject, the easier it is to get the subject in focus. You can get the subject in focus and still maintain and extremely creamy depth of field.

Whether you’re in a photo pit or just in the main venue floor, your position to begin the concert shoot can significantly affect your success for the rest of the shoot. Keeping in mind that for most general photography passes your time is limited, you need to be ready to jump right into the shoot the very second the music hits your ears. My suggestion is to start on the outer edges of the pit or venue and work your way to the middle. Many concert photographers all flock to the center of the shooting zone, and begin shoving to claim their dead center spot. When you start from the edge, while the other photographers are all congregating and fighting for the center, you have much more room to move freely on the outer edge. This is where you will have an advantage to be able to move a bit further away from your subject in order to expand your plane and get that perfect focus.

Shooting concert photography in wide aperture

Now that you’ve been let in to the secret, go out there and capture some awesome concert shots!

The post 5 Reasons to Consider Concert Photography with a Wide Open Aperture (and the Secret to Perfecting it) appeared first on Digital Photography School.


Digital Photography School

 
Comments Off on 5 Reasons to Consider Concert Photography with a Wide Open Aperture (and the Secret to Perfecting it)

Posted in Photography


3 Times it’s Okay to Consider Offering Free Sessions

20 Oct

If you’ve made the transition from a hobbyist photographer to a part-time or full-time professional photographer, chances are that you’ve spent a lot of time thinking about your pricing. You’ve likely looked over your cost of doing business and the cost of goods sold. You’ve probably had to have some difficult conversations with friends and family members establishing that you can’t work for free.

These are all really important parts of starting (and maintaining) a photography business. However, it’s also just as important to sit down and identify some instances in which you would consider donating your services. In this article, we’ll talk about three times you might consider offering free sessions or options at a reduced rate.

3 Times it's Okay to Consider Offering Free Sessions

1. New Technique or Gear

If you’ve always wanted to try newborn photography, it might make sense to offer reduced rate or free sessions. This will help you build your portfolio while perfecting your technique at the same time. Let’s be clear–offering free sessions shouldn’t replace classes and workshops designed to teach you proper technique and safety. Instead, you should consider offering free or discounted sessions after taking a class or workshop in order to implement the new techniques you’ve learned.

Learning Newborn Photography - 3 Times it's Okay to Consider Offering Free Sessions

Similarly, if you want to break into wedding photography, it might make sense to offer to assist a local wedding photographer for free. You’ll learn a lot by watching the primary photographer manage the flow of the day and seeing how they interact with the bride, groom, and guests. Additionally, depending on your contract, you may even end up with images that you can use as part of your own portfolio.

3 Times it's Okay to Consider Offering Free Sessions

Likewise, if you’ve just upgraded from a crop sensor to a full frame camera, you’ll probably want to take that equipment for a test drive before using it with a paying client. It may very well be that you can get your bearings photographing your kids in your own backyard. However, depending on the genre of photography you specialize in, it might make more sense to put out a model call on social media and offer a mini session that will allow you to put your new gear to the test in a low stakes environment.

Learning Newborn Photography - 3 Times it's Okay to Consider Offering Free Sessions

2. For a Creative Photography Project

I spend most of my time photographing newborns, children, and families. As a young mom myself, I really love that genre of photography and feel passionate about helping families preserve their memories.

That said, because I spend so much time photographing people, I make a concerted effort to take on a creative photography project that doesn’t involve people at least once a year. Sometimes, that may mean begging a winery to let me come photograph their grapes after hours in exchange for allowing them to use the images on social media.

3 Times it's Okay to Consider Offering Free Sessions

Other times, it has meant asking a local photographer for half an hour to pick his brain about astrophotography in exchange for snapping a photo of his family for their annual Christmas card. For me, the point isn’t to actually become an astrophotographer. Lord knows this image isn’t winning any astrophotography awards anytime soon, and it feels really uncomfortable to share something publicly that isn’t perfect.

But the point isn’t to be perfect with a creative project. The point is to stretch yourself in ways that you normally don’t, realizing that sometimes the journey is more important than the final destination.

3 Times it's Okay to Consider Offering Free Sessions

Ideas for your project

Perhaps you are already an award-winning astrophotographer, and you’d really like to stretch yourself by doing some child or family photography. Consider asking a friend if they’ll meet you at a park to try photographing them and their children. Try snapping a few images at your nephew’s next soccer game. Ask a friend that loves to bake if you could photograph the next cheesecake he or she makes. The point is that you’ll never grow as a photographer if you don’t take risks. Similarly, it can feel easier to take risks and do something new if you’re not being paid–there’s really nothing to lose.

The point is that you’ll never grow as a photographer if you don’t take risks. Similarly, it can feel easier to take risks and do something new if you’re not being paid–there’s really nothing to lose.

3 Times it's Okay to Consider Offering Free Sessions

3. Partner With a Non-profit You Care About

You’ve probably already been asked to donate a photo session to a non-profit’s fundraiser or auction. This is a great way to give back to the community, and it’s not my intention to discourage you from doing so. However, more and more frequently I’m finding that donating my services directly to the non-profits that I care about is an even more rewarding way to stretch my creative ability and become involved in my community at the same time. Perhaps, instead of donating a session gift certificate, offer to come photograph the office staff, an event the non-profit is holding, or the population that the non-profit serves.

Perhaps, instead of donating a session gift certificate, offer to come photograph the office staff, an event the non-profit is holding, or the population that the organization serves.

3 Times it's Okay to Consider Offering Free Sessions

In doing so, you will likely learn more about the organization itself, their mission, and the community as a whole. Your local humane society would probably love images of the animals in their care. A nearby NICU may be completely blown away by the offer to come photograph the families and babies they serve. Your child’s school may love abstract photography of kids that they could hang on their walls or use as reminder postcards. If you’re religious, your church would probably love photos of their upcoming baptisms or other special religious ceremonies.

Serve your community

This sort of partnership isn’t about parlaying the non-profit organizations into future clients. Rather, it is about using your time and talent to bless others in your community. There are opportunities to use your gifts and talents to make the world better–use them.

Sometimes the things that a non-profit may ask for may be completely outside of your normal wheelhouse. You may have to tell them that you don’t think you’d be the best person for the job they have in mind. Other times, you may feel comfortable telling them that though their idea is outside your normal wheelhouse, you’d be happy to give it a try. Both responses are absolutely okay, but I’ve never regretted trying an unusual request that a non-profit has given me!

3 Times it's Okay to Consider Offering Free Sessions

Conclusion

Have you identified instances in which you will consider offering reduced rate or free sessions? Do you partner with any local non-profits in order to give back? Chime in below and tell us about your experiences.

The post 3 Times it’s Okay to Consider Offering Free Sessions by Meredith Clark appeared first on Digital Photography School.


Digital Photography School

 
Comments Off on 3 Times it’s Okay to Consider Offering Free Sessions

Posted in Photography


Why You Might Want to Consider Keeping a Visual Diary

27 Aug

Maintaining creativity can be difficult for artists at the best of times. Fortunately, there are ways to combat the dreaded artist’s-block. Carried around in the crook of many an artist’s arms, the visual diary has developed alongside the very beginnings of art history.

Famous artists like Leonardo da Vinci, Frida Kahlo, Vincent van Gogh and Kurt Cobain all kept detailed visual journals for their thoughts and creative progress. Cecil Beaton, famous for his portraits of Marilyn Monroe, religiously kept scrapbooks of drawings, newspaper clippings, paintings, and copious amounts of photographs. Art school curricular also relies heavily on the use of a personal visual diary to detail a student’s thoughts and processes.

Why You Might Want to Consider Keeping a Visual Diary

Materials in a visual diary aren’t limited to just pieces of paper. Here I’ve fixed a piece of plastic that I wanted to use later into my visual diary for safe keeping.

Why You Might Want to Consider Keeping a Visual Diary

Keeping track of different film I’ve used is easy with a visual diary – I simply stow the flattened box for later reference.

What is a visual diary?

As the name suggests, visual diaries are a collection of visual references compiled by an artist. Made up of notes, diagrams, collage, photography, images, and detritus, a visual diary can contain any number of materials compiled into a series of books or folders.

The purpose of a visual diary is to provide space for an artist to work within visually. By documenting your own progress and inspiration in a physical diary, you can build important skills and identify trends to further your creative skill. A visual diary also provides a cathartic space to record ideas and personal observations. You can combine private journal entries with test-prints and swatches, or you can keep a strictly photo-based body of work. You can even use separate books for separate media or projects. It doesn’t have to be pretty, as long as it works for you.

Why You Might Want to Consider Keeping a Visual Diary

Proof sheets of negatives are most useful when stored in a visual diary for easy reference.

What diary should I use?

One of the most popular formats of visual diaries is spiral-bound booklets. These booklets can be laid flat on a surface and have thick paper for sketching. Plus, you can stick a pen down the spiral joint so you’ll always have a marker at hand.

A4 and A5 booklets are generally the most popular sizes for visual journals. Larger journals are harder to transport and a very small booklet may be too little to stick cut-outs in. Lined and unlined booklets are another consideration. I personally prefer an unlined book – every sheet is like a blank canvas as it holds nothing but potential! Having said that, grid books can be useful for structured lighting diagrams and geometrical drawings.

An alternative to keeping a booklet as a visual diary, mood boards are another great way to maintain inspiration and direction. Having a mood board to look over and update frequently can be just as beneficial as having a visual diary, only it’s a little less portable. All you need is a good cork board, a few pins and a choice selection of images and notes. You can even use several mood boards, each sectioned off for different moods or projects.

Why You Might Want to Consider Keeping a Visual Diary

Keeping a mood or cork board full of artistic material can be a great source of inspiration for projects.

Why keep a visual diary?

There are many benefits to keeping a visual diary.

Organizationally speaking, having a visual diary keeps all your artistic detritus in one place. I’m definitely guilty of spreading my materials out, scribbling notes on bits of paper and losing them shortly after. Writing notes in your journal or taping pieces of paper with notes into your diary will keep them together so you can easily refer back to them later. Visual diaries are also great for unexpected flashes of inspiration – try keeping one next to your bed for those breakthroughs in the middle of the night.

Your visual diary is your own personal work space. Recording your artistic progress now will create a timeline of your personal development to refer back to later. This can help maintain your focus or realign your artistic direction. Once you get into the habit of filling in your visual diary, you will develop a pattern of creativity, training your photographic eye. Plus, if you aren’t keen on posting personal thoughts in an online blog, paper-based visual diaries are a safe space for your own creativity.

Visual journaling is good for your health too. Cutting images out and doodling in your visual diary can be a very meditative process, increasing mindfulness and reducing stress. Simple tasks like cutting and pasting photographs clear your mind of negative thoughts with repetitive motion and critical thinking.

Why You Might Want to Consider Keeping a Visual Diary

Negatives and digital proof sheets that need to be close at hand for projects are easy to find and revise in a visual diary.

Conclusion

Keeping a visual diary is a great way to boost inspiration, consolidate thoughts and even improve your mental health. As a placeholder for ideas and reference material, keeping a visual journal will quickly become an invaluable tool for developing your photography. Think of it as an artistic space, created and curated by you!

Visual diaries are not only great for storing inspirational material but for recording things like photography expenses or even your wish list.

The post Why You Might Want to Consider Keeping a Visual Diary by Megan Kennedy appeared first on Digital Photography School.


Digital Photography School

 
Comments Off on Why You Might Want to Consider Keeping a Visual Diary

Posted in Photography


Flash Shopping Guide – 5 Things to Consider When Buying a Speedlight

07 Aug

Lighting is one of the most challenging aspects of photography and is often the thing which makes or breaks a photograph. There are several problems when you shoot with the built-in flash on your camera. The images appear washed out (overexposed), have red-eye, and many other issues. Using the built-in flash also creates harsh shadows, and gives you a rather flat-looking image.

External flashes, or speedlights, are photographic equipment which can be used to compensate for the pop-up flash. They allow far superior control over the lighting and exposure of an image, even in low-light shooting conditions.

Use a speedlight or flash to create better lighting.

For newbies in the field of photography, and even for people who have been shooting for quite a bit of time, choosing the correct external flash can be a huge challenge. There are countless brands on the market today offering a huge variety of flashes which makes it all even more confusing.

Below are the five essential things that we felt must be considered, before investing your money on an external light source. Read this if you are about to buy a new flash or speedlight for the first time.

Flash Shopping Guide - 5 Things to Consider When Buying a Speedlight

#1 – The Brand

Initially, buying a flash was really simple. If you wanted to buy a speedlight then you had to buy it from your camera manufacturer – usually Nikon or Canon. Today the situation is completely different, and the market is flooded with several other companies that sell speedlights such as; Yongnuo, Godox, Nissin, etc. So you can opt to buy the flashes by your camera manufacturer or purchase one sold by one of the third party companies.

Although the flashes sold by Nikon, Canon, etc., are really expensive compared to the third party options, many photographers believe that they are still a better buy as they have a longer life, are more durable and are more compatible with their DSLRs.

However, even the third party speedlights these days are increasingly giving competition to the big brand names in terms of performance, durability, and more. Another plus is that they are a lot cheaper. A flash by Godox is much easier on the pocket than one by Canon, which is a welcome point for many looking to buy their first flash.

#2 – Flash Life and Longevity

Speedlights are just like any other bulb, as in they too have a limited life before which they “burn out” and stop working. Thus, before purchasing any speedlight, be it of any company or any model, do some research about its longevity, and the amount of time it can be used effectively before it needs to be replaced.

If a flash does not fire properly and at full power, then it would disturb the lighting of an image and give you an unusable photograph as well in many cases.

#3 – Flexibility

Flash light buying guide 4

Light from a speedlight used off-camera with light modifiers.

Apart from its many drawbacks, another major restriction with the pop-up flashes are that they are completely fixed and not movable at all. They only point in one direction, forward, and cannot be moved along with the camera. Thus, the light being fired cannot be controlled or bounced, as per the photographer’s wish.

This is why it is important to check the flexibility of a flash unit before purchasing it. If the head of the flash you buy cannot be moved, tilted, or angled up-down, left-right, etc., then that defeats the very purpose of using it. A speedlight is used to bounce light around, reflect it off different surfaces, and so on, and if the flash doesn’t have that much control, then using it would virtually be a waste of time.

#4 – Automatic (TTL) or Manual Control

There are two types of flashes or speedlights – TTL and fully manual. TTL simply stands for Through The Lens, which is a type of automatic flash.

Flash light buying guide 5

Do you need TTL or will a Manual flash suffice for your needs?

A manual flash has to be told and directed by you, as to how much light is to be emitted. Any change in the power of the light emitted by a manually controlled flash has to be done by you according to your requirements. These manual flashes are cheaper because their build is much simpler and more basic than a TTL flash.

A TTL flash, on the other hand, is an automatic speedlight, which interacts and communicates with the camera to determine the optimal amount of light required to illuminate a particular scene properly. An additional advantage of TTL flashes is that they can also be used in full manual mode, if you wish, for greater control.

TTL flashes have proven to be extremely accurate and reliable. Although there is a slight chance that they might not give the expected results. But that is a very minimal risk.

#5 – Flash Recycle Time

This is a point to consider especially by sports and action photographers, who often have to shoot multiple bursts of shots together. The recycle time or recycle rate is simply the time taken between two pops/firings of the flash for it to be ready to fire again. The recycling rates are usually always mentioned by the manufacturers in terms of seconds.

The specs for a speedlight will usually have two different times mentioned (e.g. 0.3-5 seconds). The lower number denotes how soon another flash shot can be taken if the flash produces its lowest light output (lowest power setting) while the higher number indicates the time it will take before taking another flash shot when it has generated its maximum light output (full power).

Flash light buying guide 6

If you need a flash that recharges and is ready to go quickly, make sure to check the recycle rate before you make your purchase.

The important recycling time to consider is the one at maximum output. Always aim to get a flash that has a shorter maximum light output time. However, even along with keeping this point in mind, remember that you also need to buy a proper battery for your flash to get the recycle rate mentioned by the manufacturer.

Conclusion

So, it all comes down to what you are comfortable with when buying a flash, depending on your usage needs and budget. To begin with, you can go with a basic manual flash and once you start understanding the application of a speedlight you can always upgrade. Nowadays, the third party flashes are almost on par with the brands such as Canon and Nikon, so nothing is stopping you from capturing creative frames irrespective of your budget.

The post Flash Shopping Guide – 5 Things to Consider When Buying a Speedlight by Kunal Malhotra appeared first on Digital Photography School.


Digital Photography School

 
Comments Off on Flash Shopping Guide – 5 Things to Consider When Buying a Speedlight

Posted in Photography


8 Things to Consider Before You Buy Your Next Lens

19 Jun
How to buy a camera lens

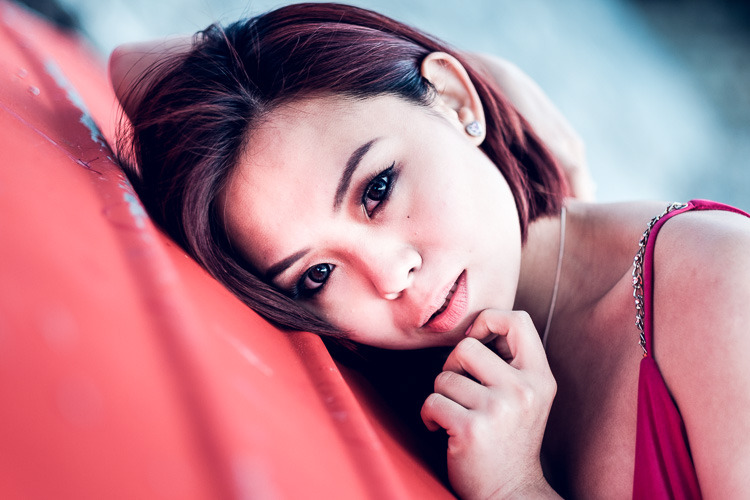
Prime lenses are best for creating portraits like this one, taken with the aperture set to f/1.2 to blur the background.

Are you thinking of buying a new lens for your camera? Stop, and read this article first.

One of the hardest things to achieve when buying new camera gear is clarity. Why do you need a new lens, how much should you spend, and where does it fit into the big picture of your gear acquisition? Once you are clear on these points, it makes the process of deciding which lens (or lenses) to buy next much easier.

Let’s look at eight things to consider before you buy that new lens:

1. Budget – how much do you have to spend?

Everybody’s budget is different, and the amount of money you have to spend determines which lenses come into consideration. But, no matter what your budget, hold that figure in mind while you read this article. You may see things in a different light afterward.

My approach is to own as few, good quality lenses as possible. In other words – don’t over buy. Keep the big picture in mind. What lenses would you eventually like to own for your camera? How does your next purchase fit into this plan? Ideally, you should have a good idea of which lenses you need, and then you can plan accordingly.

This type of thinking can lead to a big shift in what lenses you decide to buy. For example, a few years ago I became frustrated with the size and weight of my Canon system. I was also thinking ahead to some travel plans I had coming up, and realized it was important to keep my kit as lightweight as possible (hand luggage allowances are very low and strictly enforced in New Zealand airports). That led to the decision to switch to the Fujifilm X-Series system. I now have the lightweight kit required for traveling.

2. APS-C or Full-frame?

Most manufacturers offer both APS-C and full-frame cameras in their ranges. But this makes buying lenses even more confusing.

Let’s say you own an APS-C camera. But at the back of your mind you think you might one day buy a full-frame body. That raises the question – do you buy a lens that works on APS-C bodies only (the advantage being that it is probably smaller and lighter than a lens that would fit a full-frame camera) or one that fits a full-frame body as well (which will probably be larger and more expensive)?

Tricky question to answer, isn’t it? And that’s not even taking into account the difference that sensor makes to the lens’s angle of view.

Ideally, you should decide when you buy your first camera body whether it should be APS-C or full-frame, then stick to the same sensor size in the future. It greatly simplifies the lens buying process, and eliminates a lot of confusion.

How to buy a camera lens

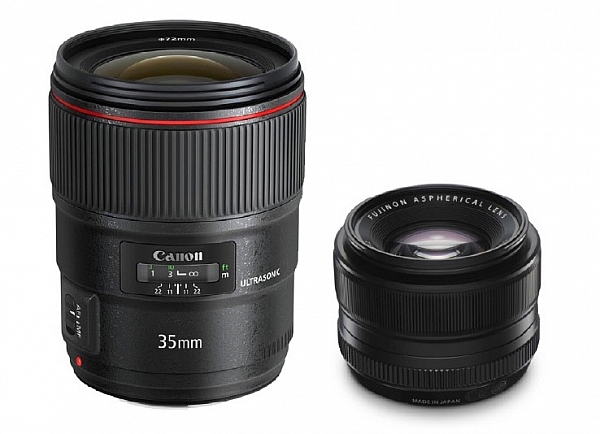
What do these two lenses have in common? They are both 35mm f/1.4 lenses. The Canon one (left) is much bigger than the Fujifilm lens (right) because it is made to fit a full-frame camera. This is a good example of how sensor size, affects lens size.

3. Don’t fall into the focal length trap

The focal length trap is the belief that you need zoom lenses that cover every conceivable focal length. For example, if you start off with an 18-55mm kit lens, then buy a telephoto zoom, you might feel that you need one that starts from 55mm so that you don’t miss out on any focal lengths in between.

This simply is not true. The next point explains the way you should be thinking about lenses.

4. What subjects are you going to photograph?

Continuing with the 18-55mm kit lens example, you may find yourself considering the following second lenses: a 50mm prime as a portrait lens (giving you the benefit of high quality imaging and wide apertures), or a macro lens for taking close-up photos of insects and flowers, or wide-angle zoom for landscape photography, or a super-telephoto for wildlife and sports photography.

The key point here is that lens choice is related to subject. The subject always comes first. Once you know what you are going to photograph, you can choose the best lens (or lenses) for the job. Focal length is a secondary consideration.

In other words, don’t buy a lens because you think you should own it, buy it because you actually need it.

How to buy a camera lens

5. Should you buy a zoom or a prime lens?

The benefit of zoom lenses is convenience. If you are a wedding photographer it is much easier to zoom from a wide-angle to a telephoto when you need to, than it is to change lenses. If you are a landscape photographer it is easier to use a wide-angle zoom to frame the scene precisely, than it is to change prime lenses (or it may not be possible to stand where you need to get the shot).

The benefits of prime lenses are image quality and wider apertures. Compare an 18-55mm kit lens (typical maximum aperture f/5.6) with a 50mm prime with maximum aperture of f/1.4. There’s a four stop difference 16 times more light) between f/1.4 and f5.6, which helps you take photos with blurred backgrounds, and also to shoot in low light conditions, without raising the ISO too much. That’s why a 50mm prime is a better portrait lens than the 18-55mm kit lens (taking us back to the point about lens choice being driven by subject, not focal length).

Some photographers prefer primes, others zooms – thinking about your priorities will help you decide which is best for you.

For example, if you are a landscape photographer who always shoots at f/8, f/11, or f/16 then the wider apertures that prime lenses have are of little use to you, and a zoom may be a better choice.

How to buy a camera lens

Action photos require a telephoto lens and a camera with a good autofocus system capable of tracking moving subjects. A zoom will help you frame the subject accurately.

6. Don’t forget about weight and size

Think about the weight and size of your lenses carefully. After all, you are the one who is going to be carrying them around.

But there is another thing you should also think about when it comes to size, and that is filters. You can save a lot of money on filters by buying smaller lenses. If you’re curious to see how much, do a search for circular polarizing filters and compare the prices of the same filter in 58mm and 77mm sizes. If you need to buy a lot of filters (landscape photographers take note) then you can potentially save hundreds of dollars by buying a smaller (the diameter of the lens or filter size is also smaller) lens.

How to buy a camera lens

Wide-angle zooms are ideal for landscape photos and will help you take photos like this. Bear in mind that smaller lenses also require smaller (and less expensive) filters.

7. Build quality, weather proofing and autofocus

Most manufacturers have inexpensive, middle range, and expensive or high end lenses. Inexpensive lenses may seem like a bargain at the time, but they won’t be built as well as more expensive ones, and they may also have inferior (i.e. slower and noisier) autofocus motors.

At the other end of the scale expensive lenses tend to be built well, use good quality autofocus lenses (i.e. faster and quicker) and may also be weatherproofed (important if you take photos in bad weather or dusty conditions).

Bear these points in mind when considering a lens. Don’t forget to ask how well the lens is built, whether it is weatherproofed, and the speed and quality of the autofocus motor.

How to buy a camera lens

Wide-angle lenses are also helpful for taking photos indoors, where you may not have space to move back to use a longer focal length.

8. Brand name or third party?

You can often save money by buying a third-party lens for your camera, but in my opinion it is best to buy a lens made by your camera’s manufacturer whenever possible. Unless you have a specific reason to buy a third-party lens (usually because the type of lens you need isn’t made by your camera’s manufacturer) then stick with OEM (Original Equipment Manufacturer) lenses. They hold their value better, and autofocus performance is usually superior.

Editor’s note: for a good discussion on that topic, head to: Brand Name Versus Third-Party Photography Gear: Which is better?

How to buy a camera lens

If street and candid photography is your thing, then consider buying smaller lenses to help you take photos like this, without being noticed.

9. Image Stabilization*

An Image Stabilizer is a motor inside the lens, that moves the elements in a way that compensates for the movement created by camera shake. It is given different names by different manufacturers (Nikon, for example, calls it Vibration Reduction). It helps you take photos in low light, using lower ISO settings or smaller apertures, than would otherwise be possible. Lenses with Image Stabilization cost more than their non-stabilized counterparts, so think carefully about whether or not you need it, before paying the extra money.

* Some manufacturers, like Sony and Pentax, build Image Stabilization into the camera body, not the lenses.

Hopefully these points will help you decide which lens to buy next for your camera. If you have any questions about lenses let us know in the comments and I will do my best to answer.


Mastering Lenses

If you want to know more about buying and using lenses then please check out my ebook Mastering Lenses: A Photographer’s Guide to Creating Beautiful Photos With Any Lens.

googletag.cmd.push(function() {
tablet_slots.push( googletag.defineSlot( “/1005424/_dPSv4_tab-all-article-bottom_(300×250)”, [300, 250], “pb-ad-78623” ).addService( googletag.pubads() ) ); } );

googletag.cmd.push(function() {
mobile_slots.push( googletag.defineSlot( “/1005424/_dPSv4_mob-all-article-bottom_(300×250)”, [300, 250], “pb-ad-78158” ).addService( googletag.pubads() ) ); } );

The post 8 Things to Consider Before You Buy Your Next Lens by Andrew S. Gibson appeared first on Digital Photography School.


Digital Photography School

 
Comments Off on 8 Things to Consider Before You Buy Your Next Lens

Posted in Photography