RSS
 

Posts Tagged ‘Composing’

Top tips for composing great landscapes

23 Jul

In this article I’ll try to outline a handful of the key elements that I look for when composing a photo in the field. The process of composing a photo can be daunting at times, but I hope that some of these tips will help you to lay the groundwork for developing an eye for composition in landscape photography.

Compositional Visualization: See the ball, be the ball

Developing an eye for composition in landscape photography is something that takes a great deal of time and practice in the field. Practice, persistence and due diligence do pay off and over time you will find yourself becoming more comfortable behind the lens.

The Mossy Grotto in the Columbia River Gorge in Oregon is incredibly difficult to shoot due to the limited compositional choices. I hiked around for almost 30 minutes before I settled on this composition which had a lot of layering and some nice diagonal leading lines to help to lead the eye to the focal point.

Mossy Grotto, Columbia River Gorge, OR

Sony a7R, Canon 16-35mm F2.8, 16mm- multiple exposures used for focus stacking and water movement. 

One thing that I’ve learned over time is that you absolutely have to pre-visualize your shot. This process starts with four key elements – the direction of the light, the focal point, the foreground and the leading line(s).

The focal point is often the first thing that your eye gravitates toward. It could be a waterfall, a mountain or even a stand of trees. If your eye gravitates toward it chances are it may serve as a good focal point to build your composition around. The next step in the process is to look for a leading line that guides your eye through the scene to your focal point.

I decided to use the river you see in this image as the leading line in this composition because it was able to the lead the viewer to the main focal point without detracting interest from it. I also enjoyed how the light in the composition added layers and depth to the image as well.

Glacier National Park, MT

Sony a7R, Canon 16-35mm F2.8, 16mm, F11, 1/15sec, ISO 160, single exposure

The ‘line’ is figurative of course. It can be a rock formation, a river, a series of interesting trees, vegetation or foliage, flowers, or even a trail. Choosing the correct leading line can have a large impact on your image. It is important to note though that the leading line may not work depending upon the direction of the light in the scene.

Let the light guide your eye to the focal point in the image

All of the elements need to work together to form a pleasing composition. Let the light guide your eye to the focal point in the image. Shadows and light play a huge role in guiding your eye through the scene and, when used correctly, can add a great deal of depth and interest to your photo.

I chose the Lupine you see here as my foreground because I felt the colors complimented the sky well (blue/purple and yellows tend to work well together) and the light play in the flowers also helped to guide your eye through the scene to the focal point at the back of the image.

Sony a7R, Canon 16-35mm F2.8L II, 16mm, F10, 1/50sec, ISO 100, multiple exposures for focus stacking and sunstar.

Choosing the correct foreground can have a large impact on the success of your image. I always try to choose a foreground that offers a complementary color palette to the other elements in the scene such as the sky or mountains. I also tend to look for elements that add depth and interest to the overall image without overwhelming the viewer- it’s a bit of a balancing act in regard to keeping the image dynamic yet visually pleasing. I also try to choose a foreground that offers a color palette that helps to ‘connect’ the overall image. When colors work well together they can really help to solidify an already aesthetically pleasing image.

Ted Gore recently published an excellent article on color theory that complements this article nicely. Using groups of colors that work in harmony and flow nicely can help to solidify an already robust composition and can add a whole new ‘layer’ of interest to the photo.

Articles: Digital Photography Review (dpreview.com)

 
Comments Off on Top tips for composing great landscapes

Posted in Uncategorized


Revisiting Film Photography After 10 Years: Composing Through New Eyes

27 Apr
Aspen Tree Fall Color in the Eastern Sierras of California

Aspen Tree Fall Color in the Eastern Sierras of California

This is the 2nd of a 3 part series on my experience jumping back into film photography after a 10 year hiatus focusing purely on digital photography. You can start here at Revisiting Film Photography After 10 Years: The Readjustment if you missed it.

Mental Math & Visualization
As I’ve been shooting with the Fuji GX617 I’ve had to make a bit of a mind-shift in my approach. On one hand I have to account for slightly different mental calculations regarding how medium format focal distance, depth of field and vignetting might impact my composition. This is rooted with the fact that medium and 35mm formats follow the same mathematics, but the calculations for similar units (focal length, aperture, etc.) result in different visual aesthetics. 90mm focal distance on the GX617 equates to 20mm on a 35mm camera and a 300mm lens on the GX617 equates to ~70mm on a 35mm camera. f/8 on the GX617 is shallow for closer subjects while not so for most images on a 35mm camera. It’s an interesting adjustment, but frustrating if you forget or don’t fully make the right mental calculations as you’re taking photos. After all mistakes on film have a financial cost.

Volume versus Quality
Back in October when I took out the Fuji GX617 and the Canon 5DS R on a trip I found it notable how different my approach to shooting was with each camera. Unsurprisingly I shot less with the film camera and was much more generous in my shooting with my DSLR.  I spent a lot more time on my film shots to focus on correct exposure and composition. With 4 exposures to a roll I took greater care to work a scene by walking around, looking for different angles, check focus, check settings, double check settings and account for various lighting conditions before triggering the shutter. The net result was feeling more connected to the scene I was photographing.

My efforts with the DSLR were much quicker and as a result I took more photos. Shooting RAW affords you to work fast and loose. It was eye opening to see how fast and loose normal shooting has become for me. Jumping back to film made that all too clear. The digital format affords you the ability to:

  1. Salvage an image with +/- 2 stop latitude (potentially more if you use a newer digital camera)
  2. Have virtually no exposure (image count) limitation creating an “insurance” mentality where you take additional photos to account for lighting or weather variations or just to cover lazy technic
  3. Change ISO or lenses during a single composition on a DSLR in the event you realize your initial approach isn’t working


In the end the ratio of digital versus film photos taken on my trip was 1:20. For every film photo taken I took 20 digital photos, but that said I utilized my DSLR to experiment and photograph a much broader array of subjects. As for the photos I considered keepers and worth sharing the ratios broke down as follows:

  • 1 out of every 9 film photos taken was sharp enough and composed well enough to share and/or print.
  • 1 out of every 7 digital photos taken was sharp enough and composed well enough to share and/or print.


Seeing photos that didn’t work out on film were much more painful. Psychologically I felt more angst either because of lost opportunities or the cost associated with a blown roll of film. I’m not sure if my history of shooting film makes me more or less prone to take extra digital photos for insurance than the average photographer, but it certainly has an impact on my emotional state.

Emotive Photographs
Beyond concerns about technical proficiency and productivity I was most concerned about being able to capture images that deeply resonated with me. It’s one thing to say that I got 5 or 100 publishable photos and it’s another to state that they’re photos I think will resonate with others let alone me. Sharp photos, well composed photos, etc. don’t always equate to a great photo.  Images that resonate more deeply are not just about sharpness and composition, but atmosphere, artistic presentation and often “je ne sais quoi”. I’ve yet to compile stats for this as I’m still evaluating images from this trip, but if history is a guide the volume is always low.

The jump back into film has been interesting, fun and even anxiety provoking at times. Most of all it’s been eye opening in how I work, compose and think about photography in general.

Continue to Part 3 in this series – Revisiting Film Photography After 10 Years: Development & Post

The post Revisiting Film Photography After 10 Years: Composing Through New Eyes appeared first on JMG-Galleries – Landscape, Nature & Travel Photography.


JMG-Galleries – Landscape, Nature & Travel Photography

 
Comments Off on Revisiting Film Photography After 10 Years: Composing Through New Eyes

Posted in Equipment


3 Factors to Think About When Composing Your Photos

28 Oct

The way you frame a photo is an important part of the composition. There are several key decisions to make when composing your photos:

  1. What to exclude from the frame
  2. What to include in the frame
  3. Where to place the main subject

The best way to learn about this is to look at several photos and explain how these principles apply. Let’s look at how they all apply:

Natural light portrait – what to exclude

Framing and composition

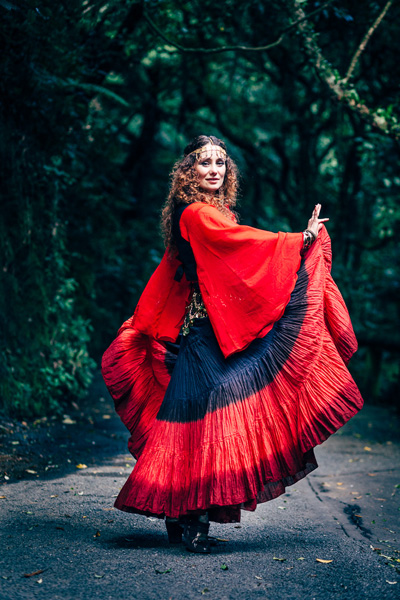
I took this photo of a local singer in Wellington’s Botanical Gardens. I knew what I wanted to include in the composition: the singer herself (she is the main subject of the photo and should take front stage in the composition) plus a hint of the background.

I achieved this by using a short telephoto lens (85mm on a full-frame camera). Telephotos are lenses of exclusion – their narrow field-of-view means they don’t include as much of the background as wide-angle lenses do.

I was also able to blur the background by using an aperture of f/2.8. This is another form of exclusion. While the leafy trees in the background are still recognizable, they don’t pull the eye as much they would if they were in sharp focus. This helps direct attention to the singer.

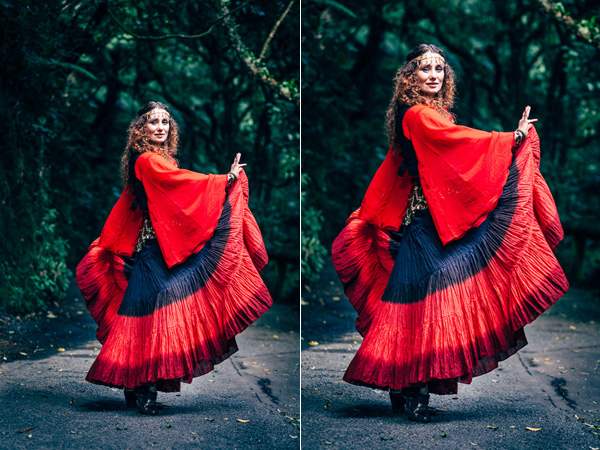
I placed her centrally in the frame. Central compositions work well when the subject is quite prominent in the frame. There is only focal point, the person in the portrait, so she doesn’t have to be on a third (following the Rule of Thirds).

Of course, this is subjective, and I know some people will disagree, so I’m going to provide a second version of this photo, cropped so the singer is on a third. It’s an important point because in an ideal world we will frame our photos perfectly when we take them, there are always times when a crop in post-production may improve the composition. Here are the two versions side-by-side.

Framing and composition

Which do you prefer? For me, I feel the original version has a better balance between the singer and the background.

The cropped version includes less of the background, however, the singer is larger in the frame, which will make it more attractive to some people.

There is no right or wrong here, like many aspects of composition it is completely subjective. But isn’t it interesting how a relatively small change in composition (a different crop) can make such a big difference to the same photo?

Beach portrait – what to include

Framing and composition

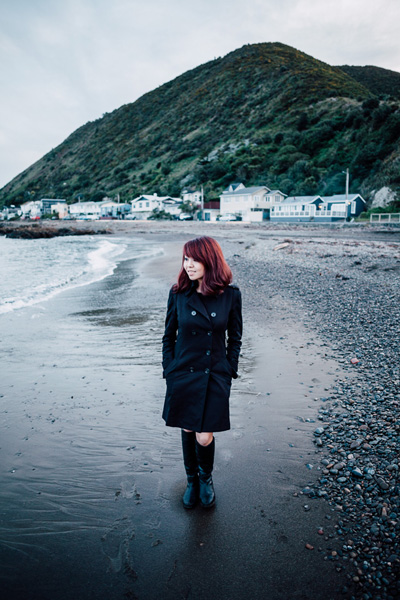
In the first example I minimized the amount of background in the photo, but in this one I included a lot more. The environment is an important part of the portrait. It was a cold, cloudy, wintery afternoon. I included the houses and hill in the background to emphasize the bleakness of the weather and the location.

The idea is for the viewer’s eye is to move between the girl in the foreground (the main subject of the portrait) to the houses and the hill in the background, taking in the detail along the way.

To achieve this I used a wide-angle lens (24mm on a full-frame camera). I was standing quite close to my model, yet this lens still included a large amount of the background. I used an aperture of f/2.8 to make the background slightly out of focus.

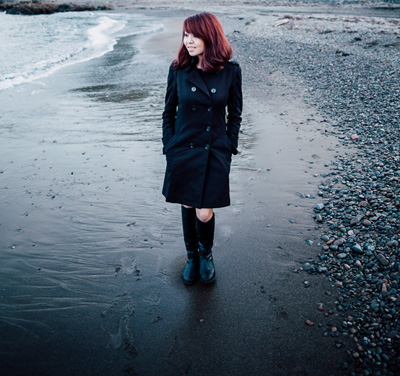
The placement of the model is an important part of the composition. If you have used a wide-angle lens you will know that a slight change in viewpoint makes a dramatic different to the composition. I made sure I held the camera high enough so that the model’s head was lower than the houses. If I crop the photo you can see that the only thing behind the model is the beach.

Framing and composition

I took care to prevent the model and the houses overlapping because they are separate elements of the photo. The composition is stronger if they are separated.

Chinese Lantern Festival – where to place the subject

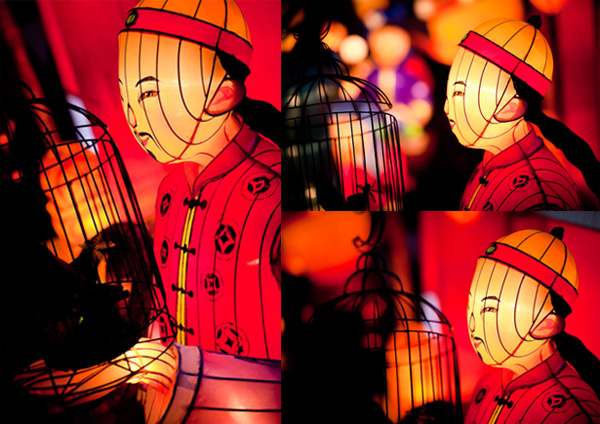
I took this photo at a Chinese Lantern Festival in Auckland. There were hundreds of elaborate Chinese lanterns on display, and they made wonderful subjects.

Framing and composition

I like to take the simple approach to photography and for this shoot I used just one camera and one lens, an 85mm short telephoto. My aim was to focus on the subject and practice using wide apertures to throw the lights in the background out of focus. This is one of my favourite photos from the evening.

I framed the image in such a way that the face of the lantern man was clearly the main focal point of the image and the lanterns in the background were out of focus. The question was just how much of the lantern should I include? The full lantern shows a Chinese man holding a bird cage. Including too much may weaken the composition. Getting too close risks cropping too tightly.

The solution, which is easy to apply with a static subject like this, is to take a variety of photos. Take some time and explore it from different angles, moving closer or farther away to change the subject’s size in the frame. Then you have the luxury of deciding which composition works best when you get back home.

The more photos you take, the more possibilities you see. It’s as if the act of taking photos warms up the part of your mind that works visually. It helps you see different and more effective ways of composing the image. It is normal to find that the last images you took are some of the best in the sequence. You end up with stronger photos than if you had taken just one or two then moved on.

Here are some of the other photos I took of the same lantern as I worked the subject.

Framing and composition

Your turn

Now it’s your turn. How do you use framing in your photos, and decide what to include or exclude from the frame? Let us know in the comments and feel free to add photos to illustrate your point.


Mastering Photography

Composition and line

My latest ebook, Mastering Photography: A Beginner’s Guide to Using Digital Cameras introduces you to digital photography and helps you make the most out of your digital cameras. It covers concepts such as lighting and composition as well as the camera settings you need to master to take photos like the ones in this article.

The post 3 Factors to Think About When Composing Your Photos by Andrew S. Gibson appeared first on Digital Photography School.


Digital Photography School

 
Comments Off on 3 Factors to Think About When Composing Your Photos

Posted in Photography


Composing Dynamic Landscape Images

18 Jul

A Guest Post by Todd Sisson from www.sisson.co.nz.

As a landscape photographer I am constantly seeking that next X-factor shot – an image that leaps from the screen or page and demands the viewer’s attention – preferably attention of the favourable variety.

If you spend an hour or two on a photosharing site like Flickr viewing landscape images in un- curated groups you will note that a very small percentage of the total image population stands out from the crowd.

However, if you view a carefully curated collection of top-shelf landscape images you will probably start to notice some themes appearing. Certain visual cues and devices appear across multiple images – there will often be subtle commonalities between these attention hogging photos.

In many instances these images will possess the qualities of what I consider a dynamic landscape image.

What is a Dynamic Landscape Image?
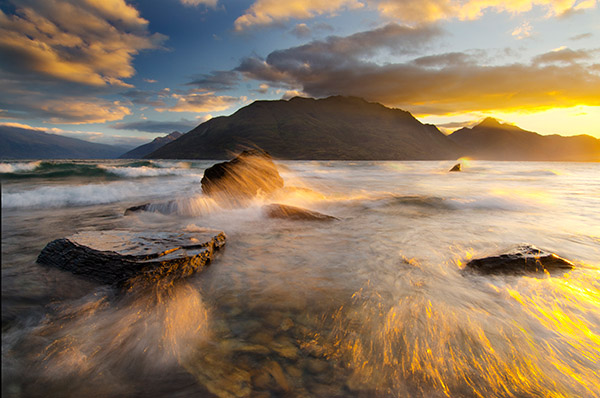
Summer Storm, Queenstown New Zealand. An example of a dynamic landscape image. To maximise the number of dynamic elements in this image I locked this composition off in the field and shot multiple images. The best of about five wave-action frames were then blended together to form the final image.

There is no dictionary entry that defines a Dynamic Landscape Image* – heck, there’s not even a Wikipedia entry – so it is a somewhat personal interpretation.

To my mind, a dynamic landscape image is one that in some way conveys the energy and scale of the natural world. Dynamic images also often seek to breach the confines of their 2D medium by inferring a sense of depth – many truly dynamic image have an almost 3D quality about them.

*As far as I am aware, the term Dynamic Landscape was first popularised by the late Galen Rowell – one of the most influential American landscape photographers of his generation. Rowell used the term to demarcate his work from the somewhat literal colour landscape photography that dominated the early 1970′s. Although he was certainly not the only photographer employing these principles in his work, he appears to have been an excellent self-promoter and the term is somewhat synonymous with his name.

Dynamic Composition

Composition is the backbone of all great photos – dynamic or otherwise – but it is essential in the creation of a truly strong landscape image.

I feel that the goal of a successful composition is to draw the eye into image and hold it there for as long as possible – which is seemingly, a maximum 15 milliseconds these days*. The following image is an example of an image that I feel achieves this objective.
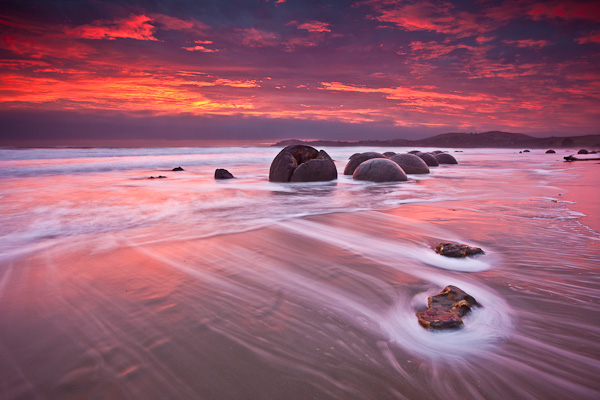
Sunrise Over The Moeraki Boulders, Otago New Zealand. Seascapes lend themselves to the creation of dynamic landscape images.

This image combines all of the elements that I feel comprise a Dynamic Landscape Image:

  • Leading or converging lines
  • Interesting perspective
  • Visually interesting foreground elements
  • Visually interesting mid-ground & background elements
  • Vivid colour or incredible light
  • Vision-locking tonal control
  • Suggestion of movement

It is important to note that not all dynamic landscape images possess all of these factors. In fact, it is depressingly rare to have it all come together in one moment. It must also be stated that what follows is not a recipe for creating great images. Photography can only be practised as an art when personal interpretation is injected into the process – only use this information as a guideline for evolving your own images.

So let’s have a very quick look at each of these Dynamic Landscape factors.

Leading Lines & Converging Lines

One of the simplest ways to draw a viewer’s attention into an image is to use converging or leading lines. Converging lines have been used by painters for centuries to create the illusion of depth within a 2 dimensional medium.

This is why photos of wharves, roads, and rivers make such successful photographic subjects. Although many consider such subjects to be cliches, I strongly council my workshop students to shoot them heavily to build an awareness of the power of a line in an image.

Leading lines not only draw attention into the image, they can also help to hold the eye within the confines of the image.

Check out the crudely overlaid wharf image below combines the strong converging lines of the wharf with secondary supporting lines in the water, hills and clouds.

Look for these lines whenever you are shooting – they are almost everywhere.
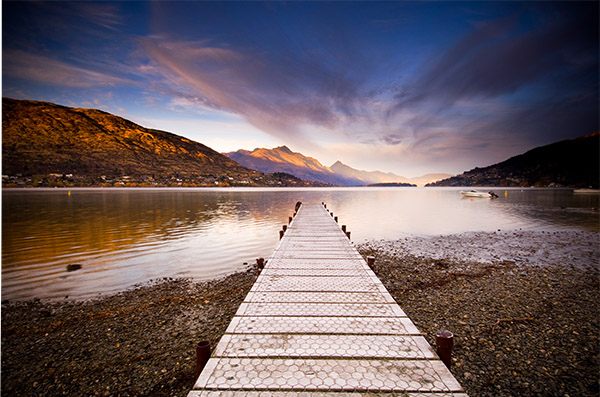
The Wharf at Frankton, Queenstown New Zealand. Shoot ‘cliched’ subjects like wharves and roads until it hurts a little. The pain is just your visual muscles growing stronger. Shooting man-made lines will teach you to look for more subtle lines in nature.
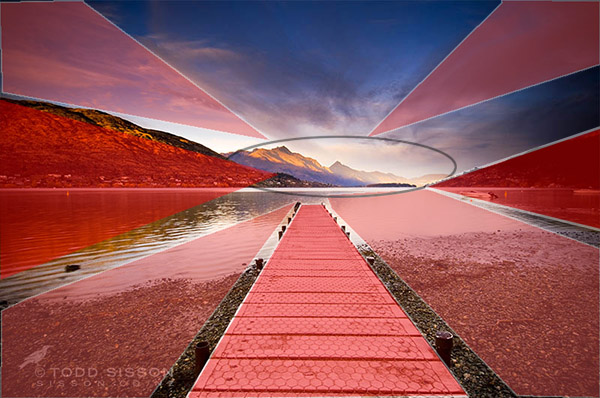
Although the wharf is the primary leading line device in this image there are a number of leading lines present in the water, hills and clouds. The darker reflected lines in the water help hold the eye in the central region of the frame.

Interesting Perspective

As a photographer you are an artist not a forensic documentarian. You get paid the mega-bucks and live the champagne lifestyle to show your audience something a little different – that is your raison d’être.

Hence I rarely find myself shooting at my natural standing position. For some reason, compositions seem to get more dynamic the closer you are to the ground/mud/ snow/ice-encrusted cow turd – it’s just the way it is.

This is especially apparent when using an ultra-wide lens. Subject matter becomes incredibly diminutive and interesting leading lines really lose their visual power when viewed from 5 or 6 feet high – so try getting uncomfortably close and low.

Aim high also. Look for ways to gain elevation to find that privileged viewpoint – I find that this often works really well when shooting telephoto lengths for some reason. Try scrambling up banks, standing on cars and sitting on your wife’s/husband’s shoulders (sans tripod) in an effort to find an interesting perspective.

Paddock Bay, Lake Wanaka New Zealand. Getting uncomfortably low in this instance dramatically altered the perceived form of the rock on the lower right of the frame. B y moving about I was able to create the satisfying impression of the rock 'interlocking' with the reflection. Note the strong leading line formed here also.

Foreground Elements

I believe that a dynamic image almost always possesses a strong foreground element, or elements, that complement the greater scene.

Take a sunset/sunrise for example. Sure, spectacular light makes for great images, but personally photos that contain nothing but vast expanses of super-saucy red clouds do little to engage me as a viewer.

The best dynamic images typically have a strong point of interest in the lower half, or foreground. This is your visual entree into an image. If your foreground element happens to include leading lines you are quite possibly onto the much vaunted money-shot.

Lupin(e)s, Fiordland New Zealand. Yeah, this is cheating – foreground elements don’t come much easier than this. That aside, keen observers will note the subtle converging lines formed out of the lupin pattern. This was accentuated by deliberately placing a bloom in each corner and leaving a little empty space at the bottom of the frame. Sunstars make an exceptional background element (segues niftily to my next point)

Visually interesting Background Elements

I often compose back to front. Firstly I will find the subject of my image, say a spectacular sunset playing out on mountains, and then I will run around like a deranged prison escapee in search of a foreground element to complement the background.

It is very much a balancing act – defining who or what element gets to play the lead role in your composition. Ideally the background is where the eye should gravitate to and the foreground should pick up a gong for best supporting actor.
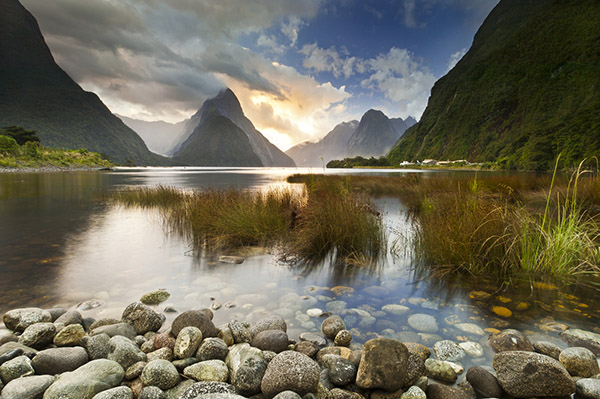
Milford Sound, Fiordland New Zealand. The star of this image is the dramatic light playing out in the clouds over the eye- catching form of Mitre Peak – the foreground & mid ground elements are critical supporting parts of the whole composition but don't hog the lime-light.

Unusually, I didn’t scramble to find a foreground element for this image – I staggered. Four minutes earlier I had been happily sleeping in the back of my truck – my alarm went off and I saw this – panic ensued….

Vivid Colour or Incredible Light

By now it should be obvious that I have some un-checked colour-dependancy issues. I love colour*, especially natural light shows. However, I feel that vivid colour needs to be kept in balance and be a part of the overall composition. Too often I see images that rely solely upon dollops of super- saturated colour.

For a dynamic landscape image to work, balance must prevail. Hence I attempt to avoid filling the frame with too much colour (yes, there is such a thing – see below).

*I am even partial to the American version – colour.
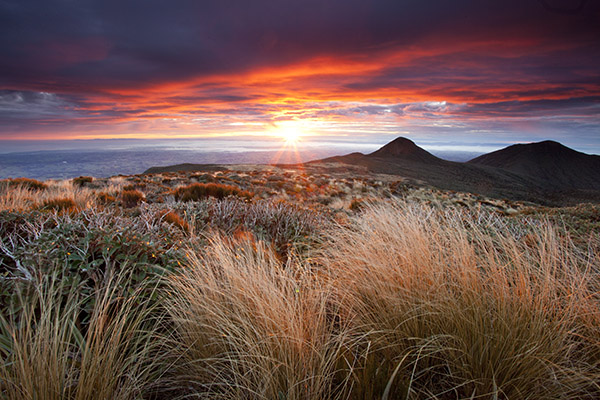
Sunrise from Mt Taranaki / Egmont, New Zealand. In this image the main act was the rapidly dissipating beams of sunrise goodness and the rich colour in the clouds. Lens choice and composition mean that the sunrise colour is just one component of the image. I often like to keep dark forms in my images (anathema to the HDR readers amongst you) as a counterpoint to the extreme lightness of a sunset/sunrise. I find the dark hills here quite mysterious in contrast to the sunstar and clouds.
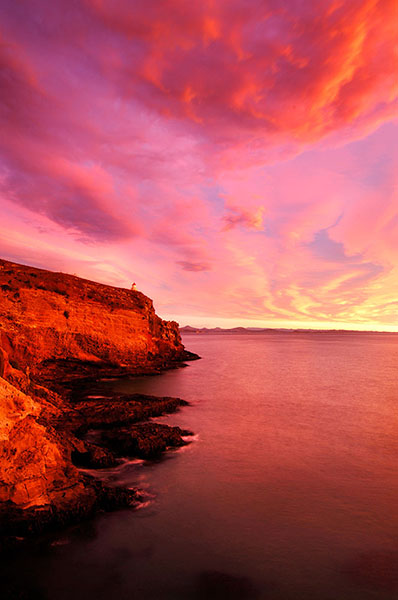
Too much colour. This was one of the most intense sunrises that I have ever witnessed. I should have just sat and enjoyed it – this is just too much colour for my tastes – it looks un-realistic. This shot has actually been partially de-saturated in an effort to tame the colour.

Vision-locking Tonal Control

I am tempted to trademark this term – it sounds like a mind-control experiment deployed by shady branches of the US intelligence community.

Basically all I am referring to is the phenomenon of vignetting.

The eye is drawn towards lightness within an image, particularly near the centre of frame. Furthermore, the eye is restrained by darkness at the edges of the frame.

When employed deftly, the viewer’s eye is gently drawn into the image by lightness and held there by the darker edges of the image.
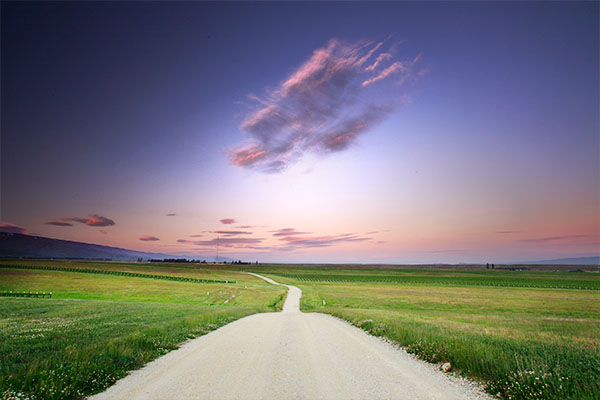
Look at all of the images above and you will see this technique in use. Often this happens in- camera just by virtue of the composition and through use of ND grad filters. However, I will often darken the top edge of an image in post and even add a subtle vignette as the last thing I do. Weird Cloud formation & Road to Nowhere. Alexandra New Zealand. In order to achieve vision-lock here I painted in a brighter layer near the central portion of the image. A little vignetting was added to further enhance the effect.

Suggested Motion

Suggested motion, by way of blur or frozen motion is not always an achievable, or desirable, element to utilise within an image – but it can add another layer of dynamism to a composition.

Don’t just get locked into shooting long exposures either – frozen, or partially-frozen motion can convey movement just as well as a long exposure in some circumstances (see the first image, Summer Storm, for an example of this).
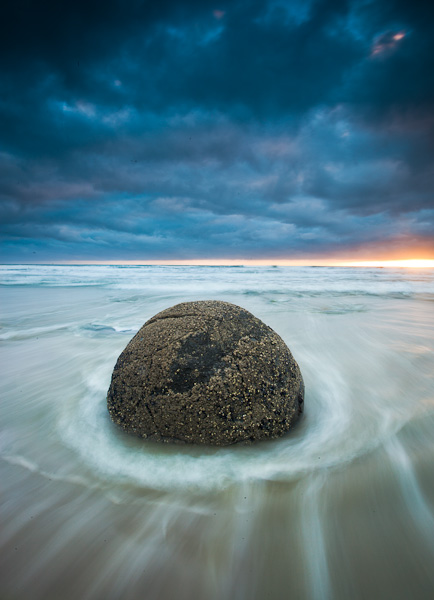
Moeraki Boulder, Otago New Zealand. Long Exposure motion blur creates a dynamic tension between the static boulder and the relentless sea. Note the other dynamic ingredients added to this image – interesting perspective, use of colour, vision-lock, foreground/background interest.

Can Dynamic Landscape Images be B&W?

Absolutely. There are many thousands of truly incredible B&W dynamic landscape images. No style renders texture and contrast better than B&W – at it’s best it is magnificent.

In order to compensate for their ‘lost’ colour Black & Whiters will often apply industrial grade quantities of Vision Locking Tonal Control (that’s why vignette sliders to go -100) and rely heavily upon strong graphical elements such as leading lines (you will find a lot of B&W photos of wharves and sewerage pipes heading out to sea).

I would show you an example of this, but I am mono-challenged. If you want to see B&W Dynamic landscapes at their best check out the work of Mitch Dobrowner & Hengki Koentjoro.

So Are All Good Landscape Images ‘Dynamic’?

Not at all. Stunning images can be made by avoiding almost all of the techniques that I have just espoused in this essay. Dynamic Landscape composition is just one style of landscape photography.

In fact, many of my favourite images by others are beautifully composed static, flat compositions. These ‘static’ images respectfully comply with the two dimensional constraints of the photographic medium and rely upon a separate set of visual devices in order to ‘succeed’.

If they will have me back here at DPS, these static landscapes will be the topic of my next blog post.

Todd & Sarah Sisson are full-time landscape photographers based in Central Otago New Zealand.

Their work can be found as fine art prints & canvas prints at www.sisson.co.nz Todd also offers private and group photographic tuition. They can be found on facebook, Google Plus and twitter.

Post originally from: Digital Photography Tips.

Check out our more Photography Tips at Photography Tips for Beginners, Portrait Photography Tips and Wedding Photography Tips.

Composing Dynamic Landscape Images


Digital Photography School

 
Comments Off on Composing Dynamic Landscape Images

Posted in Photography


Create Photos With IMPACT By Composing With Purpose

09 Jul

After I started my own critique forum I soon started to realize that composition is one of the most commonly critiqued parts of a photograph and in reality composition is the most important element of a photograph next to the subject.

That said, what composition really comes down to, and what I’m talking about today, is the idea of composing with purpose.

Compose With Purpose Not As an After Thought

I’m not here today to tell you about the different “rules” of composition. I’m not going to tell you what is right and what is wrong, because ultimately, the “rules” themselves are both right and wrong in different situations and it’s up to you as the photographer to determine when and how to use them – to do that – you must compose with purpose.

It’s not easy to teach the idea of composing with purpose, but I’m going to attempt to do so by using one of the most commonly photographed landscape subjects out there – sunset – as an example. After all it’s probably safe to say that most of us have experienced at least one or two of these in our lives.

So how many of you return to your computer after photographing a spectacular sunset to see that the entire import is filled with images that basically look exactly the same as one another? Not only do they all look the same, but they’re all missing something. They might look a little like this one right?

Composed With Purpose-2

It’s not that this is a bad photograph of the sunset, there’s detail in the water, the sky and even in the tree line behind the lake, but there’s no planned composition or story being told in the photo. It has nothing to keep the eyes of the viewer interested and ultimately it falls flat.

Just a Small Change Can Have a Big Impact

The photograph below is the exact same sunset at the same location the only difference is that I’ve just chosen a very specific composition for the scene and thus created a more complete photograph.

Composed With Purpose

By taking a little extra time to think about all the elements of the scene in front of me (with my eyes not my camera) and consciously place everything from the setting sun, to the trees in the foreground, to the lily pads on the water within the frame I was able to take what is not only a beautiful sunset and capture it in time, but I was able to add depth to what I captured which allows me to showcase not only what was happening, but where it was happening – this is what adds impact to your photos.

Of course the above is a very simple example of what I’m talking about today, but it’s important to realize that composition isn’t just a set of rules that we must follow – instead composition is an active search for the best elements within the scene in front of you.

Sometimes you’ll need to step back and take the entire scene in to find the composition that make the most sense, other times you might want to put on a super telephoto or grab some binoculars and zoom way in to find some very interesting details not obvious to your normal vision.

So the next time you go out with your camera and something starts to attract your attention, whatever it may be, don’t stress too much about the rules that you’ve learned instead just try to compose with purpose. Hopefully by doing so you’ll get some unique and powerful compositions that will ultimately allow your photographs to stand out from the crowd.

Post originally from: Digital Photography Tips.

Check out our more Photography Tips at Photography Tips for Beginners, Portrait Photography Tips and Wedding Photography Tips.

Create Photos With IMPACT By Composing With Purpose


Digital Photography School

 
Comments Off on Create Photos With IMPACT By Composing With Purpose

Posted in Photography


Composing with Curves

16 May

Do you want to make your images more dynamic and aesthetically pleasing? Try looking for curves when you are photographing!

Once you start looking for them, you will find them everywhere.

Curves make an image easy to look at by leading the viewer’s eye through the frame. It is almost as if the photographer takes the viewer by the hand, draws them into the landscape, and points the way. The viewer’s eyes are compelled to follow the line.

Curves are graceful, rhythmic, dynamic and add energy to an image. They can separate or connect elements or simply offer a balance.

Look for C Curves

C curves, or semi-circles, are probably the easiest curves to find since almost any curve qualifies. It can be anything from the gentle curve of a seashore, lakeshore, a rounded rock, or grasses blowing in the wind.

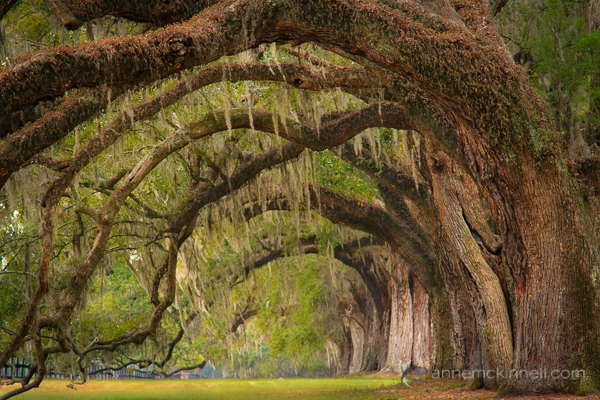
While visiting a plantation I was immediately drawn to these live oak trees with branches that curve over the entire lawn forming a canopy overhead.

Boone Hall Planation in Charleston, South Carolina by Anne McKinnell

Boone Hall Planation in Charleston, South Carolina

Arches

Arches are another form of curve. They can be found naturally in rock formations if you’re in the right part of the world, or you can find them commonly in architecture. I like to make images with multiple arches if possible and take advantage of repeating curves.

Archway in Balboa Park, San Diego, California by Anne McKinnell

Archway in Balboa Park, San Diego, California

S Curves

S curves can have a mesmerizing effect on the viewer as their eyes sweep back and forth through the frame. They also create a sense of depth as the eye moves from foreground to background.

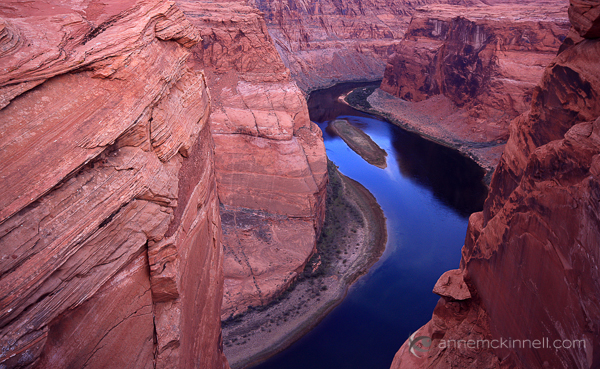
S curves can be found in the natural flow of a river, a winding road, or a pathway.

Colorado River, Arizona by Anne McKinnell

Colorado River, Arizona

Circles

Circles can be found in nature from ripples in a pond or puddles of water, or in many man-made objects.

Often in architecture you can find compositions that combine multiple curves as well as some lines that add depth and variety to the image.

Legislature Rotunda, Victoria, British Columbia by Anne McKinnell

Rotunda in the Legislature, Victoria, British Columbia

Implied Curves

Perhaps the most effective use of curves are the images that are much more subtle that the examples shown above: implied curves.

They are created when objects in the frame imply the shape. Rather than the shape jumping out at you in the bend of river, the photographer has to put a little more work into composing an image to make the elements in the scene form a shape, or by recognizing and taking advantage of a shape when it happens.

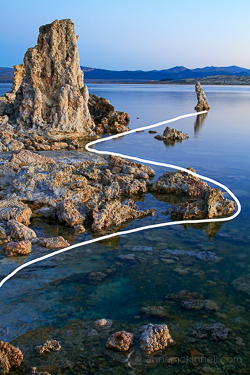
I was ready to make this image at Mono Lake, California, from a lower perspective when I realized that if I stood up and made it at eye level, the tufa formations would form an S shape.

Mono Lake, California by Anne McKinnellMono Lake, California by Anne McKinnell

At Custer State Park, South Dakota, I was following a herd of bison when this mother looked back toward her calf and I saw the S shape right away.

Bison mother and calf by Anne McKinnellBison mother and calf by Anne McKinnell

Tips:

  • Remember you are guiding the viewer’s eye so choose carefully where you want the the eye to enter the frame and where it should go from there.
  • Other compositional “rules” can also be applied. For example, you can have a symmetrical composition or follow the rule of thirds as well as having a curve shape in the frame for an effective and dynamic image.
  • Make sure the image is well balanced with your curve not too close to the edges of the frame.

Give yourself a challenge and go on a photo shoot with the goal of finding curves and use them to add interest and beauty to your compositions.

Post originally from: Digital Photography Tips.

Check out our more Photography Tips at Photography Tips for Beginners, Portrait Photography Tips and Wedding Photography Tips.

Composing with Curves


Digital Photography School
 
Comments Off on Composing with Curves

Posted in Photography


Digital Photography 1 on 1: Episode 72: Composing Portraits

24 Sep

Watch this video to learn the do’s and don’ts of portrait photography. Also learn how to break the rules. When can you chop off the top of someone’s head or limbs? What are the real no-nos of portrait photography. Mark gives you the rules of thumb as well as good posing advice.


19 October, 2010 – Composing With Color : Part 4

20 Oct

Alain Briot‘s latest essay is titled Composing With Color : Part 4. For those following Alain’s essay series this long overdue installment (my fault, not Alain’s) will be welcome. If you haven’t yet read the first three parts, now is a good time to get caught up.


 "Awesome video presentation.
 
I have learnt so much more after looking through this on the weekend.  The tip about pushing blacks and fill light in the Basic Module was worth the price alone.  My images of a recent trip to the Australian Outback are popping and punching with delight!
 
Thanks Michael and Jeff – I really appreciate you taking the considerable time to share your in-depth knowledge and insights."


The Luminous Landscape – What’s New

 
Comments Off on 19 October, 2010 – Composing With Color : Part 4

Posted in News


How to Use a Digital Camera : Composing Your Picture Using The Rule Of Thirds

29 Nov

Learn basic tips on using the rule of thirds in your digital photography to enhance your photo composition in this free photography video. Expert: Chris C. Conklin Bio: Ever since Chris Conklin was a little child growing up in Southern California, his interest in photography has been at his core. Filmmaker: Chris Conklin
Video Rating: 4 / 5