RSS
 

Posts Tagged ‘Compensation’

How to Use Exposure Compensation and When You Should Use It

27 Feb

The post How to Use Exposure Compensation and When You Should Use It appeared first on Digital Photography School. It was authored by Mat Coker.

how-to-use-exposure-compensation

Sometimes, no matter what you do, your photos seem to keep coming out too dark or too bright. If only there were a simple way to tell your camera to make them a bit brighter or a bit darker. Well, there is! In this tutorial, I’ll show you how to use exposure compensation so you’ll never have to struggle with stubborn brightness levels again.

how to use exposure compensation

Take control over the whole look of your photo with the exposure compensation button.

Using exposure compensation is perfect for people who love aperture or shutter mode but want more control over the brightness of their photos without having to overthink settings. If you aren’t ready for manual mode yet or prefer not to use it, then you’ll love the exposure compensation feature.

underexposed photo

Exposure compensation can help you to refine your landscape photos. ISO 250, f/4.3, 1/500 sec.


how to use exposure compensation

This is the exposure I was hoping for. I didn’t need to think about ISO, aperture or shutter speed. I merely need to use the +/- button and the camera did the work. ISO 800, f/4.3, 1/500 sec.

The point of exposure compensation

If you’re shooting in auto mode, then your camera makes all the decisions about how bright your photo will be. You know from experience that you’re often unhappy with how your photos turn out in auto mode.

Even if you’re using a partial-auto mode such as Aperture or Shutter Priority, then your camera still makes the final decision about how bright your photo will be.

If you’re frustrated that your pictures keep coming out too bright or too dark, then you should use exposure compensation. It tells your camera to make the picture a little brighter or a little darker than it thinks it should be.

Suppose you take a picture that turns out too dark, simply use the “+” part of the button to make the next photo brighter.

underexposed photo

The first photo was underexposed, so I used exposure compensation to increase the overall brightness of the next photo I took.

If your pictures are coming out too bright, simply use the “-” part of the button to make the next photos darker.

using exposure compensation for overexposed photos

The first photo happened to come out overexposed. So I decreased the exposure compensation for a better exposure.

How to use exposure compensation

It’s the little +/- button on your camera that controls exposure compensation. If you need help locating it, just search your camera model and “exposure compensation” on Youtube. You’ll find a tutorial showing you where it is and how it works on your camera.

exposure compensation button

You’ll need to press this button to activate exposure compensation. Search Youtube for tutorials on how to use it with your camera.

That little button will help you take better pictures, save time editing, and feel more competent as a photographer.

Exposure compensation may not work in auto mode. You may or may not be able to use it in scene mode. It may not be compatible with auto ISO too.

If you’re working in full manual mode, then you don’t need exposure compensation since you’ve already taken full control of your camera.

Begin by choosing either Aperture or Shutter Priority mode.

aperture mode

Aperture Priority mode.


shutter mode

Shutter Priority mode.

If you’re using Aperture or Shutter modes, the exposure compensation button will allow you to adjust the look of your photo without getting confused about the other settings. It’s like a secret shortcut to manual mode without having to actually be in manual mode.

If you are already using manual mode a lot but find yourself getting frustrated with constantly adjusting ISO, aperture, and shutter speed, then exposure compensation will simplify everything for you and reduces the need for full manual mode.

Using exposure compensation to solve exposure problems

Use exposure compensation as a problem solver or to refine your photos.

Overexposed photo

This photo was taken at dusk. Even though the scene looked right to my eye, the camera’s eye saw the scene as much darker and naturally wanted to brighten up the photo for me. Unfortunately, it was quite overexposed. This happens to me all the time at dusk. ISO 6400, f/1.8, 1/60 sec.


how to use exposure compensation

This photo is now properly exposed. Yes, the photo looks a little dark, but it really was this dark in reality. ISO 6400, f/1.8, 1/320 sec.

When your camera always seems to under/overexpose your photos, try exposure compensation. My Olympus Tough TG-6 always overexposes the photos, so I always have exposure compensation activated to darken the photo. My Nikons and Fuji’s always underexpose the photos, so I’ve always got exposure compensation activated to brighten the exposure.

how to use exposure compensation

This white blanket appeared very bright to the camera, so it naturally darkened the exposure for me. ISO 1600, f/2.4, 1/500 sec.


properly exposed photo

I increased the exposure compensation to get a better exposure. ISO 1600, f/2.4, 1/125 sec.

Using exposure compensation for creative effect

Exposure compensation works well to help achieve or avoid silhouette photos.

silhouette exposure compensation

When you photograph somebody against a bright background, you are almost sure to get a silhouette. I used exposure compensation to make this silhouette even darker. ISO 100, f/5.6, 1/500 sec.


how to use exposure compensation

You can increase the exposure compensation to force a brighter exposure and avoid the silhouette look. ISO 400, f/5.6, 1/250 sec.

Exposure compensation is great for a technique called “exposing for the highlights.” It’s when most of your photo looks dark, but the highlights are bright and stand out.

exposing for the highlights

This is a nicely-exposed photo, but I had wanted something more dramatic looking. ISO 800, f/3.5, 1/150 sec.


how to use exposure compensation

I used exposure compensation to darken this next photo. Now, just the highlights are shining. ISO 100, f/5.6, 1/500 sec.


how to use exposure compensation

This photo was exposed so that the highlights would look just right while the rest of the leaf falls into darkness.


water exposed for the highlights

This photo was exposed to capture the highlights on the water while letting everything else fall into darkness. The person in the foreground turns this into a silhouette as well.

Most photographers would rather think about the creative elements of the photo rather than camera settings (although camera settings do contribute to the creative look of the photo).

Using exposure compensation lets you focus more on creativity and less on settings. Save brainpower – don’t think about settings and creativity

how to use exposure compensation

I knew that I wanted the sunlight properly exposed, and I wanted her traced in highlights. A combination of composition and exposure compensation helped me achieve that quickly.

As you can see, exposure compensation can help solve a lot of problems when you’re taking pictures. You’ll be amazed at how your photos look better with a little exposure adjustment. And in time, you’ll find it easier to discern when you prefer to use manual mode or exposure compensation.

Checklist

Now that you know how to use exposure compensation, keep this checklist in mind. Exposure compensation works:

  • To achieve better exposure in your photos
  • While in aperture and shutter mode
  • To achieve or avoid silhouettes
  • For creative effects like exposing for the highlights

Once you know how to use exposure compensation (and when is the best time to use it), you’ll simplify your process as a photographer. Simplicity is good because it helps you get back to what you really love doing; taking pictures.

The post How to Use Exposure Compensation and When You Should Use It appeared first on Digital Photography School. It was authored by Mat Coker.


Digital Photography School

 
Comments Off on How to Use Exposure Compensation and When You Should Use It

Posted in Photography


How to Understand Your Camera’s Exposure Compensation Feature

20 Mar

In this article, learn about the Exposure Compensation feature on your camera to get the best exposures.

Whether you’re shooting sports, animals, portraits, toys, snowflakes, rocks, fish, weddings, or pretty much anything else you almost always have one goal in mind. You want your pictures to be properly exposed. Of course, you can fix an image in Photoshop if it’s too light or too dark, and shooting RAW definitely helps with that. But over the years I’ve found that the best solution is to just get your exposure right in camera.

This means finding the right combination of aperture, shutter speed, and ISO to get your image to look the way you want. But there’s another option you have at your disposal as well – your camera’s Exposure Compensation feature. Understanding what this does and how it works can help you get your pictures looking pixel-perfect in camera without having to adjust anything afterward.

How to Understand Your Camera's Exposure Compensation Feature - photo of a goose

What is Exposure Compensation?

Buried deep in the computational brain of your camera is something called a light meter whose job it is to measure the amount of light entering the lens. This lets your camera adjust some of the exposure settings automatically or gives you enough information for you to make adjustments yourself.

The problem with metering and the camera choosing the exposure

Depending on how you have your metering mode set up it might look at all the light coming in through lens, just the part in the center, or sometimes only the light where you have your focus point set.

As your camera takes measurements of the incoming light and adjusts exposure settings it tries as hard as it can to get a picture that is properly exposed. It might make the aperture larger or smaller, adjust the shutter speed, change the ISO or use a combination of all three of those techniques just to make sure the photo comes out right.

The trouble is, your camera doesn’t always have a good sense of how you want your picture to look.

How to Understand Your Camera's Exposure Compensation Feature - photo of a young man

My camera tried to make this image much darker because of all the light behind this young man, so I used exposure compensation to make the background slightly overexposed which meant my subject was properly exposed.

Enter the solution

Sometimes you might want your picture to be slightly over (lighter) or underexposed (darker), and this is where the exposure compensation feature really starts to shine. If you notice that your images aren’t coming out quite as light or as dark as you want them, you can either change the aperture, shutter, or ISO yourself.

Or just tell your camera “Hey, brighten things up a bit will you?” and with a quick twist of the Exposure Compensation dial, voilà, your problems are solved.

Most people find Exposure Compensation to be particularly useful when shooting in a semi-manual mode such as Aperture or Shutter Priority, but you can use it in other modes as well like program auto or even full manual.

In order to dispel some of the mystery surrounding the exposure compensation feature, let’s take a look at what your camera is actually doing to the settings when you use it in any of those modes.

General Notes for Using Exposure Compensation

NOTE: Please make note that when you dial in any Exposure Compensation it does not get reset to zero automatically for your next shot. You need to change it yourself manually once you’re done using it.

PROBLEM: One of the biggest problems beginners have is not realizing their Exposure Compensation is active. If you have erratic exposures, or all your images are either too dark or too light – check to see if the Exposure Compensation dial has been moved and correct it to zero if necessary. 

How to Understand Your Camera's Exposure Compensation Feature

“How does exposure compensation work? Please, tell us more!”

Aperture Priority Mode

Most photographers I know shoot primarily in Aperture Priority mode because of the way aperture affects depth of field and other critical elements of the composition. I use this mode almost exclusively, usually combined with auto-ISO to make sure my shutter speed never gets too slow, and it works like a charm.

I like adjusting my aperture and letting my camera take care of everything else because nine times out of ten it’s just easier for the way I prefer to shoot. If I notice my pictures are too bright or too dark I just adjust the Exposure Compensation to take care of it.

When shooting in Aperture Priority, adjusting the Exposure Compensation doesn’t ever change your aperture–doing so would defeat the whole purpose of using this mode! Instead, it changes the shutter speed by either speeding it up or slowing it down in order to make your picture brighter or darker.

How it works

In the image below, shot in Aperture Priority, you can see that the subject is way too dark while the background is properly exposed. This is partially a result of my camera’s metering mode but also because the scene itself contains a high degree of dynamic range and is therefore tricky to get just right.

How to Understand Your Camera's Exposure Compensation Feature

Aperture Priority, 200mm, 1/750th, f/4.0, ISO 100, no Exposure Compensation.

To fix the problem I could have changed my camera’s metering mode but instead, I chose to dial in an exposure compensation value of +2EV. The result left the background totally blown out while giving me a properly-exposed subject.

How to Understand Your Camera's Exposure Compensation Feature

Aperture Priority, 200mm, 1/180th, f/4.0, ISO 100, +2EV Exposure Compensation.

The key takeaway is that while the focal length, aperture, and ISO values did not change the shutter speed most certainly did. My camera dropped it all the way down to 1/180 second which let in much more light and therefore resulted in a two-stop overexposure from the original.

When using exposure compensation in Aperture Priority your camera will adjust the shutter speed to be faster or slower, which can make a big difference if you are shooting a moving subject. You might want a fast shutter speed but if you’re dialing in a few stops of exposure compensation you might end up with one that is too slow to capture the image you are going for.

It’s not a problem per se, but it is something to note and it could dramatically affect your images if you aren’t aware of what is happening. If you need a faster shutter speed you can increase the ISO a bit also.

Shutter Priority

In a similar vein, using Exposure Compensation when shooting in Shutter Priority will not change your shutter speed but will instead alter the aperture in order to make your image lighter or darker.

When I shot the image below of a duck on a frozen pond I wanted a fast shutter speed in case my avian friend started moving quickly. So I used Shutter Priority with a speed of 1/250th of a second.

How to Understand Your Camera's Exposure Compensation Feature

Shutter Priority, 200mm, 1/250th, f/8.0, ISO 100, no Exposure Compensation.

You can probably tell that something isn’t right with the photo. The duck is too dark! I had to lighten the composition quickly before it flew away, so I dialed in a value of +1.5EV on my Exposure Compensation.

How to Understand Your Camera's Exposure Compensation Feature

Shutter Priority, 200mm, 1/250, f/4.8, ISO 100, +1.5EV Exposure Compensation.

This image is a bit different from the static wood carving in the aperture priority example because you can clearly see the effect that exposure compensation has had on the composition. My camera kept the shutter speed unchanged but used a much wider aperture which gave me an image with far less depth of field. Notice how both the foreground and the background are much blurrier – a direct result of shooting with a wider aperture.

What about ISO

You might have noticed that a third exposure parameter has thus far remained unchanged, that of the ISO. While it’s standard for most cameras to alter the aperture and shutter speed when using Exposure Compensation, ISO is usually the last parameter to get changed unless you are using Auto ISO.

In that case, your camera will most definitely change the ISO if it needs to, especially if shooting in Aperture Priority and your minimum shutter speed (as set up in your settings) has been reached.

How to Understand Your Camera's Exposure Compensation Feature

I had to use a fast shutter speed on this image and didn’t care too much about aperture, so I shot in Shutter Priority and used Exposure Compensation to get the image to look how I wanted. I did not use Auto-ISO because I wanted a nice clean picture, so my camera adjusted only the aperture when I dialed in the Exposure Compensation.

Manual Mode

NOTE: This only applies to Nikon shooters! If you use Canon, Fuji or another brand Exposure Compensation does not have any effect in Manual Mode.

Exposure Compensation in Manual Mode works a bit differently because nothing changes at all when you dial in a value. Instead, it’s your camera’s light meter itself that changes so you can adjust the aperture, shutter, and ISO values manually in order to get your picture to look how you want.

It’s an interesting twist on things that might seem a little strange at first if you are used to having things automatically change when you adjust exposure compensation, but once you start using this method you may not ever want to go back.

It essentially gives you the best of all worlds by letting you adjust exposure settings to get the value you are looking for, you can then choose precisely the parameters you want to change.

How to Understand Your Camera's Exposure Compensation Feature

In Manual Mode, adjusting Exposure Compensation only changes how your light meter displays exposure. Notice how the vertical line indicating the point of proper exposure has shifted to the left when dialing in an Exposure Compensation value of +2EV.

The magic of mirrorless

I know the subject of mirrorless cameras versus DSLRs can be a bit of a thorny one for some photographers, but I would be remiss if I didn’t at least mention it here in an article about exposure compensation.

While the same logic applies regarding Aperture and Shutter Priority modes, the big difference is how you can actually see your exposure settings change in real-time as you look at your camera.

How to Understand Your Camera's Exposure Compensation Feature

This rear screen of this mirrorless Fuji X100F shows me that the photo will be properly exposed.

This is one of the main strengths of shooting mirrorless, though it should be noted that DSLRs can also this in Live View–albeit usually with some tradeoffs such as slower autofocus that usually happens when utilizing Live View.

How to Understand Your Camera's Exposure Compensation Feature

I can see the result of a -1EV Exposure Compensation on the digital readouts (i.e. light meter, histogram, etc.) but most notably the image itself has decreased in brightness as well. This helps me get a very good idea of what effect this Exposure Compensation will have on the final image.

Conclusion

I used to be somewhat scared of using Exposure Compensation because I didn’t really understand what was happening when I changed its value. With a much better idea of what my camera is changing, and why, I am now much more comfortable using it on a daily basis to get my shots to look how I want.

In fact, I often won’t even change my metering modes anymore and instead just rely on Exposure Compensation because I know what it’s doing to my photos and I’m not scared of using it. If you have never used it much either, you might want to go ahead and give a try. You just might like it.

The post How to Understand Your Camera’s Exposure Compensation Feature by Simon Ringsmuth appeared first on Digital Photography School.


Digital Photography School

 
Comments Off on How to Understand Your Camera’s Exposure Compensation Feature

Posted in Photography


Manual Mode or Exposure Compensation – Which is Best?

01 Jun

As you may know, cameras often get exposure wrong. The question is, what do you do when you realize that the exposure settings suggested by your camera are not right?

You have two options. One is to switch to Manual mode and set the ISO, aperture, and shutter speed yourself. The other is to use exposure compensation (and Aperture or Shutter Priority mode).

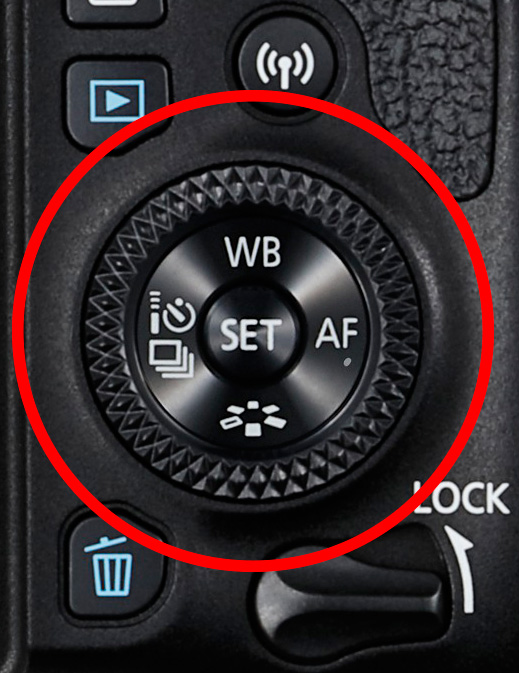
The best solution depends on the situation in which you find yourself, plus the configuration of your camera’s dials. For example, with a Canon EOS digital SLR it’s easy to apply exposure compensation by moving the Quick control dial on the back of the camera. It’s so simple you don’t need to take your eye away from the viewfinder.

Exposure compensation versus manual mode

The Quick control dial on the EOS 77D.

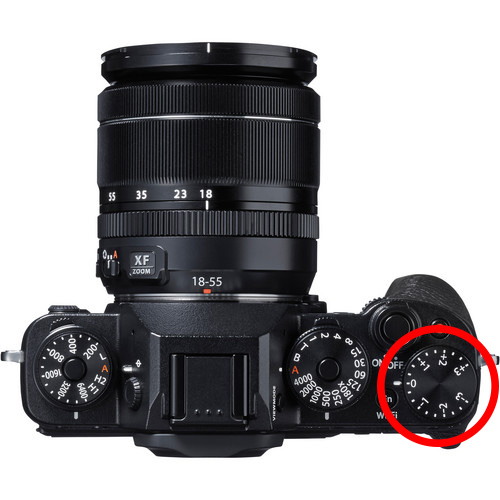
On my Fujifilm X-T1, the exposure compensation dial is on top of the camera. It’s harder to get at and nearly impossible to adjust without taking your eye away from the viewfinder. But the aperture ring on the lens makes it easy to go to Manual mode and adjust exposure by changing the aperture. An optional live histogram in the viewfinder helps you see if exposure is accurate before pressing the shutter (an advantage of some mirrorless cameras).

Exposure compensation versus manual mode

The exposure compensation dial on the Fujifilm X-T1 is much harder to reach.

These are good examples of how hardware can push you in one direction or another. My Canon SLRs pushed me towards exposure compensation, and my Fujifilm X-T1 pushes me towards using Manual mode.

Using Manual mode

Let’s look at Manual mode first. In Manual, you set the ISO, aperture, and shutter speed yourself. There are certain situations when using Manual mode (as opposed to Programmed Auto, Aperture Priority or Shutter Priority with exposure compensation) is beneficial. Let’s look at a few.

1. Shoot in Manual when the light level is constant

If the ambient light level is steady, you don’t need to change the exposure settings once you have decided which ones to use. Automatic exposure modes are influenced by the reflectivity of the subject and the exposure reading can change even if the light levels don’t.

That makes Manual mode ideal for this kind of situation. Once you’ve set the exposure you don’t need to change it. I like to use Manual mode when making portraits in natural light. Once I’ve set the exposure I’m free to concentrate on directing the model.

Exposure compensation versus manual mode

2. Shoot in Manual when you’re photographing landscapes and using a tripod

In this situation, you have plenty of time to assess exposure. Manual mode is ideal because you can set a low ISO (for image quality), a small aperture (for depth of field) and change the shutter speed to suit the light levels. It’s also easy to make adjustments to allow for any polarizing, neutral density or graduated neutral density filters you may be using.

If you’re shooting landscapes at dusk, while the light is fading, Manual mode also works well. After you take a photo, just check the histogram. As it moves to the left, which it will as the light fades, dial in a slower shutter speed to compensate.

Exposure compensation vs. manual mode

3. Use Manual Mode when you’re using manual flash

If you’re using a flash set to manual the output from the flash is the same every time. In that situation, it’s best to adjust the camera settings manually so the exposure is consistent from frame to frame.

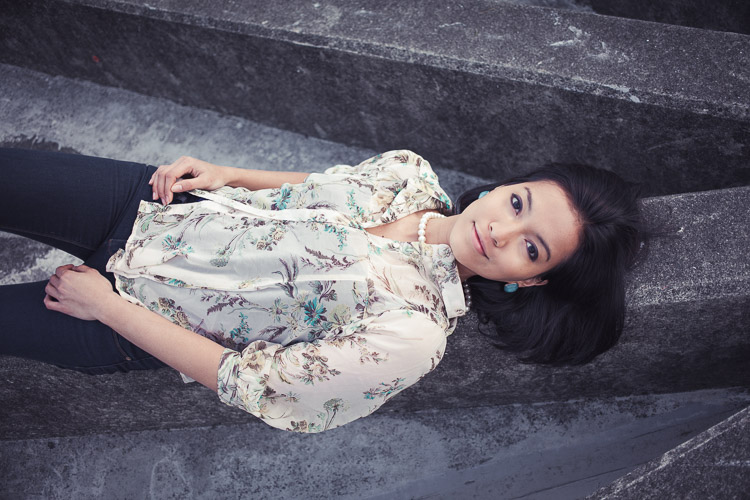
To create the portrait below, I worked with both the camera and flash set to manual. Setting your flash to manual only works when the flash to subject distance doesn’t change.

Exposure compensation vs. manual mode

4. Use Manual mode for long exposure photography

If you’re doing long exposure landscape photography and your shutter speed (exposure time) is longer than 30 seconds then you need to use Bulb mode. This is another form of Manual mode. Except that rather than telling the camera what shutter speed you want it to use, you do so by using the camera’s bulb setting and a remote release.

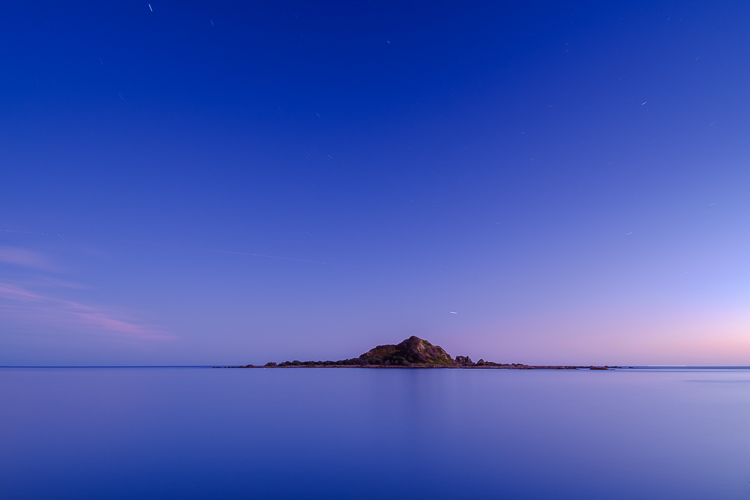
I used Bulb mode to make this landscape photo with a shutter speed (exposure time) of 82 seconds.

Exposure compensation vs. manual mode

Using Exposure Compensation

The alternative to Manual mode is to set your camera to an automatic exposure mode and use exposure compensation to override the camera’s settings.

The three best automatic exposure modes to use are Aperture Priority, Shutter Priority or Programmed auto. Other exposure modes, such as Landscape and Portrait, don’t give you enough control. On some cameras (such as Canon EOS) you can’t adjust exposure compensation when using one of these modes.

These are some of the situations where exposure compensation may be better than Manual mode.

1. Use Exposure Compensation for street and travel photography

If you are taking photos of people in the street the required exposures can vary wildly. One moment you may take a photo of something in the sun, the next you may photograph something in the shade. The sun may also be going in and out between the clouds.

In this situation, you want to concentrate on finding interesting things to photograph and creating a good composition. If you have to stop and think about exposure, then you may miss the shot. Automatic exposure modes help greatly.

Exposure compensation vs. manual mode

2. Use Exposure Compensation when you are using on-camera flash in an automatic mode (TTL)

If you have the on-camera flash set to an automatic mode, then the camera needs to be set to evaluative or matrix metering, the camera’s most advanced metering mode, to take full advantage of that. The camera and flash work together to calculate the correct exposure.

Setting your flash to automatic (TTL or E-TTL) works best when the subject to flash distance is constantly changing. Using automatic means your camera can adjust the output of the flash as it needs to.

3. Use Exposure Compensation when shooting sports or wildlife

This is another situation where the light level is likely to change frequently and you need to concentrate on tracking the action and capturing important moments. You don’t want to be thinking about exposure when trying to capture the peak of the action in sports or photographing fast-moving wildlife. Let your camera do the work, and use exposure compensation if you have to.

Conclusion

Everybody works differently, so the points in this article should be taken as suggestions only. The more experienced you become as a photographer the more you will learn to judge whether you should use Manual mode or Exposure Compensation to take control of your exposure.

It may make it easier to think of it in terms of time. If you have more time to think about your camera settings, then use Manual mode. If you have less thinking time and need to be ready to react quickly to capture the action, then use an automatic exposure mode and Exposure Compensation.

Do you prefer to use Manual mode or an automatic exposure mode with exposure compensation? Please let me know in the comments below,


Want to learn how to get perfect exposure on your digital camera? Then check out my new ebook Mastering Exposure and say goodbye to all your exposure problems!

The post Manual Mode or Exposure Compensation – Which is Best? by Andrew S. Gibson appeared first on Digital Photography School.


Digital Photography School

 
Comments Off on Manual Mode or Exposure Compensation – Which is Best?

Posted in Photography


Upcoming Fujifilm GFX 50S firmware update promises to improve AF, exposure compensation

19 Apr

In addition to announcing a handful of new medium format GF lenses, Fujifilm also unveiled plans for the first major firmware update for the GFX 50S medium format camera. According to the Fujifilm press release:

“Fujifilm will release a free firmware update for the FUJIFILM GFX 50S later this spring, adding new functionality and improving operability. New functions include computer tethering via Wi-Fi and improved operability in exposure compensation and autofocus performance in difficult scenes.”

We recently reviewed the Fujifilm GFX 50S and while we gave the camera a gold award, it was noted that AF speed and reliability was one area ripe for improvement. We also were disappointed in the lack of a dedicated exposure compensation button, so perhaps this update will make accessing that functions less annoying. Furthermore, the addition of a Wi-Fi tethering feature should go a long way to making the GFX 50S appeal to studio shooters.

Articles: Digital Photography Review (dpreview.com)

 
Comments Off on Upcoming Fujifilm GFX 50S firmware update promises to improve AF, exposure compensation

Posted in Uncategorized


How to Use the Zone System to Learn about Metering and Exposure Compensation

16 Jun

When you first move off auto, you realize how much control you have over your camera. You get to choose the aperture, shutter speed, ISO, and be able to manually select the autofocus point, among many other things. In short you get control over everything!

You also get full control over the exposure, or brightness, of the image. You decide you where to set the exposure for each image – something that the camera does not always get correct. The reason the camera doesn’t get it right all the time is because the in-camera light meter doesn’t always know how the brightness level of the subject. What tricks the light meter is bright or dark tones.

So how do you take back control of the exposure, and compensate for the camera’s errors? The process of correcting your exposure is referred to as Exposure Compensation. For more on that read: How to Use Exposure Compensation to Take Control of Your Exposure. However, before you add any exposure compensation, you first need to know how much to compensate, and understand exactly what your camera’s light meter is doing. This is why learning how to meter is important. If you are unfamiliar with the term metering, it is the process of measuring light values.

The first thing to grasp when is how your camera’s light meter sees the world. Put simply, it sees everything in grayscale. This means that all your camera sees is a world of tones; a colourless world. It cannot differentiate trees from people, people from snow, etc. (Although more modern in-camera light meters will now also recognize colour, the same basic principles apply.)

The other critical element to know is that your meter wants to make everything middle-gray, commonly referred to as 18% gray. Remember that! Right it down! Keep it with you in your camera bag until it’s firm in your memory! It’s very important!

Everything you need to know about doing exposure compensation correctly hinges off 18% gray. If your scene has a lot of bright areas in it, such as snow or sand for example, your camera will want that to be 18% gray. If you’re photographing a person in dark clothing, your camera will also want to make that 18% gray. Your camera doesn’t know your subject is actually meant to be black, nor does it know that all of that white in the viewfinder is actually snow. Leaving your camera’s meter at zero, or Meter as Read (MAR), can cause your photo to be over or under exposed.

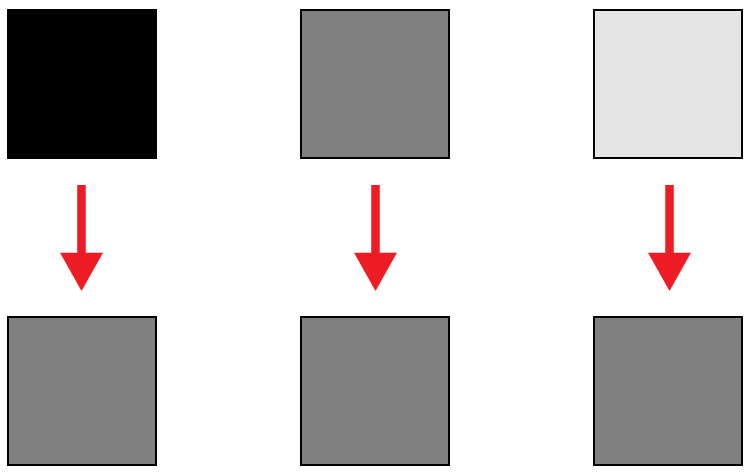
Here is an illustration of what your camera meter will do. Tones will end up 50% grey.

Here is an illustration of what your camera meter will do. All tones will end up 18% or middle gray.

So how does knowing how your camera will meter, help you to decide how much exposure compensation to apply? This is where knowing a little about the Zone System can come in handy.

What is the Zone System?

The Zone System was developed by the late Ansel Adams and Fred Archer. In essence, it was a system used to meter and continue on in the dark room when developing images. I’m not going to discuss the Zone System in its entirety – that could be something for a future article – but at its core, the Zone System will greatly help you decide how much exposure compensation to add or subtract.

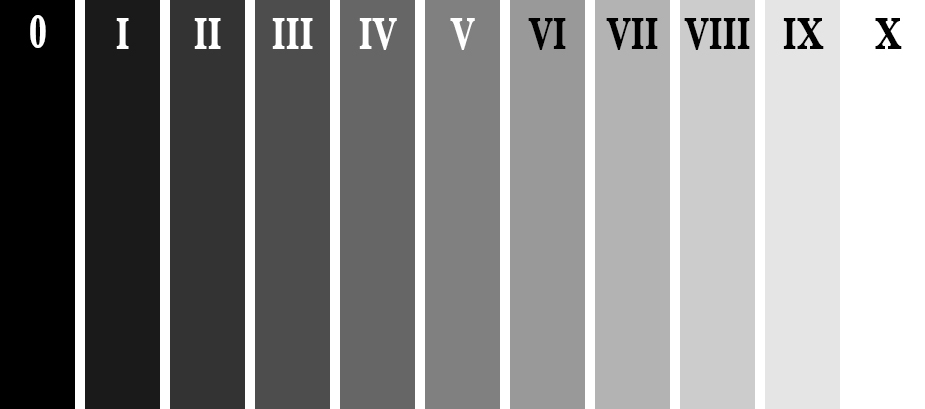
The Zone System

The Zone System

Above is an illustration of the Zone System. In it are 11 zones, denoted by Roman numerals. Here is a quick rundown of examples for each Zone:

  • Zone 0: Pure black, no detail. This is would be the edge of a negative film.
  • Zone I: Near pure black with slight tonality, but no detail.
  • Zone II: This is the first Zone where detail starts to show; the darkest part of the image where detail is recorded.
  • Zone III: Average dark materials.
  • Zone IV: Landscape shadows, dark foliage.
  • Zone V: Middle-gray, what your light meter sets to.
  • Zone VI: Average Caucasian skin tone.
  • Zone VII: Very light skin; shadows in snow.
  • Zone VIII: Lightest tone with texture.
  • Zone IX: Slight tone without texture, (e.g., glaring snow).
  • Zone X: Pure white with no detail. This would be light sources, or reflections of light sources.

This next piece of information is the other piece to the exposure compensation puzzle:

Each Zone is separated by exactly one stop of exposure.

Now that you have the information, how do you use it?! You know that you camera is metering for Zone V, or middle-gray, now consider your subject. How light or dark is it? If you were photographing a bride’s white dress, that would be very bright with texture; so going by the chart that would fall into Zone VII or VIII, which makes the exposure compensation required for correct exposure PLUS two or three stops (the difference between Zone V and where your subject should fall).

RV-02383-slideshow

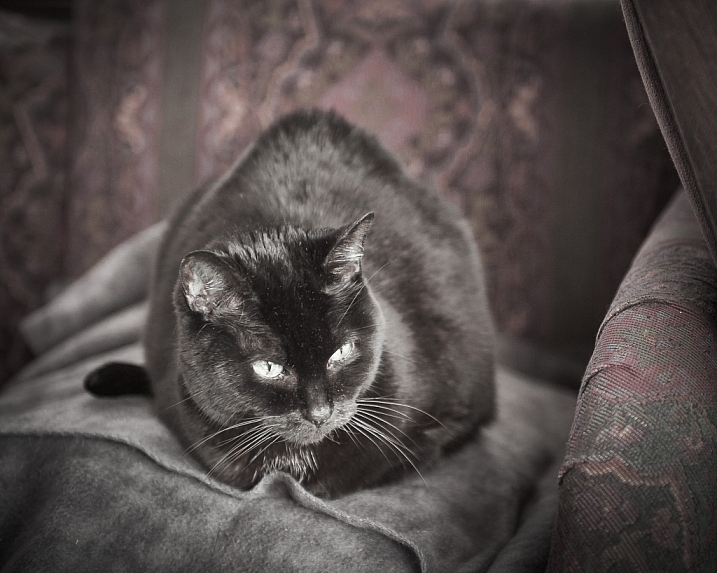
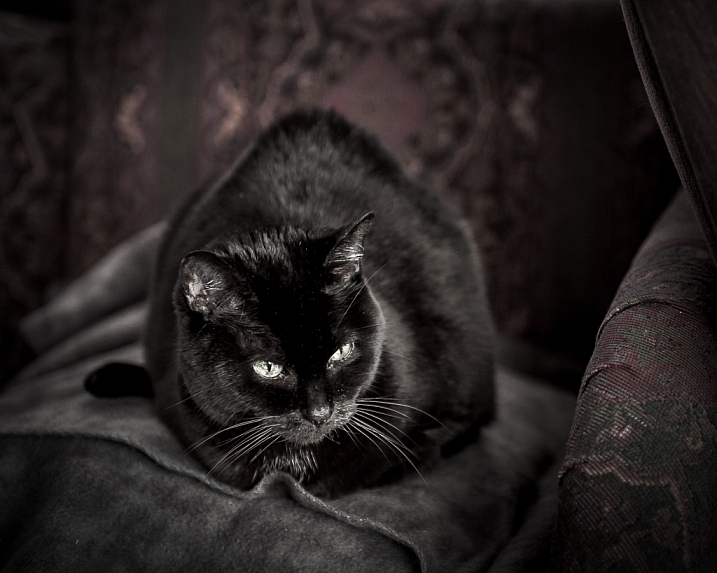
Shot at zero exposure compensation. Black cat is gray or Zone V.

RV-02383-slideshow (1)

Shot at -2 stops black cat is now black or Zone III.

As an experiment, try photographing a piece of plain white paper. First, make sure that there is no exposure compensation added – your meter should be in the middle. Take a photo. Next, add +2-stops of exposure compensation. This will bring your exposure to Zone VII. Then, take another photo. Notice the difference? The first image should be very close to middle-gray, or Zone V, where the last image should be bright white, but still show detail in the paper.

External Light Meters

Another tool that may be helpful to you, is an external handheld light meter. They work the same way as your camera’s light meter in that they meter for middle-gray, but they have the added advantage of being to reading what’s known as Incident Light: that which is falling on the subject, not reflected from it. Your camera’s meter is a reflected light meter; it reads the light that has been reflected or bounced off your subject. This may seem obvious, but there is a big difference between incident light and reflected light. Reflected light is greatly affected by tone – the darker your subject is, the less light that will be reflected, whereas the brighter your subject is the more light that will be reflected. However, the incident light – or light coming from the light source – will remain the same no matter what the tones are in your subject. By using an external light meter, you are reading the light directly from the source; unaffected by the tone of the subject.

However, do be careful when you are using an external light meter that you read the incident light from the subject’s position. You may be in the shade, for example, and your subject in the sun. If you were to read the incident light for your position,you would be getting a reading for the shade area, and not the sun, which is the light that’s falling on your subject!

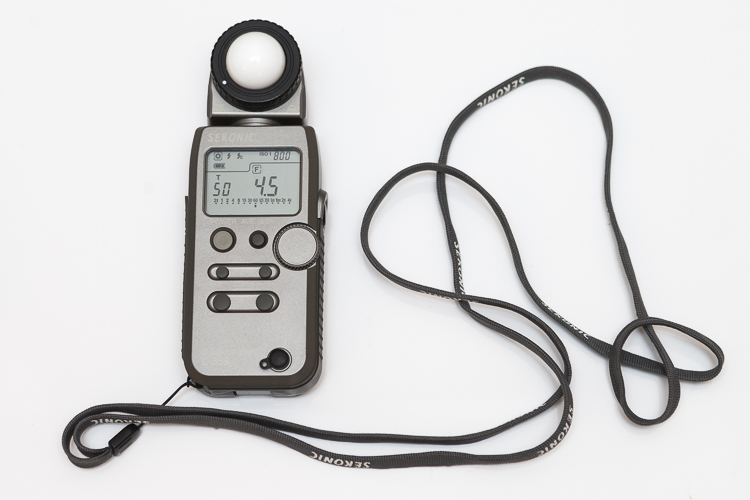
This is an external light meter. It's a Sekonic L-358, and is able to meter ambient light but also meter flash.

This is an external light meter. It’s a Sekonic L-358, and is able to meter ambient or natural light as well as flash.

Summary and application

Now that you know what your light meter is doing, and how to correct it with exposure compensation, you are on your way to getting more consistent and correct exposures.

Before you press the shutter button next time, do consider what the tones in your scene are like. Are there lots of brighter tones, or more darker tones? If your frame has more brighter tones, the exposure compensation will need to be more on the plus side to render them correctly. However, if there are more darker tones, your exposure compensation will be more toward the minus side of your meter. If you feel there are equal amounts of bright and dark tones, you may find that you don’t need to add any compensation at all.

teaching-eg-028-slideshow

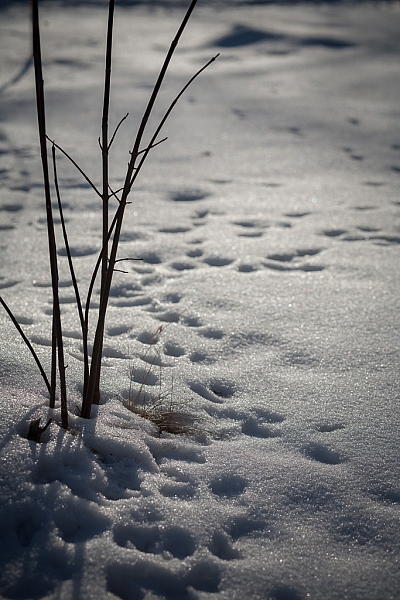
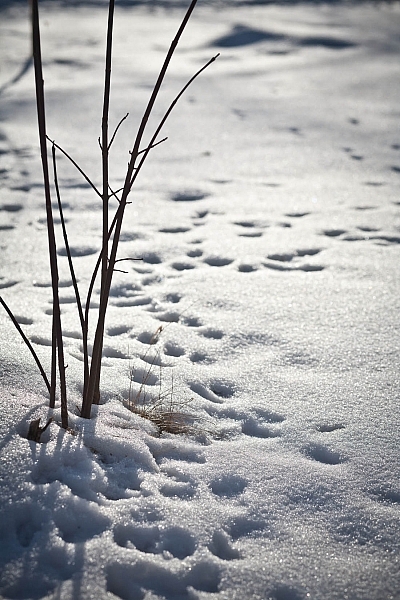
Snow shot at zero exposure compensation is gray, or Zone V.

teaching-eg-028-blog1100

Snow shot at +2 is now white with detail or Zone VII.

If you’re ever unsure of how much exposure compensation to add or subtract, take a test shot at zero, or in the middle. This will help you decide the direction in which you need to go.

googletag.cmd.push(function() {
tablet_slots.push( googletag.defineSlot( “/1005424/_dPSv4_tab-all-article-bottom_(300×250)”, [300, 250], “pb-ad-78623” ).addService( googletag.pubads() ) ); } );

googletag.cmd.push(function() {
mobile_slots.push( googletag.defineSlot( “/1005424/_dPSv4_mob-all-article-bottom_(300×250)”, [300, 250], “pb-ad-78158” ).addService( googletag.pubads() ) ); } );

The post How to Use the Zone System to Learn about Metering and Exposure Compensation by Daniel Smith appeared first on Digital Photography School.


Digital Photography School

 
Comments Off on How to Use the Zone System to Learn about Metering and Exposure Compensation

Posted in Photography


How to Use Exposure Compensation to Take Control of Your Exposure

15 Feb

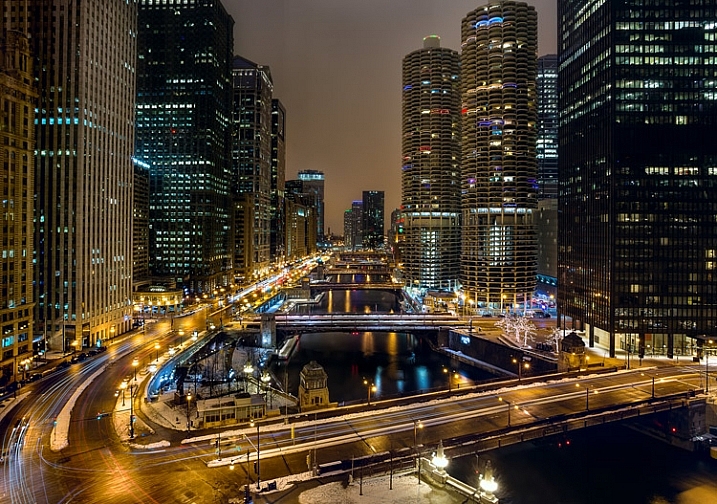
Chicago-River-2016-01-02You don’t have to shoot in Manual mode to take complete control over the exposure process.
When you use shooting modes other than Manual, the camera will set at least one of the three exposure controls (shutter speed, aperture, and/or ISO) for you. However, your camera provides you with an override called exposure compensation. It gives you the ability to change the camera’s exposure values from something other than what the camera automatically sets for you. In this article, I will show you how to use it to get the exposure you want every time.

When should you use Exposure Compensation?

First, let’s back up and talk about when you might want to use exposure compensation. You may wonder why you’d want to change anything, if your camera is already determining the proper exposure level.

The first reason is that your camera’s meter can be fooled by some of the conditions you face. The meter operates by looking at the tones in its view, then averaging them out. Basically, the manufacturers have determined that most scenes will average out to a middle grey tone, often referred to as 18% grey. Therefore, if the tones in your frame are darker than this middle grey tone, the meter will show that there is not enough light for a proper exposure, and therefore the meter thinks your picture will be underexposed. Conversely, if the tones in your frame are lighter than middle grey, the meter will show that there is too much light for a proper exposure and it thinks your photo will be overexposed. A lot of the time the camera meter is right, but sometimes it is not.

Some situations are supposed to be brighter than middle grey. A classic example is a photograph taken of a snowy scene. Your camera’s meter will assume that all that white snowy scene should be grey, and will therefore choose exposure settings that underexpose the image. Obviously you don’t want that. Here is an example, the picture to the left was taken strictly by the camera’s meter, and the picture to the right overexposed by one stop according to the camera’s meter:

A snowy scene frequently confuses your camera's meter. To the left is a shot taken at normal exposure. To the right is one taken after adding in a stop of exposure compensation (overexposure).

A snowy scene frequently confuses your camera’s meter. To the left, is a shot taken at normal exposure. To the right, is one taken after adding in a stop of exposure compensation (overexposure).

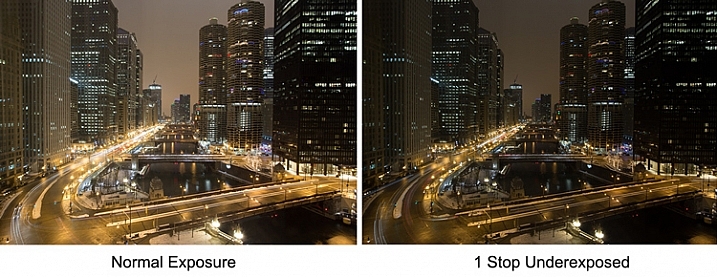
Another example is night photography, where the darkness of the scene should result in dark tones in your picture. The camera’s meter won’t recognize this though, and will tell you to brighten up the picture. Using exposure compensation will allow you to take control, and set a proper exposure.

As an example, check out the pictures below. In the picture on the left, taken at normal exposure as per the camera’s meter, it brightened the night scene and it looks a little washed out. To the right is an underexposed (according to the meter) image that more closely resembles the actual conditions of the scene.

Night-Comp

The camera’s meter (and even the histogram) tells you that the normal exposure is correct (see below). But the reason the camera thinks the normal exposure is correct, is that it that the average of the tones closely approximates middle grey. However, the underexposed image actually more closely captures the reality of the situation.

Histogram-Comp

Another reason you may want to use exposure compensation is that you simply don’t like the “correct” exposure. You may want to darken the scene to add some mood or drama, or you may want to brighten things up. Photography is ultimately an artistic endeavor, and is highly subjective, so exposure compensation gives you a tool to put that to work.

Finally, if you subscribe to the theory that you should expose to the right, exposure compensation will allow you to do so in camera modes other than Manual. If you are unfamiliar with this concept, expose to the right means that you slightly overexpose your images so that most of the tones appear on the right side of the histogram (without clipping anything). You later reduce the tones in post-processing and this can sometimes result in slightly better image quality. The overexposure happens by using exposure compensation.

How Exposure Compensation Works

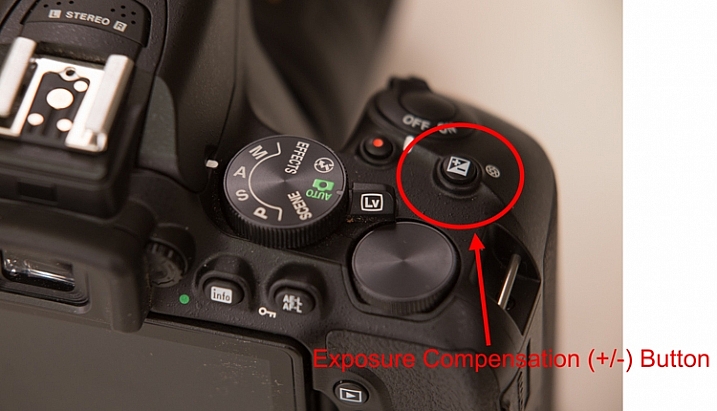
Now that you know what exposure compensation is, how do you use it? In most cases, your camera will have a little button with a +/- on it. That is the button you press to change the exposure compensation. While pressing that button, turn the main dial of your camera right or left (by main dial, I am referring to the dial on the top right of your camera, usually next to the shutter release button). That will change the exposure compensation. Turning the dial one way will reduce the exposure, and the other way increases it. Each click of the dial will usually change exposure settings by 1/3 of a stop.

PlusMinusButton

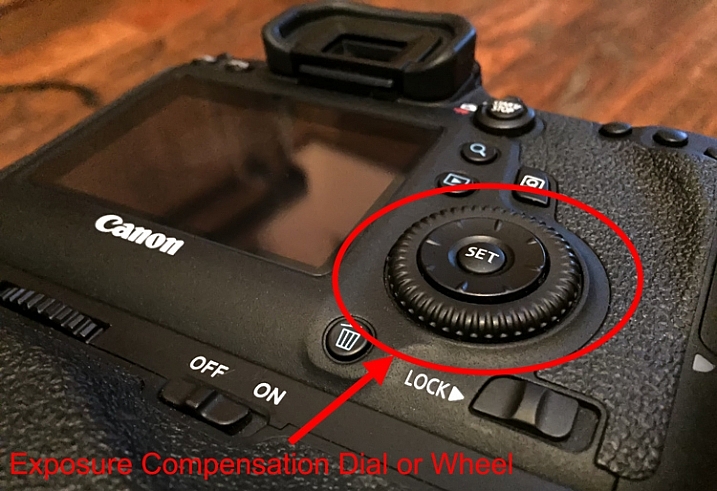
If you have a higher-end DSLR, then your camera will have a second dial or wheel on the back of the camera. Those cameras will usually not have the +/- button, but that second dial will be used to change the exposure compensation settings. The advantage is that you can just turn that dial with your right thumb without needing to press any buttons.

Wheel

Exposure Compensation in Different Camera Modes

So what does exposure compensation actually do? You know that it changes the exposure, but how does it do so? By changing the aperture? Or the shutter speed? Or both?

The answer is that it depends on what mode you have your camera in. I will explain what is going on for each of the camera modes:

  • Aperture Priority Mode – In Aperture Priority mode, exposure compensation changes the shutter speed. Remember that in this mode, you set the aperture and the camera sets a corresponding shutter speed. If you change the Aperture, your camera just sets another corresponding shutter speed, and there is no change in the exposure level. Exposure compensation gives you the ability to change the shutter speed (and the overall exposure value) while staying at the same aperture you originally set.
  • Shutter Priority – In Shutter Priority mode, exposure compensation changes the size of your aperture. It is basically the reverse of Aperture Priority mode. You set a shutter speed, and the camera sets a corresponding aperture. Exposure compensation therefore changes the exposure by allowing you to change that aperture size.
  • Program – In Program mode (P on your mode dial), exposure compensation changes the shutter speed. At least that’s what happened on the cameras I tested. It is possible that yours works differently, or that you can change it in the menu. As with so many things, this is a good excuse to pull out your camera’s user manual and go through it.

What about Manual and Automatic modes? These don’t have exposure compensation. In Manual mode, the camera does not set an exposure value for you in the first place, you set everything yourself. Whenever you change the aperture or the shutter speed, you are changing the exposure value. In Automatic mode, there is no exposure compensation because you have no control over exposure – the camera does everything for you. That is one of the reasons why you should never use this mode.

Exposure-Compensation

Here we see the back of the camera before and after applying one stop of exposure compensation. In the example to the left, the camera shows a normal exposure with a shutter speed of 1/500 of a second. In the example to the right, the shutter speed is reduced by 1 stop to 1/1000 of a second, and the meter reading reflects that.

Exposure Bracketing

While talking about exposure compensation, there is a related topic that you might find useful as well. It is Auto Exposure Bracketing (AEB, or just bracketing). It is where you set your camera to take multiple pictures in a row with the first at normal exposure, the next one(s) underexposed, and the final one(s) overexposed (if you have Canon it may look more like this:  underexposed>normal>overexposed, you can also change the order on a Nikon if you go to your menu settings).

When you enable the feature in your camera’s menu, you set the amount of under and overexposure. The camera will take three to five pictures in rapid succession (depending on your camera, if you shoot Canon you have to also set your drive mode to high speed burst). In a way, this accomplishes the same thing as exposure compensation, because you are dialling in a certain amount of underexposure or overexposure.

Bracket

Why would you want to do this? Several reasons. Usually it comes into play when there is a wide divergence of tones in the image. Using a little blending later, you can use the brightest tones from the underexposed image and the darkest tones from the overexposed image. In addition, if you are ever going to use any high dynamic range processing on your images, you should have multiple images to work with. Finally, you might just think of it as “exposure insurance” for important shots to make sure that you have nailed the exposure.

Conclusion

We all want to be able to take complete control over the exposure process, but not all of us want to work in Manual mode. When you work in a mode like Aperture Priority mode, the camera offers you a lot of benefits – speed being the main one. By adding exposure compensation to your process, you can get the speed of other modes, along with the control of manual.

If you haven’t used exposure compensation before, give it a try. If you are familiar with it, chime in below with your own tips and experiences.

googletag.cmd.push(function() {
tablet_slots.push( googletag.defineSlot( “/1005424/_dPSv4_tab-all-article-bottom_(300×250)”, [300, 250], “pb-ad-78623” ).addService( googletag.pubads() ) ); } );

googletag.cmd.push(function() {
mobile_slots.push( googletag.defineSlot( “/1005424/_dPSv4_mob-all-article-bottom_(300×250)”, [300, 250], “pb-ad-78158” ).addService( googletag.pubads() ) ); } );

The post How to Use Exposure Compensation to Take Control of Your Exposure by Jim Hamel appeared first on Digital Photography School.


Digital Photography School

 
Comments Off on How to Use Exposure Compensation to Take Control of Your Exposure

Posted in Photography


Digital Photography 1 on 1: Episode 26: Metering Part 2: Exposure Compensation

13 Feb

This week is the second episode in a four-part series about metering. In this episode, Mark will explain exposure compensation. He will also demonstrate this and show us how to use it correctly.

Info : mockmoon.sblo.jp music (MP3) download : soundcloud.com movie (MP4) download : vimeo.com Recording live : Ustream address www.ustream.tv Location : Panoramio adress www.panoramio.com


When to use Exposure Compensation. Canon Nikon tips tricks

19 Dec

Exposure Compensation www.elitevideo.com . When do you use it? The answer is, When you are taking a series of photos in a setting that has a lot of darkness around a subject, or a lot of brightness around your subject. If it is too dark or bright around your subject, then every picture you take will be over exposed or under exposed, because the camera does not know what light level to concentrate on. With exposure compensation, You are telling the camera, “Give me a little more or a little less light that you have been in this situation- on every shot.” The best way to determine if you need exposure compensation is to do a test shot in the enviornment that you will be shooting. For example Snow (lots of white), a theater (lots of dark), etc.
Video Rating: 5 / 5


Exposure Compensation – Quick Shots 06

10 Nov

How do you use exposure compensation? In this video Gavin Hoey www.gavtrain.com explains how exposure compensation can be used to over ride a cameras metering when shooting a subject that has a very dark or very bright background. For more information check out my blog at gavtrain.blogspot.com Facebook http
Video Rating: 4 / 5

 
Comments Off on Exposure Compensation – Quick Shots 06

Posted in Nikon Videos


Exposure Compensation in Aperture Mode – DSLR Photography Tutorial

24 Oct

razzi.me www.facebook.com www.PhotographersOnUTube.com https An in depth tutorial on exposure compensation in aperture mode for DSLR cameras.

PEHLA NASHA – JO JEETA .. ACOUSTIC GUITAR FINGERSTYLE . Recorded using the “D movie” feature in Nikon D90, the audio track was being recorded simulateously via line 6 toneport and Audacity.

 
Comments Off on Exposure Compensation in Aperture Mode – DSLR Photography Tutorial

Posted in Nikon Videos