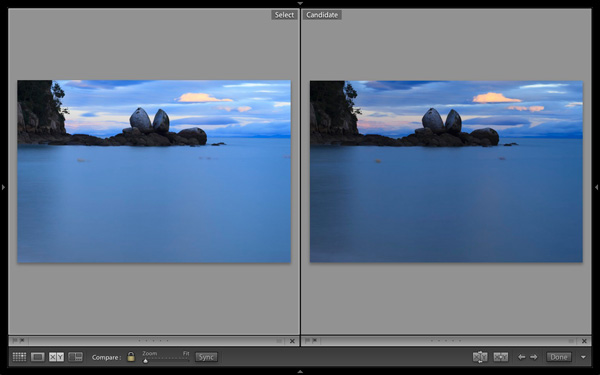
For decades photographers have faced the question of how to determine which of their images are the best. I’ve been through it all, from squinting at 35mm slides through a loupe on a lightbox, to creating contact sheets from negatives and marking the best with a red marker, to scanning negatives and slides through to the modern version of looking at Raw files on the camera’s LCD screen or in the various programs I have used over the last few years. Of those, there’s no doubt that Lightroom is one of the best for the task of comparing images and selecting the best ones.
Compare View
The tool I use for comparing images in Lightroom is the aptly named Compare View (I also use Survey View, to be covered in a future article).
To get the most out of Compare View, you should use Collections to organise your images, and Grid View to view thumbnails. Click the links to learn more about both.
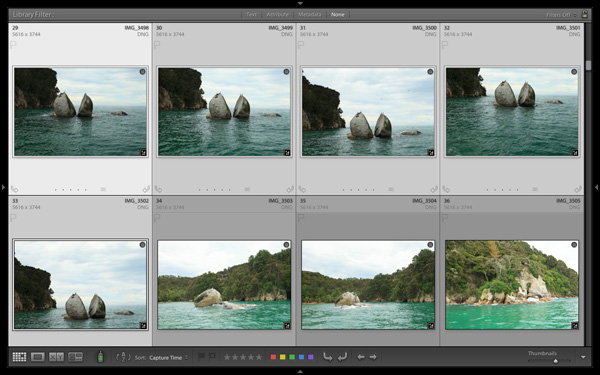
Grid View is the starting point for using Compare View. Select the images that you want to compare. It may be just two, or you may want to compare more. In this example (above) I selected five images.

The first image that you select is, in Lightroom terminology, the most selected image. It is surrounded by a lighter frame than the other selected photos. In the screenshot above the photo on the left is the most selected.
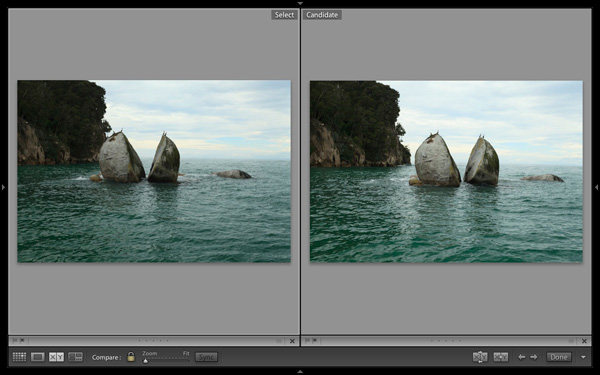
Images selected, press ‘C’ on your keyboard to go to Compare View. The most selected image is displayed on the left. Lightroom calls this photo the Select. The next image in the selection is displayed on the right. This one is called the Candidate.
The idea is to compare the Select with the rest of the images in the selection. Test it out by using the left- and right-arrow keys on your keyboard. If your selection contains more than two images, Lightroom cycles through the remainder of the selection, displaying each image as a Candidate.
Compare View icons
The icons along the bottom of the window in Compare View help you tell Lightroom what to do with either the Select or Candidate images. The first set is located underneath each photo:

1. Click on these icons to flag the photo as a Pick (left) or a Reject (right).
2. Click on these dots to give the photo a Star rating.
3. Click on the faint grey square to apply a Colour label.
4. Click on the X to deselect the photo. Lightroom removes it from Compare View when you do this.
The icons change to indicate the updated status of the image.
If the photo changes when you click any of these options, it is because you have the Auto Advance option ticked. Turn Auto Advance off by going to Photo > Auto Advance. I find it easiest to use Compare View with Auto Advance disabled.
The Toolbar icons
The rest of the icons are displayed in the Toolbar at the bottom of the Compare View window (press ‘T’ on your keyboard to reveal the Toolbar if you don’t see it).

This indicates that you are in Compare View. From left to right, these icons show Grid View (G), Loupe View (E), Compare View (C) and Survey View (N). You can switch between these modes by clicking on the icon or using the keyboard shortcuts (indicated in brackets).

With the padlock icon in the locked position (above) you can zoom into both the Select and Candidate image simultaneously by clicking once on either one. The magnification is set by the Zoom slider and both images move in tandem with the hand tool. This is useful for comparing two near identical images for fine detail such as accurate focusing or noise.

With the padlock icon in the unlocked position you can zoom into either image without affecting the other. Press the Sync button at any time to bring the second image into sync with the first.

These icons are perhaps the most important in Compare View, as they help you navigate around the images in the selection.
The two arrows on the right are straightforward. Click on them to navigate through the selection, just like you did with the arrow keys earlier.
The Swap button (X|Y with two arrows) tells Lightroom to swap the Candidate and Select images. Use it when you decide that the Candidate is the strongest image in the selection, and you want to compare it to the others.
The Make Select button (X|Y with one arrow) tells Lightroom to turn the Candidate image into the Select. The Select is removed from the display, and the next image in the selection becomes the new Candidate.

If you press the Done button Lightroom takes you to the Loupe View and displays the Select image. Alternatively, you can use the ‘G’ shortcut to return to Grid View.
Click the White arrow icon to add or remove icons from the Toolbar.
Putting it together
The main purpose of Compare view is to let you compare similar image so that you can decide which ones you want to process in the Develop module (you can also use it to compare photos that you have processed, or partly processed in the Develop module – but that’s another topic). Use the arrow keys to cycle through the images in your selection, and the Swap and Make Select buttons to compare different images. If this is new to you, it won’t take much practice before you settle into a rhythm. You’ll be pleasantly surprised at how quickly you can work you way through even hundreds of images using Compare View.
While some photographers use Star ratings and Colour labels to help organise their images, by far the simplest method is to use Flags. If you decide to process an image, click the grey flag icon underneath the photo (it’s on the left) to flag it as a Pick. If decide not to process it, leave it unpicked. Then, when you have finished, all you have to do is return to Grid View and choose the Flagged option in the Filter bar to remove the unwanted images from view. Then go to Edit > Select all to select all the flagged images and send them to a new Collection containing only the images that you want to process in the Develop module (using Collections to organise your images is covered in this article).
Mastering Lightroom Book One: The Library Module
My latest ebook Mastering Lightroom Book One: The Library Module is a complete guide to using Lightroom’s Library module to import, organise and search your photo files. You’ll learn how to tame your growing photo collection using Collections and Collection Sets, and how to save time so you can spend more time in the Develop module processing your photos.
Post originally from: Digital Photography Tips.
Check out our more Photography Tips at Photography Tips for Beginners, Portrait Photography Tips and Wedding Photography Tips.
How to Find Your Best Images With Lightroom 5’s Compare View
The post How to Find Your Best Images With Lightroom 5’s Compare View by Andrew Gibson appeared first on Digital Photography School.

Digital Photography School


You must be logged in to post a comment.