Boredom is one of the most powerful and inescapable forces on this world and photography is not immune to it. A bored photographer will likely stop to photograph or start producing boring images, which in turns will bore the viewer or client, who will likely stop following or buying the photographer’s boring work. Fighting boredom is, therefore, an absolute priority.

When you specialize in a certain kind of photography, after a while you will probably master it. You will know what lens and settings best suit the scene you have in front of you, to get this or that particular mood or effect in the final image. This is all as good as gold, don’t get me wrong, but at the same time you are also building up your comfort zone, together with your style, and producing a solid stream of consistent images.
The downside of staying too long in the comfort zone is that you may get bored; bored of the subjects you are used to photographing or bored because of lack of ideas. It is at this time, when you are looking at your portfolio and all you get is that same old same old vibe, that you need to step outside your comfort zone. Do something different, either by stepping into a new field or by changing the way you look at the subjects you are already familiar with. In one way or another, you have to bring some sparks back into your work, something that let’s you say wow once again when reviewing your own work.
I am an enthusiast urban and landscape photographer. If you are like me, chances are you have an enthusiast kit or semi-pro gear, built for the kind of photography you are interested in. Stepping outside your comfort zone and embrace a whole new photographic genre can be troublesome, both economically and for your self-esteem. Moving from landscape to portraiture, for example, may require you to buy flash guns, triggers, soft boxes and diffusors, and zoom or prime lenses that are probably not in the regular Joe’s (the landscape photographer) equipment. Then there is the self-esteem part. Chances are you will produce nothing new in the field and, if you compromise too much with the equipment, you may produce nothing more than an average portrait of a model. I think a more interesting way to step out from your comfort zone is to remain in your regular field but spice it up by adopting a different approach. This way you have the advantage of knowing the subject, and the rules to do this, before start twisting and bending them in a new and refreshing way.
Three easy ways to fight back photography boredom
Go mobile
Today’s mobile phones are equipped with decent cameras the can easily compete with many point and shoot cameras, with the plus side of having tons of apps to add extra functionalities (such as: slow shutter speed, in-phone HDR, filters and effects, panorama mode, burst mode) along with the ability to edit your photos on the fly. If you have one of these devices, use it to photograph your usual subject. It is challenging because of the intrinsic limitations of camera phones with respect to DSLR or mirrorless systems, but the results can be just as rewarding. It is a bit like forcing yourself to shoot with a single prime lens (forget the zoom of a camera phone). Having quite a short (35mm equivalent) focal length (the iPhone 5 is about 31 mm equivalent) makes camera phones suitable for landscape and street or urban shooting. Of course, you can alway zoom in and out by walking farther away or toward the subject. Here some photos taken from an iPhoneography project (where photos are taken and edited exclusively on my iPhone).

Using an app to control the shutter speed, allows you to be creative with crowded places like stations.

Panoramas are great to capture the full drama of a storm rushing in over the countryside.

HDR apps can extend the dynamic range of your phone’s camera.
For my mobile phone tips check out the dPS eBook: iPhone Photography or 8 of the Best Smartphone Accessories.
Play with the invisible light
Infrared photography was a revelation for me. If you are not living or travelling in the great wilderness but are based in, say, the same-old-same-old sleepy European countryside, you can forget about all those great and dramatic scenes you love which are featured in many magazines like National Geographic. Nevertheless, if there’s something that can add a spark to an otherwise boring countryside or city garden it is to capture the scene in infrared. This because infrared light is absorbed and reflected by different subjects quite differently than visible light. For example, green grass and leaves will appear white in an infrared photograph, while clear blue sky and water will be rendered almost pitch black. The result is usually quite surprising. Your photo will likely capture the viewer’s attention and, because of the intrinsic challenges of infrared photography, will spark your enthusiasm as well. When you start with infrared photography, chances are you will photograph trees and puffy clouds, but you may soon be asking yourself; okay, what else? You will probably start to photograph other objects in infrared, like the city, or even people.
The best and cheapest way to try out infrared photography is to already have a camera that is sensitive, to some extent, to infrared light. Manufacturers place a filter right in front the sensor to cut infrared light, but if you are in luck, it will not do a perfect job. If you can see and photograph the light coming from the infrared emitter of a TV remote control, chances are you are good to go. Next, you will need an infrared filter to place in front your lens. Ideally this filter should cut all the visible light while letting only the infrared pass through. A good filter to start with is the HOYA R72, which allows also some visible red light to pass, making it easier to frame and compose your shot. One downside is that your shutter speed will be greatly reduced. Under the bright midday sun, you may need an exposure of a few seconds in order to get a properly exposed image. This means hand-held shots are not possible and a tripod is required. A welcome side effect is that a moving crowd in front your subject will be almost, or completely gone. Also, if you are dealing with trees, in particular if they are close to you, it is best to photograph with little or no wind, so as to avoid blurring them too much. All these limitations aside, great black and white and false-colour infrared scenes can still be captured with out-of-the-box cameras and with little financial investment. Here few of my best infrared photographs using my unmodified Panasonic Lumix DMC-GF2 with a HOYA R72 filter screwed on the Panasonic 14-42mm kit lens.

False-colour infrared photography of a pond in a park near Brussels. A quite common view is turned into a very interesting winter-like scene.

Fast moving clouds and an interesting tree can make for a great infrared image.
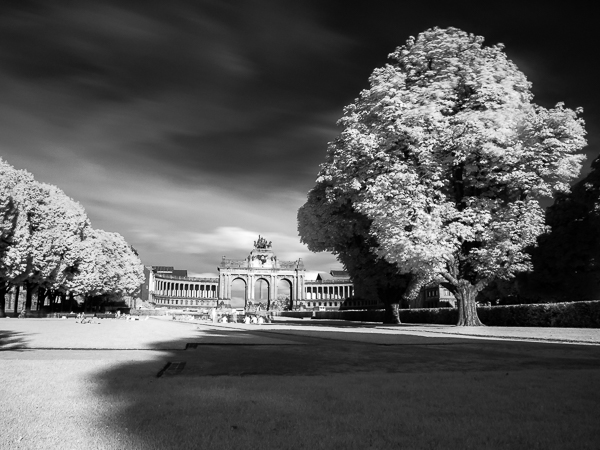
Infrared photography can also be successful in the city like this image of the Triumph Arch in the Parc du Cinquantenaire, in Brussels. The moving crowd disappeared because of the long exposure emptying the scene.
For more information on shooting the processing infrared with your camera read these dPS articles:
- How to do Surreal Digital Infrared Photography Without Expensive Gear or Camera Conversions
- 5 Creative Ways to Process Infrared Photographs in Photoshop
Introduce distortion
With a bit higher financial investment, you could consider buying a fisheye lens (please avoid fisheye lens converters because the infrared image quality is usually poor). Invest in a real fisheye lens; the fully manual (and relatively cheap) Samyang, Rokinon, and Vivitar lenses are in my opinion, the best way to start out. They are cheap, small, super sharp, relatively fast, with a great field of view. You can set the focus around the two meter mark (6.5 feet) and never touch it again as long as you stop down (use a smaller aperture than wide opened) your lens a bit.
Fisheye lenses produce very particular images. I suggest you to read about them and research as much as possible before buying one; see if the images you can create with a fisheye lens suit your photographic taste. I have recently purchased a Samyang 7.5mm f/3.5 for my Lumix and it simply blew me away. I got this lens only a few weeks ago, but boy I love its compactness, lightness, how sharp it is, and the huge field of view (15mm equivalent on full frame) at a fraction of the price of an ultra wide angle lens. Of course, this comes at the cost of having some distortion, but if you like it and you can work it to your advantage, it is a great deal, and is a killer lens for travel photography too.
Work your fisheye lens – tilt it upward to have a concave horizon and tall buildings bending and looming over the scene. Tilt it downwards to have a convex horizon, accentuating Earth’s curvature. Keep the horizon levelled or tilt the camera to see how the scene changes. Get down low by kneeling, or up high by raising the camera on a high vantage point (yes, even mounted on your monopod held high above your head). Accentuate distortions, or reduce them keeping straight lines towards the edges or towards the centre of the frame. Notice how objects at the edges of the frame are magnified with respect to those at the centre. Mix and match those distortions to create some unconventional, striking, and definitely not boring photographs. Below are some examples from my first photo walks in Brussels (Belgium), a very touristic city with very famous and well photographed landmarks.

The Atomium: huge monuments and landmarks can easily be squeezed into the frame and be portrayed in a quite a dynamic way.

Frame a busy roundabout by night from a high vantage point to capture great urban merry-go-rounds.

Thanks to the fisheye’s distortions, even an empty square becomes interesting.
Bonus tips
- Get out during unusual times of the day (dawn and night)
- Experiment with HDR and exposure fusion for more dramatic or gritty and punchy image
- Go out with bad or stormy weather to take advantage of the dramatic sky
Do you have any other tips for shaking it up and combating photography boredom? Share in the comments below.
The post 3 Ways to Combat Photography Boredom by Andrea Minoia appeared first on Digital Photography School.

Digital Photography School





Halo Combat Evolved: Walkthrough – Part 16 [Mission 7] The Library (Gameplay & Commentary)
Halo Combat Evolved Walkthrough: The Library – Mission 7 Part 16 of my Let’s Play series from Halo Combat Evolved This is going to be the last upload of this series for a couple of days now due to the fact I have uploaded 4 Episodes in three days, that is unless you guys want me to continue to release this on a daily basis? Let me know in the Comments. Follow me on Twitter – www.twitter.com Playlist – www.youtube.com
www.Berger-Bros.com Learn how to fine tune your camera’s metering. The camera doe NOT behave like your eye. The camera needs YOU to tell IT what to do. Every camera has a built in default metering mode, which is the way the camera sees the available light, and adjusts to that light. Yvonne Berger, an instructor with Berger Bros Camera in Amityville and Syosset Long Island, New York explains various metering modes, such as matrix and evaluative metering, center weight meter spot metering She explains when to use each type of metering depending on what type of photograph you are taking.
Posted in Nikon Videos