RSS
 

Posts Tagged ‘colored’

How to use Colored Gels to Create Unique and Creative Portraits

08 Aug

We’ve all seen the usual studio set up –  beautifully crisp white light, maybe some strobes, diffusers, and other things of the sort. However, what can you do beyond that to make your portraits stand out? Add some color! In this article, learn how to use colored gels to add some spice to your images.

musician portrait with pink background - How to use Colored Gels to Create Unique and Creative Lighting

Colored gels are filters that go on your light in order to change the output color. They are usually sold at photography stores and clamped onto your lights. They range in size, thickness, color cast, and most importantly, price. Be very mindful of how hot your lights are because we’ve had gels melt on the set before during long sessions (such as music videos). 

However, you can also make your own colored gels using cellophane and tape. Just take some really saturated cellophane from a local party or art store and wrap them around your softbox or LED light (so long as the LED runs cold and won’t melt the plastic paper) and fasten with tape.

This may not look like the most professional setup, but I suppose that matters little so long as the final outcome is fantastic!

spooky photo with double exposures - How to use Colored Gels to Create Unique and Creative Lighting

There are limitless possibilities with gels. In regard to color combinations, I suggest making sure all of your gels are saturated the same in order to match with one another (and not become a headache in the editing room later).

Here are some of my favorite gel lighting arrangements to create some new and unique imagery. As a personal preference, I use continuous light, but the same can be achieved with studio strobes or speedlights.

One Color Gel Setup

The simplest and most traditional gel lighting look. There isn’t any fancy setup for this look, you can photograph your model in any fashion and just replace the white light with a color. Make sure your colored gel is really vibrant or the image may fall flat. 

portrait of a girl with amber gel - How to use Colored Gels to Create Unique and Creative Lighting

Play with distance, shutter speed, and some light post-processing to see how far you can get the light to spread. That can add a unique and unexpected twist to your one-light setup!

A good use of the one color set up is backlighting! Take your light and place it behind the subject.

backlighting with gels - How to use Colored Gels to Create Unique and Creative Lighting

Double Colored Gel Setup

My personal favorite is the double colored gel setup. All this requires is two lights, each gelled with different colors. Set them to the side of your model and watch the magic happen!

The division can be very eye-catching and intriguing.

model with red and green lights - How to use Colored Gels to Create Unique and Creative Lighting

lighting diagram - How to use Colored Gels to Create Unique and Creative Lighting

Be mindful of your model’s physical structure. You want to make sure that the color division hits the proper place. Aim for the lighting to (generally) divide right at the center of the nose (split lighting).

Tri-Color Gel Setup

How to use Colored Gels to Create Unique and Creative Lighting

You can go as intense with colors as you like, but when I do three color looks, I like one of those colors to be white. The white softens the whole look and doesn’t make it overly exaggerated.

However, if you prefer a color, I suggest placing a lighter color in the center of your arrangement and the darker colors on the sides.

portrait with 3 colors of light - How to use Colored Gels to Create Unique and Creative Lighting

For three color looks, my favorite arrangement is the traditional triangle light setup. This includes one light in front of the subject and two lights at the sides.

Depending on the look you want to achieve, you can set up the two side lights behind the model and just turn them towards the model. That keeps the light from being too harsh. For a more intense look, place the lights directly at the model’s sides.

lighting diagram - How to use Colored Gels to Create Unique and Creative Lighting

Rim Light Colored Gel Setup

girl with rim lighting - How to use Colored Gels to Create Unique and Creative Lighting

Always a very dramatic and edgy look, using gels for rim lights can bring a bit of flair to your portraits. It does depend on your model’s structure as to where you place the lights. What I do is set up a white light in front of the model and two colored gels on lights to the side pointed forward.

The best colors I’ve found for the rim light look are purples, blues, reds, and greens – oranges tend to get a bit lost with the white light.

How to use Colored Gels to Create Unique and Creative Lighting

Background Light Gel Setup

How to use Colored Gels to Create Unique and Creative Lighting

The quickest way to liven up any location is to aim some lights with colored gels attached toward the background wall.

You can photograph your subject in any traditional studio light manner, and just shoot two gelled lights to the back wall. This allows your subject to be really well separated from the background (something we always strive for in studio photography).

How to use Colored Gels to Create Unique and Creative Lighting

Now go out there and play with colors!

The post How to use Colored Gels to Create Unique and Creative Portraits appeared first on Digital Photography School.


Digital Photography School

 
Comments Off on How to use Colored Gels to Create Unique and Creative Portraits

Posted in Photography


How to Create Abstract Photos with Colored Paper

04 Jul

Developed in China, paper as we know it has been around for at least 2000 years. Originally made by pressing the wet fibers of plant-derived cellulose together and dried in sheets, paper’s ability to be mass produced resulted in the advancement of the written word as a means to pass information down through time. This accelerated exchange of information triggered a revolution in cultural and technological advancements that have shaped the way we live today.

Artists paint and photographers print on specialized paper. Books, magazines, and newspapers distribute information across the world. Important documents are filed away on paper, ready to be pulled out at a moment’s notice. Even with today’s abundance of computer screens, paper has endured as an indispensable material.

Creating abstract photos is another wonderful use of paper. With a few bulldog clips, some colored paper, and a bit of creativity, you can create beautiful abstract images to enjoy and use as desktop wallpapers or backgrounds.

Creating Abstract Photos with Colored Paper - orange and red abstract image

What you will need

  • Your camera
  • A macro lens or set of extension tubes
  • A selection of different colored paper (I used a packet of variously sized one-color per piece origami paper I found at a dollar shop).
  • Several medium or large bulldog clips.

Selecting a space

First, you’ll need to choose a space to set up in. This is important because your paper needs to be exposed to plenty of natural light. Otherwise, your shadows will be too dark, and your photographs will look flat or awkward.

Set up outside, or near a large window with a decent amount of light flooding into your space. I work on a desk outside, with plenty of room to move and shoot from different perspectives.

Creating Abstract Photos with Colored Paper - orange circle abstract

Setting up

Setting up for this project is can be a little tricky. Once you’ve settled on a space to work in, you’ll need to arrange your colored paper. First, select a piece of colored paper that will serve as the background for the image. You’ll want this background to cover the frame, so choose a size that has adequate coverage. The background color is up to you, so choose whatever catches your eye.

Next, add a second layer of paper to sit on top of the background. This will be your foreground subject. Again, the color is up to you. To make an interesting image, you need to separate the foreground layer from the background. You’ll do this by physically adjusting the orientation of the foreground paper.

Creating Abstract Photos with Colored Paper - bulldog paper clip

Generally, sheets of paper want to stay flat and straight, so shaping your foreground paper can take a little bit of coordination. An easy way to control the orientation of the paper is to add weight to its edges. Attach a bulldog clip to each side of the piece of colored paper and lay it down so that there is a gap between the foreground and background paper.

Photographing your creations

Once you’ve attached your bulldog clips and arranged your paper, it’s time to get busy photographing. There are no hard-and-fast rules here, just photograph what you think looks best.

Try sitting your foreground paper vertically or horizontally in relation to the background paper for different depth effects. You can also try focusing your lens on different areas of the paper, or for a smooth, featureless gradient, unfocus your lens altogether. Focus on a small section of your paper or zoom out to include the whole arrangement.

You can modify the shape of your foreground paper by manipulating the location of the bulldog clips on the paper. Moving them closer together creates a nice S or U bend in the middle of the paper for soft organic lines. For harder lines, move the bulldog clips further away from each other to tighten the paper.

blue and yellow abstract - Creating Abstract Photos with Colored Paper

Paper has a thousand uses, the great thing about this project is that there is no right or wrong way to do things. Just take some time to relax and experiment. If you have kids or grandchildren, get them to help you – they’ll have fun helping to arrange the paper.

Enjoy!

The post How to Create Abstract Photos with Colored Paper appeared first on Digital Photography School.


Digital Photography School

 
Comments Off on How to Create Abstract Photos with Colored Paper

Posted in Photography


19 Vibrantly Colored Crimson Images

20 Aug

Here are 19 really vibrant images featuring the color red for your visual stimulation.

Hope you enjoy them.

By liz west

By Bernard Spragg. NZ

By theilr

By Ivan Bandura

By Harsha K R

By jimpg2_2015

By Bernard Spragg. NZ

By VaMedia

By jasleen_kaur

By aotaro

By d26b73

By Mike Beales

By sean_hickin

By Visha~~AWAY..VERY BUSY

By Jim Lukach

By inthepotter’shands

By Sebastian Rieger

By Johan Neven

By coniferconifer

The post 19 Vibrantly Colored Crimson Images by Darlene Hildebrandt appeared first on Digital Photography School.


Digital Photography School

 
Comments Off on 19 Vibrantly Colored Crimson Images

Posted in Photography


How to Use Colored Gels for Creative Off-Camera Flash Photography

17 Apr

Diving into off-camera flash photography opens up a world of exciting, new and creative possibilities. Besides giving you the option to shape and control the light in your image with a flash unit, you can also use colored gels to modify the color of your scene to add either a subtle creative touch or a more dramatic impact.

off-camera flash using a blue colored gel

A man playing electric guitar lit creatively by an off-camera flash colored blue.

This guide will help you to get started using off-camera flash and colored gels to bring your photography to the next level!

What are colored gels and how are they used?

Colored gels (sometimes called color filters or lighting gels) are thin pieces of colored transparent material. They can be fitted over the top of your flash unit to modify the color of the light.

Examples of colored gels that can be used to modify the color of light from off-camera flashes

A small example of the variety of colored gels available.

Often, the reason for using a colored gel is to tone of the flash so that it matches the color (white balance) of the room. For example, a typical camera flash fired in a room lit by tungsten light bulbs will appear much bluer against the orange ambient background light. By covering the flash with a gel that is tinted orange, you can make the flash match the existing lighting conditions so that all sources contribute the same color to your final image.

Attaching the colored gels to your flash

A gel can be attached to a flash in a number of ways. Perhaps the most common method for portable flash units is with a velcro strap that wraps around the flash tube. If you’re in a real pinch, you could even simply use a piece of tape. Just make sure that the gel completely covers the flash so that it completely modifies that color of the light.

Note: Magmod makes a system to do just that – read Suzi Pratt’s overview of Magmod options here.

  • Magmod Basic Kit on Amazon including attachment device and gels – $ 89.95 (are a bit more durable and will last longer than the gels).
  • Honl Photo Speed Strap – $ 10.95
  • Honl gel kits – around $ 19.95
A red colored gel filter covering an off-camera flash unit

A red gel has been attached snugly to the flash unit and will now change the color of the light from the flash to red.

A sideview of a colored gel fitted over a flash unit, attached by a Velcro strap

A view of the Honl Photo Speed Strap, which uses velcro to allows you to quickly and easily attach a color gel to your flash unit.

Gels come in a wide variety of colors and are very inexpensive, which makes it easy to get started experimenting with this fun style of photography. Also, they can continue to be used even if they are scratched or folded. You only need to replace a gel if it has a rip or a small hole.

Once you have your off-camera flash or multiple speedlight units ready, you can begin to get creative!

Using colored gels with a dark background

When getting started, one of the best ways to get a sense of how to use color gels is by taking pictures in a dark room. This gives you full control over the light throughout the scene. Creating a dark background doesn’t have anything to do with putting up black curtains or finding a wall that is painted black – it’s all about controlling where the light spills.

First, you’ll want to find a medium to large sized room. Dim the lights so that you can produce a perfectly black image without flash (available room light only). Place your subject a fair distance away from the far wall. By directing the light from your flash units only towards your subject and away from the wall behind them, you can create a completely black background.

To add just a hint of color, put a color gel only on your secondary flash. The key (main) light provides adequate lighting for the subject, while the secondary flash adds drama, intrigue, and style to the photo.

A man plays guitar with a burst of blue color from the flash behind him

This photo was taken with two flashes – the one in the front hitting him is not tinted with any color, the one behind him is gelled blue. Light from the blue-tinted flash has been allowed to “spill” towards the camera lens, created the colored lens flare effect.

Once you’ve mastered this straight-forward style of shot, you can start to mix and match colors for unexpected and fascinating results.

Getting creative with color

Color plays an incredibly vital role in telling a story or establishing a mood. We are all familiar with typical color associations – yellow represents happiness, red represents anger, blue represents sadness, and so on.

With a variety of color choices at your fingertips, you can craft a precise feeling or mood in your images simply by adding a colored gel over your flash unit.

A portrait of a man taken with a light from a flash that has been tinted blue

This image was lit by a single flash with a blue colored gel to give it a mood of introspection and melancholy.

It is important to visualize the final image you intend to create, otherwise, your shot can quickly turn into a jumble of mismatched colors.

Remember that you can also color more than just the subject. Firing a colored flash at the background wall can instantly update it, which is perfect for adding some variety to studio-style portrait shots.

An image of a man with a lightsaber, made possible through a red colour placed over an off-camera flash unit

Since lightsabers haven’t been invented yet, an off-camera flash that has been covered with a red color gel provides the distinctive glow for this image. The lightsaber itself was added later in Photoshop.

How understanding color can help you create drama

Once you start playing with color, it helps to have an understanding of how and why certain colors work better together than others.

Colorwheel

You can apply even some basic knowledge from a color wheel to get a sense of how you can create bold and vibrant color pairs. For example, colors directly opposite each other on the color wheel are called complementary colors, as they pair together very well. Knowing this you can mix blue and orange for a dramatic shot. Many Hollywood movies use color theory to help make their footage more vivid.

Or, you can break the rules for more surprising and unexpected results!

A man holding a guitar, lit by light from blue and red colored gels on off-camera flashes

Blue and red create a strong contrast, which adds a feeling of tension and drama to this image.

Once you get comfortable with controlling and creating colored light, your creative options are endless. For example, you can use a flash tinted orange to recreate the glow of a sunset. You can also begin mixing and matching with ambient light conditions, which is much trickier but can be very rewarding.

You’ll be surprised how much a thin sheet of colored plastic can transform your photography!

Some important tips to remember

  • Darker color gels, such as deep reds or blues, block a portion of the light that the flash gives off. When working with these colors you will need to increase the amount of flash power compared to when you use flash on its on.
  • If you don’t have a full set of colors, you can layer two colored gels over top of each other. For example, blue and red colored gels can be combined to make purple. Remember that doubling them up will block even more light and require additional flash power.
  • You can use any traditional flash modifiers, such as umbrellas and soft boxes, along with color gels in order to soften or shape the light that is produced.
  • Experiment and play! Even if it seems intimidating or complicated at first, trial and error is a fantastic way to learn a new skill or technique that you can add to your repertoire.

Please share your questions, comments and images shot with colored gels below.

The post How to Use Colored Gels for Creative Off-Camera Flash Photography by Frank Myrland appeared first on Digital Photography School.


Digital Photography School

 
Comments Off on How to Use Colored Gels for Creative Off-Camera Flash Photography

Posted in Photography


In The Pink – 19 Rosy Colored Images

26 Oct

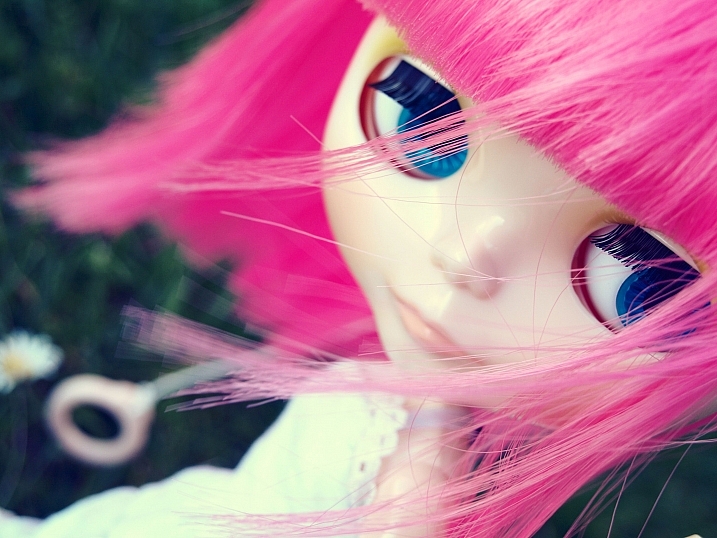
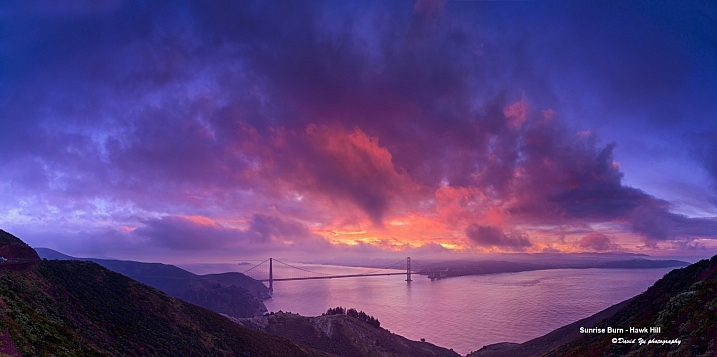
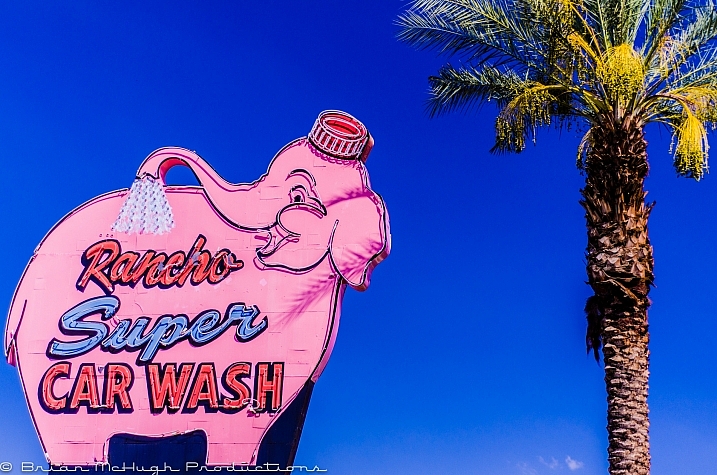
Rose colored glasses, in the pink, tickled pink, pinkie finger and a pink elephant. This color can represent a lot of things. Here are some examples by different photographers who found unique pink subjects to shoot.

Nuwandalice

By Nuwandalice

David Yu

By David Yu

Brian McHugh

By Brian McHugh

SurprisePally

By SurprisePally

Javcon117*

By Javcon117*

Katie Dalton

By Katie Dalton

Liliana

By Liliana

Howard Ignatius

By Howard Ignatius

Shimelle Laine

By Shimelle Laine

Paimei01

By paimei01

Louise Leclerc

By Louise Leclerc

*Ann Gordon

By *Ann Gordon

Ram Yoga

By Ram Yoga

Marchnwe

By Marchnwe

Duncan C

By duncan c

Ian D. Keating

By Ian D. Keating

John Verive

By John Verive

Chris Kennedy

By Chris Kennedy

Patrik Nygren

By Patrik Nygren

googletag.cmd.push(function() {
tablet_slots.push( googletag.defineSlot( “/1005424/_dPSv4_tab-all-article-bottom_(300×250)”, [300, 250], “pb-ad-78623” ).addService( googletag.pubads() ) ); } );

googletag.cmd.push(function() {
mobile_slots.push( googletag.defineSlot( “/1005424/_dPSv4_mob-all-article-bottom_(300×250)”, [300, 250], “pb-ad-78158” ).addService( googletag.pubads() ) ); } );

The post In The Pink – 19 Rosy Colored Images by Darlene Hildebrandt appeared first on Digital Photography School.


Digital Photography School

 
Comments Off on In The Pink – 19 Rosy Colored Images

Posted in Photography


Blue Light Special: Colored Streetlamps Precede Decline in Crime

20 Apr

[ By WebUrbanist in Architecture & Cities & Urbanism. ]

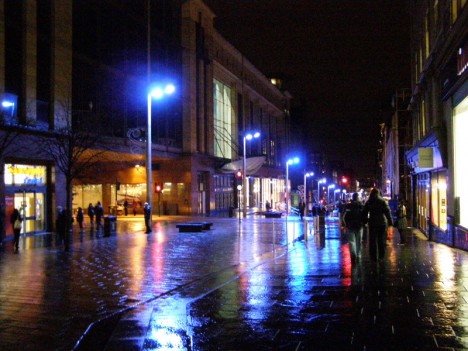
blue lights glasgow downtown

In the early 2000s, the city of Glasgow, Scotland, changed over to blue street lighting in an effort to improve the appearance of the city, but areas with the newly blue lights saw an unexpected and disproportionate decrease in crime.

blue lights street japan

No one could say for sure whether there was a causal correlation, but half a world away another city followed suit – Nara, Japan, experimentally began turning their street lamps blue. They also saw a decrease in crime.

blue light highway signs

In  the years that followed, similar deployments were tested, including the addition of over 150 blue lights to an expressway near Tokyo, aimed at reducing accidents.

blue lights underground

The Keihin Electric Express Railway Co. even changed the color of eight lights on the ends of platforms at Gumyoji Station in Yokohama, Japan, to curb track-jumping suicides. A subsequent report showed that in the years following, the station saw no suicide attempts (after previously being the site of multiple suicides per year).

There are a number of theories about why the blue light could be causing a decrease in criminal behavior.

Some argue the association of blue with police presence, except: Japanese police use mostly red lights.

Another theory posits that blue light has a calming effect, feeling more pleasant than orange or red. Indeed, studies have shown that blue lights (associated with calm waters and open skies) can reduce stress responses in fish and be used to treat SAD (Seasonal Affective Disorder) in humans.

blue light versus red

Of course, it is also possible that the new colored lights are simply different and unfamiliar enough to cause people to feel awkward engaging in illicit or dangerous behavior where they are present. And if that is the case, changing all the public lights in the world to blue might be at best temporary fix, working until people get used to the new blue lighting. Experts have warned not to read too much into the effect, regardless, since the causal mechanism or connection has not yet been definitively determined.

Share on Facebook


[ By WebUrbanist in Architecture & Cities & Urbanism. ]

[ WebUrbanist | Archives | Galleries | Privacy | TOS ]


WebUrbanist

 
Comments Off on Blue Light Special: Colored Streetlamps Precede Decline in Crime

Posted in Creativity


Rainbow Nests: What Wasps Build with Colored Construction Paper

14 Apr

[ By WebUrbanist in Art & Sculpture & Craft. ]

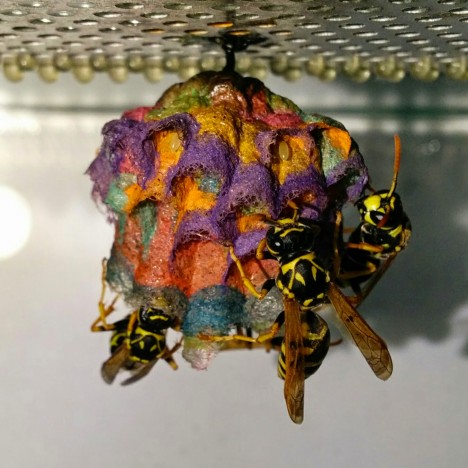
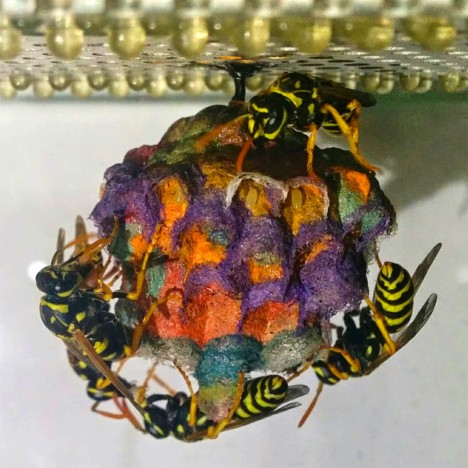
colored wasp nests

Worker wasps build with the materials available in their environment, including different hues and shades of paper, which can lead to radical rainbow homes when properly apportioned.

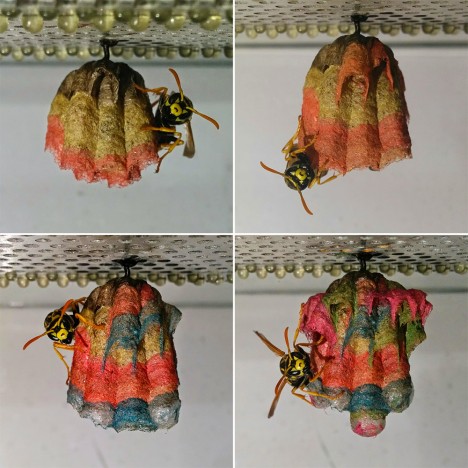
colored paper creations

Biology student Mattia Menchetti began giving a group of European paper wasps a variety of colored papers in a specific sequence in order to facilitate their creation of colorful nests.

colored wast colony

The effect is quite compelling, but wasps are not the only creatures that can take on colors from their surroundings and incorporate them – bees and ants have been known to as well.

bee honey france mandm

In one instance, an M&M production plant in France was found to be responsible for changing the color of honey created by a local bee hive. Apparently, the honey tasted fine, but of course, putting such oddly colorful honey on the market is a tough sell.

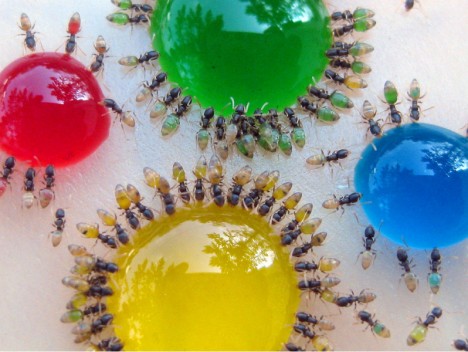
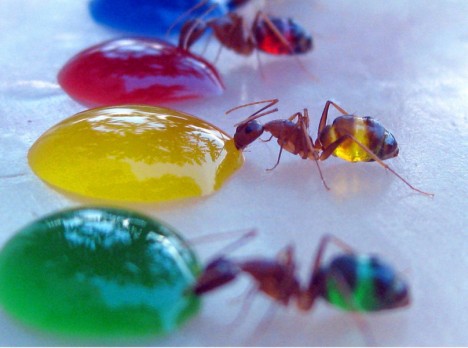
colored ant drink

In another instance, we can see the effects of giving colored sugary water to translucent ants, whose bodies then take on the spectrum of looks found in their drinks.
colored ant colony

In this case, a scientist named Mohamed Babu from Mysore, India shot a series of photos of the colony consuming this liquid sugar water (via Colossal).

Share on Facebook


[ By WebUrbanist in Art & Sculpture & Craft. ]

[ WebUrbanist | Archives | Galleries | Privacy | TOS ]


WebUrbanist

 
Comments Off on Rainbow Nests: What Wasps Build with Colored Construction Paper

Posted in Creativity


Animating Tattoos: Colored Ink Mapping Brings Body Art to Life

30 Oct

[ By WebUrbanist in Art & Drawing & Digital. ]

dither

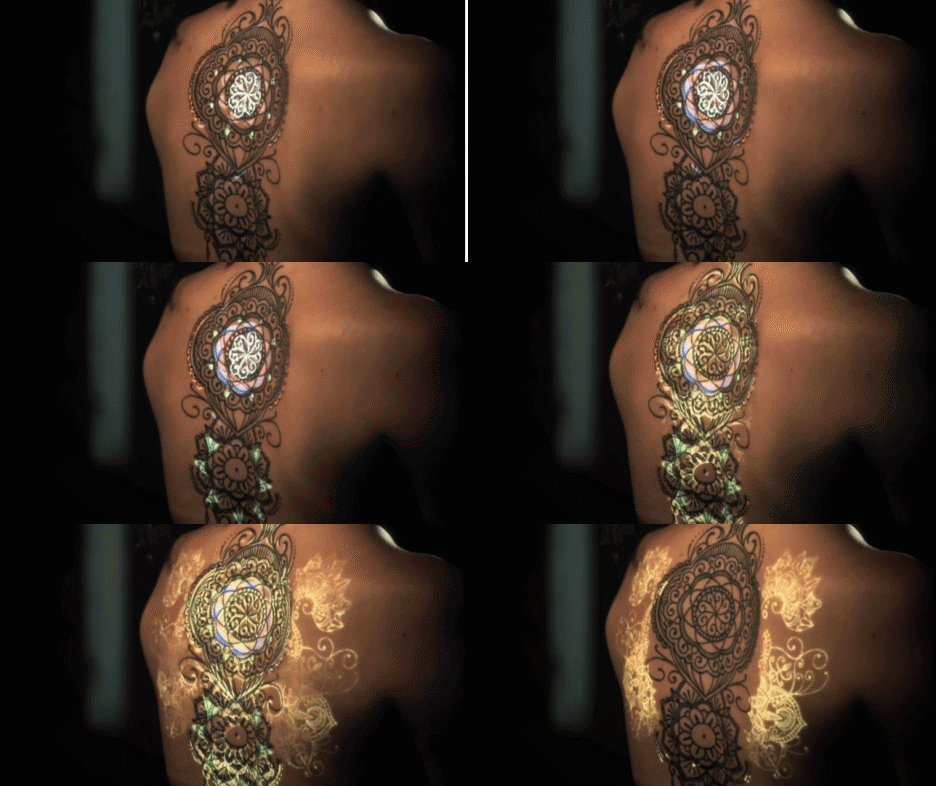
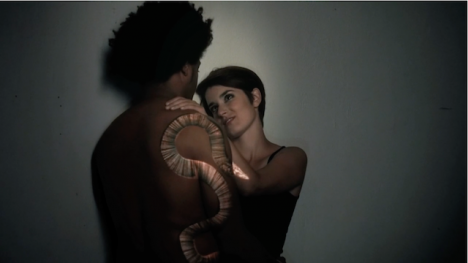
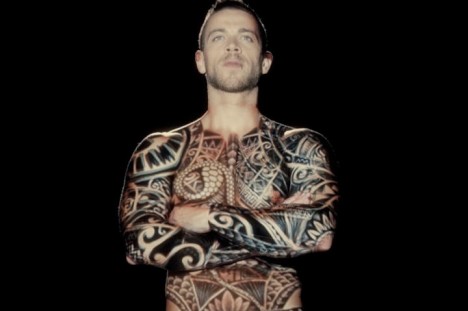
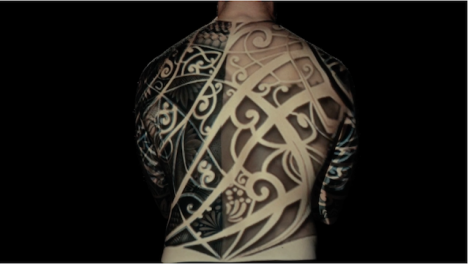
The world’s first live tattoo projection mapping event turned tattoos from static works into performance art, creating dazzling animations from inked body artworks.

Filmed in Lisbon by Oskar & Gaspar, the above video highlights the infinite possibilities of this approach, from filling in details and colors to completing partial tattoos or even animating them in living color.

animated body art

Like the future tattoos from William Gibson’s book The Peripheral, the result can seem like organic behavior, with faces coming to life and snakes slithering across a body’s surface.

ink mapped body

body art projection mapping

Remarkably, the entire film was made without any post-production – what you see as the viewer of the short film above is exactly what the audience saw on the day of the event. We still may be a ways away from embedded nanobot tattoos, but when we get there, this will be an excellent source of inspiration for the tattoo artists of the future.

Share on Facebook


[ By WebUrbanist in Art & Drawing & Digital. ]

[ WebUrbanist | Archives | Galleries | Privacy | TOS ]


WebUrbanist

 
Comments Off on Animating Tattoos: Colored Ink Mapping Brings Body Art to Life

Posted in Creativity


Real Life Instagram: Street Views Framed with Colored Filters

11 Nov

[ By WebUrbanist in Art & Installation & Sound. ]

real life instagram

Instagram is both broadly adopted and heavily criticized for the faux-vintage filter options provided to users, providing opportunities for aptly-timed and well-executed spoofs like this project.

real life photo filter

real green filter

In his Real Life Instagram installation art series, Brazilian artist Bruno Ribeiro has begun framing everything from mundane graffiti on walls and ubiquitous CCTV cameras to famous London monuments. These he carefully surrounds with physical emulations of digital snapshot borders.

real street meta picture

Hilariously enough, many people then stop to photograph the frame and the scene … presumably some of them uploading the results to Instagram, completely the somewhat silly circle.

real image filter art

Add view counts and voting stats and you can trick people, at least for a moment, into wondering if they are wandering online or in the real world. Hashtags, in turn, encourage more online sharing.

real photo image montage

The work plays on our expectations and associations. Translucent and colorful green, blue, yellow, orange and red plastic makes whatever is seen through the resulting rectangle somehow special, different or noticeable.

street scene color filtered

As in photography, the simple act of adding a frame makes a scene feel somehow intentional in its selection, except, more like movies or video in general, the scenes in this case may never stand still.

Share on Facebook


[ By WebUrbanist in Art & Installation & Sound. ]

[ WebUrbanist | Archives | Galleries | Privacy | TOS ]


WebUrbanist

 
Comments Off on Real Life Instagram: Street Views Framed with Colored Filters

Posted in Creativity


Add Interest to your Background with Colored Gels

22 Nov

Colored gels are commonly used to balance flash color temperature with the color temperature of ambient light. But you can also use gels to add creative color effects to your photos.

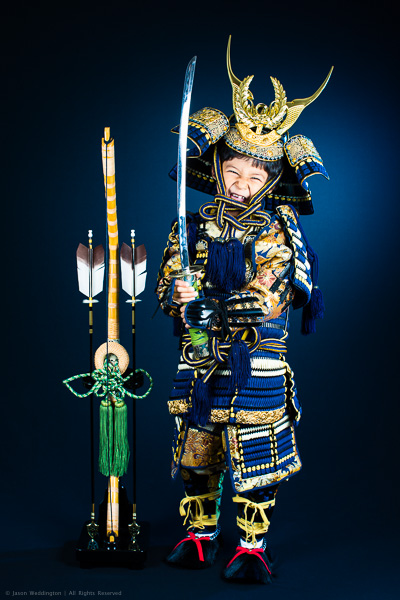
Photo of a young boy dressed as a Japanese samurai

I recently shot this portrait of my son to commemorate his Shichi Go San (7-5-3) ceremony. Shichi Go San is a Japanese rite of passage performed at ages 3 and 7 for girls, and at age 5 for boys.

The background is a black piece of cloth, stretched across a Manfrotto background stand. To separate him from the background, and add visual interest, I used a single flash with a DIY blue gel to add some color to the background. In this article I’ll explain how to make your own gels, and how to use them. Lighting your background separately from your subject, with or without gels, is a great way to add depth to your photos and can help separate subjects from a dark background.

Here’s how it looks with only the background light:

Photo showing the use of a blue gel to tone a black background

First, an overview of the lighting setup for this shot:

Main Lights: 2 x Canon 430EX II Speedlites at full power, fired through 24″ Lastolite EZY-Box softboxes at camera left and right, just outside the frame.

Background Light: Single Canon 430EX II Speedlite in a snoot, with DIY blue gel, fired at the background from the right side of the set. I aimed this flash so that the hotspot would be centered behind my son’s head.

Exposure: 1/200, f/6.3, ISO 200
Lens: Canon EF 50mm f/1.2L
Camera: Canon EOS 5D Mark III

How to make your own DIY Gels

Any piece of thin colored plastic will work well. For the above photo I used two circles of plastic that I cut from a notebook cover. I purchased the notebook for 100 yen, or about USD $ 1.25. Experiment with different colors to find what works with your creative style, and for the particular photo you’re creating. For portrait work, I’m partial to cool tones, especially blues. Warm colors appear to pop out against cool colors, so a cool colored background works well to compliment skin tones.

In addition to the gel, you also need a snoot. A snoot narrows the light, and gives a spotlight effect. This keeps blue light from spilling all over the place. For this photo, I used a Gary Fong Powersnoot, because I already have one. But a piece of black poster board folded into a cylinder works just as well.

Photo showing steps to make colored flash gels

My 8-year-old daughter taped the blue plastic to the end of the snoot for me. If you don’t have an 8-year-old, see if you can borrow one from a friend or relative. Failing that, you can also tape the plastic onto the snoot yourself.

How much flash output?

So, how much flash do you need on the background to get a nice color effect? At first glance this may seem counterintuitive, but here’s the rule:

More flash = lighter color
Less flash = darker color

The reason for this is simple. The brighter your background flash, higher the luminosity of the color hitting the background will be.

So for a nice, deep blue like in this photo, you only need a little kiss of light from your flash. I powered a single 430EX II at 1/4 power for the background light, compared to two 430EX II’s at full power for the main lights. My background flash was about the same distance from the background as my main flashes were from the subject, so basically the light on the background is 4 stops weaker than the light on the subject. (1 flash @ 1/4 power on the background, 2 flashes @ full power on the subject.)

I hope this article has given you some ideas about how to make your own DIY flash gels from inexpensive materials, as well as how to use gels to add creative color effects to your photos. I’d love to hear from you, feel free to comment below or reach out to me on Google+ or Facebook.

Post originally from: Digital Photography Tips.

Check out our more Photography Tips at Photography Tips for Beginners, Portrait Photography Tips and Wedding Photography Tips.

Add Interest to your Background with Colored Gels


Digital Photography School

 
Comments Off on Add Interest to your Background with Colored Gels

Posted in Photography