RSS
 

Posts Tagged ‘Coastal’

Important Considerations for Great Coastal Photography

24 Jan

The post Important Considerations for Great Coastal Photography appeared first on Digital Photography School. It was authored by Jeremy Flint.

great-coastal-photography

There are few places more exciting to take photos than at the coast. The joy of being by the sea is truly spectacular and an opportunity to capture the ever-changing conditions. Surrounded by rolling waves, soft powdered sands, rugged cliffs, and the truly hypnotic sound of the ocean, great coastal photography can be achieved in any season throughout the year.

There are several important factors you need to consider when capturing images by the coast.

Great Coastal Photography

Antigua, Caribbean. Canon 5DSr, 24-70mm f2.8L II, 24mm, 1/125 sec, f/11, ISO 100, Aperture Priority.

Potential risks: saltwater/corrosion and large, unpredictable rogue waves

The coastline can be dangerous as well as beautiful and commands an element of respect. There are inherent risks to yourself and your kit from the sea. Saltwater from sea spray can harm your lenses and filters and can cause corrosion to your camera, potentially making it irreparable. I suggest bringing a cleaning cloth to wipe away any unwanted saltwater and consider using a rain cover to protect your camera and lenses.

One of the major draws for people when photographing the sea is the waves. It can be very enticing to go and photograph the sea in stormy weather with dramatic light or when large waves occur. 

However, lives have been lost where people have come into difficulty with strong currents or large, unpredictable rogue waves and have even been swept out to sea. 

Be aware of these potential risks, and put safety first when going to photograph the coast. Moreover, never underestimate the sea.

Time of day

Great coastal photography can be achieved at any time of day that you visit the sea and in all weathers. Sunrise or sunset are the best times of day for taking photos along the coast. The light that appears at these times can be magical. You can capture the afterglow of the sun or the coastline as the rays of the setting sun light it.

If you shoot the coast during the day, look for interesting scenes and elements that can make your images more striking.

Image: Cornwall, England. Canon 5DSr, 24-70mm f2.8L II, 24mm, 1/90 sec, f/5.6, ISO 800, Aperture Pri...

Cornwall, England. Canon 5DSr, 24-70mm f2.8L II, 24mm, 1/90 sec, f/5.6, ISO 800, Aperture Priority.

What to shoot

There is always an opportunity to capture interesting coastal scenes. It offers a huge variety of subjects to shoot from views of the seashore and crashing waves to shells, different rock formations, and architecture. This includes lighthouses, piers, and beach huts.

You can use a wide-angle lens to capture a broader view and include several of these elements in your shots or zoom in for pictures of isolated details such as patterns on a rock or shell.

Other interesting subjects you can photograph at the coast include the motion of the sea as it swirls around some rocks, the tide moving in and out and dramatic weather.

Great coastal photography can even include a boat or person in the frame – for example, a person swimming in the sea or walking along the beach.

Great Coastal Photography

Antigua, Caribbean. Canon 5DSr, 16-35mm f2.8L III, 35mm, 1/125 sec, f/11, ISO 100, Aperture Priority.

Atmosphere

Don’t be put off visiting the coast if the forecast isn’t sunny. You can make great coastal photography in almost any weather.

Make the most of overcast conditions by capturing cloudy and moody skies, which can be great for adding atmosphere.

Alternatively, visit the coast in the winter and capture something different such as mist, fog, and seaspray. These conditions can create more drama in your shots and provide a unique look and feel.

Image: Wales. Canon 5DSr, 70-200mm f2.8L III, 70mm, 1/90 sec, f/8, ISO 200, Aperture Priority.

Wales. Canon 5DSr, 70-200mm f2.8L III, 70mm, 1/90 sec, f/8, ISO 200, Aperture Priority.

Mood of your image

One way to capture great coastal photography is to convey a sense of mood in your images. Think about what mood you are trying to demonstrate and how you can add more ambiance to your pictures.

You can create a mood with light or add drama by capturing fast-moving water and crashing waves using a quick shutter speed. The fast shutter will freeze the action.

You can also develop a feeling of tranquility with longer exposures. The blur of the water and subsequent movement can look great.

Great Coastal Photography

Wales. Canon 5DSr, 16-35mm f2.8L III, 26mm, 1/90 sec, f/11, ISO 200, Aperture Priority.

Tide times

Check the tide times and time your visit accordingly. Visit the coast when the tide is low if you want to photograph the sea coming in or at high tide when the sea is out and the beach is more exposed. Be sure to know the tides of the area you are visiting so that you don’t get stranded if the tide comes in.

You can use apps such as Tides Near Me, to keep up-to-date on the tides of the area you are visiting.

Leaving things as you found them

One thing worth mentioning for coastal photography is to leave things as you found them. Remember to keep beaches clean and take all rubbish with you. Also, be careful not to cause any damage to the landscape if you go venturing onto fragile rocks or cliffs so nature can be enjoyed by everyone who visits after you too.

Conclusion

In summary, many photographers are enticed by the sea and return to it time and time again.

For great coastal photography, consider the importance of its risks, the time of day, what you want to shoot, tide times and how to add atmosphere and mood. Now it’s your turn to capture some coastal scenes and share your images with us below.


The post Important Considerations for Great Coastal Photography appeared first on Digital Photography School. It was authored by Jeremy Flint.


Digital Photography School

 
Comments Off on Important Considerations for Great Coastal Photography

Posted in Photography


6 Ways to Capture Coastal Scenes to add Impact to Your Photos

04 Dec

The post 6 Ways to Capture Coastal Scenes to add Impact to Your Photos appeared first on Digital Photography School. It was authored by Jeremy Flint.

1 - 6 Ways to Capture Coastal Scenes to add Impact to Your Photos

Myrtos beach, Kefalonia. © Jeremy Flint

Coastal photography is a popular genre and provides a plethora of photographic opportunities. At the same time, it is an enjoyable experience being by the sea. Whether you are visiting the seaside on a day trip or as part of a holiday, or are lucky enough to live near the coast, the fresh sea air is a refreshing draw while the coastline can be incredibly scenic.

Here are 6 tips to help you capture coastal scenes with impact and take your photos to the next level:

1. Colors of the Seashore

You don’t need to be taking a vacation on a paradise island to capture a beautiful beach shot. Light and water always make an inspiring subject. Captured in the right light, which may only last minutes, a pebbly or sandy beach can become transformed into a strikingly colorful image. With careful framing and the right conditions, a color in the sea in good light and with waves can add impact to your images.

Look at the beach in different ways. Close-ups of vibrant textures in the sand or sea make for great abstract pictures. Alternatively, add contrast to a scene. You can achieve contrast by adding another element such as the sky or white foam in the water.

2 - 6 Ways to Capture Coastal Scenes to add Impact to Your Photos

© Jeremy Flint

2. Crashing Waves

Have you ever been on the coast and enjoyed seeing the dramatic effects of a rough sea and crashing waves? Capture one of the cycles of waves when the next big swell hits. It may take a few attempts to get a picture that is pleasing.

3 - 6 Ways to Capture Coastal Scenes to add Impact to Your Photos

Dunseverick Falls, County Antrim, Northern Ireland © Jeremy Flint.

Be careful to position yourself in an area that is out of danger, so you don’t end up wet. Some coastlines can produce unusually large waves so stay at a safe distance. Use a zoom lens to capture the action and avoid being too close to the sea if the conditions are hazardous.

3. Fast-Flowing Water – Sea Shot

Fast-flowing water can be a challenge to photograph well. There is often a sharp contrast between the dark shadows and the brightness of the water. In bright sunlight, there is the added disparity of light and shade. Take some test shots and adjust the shutter times for creative effects. If you want to record sharper images of the moving sea water, use shorter shutter speeds, or use a longer exposure to give a milky effect. Try different settings and see which effect you prefer.

4 - 6 Ways to Capture Coastal Scenes to add Impact to Your Photos

La Digue, the Seychelles © Jeremy Flint.

4. A Tranquil Scene

Idyllic, peaceful seascapes are great subjects to photograph by the coast.

So how do you capture a tranquil scene well? Some things you should consider are location, tone, and color. Select a suitable location, use gradients of tone to draw the eye into the picture and use color to suggest movement. Capturing a serene and calming scene can be very inspiring and great for the soul.

5 - 6 Ways to Capture Coastal Scenes to add Impact to Your Photos

The Giants Causeway, Antrim Coast, Northern Ireland © Jeremy Flint.

5. The Colors of Sunset

Who doesn’t love witnessing a spectacular sunset by the sea? Photographs of this spectacle can often be underwhelming but vastly improve when vivid skies shine brightly overhead. Aim to arrive early to capture the sunset and be in a position to capture the last rays of light on the ocean.

6 - 6 Ways to Capture Coastal Scenes to add Impact to Your Photos

© Jeremy Flint

Don’t forget to turn around and capture the sky and landscape opposite the sunset which gets bathed in beautiful light.

Take in and photograph the warm yellows and deep blues as the sun reaches the horizon before dipping below.

For subtle or dramatic tones, shoot the palette of colors left in the sky after the sun sets.

7 - 6 Ways to Capture Coastal Scenes to add Impact to Your Photos

© Jeremy Flint

6. Cloud Formations

Magnificent cloud formations are always worth photographing and help take your coastal images to the next level. If you look up from the shoreline, you can see clouds change constantly. They often take on wonderful shapes and patterns that encompass great colors interacting with the seascape.

You can create a fabulous picture of cloudy seascapes just by capturing these changes and shifts of light.

Watch for low clouds in the sky too, which can produce a magical spectacle.

8 - 6 Ways to Capture Coastal Scenes to add Impact to Your Photos

Durdledoor, Jurassic coast, Dorset © Jeremy Flint.

Conclusion

In summary, photographing the coast can be a great experience and a brilliant opportunity to capture coastal scenes beautifully. Crashing waves, fast-flowing water, tranquil scenes, clouds, and colors can all be utilized to create images with impact. Once you capture coastal scenes near you, please share your images with us below.

The post 6 Ways to Capture Coastal Scenes to add Impact to Your Photos appeared first on Digital Photography School. It was authored by Jeremy Flint.


Digital Photography School

 
Comments Off on 6 Ways to Capture Coastal Scenes to add Impact to Your Photos

Posted in Photography


Tips for Getting Started with Coastal Photography

07 Oct

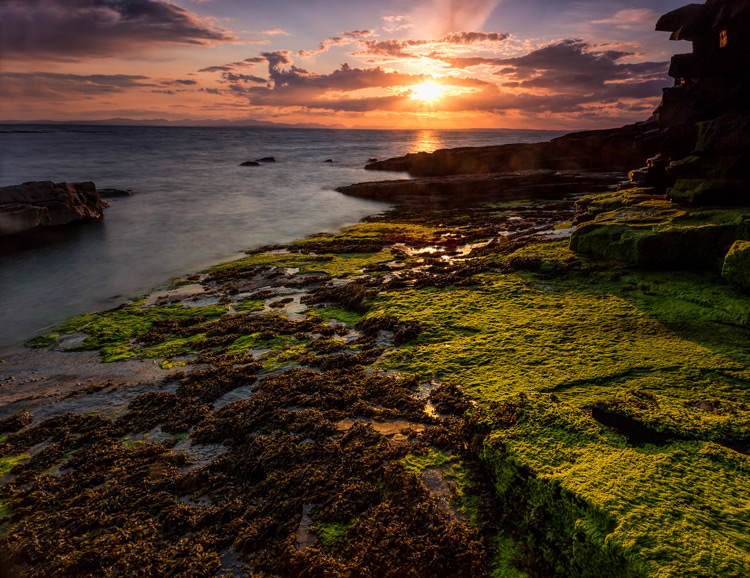
Many of us start out treating coastal photography the same as landscape photography. There are a lot of similarities. For both, you head out into the great outdoors, often to remote locations. You need a tripod and a remote shutter release for stabilization. You are capturing an entire scene rather than a discrete item or person. You want a deep depth of field. And so on.

But there are also differences between the two. In fact, treating coastal photography the same as landscape photography could leave you woefully unprepared when you head out. It could also lead to confusion as to how to set up and expose your photos. This article will help you get started with coastal photography, even if you are already familiar with outdoor shooting generally.

Mullaghmore-1

What to bring with you

There are two items you’ll need to add to your kit before you head out to do coastal photography. Both are filters, and you may have one of them, but they are both critical.

Neutral density filter

The first is a neutral density filter. In fact, you will probably want more than one since they come in different strengths. If you are not familiar with these filters, they restrict the amount of light allowed into your camera. Why would you want to do that? So you can slow down your shutter speed and allow the waves or the clouds to move through your frame while you are exposing the picture. That will smooth things out for you.

We’ll talk more about using them later, but for now just know that you’ll need one. I would start with a 10-stop neutral density filter, which is about as powerful as you will ever need. You can then add lesser strength filters like 6-stop and 3-stop filters later.

Graduated neutral density filter

VFH100_FilterGroup

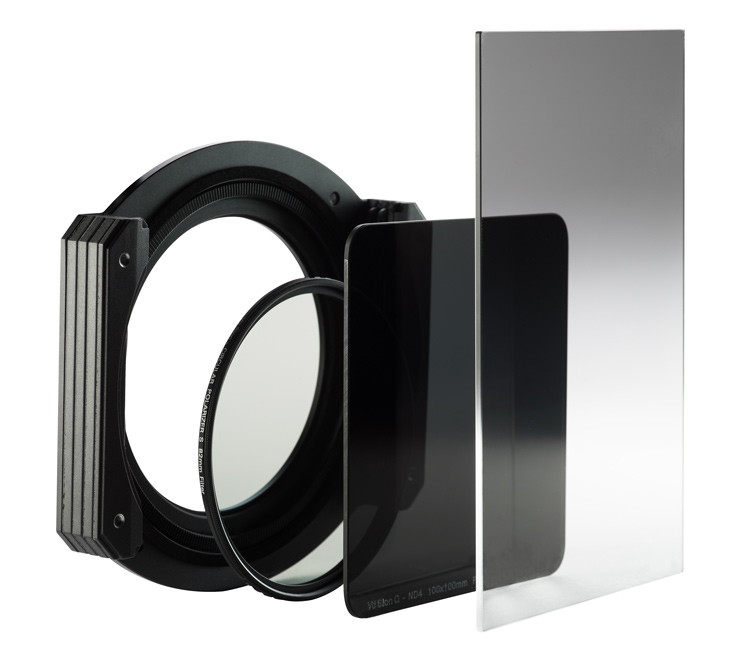
Drop-in style filter system with a graduated neutral density filter on the right.

The second item you will need is a graduated neutral density filter (aka grad ND). You may already have this one since it is also useful for landscape photography. However, it is remarkably useful in coastal photography and you will use it all the time. In landscape photography, you may have trees, mountains, or other items sticking up into the sky such that you cannot use the grad ND.

In coastal photography, however, very often the horizon line is clear and unbroken in your picture. It makes is easy to use the grad ND in a lot more situations. For this reason you will use it all the time. In addition, the sky is often a significant portion of your picture in coastal photography. So making the sky look its best is incredibly important.

Acadia-6

Where to go

Now that you have the right gear, it is time to head out. Before you do, spend some time thinking about where you will go. When you first get started in coastal photography, you will have a tendency to go one of two places: either a scenic overlook or a beach. Both have problems though, so let me explain a bit.

A great view does not always translate into a great picture. Therefore, just going to a scenic overlook will often not result in great photos. It can, so I’m not saying to avoid them, but just be aware of a few problems you are going to face. The primary problem is that you will have difficulty establishing any sort of foreground. You are up too high, and there is usually nothing to use to bring the viewer into the picture. We’ll talk more about composition in a minute, but for now just understand that you often need to get down near the coast and sometimes even get right behind something to set up an interesting composition.

On the beach

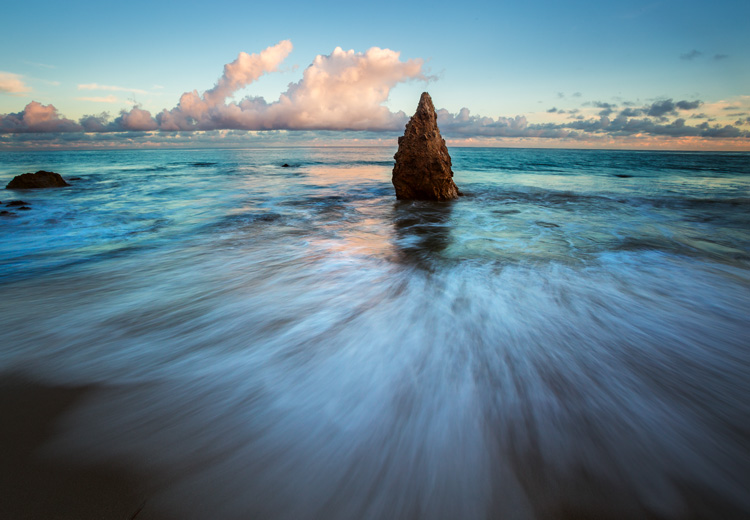
When you do manage to get right next to the coast, often that will be on a beach. Beaches are great, but they have their own problems when it comes to composition. After all, a beach is just a bunch of sand, and that’s hardly something that is going to look great in your picture. You need to find something to use as a subject or at least a center of interest. Sometimes that’s a physical object in the sand (boulder, boat, moss, etc.), or it might be a pattern in the sand itself.

The best places to go are where there are interesting features to use as foreground, and you can get down to the coast. While I just warned about beaches, very often they are the best place. They allow you access to the coast, easy parking, etc. Just don’t stay in the middle of the beach. Look for interesting features, walk to the periphery, or even go beyond the beach.

Cheeca-Sunrise-5

When to go

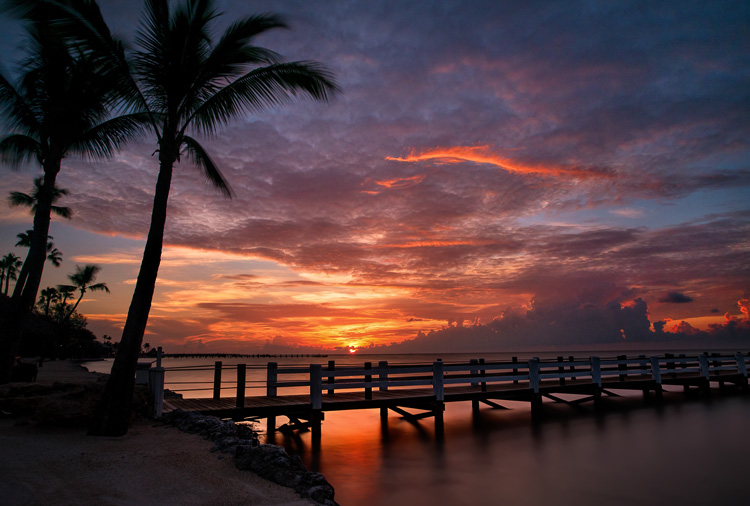
Next you need to decide when to go take your coastal photos. This one is easy. You want to go before sunrise or at sunset.

While this tip is easy, it is also absolutely critical. The sky will often take up a healthy chunk of your picture, so you need it to be interesting. Further, if you go in the middle of the day, you will face harsh contrasts that will ruin your picture. Avoid doing that whenever possible.

This leads to another problem, which is access. Many beaches and scenic coastal areas are closed and blocked off until sunrise or even later. You’ll miss the best light waiting around for them to open. Pay attention to opening hours and access to make sure you can get your shot.

Green-Rocks

How to compose your coastal photos

When it comes to composing your pictures, you always want to think about the foreground, subject or center of interest, and the background. You’ll generally want to set these up in your picture according to the Rule of Thirds.

Background

Let’s start with the easy one first, the background. In coastal photography, the background of your picture will usually be the sky. That’s one of the reasons why heading out before dawn or at sunset is so important. The sky just looks better at those times. When it comes to composition, the background will be determined by how the sky looks. Therefore, you hardly need to think about the background of your picture.

Foreground

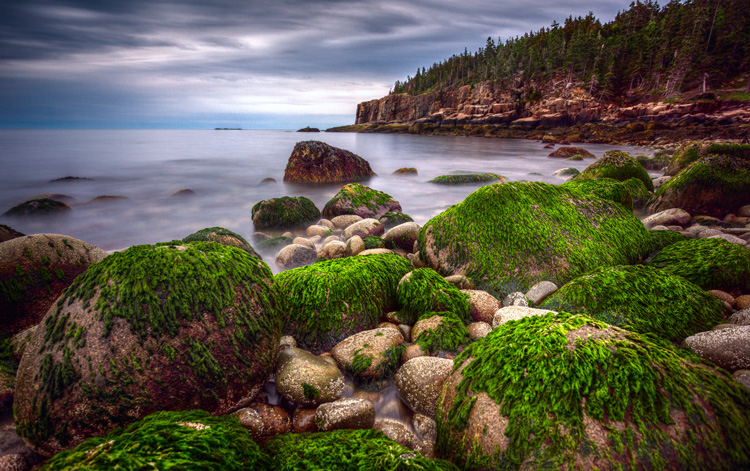
That leaves the foreground and some sort of subject or center of interest to worry about. The subject is very important, but it varies dramatically from person to person and scene to scene. It can be a physical thing like boulders or plants, or it can be a man-made item like a boat or a lighthouse. Your subject can even be an intangible thing like a leading line or a shape. Just make sure there is something tying the picture together. If you don’t, you will be left with a mere snapshot.

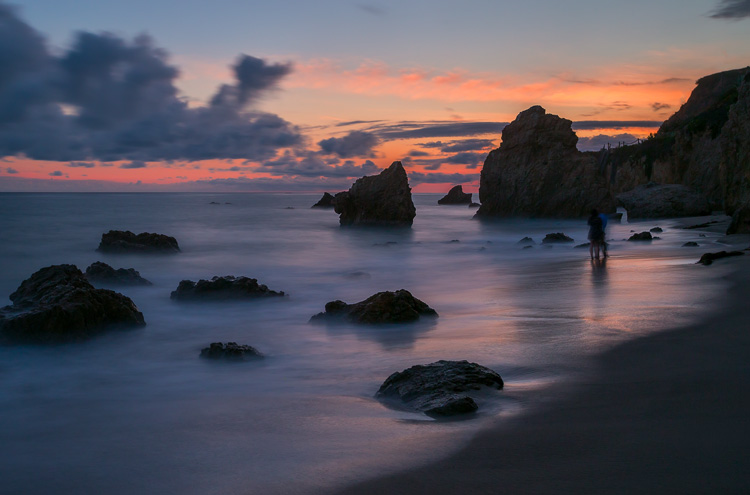
And finally we get to the foreground. This is often the hardest part of the picture to set up, but at the same time it is also the most important. You want to use foreground to create a sense that your viewer can walk into the picture. If you are on the beach, look for interesting sand patterns to use. Otherwise, look for rocks, boulders, or vegetation that can serve this purpose. Of course, the water and waves will often serve as your foreground. How this looks will depend largely on how you expose the picture, we’ll cover that next.

El-Matador-4-2016-05-10

How to expose your coastal photography

In coastal photography, your exposure controls affect more than just how bright or dark your picture looks. Your exposure controls also affect much more than just depth of field (aperture) or digital noise (ISO). How you expose your picture will also control things like the the subject and mood. That is partially true in other forms of photography, but it is especially true in coastal photography.

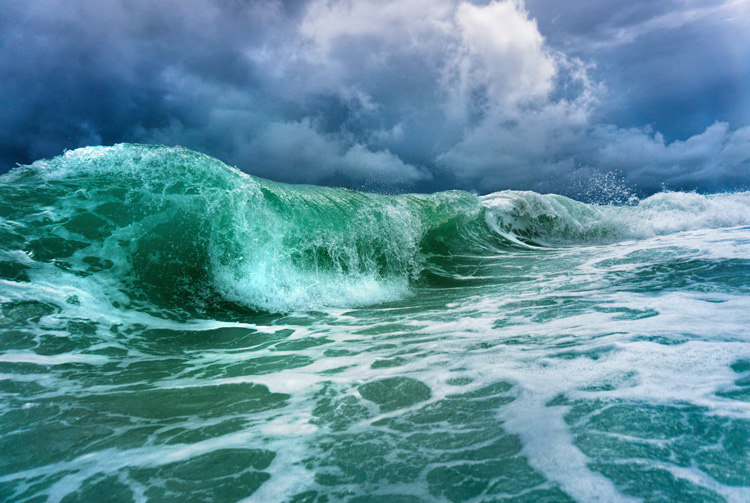
This is because your exposure settings will control how the water and waves appear in your picture. Specifically, how fast or slow you set your shutter speed will change the look of the water. If you want to stress the power and harshness of the sea, use a fast shutter speed (faster than 1/250th of a second). That will stop the action of the moving water. To create a sense of movement, use a slower shutter speed (between 1/8 second and 1 second). For a more serene scene, you can blur out the water entirely by using a very slow shutter speed (longer than 10 seconds). This is just a introduction to this concept, but to see the full range of options, check out this article: 7 Tips to Help Improve Your Seascape Photos by Controlling the Waves.

To go about using these different shutter speeds you can start by making sure you are in Manual mode and moving your aperture and ISO. To use a faster shutter speed, make your aperture a little larger (a smaller f-number) and your ISO a little higher. More often, however, you’ll want to use a slower shutter speed, for which can you should stop down your aperture to a small setting (f/16 – f/22) and use your lowest native ISO (usually ISO 100).

El-Matador-5

Using the neutral density filter

Frequently, however, there will be too much light to use the slow shutter speed you want. That’s where the neutral density filters come in. When you attach one of these filters to the front of your lens, it will restrict the amount of light allowed into your camera. That will allow you to use a slower shutter speed to achieve a proper exposure (without overexposing your picture).

Let’s make this a little more concrete with some specific numbers. Let’s say you have your shot set up with a correct exposure and you are at 1/50th of a second for your shutter speed, and your aperture is set at f/16 with an ISO of 100. You have a 6-stop neutral density filter in your bag, and you want to use a much slower shutter speed to create some blur in the water. In that case, attach the neutral density filter to your lens and now the amount of light coming into your camera is restricted by 6 stops. If you do nothing else, your picture will be severely underexposed (probably pitch black). This allows you to increase (i.e., slow down) the shutter speed by 6 stops to achieve a proper exposure, and the slow shutter speed desired.

Okaloosa-2

Let’s walk through the process of slowing down the shutter speed by 6 stops, which you will do manually.

  • Remember that a stop is a doubling of light, so slowing the shutter speed by the first stop from our starting point of 1/50th of the second will move it to 1/25th of a second.
  • After that, moving it another stop will get you to 1/13th of a second.
  • Next is 1/6th of a second.
  • 4 stops is ? or 0.3 seconds.
  • 5 stops is ? of a second
  • Finally, slowing the shutter speed by 6 stops will result in a shutter speed of 1.3 seconds.

Take the picture with that shutter speed and your picture should be properly exposed with a nice blur to the water.

Variations

This is just one example, and there are a lot of variations you can do on that. For example, you could use a 10 stop neutral density filter instead. That would allow you to set your shutter speed as slow as 20 seconds in our scenario above. That would really blur out the water. You can also adjust the aperture and ISO to bring the shutter speed in exactly where you want it.

You’ll note in our example above, we could have made our aperture smaller (to f/22 in most lenses) and restricted the amount of light by another stop. Or we could have increased the aperture or the ISO to increase the exposure and use a slightly faster shutter speed. Think of these controls as fine tuning after you have your neutral density filter on your lens.

Destin-Wave

Getting started with coastal photography conclusion

Hopefully you now have a little better sense of where to go, when to go, and how to set up your shots for coastal photography. Armed with this knowledge, just head to the coast when you can and put these tips to work.

But be careful – the coast can be a harsh and unforgiving environment for both your equipment and for you. That said, I think you’ll find there is no better place to be than on a coast at sunrise or sunset.

googletag.cmd.push(function() {
tablet_slots.push( googletag.defineSlot( “/1005424/_dPSv4_tab-all-article-bottom_(300×250)”, [300, 250], “pb-ad-78623” ).addService( googletag.pubads() ) ); } );

googletag.cmd.push(function() {
mobile_slots.push( googletag.defineSlot( “/1005424/_dPSv4_mob-all-article-bottom_(300×250)”, [300, 250], “pb-ad-78158” ).addService( googletag.pubads() ) ); } );

The post Tips for Getting Started with Coastal Photography by Jim Hamel appeared first on Digital Photography School.


Digital Photography School

 
Comments Off on Tips for Getting Started with Coastal Photography

Posted in Photography


Brutal but Beautiful: Book of 88 WWII Coastal Military Ruins

08 Mar

[ By WebUrbanist in Abandoned Places & Architecture. ]

world war eerie images

Traveling 23,000 miles over 4 years, photographer Marc Wilson has amassed an amazing collection of images spanning bunkers, gun emplacements, observation posts, command centres and other wartime infrastructure around Europe.

wwii coastal war ruins

war time bunker remnants

In his book, The Last Stand, 86 of the resulting images are arrayed to tell a complex story of different times and places. More than merely photographing these haunting remnants of war, however, Wilson also provides highly articulate reflections on everything from their site-specific purposes and aesthetics to their broader places in military and architectural histories.

war ruins woods

world war remnant architecture

“Composed of copious quantities of poured concrete,” many of these structures “defy and eschew any established aesthetic sensibilities: no hint of the classical, the gothic or the baroque here. Their geometries, purely contingent, were designed to resist the effects of the latest developments in projectile technology, their profiles shaped to deflect such missiles and avoid any direct percussive explosions on their structures.”

orld war brutalist remains

world war encampments

world war concrete bunker

His shots are carefully composed and timed, often taking place in the early hours of the morning when eerie mists and dim lights grant the subjects a surrealistic atmosphere. There is a dreaminess and dreariness to his work that manages to make the objects captured seem both ordinary and otherworldly. Prints of many of the pieces featured in the book can be purchased as well.

world war castle tower

world war winter imagery

world war water barrier

Unlike even the most pragmatic warehouse of the time, “there was nothing speculative or arbitrary about the bulwarks of their sometimes bizarre and often ungainly forms: they were purely functional. While far from being graceful or classically proportioned, there is something visually appealing about the alien (and sometimes sinister) forms of those bunkers. Novelty does not quite describe this appeal: more surprise perhaps – a surprise that courts the sublime.”

Share on Facebook


[ By WebUrbanist in Abandoned Places & Architecture. ]

[ WebUrbanist | Archives | Galleries | Privacy | TOS ]


WebUrbanist

 
Comments Off on Brutal but Beautiful: Book of 88 WWII Coastal Military Ruins

Posted in Creativity


5 Quick Tips for Coastal Photography

27 Nov

There’s nothing like a great coastline to get me excited about photography. Whether it be unmarked sand dunes, sea grasses blowing in the sea breeze, rugged outcrops of rocks and cliff faces or a beach scene complete with all the color of families on their day at the beach – coasts can present photographers with some great opportunities.

Here’s 5 tips for your next coastal photography outing!

1. Look for Reflections

Image by midlander1231

Any time you’re shooting around bodies of water you should be aware of the potential for enhancing your image with reflections. This is particularly relevant when shooting at sunrise or sunset where your images can be brightened and have interest added to them by reflecting those pretty pinks and oranges in the water before you.

2. Focus in on Details

Image by Max xx

What often grabs your attention most on coastal shoots is the grandeur of the landscape – so it’s easy to overlook what might be at your feet as you’re lining up your shot. The coast is full of smaller opportunities for amazing shots – whether it be sea shells on the waters edge, the footprints of an animal in the sand, small wild flowers growing in the dunes or patterns in rock formations. Take the time to look around you at the detail of what surrounds you. Oh… and don’t forget your macro lens!

3. Add Foreground Interest

Image by Kyle Kruchok

When shooting seascape shots its very easy to end up with images that contain few focal points of interest (ie: shots that are half sky and half sand). One way to add interest to these shots is to look for opportunities in the foreground of your shots. If you’re able to place something interesting in the foreground (perhaps some interesting rock pools) you’ll lead the eye into the image. When doing this test shooting from different heights – sometimes getting down quite low and will add more interest to the shot while sometimes a higher vantaage point might work better. Also remember that if you want the foreground and background to be in focus that you’ll want to shoot with small aperture (high f numbers).

4. Slow things Down

Image by Matthew Stewart

Another way to add interest and atmosphere to seascape shots is to slow your shutter speed down so that blur any part of the image that is moving. In this way you might get a misty looking sea that captures the movement of waves or a furry carpet of swaying sea grasses. Of course to do this you’ll want to shoot with a tripod to make sure your camera is perfectly still.

5. Horizons

Image by Garry

Two last tips when it comes to horizons. Firstly – make sure they’re horizontal with the framing of your image. There’s nothing like a horizon that slopes unnaturally down at one edge of the frame to make those looking at your shot a little sea sick. If you’re going to break this ‘rule’ – break it well and make it an obviously intentional thing. Secondly – the convention is to avoid placing your horizon in the middle of your frame but rather to position it nearer one of the thirdway points (depending upon whether there’s more interest in the sky or foreground of the shot). Of course ‘rules’ are made to be broken but for balanced shots keep these in mind.

Post originally from: Digital Photography Tips.

Check out our more Photography Tips at Photography Tips for Beginners, Portrait Photography Tips and Wedding Photography Tips.

5 Quick Tips for Coastal Photography


Digital Photography School

 
Comments Off on 5 Quick Tips for Coastal Photography

Posted in Photography


California Wildflower Coastal View

09 Nov

Sunset light falling on the beautiful California coastline at Jug Handle State Natural Reserve just north of Mendocino, California. I snuck this photo in while taking a walk with my wife on our mini-honeymoon a little over 5 years ago. Miraculously I stayed out of the doghouse while taking photos on our hike. With such amazing light falling on the California coastal landscape it was impossible to resist taking a photo for prosperity’s sake.

Wildflower Coastal View - Jug Handle State Natural Reserve, California

California Wildflower Coastal View – Jug Handle State Natural Reserve, California

Technorati Tags: landscape, nature, photography, stock photo, Mendocino, Jug Handle State Natural Reserve

Copyright Jim M. Goldstein, All Rights Reserved

California Wildflower Coastal View


JMG-Galleries – Jim M. Goldstein Photography

 
Comments Off on California Wildflower Coastal View

Posted in Equipment