RSS
 

Posts Tagged ‘clothes’

How to Remove Wrinkles From Clothes in Photoshop (Fast and Effectively)

24 Feb

The post How to Remove Wrinkles From Clothes in Photoshop (Fast and Effectively) appeared first on Digital Photography School. It was authored by Ana Mireles.

how to remove wrinkles from clothes in Photoshop

Did you know that you can easily remove wrinkles from clothes in Photoshop?

Wrinkled clothing is one of those details that gets easily overlooked. You just don’t notice them until you get back home, open your image, and see a big, ugly wrinkle ruining your photo.

Fortunately, there are several simple ways to get rid of those wrinkles and keep clothing looking as good as new!

And in this article, I’ll show you the techniques for quick and easy wrinkle removal.

Let’s get started.

Why do you need to remove wrinkles from clothes in Photoshop?

Wrinkles are distracting.

In fact, most people underestimate how eye-catching wrinkles can be.

And if you’re after a great image, then everything in the shot needs to work together and guide the viewer’s eye toward key compositional elements.

That’s why wrinkles can have such a negative impact. Viewers will get fixated on the flaw instead of considering what they love about your photo.

And if you plan on doing professional portraiture, you must get wrinkles under control.

Because here’s the truth:

Often, the difference between a professional photo and one taken by a beginner is merely attention to detail.

(Detail such as wrinkles!)

Removing wrinkles from clothes in Photoshop: The basics

There are many tools you can use to easily remove wrinkles from clothes in Photoshop.

But the most popular options are the healing tools.

Now, there are three healing tools in Photoshop: the Healing Brush tool, the Spot Healing Brush tool, and the Patch tool. Each of these can be used to “iron” your clothes and remove wrinkles in Photoshop.

When you heal an image, Photoshop samples pixels from the area’s surroundings and then matches the texture and lighting to the pixels being healed. That way, the retouch blends with nearby elements.

Using the spot healing brush to remove wrinkles from clothes in Photoshop

Now, the Spot Healing Brush will automatically determine the best pixels to sample, so all you have to do is set the size and hardness of the brush and paint over the wrinkle. Photoshop takes care of the rest.

Note that the Mode menu (in the top bar) allows you to choose the Spot Healing Brush painting mode. For removing wrinkles in clothes, the best option here is Replace. You see, fabric always has texture, and the Replace mode allows you to preserve this even as you heal away wrinkles.

You can then choose the Healing Type. You have three options: Content-Aware, Create Texture, and Proximity Match.

There’s no single “best” pick; instead, just experiment to see which one works best for your photo. In the example above, I found that Content-Aware gave the best results.

The Healing Brush tool works the same way, except that you choose the pixels you want to sample. Simply hold the Alt/Option key and click on the area from which you want to sample, then release the Alt/Option key and click on the pixels you want to heal.

Finally, the Patch tool lets you draw a selection around the area that you want to heal, then drag it toward the pixels that you want to source.

The Patch tool will allow you to work faster, as you can cover large areas with each retouch. Don’t overdo it, though. If the area is too big, the Patch tool won’t do a great job – so you need to find the right balance.

You can also move the Diffusion slider to adjust the blending speed and quality. Use lower values for pixels that have a lot of detail and higher values for smoother areas.

Using the Patch tool to remove wrinkles from clothes in Photoshop

Challenges when removing clothing wrinkles

these wrinkles looked fake when removed

When you are removing a single, isolated wrinkle, things are not very complicated. However, when there are many wrinkles or you have large areas to cover, you can run into trouble.

Some of the most common issues when using any of the healing tools – as well as the Clone Stamp tool – are the accidental patterns you can create.

To avoid this, adjust the size and hardness of your brush. Also, change the source point and distance to avoid any recognizable repetitions. Finally, vary the blend mode and the opacity.

Keep in mind that, while you don’t want to create accidental patterns, you do need to follow the patterns of the fabric’s design and texture.

That’s the challenge.

Another difficulty is maintaining luminosity. Always clone or heal from places where the brightness appears to match the surroundings, though this doesn’t necessarily mean you should source pixels from right next to your wrinkle.

Otherwise, while you might not notice your heal on the first brushstroke, you will after a handful of strokes.

So when you have to work with big areas, it’s better to use an advanced technique (which I explain in the next section).

An advanced technique for removing wrinkles from clothes in Photoshop: Frequency separation

Frequency separation is a popular, high-level technique for retouching skin blemishes.

But it’s also fantastic for getting rid of wrinkles in fabric.

The basic idea is that you separate the texture and the color into two different layers.

To do this, create two copies of the original layer.

Then hide the top copy by clicking on the eye icon next to it.

Select the middle layer (i.e., the layer sandwiched between the top copy and the original). If you want, you can rename it Color.

Select Filter>Blur>Gaussian Blur. Drag the slider until you don’t see the details of the fabric.

adding a Gaussian blur when removing wrinkles

Now enable the top layer again and select it. You can rename this one Texture.

Select Image>Apply Image.

In the dialog box, choose the layer called Color. Then select Subtract as the blending mode.

Finally, set the Opacity to 100%, the Scale to 2, and the Offset to 128. Then click OK.

using the Apply Image option when removing wrinkles

Now head to the Layers panel. Make sure the Texture layer is selected, then set the blend mode to Linear Light.

And that’s the basics of frequency separation – now your photo is divided up into Texture and Color layers. And you can heal each layer separately!

Frequency separation when removing wrinkles from clothes in Photoshop

Also, if you feel that the subject is too flat after applying this frequency separation technique, you can dodge and burn to bring back some dimensionality.

How to remove wrinkles from clothing in Photoshop: Conclusion

example with wrinkles removed

You should now be able to confidently remove wrinkles of any type – with just a few quick edits in Photoshop.

In fact, I used very extreme examples for this article, and it’s unlikely you’ll face wrinkles that serious unless you don’t iron anything at all.

(In fact, I recommend you or your client/model do a bit of ironing before a photoshoot, just to save time in editing later.)

I hope that, the next time you need to remove wrinkles from clothes in Photoshop, these techniques can be of help!

Now over to you:

Have you ever been faced with frustrating wrinkles in your photos? How did you get rid of them? Share your thoughts and images in the comments below!

The post How to Remove Wrinkles From Clothes in Photoshop (Fast and Effectively) appeared first on Digital Photography School. It was authored by Ana Mireles.


Digital Photography School

 
Comments Off on How to Remove Wrinkles From Clothes in Photoshop (Fast and Effectively)

Posted in Photography


RAW Files: Digital Manifestations of the Emperor’s New Clothes

04 Oct

What’s all the fuss and hype about RAW files? Let’s look at a little story as a comparison.

The Emperor’s New Clothes

The Hans Christian Andersen story of an incredibly vain King is an amusing tale with an interesting moral.

One day the king, who was very fond of fine clothing, was approached by two slick-talking swindlers. They posed as weavers, and they said they could weave the most magnificent fabrics imaginable. Not only were their fabrics uncommonly fine, but clothes made of this fabric were invisible to anyone who was unfit for office, or who was unusually stupid.

“Those would be just the clothes for me”, thought the Emperor. “If I wore them I would be able to discover which men in my empire were unfit for their posts. And I could tell the wise men from the fools.” As the story goes, the king bought into the story and the clothes. As a result, the people of the kingdom discovered more about their king than they ever cared to know.

RAW Files: Digital Manifestations of the Emperor’s New Clothes

Ignorance of the truth sometimes comes at an embarrassing price.

RAW Files

The truth occasionally gets lost in marketing hype, even in photography. How many times have you heard the claim that vast amount of visual information can be seen in RAW image files? There’s a major problem with that claim, the same problem that “exposed” the king in all his vanity. The claim ain’t exactly accurate.

RAW files do indeed contain all the information collected by a digital camera’s image sensor. But the file’s information itself cannot be viewed because the RAW data is not an image at all, it’s merely numbers.

Only when these numbers are parsed (interpreted) as colors and tones by special software can they display any visual information. RAW Interpreter software builds an initial visual image from the data in the file.

The RAW image, just like the ill-informed Emperor’s clothes, doesn’t actually exist until the file data is interpreted. There is no such thing as a RAW image, only RAW data.

RAW Files: Digital Manifestations of the Emperor’s New Clothes - interpretor software

RAW Interpreter software includes Adobe’s Camera Raw and Lightroom, ON1’s Photo Raw 2018 and Alien Skin’s Exposure3, among others.

When you do open a RAW file in Camera Raw, Lightroom, ON1 Photo Raw, Alien Skin Exposure 3, etc., the image you initially see on the screen is actually based on the camera’s built-in JPEG expression of the RAW data; a mere rough draft of the file’s potential information. The camera’s exposure settings (recorded along with the RAW image) determine the file’s initial appearance on the computer monitor.

Once this initial image appears on the monitor, each RAW Interpreter software provides a fairly exhaustive array of color and tonal sliders that can shape the data into a variety of interpretations. Each interpretation can be saved in JPEG format and published for others to see. Folks who shoot and publish JPEGs directly out of the camera are really shortchanging the file’s potential and leaving important color and detail on the cutting room floor.

Emperor Raw beef With vegetables - RAW Files: Digital Manifestations of the Emperor’s New Clothes

The RAW Truth

The term RAW is not an acronym for some technical phrase nor is it a reference to some uncooked food. It is merely a coined word describing the collection of undeveloped (latent) image data from the camera’s image sensor. This data file contains all the raw chroma and luminous data extracted from millions of light buckets called image receptors located on the camera’s image sensor. Each light bucket is covered by a blue, green, or red filter.

Emperor 4k bayerarray - RAW Files: Digital Manifestations of the Emperor’s New Clothes

Individual image sensors are like small light meters, each covered by a red, green, or blue filter. The Bayer filter array uses more green filters than red and blue, relying on the camera’s image processor to interpret the correct light color and intensity for each pixel.

These RGB filters split the incoming light into three channels of information. Each receptor records the strength of the filtered light as an individual color that will eventually form a single pixel in the image.

While the initial grid of receptors is covered with more green filtered buckets than red or blue, the purpose for this imbalance is a bit too complicated for this article. Suffice to say, the image processor in the camera performs some very complicated math to determine each pixel’s color value and brightness.

Emperor Nikon Camera Back - RAW Files: Digital Manifestations of the Emperor’s New Clothes

A digital camera’s image processor sends RGB pixel values to the camera’s viewing screen to preview each scene prior to capturing the image.

This light capture process begins even before the display is visible on the back of the camera. Every time you reposition the camera to frame your shot, the image processor does its magic again and delivers a new preview of the composition. If your camera is set to display a pre-capture histogram of the scene, this processor data is used to simulate the graph on the histogram.

But the real heavy-lifting happens when you push the shutter button and the image is captured. Once all the individual colors are recorded on the sensor and delivered to the processor, the final image information is preserved on the camera’s hard drive.

Emperor Purple Iris CameraRaw

The individual tonal values (luminosity) of the RAW file were fine-tuned in Adobe’s Camera Raw software to reveal detail not visible in the JPEG file.

In a RAW file, the value of each pixel can be extensively adjusted for hue (color), saturation (intensity), and luminance (brightness). JPEG files record pixels with the same initial color values but the JPEG file format significantly restricts the ability to adjust those values in the editing process. The latitude of JPEG adjustments is significantly limited.

Emperor BahamaBlue Exposure3

The controls in Alien Skin’s Exposure3 Raw Interpreter software provide extensive control over hue and saturation color adjustments.

File Types

JPEG files record each color pixel as an initial luminance (brightness level) and chroma (color) value. When all the pixels on the grid (bitmap) are collectively interpreted in imaging software, a visible replica of the original scene appears on the monitor. If that same image is also captured as RAW information, the values of luminance and chroma are captured in the context of a larger color space and can be interpreted in a wide variety of expressions of the original scene.

Emperor 35mm Negatives

Color negatives are produced from latent images when exposed films are fully developed in photo chemical solutions.

RAW files have been likened to photographic color film negatives in that when they are “developed” (viewed in RAW Interpreter software), the image can be “printed” (published) in a number of unique colors and tonal versions.

But the truth is that because this RAW file is not an image per se, but a record of the light characteristics captured by each of the camera’s light buckets, the original image data contained in the RAW file never gets altered, it only gets interpreted.

The interpretations are records of the luminous and chroma adjustments made to the RAW bitmap pixels. These interpretations are what gets saved as JPEG images.

Unlike the yarn spun by the king’s “couturiers,” RAW data files deliver custom-tailored results and can make you look really smart in a couple of ways. Dress your images for success.

The post RAW Files: Digital Manifestations of the Emperor’s New Clothes appeared first on Digital Photography School.


Digital Photography School

 
Comments Off on RAW Files: Digital Manifestations of the Emperor’s New Clothes

Posted in Photography


Guerrilla Apparel: Pirate Printers Press Clothes to Painted Public Surfaces

07 May

[ By WebUrbanist in Art & Sculpture & Craft. ]

A Berlin street art collective is hitting the streets of Europe again, touring major cities to turn infrastructural patterns into (quite literal) streetwear across the continent. Each of their unique creations is tied to public art and design patterns often overlooked as we walk by (or on top of) them.

Raubdruckerin (AKA Pirate Printer) press apparel to painted street objects featuring a level of relief, soaking up the top layer to create impressions of manhole covers, vents, grates, bike lane symbols and just about anything else with some depth to it.

In German, there is some nuance to their name as well: ‘Rauber’ means both pirate and robber, while “drucken” is both press and print. Effectively, they press and steal patterns (though since their source material is quite literally in the public domain, no one so far seems to mind).

Like graffiti artists or mobile street painters with portable canvasses, their work tends to draw a crowd and has a performative aspect to it by its nature. In turn, they aim to raise awareness of overlooked and everyday design objects.

So far they have made their way through Amsterdam, Athens, Paris and Lisbon. In each location, they press cotton bags and apparel to street surfaces coated in eco-friendly ink, then wash up behind themselves to leave no trace.

Share on Facebook


[ By WebUrbanist in Art & Sculpture & Craft. ]

[ WebUrbanist | Archives | Galleries | Privacy | TOS ]


WebUrbanist

 
Comments Off on Guerrilla Apparel: Pirate Printers Press Clothes to Painted Public Surfaces

Posted in Creativity


Mad for Max: 17 Cars, Clothes & Designs Inspired by the Series

21 May

[ By Steph in Design & Products & Packaging. ]

mad max power wheels

There’s so much to look at in the new Mad Max movie, from that ridiculous double-necked flame-throwing guitar to all of those terrifying spiked weapon-hurling vehicles, you’d have to watch it a dozen times to take it all in. Fury Road is just the latest film in the series to dazzle us visually, inspiring all manner of copycat creations and post-apocalyptic designs, including lethal-looking kid-sized vehicles, disaster fashion and fantasy architecture.

Mad Max Power Wheels
mad max power wheels 2

Maybe putting a six-year-old behind the wheel of a car covered in real metal spikes isn’t the best idea ever, but we’re still sad that this series of Mad Max-inspired Power Wheels isn’t actually real. The set is part of ThinkGeek’s annual April Fool’s Day stunt – but the site made one of its joke products into a real thing you can buy before (the Star Wars Tauntaun sleeping bag) so maybe the popularity of the movie will lead to less-lethal versions of these awesome little vehicles becoming available for purchase. The photos are fun, anyway.

Formula One x 1932 Ford 3-Window Coupe Combo
mad max formula 1 2

mad max formula 1

The glossy black body of a 1932 Ford 3-window couple comes together with Formula 1 aesthetics and functionality in this rendering by concept designer Aleksander of Muscle Car Invasion, who started sketching it in 2009 when the fourth Mad Max movie was first announced.

Runway Road Warriors: Post Apocalyptic Fashion
mad max rick owens 2

mad max fashion rick owens

PHOTO © PETER STIGTER  FALL/WINTER 2010

mad max fashion boris bidjian

mad max fashion devtac

Mad Max: Fury Road didn’t have quite the same emphasis on bizarre post-apocalyptic fashion as the previous three films, which makes sense, anyway: who would spend so much time on their appearance in a world where everyone is reduced to the single instinct of survival? But the series has made a huge impact on post-apocalyptic fashion, and Fury Road echoes the dark, rough-around-the-edges futuristic style seen everywhere from high fashion runways to indie designers’ Etsy shops. From Gareth Pugh sending his models down the runway with black foreheads a la Imperator Furiosa to a striking 2013 Mad Max-inspired editorial by Harper’s Bazaar, these visuals are all over the fashion world. The works pictured here include Rick Owens, Boris Bidjan Saberi and helmet designer Devtac. Style.com has a gallery of 18 more images.

4 Architectural Visions by Justin Plunkett
mad max architecture 1

mad max architecture 2

mad max architecture 3

mad max architecture 4
Jumbled yet unfussy, made of junk yet somehow sort of minimalist, the architecture in Mad Max is all about making use of whatever materials are available in surprisingly creative ways. Capetown, South Africa-based designer Justin Plunkett embodies this aesthetic with a series of fantasy structures made by layering 3D illustrations on top of photographs he has taken in some of his home city’s most down-and-out neighborhoods.

Next Page – Click Below to Read More:
Mad For Max 17 Cars Clothing More Inspired By The Series

Share on Facebook


[ By Steph in Design & Products & Packaging. ]

[ WebUrbanist | Archives | Galleries | Privacy | TOS ]


WebUrbanist

 
Comments Off on Mad for Max: 17 Cars, Clothes & Designs Inspired by the Series

Posted in Creativity


Open-Source Street Store Offers Free Clothes for Homeless

05 Mar

[ By WebUrbanist in Design & Guerilla Ads & Marketing. ]

pop up store hangars

Donated boxes of right-sized clothing can be a boon for those who cannot afford another choice, but this clever approach empowers people in need to choose their own apparel.

pop up sidewalk homeless

pop up shoppers

The Street Store assistants set out flat-pack cardboard hangars, signs and stands along sidewalks and fences, encouraging people to drop off clothing. Volunteers also help passerby in need package what what they find, and those with something to give find a place to put their donations.

pop up helper volunteer

Though the project was started in Cape Town, South Africa, as a collaboration between M&C Saatchi Abel and the Haven Night Shelter Welfare Organisation, it is offered as open-source to applicants from around the world who wish to use the files and create their own  regional variant.

pop up shop volunteer

The open-air approach makes everything more accessible for both donating and recipient parties; it also renders indoor spaces and infrastructure redundant, enabling pop-ups to happen in various public spaces.

pop up cardboard elements

pop up street store

As for the first day’s effort in the project’s original city: “Over 1,000 homeless people visited our store that day. Each put together an outfit that they wanted. An outfit, that for many, was the first they had ever been able to choose for themselves.”

Share on Facebook


[ By WebUrbanist in Design & Guerilla Ads & Marketing. ]

[ WebUrbanist | Archives | Galleries | Privacy | TOS ]


WebUrbanist

 
Comments Off on Open-Source Street Store Offers Free Clothes for Homeless

Posted in Creativity


Fresh Spin: Rounded Space-Saving Clothes Drying Rack

03 Jan

[ By WebUrbanist in Design & Furniture & Decor. ]

space saver interior design

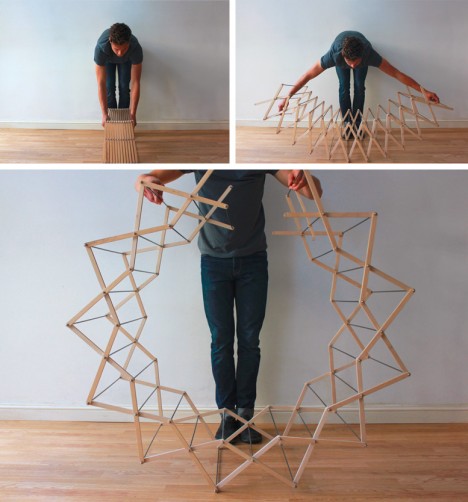
Hanging clothes out to dry is a design problem with a long history and many solutions, making it all the more rare to see something like this clever star-shaped approach that addresses the issue with such adeptness.

space interior clothes horse

In some Asian or European regions with more temperate climates, people string their clothes outside to dry, taking maximum advantage of warmth and airflow. Apartment and condo dwellers in colder places often have fewer options – Aaron Dunkerton of Queensland, Australia, but graduate of Kingston University, in the colder United Kingdom, can relate to both sets of conditions.

space unfolding clothes rack

The clever twelve-pointed-star design allows for maximum air circulation and hanging area with a minimum footprint when the drying rack is folded up and stored. A compact collection of aluminum rods strung between plywood supports are unfolded and latched to form an essentially circular shape with space in the middle – all part of a low-tech spin cycle that takes up less space in your closet, too.

space saving drying rack

space circular rack side

More about this unconventional clotheshorse: “The dimensions of my clothes horse are 56cm long, 32 wide and 23cm high when it is collapsed so it is much easier to store than a conventional clothes airer which are normally awkward sizes and hard to hide when not in use. When in use its dimensions are 56cm deep, 112cm wide and 112cm tall. The shape of my clothes horse when erect allows for good air circulation around the clothes, which will help them to dry faster.”

Share on Facebook


[ By WebUrbanist in Design & Furniture & Decor. ]

[ WebUrbanist | Archives | Galleries | Privacy | TOS ]


WebUrbanist

 
Comments Off on Fresh Spin: Rounded Space-Saving Clothes Drying Rack

Posted in Creativity


Scarlett Johansson – Photoshop Change Hair & Clothes Color

02 Aug

This tutorial shows you how to change the color of hair and clothing using Adobe Photoshop CS5. Hue and Saturations layers are your friend. All done using adjustment layers non-destructively. Visit us on Facebook @ www.facebook.com Follow us on Twitter @ twitter.com …

You gotta see this helpful info : Here’s the definitive technique for removing double chins using photoshop. Based on years of retouching using old fashion pencil and pastel techniques. More at 2011 trustseo.com Website Designer Miami Thanks to the #1 uploader of this video was nobsphotosuccess
Video Rating: 5 / 5


Photoshop – how to recolor hair and clothes

16 May

NOTE I AM SORRY FOR MY BAD ENGLISH.
Video Rating: 4 / 5

Celebrities that are modified with photoshop. I don’t know about you but for me, it makes me feel better about myself. Please, don’t believe what you see in magazine!
Video Rating: 5 / 5