RSS
 

Posts Tagged ‘clear’

EyeQ acquires image optimization company Athentech and its Perfectly Clear technology

05 Apr

Athentech, the company behind the Perfectly Clear image optimization algorithm, which is used by printing services and deployed in Bibble and Corel´s PaintShop Pro among other applications, has been acquired by Canadian company EyeQ. The new owners say they will maintain all of Athentech’s current business and will continue to offer the Perfectly Clear technology. They are also planning to invest in areas such as artificial intelligence and innovative workflow solutions.

‘Athentech was built by a team of leading scientists, physicists, and photographers on a mission to make every photo as brilliant, vibrant, and clear as possible, just like our human eye captured, all while maintaining color integrity. Our acquisition is an exciting inflection point that adds more financial muscle and expertise to allow us to upscale this 15-year mission and reach more companies worldwide,’ said Brad Malcolm, President and CEO, EyeQ.

As the first post-acquisition move the company has announced a new Web API which offers cloud-based access to the same technologies available in the latest SDK, without a need for any integration. The solution is aimed at business users who can send original JPG files and receive corrected image pretty much immediately.

EyeQ is a venture-capital backed company and on its website describes itself as ‘an innovative digital imaging company focused on evolving the way businesses correct and process batch imagery.’

Articles: Digital Photography Review (dpreview.com)

 
Comments Off on EyeQ acquires image optimization company Athentech and its Perfectly Clear technology

Posted in Uncategorized


This lens only existed for a minute and was made from a crystal clear iceberg

24 Oct

French photographer and YouTuber Mathieu Stern is known for his look at rare, vintage glass, but his latest lens might just top it all. While on Iceland’s famous “iceberg beach,” Stern fulfilled his dream of shooting photos and videos with a lens made of ice.

“Shooting photos using an ice lens [has been] my dream for almost 2 years. After some research I saw that almost no one ever tried this crazy idea, mainly because it’s hard as hell to find pure ice, and even harder to get a clear image,” says Stern in the video’s description. “So I had the choice to give up on my idea because it was too hard, or to just level up in the craziness […] If it’s hard to find pure ice in my city, maybe I should go where I could find some 10 000 year old pure ice — Iceland’s famous iceberg beach.”

The night before Stern and his friends were supposed to go to the beach, a “huge” storm went through and took all of the icebergs away from shore. So, they waited a few days and eventually went back three days later at 5am in the morning to get a chunk from one of the icebergs that had made its way to shore.

Stern says it took nearly six hours to create a single working ice lens, after four of them had broken inside of the housing. Every iteration, each of which took 45 minutes to make, was done so with the help of a Japanese cocktail ice ball maker, which Stern had hacked to form the piece of iceberg into a half-sphere.

The housing of the lens he created was 3D-printed, which held the continuously-melting piece of ice in place in front of Stern’s camera. As you could imagine, shooting with the lens was less than ideal. The lens lasted only a minute or so after it was completed and trying to focus as it was melting proved to be a challenge.

According to Stern, no cameras were harmed in the making of the video. As to whether or not he was happy with the result, Stern says “This project is a scientific, artistic and poetic project — I never imagined the result would look like the photos that comes from an ultra modern lens, but I was amazed by the strange beauty of the images I made with the first ever 10,000 year old lens.”

You can read Stern’s detailed account on the creation of the lens and see more of his work on his website.

Articles: Digital Photography Review (dpreview.com)

 
Comments Off on This lens only existed for a minute and was made from a crystal clear iceberg

Posted in Uncategorized


How to Take Clear and Creative Photos at Aquariums

19 Jul

Aquariums are amazing places to take your family. But it can be really hard to take good photos as aquariums.

Naturally, you want some really cool pictures. But you find out very quickly that aquariums are dark. Really dark! And that your photos turn out blurry. Really blurry!

Low light photography is one of my favorite challenges. So, in this article, I’ll show you how to get clear and creative photos at aquariums and how to apply some simple edits in Lightroom.

A photo of a shark swimming with fish. How to Take Clear and Creative Photos at Aquariums

I’ve always been amazed by people who go diving with sharks. I knew that I wanted my aquarium photos to seem like they were taken from in the water. So as much as possible, I got right up close to the glass, blocking everything out except the creatures in the water.

1. Getting Clear Photos at Aquariums

Turn off your flash

If you set your camera to Automatic Mode, it’ll likely trigger the flash when you take a photo. The flash will make a huge reflection on the glass which will ruin your photo. So before you even enter the aquarium, make sure to disable your flash.

If you turn your flash off you’ve eliminated the biggest problem with glare. But there still might be some ambient light reflecting off the glass. Move right up to the glass so that your camera won’t pick up any of this reflected ambient light. You’ll be standing right up at the glass looking through it, rather than standing back a few feet looking at it.

Photo of ambient light reflecting on glass at the aquarium. How to Take Clear and Creative Photos at Aquariums

Here you can see the white and orange ambient light reflected in the glass on the left side of the photo. This photo is also suffering from a slight bit of motion blur.

Photo of a fish with no ambient light reflecting on the glass. How to Take Clear and Creative Photos at Aquariums

In this second photo, I stepped closer to the glass and angled the camera so as not to see the ambient light reflected in the glass. The main fish is also sharper now. Part of drew me to this photo was the simplicity of the scene. Very little color, good subject and a repetitive pattern of fish in the background. ISO 2500, f/2.8, 1/50th.

Turning off the flash and getting rid of reflections is the first step. Now it’s time to consider freezing the action so that your photos won’t be blurry.

Motion Blur

You may find that your aquarium photos turn out blurry at first. This is because in low light situations your shutter speed can become too slow to freeze the movement.

It’s important for you to set the shutter speed yourself, ensuring that your photos will not be blurry from camera or subject movement. There are two main ways to do this; Shutter Priority or full Manual Mode.

A photo with blurry fish - How to Take Clear and Creative Photos at Aquariums

This is a typical aquarium photo suffering from motion blur. The camera settings were ISO 400, f/4, 1/10th. The shutter speed needs to be much quicker to freeze the movement of the fish. Increasing the ISO to 3200 would have allowed for a much faster shutter speed (1/80th).

Shutter Priority Mode

To use Shutter Priority Mode, start by setting the ISO as high as you are comfortable doing according to your camera. I have no problem going to ISO 3200. This higher ISO will help your camera absorb the dim light.

For photos in aquariums, I suggest setting your shutter speed to 1/125th to begin. Make sure you only set the shutter speed fast enough to freeze the action, but no faster than necessary. If the shutter speed is too quick you’ll end up with dark or underexposed images.

Close-up photo of a shark - How to Take Clear and Creative Photos at Aquariums

I was so excited to get this close to a shark! The settings for this image were ISO 3200, f/2.8, 1/125th.

Manual Mode

If you’re comfortable with it, you should use full manual mode. Set your ISO as high as you are comfortable doing according to your camera. Aim for ISO 3200 which will help your camera absorb the light.

Open your aperture as much as you can, or as much as you are comfortable doing creatively. If your aperture opens to f/2.8 or f/1.8 that will really help to capture the light.

With your ISO as high as you can make it and your aperture open as wide as you like, set your shutter speed to 1/125th or faster (likely somewhere between 1/60th and 1/250th – adjust as needed to get a good exposure based on the amount of light in your scene).

If you have a 50mm lens I recommend you make it your main lens for aquariums. The wider aperture will let in lots more light. It’s a good focal length too.

My typical settings for aquarium photos are as follows:

  • ISO 3200
  • Aperture f/2.8
  • Shutter speed 1/60th

That shutter speed is actually pretty slow. But I have practiced holding the camera really steady and most of the creatures weren’t moving too quickly.

A shark with fish. How to Take Clear and Creative Photos at Aquariums

ISO 3200, f/2.8, 1/125th.

Don’t get discouraged when the first shot doesn’t turn out. Take your time as you explore the aquarium. Try to choose a day to visit when it’s less busy. Give them a call and ask them when those times occur.

2. Getting Creative Photos

Once you’ve figured out how to get clear photos, it’s time to get creative. You might be so overwhelmed by the amazing sea life that you forget to bring your own creativity to the photos, so here are some tips for you.

Angles

To me, varying your camera angle is the quickest way to make your photos more interesting. Rather than capturing everything from the same perspective, try a variety of angles. The same shark can look very different from different angles.

A big lobster with huge claws. How to Take Clear and Creative Photos at Aquariums

I chose an eye to eye camera angle for this lobster. His claws were huge and getting right down to his level made him look like a tough guy. You have to look carefully to see his eyes in the background. This part of the aquarium was actually lit with purple light.

Low angle photo of a shark with its teeth showing. How to Take Clear and Creative Photos at Aquariums

To me, the feature that stands out the most on a shark is its teeth. A low angle is just about the only way to see those teeth in a photo.

Photo of a strange fish (eel). How to Take Clear and Creative Photos at Aquariums

The best way to capture this eel’s beauty was an eye to eye angle.

Photo of a shark chasing a fish. How to Take Clear and Creative Photos at Aquariums

A low angle can add a sense of drama to the photo. When a shark decides that it’s feeding time, that’s a dramatic moment!

Extremely low angle photo of a shark. How to Take Clear and Creative Photos at Aquariums

I would normally refer to this extremely low angle as a “bug’s eye view.” Dramatic angles such as this can really give the feeling of actually being in the water with the sharks. You’ll notice a little glare on the glass on the upper right of the photo.

Silhouettes

Silhouettes are really easy to capture in aquariums. The key to a silhouette is to have a bright background and a dark foreground and subject. If you’re comfortable using Manual Mode, then you only need to adjust your exposure until you get the desired effect.

If you’re in Auto Mode or even Shutter Priority, then your camera may naturally make the photo look like a silhouette. But you could use exposure compensation to adjust the exposure (- if you want it darker, + to lighten it) if you don’t want to shoot in Manual Mode.

A silhouette photo of people watching a manta ray. How to Take Clear and Creative Photos at Aquariums

Children are taken in by the sea creatures and parents are captivated watching their kids. This silhouette photo happened quite naturally because the aquarium is really bright compared to the people in the foreground. You’ll notice some unfortunate ambient light reflecting on the glass near the manta ray’s tail. That could be easily removed in Photoshop – if you have those skills.

Light

Pay attention to the light in the water and you should be able to get some interesting photos. Especially look for backlight or sidelight.

A dramatically lit school of fish. How to Take Clear and Creative Photos at Aquariums

I love backlighting so I positioned myself to get the huge lights in the frame. This gives the photo a dramatic deep sea feel, as though a submarine were coming along.

Close up of a backlit school of fish. How to Take Clear and Creative Photos at Aquariums

Another backlit photo. I was able to get right up to the glass to photograph this school of fish.

Editing Your Photos at Aquariums in Lightroom

When the chaos of the aquarium trip is over you can relax and sift through your photos. Choose the ones that you like the best and forget about the ones that didn’t turn out. Use a program like Lightroom to put the finishing touches on your photos.

My goal is to keep my photos looking as natural as possible. My main concerns are exposure, contrast, and clarity. However, I always want my photos to look the way the moments felt. So I don’t mind exaggerating colors or exposure if need be.

So considering your images, they’re your photos so you get to make the decisions.

Screenshot of adjustments made in Lightroom. How to Take Clear and Creative Photos at Aquariums

The adjustments here, especially clarity, allowed the shark and the fish to pop a little more.

Screenshot of adjustments made in Lightroom.

The most important adjustment made to this photos was the White Balance. I normally use Auto White Balance and the camera gets the color pretty close. But in this case, there is a strong green tint to the photo. There are all sorts of color casts in an aquarium which can make white balance tricky. Make sure you shoot raw so you can adjust it later.

Screenshot of adjustments made in Lightroom. How to Take Clear and Creative Photos at Aquariums

This lobster was impressive for its size and gritty crusty look. I bumped up the clarity significantly in order to portray that in the photo.

Bring it Together

Whether you’re going alone, with a friend, or with your whole family, don’t fight the crowds and choose a quiet time to visit the aquarium. When you get there, take your time and get comfortable with your camera settings.

Once you have figured out how to get clear photos, get creative with angles and interesting light.

Relive the sights as you cull, edit and print your favorite shots. And before you visit an aquarium again review your last photos and plan to make the new batch even better.

The post How to Take Clear and Creative Photos at Aquariums appeared first on Digital Photography School.


Digital Photography School

 
Comments Off on How to Take Clear and Creative Photos at Aquariums

Posted in Photography


Crystal clear: Inside Nikon’s Hikari Glass factory

03 May

Inside Nikon’s Hikari Glass factory

Located about 375 miles north of Tokyo in the Akita Prefecture, the Hikari Glass factory is a special place. Opened back in the 1970s, Hikari Glass has been a wholly owned subsidiary of Nikon since 2004. If you shoot with Nikon lenses, the chances are good that they started life right here – as raw powdered glass.

The Akita Prefecture, home of Hikari Glass, lies around 375 miles north of Tokyo.

Nikon invited us to visit Hikari Glass following the CP+ 2018 show in Yokohama, and along with our friends Dave Etchells and William Brawley of Imaging Resource, we were among the first journalists ever allowed inside the facility. During our visit we saw virtually the entire process of glass-making, from raw powder to finished glass ‘blanks’, ready for shaping and polishing in Nikon’s other facilities.

Click through this slideshow for a detailed look – please note that some areas of certain images are blurred at Nikon’s request.

Inside Nikon’s Hikari Glass factory

Akita and the surrounding area is blanketed with snow for several months a year. We visited on a relatively mild day, but as you can probably tell from the ice buildup on this building, ‘mild’ is a relative term.

Our tour guide, Akio Arai is the Corporate Vice President and Production General Manager of the Akita factory and has been with the company for 11 years. At present, almost all of the Hikari factory’s output goes to satisfying Nikon’s requirements for high-quality glass, but Mr Arai hopes that in future his facility will be in a position to supply even more glass to companies other than Nikon.

Inside Nikon’s Hikari Glass factory

This powder contains several different ingredients (the biggest portion being quartz, but the exact mix is secret) which are mixed, melted, and eventually turned into finished glass.

The combining of the raw material happens in batches of around 500kg (~1100 lb) in a pair of very large mixers. The precision achieved in the mixing process is somewhere in the region of 1 part to 50,000. It’s vitally important that the mixture is exactly right, because Hikari is aiming for glass with a very specific refractive index.

Inside Nikon’s Hikari Glass factory

This tub of powder (roughly the size of a small hotel bathtub) is the raw material for Nikon’s famed ED glass, used in a great many of the company’s high-performance lenses. Hikari makes 125 different kinds of optical glass, including 20 types of ‘specialty glass’ for molded lens elements.

Once the powder has been mixed, it is melted. There are two types of melting process, depending on the types of glass. The simpler of the two is called ‘direct melting’, and the more complex is called ‘pre-melting’ and ‘fine melting’. We watched the latter.

Inside Nikon’s Hikari Glass factory

The pre-melting process begins with the raw powder being heated inside a quartz or platinum crucible (depending on the exact type of glass), in a furnace at a temperature of more than 1000 degrees Celsius. The furnaces are on platforms raised several feet above the factory floor. The mixture is added to the crucibles by machines very gradually. If all the powder were dumped in at once, only the surface of the mixture would melt.

With quartz crucibles, some of the quartz inevitably melts into the mixture. This is accounted for in the formula, but since they become thinner over time as the quartz melts, the crucibles have a limited lifespan – in some cases, this can be as short as two days. We weren’t allowed to show the crucibles in this article, but the ones we were shown were roughly the size of a small domestic water boiler.

Once the glass is fully melted, a hole is opened into the bottom of the crucible to allow the molten glass to escape into a large tank of water, positioned underneath the furnace at floor level. That’s what you can see in the image above.

Inside Nikon’s Hikari Glass factory

As the glass continues to drain, eventually the water that it’s draining into becomes so hot that it starts to boil.

The remainder of the heated glass is drained into the tank, and once everything is cooled down, workers will assess whether or not the crucible in the furnace can be used again, or needs to be retired. In the old days, glass used to be melted in clay crucibles, and for every 2,500 kilos of glass, only about 500 kilos was usable. The modern method is far less wasteful.

A small water jet to the right of the stream of molten glass helps break the stream up into small droplets which cool to form what are called ‘frit’.

Inside Nikon’s Hikari Glass factory

And here is the frit – they look like little flakes of snow, but that’s where the similarity ends. In the pre-melting process, the frit aren’t meant to have exactly the exact refractive qualities of the finished glass – it’s still basically a raw material. And there’s some variation in the flakes of frit, too. Depending on where the glass was positioned inside the crucible, the makeup of each frit might be slightly different (i.e., it might contain more or less quartz, thanks to the melting of the crucibles during the process).

Inside Nikon’s Hikari Glass factory

The frit is mixed in these giant machines (it’s hard to get a sense of scale, but the fan on the far right is basically just a domestic room fan if that helps). If these look like modified and repurposed cement mixers, that’s because they are.

One of the major modifications over a standard cement mixer is inside the drums, which are lined with natural rubber to prevent any metal particles from the mixer contaminating the glass.

Inside Nikon’s Hikari Glass factory

Here’s a closer view of the rubberized interior of the mixing drum. Any rubber particles that make it into the mix will burn off harmlessly in the next major process – ‘fine melting’.

In order to hit exactly the right target refractive index for a particular kind of glass, Hikari prepares two batches of frit, one batch with a refractive index deliberately on one side of the target value, and one with a refractive index on the other. The two batches are then remixed and fine-melted together in just the right way to produce glass with the exact target refractive index value.

The direct melting process skips this pre-melting step, making it less time-consuming. The difficult part is that the glass must have exactly the right refractive index from the get-go, which requires absolute purity of the raw materials, and gives much less margin for fine-tuning.

Inside Nikon’s Hikari Glass factory

The fine melting process is one of the two most critical stages in the entire glass-making process, and takes place in platinum crucibles inside very high-tech furnaces. The exact details of the fine melting furnaces (even their external appearance) are highly protected by Hikari Glass, and we weren’t allowed to take photographs of them.

That’s OK, because to the untrained eye they don’t look like much anyway. More interesting is what they produce – long, long bars of glass, called ingots, which roll out from the machines very, very slowly on a very, very long conveyor belt in a process called ‘casting’.

Inside Nikon’s Hikari Glass factory

A skilled worker marks and precisely breaks the cast ingot at specific intervals. This particular ingot is destined for use in Nikon lenses, while glass for prisms and other purposes are processed in a different building.

Inside Nikon’s Hikari Glass factory

Once the ingot has been broken up into bars, each bar undergoes a quick inspection for any obvious major flaws or defects. If there is an apparent defect, these extruded glass bars are either recycled, if possible, or rejected.

Inside Nikon’s Hikari Glass factory

The glass bars are further checked for any bubbles or unevenness in an adjoining room. This is most often done visually, using a lightbox. Bubbles show up as bright specs, and ‘distortions’ (areas of substantially different refractive index) show up as wrinkles in the image projected onto the screen (left).

Inside Nikon’s Hikari Glass factory

Here, a worker points out a defect in a demonstration bar of glass.

During the decades that Hikari Glass has been operating, optical technology has changed a lot, and so has the legislation governing substances like lead and arsenic, which used to be commonly used in glass manufacturing. Over the years, Hikari Glass has refined its processes accordingly.

Inside Nikon’s Hikari Glass factory

To ascertain the exact refractive qualities of a piece of glass, Hikari Glass technicians turn to machines. To measure refractive index, a small test block of glass is cut, and a special liquid with the expected refractive index is then painted onto the glass. Technicians then load the painted cube of glass into this machine and look for variations in light transmission as light is shone through.

As well as the ‘final’ glass cast from the fine-melting furnaces, these machines are used to establish the refractive index of test batches of glass made from the frit we saw earlier.

Inside Nikon’s Hikari Glass factory

Once they’ve passed this quality control step, the bars of glass are split into slim rods, using heat. A heating coil warms the bar, and after a predetermined period of time, a small drop of cold water applied to the end of the bar causes it to split neatly in two with a very satisfying “pink” sound.

This bar has just been split into two rods – the bars to the right, in the background are awaiting their turn.

Inside Nikon’s Hikari Glass factory

The glass rods are then cut into smaller…

Inside Nikon’s Hikari Glass factory

…and smaller cubes, called ‘dice’ using a circular saw. You’ll notice there’s no glass dust anywhere to be seen in these images and that’s because the ‘saw’ doesn’t have a cutting surface (you could put your hand right on it, without any fear of injury). It works by friction – the spinning disc heats the glass at the point of contact, creating a clean break.

Each cube is slightly bigger than it ultimately needs to be, so that there’s scope for its weight to be precisely adjusted in the next stage of the process – grinding.

Inside Nikon’s Hikari Glass factory

The cubes of glass are weighed and placed into four categories, according to their approximate target weight. Their weight is then adjusted by grinding stones, in a very noisy machine called a tumbler (pictured above, and there’s a video of it in operation, below).

The cubes of glass that are heaviest are added to the tumbler first, followed by the second-heaviest cubes, then the third and finally the fourth. In this way, the cubes of glass that need most weight shaved from them are processed for longer, and they all come out weighing roughly the same.

Inside Nikon’s Hikari Glass factory

After hanging out in the tumbler for a while, the cubes look like pieces of beach glass.

A skilled employee then inspects each one by hand and performs any necessary additional grinding to make sure that any small chips are smoothed out, and the weight falls within the desired parameters.

This particular piece has a chip (marked in red), which is big enough that unfortunately it’s reached the end of the line and will be rejected.

Inside Nikon’s Hikari Glass factory

Several areas of the Hikari factory are dusted with white powder, but it isn’t glass dust, it’s boron nitride – a heat-resistant compound of boron and nitrogen which is used in several industries, including cosmetics. At the Hikari factory, it’s used to stop the cakes of glass from sticking to their casts when they’re pressed into shape.

A welcome effect of the roughening of the glass surface in the tumblers is that it makes the boron nitride adhere more effectively.

Inside Nikon’s Hikari Glass factory

And now the pressing begins!

The blocks of glass, covered in boron nitride, are placed into their ceramic trays and sent on a conveyer belt through a furnace – which not coincidentally, makes this area one of the warmer sections of the Hikari facility. The aim is to soften the glass, but not quite to melting point.

Inside Nikon’s Hikari Glass factory

The very, very hot piece of glass is moved by hand (well, by tongs) and tipped into a heated mold. The molds for lens elements like these are pretty simple, but we’re told that it takes much longer to prepare the molds for glass destined for DSLR and binocular prisms.

Inside Nikon’s Hikari Glass factory

Once the glass is in the mold, a worker then activates a foot pedal to press the cake of glass into shape. A clock serves as a rough point of reference for the length of time each cake of glass is pressed, but an experienced press operator can also make this call by assessing the hardness of the glass based on how the mold feels in his hands.

Inside Nikon’s Hikari Glass factory

After pressing, and cooling, the cakes of glass (which are now in their puck-shaped final form) are collected for inspection.

Inside Nikon’s Hikari Glass factory

Each cake of glass is inspected by hands for any obvious defects resulting from pressing.

This large piece of glass is destined for one of Nikon’s high-end telephoto lenses, and pieces like this go through extra inspection steps because they’re produced in a lower volume.

Inside Nikon’s Hikari Glass factory

Last but not least is the annealing process – the second most critical phase in the glass-making process, after fine melting. Like fine melting, the exact details of the annealing process are highly confidential. Essentially, annealing is a precisely-regulated heating and cooling process, which takes place over a long period of time – often several days. The goal is to make the internal density of the glass blanks completely consistent, and to eliminate any remaining bubbles and to adjust the refractive index. Generally speaking, lengthier cooling cycles result in denser glass with a higher refractive index, and shorter cycles produce less dense, higher RI glass.

The specific temperature brackets – and the period of time over which those temperatures are sustained – is critical (and secret) and depends on the exact type of glass. The huge plates of glass used in industrial steppers might spend up to two months in the annealing furnace.

The green chalkboard on the front of this furnace is used by workers to record the ‘recipe’ for the particular trays of glass blanks that have been loaded in. This furnace isn’t being used, which is why there’s nothing written on the board (and why we were allowed to take pictures of it).

Inside Nikon’s Hikari Glass factory

After all that, at long last, we have a finished ‘blank.’ These blanks are packaged and sent off to other Nikon facilities in Japan, China and Thailand for polishing and coating, before finally making their way into NIKKOR lenses.

Inside Nikon’s Hikari Glass factory

And that’s it! Here, finished blanks of glass are placed into plastic pallets ready for dispatch.

To recap, here are the major stages in the entire process from beginning to end, with links:

  1. Initial mixing of the raw materials to make glass powder LINK
  2. Pre-melting of the glass to make ‘frits’, which are intentionally created to have either a positive or negative R.I. (direct melting is a simpler process, that we did not observe) LINK
  3. Mixing the frits LINK
  4. Fine melting of the frits (not pictured) to achieve the target refractive index, and extrusion and cutting of the glass ingots into bars LINK
  5. Inspection of the glass for defects LINK
  6. Cutting into blocks into rods and dice LINK
  7. Adjusting the weight of the glass dice in the grinding machine LINK
  8. Heating and pressing the glass dice into molds LINK
  9. Annealing of the resulting blanks, to eliminate distortions in the glass and fine-tune the refractive index LINK
  10. Inspection and measurement of the finished glass blanks

We hope you enjoyed this look inside Nikon’s Hikari glass factory. If you’re eager to learn even more, our friend Dave Etchells over at Imaging Resource has published an even more detailed account of our visit here.

Articles: Digital Photography Review (dpreview.com)

 
Comments Off on Crystal clear: Inside Nikon’s Hikari Glass factory

Posted in Uncategorized


Outex launches clear, universal underwater camera housing

04 Nov

Outex has launched a clear version of its rubber underwater camera ‘housing’ via Kickstarter, where it is seeking $ 35k in funding to bring the product to market and help even more people get into underwater photography without breaking the bank.

This clear version joins the company’s original rubber sleeve, which features a solid blueish color with the exception of the lens cover. The clear design, according to Outex, makes it easier to adjust camera settings after putting the camera in the sleeve. And while the Kickstarter doesn’t mention it explicitly, we assume this version features the same IP08 rated waterproof design as the blue version, which can withstand depths up to 10 meters or about 33 feet.

Unlike most camera housings, which are made of rigid materials and designed to fit a specific camera, Outex’s rubber sleeve stretches to accommodate a variety of camera and lens shapes and sizes. Additionally, Outex says its new model has an “improved material composition” that makes both installation and removal easier by offering increased malleability and elasticity.

Finally, Outex says the housing covers also have better longevity thanks to a reformulated compound design and better manufacturing process.

As of this writing, Outex is about $ 10,000 of the way to its $ 35K goal with 31 days to go, but if the Kickstarter campaign brings in enough funds to meet certain stretch goals, Outex will also launch covers for mirrorless and compact cameras ($ 75k goal), large-body cameras ($ 150k goal), and even covers that can accommodate pistol grips and tripods ($ 175k goal).

The Kickstarter campaign is offering backers one clear cover for pledges of at least $ 100. Assuming the funding goal is met and everything goes according to plan (NEVER a guarantee), backers will receive their products in January 2018.

Articles: Digital Photography Review (dpreview.com)

 
Comments Off on Outex launches clear, universal underwater camera housing

Posted in Uncategorized


Lawsuit ruling sends clear message: Register your photo copyrights ASAP

02 Aug

Though copyright is automatically granted to creators for their created works in the United States, the option remains to officially (and voluntarily) register those copyrights with the U.S. Copyright Office. As detailed on Copyright.gov, this registration bestows certain benefits and may, in certain circumstances, be necessary: “Before an infringement suit may be filed in court, registration is necessary for works of U.S. origin.”

A recent U.S. lawsuit involving infringement may set a precedent regarding whether a copyrighted work is considered registered for the purposes of an infringement suit if the registration application is still pending.

The matter revolves around a lawsuit filed by photojournalist Matilde Gattoni against clothing retailer Tibi over its unauthorized use of her photo. According to the lawsuit, Gattoni posted one of her own photos on her Instagram; this image was taken in Morocco and her copyright registration was still pending in the U.S. Though the Instagram post included a copyright notice, the lawsuit claims Tibi cropped the image, posted the cropped portion on its own Instagram, and included only a link to Gattoni’s Instagram sans copyright info.

The lawsuit aimed to hit Tibi for both a DMCA violation and copyright infringement, seeking between $ 2,500 and $ 25,000 for the alleged DMCA violation and up to $ 150,000 in damages for the copyright infringement.

However, things didn’t quite go as Gattoni had hoped. U.S. District Court Judge Robert W. Sweet has ruled that while the case can proceed with the DMCA claim, it must do so without the copyright infringement claim due to the copyright registration’s ‘pending’ status. Discussing this matter in particular, the court stated:

Because Gattoni has alleged only that the registration for the allegedly infringed film is pending, and because no application has been made by Gattoni to amend the Complaint if and when the Photograph became registered, Gattoni has not properly pled the pre-requisite element of a copyright infringement claim.

While some courts have accepted pending copyright registration as suitable for meeting the infringement lawsuit prerequisites, others—such as this one—have chosen to accept only a complete registration as acceptable. According to Lexology, Second Circuit federal courts have sided with the completed registration interpretation of the requirements.

Photographs can register their image copyrights with the U.S. Copyright Office through its online eCO system. Details on how to register photo copyrights in particular are offered here.

Articles: Digital Photography Review (dpreview.com)

 
Comments Off on Lawsuit ruling sends clear message: Register your photo copyrights ASAP

Posted in Uncategorized


Clear or UV Filters – Essential or a Waste of Money?

18 Jul

In this video from Phil Steele he discusses the debate over whether or not you should use clear or UV filters on your lenses. It’s a highly heated topic, and Phil makes some very good points. See what he has to say, and then tell us your opinion.

What are your thoughts?

Please fill in this quick poll and tell us if you use UV filters on your lenses or not. Add your comments in the discussion area below – we want to hear from you.

Note: There is a poll embedded within this post, please visit the site to participate in this post’s poll.

If you want to learn more from Phil check out some of his video courses covering topics like event photography, Lightroom, headshots, and more on Steele Training.com.

The post Clear or UV Filters – Essential or a Waste of Money? by Darlene Hildebrandt appeared first on Digital Photography School.


Digital Photography School

 
Comments Off on Clear or UV Filters – Essential or a Waste of Money?

Posted in Photography


Tutorial: How to photograph wine on clear plexiglass

17 Jul

Photographer Dustin Dolby of the YouTube channel workphlo is used to doing a lot with a little. In this tutorial, he uses a couple of flashes, a piece of clear plexiglass, and his know-how as a product photographer to capture a classic wine look, taking you along every step of the way. He even shares a neat trick for capturing a perfect masking frame for use in post.

The tutorial is a little over 19 minutes long, so we wouldn’t call this “quick and easy,” but Dolby does show you the entire process, sharing a ton of great techniques along the way.

The first part of the tutorial covers all of the frames Dolby needs to shoot to put together the perfect wine shot later. That includes a main shot, a brighter photo to bring out details in the label, and three frames with a stripbox placed directly behind his bottle to create a perfect high-contrast black-on-white masking frame to use in Photoshop later.

Then, starting at the 6:25 mark, he jumps into Photoshop to show you how to create that perfect mask and then run you through the many cleanup, correction and compositing steps that turned these two photos:

Left: Main lighting setup | Right: Label detail shot

Into this final shot:

The final photograph after cleanup and compositing in Photoshop. © Dustin Dolby

Watch the full tutorial above to see how this shot came together from start to finish, and then leave Dustin a comment or question either on this post, or on his YouTube videos.

Articles: Digital Photography Review (dpreview.com)

 
Comments Off on Tutorial: How to photograph wine on clear plexiglass

Posted in Uncategorized


CROZ DIY camera offers just the basics in a tiny clear case

02 May

CROZ, a small DIY camera that first appeared on Kickstarter in October 2016, is now available for purchase. This camera is shipped as a do-it-yourself kit that requires buyers to assemble the device. The resulting camera, once fully assembled, is quite small and features a clear case that makes the internal components visible. The CROZ camera was developed by Taiwanese company Paper Shoot and designed by Hyle Design.

CROZ is a digital camera, though it lacks a display for previewing and reviewing photos. The camera features a 5MP CMOS sensor, LARGAN Precision Lens, four photo filters (B&W, Color, Sepia, and Blue), a microUSB connection port, and ‘automatic image algorithms.’ The entire camera, including the two AAA batteries that power it, weighs 98g / 3.4oz and measures in at 12mm / 0.45in thick.

Photos are stored to an SD card (up to 32GB capacity supported). Users can swap out the lenses based on need, as well; the kit ships with a wide-angle lens and a fisheye lens. Paper Shoot, which is offering the kit for $ 3,899 NT / $ 129 USD / £100 GBP, explains, “CROZ is designed to be simple and straight forward – it is a digital camera, period.”

Via: PetaPixel

Articles: Digital Photography Review (dpreview.com)

 
Comments Off on CROZ DIY camera offers just the basics in a tiny clear case

Posted in Uncategorized


Invisible Repairs: Artist Fixes Broken Wood Furniture Using Clear Infill

24 Dec

[ By WebUrbanist in Art & Sculpture & Craft. ]

wooden-chair-replacement-art

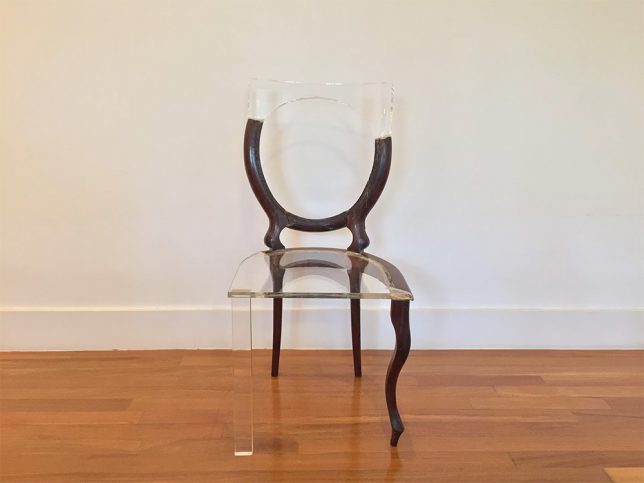
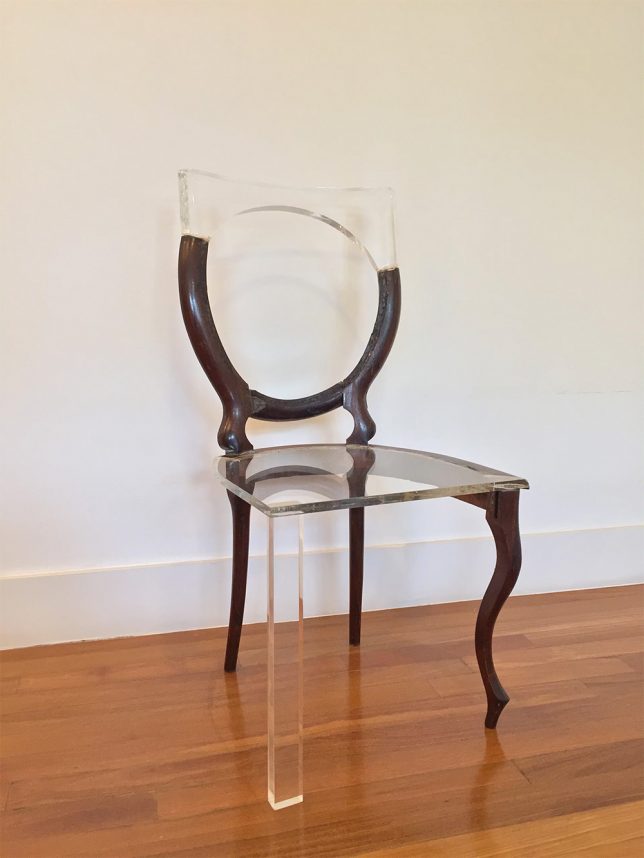
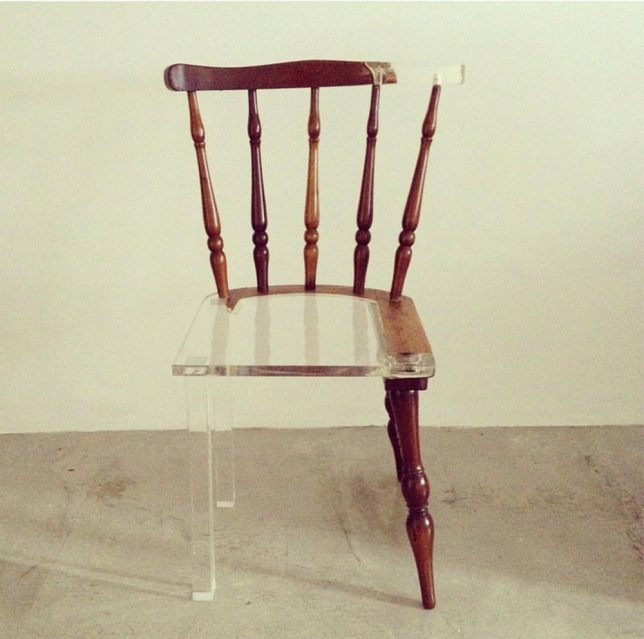
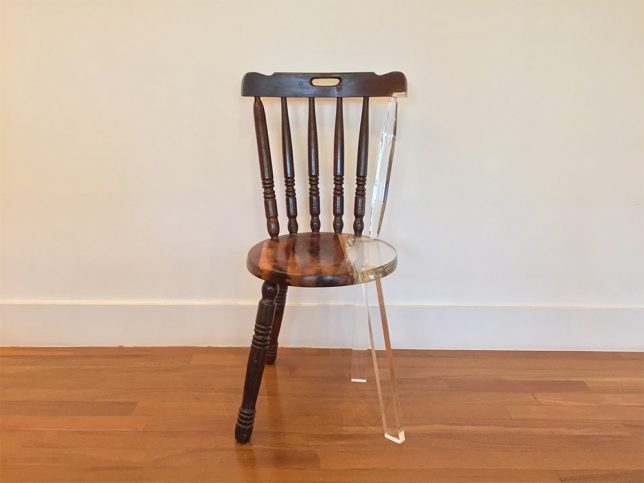
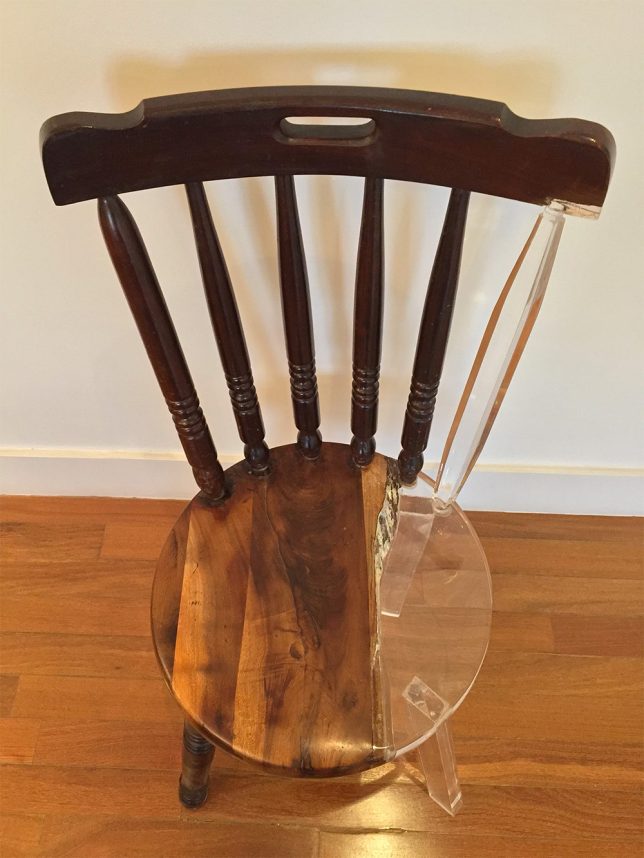
Wooden furniture remnants stand out clearly against their subtle replacement parts in this series of artistic chair and bed repairs. Translucent acrylic fills in the gaps of these pieces, parts of My New Old Chair and Dear Bed collections by artist Tatiane Freitas. Mirroring the construction methods used for the two materials, the missing lathe-spun wooden parts are replaced by simplified acrylic geometries.

wood-chair-lines

chair-repair

The approach follows a certain vein of old-versus-new expressionism also found in fields of design and architecture — added elements are clearly distinguished from existing ones in order to make the time period differences legible at a glance.

wood-acrylic-art-chairs

wood-chair-intervention

As with repair-oriented designers, there is a functional component here as well: the old chairs are able to be useful again thanks to these careful interventions.

bed-headstand-repair

wood-chair-plastic-infill

More about the artist: “In her day to day before graduating from Fashion school Tati Freitas was already looking into ways to create objects which could be both confortable and admired. Craft wood is her most common material, and that which gives her objects its forms, but she’s also been developing with more brute substances, like cement, and the sensible acrilic.”

Share on Facebook


[ By WebUrbanist in Art & Sculpture & Craft. ]

[ WebUrbanist | Archives | Galleries | Privacy | TOS ]


WebUrbanist

 
Comments Off on Invisible Repairs: Artist Fixes Broken Wood Furniture Using Clear Infill

Posted in Creativity