RSS
 

Posts Tagged ‘Cityscape’

Tips for Using Neutral Density Filters for Cityscape Photography at Blue Hour

19 Sep

Neutral density filters (ND filters) are essential tools when it comes to shooting cityscapes at blue hour. Even without an ND filter, you could shoot for a few seconds of exposure (using a small aperture like f/13) when the light falls towards the end of dusk.

But those opaque filters let you take even longer exposure photos (minutes, not just seconds), and create beautiful effects such as light trails, silky smooth water, rushing clouds, etc., by slowing down the shutter speed by a certain number of f-stops.

Singapore - Using Neutral Density Filters for Cityscape Photography at Blue Hour

This Marina Bay (Singapore) photo was shot with a 2-second exposure (at f/13) without using any ND filter. The sky looks good, but the water isn’t smoothed out at all, as that exposure is way too short to create silky smooth water effect that is seen in the photos to follow.

How ND Filters Make Your Exposure Longer

ND filters come in different strengths, some popular ones are 3-stop, 6-stop and 10-stop. The bigger the number, the darker the filter (i.e. the less light that is let through) and the longer the exposure will be.

For example, a base shutter speed of one second (i.e. when no filter is attached) can be extended to as long as 1024 seconds (over 17 minutes) with 10-stop ND filter attached, as each “stop” doubles the exposure time:


1 second > 2 seconds [1 stop] > 4 seconds [2 stops] > 8 seconds [3 stops] > 15 seconds [4 stops] > 30 seconds [5 stops] > 64 seconds [6 stops] > 128 seconds [7 stops] > 256 seconds [8 stops] > 512 seconds [9 stops] > 1024 seconds [10 stops]


It’s easy to calculate when a base shutter speed is a simple number like one second, but what about starting with, say, 1/15th of a second? This is where the Long Exposure Calculator app (for iOS) comes in handy and makes your life easier, as it automatically calculates a required shutter speed for you (look for an Android equivalent here).

ND filter and app - Using Neutral Density Filters for Cityscape Photography at Blue Hour

Neutral density (ND) filter (left) and Long Exposure Calculator app (right).

Using Different Strengths of ND Filters for Your Desired Effect

In this article, we’ll take a little deeper look at when to use which ND filter for your desired effect at blue hour.

3-Stop ND Filter

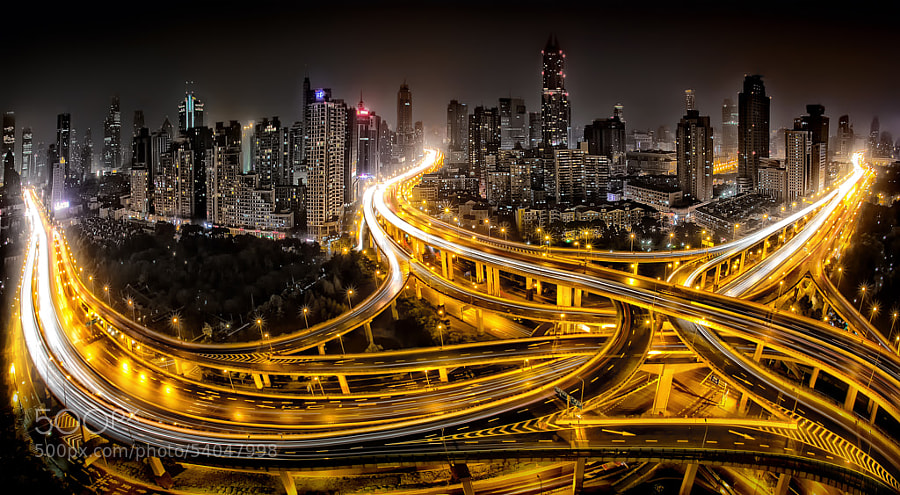
I don’t use 3-stop ND filter when taking cityscapes at a waterfront, as the strength is too mild to create a silky smooth water effect. Hence, my use of 3-stop ND filter is limited for scenes that have no water to be smoothed out, such as the photo below with light trails of moving cars, which doesn’t require a very long shutter speed.

Shanghai skyline - Using Neutral Density Filters for Cityscape Photography at Blue Hour

Shanghai skyline (China) shot with a 25-second exposure (f/8) using a B+W 3-Stop ND Filter (77mm). The base shutter speed was 3 seconds, ISO 100.

Singapore - Using Neutral Density Filters for Cityscape Photography at Blue Hour

Singapore skyline shot with a 10-second exposure (f/13) using the same 3 -stop ND filter. The base shutter speed was 1.3 seconds, ISO 100.

This mild strength 3-stop ND filter (i.e. not so long exposure) isn’t all bad, though. It allows you to take a number of photos during blue hour, unlike more dense filters like a 6-stop ND filter where you can take no more than a few photos due to a longer exposure time required per photo.

6-Stop ND Filter

I almost exclusively use a 6-stop ND filter when shooting cityscapes at a waterfront. To create silky smooth water effects, slowing down 3 stops isn’t quite enough, but a 10-stop one is way too strong. For example, a base shutter speed of 2 seconds (i.e. with no filter attached) gets extended to 15 seconds (with 3-stop ND filter), 128 seconds (with a 6-stop ND filter) and whopping 34 minutes and 8 seconds (with a 10-stop ND filter) respectively.

Shanghai - Using Neutral Density Filters for Cityscape Photography at Blue Hour

Shanghai skyline (China) shot with a 164-second exposure (f/11) using a B+W 6-Stop ND Filter (77mm) in order to achieve my desired effect of silky smooth water. Had I used a 3-stop ND filter, the water wouldn’t have been smoothed out this much (base shutter speed: 2.5 seconds, ISO 100).

Singapore - Using Neutral Density Filters for Cityscape Photography at Blue Hour

Marina Bay (Singapore) shot with a 163-second exposure (f/13) using the same 6-stop ND filter (base shutter speed: 2.5 seconds, ISO 100).

I typically aim to shoot with a base shutter speed of 2-3 seconds when using a 6-stop ND filter, which extends the exposure to 128 -192 seconds respectively. In order to create a silky smooth water effect, 2-3 minutes of exposure seems just right.

By the way, if you’re planning to buy only one filter for cityscape photography at blue hour, I’d recommend nothing but a 6-stop ND filter. I’ve probably photographed 90% of my cityscapes at blue hour using a 6-stop ND filter. It’s really a game changer if you are interested in doing this kind of photography.

10-Stop ND Filter

A 10-stop ND filter is a kind of special filter that lets you expose extremely long (longer than necessary in most cases!). Personally, I don’t really find 10-stop ND filter useful for shooting cityscapes at blue hour, as the exposure goes too long (even starting at a base shutter speed of 1/2 second gets extended to 8 and a half minutes), and digital noise caused by long exposure becomes too unbearable (even with in-camera long exposure noise reduction turned on).

So, this extreme filter’s use is rather limited to pre-dusk or even earlier in the day, not towards the end of dusk. In fact, one big advantage of a 10-stop ND filter is letting you take long exposure photos while the sky is still bright, which is something 3 and 6-stop ND filters aren’t up to the task of doing.

With a 10-stop ND filter, I usually aim to shoot with a base shutter speed of 1/4 or 1/3 second which is extended to 256 and 341 seconds respectively. I tend to avoid an exposure that exceeds 6-7 minutes, as long exposure noise starts to creep in.

Such a base shutter speed (1/4 or 1/3 second) can normally be achieved around sunset time or before, therefore you don’t really see deep bluish hue that’s typically seen at the prime time of the blue hour. Instead, your photo will have a surreal look that is very unique and distinctive to 10-stop ND filter.

Singapore - Using Neutral Density Filters for Cityscape Photography at Blue Hour

Singapore skyline shot with a 258-second exposure (f/8) using B+W 10 Stop ND Filter (77mm) with a base shutter speed of 1/4 second, ISO 100.

Singapore Using Neutral Density Filters for Cityscape Photography at Blue Hour

Singapore skyline shot with a 259-second exposure (f/7.1) using the same 10-stop ND filter (base shutter speed: 1/4 second, ISO 100).

Conclusion

I hope this post helps you get started with shooting cityscape photos at blue hour using neutral density filters. I’m sure that you’ll be hooked in no time and can no longer shoot cityscapes at blue hour without one!

If you have any questions or tips to share, feel free to do so in the comments below.

The post Tips for Using Neutral Density Filters for Cityscape Photography at Blue Hour appeared first on Digital Photography School.


Digital Photography School

 
Comments Off on Tips for Using Neutral Density Filters for Cityscape Photography at Blue Hour

Posted in Photography


Tips for Shooting Out of Focus Cityscape Bokeh Images at Blue Hour

05 Aug

You have probably seen out of focus cityscape bokeh photos with pleasing lights, like the photo below. The term “bokeh” comes from the Japanese word “boke”, which can be translated as “blur”. You should be familiar with bokeh effect that is typically seen in portrait photography where a shallow depth of field is used to purposefully throw the background out of focus (i.e. bokeh) and draw attention solely to the subject.

Unlike portrait photography, everything is thrown out of focus for cityscape bokeh photos that we’re trying here. It makes colourful light orbs appear prominently in the image and creates a unique art style. If you haven’t tried these cityscapes with bokeh lights before, follow along with the simple four steps below. It’s super easy!

Singapore - Out of Focus Cityscape Bokeh Images

Singapore skyline with bokeh lights at blue hour (26mm, f/4.2, 15 seconds, ISO 100).

Step 1: Find a location with enough lights

Shooting at popular cityscape photography spots works great, but any place (such as a road in front of your house) might be suitable as long as there are sufficient lights. The choice of location isn’t very critical, as everything is blurred out, anyway.

My favourite spot to shoot from is an overhead bridge. It always gives pleasing results with many different colors of light sources available (buildings, cars headlights and tail lights, street lamps, traffic lights, etc.).

Out of Focus Cityscape Bokeh Images

Shot from an overhead bridge in a suburb. You don’t necessarily have to go to the city center to shoot photos with bokeh lights (34mm, f/2.5, 1/2.5 second, ISO 100).

Step 2: Start shooting 10-20 minutes before the end of dusk

Cityscape bokeh images won’t work if the sky is still bright. It’s around this time (10-20 minutes before the end of dusk – check gaisma.com for your local dusk time) that city lights have been turned on, and the deep blue color of the dusk sky creates a beautiful backdrop for glittering bokeh lights.

Singapore - Out of Focus Cityscape Bokeh Images at Blue Hour

Singapore skyline with bokeh lights, shot exactly at the end of dusk (28mm, f/4.5, 6 seconds, ISO 100).

Shooting after dusk with the pitch black sky as a backdrop also works fine, but I personally prefer shooting during blue hour.

Singapore - Out of Focus Cityscape Bokeh Images at Blue Hour

The same view shot 20 minutes after the end of dusk (28mm, f/4.5, 13 seconds, ISO 100).

Step 3: Use Aperture Priority mode and a wide aperture

You may start with the smallest f-stop number and adjust to your liking. A wider aperture (smaller f-stop number) results in larger bokeh orbs, as seen in the photos below that were shot at the exact same location at different settings (top: shot with f/1.8, bottom: shot with f/4).

Singapore - Out of Focus Cityscape Bokeh Images at Blue Hour

Shot at f/1.8

Singapore - Out of Focus Cityscape Bokeh Images at Blue Hour

Shot at f/4

Step 4: Switch to manual focus

Use manual focus (as opposed to autofocus) and turn the focus ring until the lights are completely out of focus. This is easy as pie, but if the word “manual” turns you off, you can remain in autofocus and do the following, too.

  1. Set to single-point AF (autofocus).
  2. Hold up a lens cap (or a small item) towards the sky in front of you, as seen in the photo below.
  3. Focus on the lens cap and press the shutter button halfway down to lock the focus (which makes everything else out of focus).
  4. Move the camera to reframe the shot as you like and press the shutter down the rest of the way.

Singapore lens cap - Out of Focus Cityscape Bokeh Images at Blue Hour

No Fast Lens, No Tripod Needed

In order to capture these pleasing cityscape bokeh effects, you might be thinking that you need a so-called “fast lens” (i.e. a lens that is capable of opening up to f/1.4 or f/1.8, for example.) that portrait photographers typically use.

No, you do not! In fact, you can take these bokeh photos using f/3.5 on your kit lens. Some photos in this post were shot at f/4.5 on my trusty Nikon 18-35mm f/3.5-4.5, hardly a lens that is considered fast.

Furthermore, you can take these bokeh photos handheld (i.e. without using a tripod), as shooting with the aperture wide open (or close to it) helps keep the shutter speed high enough. Anyway, stability and sharpness aren’t very critical, as you are shooting photos that are completely out of focus!

The only occasion I use a tripod is when I want to create smooth water by using a neutral density (ND) filter. Then, a tripod is a must, as the exposure lasts at least for several seconds even if you’re shooting with the aperture wide open.

Singapore - Out of Focus Cityscape Bokeh Images at Blue Hour

Singapore CBD with bokeh lights at blue hour, shot with a 3-stop ND filter attached (20mm, f/3.5, 13 seconds, ISO 100).

One View, Two Images

What I particularly like about shooting cityscapes with bokeh lights is that a single view can produce two completely different images, one in focus and one out of focus, like the photos below shot at the same location.

At blue hour, I typically shoot an in-focus cityscape with a few minutes of long exposure first. Once finished, I switch to manual focus and shoot out of focus photos with the cityscape bokeh lights until the deep blue hue in the dusk sky is gone.

By the way, I like shooting with a little smaller aperture like f/3.5 to f/4.5 so that the shape of the skyline is still recognizable for those who are familiar with the place.

Singapore in focus - Out of Focus Cityscape Bokeh Images at Blue Hour

Singapore skyline in focus (18mm, f/11, 194 seconds, ISO 100).

Singapore out of focus - Out of Focus Cityscape Bokeh Images at Blue Hour

Singapore skyline with bokeh lights (18mm, f/3.5, 8 seconds, ISO 100).

Conclusion

I hope this article helps you get started with cityscape photos with pleasing bokeh lights if you haven’t tried previously.

As a cityscape photography enthusiast myself, I’ve found it quite fun to shoot something that looks completely different from otherwise ordinary cityscapes. If you have any questions or tips to share, feel free to do so in the comments below.

The post Tips for Shooting Out of Focus Cityscape Bokeh Images at Blue Hour appeared first on Digital Photography School.


Digital Photography School

 
Comments Off on Tips for Shooting Out of Focus Cityscape Bokeh Images at Blue Hour

Posted in Photography


How to Search Potential Cityscape Photography Spots Online Before Traveling

03 Jul

As an avid cityscape photography enthusiast (primarily shooting at the blue hour), I always spend quite a number of hours studying potential cityscape shooting spots before traveling to a new destination. Knowing everything from what to shoot, where to shoot from and how to get to those locations before departure will save you a ton of time and hassle, especially if your stay is rather short.

Hk 0106 - How to Search Potential Cityscape Photography Spots Online Before Traveling

Thanks to my pre-departure study online, I was able to locate this vantage point along Lugard Road at Victoria Peak (Hong Kong) without any hassle.

Hk 0173 - How to Search Potential Cityscape Photography Spots Online Before Traveling

Hong Kong skyline shot from Convention and Exhibition Centre. Another location that I successfully scouted online before traveling.

You can always start this location study with the obvious (Google!), but there are also other resources that help you find photography spots. Those are Flickr, 500px, stock photography websites, and photography forums to name but a few.

Personally, Flickr is my go-to resource, as there are more than 10 billion photos (according to their 2015 stats) and numerous groups dedicated to many big and small cities around the world. You can ask questions and possibly get answered by local photographers.

Finding what to shoot is a piece of cake. 10 minutes browsing Flickr gives you a number of potential locations. You may argue that those places are over-photographed or that you’re just copying what others have already photographed. But as a first-time visitor, I’m happy to start with the most popular locations because they are over-photographed for a reason.

Flickr - How to Search Potential Cityscape Photography Spots Online Before Traveling

With more than 10 billion photos available, Flickr is my go-to resource when searching potential cityscape photography spots.

Finding Out Where a Photo Was Shot

The next up is finding where to shoot from (i.e. The exact spot where the photo was shot) but this can be much harder. Sometimes the photo has a clue in itself, such as a name of the building (e.g. hotel name). Then, just get onto Google Maps and do a virtual walk around the area using Street View.

Let’s use Hong Kong, the city that never stops fascinating me with its amazing cityscapes, as a case study for this article. For the photo below, I shot from a footbridge on Connaught Road Central, finding the name of the building on the left (International Finance Centre) eventually led me to locate the exact shooting spot (see on Google Maps) after virtual-walking around a lot on Google Street View.

Hk 0171 - How to Search Potential Cityscape Photography Spots Online Before Traveling

Shot from a footbridge on Connaught Road Central (Hong Kong).

Try Your Luck Asking Photographers Directly

On other occasions, this crucial piece of info (the shooting location where the photo was taken) can be found in the title or description of the photo. If not, check through the comments to see whether anyone has already asked this particular question.

What I’ve found interesting is that there are photographers who normally reply to comments but somehow don’t respond to this type of question asking where it was shot. It might be because they are not really happy to share that information with a complete stranger trying to shortcut their way to an epic shooting spot they discovered by themselves (possibly by walking around for hours).

That said, there is no harm in asking. The worst thing that could happen is that you receive no response.

Author’s note: If you ask me about cityscape shooting spots in Singapore (where I live), I won’t hold anything back. I’m happy to provide all the info you need!

Asking in Flickr Groups

In case you’re hesitant about asking the photographer directly, you can also try asking in a Flickr group. Once I found a nice Hong Kong street photo with a street name included in the description. So I got onto Google Street View and moved up and down the street, but couldn’t locate exactly where the photo was shot.

As I saw this particular photographer not responding to any comments at all, I went into a Hong Kong group within Flickr and asked whether anyone knows the exact location by including the street photo in my question. Then, a fellow photographer kindly responded with the answer, which led me to shoot the photo below (shot from a footbridge over Paterson Street Tram Station, see on Google Maps).

Hk 0144 - How to Search Potential Cityscape Photography Spots Online Before Traveling

Hong Kong street view from Yee Wo Street.

Use Google Maps to Find Directions from Your Hotel

Lastly, let’s talk about how to get to those newly found amazing locations. Accessing directions have never been easier these days, thanks to Google Maps.

Prior to the trip, get onto Google Maps and find the directions starting from your hotel. To record the route, take a screenshot or copy the link from your browser’s address bar so that you will be able to revisit the page using hotel’s WiFi later.

This may not be commonly known, but Google Maps also lets you save a short URL of the directional map. Just go to “Menu”, then click “Share or embed map” and check “Short URL”. You can also save maps for offline use as well if you don’t want to incur roaming charges and can’t access any WiFi.

Google map - How to Search Potential Cityscape Photography Spots Online Before Traveling

Saving a directional map using “Short URL” feature on Google Maps.

List Photography Spots in Order of Priority

Let’s say I’m traveling for a 5-day, 4-night stay. Then, I’ll make a list of four cityscape photography spots to shoot at dusk. Plus I’ll add one or two backup spots just in case any of the original choices are unexpectedly unavailable due to a special event taking place or something. I select only one spot per day, as I’m only interested in shooting cityscapes during evening blue hour and try to gather as much information as possible before traveling.

It’s also important to list them in order of priority so that you know which place to drop if you can’t shoot on the first evening due to heavy rain, for example. In fact, such a situation often happens, so you should establish a clear order of priority for your shot list in advance.

Consider Revisiting: You Learn Something New Every Time You Go Back

Up until this point, I’ve talked about the importance of pre-departure preparations such as knowing where to shoot from. However, it’s also true that a single visit may not be enough to let you go home with best possible photos unless you’re staying for weeks. If you’re only staying for 4-5 days like I typically do, you may get unlucky with the weather and not be able to capture any photos that you’re happy with.

If that’s the case, consider revisiting the destination! The great thing about revisiting the same place is that you learn something new every time you go back, such as discovering lesser-known photography spots, finding a faster way to move around, etc. Besides, you can try new restaurants and coffee shops alike, and after a few visits, you’ll be able to walk around the city like a local!

Hk 0182 - How to Search Potential Cityscape Photography Spots Online Before Traveling

On my second visit to Hong Kong, I found this lookout point on Stubbs Road through a bus window on the way to Victoria Peak. So the next day I dedicated one evening to shoot at this spot. This is a good example of learning something new every time you go back.

Hk 0029 - How to Search Potential Cityscape Photography Spots Online Before Traveling

I planned to go back to Lugard Road lookout point at Victoria Peak to shoot Hong Kong skyline again, then accidentally diverted from the road to find this spot behind Peak Tower, so changed my plan to shoot here, instead.

Conclusion

I hope this helps you with your pre-departure search on what to shoot, where to shoot from, and how to get to those locations. These tips are quite basic, but it’s almost a prerequisite in order not to waste your precious (but limited) time at the destination, especially for those of us traveling only for a few days.

If you have any other cityscape photography tips to share, please do so in the comments below.

The post How to Search Potential Cityscape Photography Spots Online Before Traveling appeared first on Digital Photography School.


Digital Photography School

 
Comments Off on How to Search Potential Cityscape Photography Spots Online Before Traveling

Posted in Photography


6 Ways to Improve your Cityscape Photography

29 Jun

Cityscape photography is becoming increasingly popular and can be a welcome change to capturing rolling hills and scenic vistas. Urban landscape environments can offer you, the photographer, attractive buildings, patterns and lines to capture stunning scenes and an alternative to the familiar nature shots found in the countryside.

6 Ways to Improve your Cityscape Photography

Here are 6 elements you will want to consider to improve your photographs of cities:

1. Shoot at different times of the day

Think about blue hour, golden hour, and daytime for your city images.

As the sun goes down and darkness falls, cities come to life when buildings and architectural details become illuminated and can make for some spectacular image opportunities. However, a common mistake people make when doing cityscape photography is to capture images too late at night when the natural light has disappeared and the sky is completely black.

6 Ways to Improve your Cityscape Photography

Shanghai skyline at night.

Total darkness is generally not the best time to photograph buildings as they will appear less attractive with little detail.

If you intend to photograph in the evenings, I would recommend that you arrive at your location for sunset and wait for dusk to fall. You could shoot during blue hour, a period of twilight when the sun is at a significant depth below the horizon and when the sky takes on a predominantly blue shade.

Although it is called the blue hour, it usually occurs for a window of around 20-30 minutes, depending on your location and the season.

Golden hour is another good time for cityscape photography. During the early morning or late afternoon, you’ll have beautiful long shadows to work with, as well as soft golden light.

6 Ways to Improve your Cityscape Photography

Daytime shot of the same city.

Alternatively, photographing during the day allows for a more interesting composition as scenes can be more crowded. Just add people in your frame that can make intriguing subjects combined with buildings.

2. Use ambient light effectively

If you capture the final elements of ambient light in the sky before darkness falls and combine it with the artificial light of the buildings, this will usually result in good photographs.

Once the city lights come on there is usually a window of about an hour to capture pleasing cityscapes. Shooting scenes at this time will allow you to balance the sky with the artificial lights of the city.

6 Ways to Improve your Cityscape Photography - blue hour bridge

3. Consider color

Look for patterns and blocks of color that may offset one another. Buildings may be painted in different colors that work well together, for example.

The cool blue sky of the blue hour complements the warm, golden, amber hues of street and building lights perfectly. The harmony of an image is apparent when colorful tones come together, such as this image of Oxford at night.

6 Ways to Improve your Cityscape Photography - Oxford at blur hour

Also, the sun can create different colors as it strikes buildings and reflects off them.

4. Consider composition

It is best to try and exclude any distracting and unwanted objects from the frame such as trash bins, signs, and any unsightly buildings that will make your image less attractive. Re-compose your image until it’s free of clutter and you are happy with the way the image looks.

6 Ways to Improve your Cityscape Photography - building at night

Work with the light if you’re capturing cityscapes during the day. Usually, you will want to shoot with the sun lighting the buildings for the best results and to ensure everything in your view is illuminated.

5. Experiment with exposure

Cityscapes often provide a great opportunity to experiment with your exposure. You will discover that after sunset, as the light fades, you will be less able to hand hold your camera to capture your cityscape scene. Recording long exposures in cityscape photography will create motion and that feeling of movement is only possible by using a tripod.

6 Ways to Improve your Cityscape Photography - London Tower Bridge

As twilight unveils, you can capture the low ambient light by using slow shutter speeds to create mobility within your image. The stillness of buildings contrasting the movement of clouds or light trails from traffic, for example, make for an interesting image and can add drama to your composition.

Using fast shutter speeds can help to freeze the motion of different objects in the scene. I recommend that you experiment with different shutter speeds to see what different moods this creates and see which style of image you like.

6. Get creative

Add some beauty to your shot by capturing close up objects such as bridges or signs with the cityscape in the background. You could even try photographing people and the cityscape to show the full setting you are photographing within.

6 Ways to Improve your Cityscape Photography

Don’t be afraid to get closer to your subject and focus on the action. I suggest that you play around with various angles to capture something truly unique and inspirational, one that you are proud of.

Cityscape photography requires a great deal of practice and you most likely won’t walk away with award-winning cityscapes overnight. Keep shooting and with these tips, you will become more adept at capturing urban imagery you can be proud of.

Now it’s your turn, please share your cityscape photography images and tips in the comments area below.

The post 6 Ways to Improve your Cityscape Photography appeared first on Digital Photography School.


Digital Photography School

 
Comments Off on 6 Ways to Improve your Cityscape Photography

Posted in Photography


Photographers face three felonies after climbing bridge for cityscape shot

01 Sep
Benjamin Franklin Bridge at night by Jeffrey Phillips Freeman

Breaking the law to get the perfect shot can have serious legal consequences, a harsh reality currently facing photographers Martin J. Romero-Clark and Andrew Lillibridge, who were arrested after climbing onto the Ben Franklin Bridge in Philadelphia.

According to local news site Philly.com, police received an alert at 12:50AM on July 25th about a potential jumper on top of the bridge; this prompted a response from the Philadelphia Police marine units, port authority police, and the Philadelphia Fire Department. Upon arriving at the scene, authorities reportedly discovered the two photographers with camera gear. By the time the two were arrested at 1:20AM, the incident had drawn 36 firefighters, eight port authority officers, and seven port authority rescuers.

Statements from authorities to local news indicate that the photographers’ climb onto the bridge had tripped security alarms and was captured on security cameras. In addition, the bridge had to be shut down for 103 minutes.

In a statement to Philly.com, Delaware River Port Authority CEO John Hanson said the two had worn black clothing and climbed the bridge on a wet night, putting both themselves and everyone on the ground at risk. “They could have fallen, they could have been injured in the process of apprehending them, and they put the heroic men and women of our police department and the Philadelphia Fire Department at risk,” Hanson said. “We’re going to prosecute them to the fullest extent of the law. I am not amused, and I am very angry.”

The pair now face two third-degree felonies, one fourth-degree felony, and their photography equipment has been confiscated.

Articles: Digital Photography Review (dpreview.com)

 
Comments Off on Photographers face three felonies after climbing bridge for cityscape shot

Posted in Uncategorized


Window Shades: Contextual Street Art Frames View of Greek Cityscape

04 Apr

[ By WebUrbanist in Art & Street Art & Graffiti. ]

shades

A turn of phrase meets art in this mural made to look like a face, with glass-framed eyes reflecting the world outside.

shades-at-night

Graffiti interventionist Achilles likes to put art in context, using walls and spaces as backdrops for layered works that wouldn’t work quite the same way anywhere else.

streetartsurprise

angles

twistedart

Many of his site-specific works play with perspective and create visual surprises by tucking elements onto different surfaces to create reveals as the viewer approaches.

Compared to his complex works, his artist bio is short and to the point: “Achilles lives and creates in Athens, Greece. He loves street art, graffiti and painting. He works as a freelancer creating murals, portraits, paintings, illustrations etc.”

Share on Facebook


[ By WebUrbanist in Art & Street Art & Graffiti. ]

[ WebUrbanist | Archives | Galleries | Privacy | TOS ]


WebUrbanist

 
Comments Off on Window Shades: Contextual Street Art Frames View of Greek Cityscape

Posted in Creativity


Nemesis Machine: Cybernetic Cityscape Visualizes Surveillance Data

15 Jul

[ By SA Rogers in Art & Sculpture & Craft. ]

Screen Shot 2016-07-15 at 9.41.23 AM


Activated by unspecified data transmissions, spinners whir and lights blink atop skyscrapers of computer parts arranged like a miniature city, visualizing information in real time as it’s collected – including your own movements as an observer. Your own face blinks back at you from a video monitor as you gaze at the many electronic parts cobbled together into a strange dystopian vision of a modern metropolis. ‘The Nemesis Machine’ by Stanza makes use of data that’s already being collected in London, including environmental monitoring and security-based technologies, representing “the complexities of the real time city as a shifting morphing complex system.”

Screen Shot 2016-07-15 at 9.40.32 AM

nemesis machine 2

In that way, the machine becomes a sort of physical avatar of the city, reflecting its activity even when it’s assembled in another country altogether. The viewer becomes almost like a drone hovering over the miniature cityscape, observing all of those beeps, blinks, clicks and movements as they’re sent from the sensors in London, including temperature, humidity and motion. The installation asks the question, what will future cities look like as we move even further into the era of constant surveillance?

nemesis gif

Screen Shot 2016-07-15 at 9.38.24 AM

nemesis machine 3

“The Nemesis Machine is a mini, mechanical metropolis that monitors the behaviors,a activities, and changing information, of the world around us using networked devices and electronically transmitted information across the internet. The artwork reforms this information and data creating parallel realities. At the heart of this work lies an interest in the urban environment, the network of cameras and sensors to be found there, and the associated issue of privacy and alienation.”

Screen Shot 2016-07-15 at 9.38.53 AM

Screen Shot 2016-07-15 at 9.39.27 AM

“The installation poses the question of who owns the data and speculates that virtual borders will soon create more systems of control. What I’m doing, which is sort of new ground, is that I’m hacking access to a network and re-appropriating the data and information, and I’m re-contextualizing it to give it a wider meaning. I want to show that you can do something positive with this data. And as I say data is the medium of the age. The real world is made virtual and then real again.”


Share on Facebook


[ By SA Rogers in Art & Sculpture & Craft. ]

[ WebUrbanist | Archives | Galleries | Privacy | TOS ]


WebUrbanist

 
Comments Off on Nemesis Machine: Cybernetic Cityscape Visualizes Surveillance Data

Posted in Creativity


10 Tips for Better Cityscape Photography

17 May

This article is based on the new eBook: Landscapes, Cityscapes & Photography Tricks – 50% off for a limited time only.

Photography is escapism. We want to see what we can’t with our own eyes; towering skyscrapers, endless skylines, the people of faraway cultures. We long for the distant, so it makes sense that cityscape photos are so popular and marketable. I hope these 10 tips will help you take better cityscape photography, and inspire you to explore faraway cultures.

Cityscapes1

1. Right After Sunset is a Fantastic Time for Cityscape Shots

After the golden hour settles, the sky grows darker, while city lights illuminate below. This immediately post-sunset or pre-sunrise moment (known as twilight or the Blue Hour), I would argue, is the best time for shooting cityscapes. Building lights turn on before the sky turns off, and the balance of light can look almost equal. It’s a great combination of tones, and worth getting up in the morning to catch.

Cityscapes2

2. Capture the Whole Skyline with a Wide Angle Lens

For cityscapes, focal lengths between 12-35mm are a good bet. Not a necessity, but you will appreciate the wide angle, more often than not. This will allow you to capture a nice skyline without having to be miles outside the city, and allow you to include an entire skyscraper in vertical format, while standing near its base.

Cityscapes3

3. Use Your Camera’s Self-timer and a Tripod for Crisp Results

For shooting during the golden hours, and after dark, a tripod is practically essential if you want sharp crisp results. Better yet, set your camera up on the tripod, and set your camera’s two or 10-second self-timer so you don’t have to touch or jostle the camera during the actual shot. This will help your camera stay more stable, avoid blur, and capture stunningly sharp results.

4. Look for Those Leading Lines

Just like for landscape photography, leading lines are an integral part of three-dimensional cityscape composition. They add perspective, depth, and intrigue to any image, while taking the viewer on a journey from one point of the frame to another.

Cityscapes4

In cityscapes especially, leading lines can create a strong sense of coherence in an otherwise chaotic scene. Think of train tracks for example. Rows of tracks, surrounded by eager commuters and tall buildings, could easily appear cluttered and frenetic (which could be a good thing, or could seem unfocused). But, slicing the image up with the right composition and a clean line, or series of lines, can cut through the chaos.

5. In the Evening, Look for Good Vantage Points Over Busy Intersections

Practice your long exposures, then look for busy intersections of a city. Finding the right location for heavy traffic can be tricky. You’ve got to know a city pretty well, or at least have an idea of where the congested thoroughfares are located. The idea here is blurred movement; traffic in a straight line may be interesting if you’ve got some variety in the shot (maybe skyscrapers or a city icon nearby), but failing that, you’re going to want to see some movement, leading lines and curves. That’s why bendy roads and intersections work so well; you can create light lines out of conflict, movement and chaos.

Cityscapes5

6. Just like Rivers are Great in Landscapes, Fountains are Great in Cityscapes

Photographing fountains within your cityscape can add another element of beauty and serenity to your image. Most cities are full of them. From small, historic, fountains that can add interest to a composition to huge water fountain light shows that blast water up in the air and make for exciting and spectacular photos.

Cityscapes6

7. Look for Patterns

Patterns have the ability to bring a sense of visual rhythm and harmony to an image. While at first sight, a common city scene may appear dull or bland. Focusing on repeating strong graphic elements, like shapes, lines, colors or forms, will draw the viewer’s attention, and make the whole thing a lot more interesting.

Cityscapes7

8. Don’t Be Afraid to Include Pedestrians in the Shot

When it comes to intersections, some bigger cities; New York, Tokyo, Toronto; will have four-way crosswalks, where pedestrians stream across in all directions, stopping cars on all four sides of the intersection. These make especially great hectic shots, with cloudy masses, surrounded by headlights and condo lights.

Cityscapes8

9. When Tripods Aren’t Allowed – Improvise

Many businesses with great city views that attract photographers, have gotten the impression that tripods mean professional work and therefore, money. These establishments won’t let photographers in with a tripod, likely because they might be able to make money by charging a permit fee or production fee. I’ve run into this problem mostly in the U.S., but have also come across it in a few international cities I’ve visited. It is upsetting indeed, but instead of letting it defeat you, try to do your best with what you have.

Cityscapes9

Look to see if there is a place where you can set your camera down for the shot so you don’t have to hold it risking blur from hand movement. You can use tables, pillars, walls, edges, benches, anything that is flat and safe. If you can’t find a flat surface, you can make one. Prop your camera up with your jacket or other item of clothing.

10. See Bad Weather as an Opportunity (Carefully)

Not only does bad weather add an edge to your photo, but stormy weather creates skies that are full of color and texture, providing a feeling of gloominess, fury, eeriness and even peace. In short, the stormy sky portrays emotion.

Cityscapes10

With moisture everywhere, it just seems like the city glows more right after a rainfall. Most surfaces and structures will appear more colorful when wet, as water tends to bring out the saturation.

I hope these have been some helpful tips to get you started!

For Further Training:

This relentlessly in-depth new eBook is designed to help you master challenging lighting conditions no matter your experience level, take more compelling photos, post-process them to perfection, and delve even further into long exposure tricks so you know all the possibilities. By knowing all the techniques possible, it is my hope that you will learn a lot faster than I did and start seeing hidden photo opportunities that others might miss.

Found here: Landscapes, Cityscapes & Photography Tricks

googletag.cmd.push(function() {
tablet_slots.push( googletag.defineSlot( “/1005424/_dPSv4_tab-all-article-bottom_(300×250)”, [300, 250], “pb-ad-78623” ).addService( googletag.pubads() ) ); } );

googletag.cmd.push(function() {
mobile_slots.push( googletag.defineSlot( “/1005424/_dPSv4_mob-all-article-bottom_(300×250)”, [300, 250], “pb-ad-78158” ).addService( googletag.pubads() ) ); } );

The post 10 Tips for Better Cityscape Photography by Richard Schneider appeared first on Digital Photography School.


Digital Photography School

 
Comments Off on 10 Tips for Better Cityscape Photography

Posted in Photography


35 Cityscape Images to Take Your Breath Away

02 May

Recently I’ve done a lot of natural world images including landscapes, bugs, waterfalls, flowers and even pets. So it’s time for something different and I’m shifting gears to man-made.

Here’s a collection of cityscape images to get you inspired enough to get out and take some of your own. Enjoy!

Photograph Up and Above by Sebastian Opitz on 500px

Up and Above by Sebastian Opitz on 500px

Photograph Shanghai at Night by Clemens Geiger on 500px

Shanghai at Night by Clemens Geiger on 500px

Photograph Brooklyn Bridge New York City - NY by Dominique  Palombieri on 500px

Brooklyn Bridge New York City – NY by Dominique Palombieri on 500px

Photograph Houses of Parliament, London by David Mar Quinto on 500px

Houses of Parliament, London by David Mar Quinto on 500px

Photograph Concrete Jungle 2 by Kerim Hadzi on 500px

Concrete Jungle 2 by Kerim Hadzi on 500px

Photograph Dark Pace by Toby Harriman on 500px

Dark Pace by Toby Harriman on 500px

Photograph Fire over San Francisco by Toby Harriman on 500px

Fire over San Francisco by Toby Harriman on 500px

Photograph Painted Ladies by Bobby Gibbons on 500px

Painted Ladies by Bobby Gibbons on 500px

Photograph Sydney Harbour by Dragostesun Photography on 500px

Sydney Harbour by Dragostesun Photography on 500px

Photograph Sky Gate by Gianluca Gobbi on 500px

Sky Gate by Gianluca Gobbi on 500px

Photograph Puddle Mirror Reflection on Notre Dame by Loïc Lagarde on 500px

Puddle Mirror Reflection on Notre Dame by Loïc Lagarde on 500px

Photograph Silent morning by Martin Stantchev on 500px

Silent morning by Martin Stantchev on 500px

Photograph Windows by Catalina Justiniano on 500px

Windows by Catalina Justiniano on 500px

Photograph Strolling Venice by Cristina Ramos on 500px

Strolling Venice by Cristina Ramos on 500px

Photograph Blue City by Woosra Kim on 500px

Blue City by Woosra Kim on 500px

Photograph Misty Taj by Daniel Cheong on 500px

Misty Taj by Daniel Cheong on 500px

Photograph The Trench Run by peter stewart on 500px

The Trench Run by peter stewart on 500px

Photograph The Aperture by  M. Rafiee on 500px

The Aperture by M. Rafiee on 500px

Photograph Golden Sunrise by Andi Andreas on 500px

Golden Sunrise by Andi Andreas on 500px

Photograph Hong Kong by César Asensio Marco on 500px

Hong Kong by César Asensio Marco on 500px

Photograph The Twilight Hour by Marc Perrella on 500px

The Twilight Hour by Marc Perrella on 500px

Photograph Golden Bricks by Toney's Photo Journey on 500px

Golden Bricks by Toney's Photo Journey on 500px

Photograph quarters.only by Robert Pfeuffer on 500px

quarters.only by Robert Pfeuffer on 500px

Photograph On the bridge II by Roland Shainidze on 500px

On the bridge II by Roland Shainidze on 500px

Photograph Microzurich by Vladimir Popov / Uhaiun on 500px

Microzurich by Vladimir Popov / Uhaiun on 500px

Photograph Paris TS by Federico Venuda on 500px

Paris TS by Federico Venuda on 500px

Photograph Still Morning by Tristan O'Tierney on 500px

Still Morning by Tristan O'Tierney on 500px

Photograph twilight arcs by Sven Fennema on 500px

twilight arcs by Sven Fennema on 500px

Photograph Roman Forum (Rome, Italy) by Domingo Leiva on 500px

Roman Forum (Rome, Italy) by Domingo Leiva on 500px

Photograph The Petronas Tower. by sk teh on 500px

The Petronas Tower. by sk teh on 500px

Photograph Sunset in Oia by Slava Mylnikov on 500px

Sunset in Oia by Slava Mylnikov on 500px

Photograph Gothic Quarters - Barcelona by Frank van Haalen on 500px

Gothic Quarters – Barcelona by Frank van Haalen on 500px

Photograph Colmenas II by Rosa M.  Font Regí on 500px

Colmenas II by Rosa M. Font Regí on 500px

Photograph Clash of the Titans by Alfon No on 500px

Clash of the Titans by Alfon No on 500px

Photograph Madrid full moon by Juan Carlos Cortina  on 500px

Madrid full moon by Juan Carlos Cortina on 500px

The post 35 Cityscape Images to Take Your Breath Away by Darlene Hildebrandt appeared first on Digital Photography School.


Digital Photography School

 
Comments Off on 35 Cityscape Images to Take Your Breath Away

Posted in Photography


[MODIFIED] Digital Urban and Cityscape Photography – Look Outside the Main Business / Financial District

01 Aug

Step outside of a city’s main district for some of the best skyline digital photos opportunities.

Instead of taking the usual cityscape photos while inside the main Financial or Business Districts, you may want to scout out areas outside of the main ‘hustle and bustle’ to take wide-angle skyline photos that showcase more of a city’s architecture.

In Chicago, instead of just taking Loop pictures from the Chicago River and other well-photographed vantage points, consider heading out to Navy Pier to take a cityscape photo on the lakefront. Or, another great photo opportunity is north at Lincoln Park; shoot south, towards the skyscrapers, and part of Lake Michigan will be in view….

Read more at MalekTips.
New Computer and Technology Help and Tips – MalekTips.Com

 
Comments Off on [MODIFIED] Digital Urban and Cityscape Photography – Look Outside the Main Business / Financial District

Posted in Technology