Becoming a pro at choosing the correct lenses for different situations takes time and practice but is important for getting the best shots. However, it becomes second nature after a while. In this article I will try to help you cut that time based on my own experience and decide what camera lens to use. I will also talk about Continue Reading
Photodoto
Posts Tagged ‘Choosing’
A Guide to Choosing Camera Lenses – Where? When? Why?
04
Aug
Choosing Lenses: When to Use Which Lens and Why
01
Mar
The post Choosing Lenses: When to Use Which Lens and Why appeared first on Digital Photography School. It was authored by Rick Berk.

All camera systems offer a dizzying selection of lenses. These range from fisheye lenses that give a 180° field of view to telephoto lenses up to 800mm. You’ve got zooms, primes, macro lenses, super telephotos, tilt-shift lenses, and more.
So it’s not surprising that, in my time as a photographer, I’ve often had friends, students, or casual acquaintances ask me, “What lens should I get?”
There is no one right answer to this question – it all depends on you, how you like to shoot, and what you like to shoot.
Which is why I’ve written this article.
In it, I’m going to give you a rundown of each type of lens. I’ll explain what the lens can do and when you’ll want to use it.
By the time you’re done, you’ll know the perfect lens for your needs.
Let’s dive right in.
Start with your subject and your budget
What lens should you use?
To answer this question, I’d like to ask a few questions of my own.
The first question, and the easiest to figure out is, “What do you want to shoot?”
It could be sports, wildlife, birds, landscapes, architecture, portraits, or any number of other subjects.
Next, ask yourself:
“What is my budget?”
The cost of a lens depends on several things. Less expensive lenses will generally have variable apertures – so as you zoom, the maximum aperture gets smaller. More expensive lenses have a fixed aperture.
The good news is that all major camera and lens manufacturers offer a variety of focal lengths to satisfy most budgets.
After you’ve answered those two questions, it’s time to take a look at the different types of lenses and how they can be used. As you read these next few sections, make sure to focus on what you plan to shoot!
Wide-angle lenses (10mm to 35mm)

In my early days as a photographer, I never used wide-angle lenses. I started my career as a sports photographer and rarely used anything shorter than 70-200mm (and I often went for 400mm f/2.8 lenses or 600mm f/4 lenses).
But then, as I began shooting landscapes, I discovered the magic of wide angles.
Wide angles give an expansive view, and when used correctly, they can wrap you in the scene. My favorite lenses for landscape work tend to be a 14mm f/2.8, a 16-35mm f/2.8, and a 24mm f/1.4.

If you shoot scenes with prominent foreground objects, then a wide-angle lens is the way to go. A major mistake made by new photographers is to use wide angles incorrectly; by not being close enough, having no interest in the foreground, or by trying to include too much in the scene, you’ll end up with less impactful photos.
Wide angles are also handy in tight areas, like small rooms, cars, caves, etc. They can create volume and expansiveness in a limited space.
Which is why wide-angle lenses have the potential to drastically change your photography!
Standard lenses (35mm to 85mm)
Standard zoom lenses are great walkaround lenses. They are versatile, allowing you to do wide-angle landscape shooting, before zooming in to the telephoto end to take a great portrait.

In fact, standard zooms tend to cover moderate wide-angle focal lengths all the way down to a medium telephoto – they often start at 24mm to 35mm, then zoom to around 70mm or even 105mm.

Many kit lenses – lenses that come as part of a camera package – are standard zooms. However, there are also standard prime lenses.
What are standard primes?
Well, prime lenses offer just one focal length, such as 35mm, 50mm, or 85mm. So a standard prime falls somewhere in that 35mm to 85mm standard range.
In fact, back in the good old days of film, the most popular standard lens was a standard prime: the 50mm. When I was a student, everyone in the class started with a 50mm lens.

That said, whether you choose a zoom or a prime is up to you. Most people feel that zooms offer more bang for the buck these days. But a prime does force you to think more about composition and point of view, simply because it can’t zoom. And prime lenses also tend to be cheaper than optically-equivalent zooms.
Telephoto lenses (85mm to 300mm)
Telephoto lenses get you close to a subject without actually approaching them. Working with a telephoto lens is like shooting through binoculars because they magnify distant subjects.
Now, more often than not, when I speak to new photographers looking to purchase their next lens, they want something on the telephoto end. The most popular telephotos seem to be various flavors of 70-300mm or 70-200mm.

These lenses are excellent when used properly. However, too often, telephoto zooms allow the photographer to become lazy.
“If your pictures aren’t good enough, you’re not close enough,” said famed war photographer Robert Capa. Telephoto zooms allow you to stand back when the subject isn’t quite as approachable or when your subject might be feeling overwhelmed by the presence of the camera (e.g., candid street portraits). This makes telephoto zooms extremely useful for plenty of situations – but keep in mind Capa’s words, as it is easy to get lazy and let the lens do the work for you.

Telephoto lenses also compress distance, making everything appear closer together, as opposed to wide-angle lenses, which distort perspective and make things look separate.
This can be useful for landscapes when you want the sun or moon to appear large in comparison to other objects in the image. In this shot of the Shenandoah Valley at sunset, the telephoto lens compresses the scene, making the layers of mountains and mist look almost flat:

Of course, telephoto lenses are also excellent for sports, nature, and wildlife photography, where it can be difficult to get close. Sports, however, presents its own set of challenges. To be able to stop action without blur, you need a fast shutter speed. Typically, faster telephoto lenses are required.
A “fast” lens is usually one that has an aperture of f/4, f/2.8, or larger. If sports is one of your primary subjects, a telephoto zoom such as a 70-200mm f/2.8 is an excellent choice. If you really want to shoot like the pros, you’ll want a 300mm f/4, a 300mm f/2.8, or a 400mm f/2.8. These lenses are great for getting you closer to the action, but you need to be sure your shutter speed is fast enough!

Specialty lenses
Beyond the “conventional” lens types, there are a variety of specialty lenses available.
Do you like shooting tiny things? Try a macro lens.
Want to shoot architecture? A tilt-shift lens might do the trick.
In fact, there is a lens for every purpose; it’s just a matter of putting it to good use.
But always remember that a lens is just another tool on the camera. It’s up to the photographer to make it work!
What lens to use: Conclusion
Now that you’ve finished this article, you know all about the different types of lenses – and you know which lens to use and why.
So the next time you’re out with your camera, ask yourself:
What do I want to shoot?
And then pick the right lens for the job!
What lens is best for you? And what lenses would you like to purchase? Share your thoughts in the comments below!
The post Choosing Lenses: When to Use Which Lens and Why appeared first on Digital Photography School. It was authored by Rick Berk.
How to Avoid Blurry Photos by Choosing the Right Autofocus Mode
05
Jan
The post How to Avoid Blurry Photos by Choosing the Right Autofocus Mode appeared first on Digital Photography School. It was authored by Lynford Morton.

Sometimes the light is perfect, the moment is right, but when you get home, you find that your photo is blurry. Arrgh!
Why are your pictures blurry? One obvious reason is that your camera isn’t focused properly.
You see, while today’s cameras and lenses can help you quickly take sharp images in a wide variety of situations, you must first choose the right autofocus mode.
So here are some questions to help you diagnose any blurry-photo situations – so you can choose the correct autofocus settings, consistently!

Are you using the auto-area autofocus mode or the single-point autofocus mode?
Who gets to decide your focus points?
That’s what you’re deciding when you choose between the auto-area AF mode versus the single-point AF mode.
With an auto-area autofocus mode, your camera decides what it should use as your focal point. It usually decides based on what looks most prominent in the viewfinder or is closest to the camera.
Is this a bad thing?
Well, it can work if your subject is obvious and there are no potential distractions. But what do you do when you’re trying to focus on a smaller subject within the frame?
For more control, you choose a single point autofocus setting.
The single-point mode allows you to choose your specific autofocus point (check your camera’s manual if you aren’t sure how to do this).
After all, only you, not your camera, know where your subject is – and where you want to position it within your composition.
(Also, note that your camera offers several additional AF area modes – but it’s a good idea to start by choosing between the auto-area mode and the single-point mode.)
Is your subject moving?
Most DSLR cameras give you four basic options for autofocus settings: single, continuous, auto, and manual.
To help you choose the right option, ask yourself, “Is my subject moving?”
Then, based on your answer, read the relevant advice below:
No, my subject is not moving

If your subject is not moving, choose “AF-S” on your camera (though this mode is referred to as “One Shot” on Canon cameras).
AF-S acquires and locks the focus as soon as you half-press the shutter button. If your subject stays at the exact same distance from the camera, your photo will be in focus (and you’ll be able to keep taking photos and can expect them to be in focus, too). If your subject moves, then your photos will be blurry.
In other words:
Your subject has to be stationary for AF-S to work. In fact, the shutter won’t fire if your subject is moving and your lens can’t acquire focus.
AF-S also allows you to recompose. Let’s say the autofocus point is in the center of the frame, but you want your subject positioned close to the edge. As long as you maintain a half-press on your shutter button, the focus will remain sharp on your subject.
Then you can move the camera slightly left or right, positioning your subject away from the center of the frame.
Yes, my subject is moving

If your subject is moving, use continuous autofocus (“AF-C” on most cameras, though Canon calls it “AI Servo”).
With this mode, you can place your autofocus point over your subject, and the focus continues to adjust while you press the shutter button. This keeps your subject in focus as it moves.
For example, if someone is riding a bicycle, you can place the AF point on your subject and half-press the shutter button. As long as you’re half-pressing the shutter, the autofocus will adjust continuously, keeping your subject in focus as they move.
When you’re ready to take the photo, depress the shutter completely, and the camera will fire a sharp, in-focus image.
No, my subject isn’t moving, but it might

A third option merges the functionality of the single autofocus and continuous autofocus modes. This hybrid mode (“AF-A” for Nikon or “AI Focus” for Canon) works differently depending on your camera.
However, AF-A always involves some sort of automatic switching between AF-S and AF-C modes, based on whether your camera perceives a moving subject or an unmoving subject.
With AF-A activated, you can focus on an unmoving subject exactly as if you are working in AF-S. But as soon as the subject moves, your camera will switch to AF-C and begin tracking.
Make sense?
For some photographers, this is the best of both worlds and allows you to deal with erratic subjects that repeatedly move and then stop suddenly (i.e., birds). However, you’ll often lose the ability to focus and recompose, because your camera may attempt to refocus based on the position of its autofocus point – so make sure to bear that in mind.
My autofocus just isn’t getting it right
You always have the option of turning off the autofocus function and choosing the manual focus setting.
When should you do this?
Well, if your camera is having trouble detecting your focus point, it might be more efficient to focus the camera yourself.
Note that you can turn off your autofocus on accident. So every now and then, when your camera can’t seem to focus, and you don’t hear the motor searching back and forth, check to see if you selected manual focus without meaning to. This can happen more frequently than you might think!
Other issues to consider
What if you set up your autofocus properly and the lens still won’t focus?
I’d recommend you consider these solutions:
- You might be too close. Try backing away. If you are too near your subject, the camera may not be able to focus properly.
- Your subject might not have enough contrast. Your image needs to have some contrast for most autofocus systems to work. If you try to photograph a solid sheet of white or any single-colored wall, most autofocus systems will struggle. Why? Cameras use differences in colors and tones to determine their focus. If a camera can’t find any contrast, it can’t focus.
- You might have an extremely shallow depth of field. In this case, your autofocus is working, but the depth of field is so shallow, it’s hard to tell that your subject is in focus.
- You have camera shake. When you depress the shutter, you move the camera. If the shutter speed is too slow, the camera picks up that movement, and it gives you a blurry photo. Make sure your shutter speed is faster than the equivalent of your focal length. For instance, if you are zoomed out to 100mm, your shutter speed should be 1/100s or faster to avoid camera shake.
- You have motion blur. If your subject is moving quickly and your shutter speed is too slow, the photo will end up blurry – so make sure you’re using a fast-enough shutter speed to freeze all motion in the scene.
Choosing the right autofocus mode: Conclusion
Why are your pictures blurry?
If the answer is related to your autofocus mode, your fix could be as simple as choosing the right settings.
And to prevent any future blurry photos, make sure you use the process I’ve laid out above.
Do you have any other autofocus tips or tricks you’d like to share? Please do so in the comments below!
The post How to Avoid Blurry Photos by Choosing the Right Autofocus Mode appeared first on Digital Photography School. It was authored by Lynford Morton.
Back to Basics: Everything You Need to Know for Choosing the Right Tripod
22
Jun
The post Back to Basics: Everything You Need to Know for Choosing the Right Tripod appeared first on Digital Photography School. It was authored by Adam Welch.

Although they seem simple enough at first glance, tripods are tremendously important tools for photographers and videographers. Talking about camera support systems might not be the sexiest topic in photography, but there’s so much to know about tripods. So, allow me to do you a favor. I’m about to clue you in on a few things I wish I’d known about tripods when I first began making photographs nearly twenty years ago. These things will help you when it comes to choosing the right tripod for your needs.

Camera tripods come in all shapes and sizes. Materials and mechanisms vary a lot, as do the specific usages of the tripods themselves. This article will show you the basics of tripod anatomy and talk about the things you need to know about them, so choosing the right tripod for your needs will be easy.
Tripod legs: putting the “tri” in tripod
Conceptually, tripods are delightfully simple beasts. Three extendable (usually) legs offer three points of contact to the ground/floor, then terminate at an apex where your camera will hopefully be securely mounted. This is all deceptively simple and leaves a lot of room for many different types of legs made from many different materials with equally varied locking mechanisms.

Let’s break down some of the common tripod leg variants you’re likely to encounter when choosing the right tripod.
Materials
Tripod leg materials range from the oddly archaic to the weirdly space-aged. Fortunately, in most cases, you can make the best choice for which material will be best for your uses based on these three simple maxims:
- Your tripod can be lightweight.
- Your tripod can be strong.
- Your tripod can be inexpensive.
The catch here is that you can only choose two of those when selecting a tripod. This is where tripod leg materials come into play and where you should be honest with yourself about what you need the most from your tripod.
1. Wood and Steel
As difficult as it might be to believe in this day and age, I still own and regularly use a wooden tripod; yes, really.

It’s a beautifully made contraption of steel and ash wood, Berlebach Report 2042 (new version is 242). Primarily, I use it for large format and medium format work and any other time in the studio when I want to use a large setup or happen just to be feeling extra meta. It supports around 27lbs(12.25kg) and is absolutely rock solid. The drawback is my lovely Berlebach weights over 7lbs without a head, and it tips the scales at over 10lbs when fitted with one.
The point here is that yes, there are still tripod legs made using “old world” materials like wood and steel. Many of these are vintage tripods you can pick up for a wide range of prices.
If weight is not a concern for you, a heavier tripod is more ideal than a lighter one. If you do primarily static studio work, don’t overlook these wood or steel tripods.
2. Plastic
Yes, there are some plastic tripod legs out there. Most of these, thankfully, are relegated to smaller, desktop-type tripods for blogging – as they should be.

As a construction material for longer tripod legs, plastic and plastic derivatives aren’t ideal. Often the strength is far from adequate for the camera support system and flexes under the load.
While some plastic components on a tripod are perfectly fine, it’s advisable to steer clear of a large tripod with legs completely made from plastic.
3. Aluminum
Ahhhh yes, good ol’ aluminum. In the world of tripods, aluminum is the ultimate workhorse. It has an excellent strength-to-weight ratio, is relatively low in price (dropping lower all the time), and makes for a nice, healthy compromise between leg rigidity, compactness, and weight.

For the last couple of decades, aluminum has been the tripod leg material of choice when it comes to camera support systems because it checks so many boxes in terms of performance.
However, in the last ten years or so, modern science has thrown a new material into the mix that has all but unseated aluminum as the ideal material for tripod leg construction.
I’m talking about…
4. Carbon Fiber
I’ve made photographs for over half my life now, with about ten of those years professionally. For as long as I’ve been slinging a camera, I only acquired my first carbon fiber tripod about three years ago. Carbon fiber is a lightweight, strong, and extremely corrosion-resistant material, making it perfect for tripod legs.

Not to get all “sciency,” but carbon fiber is, in fact, more stiff than aluminum, being 181Gpa and 69Gpa, respectively. This means that a tripod leg made of carbon fiber flexes less than an aluminum leg of the same diameter. That’s a good thing for a tripod.
Of course, there are multiple carbon fiber species out there, and each has different characteristics.
Going back to our “big three” maxims for tripods, while carbon fiber tripods are strong and lightweight, they are often not cheap. Expect to pay around double for a set of carbon fiber tripod legs compared to aluminum.
However, this price gap is quickly closing as more and more manufacturers begin to bring carbon fiber tripods to the market. In most cases, the benefits of having an easy-to-carry tripod that is both strong and stable are often worth the investment.
5. Titanium
After an exhaustive internet search (okay, maybe about ten minutes), I couldn’t turn up any tripod legs made fully from titanium alloy. However, I did find some tripod sales pages using vague language and simply naming aluminum tripods as “titanium” models.
While titanium is making its way into the world of tripod legs, it is doing so in the form of hardware too. This is expected since titanium offers superb tensile strength and corrosion resistance. Yet, oddly enough, titanium isn’t the ultimate material for tripod legs and parts. It doesn’t wear well against other parts, and the strength-to-weight isn’t as good as some carbon fiber materials.
And the price? Words like “astronomical,” “insane” and “laughable” spring to mind.
Locking Mechanisms
To offer portability, tripod legs generally feature either folding or telescopic sections, with the vast majority being of the latter variety. This means that those leg sections sport some sort of locking mechanism. In general, you’re likely to encounter two main types of leg locks.
1. Flip locks
My very first tripod had flip-type leg locks. Then, my second tripod had flip-type leg locks…so it’s no surprise that I became accustomed to, and prefer, flip-type leg locks on my tripods. This, of course, is wholly subjective.
Flip locks are exactly how they sound: a locking mechanism that flips up to release the tripod leg section and flips down to secure it into place.

These locks make deploying the tripod fast and easy. Flip locks can be made of a variety of materials and vary in strength accordingly.
2. Twist locks
It seems as if twist locks are slowly becoming the more prevalent method for locking tripod legs into place. Much like their flip-lock cousins, a twist-type leg lock doesn’t function just as you might expect. Simply twist one direction to unlock and twist the opposite direction to secure.

Twist locks are generally less likely to fail due to dirt and sand over flip locks. However, not all twist locks are made equal. Some twist locks require a good deal of “throw” (twisting) to lock or loosen the mechanism resulting in slower deployment retraction.
Tripod Feet
Now that we’ve reached the bottom of our tripod, it’s time to talk about the silent hero of all tripod legs – the seldom applauded feet. No matter what, your tripod ultimately comes to rest on its feet…well…hopefully.
The feet of a tripod come in all shapes and sizes and are another important consideration when choosing the right tripod. In most cases, tripod feet are made from some sort of rubber or rubberized plastic.

This is where things get interesting.
Now, the shape and characteristics of tripod feet make them more or least apt to remain solid in different environments. The larger the feet of your tripod, the more “flotation” they will offer; meaning the load will be distributed over a wider surface area. The more flotation a tripod foot has, the less likely it is to sink into softer ground materials like sand and mud.

Speaking of the ground, if you know you’ll be using your tripod in widely varying outdoor environments (looking at you landscape shooters), it would be a good idea to make certain your tripod feet feature some type of spike system.

Foot spikes are your best friend when you find yourself shooting in icy winter conditions or on exposed rock. However, they are also your worst enemy when shooting indoors and are the menace of wedding venues everywhere. So if you’re a photographer who shoots both outdoor and indoor scenes, make sure your leg spikes are retractable or removable.
It’s also worth mentioning that many major tripod manufacturers offer interchangeable feet for their products, which means you can change your tripod feet depending on the situation.
Center column or nah?
Let’s move a bit north and talk about a topic of contention when it comes to tripods – center columns. A center column allows the photographer to increase the tripod’s height after deploying the legs to their maximum extension.

Center columns add wonderful versatility to a tripod’s capabilities simply because they facilitate the quick and tailored height adjustment. At the same time, center columns also introduce a point of movement into your shooting platform. Thus, causing the debate about whether or not using a center column hinders the overall quality of your photos.
Center columns are very much a double-edged sword in that they can add immense versatility to your shooting possibilities while also causing a few problems if poorly executed. As cliche’ as it might sound, the choice of whether or not you prefer a center column is entirely up to you.
Fortunately, the decision is becoming less and less of an issue, as many tripod makers now offer removable center columns for a large number of tripod models.
There’s so much more!
We’ve covered the main components of your tripod, but we haven’t even begun to talk about the wide world of ball heads, pan heads, and fluid heads! There are even base plates and plate clamps to talk about! So instead of reading about all of these cool little gadgets, why not see them in action?
Have a look at this video I made that covers all of the things we’ve already talked about plus the options that are currently available for mounting your camera to your particular camera support system.
As always, feel free to post your questions and comments about choosing the right tripod below. Have a favorite camera support system or setup you’d like to share with us? We would love to hear about them as well!
The post Back to Basics: Everything You Need to Know for Choosing the Right Tripod appeared first on Digital Photography School. It was authored by Adam Welch.
Choosing a camera Part 2: is a bigger sensor better?
19
Apr
 |
When looking at pixel size, we saw that there’s little difference between having a few large pixels and having lots of small ones, once you consider the whole image. This is because sensors have the opportunity to capture the same amount of light per-whole-image, regardless of how many pixels they have.
However, when looking for a new camera, there often is a way of getting more light and therefore better image quality: a larger sensor. This is because, at the same exposure settings, a large sensor is given the same amount of light per unit area, but has a greater sensor area capturing this light.
Key takeaways:
- Two cameras* with the same exposure receive the same light per square mm, and larger sensors have more square mm.
- Every object in your scene will be projected onto more square mm of the larger sensor if those two hypothetical cameras have the same field of view.
- This means every object is described with more photons of light, which gives the potential for a cleaner image.
- Differences in sensor performance mean one camera may over- or under-perform expectations but these differences are usually smaller than the differences made by changing formats.
The effect of sensor size:
In this instance we’re comparing the Nikon D810 and the Nikon D7000, which have the same sized pixels but different sized sensors. The D810 has a full-frame sensor that’s around 2.3x larger than the APS-C chip in the D7000.
 |
||
| ISO 1600 | ||
| D810 whole frame [Raw File] |
D7000 [Raw File] |
D810 (resized: 16MP) [Raw File] |
| ISO 3200 | ||
| D810 whole frame [Raw File] |
D7000 [Raw File] |
D810 (resized: 16MP) [Raw File] |
| ISO 6400 | ||
| D810 whole frame [Raw File] |
D7000 [Raw File] |
D810 (resized: 16MP) [Raw File] |
| ISO 12800 | ||
| D810 whole frame [Raw File] |
D7000 [Raw File] |
D810 (resized: 16MP) [Raw File] |
As you might expect, the two cameras look similarly noisy at the pixel level because they received the same amount of light per square mm and each pixel is the same number of square mm.
But when you downscale the D810’s images (as you would if you wanted to view or print at the same size), the benefit of its bigger sensor starts to appear.
Compare the D810’s output to the D7000 image from one ISO setting lower and you’ll see they look very similar, but with the D810 still a fraction ahead. This is consistent with the 1.2EV difference that the sensor size difference would lead you to expect.
Size differences outweigh performance differences
If shot from the same position, using a lens with the same angle-of-view, every object in the scene will be captured by a greater area on a bigger sensor, so with the same exposure a larger sensor will have more photons shone on it to describe the scene. As such it will tend to look cleaner if you view them at the same size.
There will be some differences in how well each sensor design can turn these photons into a digital signal (even though most modern sensors are excellent), but there are fairly large gaps between most popular sensor sizes, and these size differences tend to be greater than the differences made by sensor performance.
Now this might sound like bigger is always better. But it’s not that simple…
Click here to read Part 3:
The trade-offs of sensor size
*Assuming you’re shooting the same thing ie. both cameras are in the same position and shooting with the same framing.
Articles: Digital Photography Review (dpreview.com)
Choosing a camera Part 3: the trade-offs of sensor size
18
Apr
 |
We’ve already looked at the role played by pixel size and the benefits of a larger sensor. But, before you rush out to buy the camera with the biggest sensor you can, it’s worth bearing in mind that you won’t always see its full advantage.
Key takeaways:
- For the same field-of-view, a larger format will have shallower depth-of-field at the same F-number.
- Shallow depth-of-field can be a creative benefit, up to a point, but you sometimes need a certain depth-of-field.
- You can stop down a large sensor camera to match the depth-of-field of a smaller one, but you end up with comparable image quality if you do.
- All formats are a series of compromises and there is no correct balance to strike.
The depth-of-field trade-off
As we’ve seen, if you can achieve the same exposure settings, a larger sensor will have a chance to absorb more light and hence give better image quality. But achieving the same exposure value usually requires you to use the same f-number.
With the same f-number, a larger format will also have shallower depth-of-field, which will sometimes be desirable but other times not. Depending on your tastes and shooting style, shallow depth-of-field (and the additional light that usually comes with it) can be a valuable creative tool. But only up to a point, and not in all circumstances.
 |
| A ‘full-frame’ sensor tends to require large lenses but can capture lots of light. This extra light capture comes with shallow depth-of-field (for better or worse). |
In situations where you need more depth-of-field it’s possible to stop down the lens on a large sensor camera, but doing so will reduce the amount of light available to your camera: at which point you’ll see the advantage over a smaller-sensor system begin to diminish (while still having to deal with the larger format’s size, weight and cost).
Bigger is usually better, but how much better do you need?
Also, the examples we’ve used were shot in relatively low light. In bright daylight, the image quality of many systems will readily exceed ‘good enough:’ even simple one-shot smartphones do a reasonable job in good light. And once you’re reached ‘good enough,’ any further improvement may not be worthwhile, or even perceptible. So, while a larger sensor will give the potential to receive more light and capture every tone with greater fidelity, that difference won’t always offer a visually appreciable benefit.
 |
| A smaller sensor can’t usually capture as much total light or compete in absolute image quality terms, but it can generally be smaller and more convenient as a result. |
In the most simple terms, all systems involve trade-offs between size, price and image quality. The challenge is to understand the magnitude of these trade-offs, and choose the one that makes most sense for you and the types of photos you want to take.
Articles: Digital Photography Review (dpreview.com)
Choosing a camera Part 1: should I worry about pixel size?
17
Apr
Pixels are the fundamental building blocks of digital photography: they are the individual elements that capture the light to make up your image. Higher pixel-count cameras promise better resolution but it’s often said that their smaller pixels result in noisier, less-clean images.
So does this mean you should look for fewer, bigger pixels when you buy your next camera?
Probably not. That’s because the idea that small pixels are noisier is only really true when you examine your images at pixel level. We’ve long passed the point where you only had enough pixels to fill your monitor. And even people making large prints will find that a 24MP camera provides far more resolution than needed for printing at A3 (11.7 x 16.3″).
Looking at the bigger picture
At which point, taking a more holistic, whole-image-level perspective on picture quality probably makes at least as much sense as worrying about the noisiness of your individual pixels.
Smaller pixels each receive less light than large ones, so will always individually be noisier (because for most photography, most of the noise comes from the amount of light you sample). But as soon as we have to scale our images to view or print them, this difference becomes much less significant or disappears entirely.
Key takeaways:
- Larger pixels get more light during any given exposure, so are less noisy when viewed 1:1
- Combining multiple small pixels cancels out most (or all) of this difference when viewed at the same size
- For most applications you’ll end up downsizing your images, so there’s usually a resolution advantage but little (if any) downside to having more pixels
The effect of pixel size:
The Nikon D850 and the Sony a7S are both relatively modern full frame sensors, but they have very different pixel counts. Because they have the same sized sensor, this means the individual pixels on the 12MP a7S are much larger than the D850, which has a sensor made up of 48 million pixels.
The a7S is often described as being great in low light, but this is only true if you pixel peep.
Let’s see how they compare when scaled to the same size:
 |
||
| ISO 6400 | ||
| D850 Full size [Raw File] |
a7S [Raw File] |
D850 (resized: 12MP) [Raw File] |
| ISO 12800 | ||
| D850 Full size [Raw File] |
a7S [Raw File] |
D850 (resized: 12MP) [Raw File] |
| ISO 25600 | ||
| D850 Full size [Raw File] |
a7S [Raw File] |
D850 (resized: 12MP) [Raw File] |
| ISO 51200 | ||
| D850 Full size [Raw File] |
a7S [Raw File] |
D850 (resized: 12MP) [Raw File] |
At the pixel level the a7S is much less noisy, as you’d expect with its larger pixels. But, at all but the very highest ISO settings, that advantage disappears when you compare them both at the same scale. The difference is that you usually retain some of the additional detail that the D850 captured.
We see this same pattern across almost all cameras. The only times we have seen any disadvantage to small pixels is in the very smallest pixels used in smartphones (and those often use multi-shot modes to overcome this) or in sensors that use unconventional sensor technologies.
The thing that’s much more likely to make a difference to your image quality is sensor size. We’ll look at this in the next part of this article series…
Articles: Digital Photography Review (dpreview.com)
Guide to Choosing Subjects and Compositions for Flower Photography
09
Jul
How does the budding flower photographer go about selecting subjects and choosing compositions? In this article, I will give a detailed answer to this question. First, I will discuss the different types of flower photography subjects. Then I will give guidelines for creating stunning compositions.
All throughout this article, I will emphasize producing clean, dynamic images.

Subjects
Choosing a subject in flower photography may seem easy – flower photographers shoot flowers, right?
While this is true, it’s important to consider several factors about any particular flower. Among these is the color of the flower, the condition of the flower (is it dying and/or dirty?), and the shape of the flower.

Color
Considering color is simple. The more colorful the flower, the more interesting the image is going to be (generally speaking, of course). I like to use bright colors, placed before a brightly colored background.

It can also be useful to think in terms of complementary colors. These are the red/green, blue/orange, and yellow/purple combinations. When they are placed together in the same frame, the results can be powerful.
Condition
Another important consideration is the condition of the flower. Before taking your photograph, you should inspect your potential subject carefully.

Ideal flowers are at peak bloom: petals spread wide, edges crisp and unblemished. I try to avoid photographing flowers that are on their way out because more often than not I’m disappointed with the resulting images.
The best flowers are also free of dirt. I often wipe dirt off carefully with my finger. If there are insects, I gently blow them away from the flower center. Another tactic is to obscure the blemishes or dirt by shooting soft-focus images or silhouettes.

This flower wasn’t in peak condition, so I chose to shoot a silhouette, emphasizing the shape over the condition.
Shape
This final aspect of flower photography is more difficult to explain, but it is important, so I’m going to give it a shot. Certain flower shapes are better than others for flower photography.
More specifically, the flowers that will get you the most pleasing images are often those with clear patterns and bold, dynamic shapes.
Consider the rose. It is one of my favorite flowers to photograph. Why? The petals are dynamic, flowing and changing. They also have a clear pattern, and therefore imbue your images with a sense of organization.

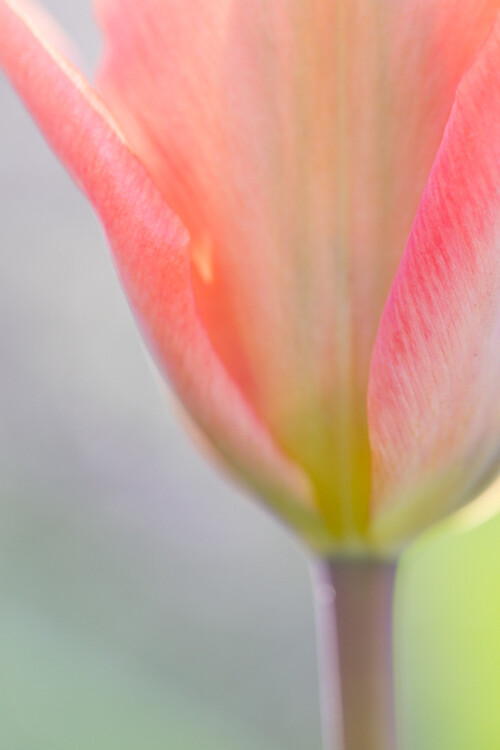
Another flower that I love to photograph is the tulip. Its structure is simple but bold, and it has large petals that curve slightly. It isn’t chaotic or messy. The viewer’s eye can easily trace its shape without getting lost.
The rose and tulip sit in contrast to flowers such as zinnias, which are rather chaotic and therefore difficult to pin down in an image. Which is not to say that a good zinnia image is impossible; it’s just a lot more difficult.
Compositions
When composing flower photographs, it is a good idea to keep a checklist in the back of your mind. In every flower photography image, try to incorporate at least a few of the guidelines provided below.
Simplify
My first tip is the most important – simplify!
Figure out what it is about the flower that you like, and focus on that, removing any extraneous elements, be they extra flowers, stems, petals, etc. Make sure that any distracting elements are not present.

Use Symmetry
While you shouldn’t always strive to use symmetry in your flower images, it can be a good starting point. Flower centers are often symmetrical or nearly symmetrical. This is something that you can use, composing with the flower smack-dab in the center of your image, anchored by its center point.

I used this flower’s symmetrical center to create a bold composition.
Have a Clear Point of Focus
Without a clear point of focus in your images, the viewer will be lost. Their eyes will wander from place to place without really being drawn into the image.
How do you create a point of focus? You ensure that at least one part of your image is sharper than the rest. You also compose with this point of focus in mind, making sure that the rest of your image merely complements this point of focus (rather than dominating it or detracting from it).

Here, the eye is drawn straight to the in-focus petals of this flower.
Use a Clean, Pleasing Background
Above, I discussed the importance of colorful subjects. But the subject isn’t the only thing that should be colorful. It’s also important to have a colorful background, or at least a pleasing one.
This can be a bit of a balancing act because you don’t want the background to overpower the subject. White and black backgrounds can work well, as can backgrounds that are a colorful but uniform wash.

I aimed for a uniform, calming background when taking this trout lily photograph.
Tilt the Camera
One last tip for creating dynamic compositions is to try tilting the camera.
Rather than having the flower sitting statically within the frame, by tilting the camera, you communicate a sense of movement. The flower seems to be emerging from the frame in a very pleasing way.

Notice how tilting the camera to shoot this Black-Eyed Susan resulted in a more energetic image.
Conclusion
When doing flower photography, it is important to carefully consider both the subject and your composition. By keeping your subjects colorful and clean, and by aiming for simple, clean compositions, your flower photography will instantly improve.

The post Guide to Choosing Subjects and Compositions for Flower Photography appeared first on Digital Photography School.
Tips for Choosing Between RAW Versus JPEG File Format
28
May
Perhaps one of the most commonly asked questions in digital photography is around which file type to use when shooting – JPEG or RAW file format. Don’t worry if you don’t know much about these two formats or whether your camera supports them. My goal, by the end of this article, is to help you understand what these two types are and help you pick the one that is right for you.

RAW Versus JPEG File Format
At the very basic level, both JPEG and RAW are types of files that the camera produces as its output. Most of the newer cameras today have both these options along with a few others like M-RAW, S-RAW, Large format JPEG, Small format JPEG, etc. – all of which determines the size of the final output file.
The easiest way to see which file formats are supported by your camera is to review your camera user manual – look for a section on file formats. Or you can go through the menu options of your camera and select Quality (for Nikon) or Image Quality (Canon) to select the file format.
Each file format has its advantages and disadvantages so choose the right option that works best for you. JPEGs are, in reality, RAW files that are processed in camera and compressed into that format. Some of the decisions the camera makes in processing the image may be difficult to change later, but the JPEG file sizes tend to be much smaller.
Let’s look at the advantages and disadvantages of both these file formats in greater detail.
Advantages of shooting RAW files
- It is easier to correct exposure mistakes with RAW files than with JPEGs and overexposed highlights can sometimes be rescued. For people like me who tend to always photograph at least 1/2 stop to 1 stop overexposed (based on my style of photography), this is really beneficial in saving many great images in post-production.
- The higher dynamic range means better ability to preserve both highlights and shadow details in a high contrast scene when the image is being recorded.
- White Balance corrections are easier to make.
- Decisions about sharpening, contrast, and saturation can be deferred until the image is processed on the computer.
- All the original image data is preserved. In fact, when RAW files are opened in post-production software like Lightroom, a virtual copy is made and used. Edits are made in a non-destructive format so the original RAW file is always available for changes at a later stage. This is very useful when you want to edit images in different ways at different times in your photographic career.

Left is the RAW file straight out of the camera. On the right is the finished edited image from the same file.
The image on the left (above) was completely blown out because I was in the car and did not have any of my settings correct. But because I photographed in RAW I was able to salvage so much detail in the image. This would not have been possible with a JPG file.

An image that was not properly exposed but photographed in RAW.

The edited image that was corrected in post-processing for exposure issues.
Disadvantages of RAW files
- RAW files tend to be much larger in size compared to JPEGs thereby requiring more storage, not just in camera but also on external storage devices or your computer hard drives.
- RAW images take longer to write to your memory card which means shorter bursts of continuous shooting. For example, my Canon 5D MIII can write about 12 RAW files continuously and about 30+ JPEG files in the continuous (burst) shooting mode. Check your camera manual for specifics around your own camera’s burst mode (a.k.a continuous photography mode).
- Not all programs can read RAW files. This used to be an issue, but now there are lots of great programs that can work directly with Raw files such as Adobe Lightroom, Canon’s Camera RAW, Luminar, On1 Raw, ACDSee Photo Studio Ultimate, and other such programs.
Advantages of shooting JPEGs
- JPEG files are much smaller in size compared to RAW files and hence need less storage space – both in camera memory and on your computer hard drives.
- JPEG images write to disk more quickly which means longer bursts of continuous shooting opportunities especially during wildlife photography, fast action sports, or even dealing with little kids that are always on the move.
- These JPEG files can be instantly viewed with many programs including common web browsers, powerpoint, and other such common applications.
Disadvantages of JPEG files
- It is harder to fix exposure mistakes in post-production with JPEG files.
- JPEG files tend to have a smaller dynamic range of information that is stored and this often means less ability to preserve both highlights and shadow details in the image.
- White Balance corrections are more difficult with JPEG files.
- Decisions about sharpness, contrast, and saturation are set in the camera itself and in most cases, these are difficult to change later in post-production without destroying the image quality.
- Since a JPEG image is essentially a RAW image compressed in-camera, the camera’s computer makes decisions on what data to retain and which to toss out when compressing the file.

The same image when edited as a JPEG for exposure issues becomes a lot grainier than an underexposed RAW image. You cannot pull them as far as a RAW file.
Another old-school way to think about these two file types is as slides and negatives. JPEGs are like slides or transparencies and RAW files are like negatives. With JPEGs, most of the decisions about how the image will look are made before the shutter is pressed and there are fewer options for changes later. But RAW files almost always require further processing and adjustments – just like negatives.
Which format to choose?
Now that you understand the difference between RAW and JPEG images, deciding which one to use is dependent on a few different factors.
- Do you want to spend time in post-processing your images to your taste and photography style?
- Are there any issues with limited space on your camera’s memory card and/or computer hard drives?
- Do you have software and/or editing programs that will read RAW files easily?
- Do you intend to print your images or even share images online in a professional capacity?
Some photographers are intimidated by RAW images. I was as well when I had just gotten started in photography because I did not know the true power of a RAW image. However, once I started photographing in RAW there was no going back.
Even everyday snapshots are shot in RAW now because of the great flexibility I have in correcting any mistakes that I make. One of the most common mistakes that many photographers make is around image exposure and that is relatively easy to fix with RAW files.

I accidentally overexposed the setting sun and lost some of that golden warmth hitting the tree.

One of my favorite San Francisco cityscapes at sunset. I accidentally overexposed and lost the sun flare but was able to edit it and bring back that sunset warmth in post-production because it is a RAW file.
It’s getting easier to use RAW files
Traditionally the two main issues with RAW files seem to be fading every day:
- The cost of memory to store or backup these RAW files is getting cheaper and cheaper by the day.
- Software that can read RAW files is more readily available. In fact, there is even inexpensive and free software that can read these RAW files now.
There is still the issue of write speed for your camera. If you focus on fast-moving subjects like wildlife or sports photography then perhaps write speed is a key factor in deciding whether to photograph in RAW versus JPEG. So for fast moving objects and/or wildlife and birding photos, JPEG may be a better choice.
Another thing to note is that most of the newer cameras have the ability to capture both JPEG and RAW images at the same time. But this takes up even more storage space and might not be the best use of memory. You are better off just picking one option and sticking with that.

Waterfall images using a slow shutter speed tend to blow out the background but editing a RAW image in Lightroom helps bring back some of the highlights.
Conclusion
I hope this was helpful in not only understanding the differences between RAW versus JPEG file formats but also in helping you decide which one to choose and why. So tell me, do you belong to the RAW or the JPEG camp?!
The post Tips for Choosing Between RAW Versus JPEG File Format appeared first on Digital Photography School.
Choosing the Right Camera Bag for Outdoor and Wildlife Photography
11
Apr
Choosing a camera bag as a photographer can seem like a never-ending task, with no single model ever seeming to fit perfectly for all types of occasions. As wildlife and nature photographers, we are outdoor people. So predominately a backpack certainly makes the most sense in terms of getting our gear to the location, in a safe and comfortable manner, while also freeing up our hands for shooting or negotiating tough terrain.
Of course, a decent bag is essential when carrying and transporting heavy and expensive equipment. Protection is a key consideration, not only for the expensive gear, of course, but also for your back! Poorly designed packs that lack adequate padding and harnesses can be real torture on a long hike. If fitted wrong, long term that can manifest as back problems, something none of us want to increase our risks of getting. So picking a good camera bag is certainly worth spending some time on.

Load Capacity
One of the first questions you need to ask yourself when choosing a camera bag or backpack is about the load capacity. How much photographic gear will you take, how much personal stuff do you need, do you need a laptop, or other items as well as your main kit? These are all considerations to think about.

A good way to gauge the size of bag that you need is to lay out your camera gear as if it is going to be in a bag.How would you like it to fit, what cameras would you want to kit up in which combinations? Laid out on the floor, it will give you a good representation of the size of camera bag you’re going to require and what sort of size main compartment you’ll be in need of to house your core gear.
If you use long telephoto prime lenses, often you’ll find you need the largest of packs in order to fit them all. Especially if carrying additional lenses and back up bodies is something you require.

Strong durable materials.
Customize the Inside
Of course, for those of us who work with a variety of kits, from large lenses to smaller landscape packs, customization is also a factor. If a bag is solely focused on telephoto shooting, and maximizing on camera gear, it can seem cumbersome on days when you only require a single camera and pair of short lenses. To handle this issue, bags that have flexible inserts can be a great feature. They have the ability to swap out camera gear for personal gear, or just strip down the bag for a smaller load.

In regards to the internal compartment’s design, most camera bags offer movable, custom dividers. These allow you to make sections within the main pack for housing and organizing your gear while protecting it from knocking and banging around while in transit.
In some models, the dividers are thinner to maximize gear space, with others offering more protection. However, I often find that due to the fact most companies use a velcro system (hook and loop) for repositioning the dividers, you can mix and match to get that perfect setup across bags. Yes, this is because you’ll probably end up buying a few camera bags.

Travel-Friendly
In addition to simply considering the capacity of a new camera bag for your gear, it’s also important to consider the size for travel. If you’re planning to use the pack when flying, be sure to check that it falls within the airline’s maximum allowance for carry-on luggage. There’s nothing worse than potentially having your bag gate checked because it’s too large.
Companies such as ThinkTank have a range of options for those who fly regularly, but for wildlife photographers, they are less practical for field work, once at your destination.
Another great option from the F-stop range of packs is removable inserts which then allow you to check the main bag, taking out the photography gear within the insert and safely storing it on board. A great best of both worlds solution. However, in my experience, camera bags with a noted reference to airline carry-on compatibility are rarely a problem.


Harness System
The carrying system is one area I can’t stress the importance of enough. When you are carrying heavy loads (my pack can often be over 20kg / 44lbs) having a comfortable and supportive back system is key to aiding in comfort and protecting your back!
With heavy loads, a padded waist belt is a must. When carrying a fully loaded kit, you’ll want the weight to be taken by your hips and not your shoulders. Waist belts can range in padding from thick to thin, with the former being great for longer hikes and heavy loads. However, the latter is better when traveling and pushing your bag into an overhead locker on a flight.
Good systems will have a strong buckle. Some even feature pockets on the waist belt that are handy for fast-access gear, such as a compact camera, trail snack, or a spare battery.


In regards to the shoulder straps, padding is less of a problem as long as they fit well (as the weight should be taken by the hips). Personally, I find straps that are too wide with too much padding uncomfortable. So I prefer the thinner, hiking-style designs of the more outdoor geared packs.
Companies such as F-Stop and LowePro offer good options. However, they are still not up to the perfection of true outdoor packs such as Osprey. In addition, some packs offer the customization of the back length. That is key to getting a perfect fit, adjustable heights in the back system means less stress pulling over the shoulders, again reducing fatigue on the trail.
If you hike a long way, these added features really make a difference. When testing the harness systems you’ll need to do it in person. So take your gear to your local camera store, load the bag up with weight, and get it fitted properly. Adjust the length of the back (if you can) to your height, so the waist belt is just above your hips and the shoulder straps come neatly over without pulling upwards, keeping tight, but not strained to your frame. Adjusting the sternum strap will keep them in position and aid in fit.
Extras

In addition to the main compartment and harness, there are also a number of extra features to look out for.
Rain Cover
Rain covers are great for working in the elements as they add extra protection, from rain dust and sand, as well as also being handy to pull out and use as a dry/clean place to set your bag down on the ground. I prefer the type that is sewn into the pack, as they are less likely to be lost or forgotten and also are always there when you need them!

Outer Pockets
Of course, in addition to camera gear, we photographers also need personal supplies. External pockets are important for additions like spare layers, coats, as well as food and water to keep us going.

Tripod Carrier
Of course, you most likely haul a tripod on location, so having a decent attachment system on your pack is extremely handy for carrying your three-legged friends any extended distances. Lots of packs have options to carry a tripod on the side or back of the bag, depending on your preference. Having this ability to free up your hands when hiking is brilliant.


Laptop Sleeve
If you work on your laptop or travel a lot, a compartment to store or protect a laptop is an important addition for when you’re on the road. Some bags include padded sections designed for a laptop at the front or rear of the bag. Those that have them close to the harness area can make bags seem stiff and uncomfortable for any length of hiking, so are best used only when getting through an airport.

Hydration Pack Compatibility
For an extended hike, a hydration bladder is extremely handy for re-hydrating on the go. Packs that feature sleeves to keep the bladders separate often have them water sealed to help protect your gear from leaks. However, I always place mine in an additional dry bag for added precaution.
Custom Bags
Sometimes no matter how hard you try, you just can’t find the perfect camera bag or one that suits your style, needs and fit. In that case, another option to think about is that of customizing a regular bag for use with cameras.
Take a well-designed hiking bag with many of the features you need (good harness, lightweight, the right size, and ruggedness) and team it up with a way pod protecting your camera gear inside. This could be through the use of an insert, such as those made by F-stop bags or Tenba, or through the use of simply wrapping gear individually in padded camera wraps, to store your gear safely.
This is a super option for when you want a high volume of personal gear for hiking, traveling, and exploring but still want to carry a DSLR with a number of lenses safely. I’d also recommend looking into a small organizer case as well for organizing any miscellaneous items such as batteries and memory cards.

Conclusion
Overall, choosing a camera bag for wildlife photography can be tough. With so many options and requirements, in many ways, there will never be one perfect bag. However, by working through the list above, deciding on your most important and specific needs, you’ll certainly find a great option. One that suits you and keeps your gear safe on location for all your photography adventures.
A backpack is a simple essential for wildlife and nature photography. Spending time to make the right decision choosing a camera bag will be something you’ll certainly be glad you made the effort to do!
The post Choosing the Right Camera Bag for Outdoor and Wildlife Photography appeared first on Digital Photography School.
You must be logged in to post a comment.