RSS
 

Posts Tagged ‘cheat’

Manual Exposure Cheat Sheet for Beginners: How to Expose Manually

22 Oct

The post Manual Exposure Cheat Sheet for Beginners: How to Expose Manually appeared first on Digital Photography School. It was authored by Kevin Landwer-Johan.

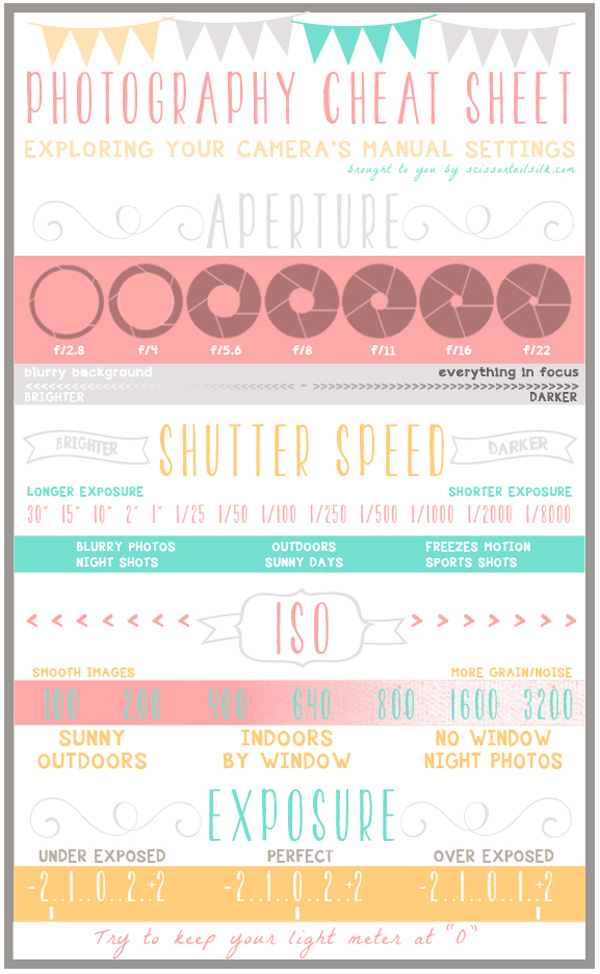
Photographers are visual people. Learning is often made easier for us with the help of graphics and images. In this article, I want to break down this classic manual exposure cheat sheet:

manual exposure cheat sheet

Beginner photographers, and even more experienced ones, often think that Manual mode is complicated.

It’s not.

But to learn how to use Manual mode well, you need to understand a few basics. These are the three camera controls that manage exposure:

  • Aperture
  • Shutter speed
  • ISO

You also need to use the exposure meter, LCD, or viewfinder to assist you in choosing the best settings. If you read the light, you can then set your exposure.

This manual exposure cheat sheet will help you understand these few essentials.

Woman in a red sofa outdoors manual exposure cheat sheet
© Kevin Landwer-Johan | Nikon D800 | Nikon 35mm f/1.8 | 1/125 sec | ISO 100

Reading the light

All modern cameras have a built-in exposure meter. This tool indicates when you have your settings balanced to achieve a good exposure. In most cameras, it looks something like this:

Exposure meter illustration manual exposure cheat sheet

Some cameras use a number system and a + or – symbol to show the exposure value.

Whatever display method your camera uses, you are aiming to have the meter read “0.” This is the indication you have a good exposure. If the display indicates the exposure is toward the – side, your photo will be underexposed. If it’s showing that the exposure is toward the + side, your photo will be overexposed.

This is a very simplified explanation of the metering system. To gain a more in-depth understanding of how it works, please read this article: Understanding Exposure Metering Modes.

With many cameras, you can also use the rear LCD to help you determine the best exposure settings. Additionally, mirrorless cameras allow you to see the effect of changes you make via the viewfinder.

To discover if your camera has this function, turn on Live View and set your camera to Manual mode. Now adjust your aperture and/or shutter speed. Can you see the brightness value of the LCD change as you do this? If so, you can use your LCD screen and/or viewfinder to help you manage your exposure settings. If you are new to using Manual mode, this method will make learning easier.

Whether you look at the exposure meter graphic or use your viewfinder/LCD to help you choose your settings, treat these as a guide. Your camera does not know what the main subject of your composition is. You must control the exposure so the most important part of your image is well exposed.

Tropical sunset manual exposure cheat sheet
© Kevin Landwer-Johan | Nikon D700 | 20mm | 1/125 sec | f/5.6 | ISO 400

Adjusting your aperture

Every lens has an aperture. This is an adjustable diaphragm that controls how much light can enter the lens. Each aperture setting corresponds to an f-stop.

A smaller f-stop number indicates more light will enter the lens. A higher number means the opening is smaller and less light will enter.

Aperture illustration for manual exposure cheat sheet

On this manual exposure cheat sheet, you can see there is a range of aperture settings. The smallest aperture setting, on the left, is f/16. To the right of the graphic is the widest setting, at f/1.4. Not all lenses have the same aperture settings. Some will have wider or narrower minimum and maximum settings.

Along with governing the amount of light that enters the lens, the aperture setting influences depth of field (DOF).

DOF is the amount of the photo that is acceptably sharp. The wider the aperture setting you choose, the shallower the DOF will be. You can see this on the cheat sheet graphic of the person and tree. At f/16, both the person and tree are sharp. At f/1.4, the person is sharp and the tree in the background is out of focus.

A narrow aperture setting allows less light to enter the lens. It also means you’ll have more of your photo in focus. A wide aperture setting allows more light into the lens and the DOF is shallower.

You can adjust the aperture setting to help balance your exposure and control how much of your composition is in focus. The amount of DOF can be used creatively in your photographs.

Woman taking a photograph manual exposure cheat sheet
© Kevin Landwer-Johan | Nikon D800 | 105mm | 1/320 sec | f/2.8 | ISO 100

Setting your shutter speed

Inside your camera, there’s a shutter. This typically consists of two “blinds” that open and close when you press the shutter release button. Opening the shutter exposes the camera sensor to light, which allows it to create an image.

The duration the shutter is open for controls how much light will affect the sensor. If the shutter is open for too long, the photo will be overexposed. If the shutter is open for a duration that is too short, the photo will be underexposed.

Your choice of shutter speed can also affect how sharp your photos will be.

If you choose a shutter speed that’s too slow and your camera moves during the time the shutter is open, your photo will be blurred. This is known as camera shake.

If you have a moving subject and use a slow shutter speed, your subject will be blurred. This is known as motion blur.

Using a faster shutter speed will help you avoid camera shake and unwanted motion blur.

Shutter speed illustration manual exposure cheat sheet

In the manual exposure cheat sheet, you can see the graphic of a person running. At a shutter speed setting of 1/1000s, the figure is sharp. At a setting of 1/60s, the figure is blurred a little. At a shutter speed of 1 second, the figure is very blurred. The relationship between how fast your subject is moving and the shutter speed will determine how much blurring occurs.

You can adjust the shutter speed to help balance your exposure and to control blur from camera shake or motion. Motion blur and camera shake, or a lack thereof, can be used creatively in your photography.

Woman at the fresh market - manual exposure cheat sheet
© Kevin Landwer-Johan | Nikon D800 |35mm | 1/2 sec | f/11 | ISO 100

Determining your ISO

ISO settings control how responsive your camera’s sensor is to light. A low number means your sensor is going to be less responsive than when you use a high number.

I prefer to use my ISO as a foundation for my exposure. I generally only adjust it when lighting conditions change significantly.

Outside on a sunny day, you will want to choose a low ISO. Inside or at night, you will want to choose a high ISO.

ISO illustration manual exposure cheat sheet

Unlike your other two exposure settings, ISO has no creative influence on your photos. It will affect the technical quality, though. At higher ISO settings, digital noise will start to appear in your photos. The color and contrast will also tend to flatten out.

In the manual exposure cheat sheet, you can see that lower ISO settings mean the sensor is less responsive compared to higher ISO settings. To avoid seeing digital noise in your photos, always aim to use the lowest ISO setting you can.

Thai entertainment
© Kevin Landwer-Johan | Nikon D800 | 105mm | 1/250 sec | f/4 | ISO 6400

Stop! This is important

Each incremental change indicated by the manual exposure cheat sheet is one “stop.” The term “stop” in photography is the measurement of exposure. Plus one stop means the exposure is doubled. Minus one stop means the exposure is halved.

A stop can be controlled by aperture, shutter speed, or ISO. If you adjust one setting by plus one stop, you can always achieve the same initial exposure by adjusting another setting by minus one stop, and so on.

As you can see on the cheat sheet, the increments I have used for the shutter speed and ISO are clearly half or double the adjacent numbers. The f-stop numbers appear a bit random, however. This is because they indicate the aperture opening size in relation to the lens focal length. But each f-stop setting is either half or double the setting on either side of it.

red lanterns against a blue sky
© Kevin Landwer-Johan | Nikon D700 | 20mm | 1/60 sec | f/4 | ISO 400

Manual exposure cheat sheet: Conclusion

Manual exposure of your photographs is not so complicated. All you need to do is manage the relationship between the three exposure settings.

The relationship between aperture settings, exposure, and depth of field is plain to see on this cheat sheet. How your choice of shutter speed affects both exposure and blurring is also well illustrated. Keep your ISO in mind and make it as low as you can. But don’t hesitate to alter it when you need to.

Print the manual exposure cheat sheet to make learning and mastering Manual mode a little easier. It will not happen without some commitment and practice.

But once you become familiar with Manual mode and manage your exposures well, your photography will become more creative.

The post Manual Exposure Cheat Sheet for Beginners: How to Expose Manually appeared first on Digital Photography School. It was authored by Kevin Landwer-Johan.


Digital Photography School

 
Comments Off on Manual Exposure Cheat Sheet for Beginners: How to Expose Manually

Posted in Photography


How to Shoot in Manual Mode Cheat Sheet for Beginners

16 Nov

The “Manual Photography Cheat Sheet-Reloaded” by The London School of Photography is a clean-cut, visual way of showing you how to step-up your photography game from automatic to manual shooting. Not only does shooting in Manual Mode enable you to produce sharp well-composed imagery – but you’ll also gain a stronger understanding of the inner workings of your camera and just how all those curious settings work in synch with each other.

How to Shoot in Manual Mode Cheat Sheet for Beginners

By shooting in Manual Mode you have full control of your shutter speed, ISO, and aperture, among an array of other settings that can further fine-tune your images. Manually controlling the aperture, for example, can help you achieve those beautiful portraits with blurred bokeh backgrounds. It’s also highly useful for changing shutter speeds, enabling you to achieve amazing shots of those fast-moving subjects like cars or cyclists in crystal clear motion without sacrificing quality.

You may often find yourself in a tricky lighting situation where everything appears far too dark, too light, or very grainy. Unfortunately, automatic mode can’t always hack these extreme conditions and often activates your camera’s flash at the smallest hint of darkness (making some photos appear positively awful). This is where learning to shoot in Manual Mode can be a lifesaver.

ISO

One of the most talked about settings on a camera is the ISO; a numerical value on your camera that controls light sensitivity. Your camera’s ISO allows you to adjust its light-sensitivity and allows it to pick up more light. Or on the flip side, to reduce your exposure on those bright sunny days for a well-balanced result.

I highly encourage experimenting with different lighting conditions to find your ideal ISO. But be wary of making your ISO too high in dark conditions as this will increase the amount of noise in your final images.

Aperture

Another common term you may have come across is aperture. This is essentially an opening in the lens that affects your exposure. It is also responsible for controlling the depth of field.

Generally, the lower the number (or f-stop), the larger the opening of the lens will be which will result in less depth of field – ideal for those blurry backgrounds. On the other hand, the higher your aperture the sharper the background will be – making it great for capturing all the tiny details in your scene (great for landscapes).

Shutter Speed

How to Shoot in Manual Mode Cheat Sheet for Beginners

Shutter speed is another key player that determines your image’s final outcome. It is essentially the exposure time of the camera’s inner shutter that stays open to allow light to enter and hit the sensor.

Generally, if you’re after blurred shots that illustrate an object’s motion (for example a racing car or cyclist) then a slow shutter speed will keep the shutter open for longer, allowing for a longer exposure time. A faster shutter speed, however, is perfect for a pristine action shot with no motion blurs.

White Balance

Another setting on your camera which also directly affects your images is your White Balance (WB). The process of setting your White Balance involves removing unrealistic color casts and ultimately using a setting that produces more naturally toned images.

It is especially useful in removing harsh yellow tones or redness on the skin. Alternatively, White Balance can be used in unconventional ways to refine your photographic style. For example, for edgier photos, the Tungsten White Balance preset can be used in an overcast setting to produce blue hues and enhance contrasts. With this in mind, it’s highly beneficial to experiment with the various White Balance modes to achieve your desired results.
Things to note for shooting in Manual Mode

Keep in mind that when you’re ready to shoot in Manual Mode your settings will not adjust to your shooting conditions. You have to adjust them, manually. By keeping this in mind you’ll ensure your exposures are consistent throughout a shoot. The process of changing your settings may sound tedious at first, but it will actually ensure your images are consistent.

This is what shooting in an automatic mode lacks, as it calculates how much light is being measured through your camera’s light meter. As good as this might sound to you, you’ll probably find that as you adjust your shooting position, the subject moves, or the lighting condition changes to overcast – you’ll eventually have a set of very inconsistently exposed images.

Other shooting modes

camera modes - How to Shoot in Manual Mode Cheat Sheet for Beginners

As much as I love to shoot manual, don’t forget about the other letters on your mode dial that are sparking your curiosity. In fact, I even recommend shooting in these semi-automatic modes as practice to help you understand exposure compensation.

  • Program mode (P) is a great transition mode when stepping out of the auto-shooting world. It governs similar shooting to auto but allows you to adjust the exposure by controlling compensation through a dial. If any of your photos appear dark, then using this simple feature can increase the brightness.
  • Aperture priority is another great transitional mode to shoot in that allows you control over aperture as well as the ISO. It gives you control over your depth of field as well as the exposure compensation to control brightness.

If you think you’ve mastered these settings then you’re ready to go manual!

Finally

In addition to camera settings, we highly recommend the following tips that will further enhance your experience of migrating to manual shooting; such as the use of a tripod, golden hours, and the top photographic golden rules to keep in mind for capturing stunning imagery time and time again.

How to Shoot in Manual Mode Cheat Sheet for Beginners

Download the full cheat sheet infographic all-in-one here.

The post How to Shoot in Manual Mode Cheat Sheet for Beginners by Antonio Leanza appeared first on Digital Photography School.


Digital Photography School

 
Comments Off on How to Shoot in Manual Mode Cheat Sheet for Beginners

Posted in Photography


A Photographer’s Shutter Speed Cheat Sheet as a Handy Reference for You

01 Mar

To take your photography to the next level and achieve perfectly exposed photos, it’s important to understand and master shutter speed and its relationship to Exposure. However, what’s even more exciting and challenging is using shutter speed as an artistic tool to achieve stunning effects.

Whether you want to master shutter speed as part of Exposure Triangle or use it artistically, the Shutter Speed Cheat Sheet makes things much easier!

Shutter Speed Cheat Sheet DPS 700px

Full Stop, ½ Stop, 1/3 Stop

The equation behind the relationship between Exposure and Shutter Speed is straightforward; by doubling or halving the shutter speed you are changing the exposure value by 1-stop. However, the introduction of digital cameras changed everything by no longer restricting how much we can change the shutter speed. Some cameras allow us to change the speed by half or even a third of a stop. Use the Shutter Speed Cheat Sheet to help you estimate and calculate your exposure.

Safe Shutter Speed

Using the right shutter speed is vital in photographing moving objects. Look at the Shutter Speed Cheat Sheet to see how speed directly affects image sharpness.

googletag.cmd.push(function() {
ruleset_slots.push( googletag.defineSlot( “/1005424/_dPSv5topic-rhs(300×250)”, [300, 250], “pb-ad-0” ).addService( googletag.pubads() ) ); } );

Light

The Cheat Sheet illustrates how a faster shutter speed means that less light reaches the camera sensor and a longer shutter speed means that more light reaches the sensor.

Artistically Shooting with Shutter Speed Cheat Sheet

Birds in Flight 1/2000

Wildlife photographers typically use a 1/2000th of a second shutter speed to ensure birds in flight are sharp. Ultimately, you can reduce the speed to 1/400th to give the bird a sharp body and blurry wings.

Action Sports

Shutter speed is crucial in fast-moving sports like football and soccer where a shutter speed between 1/500th and 1/1000th freezes the action to create crisp and sharp images.

Street Photography 1/250th – 1/500th

googletag.cmd.push(function() {
ruleset_slots.push( googletag.defineSlot( “/1005424/_dPSv5topic-rhs(300×250)”, [300, 250], “pb-ad-1” ).addService( googletag.pubads() ) ); } );

Most streets are in constant movement with pedestrians and vehicles. That is why shutter speed is critical to produce the right exposure and to avoid soft or blurry images.

Shutter Spped Cheat Sheet StreetPhotography

Street Photography 1/250th, f/8, ISO 100.

Landscapes 1/125th – ¼

Shutter speed varies across landscapes and techniques. When using a tripod, a slower shutter speed of 1/8th or ¼ of a second is acceptable. However, to avoid blurry images when shooting hand held, you need to use a faster shutter speed.

Shutter Spped Cheat Sheet Landscapes

Landscape 1/125th, f/8, ISO 100.

Panning Cars 1/15th – 1/60th

Panning is an artistic effect created when a slower shutter speed of 1/15th to 1/60th is used to track a moving object like a car. This causes the car to stay in focus while its surroundings are completely blurred.

Waterfalls 1/8th – 2 seconds

Capturing fast-moving water with a longer shutter speed creates a visual effect of motion blur which does not exist in reality.

Shutter Spped Cheat Sheet RunningWater

Waterfall 1/6th, f/20, ISO 100.

Blurring Water half – 5 seconds

For slower moving water like ocean, lakes, and rivers you need to use a shutter speed slower than half a second to create dreamy landscapes and seascapes with silky, smooth water.

googletag.cmd.push(function() {
ruleset_slots.push( googletag.defineSlot( “/1005424/_dPSv5topic-rhs(300×250)”, [300, 250], “pb-ad-2” ).addService( googletag.pubads() ) ); } );

Shutter Spped Cheat Sheet Water

Slow Moving Water 4 seconds, f/6.3, ISO 100.

Fireworks 2-8 seconds

Capturing fireworks can be exceptionally difficult. A faster shutter speed yields a speck of light across a dark sky and a slower speed creates a blurry, overexposed image. Try using a 3-5 second shutter speed for optimal results.

Stars 15–25 seconds

Like fireworks, shooting the stars requires balance. A faster shutter speed produces tiny and dim stars, but a longer shutter speed (over 30 seconds) produces a trail effect. For the brightest and clearest stars, try a shutter speed between 15 and 25 seconds.

Star Trails

Take advantage of the earth spinning on its axis by opening the shutter speed long enough to capture the star trail. This is often done with a 15-minute (or longer) shutter speed (exposure time). However, you can create the same effect digitally by taking a series of photos (100+) with a 30 seconds exposure each. Later, blend the images together using editing software to create a gorgeous trail effect.

googletag.cmd.push(function() {
ruleset_slots.push( googletag.defineSlot( “/1005424/_dPSv5topic-rhs(300×250)”, [300, 250], “pb-ad-3” ).addService( googletag.pubads() ) ); } );

The post A Photographer’s Shutter Speed Cheat Sheet as a Handy Reference for You by Viktor Elizarov appeared first on Digital Photography School.


Digital Photography School

 
Comments Off on A Photographer’s Shutter Speed Cheat Sheet as a Handy Reference for You

Posted in Photography


Another 15 Cheat Sheets, Printables and Infographics for Photographers

19 Aug

Editor’s note: Last week we shared a list of some great resources for photographers. It was so popular we thought we’d bring you another set compiled for dPS by Julia May, enjoy.

More Photography Tech and Creative Process

The basics every photographer must know. Click the links to see the original article and source.

Continued from #15 from last weeks: 15 of the Best Cheat Sheets, Printables and Infographics for Photographers

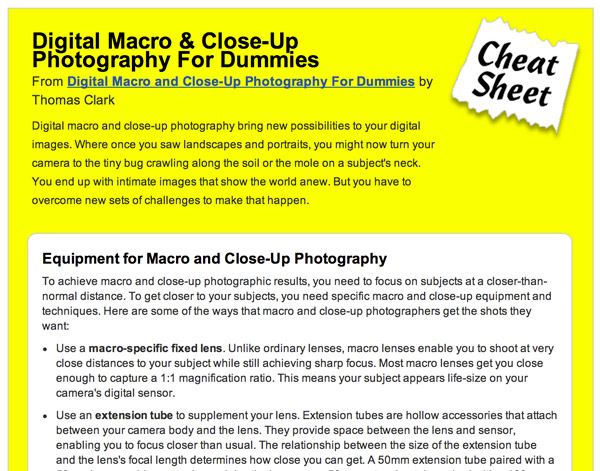
#16 Digital Macro and Close-Up Photography for Dummies

(click the link to read the full summary and see the whole sheet)

18 macro dummies

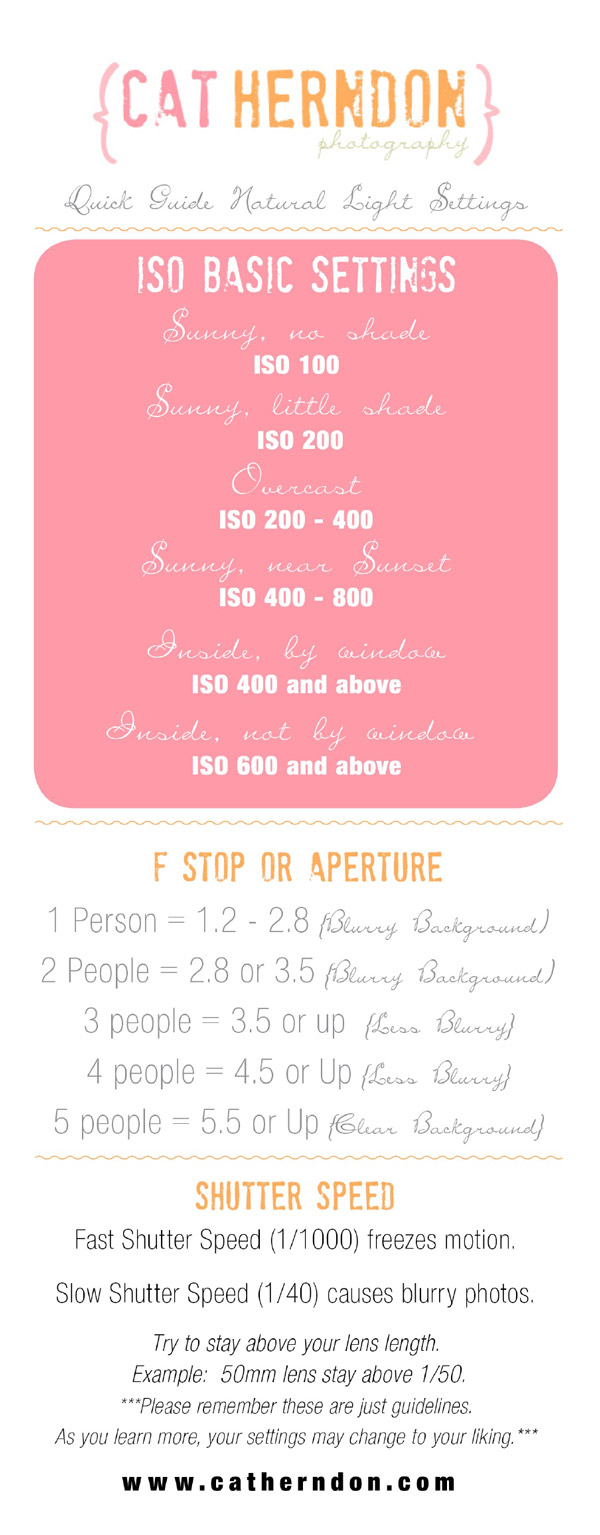
#17 Quick Guide Natural Light Settings

(Click the image to get a larger view of this graphic)

18 natural light 600

#18 Exposure Guide: Road to Photography

19 digital photography exposure guide

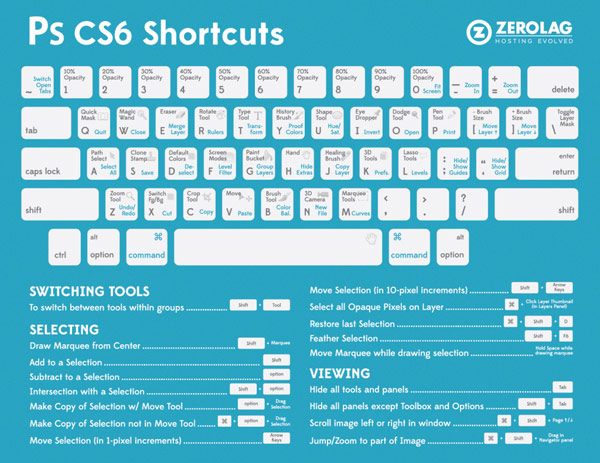
#19 Photoshop CS6 Shortcut Cheatsheet

20 photoshop cs6 shortcuts

#20 How to Take Pictures Like a Pro

(Click the image to get a larger view of this graphic)

21 photography pro 600

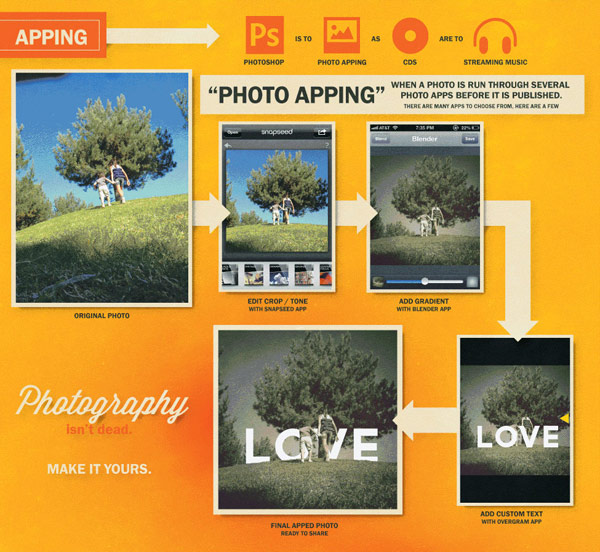
#21 Is Photography Dead? Mobile Photography Explosion

(Click the image to see the full graphic)

22 mobile photography

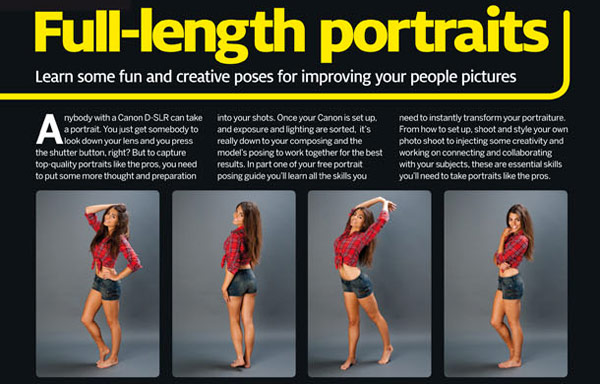
#22 21 Simple Poses to Get You Started With Photographing Children – a dPS article!

(Click the link above for the full article and all images)

23 posing guide children

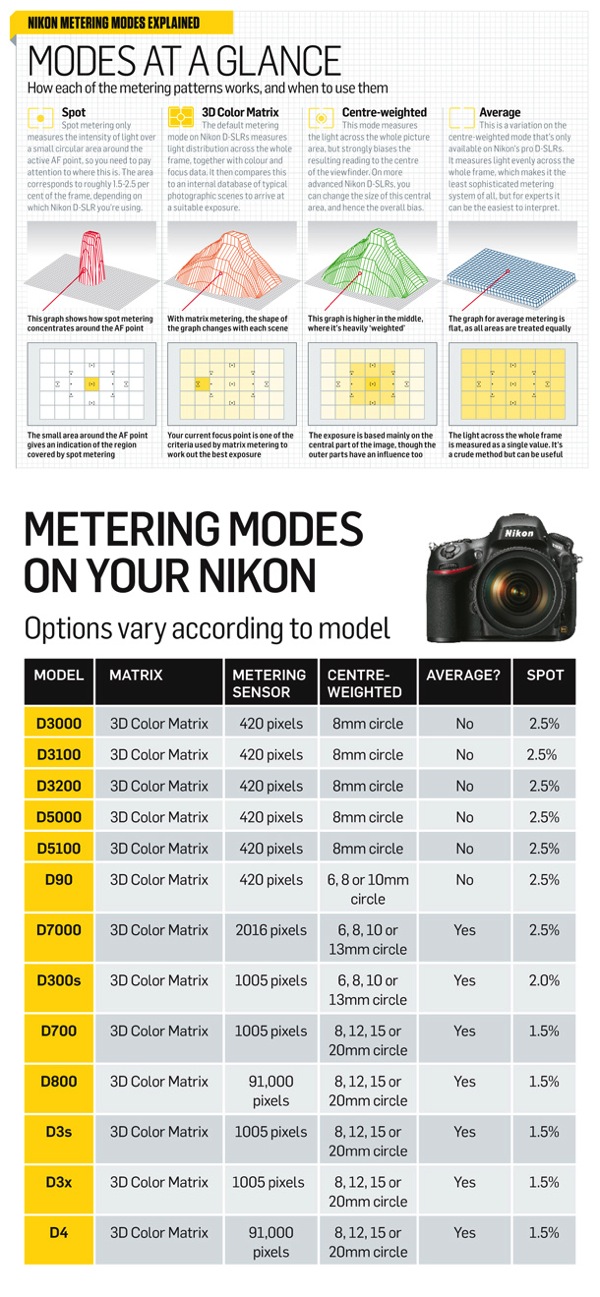
#23 Using Nikon Metering Modes

24 Nikon DSLRs metering modes full

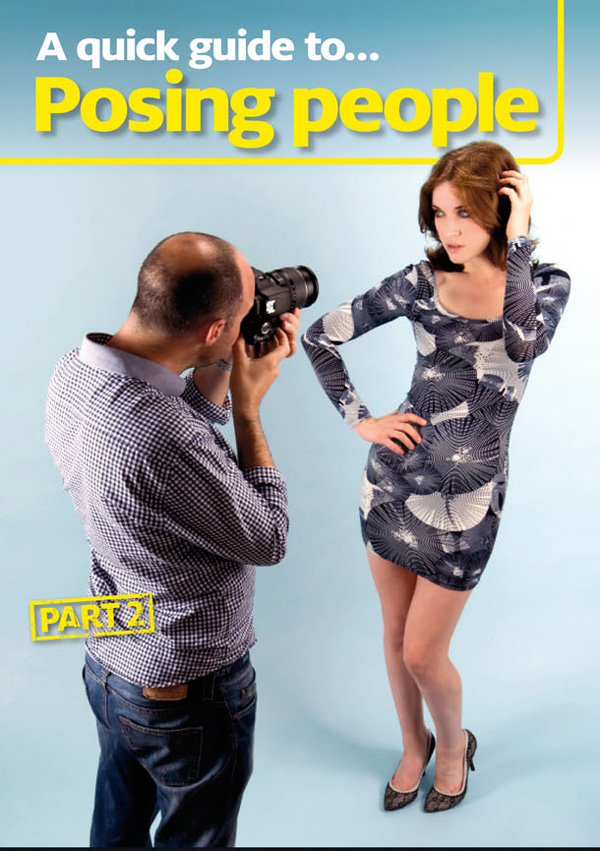
#24 Portrait Posing Ideas (Printable)

  • Part One 54 Portrait Ideas – posing guide

(Click the image to see the full graphic)

25 Portrait Ideas

  • Part Two 40 More Portrait Ideas – posting guide

(Click the image to see the full graphic)

25 Portrait Ideas part2 cropped

Photography Business and Legal

Learn how to get started with your own photography business and check if your marketing strategy includes all the latest techniques.

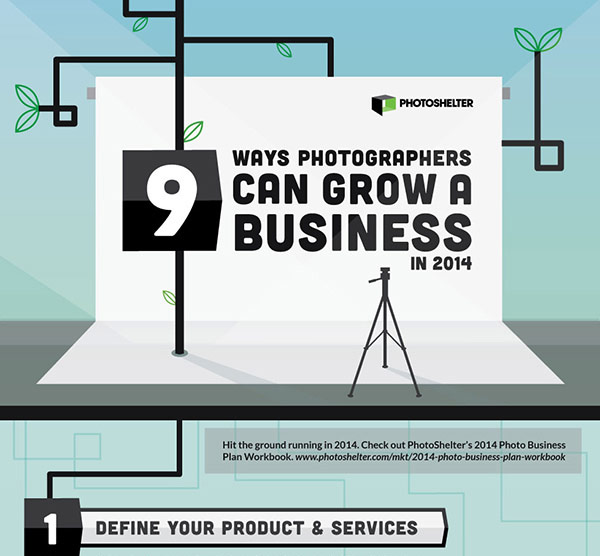
#25 9 Ways to Grow Your Photography Business in 2014

(Click the image to see the full graphic)

26 photography business plan

#26 9 Free Photography Contracts

(Click the link above for the full article and get the contracts)

27 photo contracts

#27 Creating a Marketing Plan That Works (Printable Worksheet)

(Click the link above for the full article – click the image below for the full printable sheet)

28 marketing photo worksheet

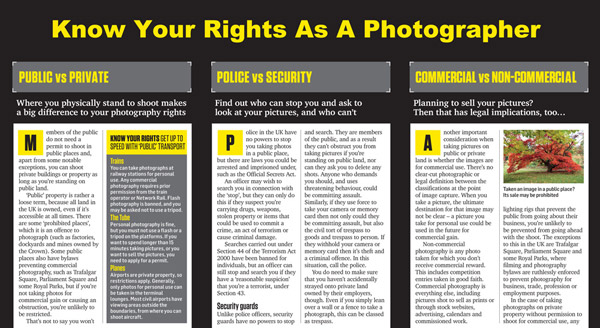
#28 Know Your Rights As a Photographer

(Click the image to see the full graphic)

29 Photographers rights

#29 Photography Marketing Cheat Sheet (SEO, Social Media, Classic Marketing, Email Marketing)

(Click the image to see the full graphic)

30 defrozo photography marketing cheat sheet

#30 Top 15 Photographers Under 25 by Defrozo

(Click the image to see the full graphic)

30 photographersunder25 600

Any useful resource I missed? Share your suggestions in the comments below.

The post Another 15 Cheat Sheets, Printables and Infographics for Photographers by Julia May appeared first on Digital Photography School.


Digital Photography School

 
Comments Off on Another 15 Cheat Sheets, Printables and Infographics for Photographers

Posted in Photography


15 of the Best Cheat Sheets, Printables and Infographics for Photographers

12 Aug

Everyone loves cheat sheets, and photographers are no exception. Squeezed into a set of short tips, schemes, and definitions, a cheat sheet is a quick way to learn something, as well as refresh your knowledge about any particular subject. Moreover, now that infographics are an extremely popular format of delivering information on the Internet, cheat sheets can also be a source for visual inspiration.

Here is a large collection of some noteworthy cheat sheets, infographics, and printables for photographers. From shooting basics to photography marketing tips, every aspect of photography is covered in this round-up. No matter whether you’re an amateur or an experienced professional, below you can find some really helpful resources, all presented as easy-to-read checklists, infographics, and printable cheat sheets for your advantage.

Enjoy this compilation and don’t forget to bookmark this page for quick access to this exhaustive cheat sheet list. Note, you need to click on screenshots below in order to view the full cheat sheet since most images were cropped for proper fit.

Photography Tech and Creative Process

Learn the basics every photographer must know and save some useful tips and camera settings for quick reference. Click the links to see the original article and source.

#1 Photography 101 – Cheat Sheet and Camera Basics

01-full

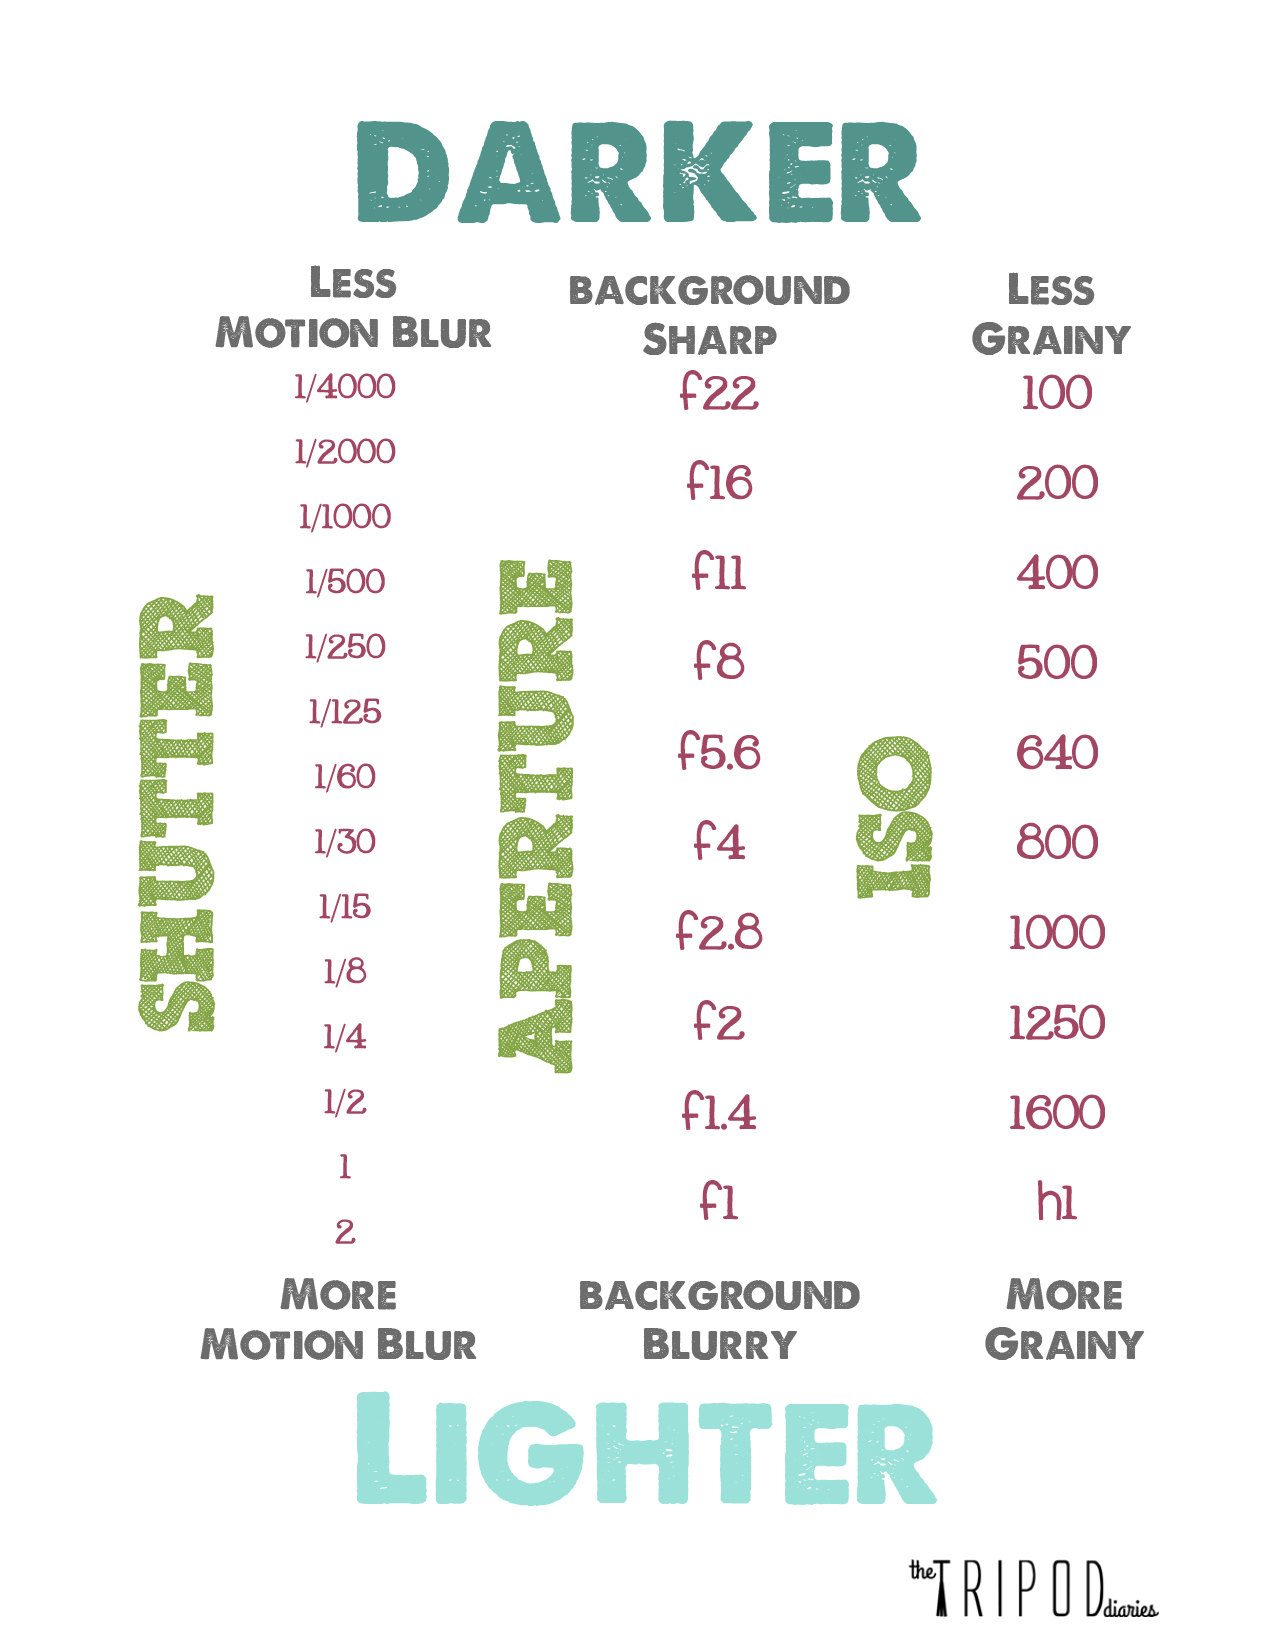
#2 Shutter, Aperture, ISO Explained

02-shutter-apperture-iso-full

#3 10 Must-have wedding shots for every bride

(Click the image to get a larger view of this graphic)

04-wedding-shots-bride.jpg

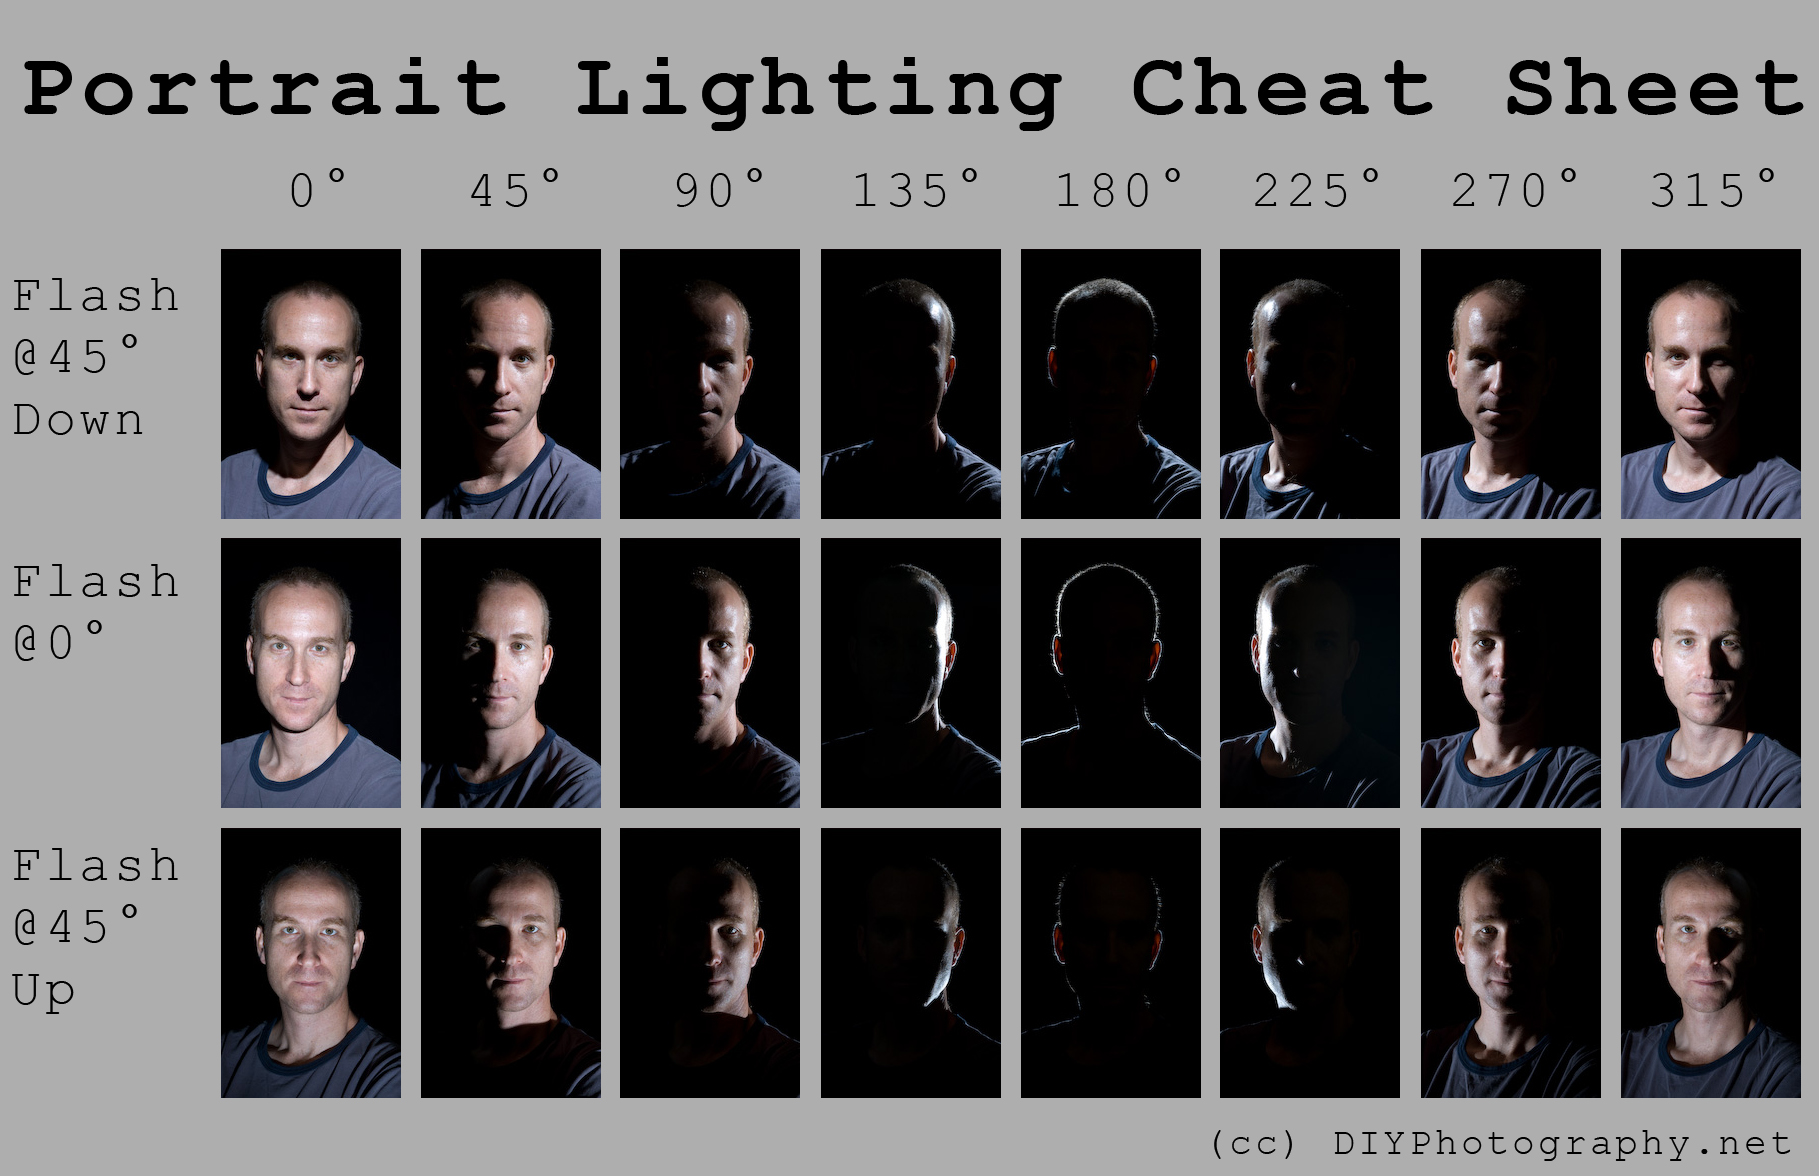
#4 Portrait Lighting Examples

(Click the image to get a larger view of this graphic)

05-portrait-lighting-full

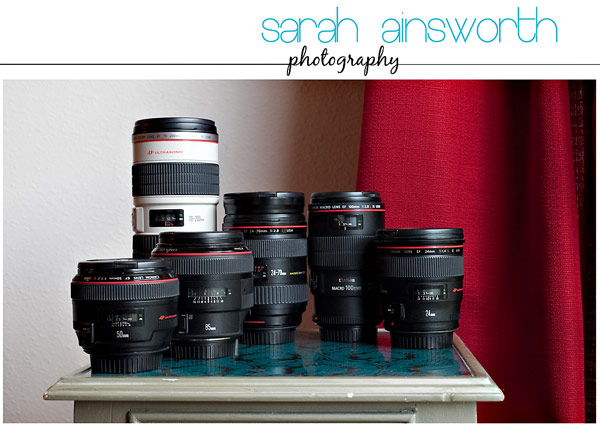
#5 Focal Lengths Cheat Sheet (click to see the whole article and cheat sheet)

06 focal lengths

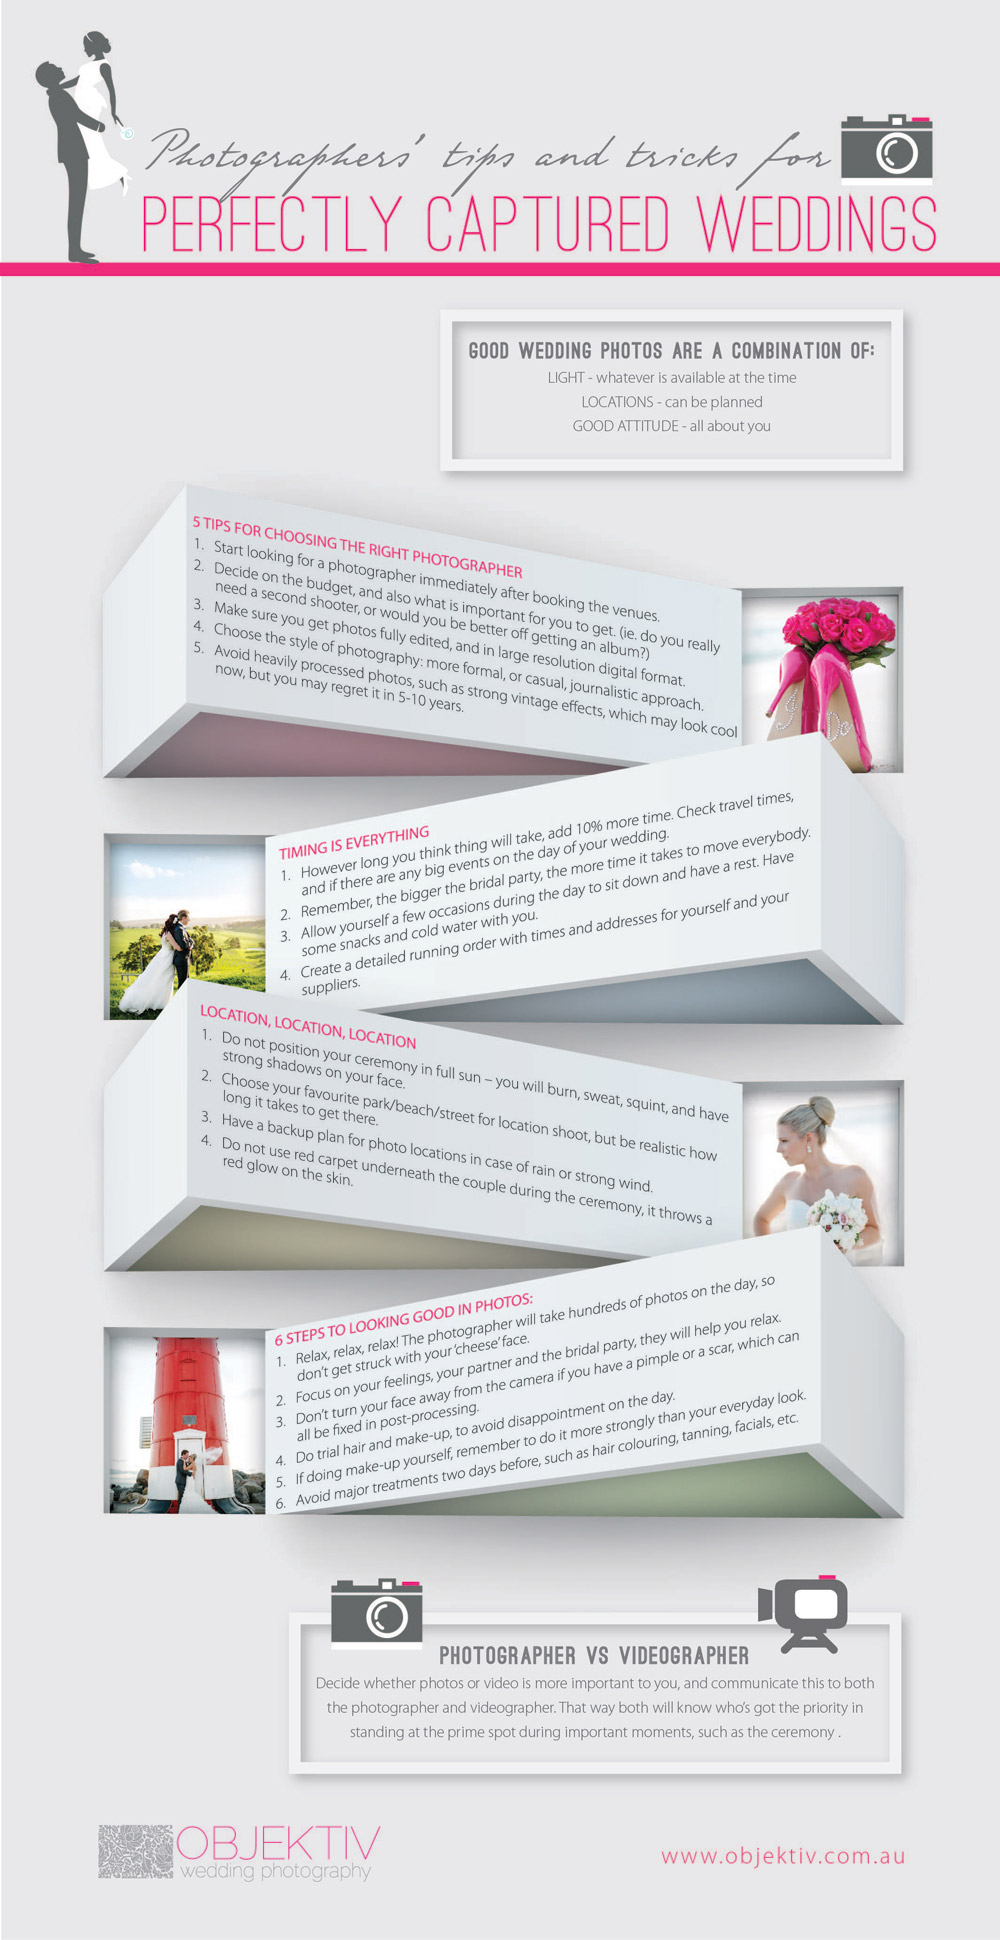
#6 Capturing Perfect Wedding Photos

(Click the image to get a larger view of this graphic)

07-wedding-photos-perfect-full

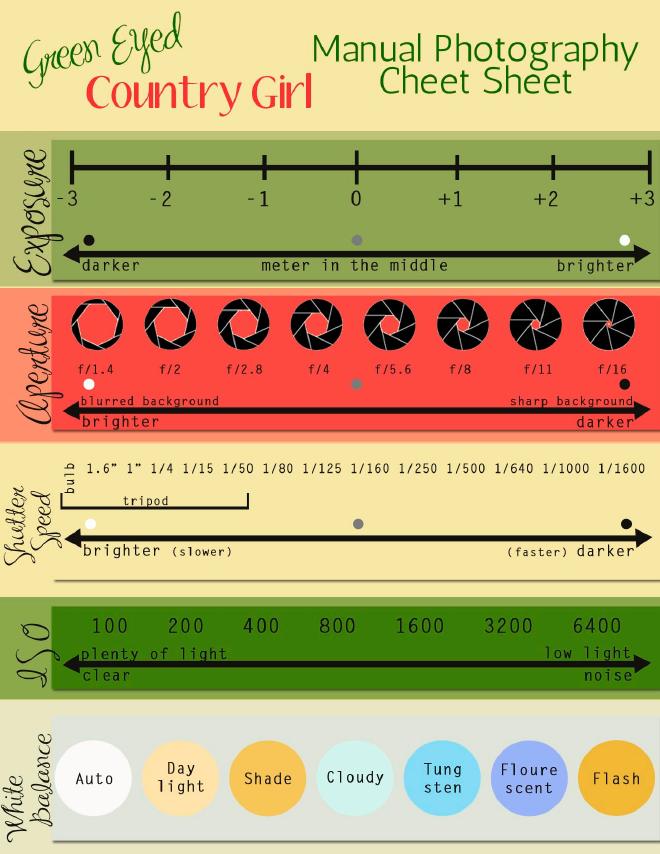
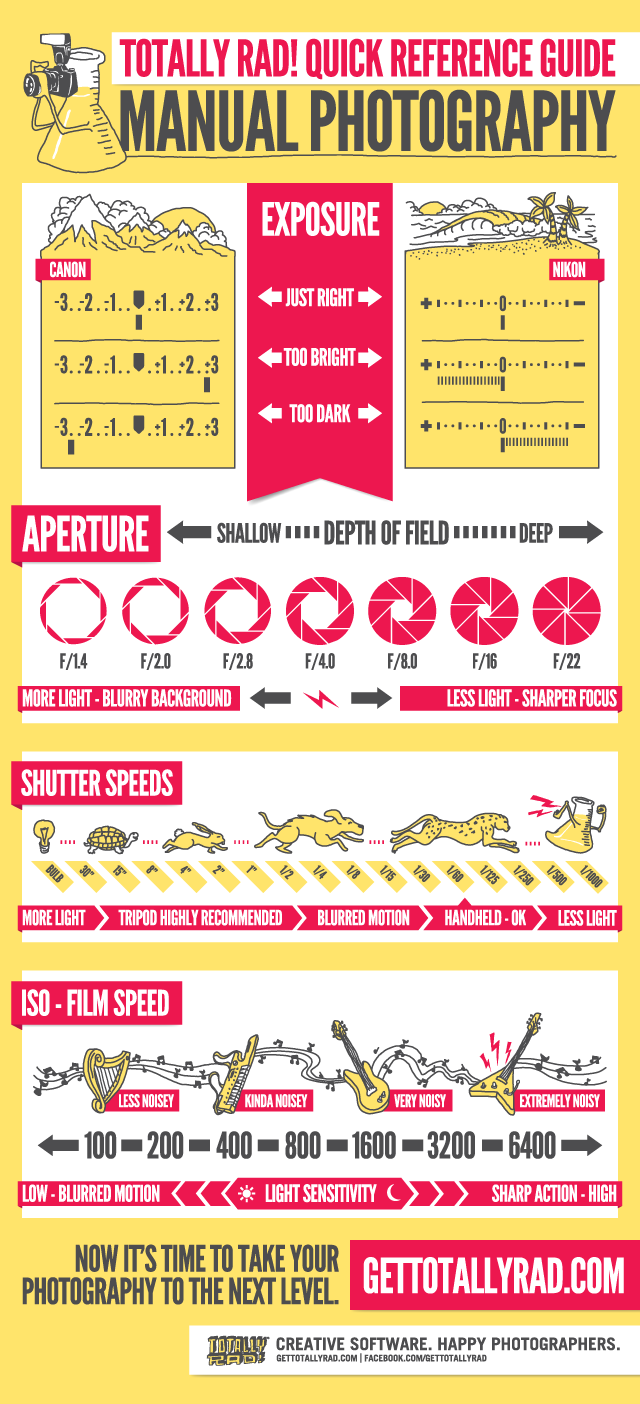
#7 Manual Photography Cheat Sheet

(Click the image to get a larger view of this graphic)

08-manual-photography-full

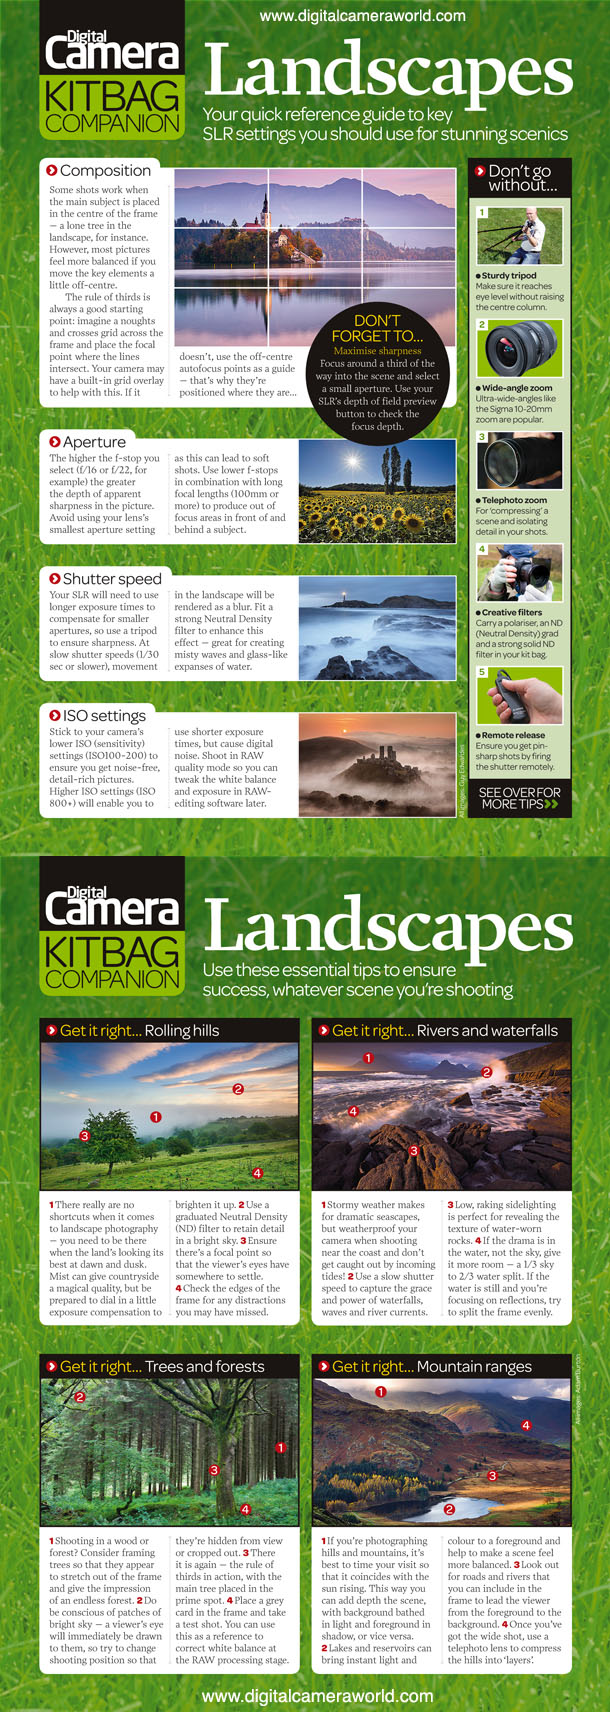
#8 Landscape Photography Tips

DCM104.tips_cards

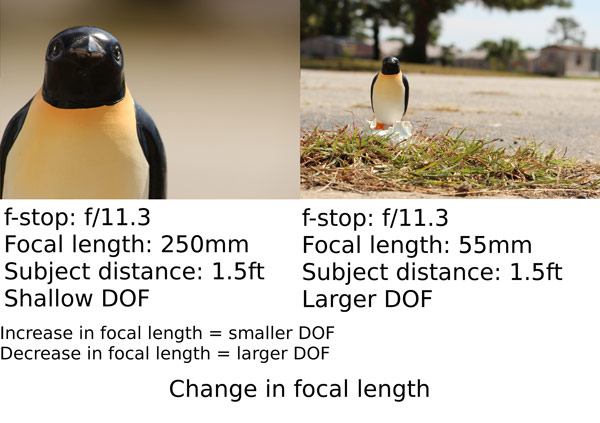
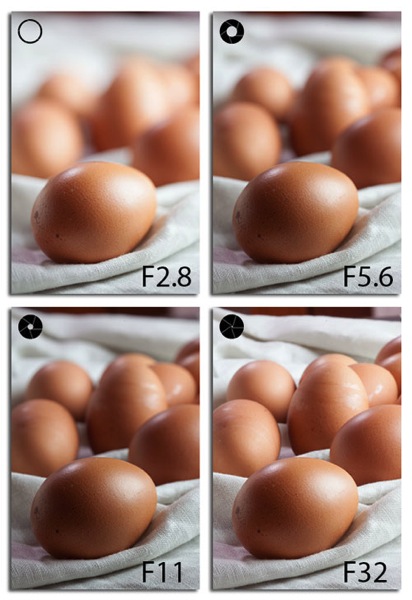
#9 Depth of field: Quick Memory Cheat Sheet

(click the link to read the full summary and see all the images)

10 depth of field

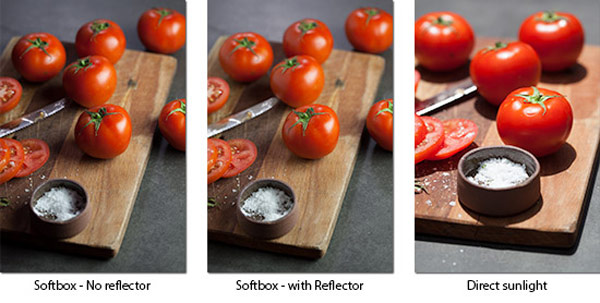
#10 Food Photography Guide

(click the link to read the full summary and see all the images)

11 food photography 01

11 food photography

#11 Photography Basics: Metering and Exposure

(Click the image to get a larger and full view of this graphic)

12 metering exposure

#12 Low Light Photography Tips

low light photography
Snapsort’s Low Light Photography Infographic – See more at: http://snapsort.com/blog/2011/04/05/low-light-photograph/#sthash.Sqx4QMsQ.dpuf

#13 Free Printable: Backlight and Sunlight

Backlight and Sunlight Cheat Sheet www.lightroompresets.com

#14 Guide to Manual Mode Magic

(Click the image to grab the PDF Printable file)

15-m-mode

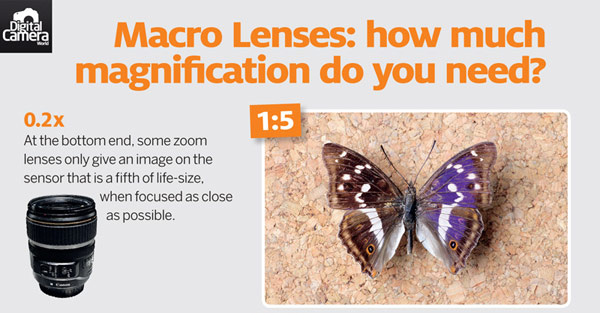
#15 What is a macro lens? Magnification and minimum focus distance explained

(Click the image to get a larger and full view of this graphic)

16-macro-nes

Any useful resource I missed? Share your suggestions in the comments!

The post 15 of the Best Cheat Sheets, Printables and Infographics for Photographers by Julia May appeared first on Digital Photography School.


Digital Photography School

 
Comments Off on 15 of the Best Cheat Sheets, Printables and Infographics for Photographers

Posted in Photography


20 Superb Infographics & Cheat Sheets to Help You Grow Your Photography Business Fast

01 Aug

You probably know that a picture is worth a thousand words. If a reader has a choice between 1000-word articles and the infographic that needs just a few scroll downs…he’ll obviously go with the infographic! Visual information is more likely read and understood than other types of data presentation. That’s why I collected helpful infographics and cheat sheets on photography for Continue Reading

The post 20 Superb Infographics & Cheat Sheets to Help You Grow Your Photography Business Fast appeared first on Photodoto.


Photodoto

 
Comments Off on 20 Superb Infographics & Cheat Sheets to Help You Grow Your Photography Business Fast

Posted in Photography


New cheat sheet tells you how to keep photos sharp when sharing

30 Jul

fb1.png

The cautious photographer is always conscious of what’s happening to their images when they’re being shared online – whether they’re being resized, re-compressed or otherwise modified from the original. Social networks like Facebook and Twitter all treat images differently, but a new cheat sheet can help you keep your pictures sharp by detailing the pixel dimensions of just about every component on the major social networking sites. Click through for more details on connect.dpreview.com

News: Digital Photography Review (dpreview.com)

 
Comments Off on New cheat sheet tells you how to keep photos sharp when sharing

Posted in Uncategorized