The post Top 10 Mistakes That Cause Blurry Pictures (And How to Fix Them) appeared first on Digital Photography School. It was authored by Anne McKinnell.

“Why are my pictures blurry?”
It’s a common question, and one that doesn’t have an easy answer. The truth is that blurry pictures are caused by many factors – so if your photos are blurry, it’s often difficult to pinpoint the exact problem.
That’s why I wrote this article. I’m going to list the 10 main reasons why you’re ending up with blurry photos. I want you to carefully go through this list. See if any of the reasons stand out.
And then make the necessary changes!
Odds are, if you can address the problem, you’ll be taking tack-sharp images in no time at all.
Let’s dive right in, starting with the biggest reason why your photos are blurry:
1. Your shutter speed is too slow
A too-slow shutter speed is the number one culprit of blurry photos.
You might think you can hold perfectly still for half a second, but I assure you there are very few people in the world who can.
In fact, most folks can only handhold a camera down to the 1/160s to 1/80s range (though this can fluctuate, depending on the focal length of the lens, as well as the size, the lens technology, and the level of magnification).
When handholding your camera, remember this rule of thumb to avoid blur caused by camera shake:
Your shutter speed should be the reciprocal of your lens’s focal length.
So if you’re using a 60mm lens, your shutter speed should be 1/60s or faster. With a 200mm lens, use at least 1/200s. With a 400mm lens, use at least 1/400s.
(The longer your lens length, the more camera shake is magnified, so telephoto lenses require much faster shutter speeds.)

Some lenses and cameras have image stabilization technology built into them. Now, image stabilization usually allows you to slow your minimum shutter speed by around 3-5 stops, so you can handhold a 60mm lens past the 1/8s range. But you should always be cautious and take extra shots just to be sure.
What is your minimum shutter speed?
In addition to the reciprocal rule, it’s important to know your own personal minimum shutter speed.
You see, we all shake a little, but some of us shake more than others. So it’s good to know at what point camera shake becomes an issue for you.
Try this exercise:
Put your camera in Shutter Priority mode and take a photo at 1/500s. Then lower your shutter speed and take another image. Keep this going until you head all the way down to 1s or so, then pull up the images on your computer. Ask yourself: When does the blur become a problem? Personally, I rarely go below 1/125s if I’m handholding my camera.
2. Not using a tripod

If you’re experiencing camera shake and you can’t use a faster shutter speed (due to low-light conditions), or you don’t want to use a faster shutter speed (because you’re purposely trying to blur something in the frame), then you need to steady your camera another way.
And I highly recommend using a tripod. It’ll keep your camera completely steady even as you dial in exposures of one second or longer. If a tripod is too inconvenient, consider a monopod, which is a more compact, flexible option.
Also, when you use a tripod, image stabilization is not necessary and may even be counterproductive, so it’s a good idea to get in the habit of turning any IS off when you put your camera on a tripod.
3. Bad camera-holding technique
For the best stability, practice the official photographer position:
Stand with your feet slightly apart, one staggered forward, and firmly planted to stabilize your body right to left and back to front. Support the camera with your left hand by holding the lens from underneath, and use your right hand to grab the grip and gently press the shutter button. Tuck your elbows tight to your chest and use the viewfinder rather than the Live View screen (holding the camera to your face will help keep it steady).
Some photographers even go so far as to listen to their breathing and heartbeat, taking care to fire the shot between breaths and beats for maximum stability.

4. Your aperture is too wide
The size of the aperture determines the depth of field, which is how much of the image is in focus. And this has a direct effect on the sharpness of your photo.
When a lens finds focus, it locks onto a specific distance known as the plane of focus. So if you focus at, say, 15 feet, everything 15 feet away from the camera will have maximum sharpness, and anything in front of or behind that plane will start to blur. The strength of this blur effect – that is, the speed at which sharpness falls off – depends on the aperture.
If you use a wide aperture such as f/2.8, the depth of field will be very shallow. This effect is magnified by longer focal-length lenses. So if you use a telephoto lens and the aperture is f/2.8, there may be only a razor-thin sliver of the image that is in sharp focus. But if you use a small aperture such as f/11 or f/18, the depth of field will be larger. More of the image will be sharp.

Choosing the right aperture depends on the type of image you want to create. But if you are trying to get everything in the frame as sharp as possible, try using a small aperture (produced by a larger f-number such as f/11 or f/22).
Note that a small aperture will let in less light, so you will need to use a slower shutter speed to compensate. See the first problem on this list!
5. Not using autofocus
These days, cameras are sophisticated. So let them do what they are good at! Cameras do a fantastic job of nailing focus, both with still subjects and subjects in motion.
Is autofocus perfect? No, and later on in this article, I’ll discuss a few times when manual focus is actually helpful. But generally speaking, autofocus is the way to go.

6. Not focusing in the correct place
Even if you’re using the perfect handholding technique or a rock-solid tripod, if you focus in the wrong place, you’ll end up with blurry pictures anyway.
Focusing carefully is especially crucial when using a wide aperture (because you’ll have a razor-thin depth of field!). A slight miscalculation in the focus can throw the subject completely out of the focal plane, or give you a subject with perfectly sharp earlobes and blurry eyes.
Photographers often leave their cameras set to an auto AF-area mode – one that tells the camera to decide automatically what part of the picture should be in focus. Most of the time, modern cameras are pretty good at this, particularly if the subject is prominent in the frame. However, with more complex compositions, the camera can get confused and try to focus on the wrong thing. To specify the focal point yourself, switch to a single-point AF-area mode.
When you look through your viewfinder, you should see an array of little dots or squares laid over the display, like this:

These are your focus points, and they show you where in the frame the camera can lock focus. In single-point AF-area modes, you can use the camera’s direction pad to select one of these dots, and the camera will always focus on that point (and that point alone).
Note that, to tell the camera to focus, you would normally depress the shutter button halfway before pressing it the rest of the way to take the shot. This works pretty well, but cameras can be overly sensitive – if you press too lightly, the button may come unpressed and try to re-focus after you’ve already found your point of focus. If you press too hard, you might capture the shot before the focus is ready. And if you take multiple pictures in succession, your camera may try to focus again before each shot. For these reasons, some photographers highly recommend back-button focusing.
7. Using the incorrect autofocus mode
There are three main autofocus modes offered by most cameras. You should be switching between these modes every time you’re faced with a new shooting situation; otherwise, you’re bound to miss shots that you normally could’ve nailed.
Single-shot autofocus, called AF-S or One-Shot AF, is meant to be used with still subjects.
Continuous autofocus, called AF-C or AI Servo AF, is designed to track movement through the frame, so it works best when your subject is in motion.
Finally, there’s an automatic mode, called AF-A or AI Focus AF. This is likely the default setting on your camera. It reads the scene and determines which of the first two modes it should use.

8. Not using manual focus
While I’m a big advocate of autofocus, there is one particular time when manual focus comes in handy:
When your camera is on a tripod, and you’re using a wide aperture to achieve a very shallow depth of field.
If you want to make sure the most important thing in your frame is sharp, switch to manual focus. Then use the LCD zoom function to magnify the display by 5x or 10x. And make tiny adjustments to the focus until you get it just right.
You can also try manual focusing when shooting close-up subjects (e.g., a flower petal) or when photographing landscapes in the darkness.
9. There’s junk on or in front of your lens
A big smear on your lens is going to affect the clarity of your image.
And if you put a cheap plastic filter in front of your lens, that’ll degrade image quality, too.
So make sure your lens is clean. And make sure that all your filters are high quality. If you always shoot with a UV filter and you keep getting blurry pictures, try taking a few shots without the filter to see if the quality of the glass is negatively affecting your images.
10. Poor lens quality
Beginners love to blame their blurry pictures on their optics, though a bad lens is rarely the problem.
That said, lens quality can make a difference, and you’ll occasionally find lenses that are genuinely soft. And some lenses may be sharp in the center but get blurry around the corners and edges of the image, or sharp at certain apertures but slightly fuzzy at others. Every lens has a unique character that may or may not be useful to the type of work you’re doing.
It’s also worth noting that each lens has a “sweet spot” – a certain aperture at which it performs best. This is usually in the middle of its aperture range, around f/8 or f/11.
Fixed focal length lenses are usually sharpest, though it’s not always convenient to carry around two or three lenses rather than a single, all-purpose zoom.

Mistakes that cause blurry pictures: final words
Well, that’s it:
The 10 most common reasons your pictures are blurry.
If you’ve been struggling with blurry photos, you hopefully now know (or can at least guess) the culprit! And you can make adjustments to get things looking sharp.
Now over to you:
Are your photos blurry? Did you figure out why? Which of these mistakes have you been making? Share your thoughts in the comments below!
The post Top 10 Mistakes That Cause Blurry Pictures (And How to Fix Them) appeared first on Digital Photography School. It was authored by Anne McKinnell.


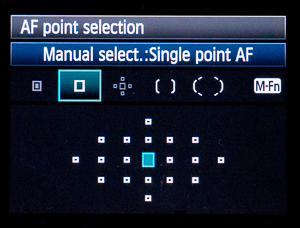 When you look through your viewfinder, you should see an array of little dots or squares laid over the display. These are your focus points, and they show you where in the frame the camera is capable of finding focus. In single-point AF area mode, you can use the camera’s direction pad to select one of these dots, and the camera will always focus on that point and that point alone.


Keith’s Just Cause 2 Multiplayer Experience – Just Cause 2 Multiplayer w/Keith Ep.8 – (Commentary)
If you enjoyed the video, please leave a like and a favorite for Just Cause 2 Multiplayer 😉 Hey guys, I’ve got onto Just Cause 2 Multiplayer when a spontaneous server announcement came up on Facebook and Twitter by the JC-MP Devs! Anyway sadly I didn’t get to record with Sean because he wasn’t online at the time of the server being up but I got a good 2 hours or so of Just Cause 2 Multiplayer recorded so hopefully you’ll enjoy those videos that I upload! Outro Music : OVERWERK – House (feat. Nick Nikon) [Monstercat Release]
Posted in Nikon Videos