RSS
 

Posts Tagged ‘catalog’

How to Catalog and Store Your Photos so You Can Find them Easier

10 Jun

The post How to Catalog and Store Your Photos so You Can Find them Easier appeared first on Digital Photography School. It was authored by Simon Bond.

catalog and store your photos

Keeping track of the photos you’ve taken is a vital element of the photography workflow. In this article, you’ll learn about different ways you can catalog and store your photos. This is important because, first of all, you’ll want to be able to easily find the photos that you took several years ago. You’ll also want to review your photos periodically to see where you can improve your work. This is easier with a well-managed photo library. Let’s take a look at the options available to you then.

How to Catalog and Store Your Photos so You Can Find them Easier
Keeping your photo library up to date is vital.

Will you catalog and store your photos in the cloud?

The options available to store large amounts of file data have grown in recent years. It’s a good job because the amount of memory most photographers go through has also grown. The biggest rule here is that if you only have one copy of something, you might as well have none. The day your hard drive fails means you could lose everything, so diversify and keep multiple copies. Let’s look at some of the options you could take.

Internal hard drive

The first and most convenient place to store your photos is on your computers internal hard drive. Doing this means the files are easy to reach, and you don’t need to play around with wires to plug other devices in.

The drawback here, of course, is that most internal hard drives are limited in storage capacity, even more so if you’re using a laptop. At best, keeping photos on your internal hard drive should only be for your most recent photos. Even then, you need to back them up on a separate external hard drive.

How to Catalog and Store Your Photos so You Can Find them Easier
External hard drives like these are one solution.

External hard drive

The next option is to use external hard drives.

The capacity of external hard drives continues to rise, and with the introduction of solid-state hard drives, their reliability has also improved. Large external hard drives that have terabytes of storage space are the best solutions for photographers wishing to back up their work. While you can have storage from flashcards and pen drives, it’s realistically far too small to database your library.

A word of warning though, most hard drives have a shelf life. That means for each external hard drive you have, you need a separate backup external hard drive.

Cloud services

The newest version of storage is cloud storage. It’s become increasingly popular, and with good reason. Companies that provide these services need to ensure your data is protected, as a result they need to keep several copies in the event one of their storage systems goes down. Your files being kept in a remote location is also safer, especially if you use cloud storage in conjunction with an external hard drive.

  • Dropbox – One of the first cloud storage services, they offer a good service.
  • Adobe – Anyone using Adobe products can sign up and store their photos on Adobe’s servers.
  • iCloud – Those using apple products will be familiar with the iCloud, it works as a hub to link up all your devices.

The downside to this type of service is that there is an ongoing subscription fee if you want storage sizes capable of backing up your photography. That compares with an external hard drive that has a one time fee. You’re also reliant on a fast, reliable internet connection, something you might not find if you’re traveling somewhere that’s more remote.

How to Catalog and Store Your Photos so You Can Find them Easier
Cataloging your photos by type works well, this is a cityscape.

What’s the best solution?

Burning to a DVD was once a way you’d store photo library’s, but this has now become outdated as storage size has far outstripped this method. The best solution is to diversify. Keep backup copies of your photos on separate external hard drives, and use a cloud service for that extra protection.

Which is the best software to use for your library?

Now you know what hardware you’ll use to store your photos, the next step is to decide which program you’re going to use to store them. Once again, there are several options, and here are some of them.

Catalog in folders

One option is to simply set up folders, and then subfolders on your hard drive. You can use these to store individual sets of photos. The problem is this takes a lot of work, and could quickly become disorganized if you’re not on top of it all the time.

How to Catalog and Store Your Photos so You Can Find them Easier
Photos is the current storage option for apple users.

Apple Photos

Apple Photos is now the default photo storage program that comes with apple devices, be that a phone or a computer. It’s taken over from the older iPhoto, and the concept with the program is to share between devices. That means all your files will be synced to the iCloud account you have. You’ll likely need to pay the subscription fee for this functionality to be of any use.

The program comes with some basic editing functions, with the ability to catalog your photos into albums. You can further organize your work by putting these albums into folders. You can download Apple photos to use with windows as well.

Adobe Bridge and Lightroom

Adobe is the choice of many photographers, especially Adobe Lightroom.

There are actually two separate programs to create a library from. The two programs create folders on your hard drive, as opposed to Apple Photos, that has a closed-off app.

You can select the folder you’re going to use, so putting these photos on an external hard drive will work well.

Bridge and Lightroom allow you to organize your photos by folder, but you can also put them into collections. Where Lightroom differs from Bridge is that it offers an advanced photo editing suite. For many photographers, this is all they need.

As is becoming increasingly standard, there is also the option to store your photos in Adobe’s cloud service through these programs.

How to Catalog and Store Your Photos so You Can Find them Easier
Adobe is the most popular service for most photographers.

Other options

There are many other options you can use to organize and store your photos. If you’re using a Mac, using Photos or Lightroom is probably the best move. If you’re using a Windows machine, Lightroom is a great option. However you could buy a different program if you wish, this article gives a list of some of the possible alternative options.

How will you subdivide your collection into folders?

The last step in organizing your photos is putting them into categories that will make them easy to find. This comes down to some basic organization. Typically, you’ll want to start with a broad way of labeling photos, and then get more specific for the subfolders you put these photos into.

The year

Every year it’s time to reset and look again at your photos. It’s also a good time to begin a new folder for that year’s photos. In doing this, you’ll prevent any folder or library from becoming too large.

How to Catalog and Store Your Photos so You Can Find them Easier
A location like a national park is a good name for a folder.

The location

This is a category you can obviously narrow down further from the broad area of just the location. The following are some suggestions on how you might do just that.

  • Country – Every time you make a trip to a new country, this should have its own folder. In fact, you might decide to make a whole new library with the year and country as the title for this library.
  • City/Town/Village – The next step down from the country is the place you visit within that country. Often an urban center of some description will be the next folder you use.
  • National park – Visiting an area of natural beauty will be high on the landscape photographer list. These are often national parks, so this would also form a folder.
  • District/Market/Lake/Mountain – To further narrow down where the photo was taken, look to the district or market you visited in an urban center. Likewise, if you’re in the countryside, look for things like lakes or mountains to signify the photo’s location.
How to Catalog and Store Your Photos so You Can Find them Easier
This photo could be labelled portrait, light painting, or wire wool.

The day

Now you’re getting down to the nitty gritty of how to catalog and store your photos.

How you apply this to your organizational structure will depend. If you’re visiting a country for one week you might dispense with the city or national park, and just name each day France day 1, France day 2 and so on. However, if you’re in a country for longer, you might decide to use Paris day 1, Paris day 2, Lyon day 1, and so on.

The event

Photographing at festivals and events is a great way of getting unique photos, as they’re dynamic and you’ll be constantly on the lookout for moments of capture. Events like these will typically lead you to take many photos. If the event lasts several days, you’ll likely want to catalog by day.

The photography technique

Another approach to organizing your photos is to do it by type. In this case, you might be working on a photographic project, and you’ll want to keep all the photos of a particular type together. Below are a few examples you could try.

  • Color – Take a series of photos that are all the same color.
  • Technique – Use a technique like silhouettes, light painting or Lensball photography.
  • Portraits – If you’re a portrait photographer, you’ll likely want to sub-genre this topic. If you’re a travel photographer, it might form its own folder.
  • Street – Street photography is a great topic to try out and lends well to anyone living in an urban center.
  • Urban – Urban photography could include things like cityscapes, architecture, or rooftop photography.
How to Catalog and Store Your Photos so You Can Find them Easier
Festivals provide many photographic moments.

Favorites

Lastly, one of the best folders of photos any photographer can have is the favorites.

Each day you’ll choose your favorites from that day. However, at the end of the year or the end of a trip, it’s worth refining your selection further. To do this, go back over your favorites from each day and pick the very best images. Then use those images to create a portfolio folder for your very best work.

What’s your preferred way to catalog and store your photos?

There is a definite process you need to follow when you catalog and store your photos. This article lays out where and how to store photos so that you don’t lose control of your database of images.

There are many ways to do this, so how do you catalog and store your photos? If you use a different approach, we’d love to hear your ideas in the comments section.

Likewise, if you use any of the approaches in this article, which have you found the best? It’s always good to be organized, so organize your photos today so you can add more of them to your collection tomorrow!

The post How to Catalog and Store Your Photos so You Can Find them Easier appeared first on Digital Photography School. It was authored by Simon Bond.


Digital Photography School

 
Comments Off on How to Catalog and Store Your Photos so You Can Find them Easier

Posted in Photography


How to Migrate Your Lightroom Catalog into Capture One Pro

26 Jan

The post How to Migrate Your Lightroom Catalog into Capture One Pro appeared first on Digital Photography School. It was authored by Darina Kopcok.

Migrate-Your-Lightroom-Catalog-into-Capture-One

When it comes to high-end studio work, Capture One Pro is the choice of professionals. If you’re doing advertising or product photography, COP gives you certain tools and functionality that don’t exist in Lightroom.

The tethering feature in COP is far superior and allows you to work tethered with Live View and use layout overlays. This is a crucial feature to have when working on things like product packaging shoots or magazine cover portraits. You’ll be provided layout overlays to use as a guide in how to frame your shots to get the subject to fit with the artwork.

There is no right and wrong when it comes to your favorite RAW processor. It comes down to preference.

However, if you take the time to play around with a trial version of Capture One Pro, you may decide the sophisticated tools and incomparable color rendering will make you want to make the switch from Lightroom.

Great! But what about the thousands of images in your Lightroom database?

The idea of migrating your Lightroom catalog to Capture One Pro may seem intimidating, but it’s actually very simple and involves only a few quick steps.

Migrate-Your-Lightroom-Catalog-into-Capture-One

Migrating a catalog from Lightroom to Capture One Pro

The most important thing to know before you get started is that migrating your Lightroom catalog to Capture One Pro will not have any impact on your Lightroom catalog. You can continue to use it as you ordinarily would, and it will stay in the same place.

Before you can migrate your catalog, make sure you know its location.

If you’re not sure where your current Lightroom catalog lives, simply go to your Lightroom menu, and click on “Catalog Settings.”

This will bring you a dialog box with the tabs “General,” “File Handling,” and “Metadata.”

Choose “General.”

Under location, it will tell you the name of the catalog and where you can find it. Click on “Show” to navigate to the catalog location.

Migrate-Your-Lightroom-Catalog-into-Capture-One

For example, mine is located on an external disk. I have all my photos and documents on two external 4TB hard drives to avoid clogging up my computer’s hard drive.

The other thing you should be aware of that every single property from your Lightroom catalog may not carry over. This mostly refers to color adjustments. Things like exposure, white balance, rotation, and orientation are usually switched over seamlessly when migrate your Lightroom Catalog into Capture One.

When you start the import process, COP will also notify you of any incompatible files in a dialog box.

Catalog vs Sessions

COP has two file management systems: Catalogs and Sessions.

As with Lightroom, a Catalog in COP is a database containing information about your images, such as metadata and ratings. Catalogs are most suitable for organizing large volumes of images.

A Session functions more like a Lightroom Collection. It provides a more simple, folder-based workflow and the ability to browse any folder on your computer without having to import images. Adjustments are placed in a subfolder next to the images.

Sessions are great for on-set workflow and tethered shooting, and are generally seen as the more efficient option. Sessions allow you to store all the files from a single project together.

Once you have migrated your Lightroom Catalog into COP, you can build and structure your photos into sessions if you choose.

Use the following steps to migrate your Lightroom Catalog into Capture One.

Steps to migrate your Lightroom Catalog into Capture One Pro.

Step 1

Start by creating a new catalog in Capture One Pro

Open COP and go to File -> New Catalog.

How to Migrate Your Lightroom Catalog into Capture One Pro

Step 2

After you have created the new Catalog in COP, you need to import the LRCAT Lightroom file.

Go to  File -> Import Catalog -> Lightroom Catalog.

Migrate-Your-Lightroom-Catalog-into-Capture-One

This is when a dialog box will notify you about any offline or incompatible files so that you’re aware.

How to Migrate Your Lightroom Catalog into Capture One Pro

Hit  “Continue.”

Step 3

This is where you get asked to name the catalog as you want it to appear in COP.

Give your catalog a name and hit “Enter.”

Under “Location,” navigate to the Lightroom catalog you wish to import. Click on the folder and then hit “OK.”

How to Migrate Your Lightroom Catalog into Capture One Pro

COP will start the import process.

It will tell you how many files it’s reading and how long the import will take.

If you have thousands of images, note that migrating your Lightroom catalog to Capture One Pro can take some time.

How to Migrate Your Lightroom Catalog into Capture One Pro

Conclusion

As you can see, migrating your Lightroom catalog to Capture One Pro is a simple and fairly seamless process. If you have more than one Lightroom catalog, follow these steps to import each catalog.

Once you have your catalogs in COP, you can further organize them into Sessions.

Do you have any other tips to migrate your Lightroom catalog into Capture One, or had experience doing with this process? Share your thoughts in the comments below.

The post How to Migrate Your Lightroom Catalog into Capture One Pro appeared first on Digital Photography School. It was authored by Darina Kopcok.


Digital Photography School

 
Comments Off on How to Migrate Your Lightroom Catalog into Capture One Pro

Posted in Photography


Catalog Photos Like a Pro: ACDSee Photo Studio Standard 2019 Review

11 Jun

The post Catalog Photos Like a Pro: ACDSee Photo Studio Standard 2019 Review appeared first on Digital Photography School. It was authored by Glenn Harper.

ACDSee software has been around since the earliest days of digital photography. For 20 years, it’s been competing with Adobe Photoshop. Today, with Adobe offering its top image-editing programs by subscription only, there’s more room than ever for alternatives. ACDSee offers a compelling subscription model of its own, but it also maintains a full suite of standalone products. Photo Studio Standard 2019 is among them, and I’ll review it here.

ACDSee Photo Studio Standard 2019 - default layout

The default layout in Manage mode of ACDSee Photo Studio Standard 2019. You can move things around as you wish and close any panes you don’t need.

Aimed at keen photographers with growing photo collections, ACDSee Photo Studio Standard 2019 is ideal for sorting, finding, and viewing photos. It also has a set of editing tools that will quickly make your pictures look good for the web or printing. We’ll look at all this in detail. To avoid wasting anyone’s time, this program recognizes and opens raw files but it’s not a raw editor or metadata editor – it’s a pixel editor. You have no control over how raw files are processed and can only save 8-bit files.

Embedding ACDSee metadata into DNG files

Preview of a DNG file. You can embed ACDSee metadata into DNG files, unlike other raw formats.

This review of ACDSee Photo Studio Standard 2019 will include the following:

  • Starting up
  • Manage mode
  • Photos mode
  • View mode
  • Edit mode
  • Other features
  • Conclusion

Starting up

One thing that struck me immediately about ACDSee software was how quickly it opened. Sometimes I wait 2-3 minutes for Photoshop CC to start. There are technical reasons for that, like the plug-ins I have loaded into it and its sheer girth. Perhaps it connects to my Adobe account, too. Whatever. Photo Studio Standard 2019 opens in around 15-20 seconds every time.

Manage mode

Digital asset management (DAM) is the great strength of ACDSee Photo Studio Standard 2019. In Manage mode, the software offers all you need for sorting and locating your images. Like many people, you may already have your folders arranged chronologically. This is handy for sifting through them using the folder pane of ACDSee, but the software gives you lots of other ways to find pictures.

ACDSee Photo Studio Standard 2019 - folder pane

Here, I’m using the folder pane in Manage mode to browse photos. I’m not the best organizer, but I do have most folders labeled chronologically.

Calendar pane

I latched onto the Calendar pane within minutes of opening ACDSee. Even if you have your folders arranged by date, it’s so quick to rifle through your photos month by month using the calendar. You can widen the search by choosing multiple months or use single days to narrow it. I used this feature straight away to dig out a few files I might’ve overlooked as potential stock photos.

Catalog pane

The ACDSee Catalog pane gives you several ways to find what you’re looking for: color labels, keywords, ratings, saved searches, categories, and auto categories. Of course, you have to add most of this info yourself to the images, but that’s easy using the software. Auto categories come from EXIF data, so you can filter results by the lens or aperture used, for instance.

cataloging photos with ACDSee software

There are various ways to filter photos in the Catalog pane, some of which rely on you having rated, keyworded, labeled, tagged, or categorized your photos already. In this screenshot, I’m looking at photos taken with a particular lens.[/

Map pane

ACDSee includes a Map pane. Drag your photo(s) onto the place where they were taken, hit Save, and the GPS coordinates are automatically embedded into the EXIF data. Cool! That wasn’t a feature I expected at this price point (Lightroom has it), but it does show how thorough this software is in what it does.

Embedding GPS coordinates into photos

Dragging a photo or several photos onto a spot on the map and hitting “Save” embeds GPS coordinates into the metadata.

Shortcuts pane

The Shortcuts pane offers a way of bookmarking files you know you’ll often need. It makes it that little bit quicker to find any special photos – perhaps a collection of your best-ever shots.

Image Basket

Another neat feature of Photo Studio Standard 2019 is the Image Basket. Normally, when I’m preparing a gallery for the web, I create a new folder on my desktop to work from. The Image Basket is a way of gathering original files together without having to copy them elsewhere.

Keywording in ACDSee

Keywords are an invaluable way of quickly finding what you’re looking for, but they can be time-consuming to add. ACDSee is ahead of Adobe in this respect. It’ll import any keywords you’ve added elsewhere to the IPTC data, but it has excellent keywording capability of its own.

Adding keywords to images

The ability to create large keyword sets of up to 250 is enough to satisfy any lexicologist. I wouldn’t normally need that many, but 40 or 50 isn’t uncommon. Adobe software is restrictive in this respect.

A welcome feature of the new ACDSee ‘Quick Keyword’ tool is the ability to use 25 rows by 10 columns of words (i.e., up to 250 keywords). In Lightroom, you can only have 9 keywords max per set – a source of frustration for many users. ACDSee has its own metadata field that is stored in the database rather than embedded in the file, but you can embed it into suitable file formats.

Photos mode

In Photos mode, ACDSee catalogs all images from the location(s) of your choice and puts them on display so you can scroll through them. Like the Calendar pane, it’s an easy way for you to search visually and find pictures. Hovering the cursor over a thumbnail brings up a larger preview with vital info such as image dimensions, file size, and folder location.

ACDSee Photo Studio Standard 2019 - Photos mode

Photos mode on the daily setting. You can scroll through your whole database, but it’s still divided by daily, monthly or yearly headings.

View mode

Double-click on a photo in Manage or Photos mode and you’ll bring up a large view of the image in ACDSee’s View mode. Various viewing options are available as well as useful editing tools like Auto Light EQ™ and Auto Lens. You can rapidly scroll through files in this mode and tag images or add ratings, labels, keywords, and categories. It’s an extension of Manage mode if you want it to be. Clicking on Edit mode from here takes the open picture into editing.

ACDSee Photo Studio Standard 2019 - View mode

View mode is the place to be if you want to browse large previews of your pictures. Double-clicking on any picture in Manage or Photos mode brings you here, too. You can also perform a few basic edits in this space or categorize photos.

Edit Mode

ACDSee Photo Studio Standard 2019 has plenty to offer in terms of editing but something has to be sacrificed at this price point, and that’s parametric (non-destructive) editing. Photo Studio Standard is a pixel editor only, so you make physical changes to rendered images. You can still leave the original file untouched, but as soon as you finish editing and save a file, there’s no going back and tweaking your adjustments. This is more important if you’re in the habit of reworking pictures or if you edit extensively and want your work to be reversible.

Repair

There are a couple of tools under the “Repair” heading. The red-eye reduction tool is something I’d probably never have a need for, but I tested this with a public domain image. Works well – easy to use.

Correcting redeye in photos

With this close-up view, I found myself wishing the size of the adjustment would go slightly larger, as it barely covered the dilated pupil. But still, the red-eye has gone. Most portraits won’t be as near to the subject. Photo: Wikimedia Commons.

One of the few glitches I encountered in ACDSee Photo Studio Standard 2019 was a malfunction among the repair tools. I can get the Heal tool to work, and it does a nice job of blending the sampled pixels into a new area. But the Clone tool hasn’t worked for me even after a reinstall. I just get a blacked-out image. This appears to be a bug in the program, as it works flawlessly in other ACDSee software I have on my PC.

Add

Under the “Add” heading you can insert text into your photos or a watermark (the Watermark feature is new in 2019). The default watermark is the ACDSee camera logo, but you can use your own graphic if you want. There are also borders, vignetting, special effects and tilt-shift choices here.

tilt-shift photo effect

The Tilt-Shift tool makes Manhattan look miniaturized.

Personally, I’d be most likely to use vignetting out of these, as it helps direct the viewer’s eye and is a useful photographic tool. It can be fun to add borders to your photos, too, which you can customize in this case with a wide selection of textures or any color you choose.

I counted 54 special effects in ACDSee’s collection, and each is modifiable in some way. Even the ones that don’t instantly appeal might work for you with some adjustment, so there’s a lot to go at. Among my favorites are Collage, Lomo, and Orton. The latter is great for creating a dreamy look.

ACDSee Photo Studio Standard 2019 - Orton special effect

This is the Orton special effect, making a peaceful scene even dreamier.

Geometry

Under “Geometry”, ACDSee provides rotate, flip, crop, and resize tools. There are some thoughtful touches among these tools, like the ability to control darkness outside the crop area. The Rotate tool also has a cropping feature, so you can level the picture up if necessary and correct wonky horizons.

When resizing, the default algorithm is Lanczos, but it’s worth experimenting, depending on what you do with your photos. Lanczos gives a sharp result when downsizing, for instance, but if you want to back off that a little and achieve smoother edges, try Bicubic.

Exposure/Lighting

ACDSee offers some powerful tools under “Exposure/Lighting,” not least its excellent Light EQ™ technology alongside traditional tools like levels and curves. Light EQ™ is similar to curves, only better in some respects since it treats highlights, mid-tones, and shadows separately. That’s only possible to a degree using curves without layers.

ACDSee Light EQ technology

Here, I’m using ACDSee Light EQ™ to adjust the tone of the image. By having the Exposure Warning switched on, I can ensure a good tonal range without losing detail in the shadows or highlights. As soon as pixels appear in red or green, I back off the adjustment slightly. I have the histogram showing the blue channel, as that’s the nearest to clipping at both ends.

The auto buttons in these exposure/lighting controls are also worth a hit every now and again. Personally, I find the auto setting in Light EQ™ tends to make things too bright, but it might provide a better starting point.

You can set your black and white points using eyedroppers in levels and also define the clipping limits under “tolerance.” (Don’t worry if this means nothing to you – it’s only one of several options.

I should mention, too, that ACDSee provides an Edit Brush and gradients with many of these controls, so you can apply edits to selected parts of the image.

Color

Under “Color,” you’ll find White Balance, Color Balance, Convert to Black and White, and Color LUTs. The White Balance tool is excellent, though, like all white balance tools, it relies on neutral tones in the image to use as reference points.

You could also correct color using the Color Balance tool, especially in conjunction with the floating histogram. A good thing about the ACDSee histogram is you can stretch it out as far as you like for a detailed look at tonal distribution. There’s a hue/saturation tool alongside color balance.

Using the histogram - ACDSee software

You can make the floating histogram as compact or elongated as you wish.

“Convert to Black and White” is new to ACDSee Photo Studio Standard 2019. Based on the colors you know are in the image (e.g. blue sky), you can adjust their brightness to alter the contrast of the final result. This also lets you emphasize different areas of the photo. Good stuff! Contrast is also affected by the RGB percentages, which must always add up to 100. A high proportion of red usually creates more contrast in cloudy blue skies, for instance. Colorized monochrome images are possible, too, under Convert to Black and White.

ACDSee Convert to Black and White

Using the new “Convert to Black and white” feature, I’ve increased the brightness of cyan a fair bit to make the fire-escape steps stand out more. Then I’ve colorized the picture with sepia-like brown tones.

One of the best things in ACDSee Photo Studio Standard 2019 Edit mode has to be Color LUTs. These let you alter the look of your photos (often drastically) via numerical color shifts. They’re like photo filters on steroids. ACDSee LUTs are good, but you can also download LUTs from the web and load them into the program.

Using color LUTs in photos

The lower half of this picture has the ACDSee “Turin” Color LUT applied to it. Look closely and you’ll see it’s darker with deeper blue windows and yet has a more cyan sky. You can use the Edit Brush or gradients on many edits.

Detail

Sharpen, blur, noise, and clarity all lie under the “Detail” heading. These are all pretty standard. The sharpen tool is like unsharp mask with amount, radius and threshold settings. Typically, you use a low radius for high-frequency photos with a lot of fine detail or a higher radius to bring out coarse detail across a wide area. A sharpening mask slider would be a nice bonus here if I were compiling a wants list. That would be quicker than selective sharpening with a brush.

Other Features

In case all the above isn’t enough, there’s more. For instance, the external editor feature in Manage mode lets you swiftly open images in other programs. Perhaps that will be Photoshop or it could be ACDSee Photo Editor 10, which would complement Photo Studio Standard well.

ACDSee also has a dashboard that gives you stats on equipment used, database size, and photo counts that show you how prolific you’ve been at various times.

ACDSee Photo Studio Standard 2019 dashboard

The ACDSee Dashboard, indicating prolific use of a Sony RX100 in my case. There are numerous other stats available.

You can create PDFs, PowerPoint files, slideshow files, zip archives, contact sheets, and HTML albums straight out of ACDSee Photo Studio Standard 2019, too. There really isn’t a lot you can’t do.

More new stuff

ACDSee also introduced AutoSave and Auto Advance features in 2019. AutoSave does away with the “do you want to save changes?” dialog when you move onto another image. Auto Advance is good for rating, labeling, or categorizing photos, as it moves onto the next image automatically once you’ve clicked.

Also new in 2019 are customizable keyboard shortcuts, support for HEIF files (used on later iPhones), and print improvements that let you adjust for differences between what you see on screen and what your printer produces.

Conclusion

As much as I understand the benefits of SaaS and subscription software models, I think there will always be a market for standalone products that consumers can update when they want.

ACDSee Photo Studio Standard 2019 is, first and foremost, a great photo organizer. I’ve never seen better. It’s quick as a browser – doesn’t hold you up – and it gives you workflow choices. There are lots of nice touches to make tasks easier. It’s not especially advanced as a photo editor, but you can achieve a lot without layers, 3rd-party plugins, and even Adobe’s unassailable repair tools.

If like me, you prefer taking photos to organizing them, ACDSee Photo Studio Standard 2019 is the ideal way to get your collection under control. It drills into your database from several directions and helps you find any picture. Many people will want to supplement the editing capabilities with other programs, but you won’t find much better than this for photo management.

Disclaimer: ACDSee is a paid partner of dPS

The post Catalog Photos Like a Pro: ACDSee Photo Studio Standard 2019 Review appeared first on Digital Photography School. It was authored by Glenn Harper.


Digital Photography School

 
Comments Off on Catalog Photos Like a Pro: ACDSee Photo Studio Standard 2019 Review

Posted in Photography


How to Find Your Photos in the Lightroom Catalog Using Filters

28 Sep

You’ve likely had this problem if you’ve been using Lightroom for any length of time. Can you relate? You go to your Lightroom catalog to find that amazing picture you took of the sunset in Maui last summer and scroll through thousands of previews in the filmstrip, but you can’t find your photos.

Lightroom Grid View - How to Find for Your Photos in the Lightroom Catalog Using Filters

But was it before the weekend you went camping with your family? Or was it around the time you photographed your sister’s baby shower? You have thousands of images and can’t find what you’re looking for, and everything is a mess.

Sound familiar?

Luckily, with a little bit of organization and know-how, it’s really easy to find your images in Lightroom.

One of Lightroom’s biggest strengths is the ability it gives you to organize and archive your photos.

You can find your photos by:

  • Using the Library Filter Bar
  • Using Collections
  • Using keyword tags

You can also customize the Library Filter bar and use Library Filter presets.

So without further ado, let’s look at some of the ways we can sort and find photos in Lightroom.

Grid View-Lightroom - How to Find for Your Photos in the Lightroom Catalog Using Filters

Lightroom Grid View

Sort Order

The most basic way of locating your photos is to scroll through Grid view. If you know the filename or approximate capture date, you can sort the photos into a specific order.

The Sort options are on the Toolbar in Grid view under View Menu > Sort.

Capture Time-Sort - How to Find for Your Photos in the Lightroom Catalog Using Filters

By default, I have mine set to Capture Time, which sorts my photos from the oldest to the newest.

  • Added Order sorts the photos according to the time of import, with the most recent imports first. The Previous/Current Import collection is set to Added Order by default.
  • Edit Time sorts your pictures according to how recently they were edited, including both Develop and metadata edits.
  • Edit Count sort photos according to how frequently you’ve edited that photo.
  • Rating groups photos by their star rating, from highest to lowest.
  • Pick sorts photos by their flags; flagged photos are first, followed by the unflagged photos, and then the rejected photos.
  • Label Text groups the photos alphabetically according to their label text.
  • Label Color sorts the photos by their label color, regardless of label text.
  • File Name sorts the photos by just that.
  • File Extension sorts the photos by their file extension, such as JPG, TIFF, PSD, etc.
  • File Type groups the photos by their file type, such as PSD, Video, or JPEG.

Scrolling through photos is impractical unless you have a small number of photos, which is usually not the case. Filtering hides the photos that don’t meet the criteria that you choose.

For example, you may only want to view the photos that you have applied 5 stars to, as I do to all of the images I have finalized editing and exported to a folder.

Searching Photos in Lightroom - How to Find for Your Photos in the Lightroom Catalog Using Filters

The Library Filter Bar

The Library Filter bar at the top of the Grid View in the Library Module offers three main ways to find your photos by using the Text filter, the Attribute Filter, or the Metadata filter.

The bar appears in the middle of the grid of your images in the Library Module (circled below). You cannot see it unless you are in Grid View.

Lightroom Library Filter Bar - How to Find for Your Photos in the Lightroom Catalog Using Filters

If you don’t see it, go up to View and choose Show Filter Bar or hit backslash ( \ ) on your keyboard.

View-Show Filter Bar - How to Find for Your Photos in the Lightroom Catalog Using Filters

Also, choose where you want to search. If you are searching all of your photographs in the Catalog, be sure to click on All Photographs under Catalog in the left-hand panel under Navigator.

Catalog-Search - How to Find for Your Photos in the Lightroom Catalog Using Filters

All Photographs

Text Filter

The Text Filter allows you to search through the catalog or a selection of photos using a certain text search field.

There are several search options, such as keywords, metadata, as well as IPTC or EXIF information. EXIF information includes the camera make, model, serial number and software.

Any searchable plug-in field includes searchable metadata fields created by third-party plug-ins.

Search Option Text - How to Find for Your Photos in the Lightroom Catalog Using Filters

For example, I can use Any Searchable Field to search for files that have a certain number in them. Or I can search for all my images that have a certain keyword.

If I search for “culinary”, it will search for all of the keywords, captions, file paths, folders, virtual copies etc., for that word. I include the word culinary in all of my food photography. So by using filters, I can find all my food images quickly in Lightroom.

Text Search cullinary - How to Find for Your Photos in the Lightroom Catalog Using Filters

Attribute

Lightroom gives you the option to filter your photos by flag status, edit staus, star rating, color label, or copy.

In the screenshot below, you can see that I searched for all of my photographs that I have rated as 5 stars. I give 5 stars to images upon export, when I have finished editing them. I assign them a color label as well. For example, red means that I have submitted the images to my stock portfolios.

attribute - How to Find for Your Photos in the Lightroom Catalog Using Filters

You can also search your virtual copies and videos using Attribute, within the icons on the far right of the panel.

The middle icon is for Virtual Copy, while the far right icon is for Video.

Click again on Attribute if you no longer want to see the Attribute Bar.

Searching Photos Lightroom strawberries - How to Find for Your Photos in the Lightroom Catalog Using Filters

Metadata

Inputting metadata after each shoot can be a lot of work, but doing so makes it easy to locate your photos at a later date.

Your camera automatically embeds some metadata or any you’ve added manually say when you’ve set up Lightroom for tethered capture.

When you’re editing in Lightroom, it’s a good idea to put some keywords in the Keyword panel in the Library Module. This is something you need to do if you’re licensing your work for stock photography, but I recommend doing it regardless so that you can more easily search your photos.

For example, if you have input the word “strawberries” in your keyword metadata, you can find all the images that contain strawberries.

When you click on Metadata in the Library Filter bar, you can search using a wide range of criteria, including file type, and camera and exposure information. You can even find images you have not assigned your copyright status.

Lightroom Metadata - Keyword Filter - How to Find for Your Photos in the Lightroom Catalog Using Filters

Metadata Search Filters - How to Find for Your Photos in the Lightroom Catalog Using Filters

Lightroom also gives you the option to add more than one type of search criteria at a time.

For example, when I searched for images of strawberries, I also searched for shots taken with my Canon 5D Mark III, using my 24-70mm lens, as well as any shot with my 100mm macro. I also searched for flagged images, as I only wanted to see my top picks, not every single image of strawberries.

multiple Metadata Criteria in Lightroom - How to Find for Your Photos in the Lightroom Catalog Using Filters

Note that if you want to search two types of photos, such as portraits and landscapes, be sure to choose them both in the first panel on the left. If you put it in the next panel, Lightroom will look for images that are both landscapes and portraits, rather than images that are landscapes or portraits.

Click on the first keyword then hold down the Ctrl (PC) or Command (Mac) key to select the second keyword. You can select multiple choices from the same column this way.

If you would like to do a different search or cancel that search, simply click on None in the Library Filter bar. When you do another search, Lightroom will remember the criteria you input for your last search.

To reset this, click on All, which is the first choice in the Filter panel.

lightroom-filters strawberry cheesecake - How to Find for Your Photos in the Lightroom Catalog Using Filters

Conclusion

As you can see, you can find your photos in Lightroom in various ways by using a plethora of criteria.

This is exciting news if you have been scrolling endlessly through your images to locate what you’re looking for, or you need a more organized approach to your workflow.

The post How to Find Your Photos in the Lightroom Catalog Using Filters appeared first on Digital Photography School.


Digital Photography School

 
Comments Off on How to Find Your Photos in the Lightroom Catalog Using Filters

Posted in Photography


New York Public Library launches interactive Photographers’ Identities Catalog

05 Apr

The New York Public Library has launched a new online tool called Photographers’ Identities Catalog (PIC), an interactive map with biographical data on more than 115,000 photographers, as well as photography dealers, studios and manufacturers. Users are able to filter the data based on several categories, such as region and format, to search for results throughout the entire history of photography.

Each PIC result appears as a colored-coded dot on an interactive globe, and each dot marks a specific individual or entity. Biographical data on photographers includes name, nationality, any relevant locations or dates, and the source of the NYPL’s data. Information on businesses includes addresses and years of operation. In addition to filters, users can zoom in on a specific region to explore its results.

Because of the wide variety of filters, users can perform very specific searches. As one example presented by the NYPL, someone can locate female photographers who worked with specific studios in certain countries. The library advises that some data could be incorrect, however, and those who spot an error can report it for correction. Historians and scholars with relevant data are encouraged to contact the NYPL to help expand the catalog, as well.

Via: New York Public Library

Articles: Digital Photography Review (dpreview.com)

 
Comments Off on New York Public Library launches interactive Photographers’ Identities Catalog

Posted in Uncategorized


6 Steps to Save Your Ass With Lightroom Catalog Changes

22 Apr

Avoid downtime with these 6 steps to keep your Lightroom Catalog in tip top shape:

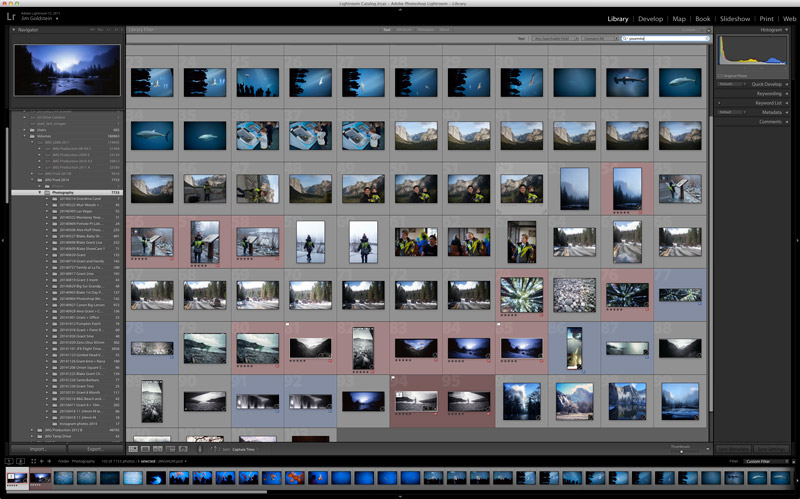
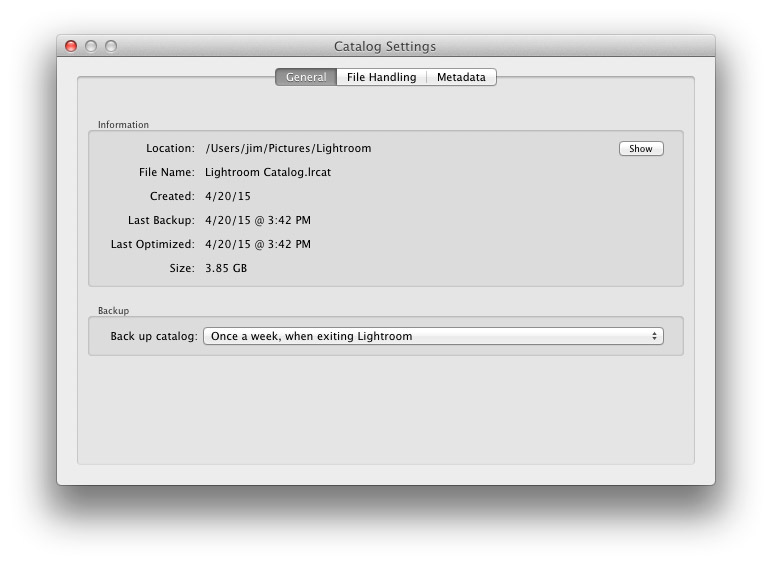
1. Know Where Your Catalog Resides

Lightroom saves catalogs in the following folders:

  • Windows: \Users\[user name]\Pictures\Lightroom
  • Mac OS: /Users/[user name]/Pictures/Lightroom

When in doubt check here:

(Mac OS) Lightroom > Catalog Settings

(Windows) Edit > Catalog Settings


Know Where Your Lightroom Catalog Resides

2. Save Metadata to Your Files

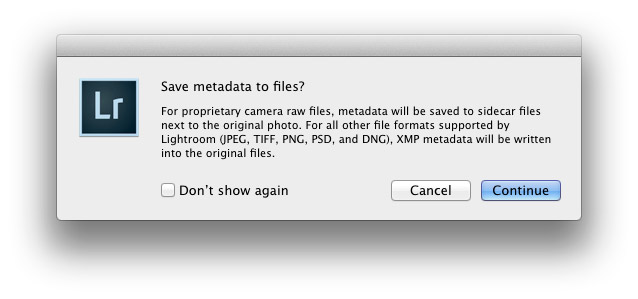
To save metadata to your files highlight your images and hit Command-S on Mac or Control-S on Windows. This will save author’s name, resolution, color space, copyright, and keywords to a sidecar file for proprietary RAW files or directly to the file if JPEG, TIFF, PSD, and DNG. This is a great precursor step that builds in redundancy in case there are any catastrophic failures in your future.

Why you should use DNG:  DNG, RAW and JPEG: What I Use & Why

More on Metadata: Metadata Basics and Actions via Adobe


Save Metadata to Your Files

3.  Back Up Your Catalog Regularly

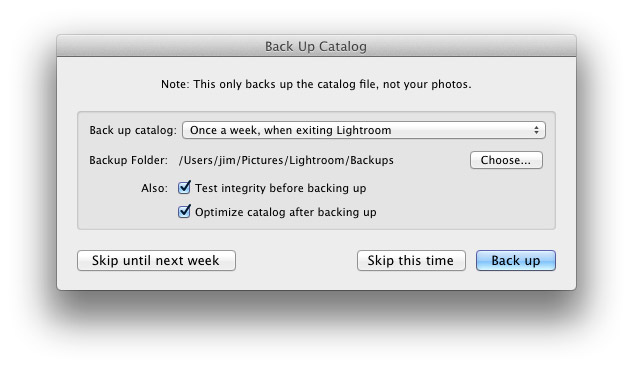
There is one key prompt you should never ignore in Lightroom and it is the “Back Up Catalog” prompt.  Always take the time to regularly backup your catalog in the event your hard drive fails, you suffer file corruption or a meteor crashes into your home destroying your computer. Well for the last point see step 4 below.


Back Up Your Lightroom Catalog Regularly

4. Save Your Back Up Catalog to the Cloud

Redundancy is the name of the game in case you suffer a catastrophic data corruption or loss of equipment at home. By having your most recent catalog saved to the cloud (Dropbox for example) you can restore the organization (color coding, stars, edits, etc.) of your entire catalog assuming you have an off site backup of your image files.

The quick and dirty of how I back up my image files in case you’re wondering…

I have a hard drive enclosure that mirrors 2 drives (RAID 1). As I work on my files they’re saved to 2 drives simultaneously. At regular intervals I back up these mirrored drives to a 3rd drive that I keep offsite. In the event of a catastrophic event I always have 1 copy of my image files at an outside location. This combined with my Lightroom Catalog being saved to the cloud means that I can restore my Adobe Lightroom environment at any time.


Save Your Back Up Catalog to the Cloud

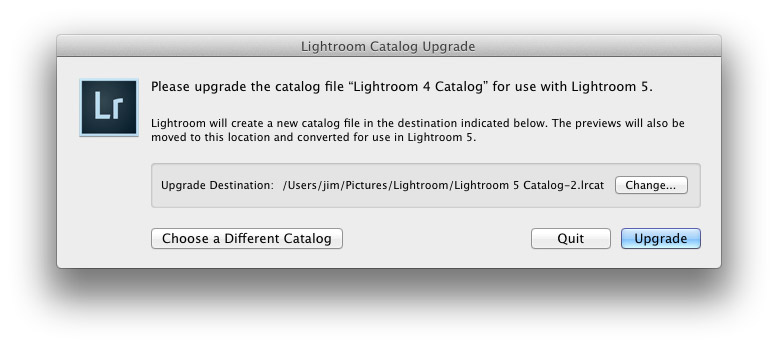
5. Before You Upgrade Lightroom Make A New Catalog Back Up

Lightroom will prompt you to upgrade your catalog when you upgrade your copy of Lightroom to the latest version.  To avoid any risk of a fluke corruption when you upgrade your Lightroom Catalog always make sure you have a very recent back up copy of your catalog. Before any upgrade my first step is to make sure I have a recent catalog backup.

Before You Upgrade Lightroom Make A New Catalog Back Up


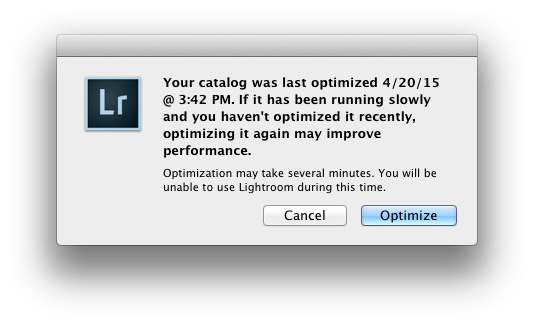
6. Regularly Optimize Your Catalog

If you’re experiencing performance issues or you want to make sure that your catalog is in optimal condition then be sure to optimize your catalog from time to time. To do this go to Lightroom > Optimize Catalog

Regularly Optimize Your Lightroom Catalog


Recommended Reading: Lightroom Catalog FAQ and Lightroom Help / Optimize performance

Did I miss any precautions you take? If so add them to the comments.


Copyright Jim M. Goldstein, All Rights Reserved

6 Steps to Save Your Ass With Lightroom Catalog Changes

The post 6 Steps to Save Your Ass With Lightroom Catalog Changes appeared first on JMG-Galleries – Landscape, Nature & Travel Photography.


Related Stories

  • 6 Steps to Save Your Ass With Lightroom Catalog Changes – Enclosure
  • Talking Lightroom & Photography
  • Talking Lightroom & Photography – Enclosure


JMG-Galleries

 
Comments Off on 6 Steps to Save Your Ass With Lightroom Catalog Changes

Posted in Equipment


27 November, 2014 – 25% Off entire Video Catalog

03 Dec

 Lu-La’s Black Friday Sale is now on!

Get 25% Off our entire Video Catalog until midnight Sunday, November 30.

Use this coupon code at checkout:

25pcOFF_LL-BF


The Luminous Landscape – What’s New

 
Comments Off on 27 November, 2014 – 25% Off entire Video Catalog

Posted in News


27 November, 2014 – 25% Off entire Video Catalog

28 Nov

 Lu-La’s Black Friday Sale is now on!

Get 25% Off our entire Video Catalog until midnight Sunday, November 30.

Use this coupon code at checkout:

25pcOFF_LL-BF


The Luminous Landscape – What’s New

 
Comments Off on 27 November, 2014 – 25% Off entire Video Catalog

Posted in News


Video Tutorial How to Manage Your Lightroom Catalog While Travelling

07 Jul

Last week I shared one of Serge’s videos on some of the new features of Photoshop Creative Cloud (CC). Serge is a French photographer in Paris and was recently doing a workshop with our very own dPS writer Valerie Jardin. So I’ve approached Serge and hopefully he’ll be doing some videos just for you on dPS shortly.

Until then he has many helpful videos already, you can search through his YouTube library. I found this one and thought I’d share it as this is something that comes up a lot on my travel tours and workshops about travel photography. How to manage your Lightroom catalog while travelling or on the road. You should get some good tips from this – have a watch.

Need more Lightroom help? Try these:

  • How to Convert Photos to Black and White in Lightroom
  • Mastering Color in Lightroom using the HSL Tab
  • Save Tons of Editing Time with Lightroom Presets
  • The Triangle of Color Adjustments in Lightroom

The post Video Tutorial How to Manage Your Lightroom Catalog While Travelling by Darlene Hildebrandt appeared first on Digital Photography School.


Digital Photography School

 
Comments Off on Video Tutorial How to Manage Your Lightroom Catalog While Travelling

Posted in Photography


creativeLIVE’s entire photography catalog on sale until 31st October

29 Oct

FlashSale_950x360.jpg

Photography education resource creativeLIVE has announced a sale on all of its online photography workshops from now until the end of this month, plus a free three-day ‘Autumn Photo Critique’ evaluating submissions in three categories: wedding and family, commercial and fine art and portraiture. Click through for more details of the promotion.

News: Digital Photography Review (dpreview.com)

 
Comments Off on creativeLIVE’s entire photography catalog on sale until 31st October

Posted in Uncategorized