RSS
 

Posts Tagged ‘brushes’

Capture One releases Nikon-specific version, also adds improved clone and healing brushes

18 May

Earlier this month, Capture One teased a variety of new features in an upcoming free update to Capture One 20. Today, this free update has been released to all existing Capture One 20 users. Further, Capture One has released a new dedicated version of their software specifically for Nikon users, Capture One for Nikon.

The new Nikon version of Capture One follows the same pattern as existing Fujifilm and Sony versions, meaning that the software will only work with files from Nikon cameras. Profiles for each supported Nikon camera have been specifically built for Capture One by the software team in Denmark using an exhaustive lab-based process. Further, the Vivid, Neutral, Standard, Landscape and Monochrome profiles in Nikon’s cameras are supported, allowing Capture One for Nikon to match the colors you see on your camera.

The list of supported Nikon cameras is exhaustive and includes the company’s DSLR and mirrorless Z cameras. Many cameras also support tethered capture. You can view the full list of supported cameras and features by clicking here.

Returning to the newly-released update for all versions of Capture One 20, we were previously shown the new heal and clone brushes plus an improved before/after viewer. The revised healing and clone brushes now create dedicated healing and clone layers, respectively, and utilize more intelligent source point technology. You can also now utilize as many source points per layer as you desire with no discernible impact on performance.

With respect to the before/after view, users can now click a button in the toolbar to select from new before/after view modes. This is a much simpler and more streamlined process than in prior versions of Capture One and can be used across multiple images at varying zoom levels.

Capture One has released additional videos showing off these new features, which you can view below:

Another new feature that was not shown off during Capture One’s livestream in early May is an improved Lightroom Catalog Import tool. The tool now allows for importing files located on disconnected drives. Capture One will automatically import the files once the drive has been connected. Further, when importing a Lightroom catalog, some basic image adjustments and catalog structure can be imported into Capture One 20. To see how this works, refer to a new video tutorial from Capture One below.

The update to Capture One 20 is available now at no cost for all existing users. If you don’t own Capture One 20 and would like to try it, there is a free trial available on Capture One’s website.

Capture One 20 is available both as a subscription and as a lifetime license. An annual subscription is $ 180 USD and a lifetime license for new users is $ 299 USD. For a full pricing breakdown and to view additional bundles, click here. Further, there is an ongoing promotion for new purchasers, allowing for 12-month access to SmugMug Portfolio or Power plans, depending on their selected product.

Capture One for Nikon can be purchased for $ 9.99 USD per month, $ 99 per year or as a perpetual license for $ 129.

Articles: Digital Photography Review (dpreview.com)

 
Comments Off on Capture One releases Nikon-specific version, also adds improved clone and healing brushes

Posted in Uncategorized


Capture One teases upcoming Capture One 20 update, including new heal and clone brushes

06 May

Earlier today, Capture One showed off a trio of major new features coming via a free update to Capture One 20 later this month. The announcement came in a live stream, which you can watch the replay of below, hosted by Product Manager Alexander Flemming and Business Development Manager David Grover.

In the live demo below, the first major new feature coming to Capture One 20 later this month is a revised healing brush for retouching images and removing unwanted spots. In the current version of Capture One 20, the healing workflow comprises creating a new heal layer, select your brush and pick a source point. Further, you can only select a single source point per layer.

In the upcoming update, the software will be able to quickly and intelligently select a source point for each instance of using the heal brush on a single ‘Heal Layer’. Per Flemming, there will be no limit to how many different heal points you can have on a single layer nor has the team found any performance issues when utilizing many heal points.

In the livestream, Flemming and Grover shared a few interesting tidbits about how the new healing brush operates. The first time you use the brush on an image, the software caches the entire image, so that all subsequent uses of the heal brush are much faster. Further, the new healing technology is adept at adjusting the luminosity of your source point to match the area you wish to heal or touch up. For example, if an area in the image with the best match for texture is brighter or darker than the area you are trying to heal, the software can match the source area by brightening or darkening it.

In addition to the new healing brush, there’s also a new clone brush. The clone brush works similarly to the new heal brush, but it creates a ‘Clone Layer’ rather than a ‘Heal Layer’. The clone brush creates a pixel-for-pixel clone, rather than replacing a healing area via a source selection. Basically, the clone brush allows you to copy a selected set of pixels from one area of your image to another area.

In this screenshot from Capture One’s presentation, the new clone brush is being used. Image credit: Capture One

Another addition is the new before and after button, which can be found on the toolbar. In prior versions, seeing a before and after comparison was done via a convoluted process whereby you reset the image and then undid the reset. Now you will be able to simply press the before/after button, which creates a sliding before/after split view, showing before on the left and after on the right. This works at all zoom levels and can be used across multiple images. Users will even be able to edit in this view if they so desire. There’s also a secondary before/after mode where you can view the entire image in its before and after state, rather than using a slider.

The upcoming free update to Capture One 20 includes a new before/after view. You can use this view across multiple images at once as well, as can be seen here. Image credit: Capture One

As mentioned, the update is scheduled to arrive by the end of the month. The update will be free for all existing Capture One 20 users, including those who use Capture One Fujifilm and Capture One (for Sony). For more information on Capture One 20, including pricing information for both subscriptions and perpetual licenses, click here.

Articles: Digital Photography Review (dpreview.com)

 
Comments Off on Capture One teases upcoming Capture One 20 update, including new heal and clone brushes

Posted in Uncategorized


How to Dramatically Shape the Light and Mood Using Adjustment Brushes in Lightroom (video)

18 Apr

The post How to Dramatically Shape the Light and Mood Using Adjustment Brushes in Lightroom (video) appeared first on Digital Photography School. It was authored by Caz Nowaczyk.

How to Dramatically Shape the Light and Mood Using Adjustment Brushes in Lightroom (video) Featured image

In this video from PiXimperfect, you’ll learn how to dramatically shape the light and mood of a photo using Adjustment Brushes in Lightroom.

Throughout this tutorial you’ll learn:

  • the difference between local adjustments and global adjustments
  • how to auto-set particular sliders
  • ways to expand the tonal range
  • how to avoid edge glow when using particular sliders
  • about the tone curve and how to use it effectively
  • valuable shortcuts to help you see when you are creating clipping (blown-out, and underexposed areas with no detail), to view before and after shots, to select the adjustment brush and more
  • how to use the HSL panel to great effect
  • ways to use split toning

We’d love to see the images you edit after watching this tutorial. Please share them with us in the comments section.

You may also like:

  • Landscape Editing Techniques for Fine Art Photography Using Lightroom
  • 5 Things to Do to Every Photo In Lightroom to Improve Your photos
  • How to Jump from Lightroom to Photoshop and Back Again When Editing Photos (video)
  • Answers to Your Most Common Lightroom Questions
  • How to Make Your Photos Pop in Lightroom (With Just 4 Quick Edits!)
  • Create Amazing Sunrise Photos with these Easy Lightroom Editing Tips
  • How to Make Your Photos Awesome in Lightroom or Photoshop Camera RAW

The post How to Dramatically Shape the Light and Mood Using Adjustment Brushes in Lightroom (video) appeared first on Digital Photography School. It was authored by Caz Nowaczyk.


Digital Photography School

 
Comments Off on How to Dramatically Shape the Light and Mood Using Adjustment Brushes in Lightroom (video)

Posted in Photography


How to Create Custom Brushes in Photoshop

08 Sep

The Brush Tool in Photoshop is one of the most versatile and it can be used for many applications. It already comes with many useful brushes preloaded into the program and you can find even more online. But sometimes you just need to be more creative and have full control. Don’t you think?

Not to worry, another great thing about Photoshop is that you can create your own custom brushes. Let me show you how.

What is a Brush?

First things first, what exactly is a brush? It’s a tool used to draw strokes. You can find it in the toolbox or you can activate it by using its hotkey: B.

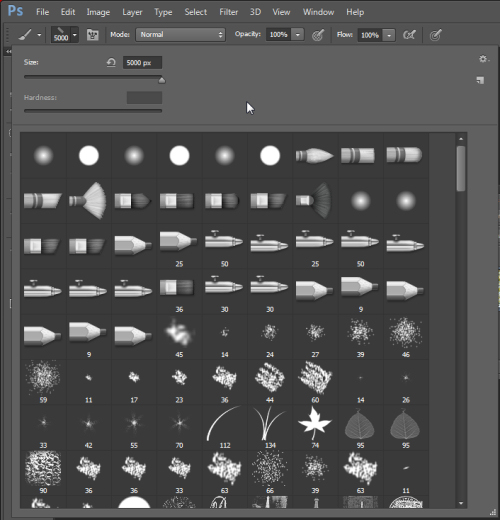
This tool is very flexible because you can adjust its shape, size, opacity and lots of other specs from the Presets panel. That multiplies the options far beyond the first array of choices that you see on the first menu.

Create custom Brushes Photoshop Tutorial Tool Options Presets

None the less, there are times that you need something you just can’t find pre-installed. For example, you can turn your signature or your logo into a brush, it doesn’t get more personal than that right? In just a few steps you can achieve this.

Make a Signature Brush

Open the image that contains your signature or logo, this can come from a scanned paper, for example, or the JPG version of a logo designed in a different program. Now that you have that opened, activate the Marquee tool to select the image. Just click and drag the selection around it and make sure you’re not grabbing anything else from the image.

How to Create a Custom Brushes in Photoshop

Then go to Menu > Edit > Define Brush Preset and a new window will pop up where you can name your brush. Type any name you want, preferably something that will help you identify it later, and click OK.

How to Create a Custom Brushes in Photoshop

Note: In the Brush Name window you’ll see a thumbnail with the preview of your brush, you’ll notice that the color (if it had any) is lost, that’s because brushes are grayscale, so it won’t register the colors of the original. You can, of course, apply any color when you use it though.

Now you have your new signature brush. Whenever you want to use it, just select the brush tool then open the drop-down menu from the options bar. You can also pick it from the Brush Presets panel which you can reach from the Window menu in case it’s not already opened.

How to Create a Custom Brushes in Photoshop

Using the Custom Brush

You may be wondering why you need to turn it into a brush instead of just placing it as an image. This is because it gives you access to all the settings and controls of the brush tool. Just open the Brush panel and you’ll be able to change from color to size to spacing – anything you need for you to create patterns, watermarks and more!

How to Create a Custom Brushes in Photoshop

How to Create a Custom Brushes in Photoshop

That’s just how easy you can turn any image into a custom brush. But how about creating one from scratch?

Create a New Custom Brush

First, open a white canvas and draw the shape you want to turn into a brush. To do this you can use any of the Shape tools or even other Brushes. For example, I’ll make a simple sparkle. For that, I just need four lines using the Line tool and a round brush with very soft edges in the center so that it has a glow effect.

How to Create a Custom Brushes in Photoshop

Remember that color is not registered so it doesn’t matter which colors are you using to draw your shape. Just know that anything in white won’t be part of the brush as it will translate as transparent. Now to turn it into a brush just follow the steps that you did before. Menu> Edit > Define Brush Preset. Click name it.

How to Create a Custom Brushes in Photoshop

Now your custom brush is done, grab it from the menu like any other brush. It’s very easy to create but its use can be as elaborate as you need since it has a lot of possibilities. Let me give you some tips to make the most of it.

Tips and Tricks

You can quickly access some of your brush’s most used properties like size, hardness and opacity from the Options Bar or get a lot more control if you open the brush panel. Regardless of whether you created the brush or it came with Photoshop, you can adjust its presets in the brush panel.

A quick overview of the presets I find more useful:

Brush tip: Apart from the size and hardness that you can also find in the Options Bar, here you can also adjust the roundness and angle of the brush.

How to Create a Custom Brushes in Photoshop

Scattering: this is as straightforward as the name suggests. With this option, you can place the brush more randomly, thus, scattering it.

How to Create a Custom Brushes in Photoshop

You can also change the blending mode of the brush in the drop-down menu. This changes the way the brush stroke interacts with the object directly below, which could be an image or a previous brush stroke. However, I prefer to leave it as Normal and put the new brush strokes on their own layer and then alter the layer’s blending mode, that way I can always come back and change it later if need be.

Opacity and Flow: Both of these refer to the amount of paint that you are applying. However, with opacity, it won’t add more paint if you pass over the same area many times unless you release the click and start again. While flow will keep adding paint regardless.

Over to You

I hope you found the tutorial useful and give your creativity a go with some custom brushes of your own!

The post How to Create Custom Brushes in Photoshop appeared first on Digital Photography School.


Digital Photography School

 
Comments Off on How to Create Custom Brushes in Photoshop

Posted in Photography


Review: Light Painting Brushes – Tools for Creativity

20 Jul

If you enjoy light painting photography, I think this review of tools from Light Painting Brushes (LPB) will interest you. All photographers know that light is essential to taking a successful photograph. At night, when light is limited, light painting can be a fun and artistic form of photography that may stretch a shutter-bug’s creativity by creating light, solely for the purpose of photographing light. If you are new to light painting please read my article – Beginner’s Guide to Light Painting for some ideas to get started.
Light-Painting-Brushes-10

Also, Light Painting Brushes has a great online presence, full of ideas, examples and tutorials. Check out this example of the great tutorial video available:

There are two main types of light painting:

  1. Off-camera painting, by which a light source, unseen to the camera’s view, is used to illuminate a scene or objects so as to make them appear out of the dark in an image. Here the light is only showing the subject and is not part of the image.
  2. Secondly, on-camera painting, in which the light source is seen by the camera and is a subject to be photographed. So here the light IS the subject.

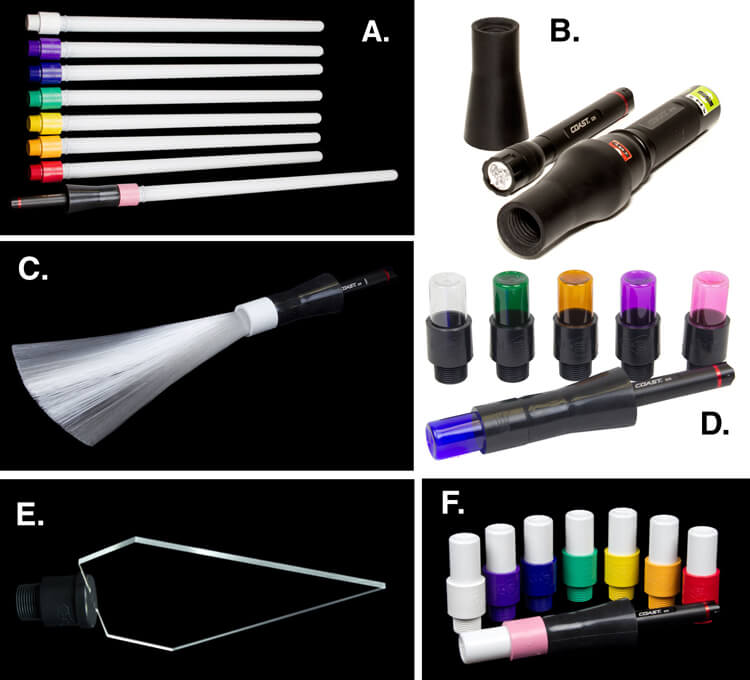
The tools I am reviewing in this article are used for on-camera light painting. With Light Painting Brushes, most of the tools are used to add a graffiti-type light to a scene. This can be lots of fun (especially in social situations) and the creative options are endless! Listed here are the items from Light Painting Brushes that I will be reviewing in this article. (Spoiler alert. they are really cool!)

  • Universal Connectors
  • Set of 8 Opaque Light Writers
  • Set of 6 Translucent Light Writers
  • White Fiber Optic
  • Black Fiber Optic
  • Plexiglass Diamond
  • 22″ Light Sword
Light-Painting-Brushes-Tools

A. – Light Sword, B. – Universal Connectors, C. – White Fiber Optic, D. – Translucent Light Writers, E. – Plexiglass Diamond, F. Opaque Light Writers

Universal Connectors

The universal connector is the glue that literally holds this whole system together. Made of a durable rubber, the universal connector allows any flashlight with a diameter of .975″ to 1.5″ to connect to any of Light Painting Brushes’ tools. The end of the universal connector appears to be threaded, but don’t try to screw the brushes into the connector. The thread’s function is to just grip the brush and hold it tightly it in place.Light-Painting-Brush-Universal-Connector-2-750px
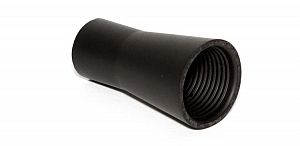
Flashlights will easily insert into the other end, but never hold the whole thing by just the flashlight, as the brush may slide out. Instead, hold it by the universal connector. The universal connector may also be used to connect a “brush” of one’s own making, such as a pop bottle, to a light source (your flashlight).

Opaque Light Writers (Set of 8)

Use the universal connector to connect these opaque colored lights to your light source. The set is available in eight hues including white, purple, blue, green, yellow, orange, red, and pink. The opaque color makes them excellent tools for light writing, drawing or graffiti, and creative uses limited only by one’s own imagination. Because of the opaque colors of these light brushes, a very crisp drawing or writing source results. After some practice with this tool, I am sure some very detailed light drawings can be captured within a photograph.

Translucent Light Writers (Set of 6)
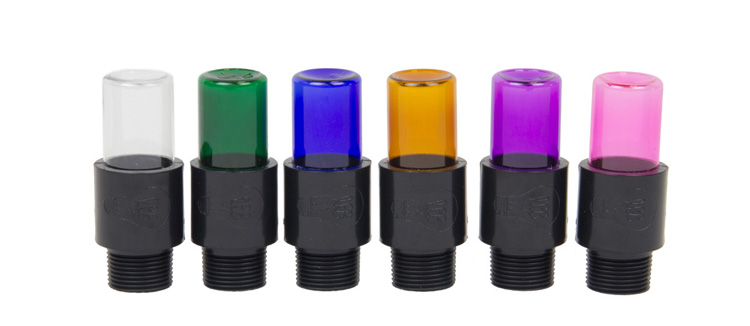
Light_Painting_Brushes_Translucent_Light_Writer_Set-750px

These attachments are very similar to the opaque light painting brushes, but because they are translucent the lights create a more textured effect than the opaque lights. Another tool for artistic expression lighting up the night!

White Fiber Optic
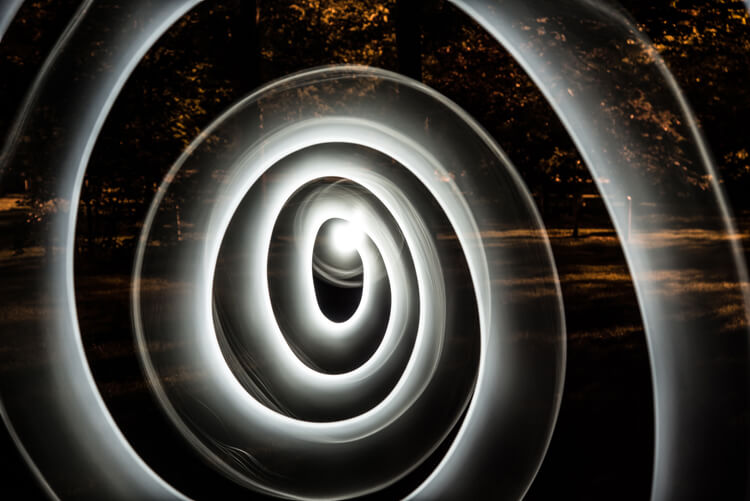
Light-Painting-Brushes-9

Spiral design created using the White Fiber Optic brush

The fiber optic brush connected to a light source really makes some awesome wispy lines. The white light has great depth as the whole strand of the brush lights up. This tool really gave me the feeling that I was actually painting with light! The white fiber optics is so much fun to use, creating some great effects and can be used for many light painting applications.

Black Fiber Optic
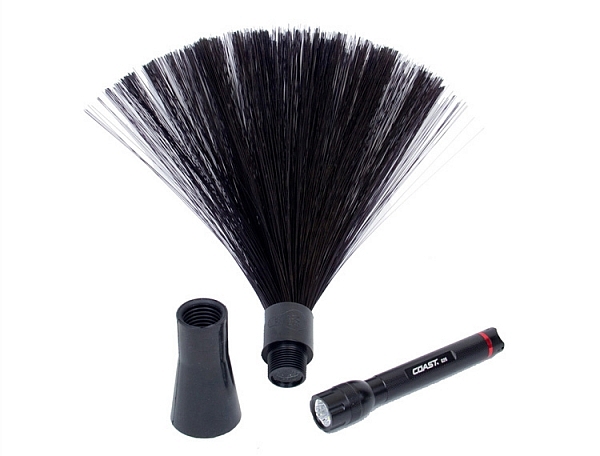
Light-Painting-Brushes-Black-Fiber-Optic-02-750px

The black fiber optic tool only lights up the ends of the brush, great for use in portraits. However, I feel it has a more limited use for other types of light painting, since it puts out a lesser amount of light.

Plexiglass Diamond
Light-Painting-Brushes-11

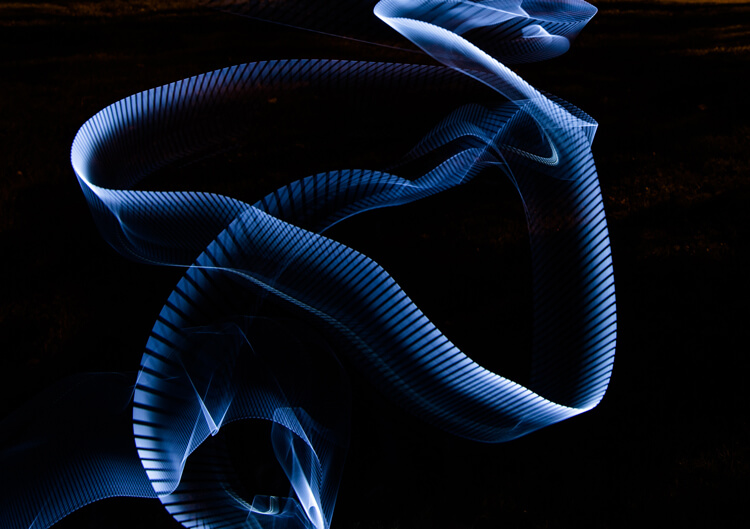
Abstract design created using the Plexiglass Diamond brush

The 9” Plexiglass Diamond shines light out through the cut edges, creating interesting and unique textures when waved about as the image is being shot. This tool is great for light graffiti, portraits, and abstract designs. It is my favorite tool of all the ones I’ve reviewed in this article!

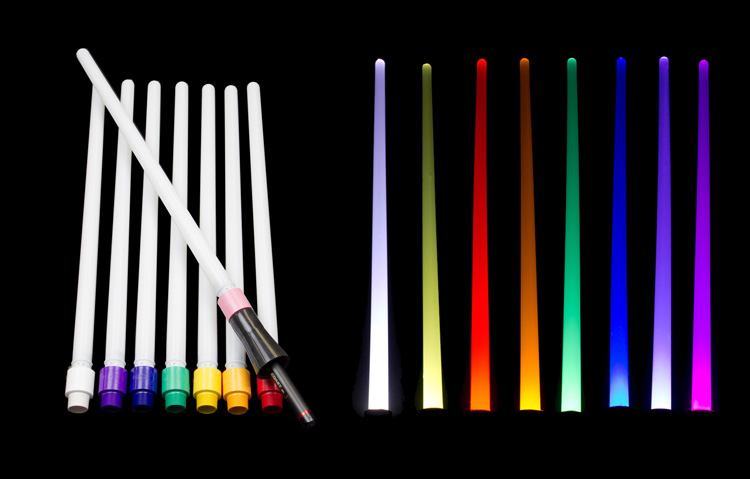
22″ Light Sword
22in-Light-Swords-Illuminated-750px

These tools create a very wide path of light, and are available in 8 different colors: blue, green, orange, pink, purple, red, yellow and white. The colored swords cause some stunning effects, but while the white sword can make some nice strokes of light, in my opinion its results are not as exciting as the colors.
Light-Painting-Brushes-8

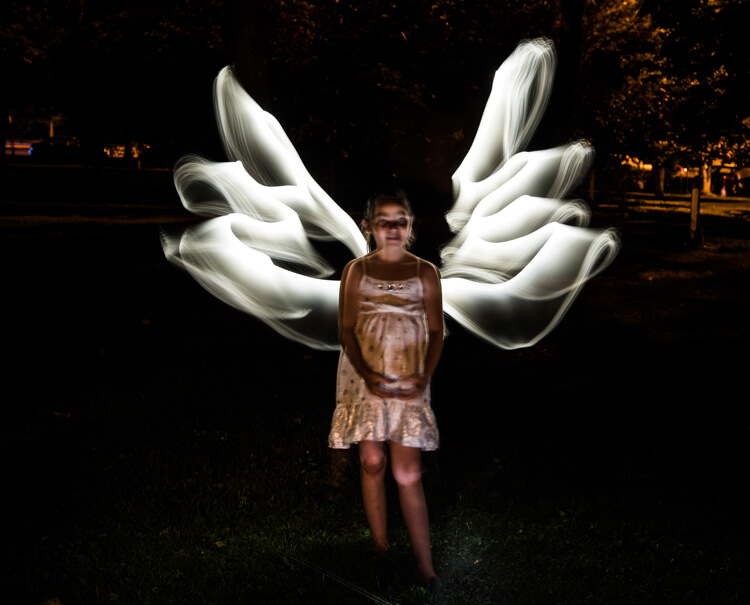
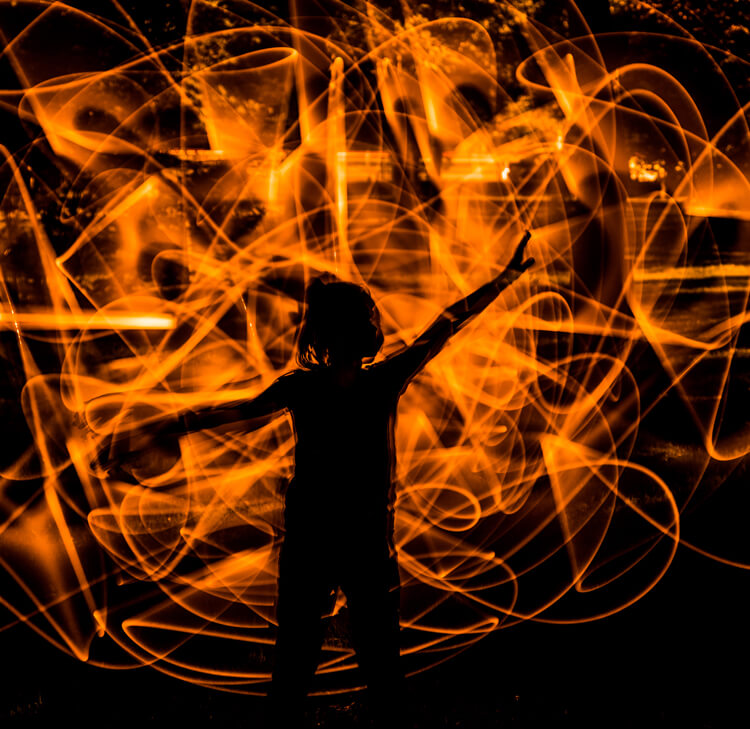
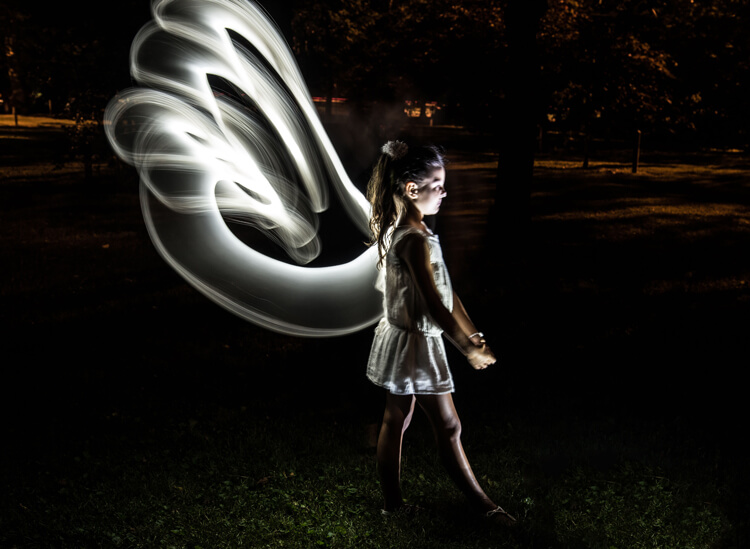
This silhouetted image of a girl was created using the orange 22″ sword brush

Tips:

  • To remain as invisible as possible when trying to photograph a light painting, wear dark colored clothing, keep moving, and avoid holding the light source too close to your body.
  • Speed of motion can make a big difference with many of these tools: the slower the motion, the more vibrant and textured the effect; the faster the motion, the smoother but fainter the effect.

First impressions
Light-Painting-Brushes-7

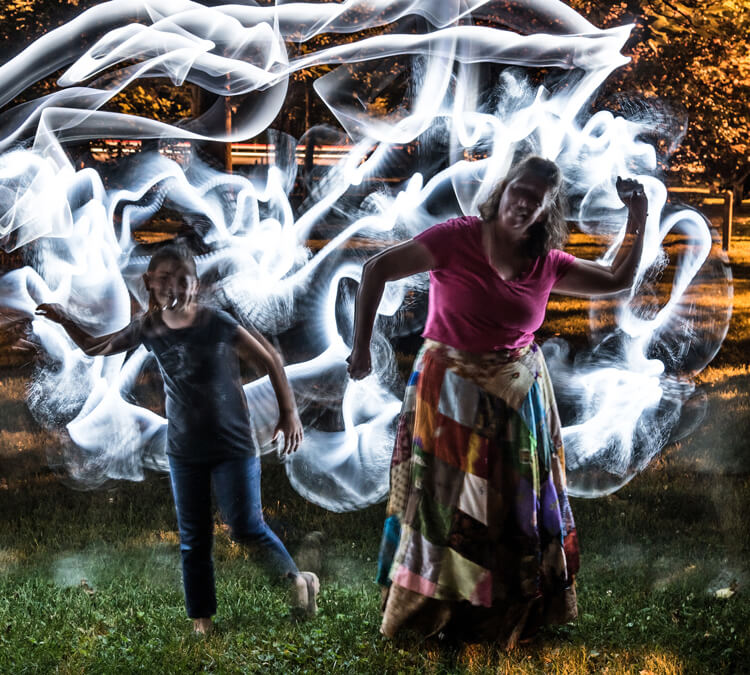
I recently had the privilege to lead a light painting workshop with some local photographers, so I introduced the Light Painting Brush system to them during our course. The following feedback comes from a few of the participants:

  • “I felt like a kid, amazed and surprised with all the images we shot and with the numerous options we used to create and express ourselves as we played with the Light Painting Brushes. My favorite was the colored ones because they made things and shapes look like I was using chalk, and the colors were great in the pictures! It helped me to express and to imagine numerous things. I just wish we’d had two more hours!”
  • “Several lighting methods were demonstrated, but my favorite was using light painting brushes to create an angel figure out of a beautiful little girl.”
  • “My favorite was the white fiber optic, as it made a really pretty effect and I felt I could be more creative with it.”
  • “I was very impressed with the quality and the different possibilities of the light painting tools! I love that it gives you the ability to add your own personal unique touch to a photo!”

The brushes were easy to use, even for beginners, and cast a new “light” giving night photography a new perspective and dream like world.
Light-Painting-Brushes-13


Conclusion

Whether you are an experienced light painter or just wanting to give this technique a try for the first time, these tools from Light Painting Brushes are a fantastic addition to your accessory arsenal. They are designed by light painters who create and use their products. If you watch their tutorials online you’ll see that they have a passion to create tools that are to be used to create works of art in Light Painting.

Here’s another really cool thing you can do with these tools – make a spirograph!

The Universal Connector is the essential tool for using the actual brushes. I really like the unique textures and shaping possibilities of my two personal favorite brushes, the White Fiber Optics and the Plexiglass Diamond. My previous experience with light painting has mostly been of the off-camera type, but after using these Light Painting Brushes my interest has really been piqued to pursue on-camera light painting.

googletag.cmd.push(function() {
tablet_slots.push( googletag.defineSlot( “/1005424/_dPSv4_tab-all-article-bottom_(300×250)”, [300, 250], “pb-ad-78623” ).addService( googletag.pubads() ) ); } );

googletag.cmd.push(function() {
mobile_slots.push( googletag.defineSlot( “/1005424/_dPSv4_mob-all-article-bottom_(300×250)”, [300, 250], “pb-ad-78158” ).addService( googletag.pubads() ) ); } );

The post Review: Light Painting Brushes – Tools for Creativity by Bruce Wunderlich appeared first on Digital Photography School.


Digital Photography School

 
Comments Off on Review: Light Painting Brushes – Tools for Creativity

Posted in Photography


PhotoshopUser TV: Flame FX and Brushes – Episode 421

01 Sep

This week on PUTV, Corey has a tip on using the flame generator. Pete dives a little deeper into brushes and gives you some helpful tips in using them.

This Week’s Sponsors:

Wacom | mpix | B&H Photo | Kelby Training | NAPP | onOne Software | Peachpit | Squarespace | Expo Imaging | Intel | Athentech

Photoshop User TV Episode 421 is now playing!

Download Episode 421
(In order to download this file directly to your computer, right-click (Control-click on Mac) on the Download link and choose the Save As option.)

Photoshop User TV

 
Comments Off on PhotoshopUser TV: Flame FX and Brushes – Episode 421

Posted in Photography


The Easy Way to Make Your Own Custom Photoshop Brushes

26 Nov

If you’ve never heard about the creative use of brushes in Photoshop, this article is for you. If you already know about using brushes, you’ll be able to ramp up your creativity once you learn this easy skill – making your own brushes.

DSC_0974Pond2W

What are Photoshop brushes and why you’d want to learn how to make your own?

Photoshop brushes are tools that are mostly used just like regular paint brushes to add strokes of color to your images. Most often people will use them as part of their dodging and burning workflow. Some people also use them in digital painting. The built-in brush set comes with a great assortment of  brush styles, such as soft bristles, round, square etc., but you can also make your own “fancy” custom brushes (which are reusable) to speed your workflow and add elements of interest to your images.

The creative side of custom brushes allows you to use all sorts of imagery, textures, individual shapes, and even other photos like an old fashioned stamp pad, so you can quickly add artistic treatments to your images. You can even make a brush of your signature to easily sign your work.  Then combining the stamped brushes with layers and blending modes you have a whole other set of easy creative tools you can use to multiply your photographic impact.

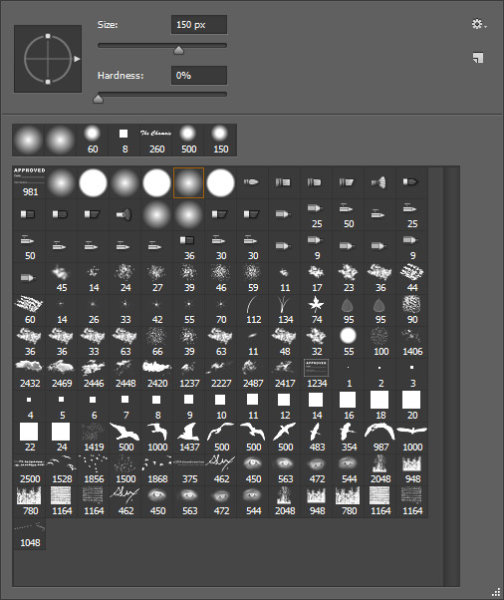
brushes-palette

Screenshot of the Brushes Palette – notice the birds and my name close to the bottom? These are custom brushes.

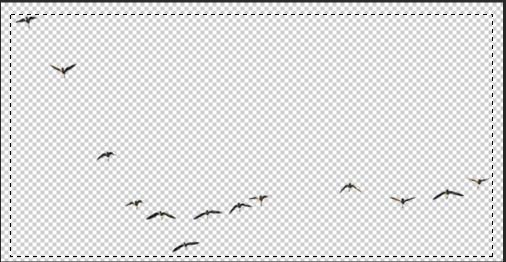
Making reusable items into brushes helps you to easily add objects of interest or even subject matter to your images. Birds are very popular in landscape images these days. Who doesn’t instantly feel the freedom and purpose of birds in flight? Adding a carefully placed flock of birds, or even just one bird in flight, can change the entire story of the image and add a powerful element to your composition.

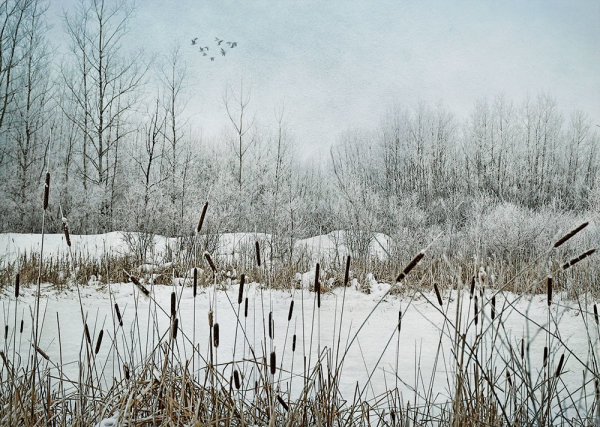
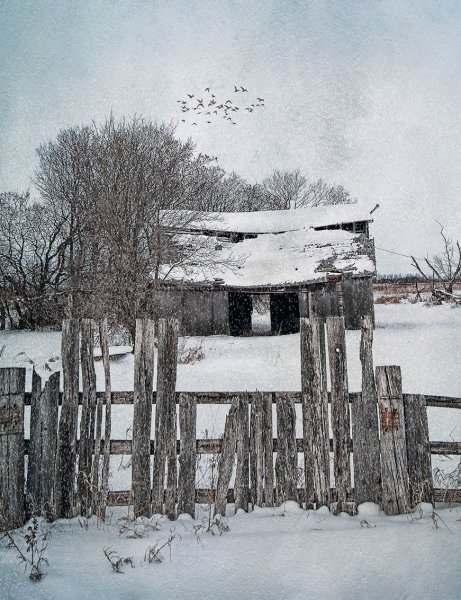
_300385203W

Adding a “flock of birds” brush to create a better story.

By creating your own “instant flock” with brushes you will never be at a loss to fill an empty sky. As well, this technique is the same whether you’re making a birds brush, a signature brush, sparkles, snow flakes, or music notes – what you can create is entirely open, limited only by your imagination.

The Simple Process for Making Custom Brushes

Let’s use birds for this example. Birds are popular and a versatile addition to landscape images, so this demo will show you how to make a custom reusable brush for adding a flock of birds to your images. This assumes you have a photo of birds. If you don’t, but still want to follow along, the zip file below contains all the elements you need to replicate this specific tutorial.

Step 1

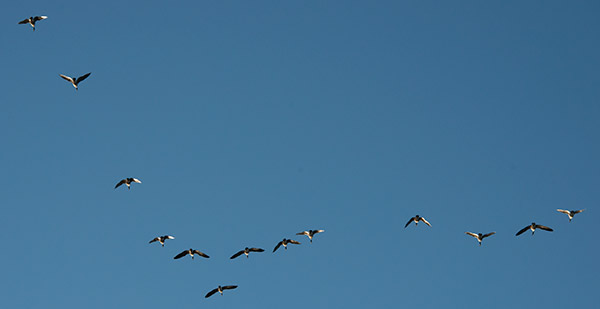
Open the image you want to make the brush of – birds, trees, etc. – in Photoshop. The best images to use are ones where the item that is to be the brush is isolated on a plain background, in the case of birds a clear blue sky is perfect. If you want to make brushes from images of trees, try to use images where the trees are against a plain uncluttered background.

A good image for a brush base.

A good image for a brush base.

Step 2

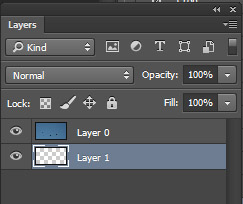
Double click on the background layer to make it editable – it should now be called Layer 0. Make a new empty layer and move it beneath Layer 0 as shown below.

layers

Step 3

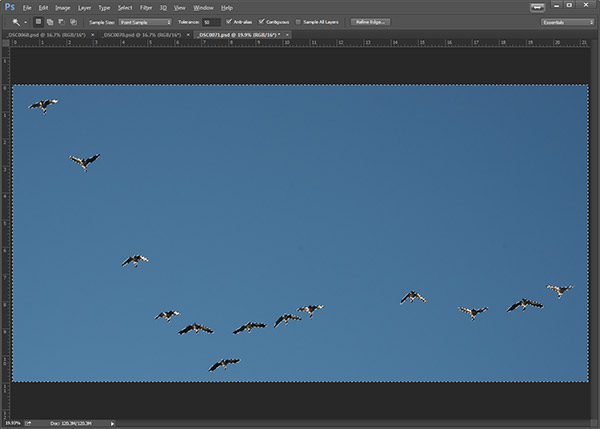
Next,  you are going to select the background and cut it out. Using the Magic Wand tool, set the Tolerance in the top menu to around 50. This will ensure that all your background pixels are selected. If you have a more complex background, you will have to play with the Tolerance, or perhaps try the Lasso tool to cut out the background.

magicwand

Background selected with the Magic Want tool.

Step 4

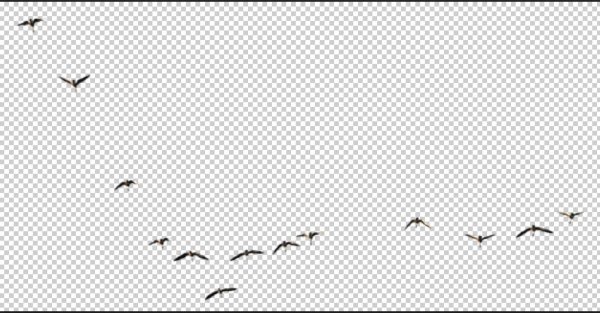
With Layer 0 as your active layer, and the background with the marching ants, hit Backspace on your keyboard to delete the background. Click CTRL D to remove the marching ants. Your image should now look like this:

brush-base

Step 5

Now you’ll will make the actual brush. You can use the Rectangular Marquee tool or the Freehand Lasso to select the birds or the subject of your brush. Which tool you use will depend on your brush subject. I will use the Rectangular Marquee tool for this example. Using the marquee tool draw a selection  around your birds.

selection

Under the Edit menu, look for Define Brush Preset and select it. You’ll get a pop up that wants you to name your brush. Give it a creative name and click ok.  Now go into your Brush Preset palette by clicking on the brush tool, and you’ll see your newly minted brush at the bottom of the list.

brush tool     brushes context menu


your-new-brush

Step 6 IMPORTANT!

The final step is to SAVE your new brush so you can use it over and over. Look for the little gear in the top right corner of this brush preset palette. Click Save Brushes and give your new set a name.

You’re done! Yay. Birds in flight forever. Whenever you want to add birds, just select this brush from the palette and stamp away (use the brush at 100% to have solid birds, anything less they will become see-through).

One big hint for using ANY brush is to use it on a new layer. This way if you don’t like its position, opacity, size, etc., you can easily edit it without having to start your image over again.

You may have noticed that this SAVE you just did, saves all the other brushes together with your new one.  If you want to really get savvy with custom brushes to create special brush sets with only your brushes watch for my article on Advanced Brush Creation and Management.

Download the zip file for this image: DPS Making Brushes – use it to create your bird brushes. Show us the images you’ve made using brushes,  especially the ones you’ve created with this file!

The post The Easy Way to Make Your Own Custom Photoshop Brushes by Alex Morrison appeared first on Digital Photography School.


Digital Photography School

 
Comments Off on The Easy Way to Make Your Own Custom Photoshop Brushes

Posted in Photography


Photoshop tutorial – Fracture photo effect – splatter brushes (english subtitle)

19 Dec

www.flashstudioimmagine.com 220 tutorial inediti www.youtube.com Visita il mio canale youtube labottegadellafotografia.blogspot.it IL mio blog Download brushes:myphotoshopbrushes.com You can perform this process using splatter brushes. In this tutorial I explain step by step how to dissolve a photo and spread it like splashes of paint. Powered by Luciano Boschetti, photographer.
Video Rating: 4 / 5


5 Things to Know About Photoshop Brushes

13 Nov

5 things to know about photoshop brushes opener

Brushes are used a lot in photo editing from removing blemishes and smoothing skin to dodging and burning and painting on masks. Here are five important features of the brush tool in Photoshop.

1. Adjust Size, Opacity and Hardness from the Keyboard

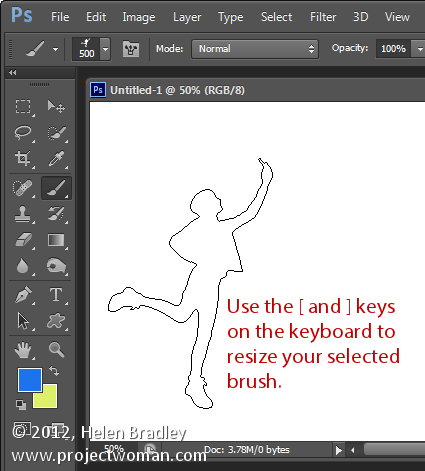
When a brush is selected you can adjust its size without having to open the Brushes palette by clicking the [ and ] keys on your keyboard.

Provided a brush is selected you can change its Opacity by typing a number. For example, type 5 to set Opacity to 50%, type 1 for 10% and 0 for 100%.

To adjust the hardness of the brush hold the Shift key as you tap either the [ or ] keys on the keyboard. Each tap increases or decreases the hardness by 25% in the range 0%-100%. The results of doing this are harder to see as there is no hardness indicator on the tool options bar. However, if you have the Painting Cursor set to Normal Brush Tip in preferences you will see a difference in the brush size as you do so

5 things to know about photoshop brushes 1

2. Save the Brush

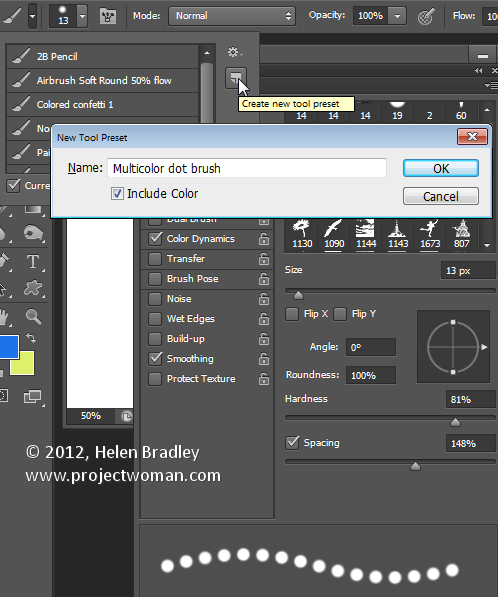
When you have a brush configured with your preferred settings, save it as a Tool preset. To do this from the Brush Preset list in the top left of the screen click the Create New Tool Preset button and type a name for the preset. Click Ok.

In future you can select this saved preset from the list and just start painting with it.

5 things to know about photoshop brushes 2

3. Disappearing Brushes

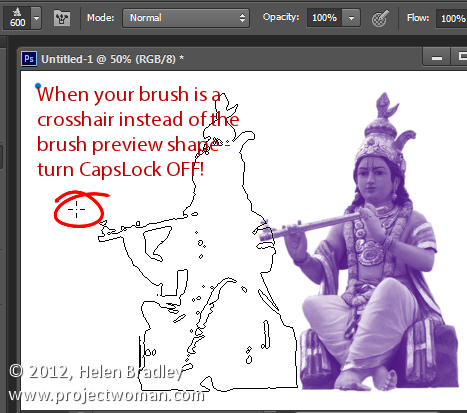
One of the very annoying things that will happen to most of us at one time or another is to have the brush appear to disappear. Instead of the regular brush cursor which shows the size and style of the brush you will see a crosshair cursor.

The issue is not with the brushes themselves but is with the Caps Lock key. If you disable Caps Lock on your keyboard the more visual brush cursor will reappear.

5 things to know about photoshop brushes 3

4. Paint a Straight Line

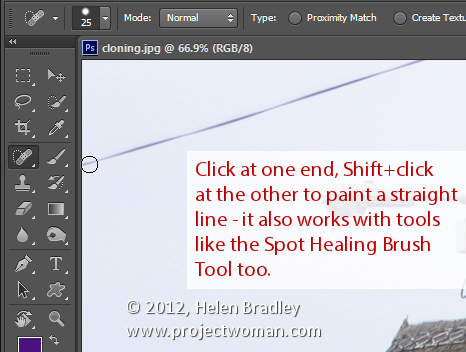
To paint in a straight line, click at one end of the line, hold the Shift key and click at the other end of the line. This draws a continuous brushstroke between both points.

If you adjust the spacing of your brush by using the Brush panel Spacing option to make it more than 100% you can create a line of dots this way.

This can also be used to remove power lines with the Spot Healing Brush Tool. Click at one end of the power line, Shift + Click at the other end to paint a straight line over the power line and it will be removed automatically.

5 things to know about photoshop brushes 4

5. Quickly Show the Brush Panel

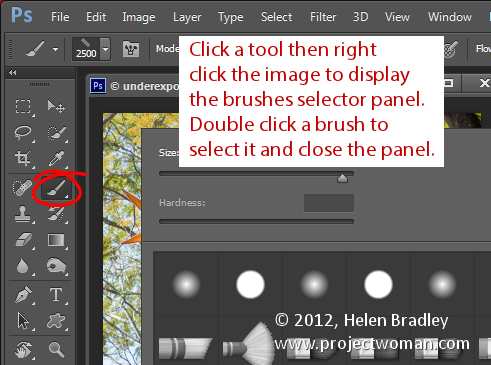
You can quickly show the Brush panel so you can choose a brush to use by first selecting a tool that uses a brush such as the Brush Tool, Dodge, Burn, Eraser tool and so on.

Then right click on the image and the brush panel appears automatically. To select a brush and exit the panel in one step, double click the brush to use.

5 things to know about photoshop brushes 5

And now it is over to you. What other features of Brushes do you think are valuable for photographers to know?

Post originally from: Digital Photography Tips.

Check out our more Photography Tips at Photography Tips for Beginners, Portrait Photography Tips and Wedding Photography Tips.

5 Things to Know About Photoshop Brushes


Digital Photography School

 
Comments Off on 5 Things to Know About Photoshop Brushes

Posted in Photography


Healing brushes, Patch tool tricks: Photoshop retouching
23 Mar

High Quality www.youtube.com Hi def version at tutorialbucket.googlepages.com Knowing how to use the Spot healing brush and regular Healing brush can make retouching a breeze. See the tricks to get these two working at maximum speed!