RSS
 

Posts Tagged ‘Breaking’

Breaking: CP+ 2020 cancelled amid Coronavirus concerns

14 Feb

Camera & Imaging Products Association (CIPA) has announced it’s canceling the CP+ 2020 trade show, citing concerns surrounding the Coronavirus.

In a post shared on its website, CIPA says the annual tradeshow, which was supposed to take place from February 27th through March 1st in Yokohama, Japan, has been canceled ‘given there is no effective treatment or containment measures to deal with the novel coronavirus (COVID-19).’

A screenshot of the note on the CP+ 2020 website.

Mobile World Conference (MWC), the world’s largest smartphone exhibition, was canceled earlier this week, leaving many wondering if CP+ was next. As now evident, those concerns were valid. Below is a tweet from the official CP+ Twitter account confirming the cancellation:

According to CIPA’s website, CP+ drew in exhibitors from 120 countries and nearly 70,000 visitors last year. No further information has been given at this time and as of publishing this no manufacturers have commented on the cancellation. We will continue to update this story as more details are revealed.

Articles: Digital Photography Review (dpreview.com)

 
Comments Off on Breaking: CP+ 2020 cancelled amid Coronavirus concerns

Posted in Uncategorized


2019 Pulitzer Prize photography award winners announced for Breaking News, Feature Photography

17 Apr

Editor’s note: Some of the photographs in the winning selections are graphic in nature. We have taken the liberty to censor a few of the more graphic images and provide uncensored links in the gallery description, but even some of the uncensored images are tough to look at. Please keep this in mind when proceeding through the award-winning images.


The 2019 Pulitzer Prize winners have been announced, including two in their respective photography categories: the photography staff of Reuters for Breaking News Photography and Lorenzo Tugnoli of The Washington Post for Feature Photography. Both winners have been awarded $ 15,000 each.

The photography staff of Reuters was awarded a Pulitzer Prize for their ‘vivid and startling visual narrative of the urgency, desperation and sadness of migrants as they journeyed to the U.S. from Central and South America,’ it was announced. The photography staff of Reuters was awarded the Feature Photography Pulitzer Prize in 2018, as well. Below is a gallery of the winning photographs in the Breaking News Photography category:

$ (document).ready(function() { SampleGalleryV2({“containerId”:”embeddedSampleGallery_0351352454″,”galleryId”:”0351352454″,”isEmbeddedWidget”:true,”selectedImageIndex”:0,”isMobile”:false}) });

Reuters congratulated the winners on Monday. The publication’s Editor-in-Chief Stephen J. Adler said in a statement:

While it’s gratifying to be recognized for the work, public attention should be focused more on the people about whom we report than on us: in this case, the Rohingya and the Central American migrants.

In addition, Lorenzo Tugnoli of The Washington Post was awarded a Pulitzer Prize for his ‘brilliant photo storytelling of the tragic famine in Yemen, shown through images in which beauty and composure are intertwined with devastation.’ The work was moved from the Breaking News Photography to the Feature Photography category by the Pulitzer jury. Below is a gallery of the winning photographs in the Feature Photography category:

$ (document).ready(function() { SampleGalleryV2({“containerId”:”embeddedSampleGallery_6894478642″,”galleryId”:”6894478642″,”isEmbeddedWidget”:true,”selectedImageIndex”:0,”isMobile”:false}) });

Tugnoli was joined by Craig F. Walker of The Boston Globe and Maggie Steber and Lynn Johnson of National Geographic, who were nominated as finalists. In the Breaking News Photography category, the photography staff of Associated Press and Noah Berger, John Locher and Ringo H. W. Chiu of Associated Press were nominated as finalists.


Photo credit: Photos by their respective photographers/organizations, used with permission from the Pulitzer Prize organization

Articles: Digital Photography Review (dpreview.com)

 
Comments Off on 2019 Pulitzer Prize photography award winners announced for Breaking News, Feature Photography

Posted in Uncategorized


Center Field – 9 Acceptable Ways For Breaking Rule of Thirds in Photography

22 Nov

When starting, most photographers tend to shoot all subjects center-frame. As they learn more about photography and composition, they learn that centering a subject is not appealing and that they must follow the ‘Rule of Thirds’ to have a good composition. What if I suggest breaking Rule of Thirds?

The Rule of Thirds

The Rule of Thirds is taking a frame and dividing it into three equal sections both horizontally and vertically, creating a rectangular ‘tic-tac-toe’ box. Framing a subject so that it falls on one of the four intersecting points of that box can sometimes make an image more appealing to a viewer engaging with it.

2 - Breaking Rule of Thirds in Photography

Implementing the Rule of Thirds.

While you may not perfectly frame your subject to fall within one of those four points, if your subject falls on one of the four internal lines within the box, in most cases, it still gives a better appeal than a centered image.

When It’s a Good Idea to Center Your Subject

1. Centering as a Compositional Tool

Placing your subject dead-center can work to your benefit if the subject still tends to comply with the Rule of Thirds guideline. Such as, when more than one point of focus falls on more than one line within that ‘Rule of Thirds’ box as shown in the image below.

The sets of pillars fall on one of the two vertical lines in the frame according to the Rule of Thirds even though the entire image is centered.

2. Place Focus on Your Main Subject

Sometimes when there is a busy foreground or background, placing your subject dead-center helps to draw the viewer’s attention to it. While the image below shows much texture, centering the stool brings focus to it.

4- Breaking Rule of Thirds in Photography

Bring better focus to a subject by centering.

3. Emphasize Symmetry

You may sometimes run into a subject that has a symmetrical value to it. The item could include columns at a building’s entrance, a person’s face or something with repetitional characteristics. Centering the subject, in this case, allows the viewer to relax because the order in the image makes sense.

5- Breaking Rule of Thirds in Photography

This nonsymmetrical image is not as appealing as the image below.

In the next image, there is a sense of order due to the equal number of pillars to the right and left of the fountain, producing symmetry.

6 - Breaking Rule of Thirds in Photography

This image represents symmetry.

4. Draw the Viewer’s Eye Inward

One of the most common goals for a photographer is to draw a viewer’s attention into the image instead of out of it. Straight roadways, paths, or sidewalks are great examples that keep your viewer’s attention within the frame – by drawing the eye inward.

The hall and chandeliers are centered taking the eye inward into the photo.

5. Create a Sense of Size and Space

Centering a subject can often showcase its size, especially when surrounded by people, buildings or other objects that serve as a comparison. Such as in the image below.

8 - Breaking Rule of Thirds in Photography

Centering a subject can sometimes emphasize the size of a subject.

Centering a subject can also give a sense of space. A good example is when there is water or cityscape in the foreground of an image and a clear sky in an upper part of the image. See an example below.

9 - Breaking Rule of Thirds in Photography

Centering the Eiffel Tower in this image works to show a sense of space.

6. Square Image Format

A great way to justify centering an image is when you use the square image format. A square has all equal sides in length, so placing a subject dead-center works well. I also like it because, in most cases, it’s an equal distance from the subject to all edges of the sides.

Centering the Eiffel Tower in this image works to show a sense of space.

7. Shooting With Shallow Depth of Field

When you open up your aperture and shoot with shallow depth of field around your subject, it creates a more three-dimensional feel, adding depth to your image. In this case, centering your subject works because it washes out distraction around your subject, as in the image below.

11 - Breaking Rule of Thirds in Photography

Shooting with a shallow depth of field.

8. Overcoming Location Difficulties

Sometimes the location of a fixed subject makes it difficult to capture a stunning shot. During these times try to get creative, as I did in the image of the clock at Grand Central Terminal in New York City below. I could’ve taken that shot from any number of directions or angles. However, for a better shot, I centered it at an angle that included the American flag in the background.

12 - Breaking Rule of Thirds in Photography

Center a subject to overcome location difficulties.

9. Simplicity

You know the saying, ‘less is more?’ While placing a subject off-center adds tension to an image, placing a subject dead center can give a calm and orderly feeling. In addition, placing your subject in a central position is like opening a book to its story. You are making it the most important element in the image. A natural environment, a natural face – it’s an open book. What is your subject’s story that you are introducing to your viewers?

13 - Breaking Rule of Thirds in Photography

Simplicity

Tying It Altogether…

Some ‘rules’ are meant to be broken. The Rule of Thirds is not the only way to guarantee a good composition. As long as you understand why you’re breaking the rules and foregoing guidelines with a specific intention, your images can be as compelling subject-centered as with your subject off-center.

The post Center Field – 9 Acceptable Ways For Breaking Rule of Thirds in Photography appeared first on Digital Photography School.


Digital Photography School

 
Comments Off on Center Field – 9 Acceptable Ways For Breaking Rule of Thirds in Photography

Posted in Photography


Breaking Vlad: Street Art Takes On Vladimir Putin

15 Jan

[ By Steve in Art & Street Art & Graffiti. ]

putin-graffiti-1a

Vladimir Putin of Russia is a polarizing figure to say the least, as these examples of street art, graffiti and stencils from all over the world illustrate.

putin-graffiti-1b

Considering his position at the zenith of Russian politics for most of the 21st century, it’s really no surprise Vladimir Putin has topped Forbes list of The World’s Most Powerful People the last four years running. Such global influence hasn’t gone unrecognized by the world’s artistic community either, though their acknowledgment isn’t always complimentary.

putin-graffiti-1d

One place where you WILL find pro-Putin street art is in Crimea, the Ukrainian territory annexed by Russia in March of 2014. Are these flattering public portraits really the work of independent street artists? That’s the authorities’ story and they’re sticking to it.

putin-graffiti-1c

putin-graffiti-1f

putin-graffiti-1e

Social media users aren’t sure what to think of the tributes and as one might think, critiques are a delicate matter – Big Brother really is watching. Even so, some anonymous protesters have made their feelings felt, in some cases so effusively the compromised “artwork” has had to be painted over.

The Worm Turns

putin-graffiti-2a

In other parts of the Ukraine, Putin is, er, not so highly regarded. The above graffiti from Ternopol, western Ukraine, implies Putin has acted in an insidious, duplicitous, “wormlike” manner. The German stahlhelm is meant to evoke a previous threat to Ukrainian lives and livelihoods.

Ukraine Not Weak, Very Tasty

putin-graffiti-3a

putin-graffiti-3b

Being the powerful leader of a nation practicing an aggressive foreign policy is a two-edged sword: that leader becomes the focus of resentment, resistance and remonstrance by the aggressees. This graffiti of Putin acting power-hungry was painted in Odessa in April of 2014 by artist Sviatoslav Lavrusenko. “I think, Putin will get indigestion, if he does not stop,” states Lavrusenko on his Facebook page.

putin-graffiti-4a

“The character ‘HACKERMAN’ from the 2015 film Kung Fury… is used in jokes regarding a person’s inflated sense of self-esteem when they solve a simple technical issue,” according to Know Your Meme. Russia’s alleged hacking of the DNC during the 2016 U.S. presidential election, however, was (a) no joke and (b) doubtlessly did little to boost Vladimir Putin’s healthy sense of self-esteem. This cleverly painted corrugated metal garage door can be found in Melbourne, Australia.

Next Page – Click Below to Read More:
Breaking Vlad Street Art Takes On Vladimir Putin

Share on Facebook


[ By Steve in Art & Street Art & Graffiti. ]

[ WebUrbanist | Archives | Galleries | Privacy | TOS ]


WebUrbanist

 
Comments Off on Breaking Vlad: Street Art Takes On Vladimir Putin

Posted in Creativity


Record Breaking: Magnetic Levitating Turntable Lets Vinyl Defy Gravity

23 Oct

[ By WebUrbanist in Technology & Vintage & Retro. ]

floating-record-turntable

Cool and clever trump common sense and normal physics in this levitating record turntable, which aims to bring a vintage technology into the future.

Mag-Lev Audio wants to push audio technology in a new (vertical) direction, creating an “uplifting experience of music” in the form of the world’s first floating record player.

floating-record-player

The device, the creators claim, not just about a look, but also the ability to “maintain the incredibly precise turning of the platter with sensor regulating software. Air is the smoothest medium with least amount of friction, which further elevates this project into a truly unique listening experience.”

record-player-feet

Feet support the spinning platter when it is not in use while stored-up power can bring the system to a comfortable stop and lift the needle in case of an outage (instead of it dropping the floating disc uncontrolled).

vinyl-with-leds

The makers boast the simplicity of the system: “pick a favorite record; turn the turntable on; move the tone arm into position; and lower the cueing lever; then let the smart-record player do the rest.”

hovering-turntable

night-light

hovering-disc-vinyl

A series of LED lights and digital displays lend the entire setup an air of cyberpunk futurism as well, reinforcing the ambient aesthetic created by the floating form of the disk. Whether this approach will take off remains to be seen, but the gadget has already raised enough money on Kickstarter to make it happen.

Share on Facebook


[ By WebUrbanist in Technology & Vintage & Retro. ]

[ WebUrbanist | Archives | Galleries | Privacy | TOS ]


WebUrbanist

 
Comments Off on Record Breaking: Magnetic Levitating Turntable Lets Vinyl Defy Gravity

Posted in Creativity


Countdown to PIX 2015: Dixie Dixon and breaking into fashion photography

01 Oct

We’re less than a week away from PIX 2015, and we’re taking the opportunity to introduce you to some of our talented re:FRAME speakers. Dixie Dixon acquired her first camera, a Nikon FG, when she was just 12 years old. Now she’s made a name for herself in fashion and commercial photography – find out a couple of her tips on breaking in. Read more

Articles: Digital Photography Review (dpreview.com)

 
Comments Off on Countdown to PIX 2015: Dixie Dixon and breaking into fashion photography

Posted in Uncategorized


Photographing Starry Skies for Nocturnal Landscape Without Breaking the Bank

02 Aug
Photo01

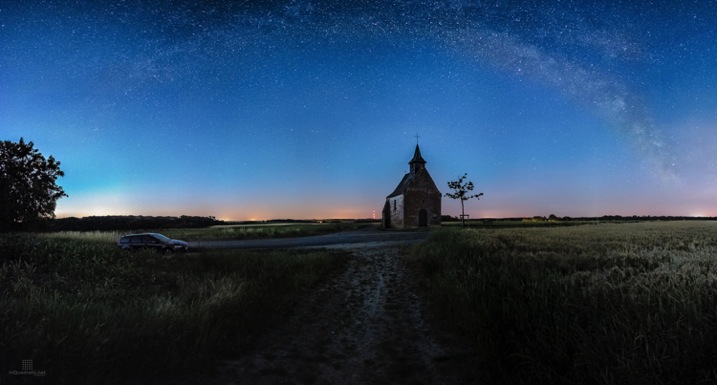
Milky Way over the Belgian countryside – Sony RX100, 28mm equivalent f/1.8 + LPR (Light Pollution Reduction) filter, ISO 6400. Panorama composed of 12×3 frames, each frame is the image average of four different photos

Photography in low-light conditions is one of the most challenging things to do with a camera. In conditions with faint, moving, distant lights it is even trickier. There is something about a starry sky that simply inspires awe in all of us. And it does so more often since light pollution is getting worst all around the world. I wonder how many children have seen The Milky Way first hand.

Recently, night photography caught my attention because, it is convenient for me. It is the time my duty as father can be left to sleep alongside my son, and the photographer in me can go out hunting starry skies. What is not convenient, is that I live in Belgium. People may know Belgium for its massive variety of beer, but also sports one of the most light polluted skies in all of Europe (dare I say the world?). Don’t believe me? Check the image below, extracted from the Dark Site Finder website.
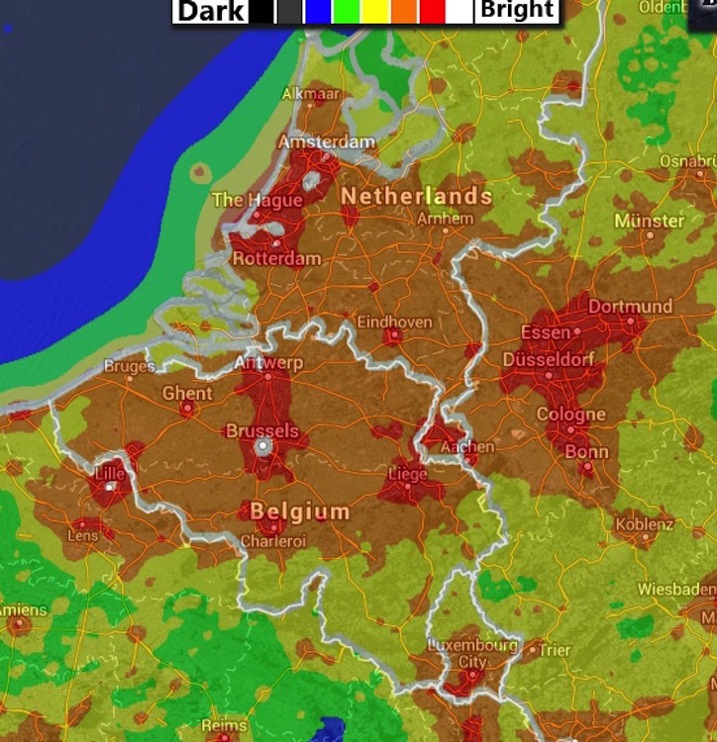
Photo02

Light pollution in Belgium (Source: Dark Site Finder)

As you can see, in Belgium the most you can hope for is a moderately dark sky, somewhere between typical urban suburbs and rural skies. This is mostly due to the presence of street lights lighting up almost all of the Belgian road network. Unfortunately, true dark skies are among the rarest gems in Europe: small, precious, and hard to find. Let me be clear here – nothing beats a truly dark sky and a clear atmosphere when it comes to photographing the stars.

But fear not – we can still get some pretty photos of starry nights with a bit of patience and the right gear.

Astrophotography versus nocturnal landscape

There are two main kinds of night photography that involve the starry sky: astrophotography and nocturnal landscape photography.

The first, in my view, is the attempt to photograph distant objects in the sky (planets, nebulae, galaxies) with no landscape. This kind of photography is usually achieved by using a camera mounted to a telescope (or to a long telephoto lens), all mounted on a motorized head on a tripod. Objects in the sky move pretty fast, so if you cannot track their movement with some sort of tracking device, you will not get many astrophotos. This kind of photography has its own challenges, but it is pretty straightforward: get a telescope, a tracking head, a sturdy tripod and you are pretty much done. A number of filters are also available to enhance the view of nebulae, planet and galaxies, as well to suppress the sky glow and punch through light polluted skies.

Nocturnal landscapes, instead, are another kind of beast entirely – the main problem is that you have the stars moving (fast!) across the fixed landscape. If your exposure is too long, stars will stop appearring as dots, and will begin to become trails. And you cannot track their movement or the landscape will be blurred. Here is the difficulty – you are trying to photograph in low light faint, distant lights and you want to do that as fast as possible (except if you do want to photograph star trails). The technical steps you have to adopt in order to capture a nocturnal landscape may vary depending if you want record star trails or not, and on the darkness of the sky above you.

What you cannot (easily) control: The ideal conditions

Ideally you want to have:

  • The darkest sky possible above you
  • A clear, moonless night (few clouds are allowed)
  • A clear and thin atmosphere
  • An interesting view or foreground

Remember, you are still doing landscape photography. A boring landscape with a dark, empty foreground will ruin even the most majestic of skies. You need to balance both parts to get a keeper.

What you can control: The ideal gear

Ideally, money is one of your last concerns and you have a digital full frame camera (oh what the heck, let’s take a digital medium format camera, even better) with excellent ISO capabilities and a set of fast (ideally f/1.4 to f/2.8) and sharp lenses to put in front of your sensor. Also, you need a sturdy tripod and head, a remote shutter, a headlamp (to see what you are doing) and strong lights (or even off-camera flashguns if you are brave enough) to do some light painting.

If you are like me, and money is a constraint, you can get away with any camera able to shoot at 3200 ISO (while still retaining some image quality) in RAW format. But you will still need fast glass (a lens with a large maximum aperture), anywhere from f/1.8 up to f/3.5.

To give you an idea, below there is the list of my current gear for nocturnal landscape photography:

  • Olympus OM-D EM–10
  • Samyang 7.5 f/3.5 UMC fisheye (Micro Four Thirds) – equivalent to 15mm on full frame
  • Samyang 12 f/2.0 NCS CS
  • Sigma 30 f/2.8 Art DN
  • Sony DSC-RX100 M2 (yes, a compact camera)
  • Manfrotto 055XPROB + ball head
  • MeFoto + ball head with uncoupled pano movement
  • Spare SD memory cards and batteries
  • Remote shutters with intervalometer

Nocturnal Landscapes with star trails
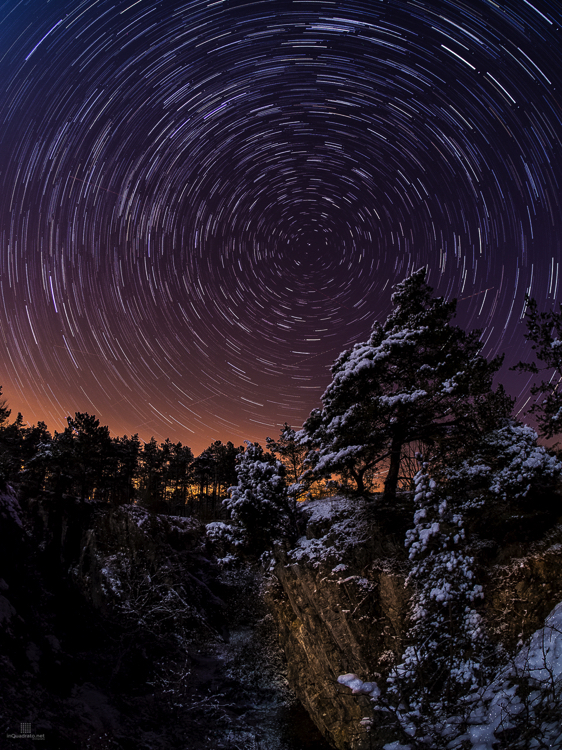
Photo03

Star trails (Stack of 60 frames taken with Olympus OM-D EM–10 + Samyang 7.5 f/3.5 fisheye lens)

The easiest nocturnal landscape you can take is one with star trails, mainly because you are not trying to fight the sky’s rotation (well, technically the Earth’s rotation). Instead, use this to your advantage to create striking images, in particular if you can get the North Star in the frame, so that you will end up having concentric star trails, all centred on the North Star (assuming you are in the northern hemisphere, of course).

In principle, all you need to do is: compose your scene, focus on infinity, set the camera in BULB mode and go grab some coffee. The longer you let the camera register the scene, the higher the number of trails you will record; and they will be longer and more continuous. Practically however, you do not want to do that because the noise due to the overheating sensor (hot pixels) will degrade the quality of the final image. You are better off by taking many shorter exposures (30 seconds each) and stack them later using software like StarStax or similar. This will allows you to keep the digital noise under control, with the downside of recording a great number of images to process later. Be sure you have a high capacity SD card that is empty, and your battery is fully charged before you start taking the sequence. An intervalometer is a must in order to set the appropriate number of shots to take, and the time interval between them. Never touch your camera until the end of the shot sequence.

In summary, get an interesting composition and fire at will. It does not require much more than that. You can even do cityscapes with star trails, like the shot below; this is a view over the city center of Brussels (Belgium), from the roof of my building.
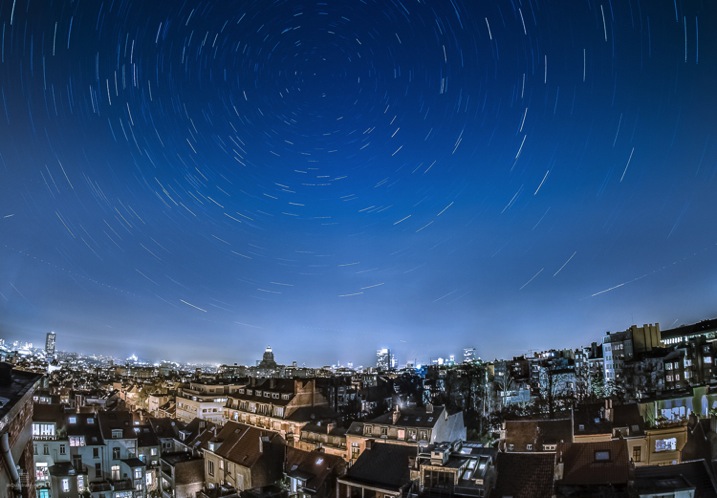
Photo04

Star trails over Bruxelles, Belgium. (Stack of 400 frames taken with Olympus OM-D EM–10 + Samyang 7.5 f/3.5 fisheye lens)

With cityscapes there is the extra difficulty of not blowing out the city lights, which are much brighter than the sky. Graduated filters may be of great help if you have a distant, flat horizon. Else, just expose (to the right) for the city and hope for the best, but some stars should show through. Mind your exposure time will be short because of the bright cityscape, so be prepare to shot a lot of frames (note the number for the shot above).

Nocturnal landscapes without star trails

Basically, the Holy Grail is getting a bright, sharp, colourful, and structured image of the Milky Way to shine across your landscape. This is the most difficult task and requires much more thinking that just doing star trails.

  • Size matters – the Milky Way is huge, so you need an ultra wide angle, or a fisheye, lens to fully capture our galaxy
  • Time matters – you want to get a sharp image of the sky, meaning you should avoid recording the stars movement. There are a couple of mathematical relations that can be used to estimate the longest time you can record the scene at a given focal length (or the equivalent in 35mm if you have a cropped sensor) before stars begins to form trails. These are called 600 and 500 rules: the longest time you can record the image is given by the following equations:Exposure time (t) = 600 / Focal Length OR Exposure time (t) = 500 / Focal LengthWhere the 500 rule is the most conservative of the two. Once you get the maximum exposure time (t) for your chosen focal length, it is just a matter of setting the proper aperture and ISO settings to match it. Usually you will need to use a larger aperture (small f-number), a good starting point for setting the proper ISO value is given by the following equation:

ISO = (6000 * f^2) / Exposure time  – f^2 means the f-number to the power of two

For example, with my Samyang 12mm f/2.0 on my Olympus OM-D (crop factor 2x), in order to get a good sky I should use a shutter speed no longer than: Exposure time = 500/(12*2) or approximately 21 seconds.

Assuming I go for the widest aperture, I should use an ISO value of about:  ISO = 6000 * (f2.0 to the power of 2 = 4) / 21 = 1142 or rounded up to ISO 1150. 

If, say, the aperture was set to f/4.0 instead of f/2.0, the ISO will need to be: ( 6000 * (4.0 ^2)  / 21 OR ( 6000 * 16 ) / 21 = 4571.

With this in mind, it is obvious that wider and faster your lens is, the easier it will be to record a good sky. This will also allow you to use a relatively low ISO, to keep the digital noise as low as possible. The shot below is one of my first attempts to capture the Milky Way. It has been done with my OM-D EM–10 with the Samyang fisheye at f/3.5, ISO 1000 with a shutter speed of 40 seconds, under a fairly dark sky (for Belgian standards).
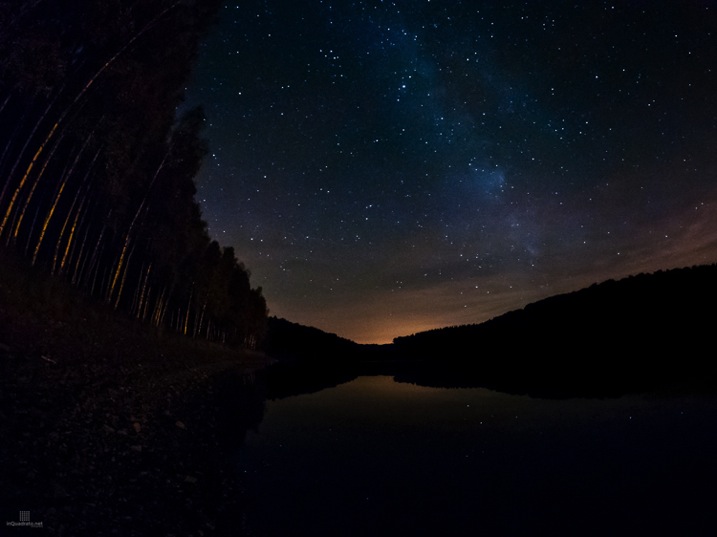
Photo05

The Milky Way in the winter Belgian sky (Olympus OM-D EM–10 + Samyang 7.5 f/3.5 fisheye lens)

Doing nocturnal landscape panoramas

As if the things were not already complicated enough, sometimes a single shot is not enough; either because it is not wide enough, or because you want to produce really large prints and you need to have a file with a resolution larger than that of a single photo. Sometimes you want to do a nocturnal panorama and that means taking different images and merging them later to form a panorama. The only difficulty is that you need to be precise in the camera movements and work as fast as possible to avoid large star movements between one photo and the next. In my experience it is also best to use a wide lens, like a 28mm (in 35 or full frame format) or wider. This because software struggles to automatically stitch together photos containing only stars and no big, fixed points, like a part of a rock or a tree, and also because longer focal lengths will require a greater number of frames to stitch together to cover the same view. For seamless stitching of the different frames, it is best to allow a superposition between the frames in the order of 30–50%.

To help you to work fast, note the vertical and horizontal angles of view for your lens and your camera before heading out. A great tool for this is the Angle of View Calculator. Once you know the vertical and horizontal angles of view you can move precisely and fast with your camera by using the graduated scales on you tripod head.
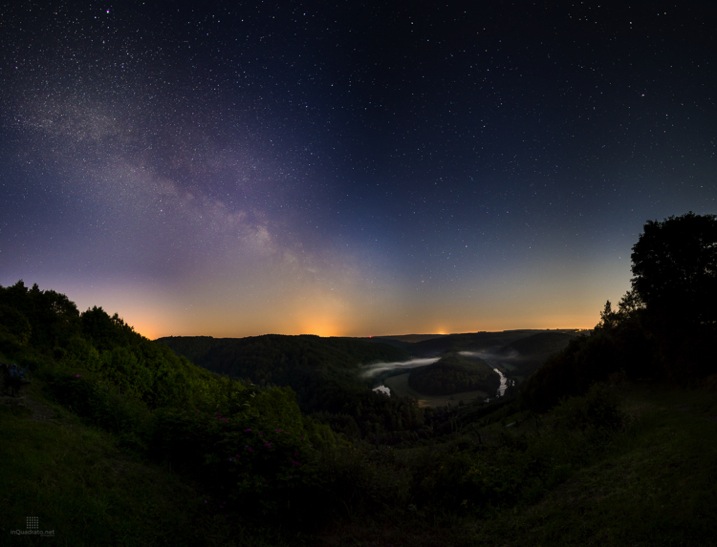
Photo06

The Milky Way over the Belgian Ardennes – Olympus OM-D EM–10 + Samyang 12 f/2.0; panorama composed of 12 (4×3) photos.

Fighting the evil orange glow: LPR filters

Light pollution is, unfortunately, a sad reality in many countries. It is not always possible to be under your dream sky and you have to try to deal with light pollution and the resulting orange glow in the sky. As I mentioned when introducing astrophotography, some filters exist to help holding back light pollution by absorbing light of specific wavelengths: in particular, broad band Light Pollution Reduction (LPR) filters try to reduce the orange glow by absorbing the light emitted by streetlights used in cities and on roadways. Those lights are from low and high pressure sodium lamps, which emit light at around 583nm; this light is cut by the LPR filters. The transmission spectrum for my Sky-watcher LPR filter is shown below.
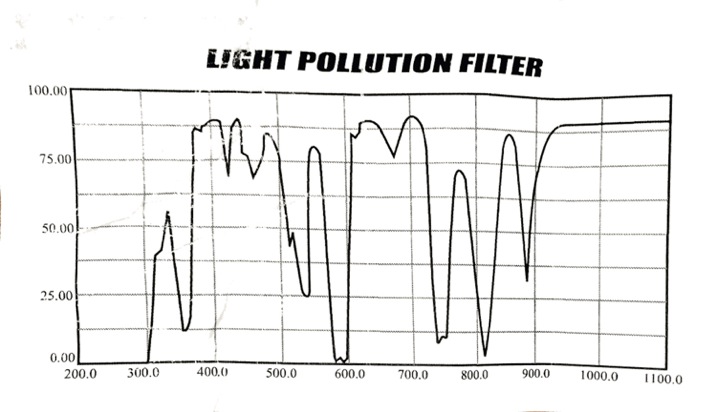
Photo07

Typical transmission spectrum of a broadband LPR filter.

There are many kinds of filters and light polluting sources so you have to find the right filter to suppress or reduce the kind of light in your location. At the moment, here in Belgium, I am happy with the Sky-watcher LPR filter. There are several manufacturers who produce different filters to suit different equipment, as well as large and small wallets. Just have a look for Sky-watcher LPR and UHC filters or Astronimik CLS filters just to name two options.

Do the filters really help in the field? It depends on the kind of light pollution, and also on the amount of pollution versus ambient light. I found that in some circumstances the filter clearly helps, and the non-filtered image cannot be saved in post processing. Other times, the filter seems to be less important. Anyway, with a polluted sky I’d say the filter does help. The image below shows the effect of the filter on street lights compared to using no filter; in both cases you can see the RAW and edited image. They should speak for themselves.
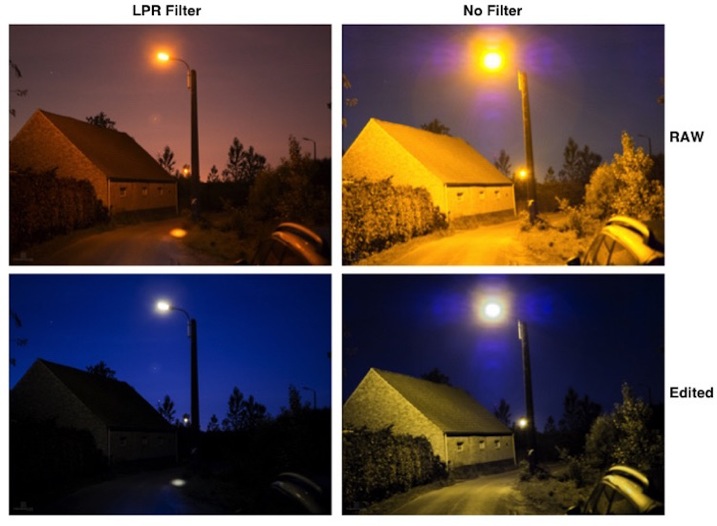
Photo08

Comparison between test shots with and without an LPR filter

Note there are some downsides to the use of this filter. First, it darkens the scene of about one stop (the images above are taken at the same exposure value by using a slower shutter speed when the filter was in use), and it does not work with wide angle lenses. This is because it is an interference filter, and cannot handle light coming in with very different angles, like when using a wide angle – it will generate banding on the image that is difficult or impossible to remove. The solution is using lenses with an equivalent focal length of about 30mm or more and shoot a panorama.

Having to deal with a one stop loss of light, and the use of lenses with a relatively long focal length is challenging, in particular if the lenses you have are not very fast, but it is worth giving the filter a shot.

A final word of caution: cheap LRP filters like mine come usually in sizes of 1.25” or 2” in diameter, and the most suitable diameter of the two is 2”, which corresponds to a 48mm threaded filter. This size suits very well many lenses for micro four thirds camera, such as the Panasonic Lumix 14mm f/2.5 and Lumix 20mm f/1.7, old Zuiko legacy lenses, Sigma 19 and 30 f/2.8 and so on. With larger lenses the amount of vignette you will get will probably make it impossible to produce a useable panorama.

Because my fastest, not too wide lens, is the wide end of the zoom on my Sony DMC-RX100 M2, which is equivalent to a 28mm f/1.8, I decided to play along and use it to photograph the Milky Way. I went to the Chateau de la Hulpe, in La Hulpe (Belgium), which is located a few miles from Bruxelles, under a heavily polluted sky (even for Belgian standards) and I made a 8×4 panorama of the Castle under the Milky Way. I fitted the camera with the LPR filter and shot 18, 20 second long, exposures at f/1.8 and ISO 6400. To contain the digital noise, each frame used for the panorama is the result of image averaging two shots. The result is shown below. I think it is not bad at all and that there is still plenty of room for improvement.
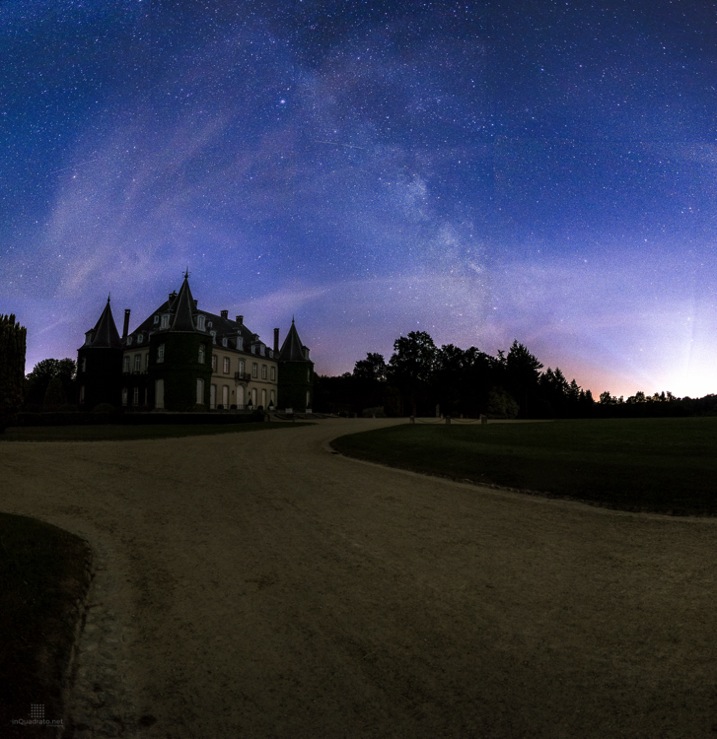
Photo09

The Milky Way in the Belgian heavily light polluted sky – Sony DMC-RX100 M2 at 10.4mm (equivalent to 28mm on full frame camera) and f/1.8 + LPR filter; panorama composed of 32 (8×4) frames.

In summary, don’t give up just yet, if you live in a light polluted area; with a bit of luck (and gear) there is hope, even in the orange glowing sky.

Disclaimer: I am not associated in any way with Skywatcher, Astronomik, Panasonic, Olympus or with any of the other brands I have mentioned in this article.

googletag.cmd.push(function() {
tablet_slots.push( googletag.defineSlot( “/1005424/_dPSv4_tab-all-article-bottom_(300×250)”, [300, 250], “pb-ad-78623” ).addService( googletag.pubads() ) ); } );

googletag.cmd.push(function() {
mobile_slots.push( googletag.defineSlot( “/1005424/_dPSv4_mob-all-article-bottom_(300×250)”, [300, 250], “pb-ad-78158” ).addService( googletag.pubads() ) ); } );

The post Photographing Starry Skies for Nocturnal Landscape Without Breaking the Bank by Andrea Minoia appeared first on Digital Photography School.


Digital Photography School

 
Comments Off on Photographing Starry Skies for Nocturnal Landscape Without Breaking the Bank

Posted in Photography


Breaking Down the Creative Process

03 Nov

I’ve been thinking quite a bit lately about the creative process. When we talk about “creativity,” people generally end up putting themselves into one of two categories– creative or not creative. I’m always amused– and a bit leery– when people who consider themselves creative say that they have no creative process. That ideas “just come” to them. I’m not buying it. I can’t help but ask if ideas really do just come to them, or have they refined and streamlined their process to the point that they don’t even recognize it as a process? And if there really is a process, can someone who thinks they aren’t creative follow a series of steps that can help them become creative? The truth is, everyone has creative potential.

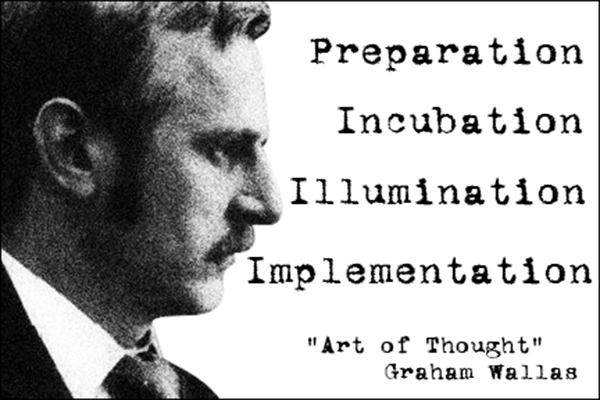
Graham Wallas (1858-1932) was an English social psychologist and co-founder of the London School of Economics. In Art of Thought – The Model of Creativity, written in 1926, Wallas broke down what we now refer to as the “creative process” into four distinct stages– Preparation, Incubation, Illumination, and Implementation. I’ve seen his approach described in several sources recently and over the years, but few ever seem to give any proper credit to the source material, espousing these thoughts and concepts as if they were original ideas. And so, Graham Wallas– this one’s for you, with my thanks.

guyer-photography-graham-wallas

Preparation

It sounds simple, and maybe a bit obvious, but this first step really does lay the foundation for the entire process. Writers write, read, research, and revise. Musicians practice and rehearse. They listen to music– sometimes their own, sometimes that of their influences. Painters experiment with color and visit museums. They sketch. As a photographer, what are you doing to prepare? Do you have influences and inspiration? Do you look to other art forms? How will you nurture an idea once it’s formed? We all draw from different emotional resources, but one thing that every creative has in common at this stage in the process is that the steps can actually be pretty boring. We may enjoy walking through museums or scouting locations, and they may get the creative juices flowing,  but they are not the exciting part of the process. Preparation is, quite simply, evaluating your creative options and beginning to come up with a plan.

Incubation

For me, this is where the fun begins– partially because half the time I don’t even realize it’s happening.  This is the stage where those first hints of a hopefully great idea are bouncing around in my head.  This is when I’m sitting in the car at a red light and happen to notice how the sun is hitting an object.  This is the stage when I’m flipping through a magazine  and an off-handed remark in an article brings the whole project into focus (no pun intended).  During the incubation step your conscious AND subconscious minds are working on the idea.  Wallas talked about the incubation stage being one where no real direct thought was given to the project or idea. Have you ever tried forcing an idea? It doesn’t usually work, right? Just like you sometimes have to take a break and clear your head, diverting your thoughts to other problems or projects– or to nothing at all– during the incubation stage may be just what you need for you to find yourself at…

Illumination

This is the “A-hah!” moment.  When this moment hits, your creative urge is so strong that you just have to get the idea out of your head and into its medium (camera, canvas, paper, etc.)– usually to the point that you have no problem ignoring or losing track of everything else going on around you.  The biggest problem with my illumination moments is that they usually happen at the most inconvenient times (in the shower, driving, middle of the night, etc.). It’s going to happen when it happens. You’ve had all these preparatory elements bouncing around– incubating– inside your head that when they do finally snap into a coherent form, it’s almost like the wheels on a Vegas slot machine coming to rest in perfect alignment.

Implementation

This is where your idea sees the light of day.  You’re taking conscious, positive steps towards executing your idea. Remember, though, that implementation in and of itself does not mean that your idea is going to be a success. This is also the point where a good creative begins to evaluate the idea and determine whether it was a good or bad idea.  Until you have something tangible to show for your idea, it’s almost impossible to decide whether this theoretical notion you’ve been nurturing through the process can be a success.  How many times has the idea or image in your head not matched the photo in your camera?  For every great idea, there are several I wish I’d never had.

Bringing it All Together

Obviously, we’re not talking about flow charts or checklists. Each of these “steps” is really more like part of a gradient– soft edges overlapping as you move from dark to light. As you know from your own experience, sometimes this process runs start-to-finish in the blink of an eye, but it can also take weeks. You just never know. While they may not always be clearly defined as you process each idea or project, it can be extremely helpful knowing what they are and how to identify them. Being able to recognize where you are on a creative journey can often be the confidence boost you need to see something through from preparation to implementation.

Post originally from: Digital Photography Tips.

Check out our more Photography Tips at Photography Tips for Beginners, Portrait Photography Tips and Wedding Photography Tips.

Breaking Down the Creative Process

The post Breaking Down the Creative Process by Jeff Guyer appeared first on Digital Photography School.


Digital Photography School

 
Comments Off on Breaking Down the Creative Process

Posted in Photography


‘Film was never this sharp’: Breaking Bad photographer interviewed

14 Aug

fo3_bb_main.jpg

Commercial photographer Frank Ockenfels III has worked on several high-profile blockbusters like Harry Potter and Men in Black 3, as well as a number of TV shows, and his most recent work is currently being used to promote the season five finale of Breaking Bad on AMC. PopPhoto has published an interview with him, in which he explains how he got started in the TV and movie business, the equipment he uses, and why he bases his career around the concept of ‘never having just one idea’. Click through for a link to the full article. 

News: Digital Photography Review (dpreview.com)

 
Comments Off on ‘Film was never this sharp’: Breaking Bad photographer interviewed

Posted in Uncategorized


Article: Breaking Compositional Rules

11 Nov

thomas-park-sushi.jpg

Photographers have no shortage of compositional rules to turn to when trying to create better images. Pro shooter and educator Thomas Park shows how you can actually make more compelling images by breaking these rules – as long as you understand them first.

News: Digital Photography Review (dpreview.com)

 
Comments Off on Article: Breaking Compositional Rules

Posted in Uncategorized