RSS
 

Posts Tagged ‘BOSS’

REVIEW: LaCie DJI Copilot BOSS External Hard Drive

09 Jul

The LaCie DJI CoPilot BOSS is a portable hard drive with an internal battery and added interfaces. The interfaces include an SD card slot, USB-C and USB-A connectors, and a custom cable for connecting the device to a phone or tablet.

There is an app available for both Apple and Android devices which gives you the ability to perform simple procedures on stored photos.

REVIEW: LaCie DJI Copilot BOSS External Hard Drive

The device is meant to be simple and easy to use while providing long battery life for extended periods away from a computer or outlet. The idea is to remove the need to take a bulky or brittle laptop into the wilds while shooting. But still, allow for backing up of critical images while on location.

Who is the LaCie DJI Copilot BOSS for?

While the drive is marketed by DJI, a leading drone manufacturer, the drive can be used by any photographer. With its ruggedized covering, it’s meant to travel far and wide. Its interfaces make it device agnostic. If you have an SD card (or micro-SD with the included adapter) or a USB connection, this device will work for you.

It is meant to be easy and straightforward without the extra cost that comes with all kinds of unused bells and whistles.

Some stats

REVIEW: LaCie DJI Copilot BOSS External Hard Drive

What’s in the box of the LaCie DJI Copilot BOSS External Hard Drive. (Photo courtesy of LaCie/DJI)

  • 2 terabyte (TB) capacity
  • 5.3″ x 4.3″ x 1.4″ (136mm x 111mm x 36mm)
  • 1.2lbs / .53kg
  • Compatible with Window 10 or higher and Mac OS X 10.10 or higher via USB-C 3.1, Thunderbolt, 3, USB  2 or 3
  • Mobile phones/tablets running iOS 10.3 or higher or Android 4.4 or higher
  • Connects to mobile devices via included Lightning, micro USB or USB-C
  • Comes with a wall charger with multi-country adapters as well as a micro USB adapter
  • For reference sake, the 2TB drive can download 31 x 64GB cards. That’s about 70,000 20MP images (at roughly 28MB each) and hours of 4K video. Storage capacity varies depending on your camera settings.
  • Suggested retail price is $ 349USD

REVIEW: LaCie DJI Copilot BOSS External Hard Drive

The unit can be charged with the included AC adapter (more on that in a minute) or through the USB-C connection, but only when connected to a computer or power pack, not through a wall charger.

The unit does have the ability to charge via its USB-C connection but only when connected to a laptop/desktop or portable external battery. When I asked, LeCie stated a wall charger would not work with the USB-C connection and it was also slower than the AC adapter (taking 12 hours to charge from 0-100% vs. 3 hours with the AC adapter).

How it works

Operation of the CoPilot is pretty simple. There’s only one button and you press it once to get system status (battery level and storage space remaining) or hold it down for three seconds to turn the unit on.

REVIEW: LaCie DJI Copilot BOSS External Hard Drive

The on/off button.

Next, insert a memory card, USB drive, USB connection for a phone or USB connection to your camera or drone. The screen will ask you, “Copy?” (see image below) and indicate one press of the button for yes or hold down the button for no. Pretty easy!

REVIEW: LaCie DJI Copilot BOSS External Hard Drive

REVIEW: LaCie DJI Copilot BOSS External Hard Drive

The unit will scan the drive and start copying, updating status as it runs. It gives updates with a progress bar and the remaining battery level of the unit.

If you press the button, it will also show the number of files copied alongside the total number of photos to be copied. The next screen shows that previous amount as a percentage complete and then is a screen displaying the rate at which your card is being backed up.

REVIEW: LaCie DJI Copilot BOSS External Hard Drive

Some nice features

The unit also has the ability to queue up different backups, such as plugging in both an SD card and a USB drive for total unattended backup of your devices.

When the copy process is complete, the unit will display “Done” and it will remain on that screen until OK is pressed. I love this feature. In the past, I have used units that never gave a copy confirmation and I’m not one to stare at a device for 5-30 minutes depending on how many photos are being backed up. I never knew if a backup failed or completed.

The CoPilot will tell you if the copy competed or if there was an error, before letting you move on to another card. Very handy. Also, there is a ring around the outside of the display showing, as a percentage, how much space has been used on the CoPilot.

Copy procedures can be stopped at any time by simply holding down the button for three seconds and then pressing once more to confirm cancelation.

REVIEW: LaCie DJI Copilot BOSS External Hard Drive

The CoPilot App

The CoPilot App runs on Apple or Android devices. I will be sharing screenshots from an Apple iPad in this article. The unit comes with three cords for connection; Apple Lightning, micro-USB, and USB-C. The cord for connection wraps nicely around the unit, a thoughtful touch.

REVIEW: LaCie DJI Copilot BOSS External Hard Drive

After the initial setup of the app and device (those instructions are included with the device), it’s pretty easy to browse photos stored on the CoPilot or even on inserted SD cards or connected USB devices. This is helpful as it can turn your phone/tablet into a card reader for other purposes.

REVIEW: LaCie DJI Copilot BOSS External Hard Drive

On the left side of the screen are the available devices, with the first item being the CoPilot, followed by the device you are using (my iPad is named Spiff, as in Spaceman Spiff) and then the other ports on the CoPilot.

The main screen shows folders on the CoPilot when it is selected. The Backups folder is where everything resides and tapping it brings up a folder for each backup run.

REVIEW: LaCie DJI Copilot BOSS External Hard Drive

The folders are named by date, the time the backup was started and a unique identifier for each card or device. The date is below each folder if that makes reading easier.

Using the app

Tapping a folder will let you drill down through the typical card structure (depending on your camera manufacturer’s specifications) until you arrive at your photos.

REVIEW: LaCie DJI Copilot BOSS External Hard Drive

At this point, the image grid can be made fullscreen to cover more real estate if you like.

REVIEW: LaCie DJI Copilot BOSS External Hard Drive

The LaCie DJI Copilot BOSS External Hard Drive can handle all the major Raw and JPEG file types as well as PDFs and a few others.

One more tap brings up a single image to fill your screen. It’s a 100% version, so you can zoom in just as you would on your desktop. There is not a zoom indicator anywhere, though.

REVIEW: LaCie DJI Copilot BOSS External Hard Drive

REVIEW: LaCie DJI Copilot BOSS External Hard Drive

There are a few things you can do with the photo at this point. The Move and Copy options are both straightforward. Images can be copied either to another place on the CoPilot or to an attached USB or SD card. Rename might be helpful to some users as well.

REVIEW: LaCie DJI Copilot BOSS External Hard Drive

Full EXIF information is also available although DJI/LaCie need to clean up how it is presented.

REVIEW: LaCie DJI Copilot BOSS External Hard Drive

Exif information display for this image.

I can see why a programmer made it display this way, but it’s not too user-friendly. An exposure time of 0.00200o seconds?

A little handier is the ability to share out the image with normal platform-specific applications. Here you see the standard Apple lineup and I enjoy that “Save Image” is there, making it easy to drop the file onto my iPad for use in a blog post or the like.

REVIEW: LaCie DJI Copilot BOSS External Hard Drive

Share options.

If installed, the image can be handed off to the likes of Adobe Lightroom or Photoshop Express or Dropbox or any of a number of other apps. Note that these are the RAW (.CR2 in the case of Canon) files, not JPEGs if you are shooting RAW.

REVIEW: LaCie DJI Copilot BOSS External Hard Drive

The image opened in Photoshop Express.

Previews in the app

One small annoyance with the app is the chronological preview creation. In this case, I had over 800 images in the folder on the CoPilot so it starts at the top creating previews. Before that they all look like this:

REVIEW: LaCie DJI Copilot BOSS External Hard Drive

And if you want to work with an image shot just moments ago, it’s going to be at the bottom of the folder and you have to wait for the preview to resolve. Not a big thing, but something to note if you have thousands of images in one folder.

Otherwise, the app is pretty slim in features. You can rename folders and delete them if you like, which is handy. I wish I could drag images from the main part of the screen to my iPad folder on the left, but that’s not the case. I’d also like the ability to star or pick my photos as I do in Lightroom. That would make the app a lot more useful.

In the real world

At times I thought I should be able to just plug a card in (without powering on the unit) and start copying. Once I got over that mentality and was patient enough to wait for it to power on, I found the CoPilot easy to use.

I really enjoyed that it could back up all my media, including my phone photos (but not a true backup of my phone as I do on my desktop). With a cable, I can also download directly from my drone, but I often found it easier to use the micro-SD card adapter. After all, that’s what I do now when downloading drone footage.

The unit is a little hefty and all the rubberizing makes it a little bulky. It’s certainly not as small as my Western Digital Passports but also not as large as a standard external drive. I do feel pretty confident with that mass of rubber coating all around the shell and the toughness of a non-touchscreen.

REVIEW: LaCie DJI Copilot BOSS External Hard Drive

Minor issues

This will seem like a minor gripe and I guess it is, but not owning a newer Android phone, I also do not own a USB-C to USB-A cable. The unit comes with a USB-C to USB-C cable for connecting to your desktop or laptop for final download and workflow, but not the cable I needed. Not a big deal, but it’s one more cable.

My bigger complaint is with the interface cover. It’s not tethered to the unit and I easily see myself losing it within a month of owning a CoPilot. It’s great that there is a cutout on the inside of the cover allowing you to keep SD cards (or the Micro-SD adapter) inserted with the cover on. But when hooked to USB, that cover can go missing.

For portability, I’m not happy that I can only use the somewhat bulky AC adapter that comes with the unit to charge the hard drive. When I am out of the country for 2-3 weeks leading one of my tours, I can’t trust that I’ll have enough battery power. So yet another power adapter has to be packed and accounted for.

It would be great if I could charge the unit with USB power (and that would take away my complaint above). However, if I was only going to be gone 1-2 weeks and thought I would shoot maybe only 4000-6000 images, I think it would be okay. This aspect needs more real-world battery drain testing.

Backing up your files

Unfortunately, there is no ability to perform incremental backups. The good news is you can use the app from your phone or tablet to simply delete the previous, redundant backup.

Such as, if you shoot 400 photos and back those up, then keep using the card for another 600 images. Your second backup will contain all 1000 images and with the app, you can delete the first backup of 400, if you want. It’s also handy that Lightroom and other desktop apps will recognize the duplicates and only import one copy, so you don’t have to delete the redundant backup copies if you don’t want to.

Backup speeds will depend on the type of card you are using. It is handy that the unit will tell you the exact throughput (in MBs) while it is downloading so you can estimate time remaining. In my experience, 40GB of backup from an SD card to the unit used about 6-8% of battery. I would estimate 12-14 32GB cards could be downloaded with each charge.

Dirt issues

Lastly, this is a minor thing, but the rubberized coating of the CoPilot attracts dirt and lint. I placed the unit in a planter for the introductory photo of this post and it came away with dirt stuck fairly well to the housing. It’s meant to take a beating, but my unit was not sparkling new for long.

See all the dust and stuff stuck to it?

(Photo courtesy of LaCie/DJI)

Downloading from the CoPilot

When matched with the likes of Lightroom and its ability to ignore duplicates, the CoPilot is a breeze when it’s time to download images at home or the office. Plug into the USB-C connector and start your import. No need to browse folder to folder.

Yet, if you only want to download a particular day’s worth of images, the CoPilot’s structure of naming folders first by the date shot is a big help in finding just the right images. The USB-C is fast at a rate of about 5Gbps.

Otherwise, the drive works like any other external hard drive and can be read directly. It can also be used as a card reader while plugged in.

(Photo courtesy of LaCie/DJI)

Is it worth it?

The LaCie 2TB DJI Copilot BOSS External Hard Drive lists for $ 349. That’s a hefty price and not a cheap purchase. If you travel occasionally, this might not be the right device for you, given that price point. But if you find yourself lugging your laptop around only to be used as a conduit for backing up photos, the CoPilot will pay for itself soon enough.

Personally, when I lead photo tours I carry enough gear for the group that I don’t want to bring a laptop. I intend to purchase a CoPilot BOSS before my next trip abroad in order to lighten my load while ensuring I all my precious photos return with me.

The post REVIEW: LaCie DJI Copilot BOSS External Hard Drive appeared first on Digital Photography School.


Digital Photography School

 
Comments Off on REVIEW: LaCie DJI Copilot BOSS External Hard Drive

Posted in Photography


Leica Boss: Hands-on with new Leica M10

19 Jan

Hands-on with new Leica M10

The new Leica M10 is slightly slimmer than its predecessor, a bit lighter, faster and (we think) a little more sensible. This 24MP full-frame rangefinder can’t shoot video and there’s not a even a USB jack, but for all that it’s surprisingly modern, thanks to built-in Wi-Fi and a very usable live view implementation, among other things.

We’ve had access to a pre-production camera for a few days – click through for a quick tour.

Hands-on with new Leica M10

From the front, the Leica M10 looks a lot like the Typ 240 and Typ 262 that came before it. Unlike earlier M-series cameras though it lacks a frame-line illumination window. The frame-lines are illuminated with an internal LED. The small black lever allows you to preview the (approximate) frame coverage of other focal lengths, when you have a lens mounted. 

Hands-on with new Leica M10

The 24MP CMOS sensor in the M10 is ‘newly developed’, but we don’t know exactly what this means. Although we haven’t yet completed our full range of studio tests (we’ll have to wait for a final shipping camera before we do that) our initial impressions of image quality are extremely positive. Detail resolution is high across the M10’s standard ISO range of 100-6400, and noise is well-controlled even at high ISO sensitivity settings.

The M10 also incorporates an upgraded processor, the ‘Maestro II’ (first seen on the Leica SL), along with 2GB of buffer memory. This allows the camera to shoot at up to 5 fps for 30 Raw files (~100 JPEGs).

Hands-on with new Leica M10

Physically, the M10 is slimmer than previous M-series digital cameras, and very slightly lighter. It’s slightly taller than the film-era M6 (and previous models) but has basically the same footprint. Although the size reduction is relatively subtle, the M10 definitely feels like a more compact camera than the Typ 240.

Hands-on with new Leica M10

New in the M10 is a physical button for ISO adjustment, which occupies previously wasted space on the upper left of the digital M-series. ISO can be adjusted in full stops from 100-6400, plus a user-assignable ‘M’ setting. A very practical Auto ISO setting is also available, which offers automatic maximum shutter duration options based on focal length (with 6-bit coded lenses) as well as user-assignable settings.

Hands-on with new Leica M10

The M10’s on/off switch is simpler than it was in previous digital M-series cameras, and no longer provides access to continuous and self-timer shooting modes. Whether this is a good thing depends on how much you use continuous and self-timer, but on balance we prefer it. These modes are now accessed via the M10’s menu system. 

Hands-on with new Leica M10

Speaking of which, the M10’s menu system has been simplified, and now includes a customizable ‘favorites’ menu, which appears by default on the first press of the ‘menu’ button. The full menu appears on the second press. The M10’s 3″ rear screen is coated in Corning ‘Gorilla Glass’ for scratch resistance and offers a resolution of 1.04 million dots. 

Hands-on with new Leica M10

An optional ($ 545) ‘Visoflex’ electronic viewfinder can be attached to the M10 for live view shooting. This isn’t as silly as it sounds – shooting in live view ensures accurate framing, and accurate critical focus, and also allows you to use spot and ‘multi-field’ metering. The Visoflex Typ 020 offers a resolution of ~2.4MP and includes a GPS module.

Hands-on with new Leica M10

The Visoflex can tilt up to 90 degrees, which is handy for close-up work and candid photography.

Hands-on with new Leica M10

Some things will never change though, and one of those things is Leica’s insistence on retaining the film-era removable baseplate. This made sense (sort of) a few decades ago, but does seem increasingly silly in the digital age. Supposedly it helps keep the camera dust and water-resistant (to some extent at least – Leica doesn’t say exactly how much) but removing the bottom of the camera to change a memory card is a bit of a pain – especially if you’re working on a tripod. 

The slimmer body has necessitated a smaller battery, which offers a capacity of 8.2Wh, which carries a CIPA rating of ~210 shots – increasing to ~500 if the camera is used in rangefinder mode (i.e, not live view). This isn’t particularly impressive, but as usual, in normal use (with Wi-Fi turned off) we’ve found that a single charge can be expected to last for much longer, assuming minimal ‘chimping’.

Hands-on with new Leica M10

This view gives you a good idea of the M10’s generally uncluttered control layout, which will look familiar to anyone who has ever used an M-series camera at any point in the last 60 years.

The Leica M10 is available now, for a body-only price of $ 6595. What do you think?

Articles: Digital Photography Review (dpreview.com)

 
Comments Off on Leica Boss: Hands-on with new Leica M10

Posted in Uncategorized


BSI Boss? Sony Alpha 7R II added to studio scene

01 Sep

Sony’s Alpha 7R II breaks a lot of new ground in terms of photographic technology. Its 42MP chip is the first full-frame backside-illuminated sensor, and it’s bolstered by a 5-axis stabilization system. We’ve been testing its autofocus and low light capabilities, and now we’ve put it in front of our studio test scene. Find out if a BSI sensor gives it an edge over its peers. Read more

Articles: Digital Photography Review (dpreview.com)

 
Comments Off on BSI Boss? Sony Alpha 7R II added to studio scene

Posted in Uncategorized


How to Crop Like a Boss in Photoshop

21 Jan

I have a habit of shooting for the crop (see my previous article ‘No Telephoto lens No Problem – Shoot for the crop‘) which often means that my final vision is a 4:2 proportion, or even a 4:1 panorama style image, instead of the most common 3:2 that is the default for most digital cameras.

With Photoshop’s latest crop tool this has never been easier, so let me show you how to crop like a boss!

How to crop like a boss in Photoshop

Step 1 – Load the Crop Tool in Photoshop

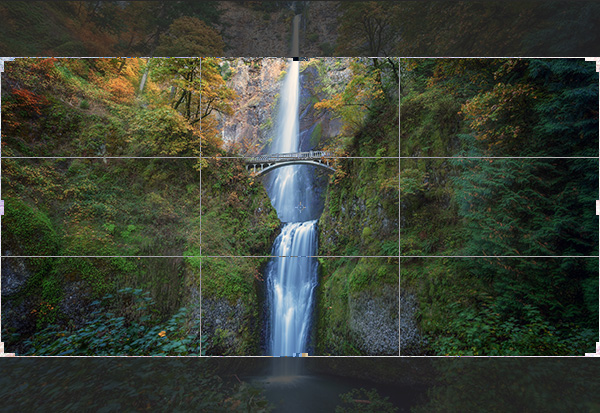
With your image open in Photoshop, press the ‘C’ button on your keyboard. This loads the crop tool; you’ll know this by the appearance of the marquee (square) which has been drawn around your image. You can now begin to draw the crop shape you want simply by dragging the corners of the crop marquee, but I’m going to show you a cleaner way to do this.

How to Crop in Photoshop CC

Step 2 – Choose an Aspect Ratio

If you want to keep your existing aspect ratio but simply want a smaller crop you can hold down the shift key while dragging one of the corners of the marquee. But, what if you want to get creative and want a different aspect ratio?

We do this by clicking in the very first drop down menu in the crop tool properties (usually displayed at the top under your main Photoshop menu).

Photoshops Crop Tool

For now I’ll specify an aspect ratio of 2:1 and I do this by entering the number 2 in the ‘width’ box and the number 1 in the ‘height’ box.

2:1 Ration in Photoshop crop tool

I’ve also specified the ‘Rule of Thirds’ grid (image below) because it closely matches the grid that I use on my camera when shooting. There are several to choose from, pick a grid that works for you.

Rule of Thirds grid in Photoshops crop tool

What About Custom Sizes?

You may decide that you’d rather not conform to an industry norm so you’re free to crop to a custom size and ratio. Either leave the aspect ratio boxes empty or press Clear if you’ve already played around. You can then drag the marquee tool to whatever size or shape you like. If however, you intend to send your image to a print lab, you’ll discover that they charge more for custom sizes so it’s often a good idea to choose the closest aspect ratio to your artistic vision. I just saved you $ $ $ $ , you’re welcome.

Step 3 – Place the Crop

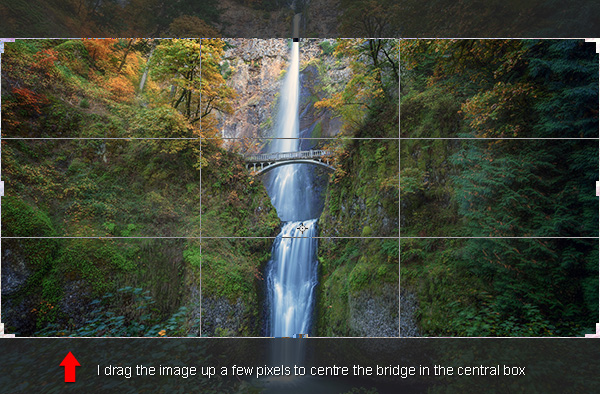
The really cool thing about Photoshop crop tool is that now you’ve specified your aspect ratio you can then move the image around within those crop constraints. All I do is click on the image and drag to position. In this case all I’m doing is dragging the image slightly higher so that the bridge is perfectly centred in the middle box of the grid.

Drag Photoshops crop tool to place your crop

Step 4 – Now Experiment

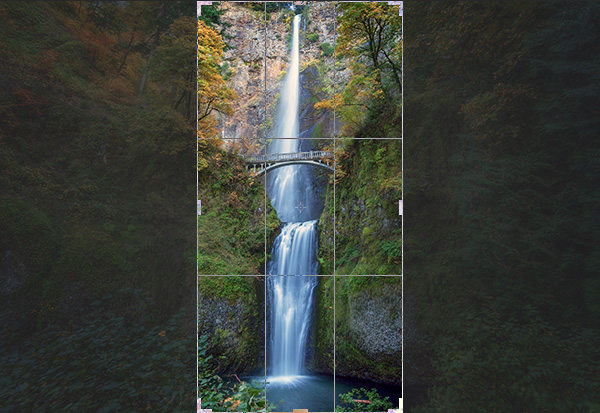
Before you decide to apply the crop, it’s worth playing around a little to see if you can spot a better composition. For fun, I’m going to reverse the aspect ratio by entering 1 in the width box and 2 in the height box. This gave me a crop like this:

Vertical Crop in Photoshop

Step 5 – Apply the Crop

When you’re happy with the crop you’ve found, it’s time to apply it. You need to decide on whether or not you’d like to commit to this crop or if you’d like to keep the ‘cropped’ pixels. There’s a checkbox entitled ‘Delete Cropped Pixel’ which is ticked by default. Simply apply the crop by hitting ‘enter’ on your keyboard.

Delete cropped pixels

If you uncheck this box it doesn’t really crop your image, it just displays the cropped version while you view it in Photoshop. This is called ‘non-destructive’ editing.

With this option, you can save the image after you’ve cropped and although you’ll be looking at the cropped version in Photoshop, the original is still intact. If you want to recall the original (uncropped) image, just open the image file, load the crop tool and then enter the original aspect ratio to revert back to its original crop state (3:2 in most cases).

Confused? Yeah, it sounds kind of silly if you’re not used to Photoshop logic. I personally prefer to have the ‘Delete Cropped Pixel’ checked and then I simply save the cropped image as a separate TIFF file, leaving the original image unsaved and untouched. That’s just good old fashioned file keeping.

To Cancel the Crop

If you get nervous and want out of the crop tool, just hit your ESC key repeatedly until the crop tool vanishes. You can also press the M key to go back to the ‘Rectangular Marquee Tool’ which cancels the crop tool quicker.

How to Use Aspect Ratios

There’s a brilliant article by Elliot Hook called Aspect Ratios in Landscape Photography where he explains all of the standard aspect ratios that most print labs can handle. Try some of the ones that he mentions to see if they work for your image crops.

Try it with Your Images

I’d love to see some great examples of images that you have cropped using this technique. I often say that you can learn a lot about composition simply from carefully cropping existing images to create new compositions. It’s fun and easy to get busy with the crop tool and now you’ve learned how to crop like a boss!

googletag.cmd.push(function() {
tablet_slots.push( googletag.defineSlot( “/1005424/_dPSv4_tab-all-article-bottom_(300×250)”, [300, 250], “pb-ad-78623” ).addService( googletag.pubads() ) ); } );

googletag.cmd.push(function() {
mobile_slots.push( googletag.defineSlot( “/1005424/_dPSv4_mob-all-article-bottom_(300×250)”, [300, 250], “pb-ad-78158” ).addService( googletag.pubads() ) ); } );

The post How to Crop Like a Boss in Photoshop by Gavin Hardcastle appeared first on Digital Photography School.


Digital Photography School

 
Comments Off on How to Crop Like a Boss in Photoshop

Posted in Photography


Edit Like a Boss on Photoshop With ATNX Digital

04 Dec

Photoshop actions are the best thing in the world if you use Photoshop a lot. Not only do they save you time and trouble, but they also empower you to improve your pictures any way you want. We don’t generally spotlight that many young companies, but one that we just thought you absolutely had to know about is ATNX Digital. Continue Reading

The post Edit Like a Boss on Photoshop With ATNX Digital appeared first on Photodoto.


Photodoto

 
Comments Off on Edit Like a Boss on Photoshop With ATNX Digital

Posted in Photography


RuneScape – Evolution of Combat Boss Solos Pt. 1

03 Feb

Several days after the release of EoC to RuneScape, I thought it would be nice to make a compilation of boss monsters soloing once more. Like, Comment, Fav, and subscribe for more videos like this! 🙂 My comments regarding some boss monsters in this video: – Chaos Elemental: Lvl 138; Life points: 17250; Weakness: Bolts With the removal of PK Skulls, the wilderness is now even much more dangerous and high-risk, as you will drop all of your items at death (with the exception of 1 item if you have Item Protect). What you will face is the Chaos Ele will randomly teleport you around (usually away from); you can resolve this by using an ability on your actionbar, assuming you have the boss targeted. The Ele can also disarm you if you have inventory space. This is dangerous when you are peforming an ability that channels. As shown in the video, I was using Snipe, but then I got disarmed, so snipe did not work as damage calculation only triggers if I have a ranged weapon equipped. While re-equipping your armour or weapon, you will suffer a 2-second cooldown for all abilities. Dagannoth Kings: Lvl 156’s; Life points: 37400 Weaknesses: Prime: Arrows; Rex: Fire; Supreme: Stab These bad boys are by far the hardest to solo, you cannot bind Dagannoth Rex (even if the spell hits) as he is immune to stuns (including many other bosses). I’m hoping Jagex decides to fix this particular error. Even if you were trying to kill Supreme first with Magic Protection prayer, you will get destroyed

Video Rating: 0 / 5


RuneScape BOSS Monsters Solo Version 2 (Part 2)

14 Jan

Music: — Fairy Tail – Salamander Fairy Tail – Hyoujin Mau [Dance of Ice Blade] Fairy Tail – Natsu’s Theme Fairy Tail – Erza’s Theme (Original upload date: May 17, 2010) This is Part 2 of my High-Level Boss Monsters Solo series featuring RS2 combat system before EoC, featuring the following bosses: Phoenix, Wild Jade Vine, Bork, Skeletal Horror, Giant Mole, Kree’arra, Commander Zilyana, General Graardor and K’ril Tsutsaroth Like mentioned in Part 1, this video was made in 2010 and did not include the following updates: Damage Soaking Damage Splat Calculation Ancient Prison in God Wars Dungeon Nex armour The reappealing of the Unbalanced Trade Removal Capes of Distinction Polypore staff Left-clicking Attack boss feature New Combat Sound Effects Commander Zilyana’s redesign K’ril Tsutsaroth’s redesign Items/Abilities related to the Loyalty Programme Several Armour revisions Evolution of Combat RuneScape is a trademark to Jagex Ltd. I do not own any of the contents used for this video, but used for the sole purpose of entertainment without profit. All music used in this video is copyrighted to the respective owners.
Video Rating: 4 / 5


RuneScape BOSS Monsters Solo Version 3 (Part 5)

04 Jan

Music: — To Aru Kagaku no Railgun – Imminent Crisis The Sacred Blacksmith – Nigemadou Hitobito The World God Only Knows – Sentakushi Souatari Umineko no Naku Koro ni (Game) – The Dark and Crazed Requiem of Purgatory To Aru Majutsu no Index II – Queen’s Fleet This is Part 5 of the solo series (Non-EoC 2012 Edition), featuring the hard version of Sunfreet in the special challenge “The Fire! It Burns!” in Dominion Tower. All damage dealt to Sunfreet are capped at 500. Defeating the hard version of Sunfreet is required for the Completionist Cape. Defeating the hard version of Sunfreet is not a required achievement to obtain a Stage 4 Dominion Marker. RuneScape is a trademark to Jagex Ltd. I do not own any of the contents used for this video, but used for the sole purpose of entertainment without profit. All music used in this video is copyrighted to the respective owners.

Video Rating: 0 / 5


RuneScape BOSS Monsters Solo Version 3 (Part 6)

21 Dec

Music: — To Aru Kagaku no Railgun – AIM Burst Umineko no Naku Koro ni (TV-Anime) – Kudasareru Shinpan Black?Rock Shooter TV-Anime – La Storia ~ il destino Shakugan no Shana III – Dans le tourbillon d’une lutte The final piece to the solo series non-EoC 2012 edition featuring the Corporeal Beast. I’m sorry to say that Nex will not be introduced to the series but will appear on the EoC edition when I’m prepared for it. Corporeal Beast is easy based on many other updates since it was released, as the only thing that a player needs to worry about is magic level and defence bonus which determines the damage output from the corp’s mage attacks since meleers only need to pray melee or flash-Soul split if using Ancient curses. RuneScape is a trademark to Jagex Ltd. I do not own any of the contents used for this video, but used for the sole purpose of entertainment without profit. All music used in this video is copyrighted to the respective owners.
Video Rating: 5 / 5


RuneScape BOSS Monsters Solo Version 2 (Part 3A)

18 Dec

Music: — To Aru Kagaku no Railgun – battle area To Aru Majutsu no Index – Breakthrough (Original upload date: June 11, 2010) Third video of four featuring the TzTok-Jad before the TzHaar City update. In this video, I choose to use magic against him and it is fun back then. RuneScape is a trademark to Jagex Ltd. I do not own any of the contents used for this video, but used for the sole purpose of entertainment without profit. All music used in this video is copyrighted to the respective owners.
Video Rating: 5 / 5

An understandable description of how to use the manual mode on your DSLR or advanced point and shoot camera. This is the second of three videos in the basic manual photography series.
Video Rating: 0 / 5