RSS
 

Posts Tagged ‘Borealis’

How to Photograph the Northern Lights (Aurora Borealis)

17 May

The post How to Photograph the Northern Lights (Aurora Borealis) appeared first on Digital Photography School. It was authored by Christian Hoiberg.

how to photograph the northern lights

Want to know how to photograph the northern lights?

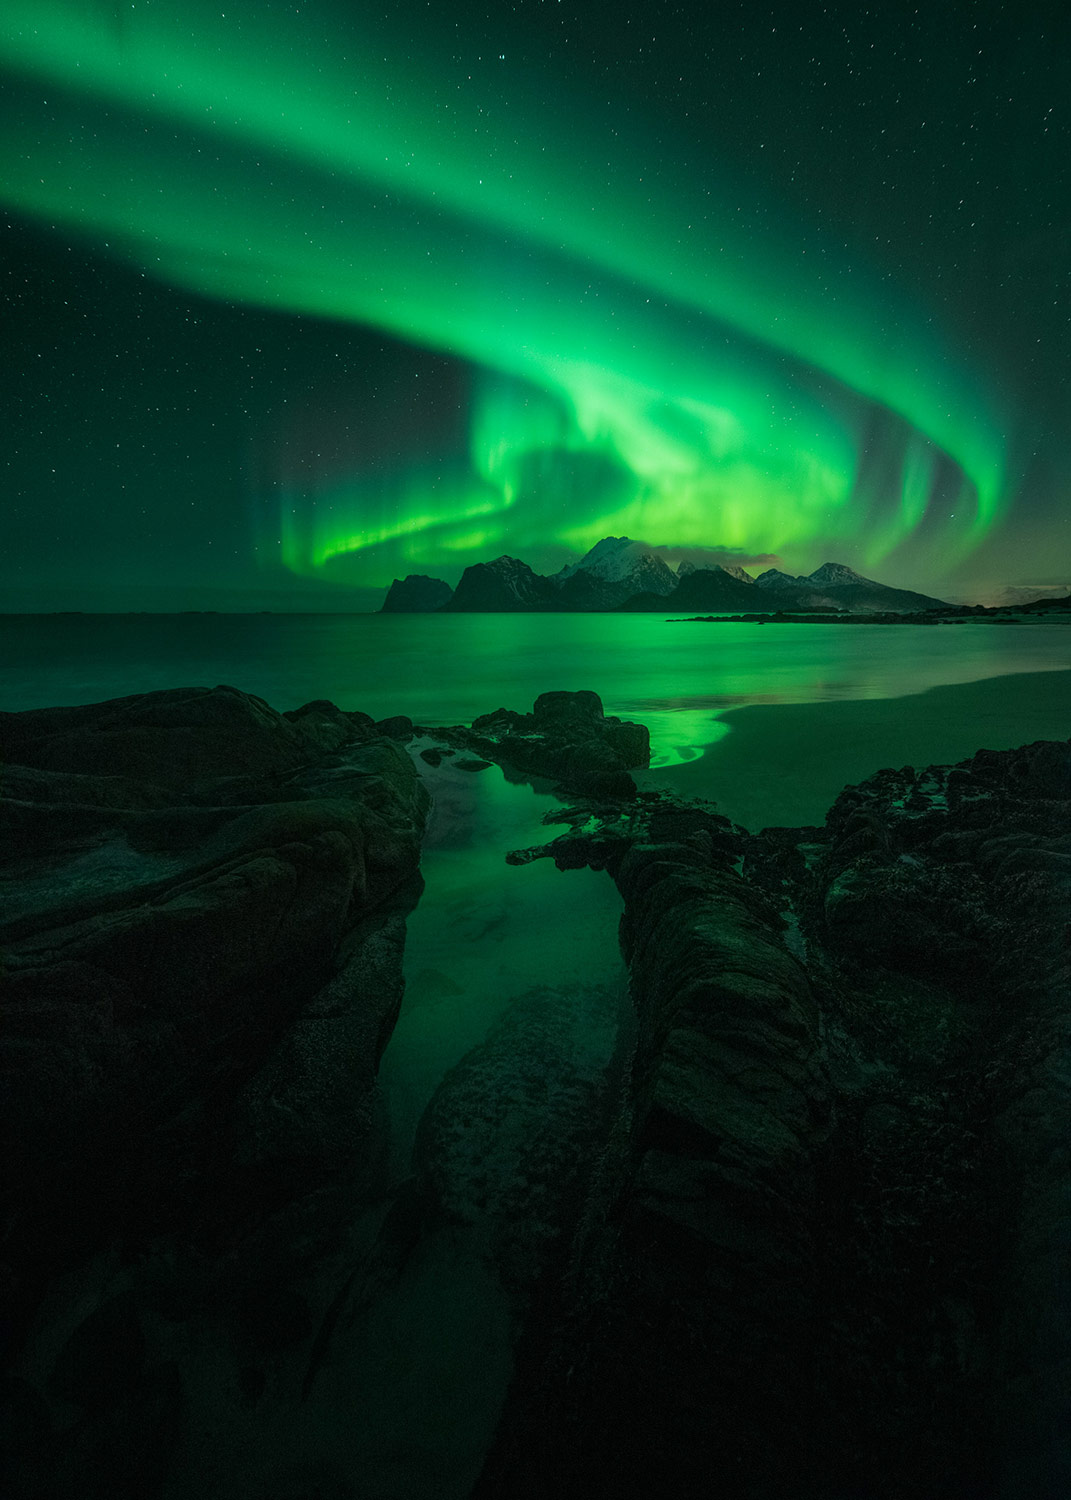
In this article, I’m going to share plenty of northern lights photography tips and tricks – so that you can capture stunning aurora shots of your own.

This advice comes from lots of experience; I’ve had the pleasure of watching and photographing the northern lights, also known as the aurora borealis, for years (and I still find myself shouting in awe when I see them elegantly dancing in the sky!).

So if you’re ready to become an expert, then let’s get started.

How to see the northern lights

The first step in photographing the northern lights is, obviously, finding them. It’s simply not possible to see the aurora whenever and wherever you want – you must be in the right region and follow a few simple steps, as I discuss below:

1. Be in the Northern Hemisphere

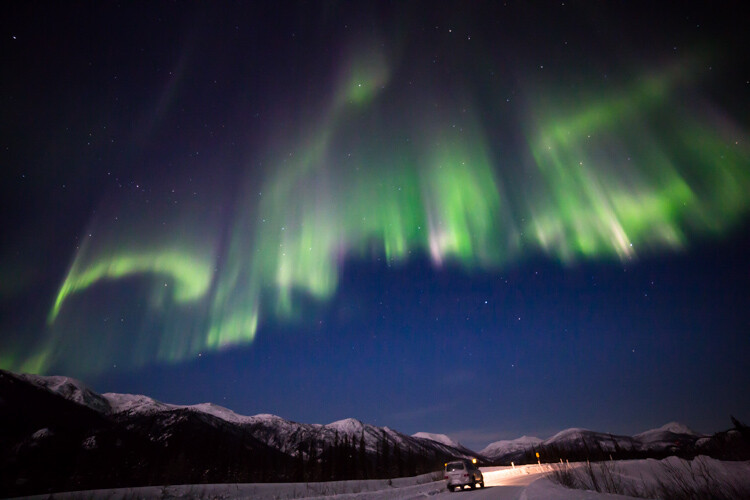
The northern lights aren’t visible all over the world. As the name indicates, they are a phenomenon visible in the Northern Hemisphere. 

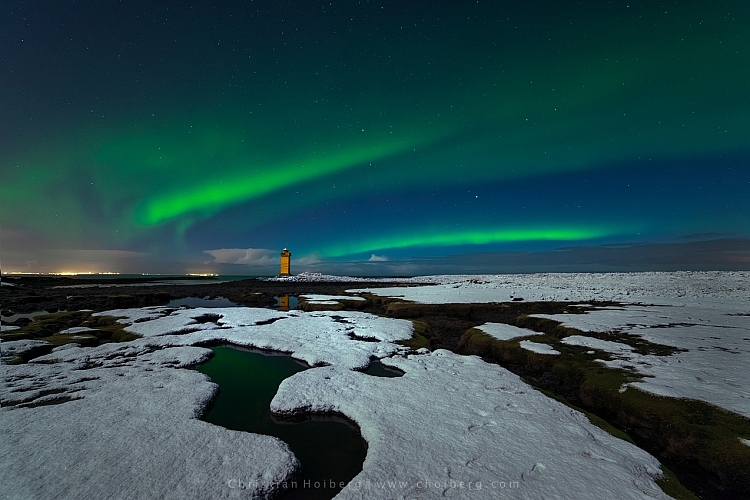
Places such as northern Norway, Iceland, and Alaska are typical areas you can witness the northern lights.

While you generally want to be north of the Arctic Circle (or close to it), you can witness the lights further south during extreme solar storms. But this is not as common and the display is rarely as impressive compared to “northern” northern lights.

When planning your trip to the north, you’ll need to bear one more fact in mind:

The northern lights season lasts from late fall to early spring. After all, northern lights are only visible in the night sky, and in the Arctic, the sun doesn’t set during the summer months – so there’s no darkness and no northern lights.

the northern lights over the ocean

2. Get away from light pollution

It’s nearly impossible to see the northern lights from the downtown of a large city. You might catch a glimpse if the northern lights are strong, but the display won’t be nearly as impressive as if you leave the city lights behind.

To increase your chances of capturing the northern lights, you should get away from light pollution and find a location where you can clearly see the stars.

There are a few different tools you can use to find areas with minimal light pollution. Dark Sky is a great website for this purpose; it shows a detailed map of light pollution.

the northern lights over ice

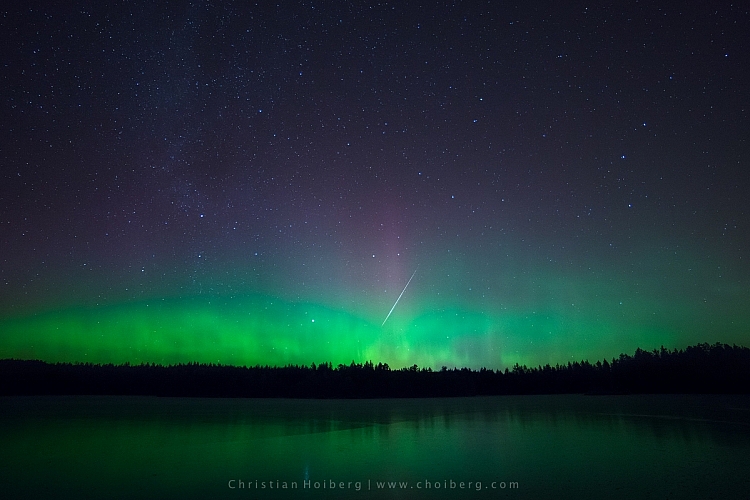
3. Look for clear skies (and a high Kp-index)

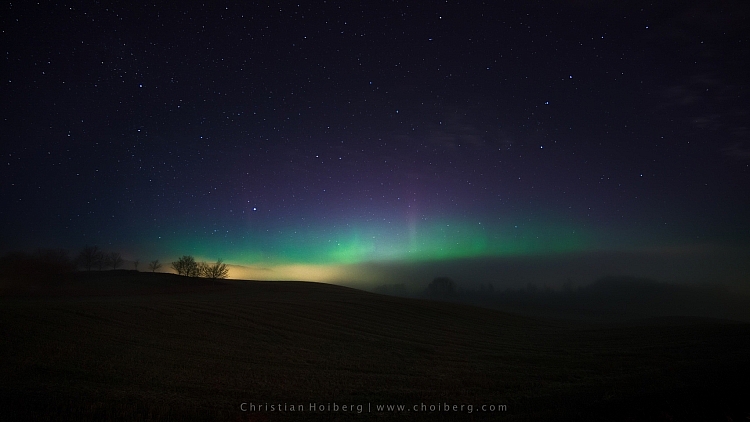
In order to see the northern lights, you need to see the stars – so cloudy nights aren’t good for aurora borealis photography. If the sky is cloudy, you might as well enjoy the comfort of a warm cabin.

Fortunately, when you’re north of the Arctic Circle, clear nights typically mean you will get a glimpse of the northern lights. The display might not always be strong, but chances are high that you’ll at least get a nice arch across the horizon. 

Keep in mind that weather conditions change quickly in the Northern Hemisphere. Just because it’s cloudy one moment doesn’t mean it’ll be cloudy in an hour, so you should keep a close eye on the forecast and stick your head outside from time to time. 

Also, a quick tip: To predict the aurora display strength, refer to the Kp-index. Note that the higher the Kp-index, the stronger the display. (There are other factors involved in predicting the northern lights, but the Kp-index is the easiest and most convenient.)

the northern lights over a mountain

How to photograph the northern lights

Once you’ve found the northern lights, how do you actually photograph them? It’s easy to get overly excited and forget about the technicalities – after all, the northern lights are stunningly beautiful – but I urge you to study the next few steps so that you’re as prepared as possible when the sky explodes.

1. Use a tripod and a remote shutter release

Photographing at night means that you’re working with long exposures (i.e., slow shutter speeds). It’s therefore essential that you mount the camera on a tripod. This will make sure that your camera stays still for the duration of the exposure.

You should also consider using a remote shutter release when you’re photographing the northern lights. This removes any chance of the vibrations caused when you press the shutter.

An alternative is to use the camera’s self-timer – but sometimes you want to capture the image at an exact moment with no delay, which is why I highly recommend a remote release.

the moon and the aurora borealis

2. Use a wide-angle lens with a large aperture

I generally encourage photographers to experiment with different focal lengths, but there’s no getting around it: an ultra-wide-angle lens is ideal for photographing the northern lights. 

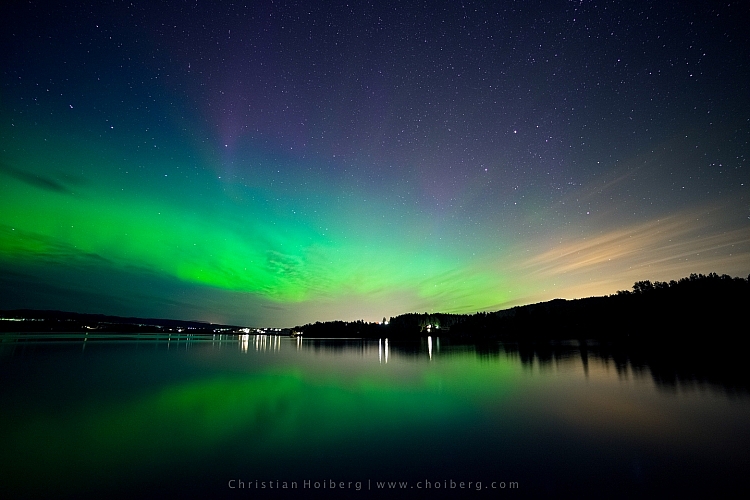
A wide-angle lens allows you to capture both the landscape and the sky in one shot. That way, you can incorporate the northern lights into a good composition.

Also, when you first experience the northern lights, you’ll realize that they can fill up the entire sky. It’s impossible to capture all this beauty with a narrow focal length lens (in fact, even wide-angle glass isn’t always enough!).

It’s also important to use the widest possible aperture. A wide aperture means more light reaches the sensor, allowing for a brighter exposure.

For that reason, apertures such as f/2 and f/2.8 work well for night photos. You can get away with f/4 if your lens doesn’t open to f/2.8 – but you’ll need to increase the ISO or extend the shutter speed to pull it off, neither of which are great for northern lights photography.

aurora borealis over a river

3. Adjust the shutter speed and ISO according to the northern lights

Guides such as the 500 rule or the NPF rule are great indicators of the shutter speed you should use for night photography – but these do not work for northern lights.

Why?

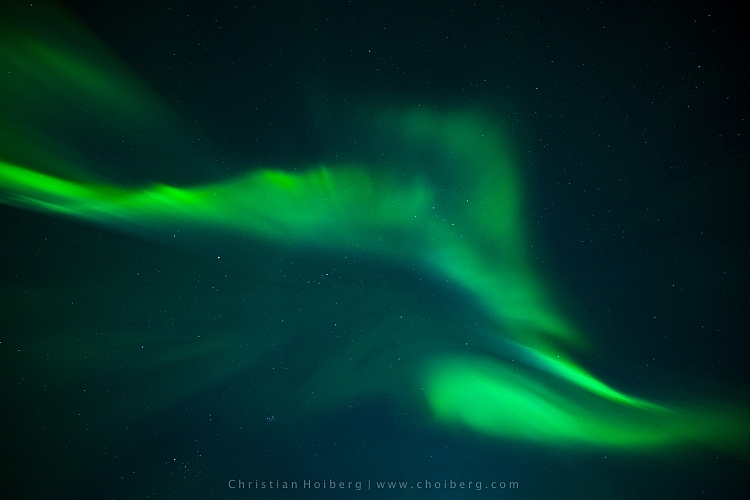
Because the best shutter speed completely depends on how active the northern lights are. I’ve experienced extreme displays where I’m using a 1/2s shutter speed and an ISO of 200, yet I’m still overexposing the sky!

Therefore, you need to adapt the shutter speed to the situation and make changes throughout the night. I typically use a shutter speed between 4 and 20 seconds. 

Now, a fast-moving northern lights display requires a faster shutter speed. The bright light moving across the sky will quickly get overexposed. But when the display is slower, you get away with a longer shutter speed.

The ISO also depends on how bright the night sky is. I typically use a value between ISO 1600 and ISO 6400. That said, on rare occasions, I go all the way down to ISO 200.

I’ll admit that it does require some experience to get your settings right from the very beginning. But keep an eye on the image preview between every few shots, and you’ll learn exactly what to adjust for great results.

the aurora borealis over a mountain how to photograph the northern lights

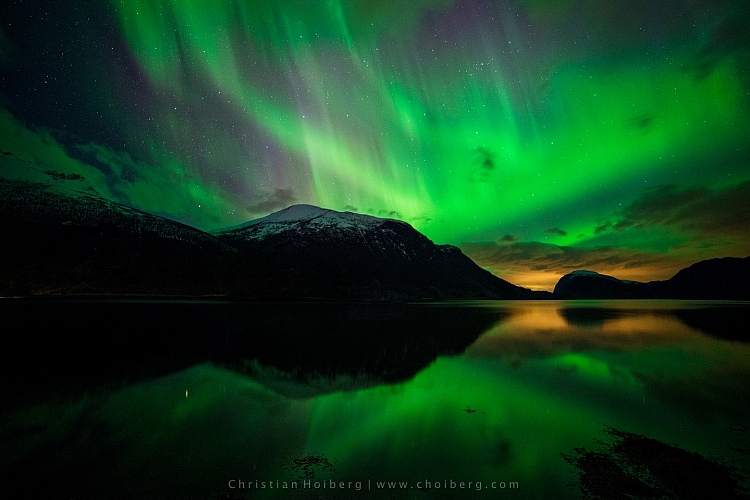
4. Use a cold white balance (3000-4000K)

I know that the white balance technically doesn’t matter if you’re shooting in RAW, but I’m someone who prefers to make the photo look as good as possible in-camera.

So when photographing the northern lights, avoid using Auto White Balance or preset modes. While these often do a great job during the day, they’re less consistent at night. You might get some okay results with Auto White Balance, but it won’t always work.

I recommend that you set the white balance manually – use Kelvin mode and chose a value somewhere between 3000K and 4000K. This will produce a colder and more natural-looking sky.

(Using values above 4000K makes the green in the northern lights look muddy and strange, which is something you want to avoid.)

purple and green aurora borealis how to photograph the northern lights

5. Bring something warm to drink!

The winter nights in the Northern Hemisphere can be quite cold and miserable. It’s essential that you stay warm when you’re outside waiting for the northern lights. Good clothes (and several layers) help a lot, but it’s also nice to bring a thermos with a warm drink.

Once you get too cold, it’s hard to stay motivated. Especially if you’re planning to shoot for a while or make a timelapse.

How to photograph the northern lights: conclusion

Now that you’ve finished this article, you should be well-equipped to photograph the northern lights.

That said, if you want to learn more about northern lights photography – so you can start creating images like those in this article, fast – I highly recommend my course, Northern Lights Photography Made Easy. I teach all the essentials of capturing and processing stunning images of the night sky’s most amazing feature. So check out the course here!

how to photograph the northern lights

The post How to Photograph the Northern Lights (Aurora Borealis) appeared first on Digital Photography School. It was authored by Christian Hoiberg.


Digital Photography School

 
Comments Off on How to Photograph the Northern Lights (Aurora Borealis)

Posted in Photography


Laowa 15mm F2 Zero-D sample gallery: aurora borealis and architecture

15 Dec

$ (document).ready(function() { SampleGalleryV2({“containerId”:”embeddedSampleGallery_0172075546″,”galleryId”:”0172075546″,”isEmbeddedWidget”:true,”selectedImageIndex”:0,”isMobile”:false}) });

The Laowa 15mm F2 Zero-D from Venus Optics is a fast, wide prime lens for full frame mirrorless cameras, available in RF-mount, E-mount, and Z-mount. Like Lawoa’s other ‘Zero-D’ lenses it’s designed to have extremely limited distortion despite the short focal length.

We’ve included a number of images representing two common use cases for this type of lens: astrophotography and architectural photography. Overall, it provides excellent results and delivers on its promise of minimal distortion. Not surprisingly, there’s some vignetting wide open, but it clears up pretty quickly when stopped down and – if desired – is corrected quite well using the lens profile in Adobe Camera Raw.

To illustrate the point, here’s an uncorrected sequence of dark sky photos shot at F2, F2.8, F4 and F5.6. The original Raw files for these images can be downloaded from the sample gallery if you want to make your own comparisons. Click through to the gallery to see all the images.

Articles: Digital Photography Review (dpreview.com)

 
Comments Off on Laowa 15mm F2 Zero-D sample gallery: aurora borealis and architecture

Posted in Uncategorized


Video: 360° 8K timelapse of the aurora borealis during a lunar eclipse

15 Mar

Photographer William Briscoe captured this spectacular 360° 8K timelapse on January 31st near Fairbanks, Alaska. He shared the video on his YouTube channel and Facebook page a few weeks ago, alongside this description:

Here is a 360 video of the Lunar Eclipse, Alaska style, which I filmed on January 31st near Fairbanks. Lady Aurora, being the Diva she is, just couldn’t let the moon have all the attention that night, so she made a nice showing as well.

If you have VR glasses of some sort, by all means slap them on! If not, simply drag the video around until you spot the moon, then watch as it disappears and becomes a black disk by about 30 seconds in, allowing the aurora to cover it entirely for the duration of the eclipse.

The full video is only a minute and ten seconds long, but that doesn’t mean it was easy to shoot. Responding to a comment on YouTube, Briscoe revealed that it was -31°F (-35°C) out that night, so just getting his 360° rig (a custom-built array of numerous 35mm DSLRs) to work was a challenge.

Articles: Digital Photography Review (dpreview.com)

 
Comments Off on Video: 360° 8K timelapse of the aurora borealis during a lunar eclipse

Posted in Uncategorized


How to Photograph the Aurora Borealis – Nature’s Night Light

14 Sep

The Valkyrior, the “Dance of the Spirits,” polar lights, Goddess of the dawn, the mythical firefoxes of Lapland, the Northern Lights, Aurora Borealis. By any name, Aurora has intrigued, scared, excited, and fascinated humans since the dawn of time.

Named after the Roman goddess of dawn, Aurora, and the Greek name for the north wind, Boreas, in Northern latitudes, they are known as the Aurora Borealis (or the Northern Lights), in Southern latitudes (e.g., Antarctica, South America, New Zealand, and Australia), the Aurora Australis (or the Southern Lights).

How to Photograph the Aurora Borealis - Nature's Night Light

These phenomena are commonly visible between 60 and 72 degrees north and south latitudes, which place them in a ring just within the Arctic and Antarctic polar circles. Aurora sightings, while occasionally seen at lower latitudes are not as common. Thus, making the trek to extreme Northern or Southern latitudes is a necessity if you want greater viewing opportunities along with greater success in photographing the Aurora.

If you are interested in learning more about exactly what the Aurora are, where they come from, and what produces the various colors that often accompany an Auroral display, there are countless books you can read and websites that one may search for this information.

How to Photograph the Aurora Borealis - Nature's Night Light

This article will provide you with insider tips on how to successfully photograph the Aurora. Return home with lasting memories and images of one of life’s most amazing experiences.

Okay, I am ready to photograph my first Aurora – now what?

Observing and photographing the Aurora is subject to local weather conditions, patience, geographic location, dark sky venue, patience, minimal ambient light, patience, being in the right place at the right time, patience and some luck.

How to Photograph the Aurora Borealis - Nature's Night Light

You see a central theme developing here, patience. If you are not willing to spend time in the field, sometimes in extremely cold weather, your opportunity for both bragging rights and capturing that awesome image, will be severely limited.

When all is said and done, you are at the complete mercy of the Sun, Earth, solar winds, nature and space. The Aurora is not a man-made light show, the cosmos rule here.

So, beyond patience, what does it take to capture that jaw-dropping image of this wonderful phenomena?

Location, Location, Location

Your first challenge is getting yourself to the right location in either the Southern or Northern hemisphere that will maximize your potential and opportunity to see the Aurora.

The best Northern hemisphere latitude is within the Auroral zone – between latitude 65 to 72 degrees. In the Northern hemisphere, you will need to head to destination cities laying on or slightly above the Auroral zone (also referred to as an Auroral oval, is centered about the magnetic poles) and north of the Arctic Circle.

How to Photograph the Aurora Borealis - Nature's Night Light

You will stand a good chance of viewing the Aurora, if you head to Tromsø, Norway, Yellowknife, Northwest Territories, Canada or Bettles, Alaska. Other excellent choices are Svalbard, Norway, Jukkasjärvi, Sweden, Kakslauttanen, Finland, Kangerlussuaq, Greenland and Reykjavik, Iceland. This is only a representative list as there are many Northern latitude cities, which make good Aurora viewing destinations.

Under the right conditions, you can see the Aurora Australis from Ushuaia, Argentina, Tasmania, Australia, Stewart Island, New Zealand and the Southern tip of South Africa, all destinations more easily accessible in the Southern hemisphere.

Estote Parati (Be Prepared)

Photographing the Aurora by its very nature requires heading out at night. Here are some things to watch out for and prepare.

  • Be aware of your surroundings, especially if you are visiting unfamiliar territory, a foreign country, or even your own neighborhood park.
  • Take extreme caution when walking in deep snow, ice, and across frozen bodies of water. You may not be able to see or identify potential hazards.
  • Team up with someone as excited about viewing and photographing the Aurora as you are or who is just willing to sit in a nearby warm car, in case you need support. Always ensure you head out with a full tank of gas.
  • Conduct visual reconnaissance during the day, identify potential ground hazards, layout a destination path and test snow and ice conditions en route to your evening’s photographic destination.
  • Let someone know your planned photographic destination(s) and anticipated return time, especially if you are headed out on your own.
  • Don’t count on your mobile phone working if you are far from service towers or in a foreign country.
  • At all times consider your intended shooting location and ensure that you comply with all local laws regarding access to properties (private and public), lakes, bridges, etc.

How to Photograph the Aurora Borealis - Nature's Night Light

Dress for Success

Dressing for the location, season, and weather conditions are essential both for your safety and for the ability to remain outside for an extended period of time in potentially body-numbing temperatures.

  • Wear many wicking, warm, and insulating layers and consider clothing appropriate for the local geographic and weather conditions.
  • Protect your entire body from exposure to what will probably be the coldest temperatures you may ever experience.
  • Carry a fully charged torch/flashlight (although wearing a headlamp frees up your hands).
  • Outfit your torch or headlamp with a red light or filter. The red light allows you to easily see where you are walking yet, preserves your night vision so you can easily and quickly operate your camera.
  • Pack chemical hand and foot warmers. Take more than you think you will need because you will need more than you think.
  • Use extra hand warmers to keep your camera batteries warm. This helps to extend their useful life in extremely cold conditions.
  • Invest in a really good pair of boots, e.g., affordable military surplus Bunny boots are rated to -60F (-51.11C) in cold, dry climates.
  • Bring a warm (non-alcoholic) drink and a snack, it may be a long night.

How to Photograph the Aurora Borealis - Nature's Night Light

Camera Equipment

You really don’t need much technical equipment to photograph the Aurora but there are some essential kit items you simply cannot do without.

Camera

A camera with interchangeable lenses will be best, but in principle, any camera can be used, even your mobile phone. Handholding your mobile phone, attempting to capture a shimmering, undulating Aurora, will not produce the same quality image that you can get with a digital camera, supported by a sturdy tripod, using a remote shutter release. This, however, should not stop you from capturing that moment and preserving the memory.

Be sure to keep your camera dry and avoid contact with snow or moisture. When walking about, it is always a smart idea to place your camera in a large zip lock plastic bag. Should you trip, slip or accidentally drop your camera (numb fingers will do that to you) in the snow, your camera body will stay dry and protected from the elements and the lens free from moisture, grime, etc.

DPS Aurora Article Image 7

Lens

To take in as much of the sky as possible and a bit of interesting foreground, using a wide or super wide-angle lens (focal length between 10mm and 24mm, with an aperture of f/1.2-2.8) will give the best results overall. In reality, almost any lens will work, keep in mind, however, your images will look different than those you see posted on the web, taken with wide or super wide-angle lenses.

Prior to your first shot, focus your camera at a distant point, back off slightly from the infinity setting and then turn off the autofocus feature on your lens. Given the dark sky, you don’t want your camera and lens trying to automatically focus on an ever-changing, moving Aurora. Locking in on manual focus, set slightly south of infinity, will give you well-focused images.

If the temperature warrants a brief duck into your car for a “warmup,” leave your camera and tripod safely outside. Bringing your camera into a nice warm car and then back out again into frigid arctic temps, will cause lens fogging, condensation, and other nasties to potentially damage your camera.

Read more on shooting in tough conditions here: How to Take Care of Your Camera in Cold Weather.

DPS Aurora Article Image 8

If you notice lint, dust or any other foreign material on your lens, NEVER blow on it. Your warm breath will instantly fog the lens. Depending on the ambient temperature outside, even small traces of moisture vapor in your breath may crystallize and freeze your lens, rendering it useless until it defrosts. Use only a lens brush pen or dry microfiber lens cleaning cloth.

Sturdy Tripod

To avoid blurring your picture due to camera movement, shaky hands, or unsteady footing on snow or ice, a sturdy tripod is essential. If you will be photographing in arctic conditions, be certain that your tripod is up to the task. Plastic tripod legs will snap in extremely cold temperatures.

Here are a few tripod options to check out:

  • Product Review: Polaroid Carbon-Fiber Travel Tripod and Varipod
  • Benro FGP18C SystemGo Plus Travel Tripod with B2 Ball Head – Review
  • Induro PHQ-3 Head and CT-214 Tripod [REVIEW]
  • Review of the K&F Concept TC2534 Lightweight Carbon Fiber Tripod

Remote Shutter Release

A remote shutter release, designed to be used with your camera, provides important benefits in obtaining that memorable photo of the Aurora. First, it will be invaluable in its contribution to creating sharper images by reducing camera shake, which occurs naturally when you depress the shutter release. Secondly, for longer exposures, which may be necessary depending on changing atmospheric conditions and your ISO setting, you can hold the shutter open without physically touching the camera’s shutter release button.

Memory Cards

Pack extra memory cards, having formatted them prior to going outside. Backup and clear your memory cards prior to your next outing. Extra cards are essential if you do not have a means to download each evening’s images to a backup device. Plan to use a single card each evening you head out. If you shoot all of your Aurora images on a single card, and that card fails, for whatever reason, well – enough said.

DPS Aurora Article Image 10

Spare Batteries

Photographing in cold temperatures drains batteries very quickly, photographing in arctic temperatures drains batteries exponentially faster. Always pack extra camera batteries. Running out of fully charged batteries when the Aurora is on full display is heartbreaking, especially when proper preparation would have prevented this situation.

Keep all extra batteries in an interior pocket of your jacket, close to your body. Trapped body heat, created by your insulated jacket and multiple layers of clothing will help keep the batteries reasonably warm, holding the charge longer.

Airtight Waterproof Dry-bag

Tough, waterproof and airtight, a dry-bag is essential. It protects your camera’s sensitive internal optics and circuitry from moisture and condensation buildup that occurs due to the extreme fluctuation in temperature when you bring your camera inside after a long evening photographing outside in sub-zero temperatures. Lens fogging and damage to your camera itself may occur if you don’t let your camera acclimatize gradually to the warm inside temperatures.

DPS Aurora Article Image 11

Prior to going inside for the evening, slip your camera into the dry-bag, roll and seal it tightly and then bring the bag and your camera inside. While there is no official rule as to the length of time your camera should remain in the dry-bag, a good rule-of-thumb is to let the camera sit in the bag for two to four hours. That’s plenty of time to acclimatize to the much warmer indoor temperature and for you to remove multiple layers of clothing and secure a warm beverage of choice.

Include several small bags of silica, moisture absorbing dry-packs in the dry-bag prior to sealing it. The silica protects against mildew, corrosion, fogging and condensation, which might damage your camera’s sensitive electronics.

Taking that Memorable Aurora Picture

While the mechanics of taking a picture of the Aurora are not complex, there are a few guidelines that will enhance your success of taking that amazing and memorable picture.

DPS Aurora Article Image 12

1. Select and shoot in the RAW format – this will provide you with the maximum amount of digital information needed to create a final image.

2. Remove the protective clear, polarizing or UV filter on your lens prior to going out to photograph the Aurora. The UV filter will likely cause concentric rings to appear in your final image.

3. Set your camera to M (manual) and turn off the camera’s flash settings.

4. Dial the lens focus ring to infinity and back off slightly.

5. Turn OFF any autofocus capabilities associated with your lens. You don’t want the autofocus feature of your lens attempting to continually refocus on the quickly moving, shifting Aurora.

DPS Aurora Article Image 13

6. Open up the aperture as wide as possible. This is when the f-number is as low as possible, i.e. f/1.2 – f/2.8 or lower for many prime and pro lenses, or f/3.5 or f/4 for many consumer zoom lenses.

7. Set the shutter speed to Bulb. This allows you to use the remote shutter release necessary to keep the shutter open for longer exposures. Depending on the intensity and movement of the Aurora, you may need to hold the shutter open anywhere between three and 12 seconds. Check your image using your camera’s live view function (if so equipped). Too long of an exposure time will tend to blur both the Aurora and the stars as they move across the sky.

DPS Aurora Article Image 14

8. Determine the proper ISO setting. This is somewhat both a technical and a personal decision. Technical as it will depend on the type of camera you have and the camera’s inherent ISO range. Personal depends on how much noise you are willing to live with in your image, again as a factor of an increasingly higher ISO setting. Start off with an initial ISO setting of 800 and adjust as your personal preferences and the photographic conditions warrant.

9. Bring and use a sturdy tripod. You want sharp Aurora images and to keep your camera as still as possible. If you don’t have a tripod, you can use a beanbag, flat rock, or another solid surface. Do not touch the camera until it is done exposing, and shield it from the wind if you can.

DPS Aurora Article Image 15

10. When possible, include a contrasting foreground. The Aurora by its very nature looks best when photographed to include a foreground, which provides scale, context, and perspective. A suitable foreground can be a tree, a building, fellow photographer, a car, etc.

11. Consider joining a professional tour if (a) this may be your first trip to the Arctic or (b) you are headed to a new international destination. Most professional “Aurora hunting” tour operators have many years of seasonal experience are very familiar with the local area, best viewing venues, are eager for you to see and photograph the Aurora and know where you can tread both safely and legally.

DPS Aurora Article Image 16

Ah…The Amazing Aurora

Being present during Aurora’s magical dance fills the observer with wonder, awe, and excitement and the experience often leaves one speechless. Capturing the Aurora in a photograph preserves that experience for a lifetime.

I hope that you may be fortunate enough to be at the right place, during the right months, at the right time, to observe and photograph Aurora’s magical dance.

DPS Aurora Article Image 19

For most of us, getting to the dance is not easy. But once there, none of the logistics, long flights, cost, or cold, make a difference. You are witness to the most spectacular light show orchestrated by Mother Nature.

The next time you gaze into the night sky, be assured that the Aurora is there dancing the night away…just waiting for you.

The post How to Photograph the Aurora Borealis – Nature’s Night Light by Al Marcella appeared first on Digital Photography School.


Digital Photography School

 
Comments Off on How to Photograph the Aurora Borealis – Nature’s Night Light

Posted in Photography


How to Photograph Northern Lights (The Aurora Borealis)

15 Apr

A trip to photograph Northern Lights (also called The Aurora Borealis) often tops the wish list for many photographers. For good reason too; the aurora is a natural phenomenon unlike any other. Lights dancing over the frozen winter landscape is ethereal, beautiful, and at times, jaw-dropping. Living in Alaska has provided me the opportunity to shoot the lights more often than most, and yet more than once, I’ve had to stop clicking and just watch the curtains shift and dance. In fact, let that be my first tip if you are planning an aurora

In fact, let that be my first tip if you are planning an aurora photo shoot – occasionally just stop and watch. Seriously, put that camera down for a moment and relish the sight. Okay, now let’s figure out how to photograph the Northern Lights.

How to Photograph Northern Lights (The Aurora Borealis)

Gear

Tripod

You need one. There is no faking this one, get one and use it. If it’s brutally cold (which, let’s face it, it probably will be) you’ll appreciate carbon over cold-channelling aluminum, but either will work. Bring it, use it, no excuses.

Camera

I’ve seen beautiful images of the Northern Lights made with everything from good point and shoot cameras to high-end mirrorless and DSLRs. So don’t feel too restricted by your choice of camera. That said, a camera with low noise at high ISO is definitely preferable. Though not absolutely necessary, the ability to change lenses, too, is a major asset.

Lenses

As a general rule, you want a lens that is wide and fast (has a large maximum aperture). The faster the better. My primary aurora lens is a 14mm f/2.8, but I’m eyeing a 20mm f/1.8 for the extra speed. All lenses will need to be manually focused, so make sure that is straight-forward. A variety of focal lengths, either in the form of a zoom, or a choice of lenses is also helpful. I’ve used everything from a 70-200mm to my fixed 14mm to photograph Northern Lights.

How to Photograph Northern Lights (The Aurora Borealis)

I’ve got to admit, living in the far north has its advantages. I merely needed to step out my front door to make this image. (If you are wondering what that strange U-shaped white form in the sky is, it’s the exhaust trail from an aurora research rocket fired off by the University of Alaska Fairbanks).

Remote Release

Though not absolutely necessary, a cable or wireless release for your camera will help reduce camera shake when you click the shutter. A jiggly blur in the stars can ruin an otherwise good shot. If you don’t have a release, use the camera’s self-timer, many have a 2-second setting which is useful. Keep in mind that using a timer rather than a release will slow you down.

Clothing

Maybe I should have put this one at the top of the gear list, because it is probably the most important thing for a successful winter shoot of any kind. Right now, as I’m writing this article, I’m sitting in a cabin 70 miles north of the Arctic Circle in the Brooks Range of northern Alaska. I’m leading an aurora photo tour, and the warmest night-time temperature we’ve seen so far was -35F (-37c). Good clothing has not just been important, but vital.

How to Photograph Northern Lights (The Aurora Borealis)

Right now, as I’m writing this article, I’m sitting in a cabin 70 miles north of the Arctic Circle in the Brooks Range of northern Alaska. I’m leading an aurora photo tour, and the warmest night-time temperature we’ve seen so far was -35F (-37c). Good clothing has not just been important, but vital. I don’t want to go into too much detail here, but a thick down coat with a hood, down or synthetic fill pants, mittens, liner gloves, face masks, and warm hats should all be on your list.

That said, I do want to take just a second to talk about footwear. Trips like the one I’m currently leading are not the time to toy around with light winter boots. This is not the time for fashion. Pack boots, god-ugly bunny boots, mukluks, and other extreme-cold footwear, a couple sizes too big (to account for thick socks and toe warmers) are what you are looking for. Nothing will wreck a night of photography more quickly than painfully cold, or (please no) frost-bitten toes. Enough said.

How to Photograph Northern Lights (The Aurora Borealis)

Interesting foregrounds are an important part of any image, and aurora shots are no different. In this case, I climbed a rock outcrop and used a wireless trigger to make this image.

The Day Before

Prefocus – autofocus rarely works in the dark, so you’ll need to manually set your focus. The first thing I do when I’m leading a photo workshop or tour is to take my clients out in the daylight, before our first night chasing the lights, and have them set their focus to some distant mountaintop. After making sure it is tack sharp, I hand out small pieces of electrical tape and have everyone tape the focus in place so it won’t shift around accidentally.

With the excitement of the first aurora show, no one has to worry about messing with their focus points, or worse, find their shots heartbreakingly soft. A caveat: You still need to check your focus periodically. I’ve found that some lenses will shift their focus point slightly when there are extreme temperatures. Pixel-peep occasionally and adjust as necessary.

How to Photograph Northern Lights (The Aurora Borealis)

When the lights are directly overhead, sometimes pointing your camera straight up can be the best option.

In the Field

Have patience. The aurora is a fickle lover, and she only appears when she wants. Even when the forecasts are coming together and everything seems set for success, the lights may take awhile to appear, they may erupt when you don’t expect it, or clouds may obscure the sky. Plan several nights to account for bad weather or uncooperative conditions. Be prepared to stay up late, and again, be patient.

Exposure

How to Photograph Northern Lights (The Aurora Borealis)

This is one of my first images of the aurora. The lights were bright, and while I managed to capture some color, the 20-second exposure blurred the details into an indistinct curtain. I know better now.

In the days of film and early days of digital, long exposures of 15 or 30 seconds for the aurora were the name of the game. This allowed the lights to appear bright and colorful, but details within the aurora, the pillars, and beams blurred away leaving behind an indistinct curtain. Technology has moved beyond this.

You want the shortest shutter speed possible that allows sufficient brightness and low noise. ISOs in the 1600-6400 range are typical. I start with a setting of f/2.8, ISO 1600 or 3200, for 5 seconds. From there, depending on what the lights are doing, the amount of moonlight, and other factors, I’ll adjust up and down.

Last night, for example, for about 10 minutes the lights brightened and started moving VERY fast. Sacrificing some noise, I went to ISO 6400, f/2.8, and a 1-second exposure. The shots needed a bit of noise reduction in post-processing, but I was able to capture the details of the curtains, and that sharpness in the aurora makes the images successful. A shutter speed just a second or two longer would have blurred the lights.

How to Photograph Northern Lights (The Aurora Borealis)

In contrast to the previous image, for this shot of a very fast moving display, I used a shutter speed of just one second at ISO 6400, f/2.8. As a result, the pillars of light and details in the curtains are sharp.

Composition

When the aurora is hopping, your attention will shift to the sky and away from the foreground. This is natural, but try to pay attention to your composition, just as you would with any landscape image. In the dark, a poorly framed image may not stand out the way it does in daylight. But, I’ll guarantee that you’ll notice when the photos appear on your computer the next morning, and you’ll kick yourself.

Consider where you are, provide some context, avoid distractions, and compose carefully.

How to Photograph Northern Lights (The Aurora Borealis)

A red aurora is a very rare thing indeed. Of the hundreds of nights I’ve spent shooting the Northern Lights, this one had the deepest, brightest reds I’ve ever seen. (FYI, I used my headlamp to light paint the trees in this image.)

Where and When to Photograph the Northern Lights

Choosing the right location for an aurora trip is a big decision. The Aurora Borealis can be seen around the planet’s northern regions. Scandinavian countries, Iceland, northern Canada, and of course Alaska, are popular destinations. While your budget and available time may limit you, it is important to consider the likely weather conditions, local tours, lodging and transportation options, and seasons.

The aurora is primarily a winter phenomenon. In the far north, nights don’t get dark enough in the summer for the lights to appear. Here in Alaska, you can see the lights from late August or early September through mid-April, but prime time is late September through early April.

How to Photograph Northern Lights (The Aurora Borealis)

The nearly full moon in this image was not enough to blow out the bright display of lights, but it takes strong aurora to overcome a full moon. Moonlight is great for foregrounds but can cause issues with visibility of the Northern Lights. If you are shooting the aurora for the first time, I recommend making your trip around the new moon.

Research weather patterns. Some months are more likely than others to have clear skies. In Alaska, March is the driest month with the best chance for clear skies, but other locations will differ.

Moonlight is another thing to consider. While great lights can occur regardless of how bright the moon is, during the dark nights of a new moon, even low-grade aurora displays will appear more distinct against the darker sky.

Getting Help

How to Photograph Northern Lights (The Aurora Borealis)

One of my clients on an aurora photo workshop photographs the northern lights in the Brooks Range of northern Alaska.

Like any discipline of photography, learning to shoot the aurora takes practice. This can make aurora photography a frustrating pursuit for people new to it or with limited time. Organized workshops or tours, or private photo-guide services are a great way to assure some success. Even if you prefer to shoot independently, hiring a local expert for a night to get you started may help you dodge the usual pitfalls and find the best locations to shoot.

How to Photograph Northern Lights (The Aurora Borealis)

Patience Pays Off

Last night it was bitterly cold here in the Brooks Range. We started the night about 9:00 p.m. by driving 50 miles north to a spot high above tree line, a stone’s throw from the continental divide. There, we waited in the moonlight for the Northern Lights to appear. They didn’t, not for the three hours we sat patiently watching the sky. I had a sinking feeling that we were about to get skunked.

Half past midnight we gave up, turned around, and headed back to our rented cabin. Another hour later we pulled in and started unloading the gear. I glanced toward the sky, and there, sure enough, was a single, pale band of northern lights. It was nearly 2:00 a.m., and I’ll admit, my warm bed was sounding really good. But stubbornly, we reloaded our camera bags and tripods and drove a few miles back up the road where the mountains loomed close. When the lights exploded 20 minutes later, we were ready. Our cameras popped in the frigid air as the aurora swirled. We made some of the best images of the trip there.

How to Photograph Northern Lights (The Aurora Borealis)

Be Ready

We were patient, had the right clothing to handle the -40 temperatures, and had our cameras and settings ready. That’s really the core lesson here: be ready. The lights sometimes don’t last long and if you are fiddling with camera focus, or clothed improperly, you’ll miss it. However, preparation and research will greatly increase your chances of success. A chance to photograph Northern Lights, or simply observe them, is not an opportunity to squander.

The post How to Photograph Northern Lights (The Aurora Borealis) by David Shaw appeared first on Digital Photography School.


Digital Photography School

 
Comments Off on How to Photograph Northern Lights (The Aurora Borealis)

Posted in Photography


Photographer captures stunning Aurora Borealis time-lapse from airplane

19 Jan

If you’re seated next to a window on a flight to Iceland, it’s a good idea to keep your camera close. Landscape photographer Aryeh Nirenberg did, and was treated to an incredible show from the Aurora Borealis at 35,000 feet. With an empty row and his camera nearby, he created an impromptu rig to stabilize the camera and record the time-lapse above.

Whatever works, right? Nirenberg’s D810 is braced against the window with a tripod, and a blanket cuts glare from the cabin lights.

Nirenberg propped his Nikon D810 against the window using his tripod, and wrapped a blanket around the lens to cut the glare from cabin lighting. We think the effort was well worth it for a unique view of one of nature’s best light shows.

Check out Aryeh Nirenberg’s Instagram to see more of his work.

Articles: Digital Photography Review (dpreview.com)

 
Comments Off on Photographer captures stunning Aurora Borealis time-lapse from airplane

Posted in Uncategorized


How to Photograph the Northern Lights or Aurora Borealis

16 Aug

Tips for seeing and photographing the Northern Lights:

Northern Lights, also known as Aurora Borealis, might be one of the most fascinating phenomena to photograph during the night. Watching the sky turn green, blue, pink and even red, is something that will change you forever. After seeing The Lady in Green countless times, I still find myself shouting in awe when she’s elegantly dancing in the sky.

Innfjorden-Aurora-Horizontal-Reflections

Seeing, and photographing, the Northern Lights aren’t something you can do all over the world. The truth is that even if you’ve booked a flight to northern Norway or Iceland, there’s no guarantee that you will see the northern lights at all.

How to see the Northern Lights

Be in the Northern Hemisphere

Unfortunately, the Northern Lights aren’t visible all over the world. As the name might indicate, they are a phenomenon visible in the northern hemisphere. Places such as northern Norway, Iceland and Alaska are typical areas where people travel to witness the Aurora Borealis.

Lauarvann-Aurora-Metorite

That being said, during extreme solar storms your might be able to see the phenomenon further south too, but not as powerful as in the north.

So, the first step in seeing the Northern Lights is to travel to the north. Remember that the Aurora Borealis is a night phenomenon and since summers in the north have up to 24 hours of sun, you should plan your visit for late fall or winter.

Get away from light pollution

It’s nearly impossible to see the Northern Lights if you’re standing in the downtown of any larger city with light pollution. Yes, it is possible; if the KP Index (the strength indicator for Northern Lights) is at its highest. However, to increase the chances of seeing, and capturing a good shot of the Northern Lights, you should get away from light pollution, and find a location where you can clearly see the stars.

vatnsleysustrandar-aurora-borealis

I have lived in a small town not far away from Oslo, Norway for most of my life. Yet, it wasn’t until a few years ago I realized that even here in southern Norway we can see the Northern Lights. In fact, it happens more often than you realize.

There are a few different tools you can use to see what area close to you is dark enough to see the stars, and possibly the Northern Lights. Dark Sky is a great website for this exact purpose, and it shows a detailed map of the light pollution.

How to photograph the Northern Lights

Now that you know where, and how to discover the Aurora Borealis, let’s see how you can capture it with your camera.

Use a tripod and remote shutter release

Since you will be photographing in the dark you’ll be working with long exposures (long shutter speeds), and it’s therefore essential that you use a tripod to ensure you get a correctly exposed image that is still of usable quality.

fiskumvannet-northern-lights

You should also consider using a remote shutter when you’re photographing the Northern Lights. This removes any chance for vibration caused by pressing the shutter. Optionally, you could use the 2-second timer, but sometimes you want to capture the image at that exact moment with no delay.

Use a wide angle lens at a large aperture

When photographing the Northern Lights you want to use a wide angle lens. This lets you capture both the landscape and the sky in one shot. When the Northern Lights are strong you’ll also notice that they stretch all over the sky and it’s impossible to capture all of it in one image, unless you use a wide angle.

northern-lights-hedenstad

During nighttime photography you want to use an open aperture such as f/2.8 to allow enough light to reach the sensor. When using my 14mm I more or less always have it at f/2.8, as I rarely use it at any other time than during the night.

Set the shutter speed according to the KP Index

The shutter speed depends on the strength of the Northern Lights. I’ve experienced when one second at ISO 400 has blown out the green (I’ve never seen the Aurora as powerful as that since) but then it can be barely visible at ISO 3200 and a shutter speed of 20 seconds at other times.

You should also keep in mind the movement of the Northern Lights. If they area quickly changing shape, a long exposure might blur them out too much, and you’ll lose detail. It’s better in that instance to increase the ISO, and lower the shutter speed, so you freeze the motion and capture all its textures.

corona-aurora

Another factor you should keep in mind when you choose the shutter speed is the movement of stars. If you go beyond 25 seconds you’ll start seeing small startrails. Sometimes this can give an interesting effect, but if you want to have a sharp and crisp image, be sure to use 25 seconds or less as your shutter speed.

Set a cool white balance (3000-4000K)

I’ve experienced that the ideal white balance is somewhere between 3000-4000 Kelvin when photographing at night. This results in a cooler, and more natural look in the dark sky. If you go above 4000K you’ll also notice that the green in the Northern Lights gets a muddy look, which you want to avoid.

Avoid using Automatic White Balance and other preset modes such as cloudy. While these often do a great job during the day, they’re more of a gamble at night. You could get some okay results with AWB but generally you won’t.

Innfjorden-aurora-vertical

Bring something warm to drink!

I had to include this last tip. Remember, when you’re photographing the Northern Lights that it’ll most likely be winter or late fall. That means that temperatures drop, and since you’ll be out during the night, there’s no sun to warm you.

Bringing a thermos with something warm to drink could be wise during these long winter nights. Especially if you’re planning to stay out for a while or even make a timelapse.

googletag.cmd.push(function() {
tablet_slots.push( googletag.defineSlot( “/1005424/_dPSv4_tab-all-article-bottom_(300×250)”, [300, 250], “pb-ad-78623” ).addService( googletag.pubads() ) ); } );

googletag.cmd.push(function() {
mobile_slots.push( googletag.defineSlot( “/1005424/_dPSv4_mob-all-article-bottom_(300×250)”, [300, 250], “pb-ad-78158” ).addService( googletag.pubads() ) ); } );

The post How to Photograph the Northern Lights or Aurora Borealis by Christian Hoiberg appeared first on Digital Photography School.


Digital Photography School

 
Comments Off on How to Photograph the Northern Lights or Aurora Borealis

Posted in Photography