RSS
 

Posts Tagged ‘boost’

ON1 reveals Photo RAW 2018.5 with ‘massive performance boost’, LUTs and more

12 May

ON1 has released a major update to its ON1 Photo RAW photo editor. Version 2018.5 will be available in June and boasts, “a massive boost in overall performance” in addition to bug fixes and two major feature additions: a new LUTs filter in the effects panel, and the ability to select brand-specific in-camera profiles, including Fujifilm’s much-loved film simulations.

There are also some other new features like the ability to collapse RAW + JPEG frames into a single image to de-clutter your library, nested albums, background export, and more. But the big three additions are performance, LUTs, and Camera Profiles.

Performance Boost

ON1 says Photo RAW 2018.5 comes with a “massive overall performance boost,” which should be noticeable across Browse, Develop, and Effects. This is particularly obvious when you flip through photos in the filmstrip view, regardless of module. You should see practically no lag at all.

In addition to culling images, brushing performance, switching between modules, and exporting/sharing photos have all benefitted noticeably from this performance boost.

LUTs Filter in Effects

A much-requested feature, LUTs (or Look-Up Tables) are a popular way to add various color grading looks to your images. This feature is now available inside the Effects module in ON1 Photo RAW 2018.5, which will launch with “a ton” of LUTs, alongside packs you can purchase from professional photographers like Matt Kloskowski and Tamara Lackey. You can also import both the .3DL and .CUBE LUT formats into Photo RAW if you have LUTs of your own.

Applying a LUT will work like all of the current filters available in the Effects module, meaning you’ll be able to “stack them, mask them and control the blending options.”

Camera Profiles

The final feature update coming in 2018.5 is the ability to apply brand-specific camera profiles to your pictures. If you shoot Canon or Nikon, that means your Natural, Landscape, Portrait, etc. profiles will all be available. If you shoot Fuji, that means your film simulations.

Additionally, you’ll have some built-in ON1 profiles—in addition to ON1 Standard, you now have ON1 Faithful, ON1 Landscape, ON1 Portrait, and ON1 Vivid—that can be applied across brands, just like the recently-announced Adobe RAW profiles in Lightroom.

$ (document).ready(function() { SampleGalleryV2({“containerId”:”embeddedSampleGallery_8405143667″,”galleryId”:”8405143667″,”isEmbeddedWidget”:true,”selectedImageIndex”:0,”isMobile”:false}) });

ON1 Photo RAW 2018.5 is scheduled to arrive officially in June. It’ll be a free upgrade for owners of ON1 Photo RAW 2018, but if you’re not part of the ON1 ecosystem yet, there are some discounts to be had before launch.

Owners of previous versions of ON1 Photo RAW can upgrade for just $ 80 (usually $ 100) and new users can purchase ON1 Photo RAW 2018.1 for $ 100 (usually $ 120). Each license of ON1 Photo RAW includes both Windows and Mac installers, and can be activated on up to five devices.

To learn more about ON1 Photo RAW, visit the ON1 website. And if you want to learn more about 2018.5, the company has set up a landing page where they’ll be demoing new features every week before the official release goes live.

Press Release

ON1 Photo RAW 2018.5 – Coming this June

Portland, OR – May 10, 2018 – Today, ON1, Inc. announces the new ON1 Photo RAW 2018.5, a significant update to Photo RAW 2018. Version 2018.5 will include a massive boost in overall performance, fixes for user reported issues, and new key features such as LUTs and camera profiles.

“We’re incredibly excited to unveil the new features in ON1 Photo RAW 2018.5 over the next several weeks. We plan on showcasing the new features and improvements through weekly videos leading up to the June release,” says ON1 President, Craig Keudell.

Key Features and Improvements

  • Camera Profiles – Select the same looks you see on the back of your camera in ON1 Photo RAW. Select from Natural, Portrait, Landscape, etc. depending on what your camera offers. These are not presets as they don’t adjust any of the sliders, and are non-destructive. These will include popular cameras like Fujifilm®.
  • LUTs in Effects – LUTs or Look-Up Tables are a favorite way to add matte, vintage or cinematic color grading looks. These will be available inside Effects in version 2018.5. A ton of LUTs will be available in the release along with individual packs from Matt Kloskowski, Tamara Lackey, and Hudson Henry. The common .3DL and .CUBE formats found online can be imported into Photo RAW. LUTs will work like any of the current filters in Effects. You can stack them, mask them and control the blending options.
  • RAW+JPG – If you shoot RAW and JPG at the same time, you will be able to collapse and hide the JPG copy, so your library isn’t cluttered. Any metadata or file changes you make are mirrored to the JPG seamlessly.
  • Faster Film Strip for Culling – Using the Filmstrip in Develop and Effects will be just as fast as in Browse. You will be able to switch photos instantly! You can even perform your editing and culling tasks, like ratings, labels, rotate and delete, while you are adjusting your raw processing.
  • Transform Enhancements – The Transform pane in Develop will include new tools to correct perspective and rotation issues along with a new grid will make it easier to visualize results.
  • Nested Presets – Ability to better organize presets into a nested category structure will be added along with the ability to move, rename, delete, and nest presets and categories.
  • Nested Albums – Nest albums or photos inside of other albums. If you are migrating from Lightroom®, your nested collections are brought over by the Lightroom migration assistant.
  • Improved Brushing Performance – Brushing with the Masking Brush will be more fluid and responsive, especially on Windows computers with large or high-dpi displays.
  • Export Improvements – Exporting will be processed in the background so customers can continue to work on another job without having to wait for the export to finish. You can even stack multiple export jobs and continue working on your photos.
  • Performance Boost & Increased Stability – Significant under the hood speed and stability improvements are coming in 2018.5. These include speedier switching of modules between Browse, Develop, and Effects along with switching and culling photos using the film strip in Develop and Effects.
  • New Cameras & Lenses – Each update includes new cameras and lenses. The list is continuously updated, and we will share the final details when version 2018.5 is released.

ON1 Photo RAW 2018.5 Exposed

Each week ON1 will be adding videos showcasing the new features and improvements available in version 2018.5. Get a sneak peek of the new camera profiles, new LUTs, and overall performance improvements at www.on1.com/exposed.

Price and Availability

ON1 Photo RAW 2018.5 will be available this June. New customers can purchase version 2018.1 today and receive 2018.5 as a free update once it becomes available. ON1 is running an introductory price of $ 99.99 for new customers for a limited time (Reg: $ 119.99). Owners of previous versions of ON1 can also upgrade at an introductory price of $ 79.99 (Reg: $ 99.99). Version 2018.5 is a free update for all owners of ON1 Photo RAW 2018. A single purchase of ON1 Photo RAW will include both Mac and Windows installers and activation for up to five computers. It comes with a 30-day money-back guarantee, world-class customer support, hundreds of free video tutorials, and free ON1 Loyalty Rewards every month.

About ON1 Photo RAW

ON1 Photo RAW is the only photo editor designed by photographers for photographers. ON1’s unique community-driven development approach via The Photo RAW Project gives customers a voice in how it’s designed, allowing users to submit ideas and vote on new features. The majority of new features and updates in version 2018.5 have come as a result of the Photo RAW Project. With fast photo organizing, hundreds of customizable photo effects, powerful masking tools, LUTs, Camera Profiles, HDR, panos, layers, and other Lightroom and Photoshop®-like features, Photo RAW is the ultimate all-in-one photo editor and raw processor with no subscription.

ON1 Photo RAW 2018.5 isn’t just for raw files. It also supports JPEG, TIF, PSD, PSB, PNG, and DNG are supported and benefit from the speed, performance, and abundance of editing tools in the app. Photo RAW 2018.5 will continue to work seamlessly within current photography workflows. The app will integrate as a plug-in for Adobe® Lightroom Classic CC and Photoshop CC. Like the current version, Photo RAW 2018.5 will integrate with the major cloud services to allow for uploading, managing, and editing photos across multiple computers. This enables users to sync photos and their edits across multiple computers or in a studio setting.

Articles: Digital Photography Review (dpreview.com)

 
Comments Off on ON1 reveals Photo RAW 2018.5 with ‘massive performance boost’, LUTs and more

Posted in Uncategorized


Luminar Jupiter update brings new Raw conversion engine and big performance boost

17 Apr

Skylum Software—the artist formerly known as Macphun—has released a major update to its photo editing program Luminar. The update, known as Luminar Jupiter, brings more than 300 updates and improvements, including a big performance boost for both Mac and Windows users, automatic lens correction tools, a new Raw conversion engine, and much more.

One of the biggest improvements Luminar Jupiter brings is speed. According to Skylum, the update improves performance by up to 5x on Windows devices and a whopping 12x on MacOS, as illustrated in the graphics below:

Comparison charts for Luminar 2018 running on a Mid-2015 15″ MacBook Pro.
Comparison charts for Luminar 2018 running on a custom-built PC.

Beyond speed, the core of the update is two new features available in both the Windows and MacOS versions of Luminar 2018. They are: automatic lens correction controls and an improved Raw conversion engine that’s said to yield better exposure calculation, cleaner gradients, minimized chromatic aberrations and more robust camera compatibility.

Windows users in particular gain numerous new features including batch processing, an improved cloning tool, and better masking controls, while Mac users gain advanced digital camera profiles.

$ (document).ready(function() { SampleGalleryV2({“containerId”:”embeddedSampleGallery_1182252186″,”galleryId”:”1182252186″,”isEmbeddedWidget”:true,”selectedImageIndex”:0,”isMobile”:false}) });

The Luminar Jupiter update is available now as a free update to owners of Luminar 2018. Luminar 2017 owners can upgrade for $ 50, while entirely new users can grab the most recent version of Luminar for $ 70. To find out more or to purchase Luminar 2018 for yourself, head over to the Skylum Software website.

Press Release


CORRECTION: Luminar 2018 for new users costs $ 70 for new users, not $ 60 as this article previously stated.

Skylum Updates Award-Winning Software with Luminar 2018 Jupiter

Includes Enormous Speed Increases/New Features and Functions

WHO: Skylum Software, creators of multi-award-winning Luminar 2018 imaging software, has added new and improved features with Luminar 2018 Jupiter.

WHAT: Luminar 2018 Jupiter now provides processing speeds up to 5X faster with Windows and 12X faster with Mac.

Additional new features and updates include:

  • Automatic lens correction features (NEW for Mac and Windows)
  • Improved RAW Conversion engine (Mac and Windows)
  • Advanced Digital Camera Profiles (DCP) for Mac

10 NEW features for Windows users including:

  • Batch Processing
  • Free Transform, Flip and Rotate Tools
  • Overall, more than 300 updates and improvements to software

WHEN: Luminar 2018 Jupiter is available now as a free update to current owners of Luminar 2018. Luminar 2017 owners can upgrade for $ 49 and new customers can purchase Luminar Jupiter for $ 69 (No annual subscription or software renewal needed). Download software here

WHY: Through the efforts of its internal product development team, Skylum Software has developed one of the fastest, easiest, and most affordable universal image processing software in the world. A one time, low-cost purchase with no annual subscription.

DETAILS: Luminar 2018 Jupiter is taking the most complete and cost-effective image processing software and making it a whole lot better by:

  • Increased performance speed by up to 5X (Windows) and 12X (Mac)
  • Automatic Lens Distortion correction (Mac and Windows)
  • Improved RAW Conversion Engine (Mac and Windows)
  • Better exposure calculation
  • Cleaner gradients
  • Fewer halos
  • More cameras, better compatibility
  • Eliminate chromatic aberrations

New Features for Windows

  • Batch processing
  • Better cloning
  • Better masking controls, cleaner zooms, easy transformations
  • Improved workflow with other applications (as a plugin)
  • Share workspaces (remote sharing)

“Our loyal community of users continues to offer ideas for additional features that would benefit their respective workflows, and we continued to listen, learn, and improve,” said Alex Tsepko, CEO of Skylum. “Our goal is to produce a fast, easy, and feature-rich imaging software that can offer both single-click solutions as well as custom functions for those want absolute control.

Articles: Digital Photography Review (dpreview.com)

 
Comments Off on Luminar Jupiter update brings new Raw conversion engine and big performance boost

Posted in Uncategorized


6 Creative Composition Techniques to Boost Your Images

12 Mar

I am a huge fan of the Canadian rock band Barenaked Ladies. They were very popular in the 2000s and their songs were creative, fun and edgy. They also came up with a children’s album called Snacktime and it was a blockbuster hit. Now you must be wondering what a music band has to do with photography but just bear (pun intended!) with me and keep reading on.

One of the songs on the kid’s album is called “Crazy ABC’s” and it was not the traditional alphabet song. In fact, the whole song used unique and different words that begin with the traditional letters of the alphabet. Are you still with me here? At the end of the song, the lead singer (Ed) encourages kids to think outside the box when it comes to learning. Everyones knows the typical A, B and C words like Apple, Cat, and Ball. But think outside the box and see what a wonderful world it opens up.

Thi is how that example relates to photography. We all know the basic composition techniques – the rule of thirds, center focus, fill the frame, etc. How about we change things up and look at some of the atypical composition techniques – after all, it really is such a wonderful world out there, why see it from a boring frame of reference!! Let’s get creative.

#1 Look for reflections

Reflections don’t always have to be done with water. Reflections on water are probably the easiest thing to do if you want to get creative. But following the theme of changing things up, try other surfaces as well. Actually, any reflective surface can be used to add an element of creativity to your frame.

6 Creative Composition Techniques to Boost Your Images - reflections

Nothing wrong with the typical reflection in water shot…the fact that I get to see the snow-capped Himalayas twice over was enough to get me to do the typical/traditional shot.

Karthika Gupta Photography - Memorable Jaunts DPS Article-Creative Composition Techniques-reflection 1

But pushing beyond the boundaries of typical and photographing this lovely couple’s first look on their wedding day, with an added reflection in the glass takes it to another level.

#2 Look for symmetry

Just like in point number one above, symmetry does not necessarily mean centered composition of the subject. As long as you can draw a virtual line across the frame and have two exact replicas of the image, symmetry is achieved. Try to think of creative ways to achieve symmetry.

food - 6 Creative Composition Techniques to Boost Your Images

Food is one of those subjects that lends itself to a multitude of different composition techniques. By isolating these appetizers (don’t they look absolutely delicious) in a central composition, I was able to create symmetry horizontally, vertically and maybe even diagonally! Again, think outside the box.

6 Creative Composition Techniques to Boost Your Images - symmetry

One of my favorite clients from a few years ago…here the symmetry is implied – parents on one end of the spectrum and kids on the other.

#3 Use of negative space

I love the use of negative space to add so much more to an image without any additional weight of other subjects. I am always thinking of ways to use negative space to add that extra special “oomph” factor to my images.

6 Creative Composition Techniques to Boost Your Images - negative space

This little Italian car screamed for my full attention – using negative space with a wall exactly the same color as the car was a little different but this image is all about that car and nothing else!

The Vatican - 6 Creative Composition Techniques to Boost Your Images

Negative space can be used for any genre of photography – people, things, and even places. The Vatican deserves everyone’s undivided attention, there’s no doubt about that!

negative space with a model - 6 Creative Composition Techniques to Boost Your Images

My lovely model from an editorial shoot last year. She totally owned that shoot and this image shows her strength, tenacity, and attitude – the only thing in this image is her, simplified by the use of negative space.

#4 Multiple exposures

This is by far one of my favorite ways to add a little creativity to my images. Don’t feel you need to be limited by using only two exposures in the case of multiple exposures. This works great for three or even four exposures and can be done in-camera as well as in post-processing.

6 Creative Composition Techniques to Boost Your Images - double exposure

A typical double exposure using a textured image and a human element.

6 Creative Composition Techniques to Boost Your Images - multiple exposures

But why stop at two exposures? Here I used three exposures to showcase the active, multi-faceted mind of a creative. A lot of thoughts race through our minds at any given point in time – here is a creative way of documenting that!

6 Creative Composition Techniques to Boost Your Images - multiple exposures

Another three exposure frame – an extension of being creative with your composition.

#5 Slow down your shutter speed

By having a long exposure (slowing your shutter speed) you can add some creativity to your shots. Traditionally we see this with waterfalls or flowing water shots. But try and do this with other subject matter as well. Sometimes that intentional blur can be used just as a creative expression, or to create abstract art in your images.

6 Creative Composition Techniques to Boost Your Images - intentional blur

This was actually taken from a car as we were driving along a California highway. The car was too fast for me to get any sort of sunset shot so I decided to embrace the movement and create an abstract version of what I was seeing.

6 Creative Composition Techniques to Boost Your Images - motion blur

Here motion blur or slow shutter speed was much more intentional. I was camping on the beach along the Oregon coast as the fog was just rolling in and people were walking back to their tents. By slowing the shutter, the waves took on this milky look and the people magically faded away from the shot. For this kind of shot, I used a tripod to make sure the sea stacks were sharp.

#6 Creative framing

Try and incorporate frame within a frame within a frame or any combination of that in your photos to add a fun element and lead the viewer into where you want them to focus their attention.

6 Creative Composition Techniques to Boost Your Images - framing

My lovely client backlit and framed within the doorway. The sun was too bright behind her and the rest of the room was dark – a perfect recipe for taking a step back and framing the dark against the bright.

6 Creative Composition Techniques to Boost Your Images - framing

Here the happy couple is being framed by the staircase and steps in a more subtle way. The eye is being led down and around the sides of the railing leading the viewer into the bottom of the frame where the couple is taking a moment to be with each other.

6 Creative Composition Techniques to Boost Your Images - framing

This is one of my favorite images of my kids…one of the few times that big sister is being nice to her little brother! The leaves along with the tree frame them, directing your eyes to the center of the frame where they are interacting.

Conclusion

I hope these tips encourage you to think differently when it comes to photographic composition. Sure you likely know the tried and true rules – things that you know will work when all else fails. But you know what? Embrace that failure to grow creatively.

Experiment and try some of these creative composition techniques. In fact, take a chance and maybe try a couple of them together. Who knows what might happen, but at least you will feel like you explored outside your comfort zone. And the best part is that these tips work well for almost any genre of photography. So get out there and create some magic.

The post 6 Creative Composition Techniques to Boost Your Images by Karthika Gupta appeared first on Digital Photography School.


Digital Photography School

 
Comments Off on 6 Creative Composition Techniques to Boost Your Images

Posted in Photography


Lightroom Classic 7.2: Major performance boost, new features, and more

14 Feb

Lightroom Classic 7.2—the performance boosted version of Lightroom DPReview got to test for ourselves at the end of January—has finally arrived! And with it come numerous performance improvements, better support for Intel hardware, a fix for speed issues experienced by some users, and some new features to boot.

Additionally, Adobe has also updated the new cloud-based Lightroom CC ecosystem for both desktop and mobile operating systems. Let’s take them one at a time.

Lightroom Classic Performance Boost

The company explains that it has worked with Intel to improve performance scaling on computers that have multiple cores and at least 12GB of RAM, and as we showed in January, the result is much faster importing and preview generation, and improved speed for things like adjustments rendering in Develop, HDR/Panos rendering, and more.

“One key attribute of the enhancements is that they scale appropriately with a customer’s investment in hardware,” says Adobe. Users who invest in newer, more powerful hardware will see more performance improvements, particularly if the system has at least 12GB of memory. This time around, Adobe says it focused on batch processing improvements (how efficiently system resources are used and batch tasks are completed), but the company will also focus on Interactive (interface response speed) needs in the near future.

Some users had experienced problems with Lightroom Classic slowing down over time, an issue Adobe says it has fixed “in most cases,” though it is possible some users will still experience this issue.

Lightroom Classic Feature Enhancements

Performance improvements and fixes aside, Lightroom Classic 7.2 comes with multiple new features, including a text search for finding a specific folder (“Folder Search”), the ability to filter favorites within folders, an option for creating collection sets from folders for use with Lightroom mobile, as well as a feature for creating collections from Map Module pins.

This version of Lightroom Classic also adds a library filter for unedited and edited images and enables users to create smart collections with unedited or edited images.

$ (document).ready(function() { SampleGalleryV2({“containerId”:”embeddedSampleGallery_3173476968″,”galleryId”:”3173476968″,”isEmbeddedWidget”:true,”selectedImageIndex”:0,”isMobile”:false}) });

Finally, Adobe says it has enabled Photoshop Continuously Scalable User Interface in the Adobe Camera Raw plugin, with the scaling limited to 100% or 200%. Support for per-monitor scaling in Windows has also been added. In explaining the plugin update, Adobe said, “This is primarily a Windows change to sync up Photoshop, and Windows users will now be able to scale the ACR plugin from 100% to 500%, in increments of 100%.”

The full Lightroom Classic 7.2 update changelog is available here, new camera support can be found here, and new lens profile support can be found here.

Updates to Lightroom CC and Lightroom Mobile

In addition to the Lightroom Classic CC updates, the whole Lightroom CC ecosystem—including the Lightroom Mobile apps on iOS and Android—have been updated as well with “optimized performance, added support for new cameras and lenses, and some great new features for desktop and Android.”

Adobe says it put a lot of effort into “tuning and improving stability” with this update. Lightroom CC on Mac and Windows will see performance improve when moving between photos, grid scrolling, and exporting, while all the apps across mobile and desktop should be “a lot more stable.”

As for new features, Lightroom CC for desktop gets the ability to add copyright to imported images; meanwhile, Lightroom Mobile on Android gets a geometry tab for correcting perspective distortion, the ability to add a watermark upon export, the ability to search your Lightroom library with Google Assistant, and a new “Add to Lr” option that will allow you to add photos from third party apps directly into your Lightroom library.

$ (document).ready(function() { SampleGalleryV2({“containerId”:”embeddedSampleGallery_8528326624″,”galleryId”:”8528326624″,”isEmbeddedWidget”:true,”selectedImageIndex”:0,”isMobile”:false}) });

All of these updates are available now, so if you have a Creative Cloud subscription, update to the latest versions and give them a go. And if you want to dive deeper into all of these new features, head over to the Adobe blog.

Articles: Digital Photography Review (dpreview.com)

 
Comments Off on Lightroom Classic 7.2: Major performance boost, new features, and more

Posted in Uncategorized


How to Boost your Lightroom Performance and Improve Speed

22 Jun

Are you running out of space on your hard drive? If you’re both a prolific photographer and a Lightroom user the answer may be yes. A hard drive that’s close to being full is bad news because it slows down Lightroom and just about every other application that you use on your computer. So how can you boost your Lightroom performance and make your computer run faster?

Luckily, there are ways to both minimize the amount of hard drive space Lightroom uses and to free up some space that is being used unproductively. As a result, Lightroom will run faster, as well as your entire computer usually.

So, how much spare hard drive space is required for Lightroom?

Ideally, you need at least 20% of your hard drive space to be free. If you have a 1TB drive, that means you should aim to keep at least 200GB free. If you have a smaller drive, such as the 256GB solid state drive I have on my iMac, then you need less. In my case, I need to keep at least 50GB free to keep Lightroom happy.

So, here are some tips to help improve Lightroom performance:

1. Store all your photos on an external hard drive

This has nothing to do with Lightroom per se, but it’s important because your photos are likely to take up a lot of hard drive space (especially if you shoot in Raw). The best approach is to use a separate hard drive for your photos, either an external drive or another internal drive added to your computer (if this is possible on your machine).

For example, my Raw photos take up 1.96TB of hard drive space. I keep them on a 3TB external hard drive like the one shown below.

How to Boost your Lightroom Performance and Improve Speed

It’s important that the hard drive on which your photos are saved also has at least 20% of its space free. Otherwise, it might slow Lightroom down as well.

It’s good practice to use the external drive for photos and Lightroom catalog backups and nothing else. That means it won’t get cluttered up with other files. It’s easier to backup to other hard drives.

2. Save fewer LR catalog backups

It’s important to backup your Lightroom catalog regularly in case it becomes corrupted or the hard drive it is saved on fails.

Many photographers recommend that you set up Lightroom to backup the catalog every time you exit the program. The only problem is that the hard drive space occupied by those catalog backups can soon add up to a considerable amount.

It’s less of an issue in Lightroom 6 and Lightroom CC, which compress the backup catalogs than it is with older versions of Lightroom. But even compressed backups take up a lot of hard drive space. For example, my backup folder currently has six backups in it and is 2.94GB in size.

There are two steps to take to minimize this problem:

1. Save catalog backups on an external hard drive. The same one you use to store your photos is ideal.

Each time you quit Lightroom the Back Up Catalog window appears. Click the Choose button to select the folder where you want it to save the Catalog backups. NOTE: this is the only time this option appears!

Also worth noting is that you want to save your backups on an external drive anyway because if your main hard drive crashes, both your main catalog and all the backups are gone. That is not good and defeats the purpose of having backups.

How to Boost your Lightroom Performance and Improve Speed

2. Delete old backups. You don’t need to keep anything older than the two most recent catalog backups.

I deleted my four oldest backups and freed up nearly 2GB of hard drive space. It may not sound like much if you have a 1TB or larger hard drive, but it does make a difference on a 250 GB solid state drive.

It may be tempting to move your catalog to an external drive, but this will slow Lightroom down. It’s best to keep the working catalog on your internal hard drive.

3. Keep an eye on the Preview Cache

If you go to Lightroom > Catalog Settings (Mac) Edit > Catalog Settings (PC) and click on File Handling you will see something like this.

How to Boost your Lightroom Performance and Improve Speed

Lightroom gives you a lot of useful information about how it uses hard drive space here. First, it tells you the size of your Preview Cache. This is where Lightroom stores all the previews it builds which enable you to view your photos in the Library module.

As you can see, my Preview Cache is currently 36GB, which is a large chunk of a 250GB hard drive. It’s less of an issue if you have a bigger hard drive.

How to Boost your Lightroom Performance and Improve Speed

If your Preview Cache is too large, there are some tips for reducing its size in the next two sections.

4. Regularly delete 1:1 Previews

Of all the Library module previews Lightroom uses the 1:1 Previews take up the most space. But they are essential for zooming into your photos at 100%, which is why many photographers build them.

You can manage 1:1 Previews by setting Automatically Discard 1:1 previews to After 30 Days. You can also set it to After One Week or After One Day. Just pick the one that works best for you. Avoid the Never option, otherwise, your Preview Cache will grow out of control.

How to Boost your Lightroom Performance and Improve Speed

Set your File Handling Preferences in the Catalog Settings to automatically delete 1:1 Previews after 30 days.

There’s another way to delete 1:1 previews:

1. Go to the Catalog panel in the Library module and click on All Photographs.

How to Boost your Lightroom Performance and Improve Speed

2. Go to Edit > Select All (or click CMD/CTRL+A for the keyboard shortcut).

3. Go to Library > Previews > Discard 1:1 Previews (click the Discard option in the next window).

There are a couple of things you should be aware of, though:

  • Lightroom doesn’t delete the 1:1 previews from the Preview Cache right away. There is a delay, so in case you change your mind you can use the Undo function. You may have to wait a day or so to see the benefit.
  • Lightroom only deletes 1:1 previews that are at least double the size of your Standard previews.

5. Build Standard Previews that aren’t too large

You can set the Standard preview size in your Catalog Settings as well. If you select Auto Lightroom sets the smallest size required for your monitor resolution. You can also set Preview Quality to Medium or Low to reduce the space the previews take up.

How to Boost your Lightroom Performance and Improve Speed

6. Build fewer or dump Smart Previews

The Catalog Settings also show you the amount of space occupied by Smart Previews. If that is too large, you can delete them.

How to Boost your Lightroom Performance and Improve Speed

  1. Go to the Catalog panel in the Library module and click on All Photographs.
  2. Go to Edit > Select All.
  3. Go to Library > Previews > Discard Smart Previews (click the Discard option in the next window).

7. Regularly dump the Camera Raw Cache

Lightroom creates more previews to use in the Develop module when you process your photos. These previews are saved in the Camera Raw Cache.

You can set the maximum size of that cache by going to File Handling in Preferences. The larger the number you set the more hard drive Lightroom’s Develop module previews will potentially take up. But, Lightroom may run slower if you set it too low – so you need to find a balance between too big and too slow. Try around 20GB to start with and see how you go.

How to Boost your Lightroom Performance and Improve Speed

You can delete the Develop module previews by clicking the Purge Cache button. It’s probably a good idea to do this every now and then to free up hard drive space. The last time I did it I gained over 20GB of space (see below).

How to Boost your Lightroom Performance and Improve Speed

If you edit or view video files in Lightroom you can also gain space by purging the Video Cache (below).

How to Boost your Lightroom Performance and Improve Speed

Conclusion

Lightroom is essential for most photographers but it can use up a lot of hard drive space. The tips in this article let you take back control of your hard drive. Any questions? Let me know in the comments below.


If you’d like to learn more about Lightroom, then please check out my popular Mastering Lightroom e-books.

The post How to Boost your Lightroom Performance and Improve Speed by Andrew S. Gibson appeared first on Digital Photography School.


Digital Photography School

 
Comments Off on How to Boost your Lightroom Performance and Improve Speed

Posted in Photography


15 Photography Ideas to Boost Your Creativity

21 Mar

Doing photography exercises brings forth new opportunities to improve your skills, hone in on your craft and who knows, even guide you in the direction of finding a new genre that you love more than anything in the world! Here are 15 creative ideas to take you out of your comfort zone, and guide you in your quest to boost your creativity.

Get out there and put your own spin to each of these prompts. Bonus points if you have never tried any of these before. When you push yourself to get comfortable being uncomfortable, to step outside your comfort zone, to try new things, and to give yourself the permission to fail – you also give yourself the chance to figure out who you want to be when you grow up!

#1 – Add emotion to your images

15 Photography Exercises to Boost Your Creativity

I absolutely adore this image. There’s nothing like laughing with unabashed happiness on your wedding day!

Choose to evoke emotion in your images – either in the eyes of the beholder or in the eyes of the beheld (a.k.a your subjects). When you want emotion from your subjects, ask for it. There is nothing more uncomfortable for your clients than a photographer who is silent behind the camera while continuously clicking the shutter.

Most clients are not professional models and generally, they are quite camera shy and self-conscious. It is our responsibility as the photographer to direct, educate, and interact with our clients to make them comfortable in front of our lens.

If you are shooting landscapes or still lifes, aim to create emotion in your images that move your audience to feel something. Be it a serious case of wanderlust viewing a travel photo from an exotic locale, or insane hunger when looking at your food images!

15 Photography Exercises to Boost Your Creativity

Sometimes staged photos take a turn of their own and present opportunities for different perspectives!

#2 – Try some motion blur

There are many different ways to achieve motion blur. I associate motion blur with the effect of capturing movement in a frame. You can either capture movement in your subject or by moving yourself or the camera (e.g. panning). For me, the easiest way to achieve motion blur is to slow the shutter speed and show some movement of the subject. Motion blur adds an interesting artistic element in your images if done right. One tip, use a tripod for optimal effect.

15 Photography Exercises to Boost Your Creativity

When fog was our constant companion on a beach camping trip in the pacific northwest, I chose to use it to my advantage to create an eerie effect with motion blur – in the waves and the people walking along the beach!

15 Photography Exercises to Boost Your Creativity

Panning image courtesy of dPS Editor, Darlene.

googletag.cmd.push(function() {var gpt_slot = googletag.defineSlot( “/1005424/_dPSv5in-post-mobile(300×250)”, [300, 250], “pb-ruleset-mobile-ad-0” ).addService( googletag.pubads() );ruleset_mobile_slots.push( gpt_slot );});

googletag.cmd.push(function() {var gpt_slot = googletag.defineSlot( “/1005424/_dPSv5in-post-mobile(300×250)”, [300, 250], “pb-ruleset-desktop-ad-4” ).addService( googletag.pubads() );ruleset_desktop_slots.push( gpt_slot );});

#3 – Go macro

Traditionally macro photography has been associated with floral and fauna. But resist the urge to get out into the garden to find the smallest ant to photograph. Instead, think of macro as a great way to isolate details in an image.

15 Photography Exercises to Boost Your Creativity

As a wedding photographer, I love using my macro lens to capture unique ring shots for my couples. And of course, nothing like highlighting the snow (I live in Chicago!).

#4 – Find reflections

As the name suggests, try and find mirror images or reflections, either with mirrors or with water, of your subject and shoot creatively.

Reflections of people in water image - 15 Photography Exercises to Boost Your Creativity

It really helps if your subjects are great sports and willing to get into the water for a shot like this!!

#5 – Shoot out of focus

Whether it’s an unlucky accident or intentional, I love out of focus images. Remember these creative exercises are simply an attempt to create something you are proud of. There are no right or wrongs, they are all just ways to stimulate your creative juices.

#6 – Wabi-sabi – embracing imperfection

As per Wikipedia, wabi-sabi represents Japanese aesthetics and a Japanese world view centered on the acceptance of transience and imperfection. The aesthetic is sometimes described as one of beauty that is “imperfect, impermanent, and incomplete”.

There is something innately beautiful in imperfections. That feeling of being alive and being human and living life to the fullest, versus living in the proverbial glass house where nothing is out of order. The best way to think of wabi-sabi is to look for imperfections in your everyday.

15 Photography Exercises to Boost Your Creativity

I love everything old and vintage. They always tell me stories of a different, more interesting time and place!

15 Photography Exercises to Boost Your Creativity

#7 – Double exposures

Ding a double exposure is a carry-over from the old film days and it is a super creative way to take your images from boring to wow! In its simplest form, it is a way to superimpose two images onto a single frame. The good news is that you don’t need a film camera to create double exposures. Some of

Some newer DSLRs have a multiple exposure setting as a tool for creative photography. It takes a little bit of reading but once you get the hang of it, I promise, you will be hooked. We also have a great article in the DPS archives that talks about the techniques of multiple exposures How to do Multiple Exposures In-Camera.

15 Photography Exercises to Boost Your Creativity

googletag.cmd.push(function() {var gpt_slot = googletag.defineSlot( “/1005424/_dPSv5in-post-mobile(300×250)”, [300, 250], “pb-ruleset-mobile-ad-1” ).addService( googletag.pubads() );ruleset_mobile_slots.push( gpt_slot );});

googletag.cmd.push(function() {var gpt_slot = googletag.defineSlot( “/1005424/_dPSv5in-post-mobile(300×250)”, [300, 250], “pb-ruleset-desktop-ad-5” ).addService( googletag.pubads() );ruleset_desktop_slots.push( gpt_slot );});

#8 Diptych

A diptych is a concept of placing two images side by side so that they add context to each other and tell a complete story. When choosing images to form a diptych, pay close attention to light, tones, and exposures. Typically I compose my diptychs to include a big picture image and a detail shot of an element of that image.

15 Photography Exercises to Boost Your Creativity

My focus with dyptics is to dig deeper into my stories…focus on the details along with the big picture.

#9 – Triptych

Similar to diptych, a triptych is a concept of placing three images side by side so that they collectively tell a story.

15 Photography Exercises to Boost Your Creativity

Especially with tryptics, pay special attention to the order and orientation of the images. At times this might limit the placement of the images in a certain order.

#10 – Shooting through objects

I love shooting through objects, it adds an element of interest and depth in the foreground. You can really take this up a notch by using every day elements like leaves, branches, fabric pieces and ever glass to create some cool artistic effects in your images.

15 Photography Exercises to Boost Your Creativity

15 Photography Exercises to Boost Your Creativity

#11 – Different perspective

The next time you find yourself shooting the same subject the same way, take a step back and rethink your strategy. Are you a 100% vertical shooter like me? Then force yourself to take a horizontal frame. Are you always looking at details? Then use a wide-angle lens and force yourself to take in the big picture. Do you always shoot at a narrow aperture so as to get everything in focus? Then dial down your aperture and shoot at the widest possible setting (based on your lens) to focus in on one detail of the whole image.

15 Photography Exercises to Boost Your Creativity

Personally, I tend to shoot closeup and focus on the details a lot more than I do the big picture. So I have been forcing myself to do just that…and I love when I get diversity of 50-50 in my vertical and horizontal orientation shots! Bonus point to you if you can spot the subject here!!

#12 – Burst of color

It’s a beautiful, colorful world out there. Get out and photograph it. Don’t be afraid of the bold bright colors, but definitely be aware of which colors work and which ones don’t quite translate well in imagery. Train your mind to look for certain colors and patterns and before you know it, you will have a collection of colorful images that make you happy.

15 Photography Exercises to Boost Your Creativity

15 Photography Exercises to Boost Your Creativity

I just loved the pop of color from my husband’s red jacket as he walked along the lakeshore with the Olympic mountains in the background.

#13 – Monochromatic

This is the exact opposite of #12 where your challenge is to look for and shoot a black and white image. You can either convert the image to B&W in post-processing or change the setting on your camera (depending on the make and model) to shoot monochromatic in-camera.

googletag.cmd.push(function() {var gpt_slot = googletag.defineSlot( “/1005424/_dPSv5in-post-mobile(300×250)”, [300, 250], “pb-ruleset-mobile-ad-2” ).addService( googletag.pubads() );ruleset_mobile_slots.push( gpt_slot );});

googletag.cmd.push(function() {var gpt_slot = googletag.defineSlot( “/1005424/_dPSv5in-post-mobile(300×250)”, [300, 250], “pb-ruleset-desktop-ad-6” ).addService( googletag.pubads() );ruleset_desktop_slots.push( gpt_slot );});

The key here is to look for patterns and compositions that work well in black and white. A point to note is that processing is very subjective, as is black and white imagery. There are no right or wrong images, but here are a few articles to help you take great monochrome images.

  • How to Create Good Black and White Portraits
  • 6 Tips to Help You Make Better Black and White Landscape Photos
  • Avoid These 5 Common Mistakes in Black and White Photography
  • A Guide to Black and White Conversion in Photoshop
  • A Guide to Black and White Conversion in Lightroom
  • Improve Your Middle of the Day Photos By Doing Black and White

15 Photography Exercises to Boost Your Creativity

15 Photography Exercises to Boost Your Creativity

#14 – Pattern play

Take the time to look around and see if you are able to find any natural patterns around you. These can be either man-made or natural. Facades of buildings, windows, parking lots, and landscapes all provide many opportunities to capture repeating patterns. Capture them in an interesting way to highlight those patterns.

15 Photography Exercises to Boost Your Creativity

#15 – Shadow play

Shadow play is most prevalent in situations when the sun is high in the sky creating harsh shadows on the ground, on buildings and directly unto the subject. But magic with light also happens indoors. Learn to embrace this high contrast between shadow and sun and try to capture some creative angles.

Dramatic light Images Shadow play - 15 Photography Exercises to Boost Your Creativity

Conclusion

I hope these exercises have proven to you that there isn’t any lack of creativity prompts in and around you. You just have to look for them anytime you feel stuck or find yourself creating the same or similar images again and again. Keep these prompts in the back of your mind, use them, combine them, mix them up – the possibilities are endless!

googletag.cmd.push(function() {var gpt_slot = googletag.defineSlot( “/1005424/_dPSv5in-post-mobile(300×250)”, [300, 250], “pb-ruleset-mobile-ad-3” ).addService( googletag.pubads() );ruleset_mobile_slots.push( gpt_slot );});

googletag.cmd.push(function() {var gpt_slot = googletag.defineSlot( “/1005424/_dPSv5in-post-mobile(300×250)”, [300, 250], “pb-ruleset-desktop-ad-7” ).addService( googletag.pubads() );ruleset_desktop_slots.push( gpt_slot );});

The post 15 Photography Ideas to Boost Your Creativity by Karthika Gupta appeared first on Digital Photography School.


Digital Photography School

 
Comments Off on 15 Photography Ideas to Boost Your Creativity

Posted in Photography


How Having a Play Camera Can Boost Your Creativity

23 Aug

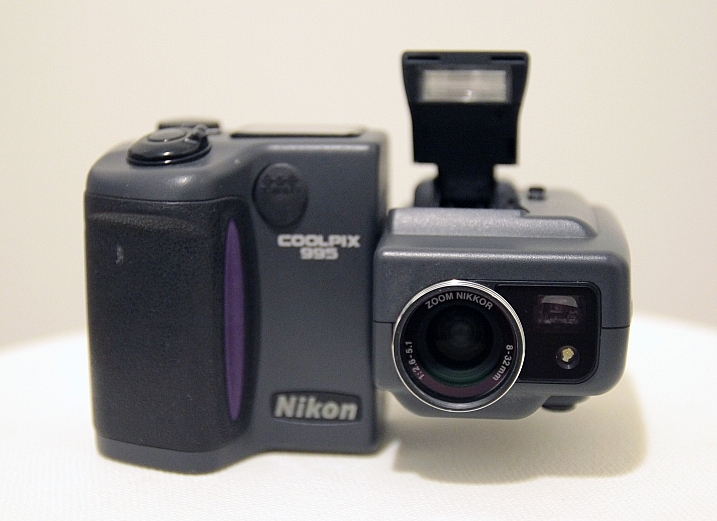
In 2001, after many years as a film photographer, I bought my first digital camera. It was a Nikon Coolpix 995, and I still remember how excited I was when I opened the box and took my first pictures with it. I was really amazed with what those three megapixels were able to do. Since then, I followed the digital road, and never looked back.

I took really good care of that camera, bought all the accessories and lens adapters for it, and took it everywhere with me. For a while it was my pet or play camera.

Chung Chu

Nikon Coolpix 995 – By Chung Chu

I remember the feeling of falling in love with photography all over again, and I believe that some of the best pictures in my portfolio were made with that camera.

Advances in technology

After that, the first decent resolution DSLRs came on the market, and I decided to invest in one to keep up with the professional photography market demand. My Coolpix started being used less and less, in no time those three megapixels were just ridiculous compared to what DSLRs could do, and my play camera just got stored on the back of my equipment closet, never to be used again.

I had a lot of compact cameras after that, but none of them replaced my play camera, the fact is that each time I downloaded the pictures and looked at them in a computer screen, they all just seemed to have a really poor quality compared to the files I was getting with my DSLRs. Sadly I had become a pixel peeper.

One more try at having a play camera

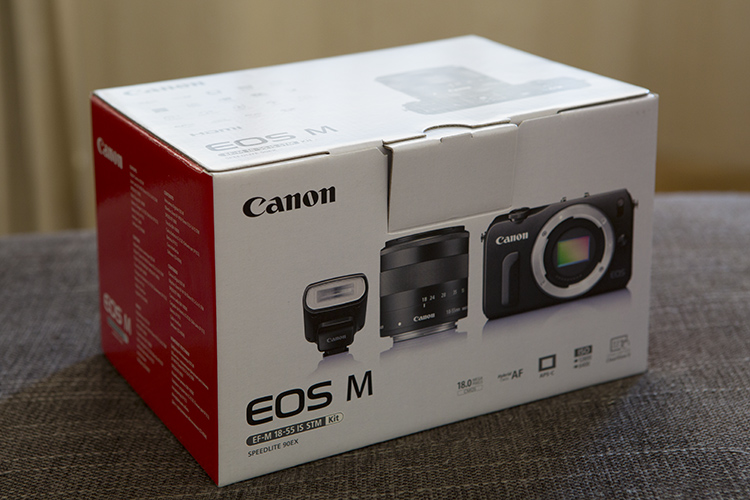
Recently my wife bought me a Canon EOS-M as a gift, which was the first attempt by Canon on the mirrorless market. Well, if you are into photo equipment at all, then you likely know that this camera was the biggest flop on the market of recent digital camera history. Besides having really bad focusing issues, it was no competition for what other brands had already launched, which is my wife was able to buy the kit for about $ 300, as everyone was dumping their inventory of it.

I would never have bought this camera myself, but it was a present, so I decided to give it a try.

01

I opened the box and it reminded me of my beloved Coolpix 995. The EOS-M is a really good looking camera, with a great design, and the fact that it was just not a simple compact camera got me a lot more interested on it. The test shots I made after a firmware update fixed some focussing issues, got me back to that loving feeling all over again.

Those were great images, and the pixel peeper inside me was happy with the image quality when I looked at them on the computer screen. The fact that everybody was considering this camera Canon’s ugly duckling, made me love it even more, because it had some kind of “misfit” attitude amongst all the other mirrorless camera out there.

Why have a play camera?

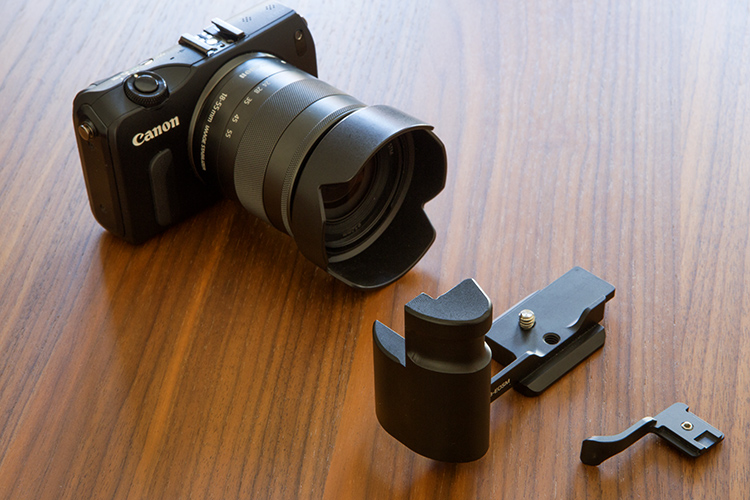
Pretty soon I was buying accessories, and taking it everywhere with me. At last I had a new play camera – the point of which is to have it and use it all the time! A grip and a thumb rest were the obvious first things to buy, as the camera seemed so small in my hands and it made me feel like I was going to drop it every time I photographed.

02

03

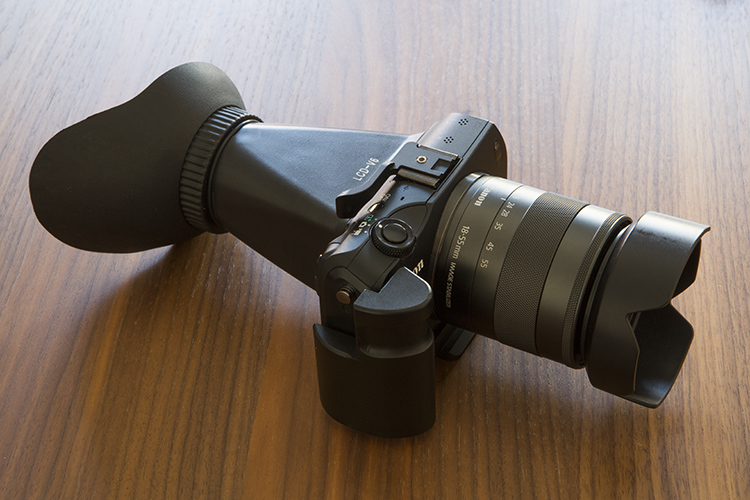
An added LCD loupe helps block the ambient light on the LCD, and gave me a better sense of the exposure and focus.

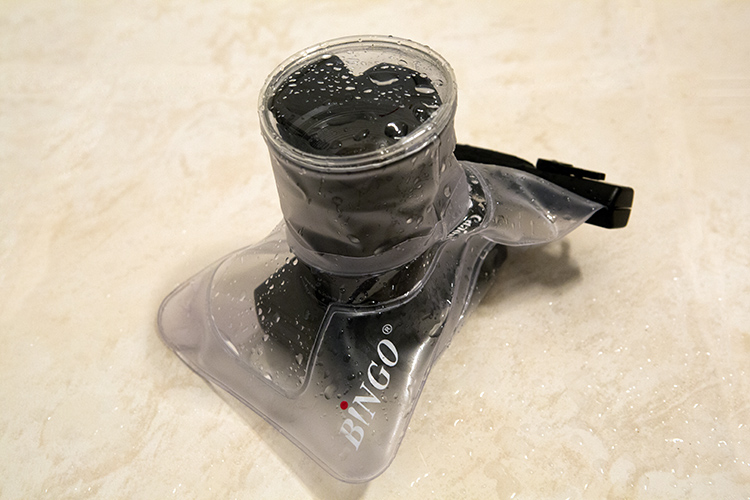
The fact that it didn’t cost a lot of money, made me comfortable using this camera in situations I would never use my expensive DSLRs, like underwater with a cheap protective bag.

04

There were no limits for what I could do with this camera, and even when I had a lot of commercial work, I made an effort to find some time to get back to my personal photography projects.

I must say that my favorite feature on this camera, is the fact that it is able to use not only the dedicated EF-M series lenses Canon launched with it, but with a special adapter it is also able to use EF or EF-S lenses also, keeping all the automatic features.

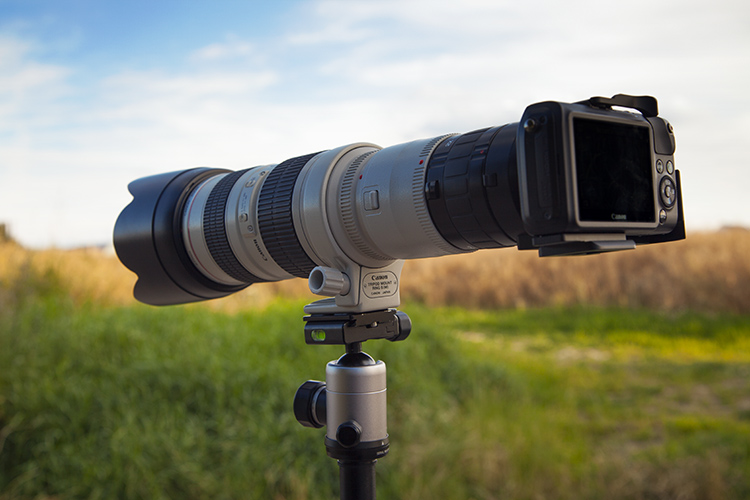
Over all these years as a Canon DSLRs user, I have collected some serious L-glass along the way, so the fact that I could use all those lenses on this tiny mirrorless body was a huge plus in my book. I must admit though, that it looks a bit ridiculous to see this camera together with an L-series lens, but the fact is that it works.

Try new and whacky things

It even got me carried away experimenting with some crazy extender combination with my EF 70-200 2.8L coupled with the Canon 2x extender and the Kenko 2x Teleplus Pro 300, giving me some serious telephoto ability for wildlife pictures.

05

200mm X (APS-C 1.6 crop factor) X (Canon extender 2x) X (Kenko 2x converter) = 1280mm equivalent.

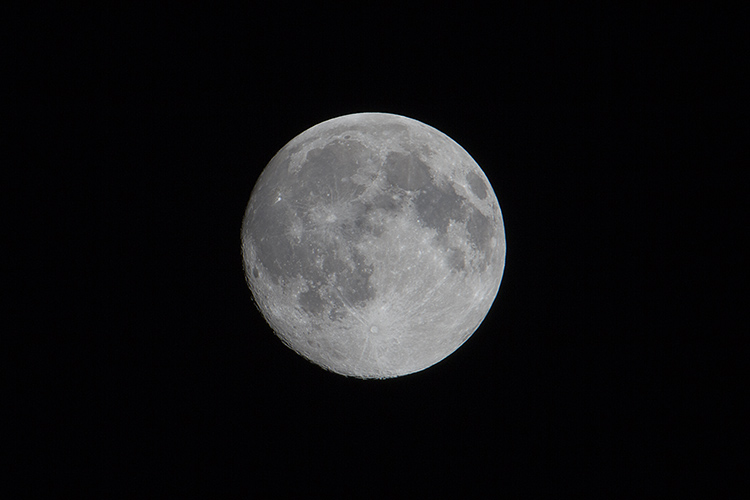
This telephoto ability also got me into moon photography, as it is the perfect focal length to capture great pictures from my bedroom window.

06

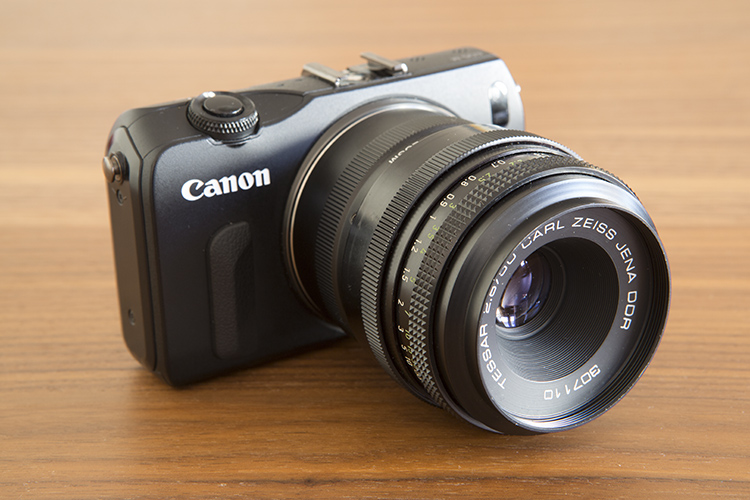
Another great thing is that you can even take it beyond EF lenses. With third party adapters you can make the camera body work with almost any lens you want, even though you lose autofocus ability. To me it’s great to again use old lenses I totally forgot I had, like this M42 50mm f/2.8 Carl Zeiss Jena Tessar that has a really fantastic image quality, and makes me go back to when I was a young kid using my old Pentax with a split prism focusing screen.

07

Bottom line

So, the bottom line is that even though this camera was released in 2012 and the EOS-M2 and the EOS-M3 were released after that, I still have great fun with it and don’t feel any need to upgrade to a newer model.

I guess I just feel really free experimenting with this camera without being worried about damaging it, or being bothered to carry it around. For me this is what a pet camera means despite of brand, model or type of camera.

Photography is about taking pictures, and the best camera is the one you feel more comfortable with, for what you want to shoot.

Do you have a play camera? One you take with you everywhere, one that you don’t worry about losing or damaging? Do you feel you are more creative with it than your regular camera? Share your experience in the comments below.

googletag.cmd.push(function() {
tablet_slots.push( googletag.defineSlot( “/1005424/_dPSv4_tab-all-article-bottom_(300×250)”, [300, 250], “pb-ad-78623” ).addService( googletag.pubads() ) ); } );

googletag.cmd.push(function() {
mobile_slots.push( googletag.defineSlot( “/1005424/_dPSv4_mob-all-article-bottom_(300×250)”, [300, 250], “pb-ad-78158” ).addService( googletag.pubads() ) ); } );

The post How Having a Play Camera Can Boost Your Creativity by Ivo Guimaraes appeared first on Digital Photography School.


Digital Photography School

 
Comments Off on How Having a Play Camera Can Boost Your Creativity

Posted in Photography


How to Boost Your Creativity by Including Props in Your Photography

31 Jul

Props: are they a blessing or a curse? In photography, props can often make or destroy a photo, and because of this some people try to avoid them, some are afraid to use them, and other people love to use them.

I moved from being afraid to loving props because I found they are amazing tools to unlock creativity.

Photo00

Freshly squeezed coffee. A different way to prepare a fresh cup of coffee.

Why use props?

Usually, the role of the props in photography is to help add character and interest to a photo, or to add context to the scene.

Some kinds of photography, such as conceptual photography, cannot exist without props, as they are needed to translate the abstract concept or message into an image.

Photo01

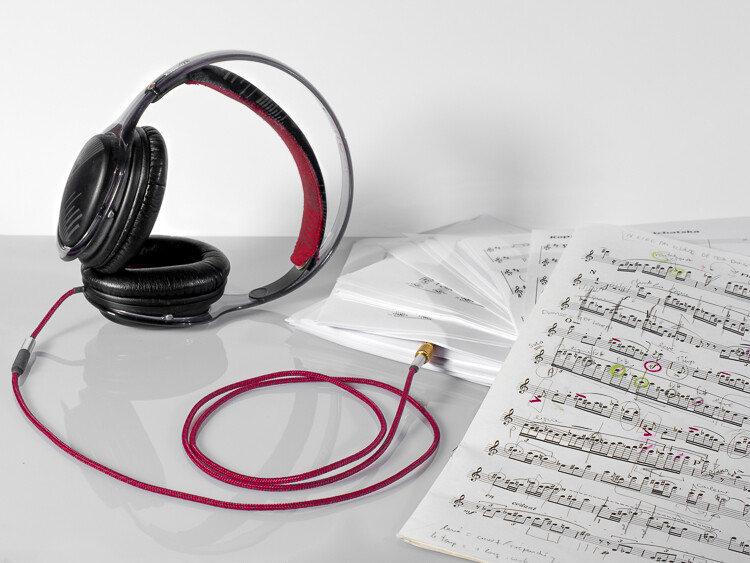
Musical scores.

Props in commercial photography

In tabletop photography (product, food photography, and still life), props are used to build the scenography of the photo you are crafting.

Photo02
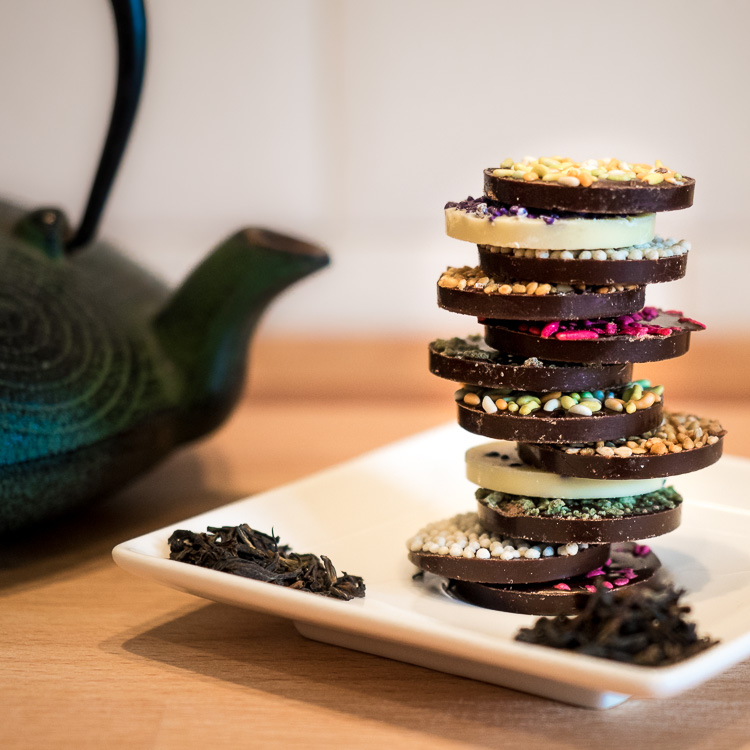
The teapot, the plate, and tea leaves are all elements of the scenography used for the pile of chocolate biscuits in this a classic food photograph.

Props in landscape photography

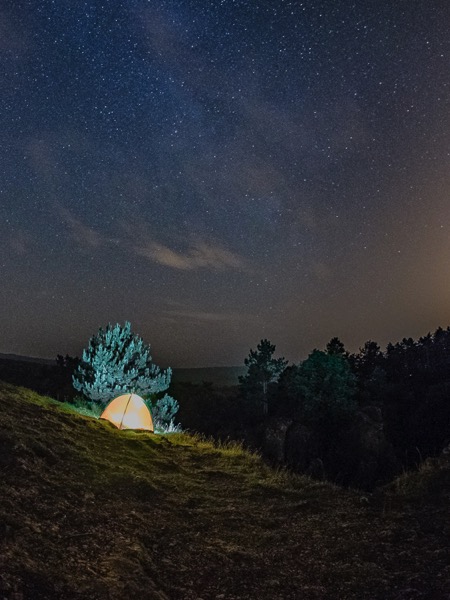
Props are sometimes present even in landscape photography, usually with the task to add interest to the foreground. A classic example would be to photograph a camp site in the wilderness, with a lit tent under a starry sky.

Photo03
This tent is, indeed, just a prop. I brought it along with me solely with the intent to add interest to this nocturnal landscape.

Props and portrait photography

Using props will also help you to create more interesting portraits. Are you into self-portraiture? Cool, but there is only so much you can do with your face, and after a while you will probably feel the need to start using props, The more creatively you can use them, the better and more interesting your portrait will be.

Photo04

A simple ball thrown in the air with a bit of timing can make for a dynamic, “It’s a kind of magic” portrait.

So, props are all those objects that photographers add into the scene they’re photographing that are not the main subject of the image. I don’t consider hats, jewelry, wristwatches, and all those accessories your model wears for a portrait, to be props.

Another plus with props, especially in portraiture, is that they can help your model to be more comfortable in front the camera by giving him/her something to do or to focus on, thus forgetting about you and your camera.

Photo05
A prop in the hands of a 3 year old toddler (my son in this case) can lead to interesting results without making a fuss.

Things to look out for using props

So where is the problem with the use of props? Why people can be negative about them? My guess is because they are so widely used in photography that the risk of fall into photographic clichés is quite high.

Below are five tips to help you be creative with props, instead to fear them.

Before you continue allow me a final word. While it is true that many things can be do inside editing software, to really exercise your creativity don’t be a lazy photographer, craft your images for real as much as possible.

Photo06
I consider the flame and the smoke in this photo of a hot pepper to be props. The fun in crafting the image with real fire and smoke was unbelievable.

Tip #1: Use a classic prop in a fresh way

Old film cameras are classic props in portraiture, and the ways to use them are variations of my son’s portrait you saw above.

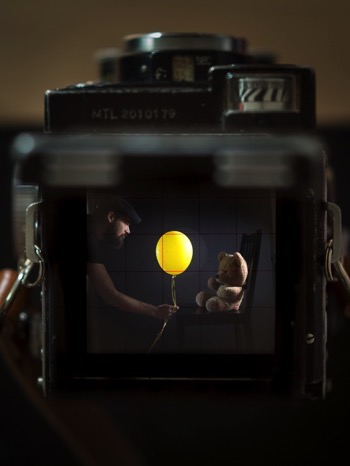
Among those cameras, the most photogenic ones are, in my opinion, the TLR (twin lens reflex) cameras, such as Rolleiflex, Rolleicord and Yashica. Because these cameras have a huge focusing screen you have to look into from above, the usual way to use these props is to have your model look down into the camera.

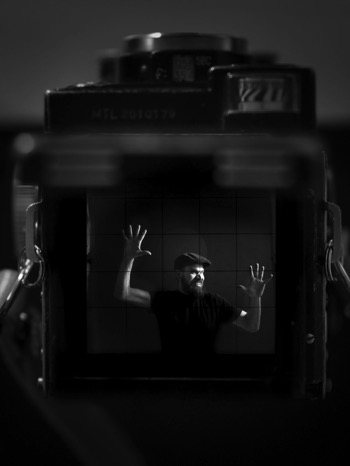
A less common way to use those TLR cameras as props is to take advantage of their massive focusing screen, which is many time larger than any SLR camera viewfinder, and to photograph the scene the TLR camera is seeing.

Once you get the setup right, don’t stop after the first shot, but experiment with poses and props.

Photo07

Trapped!

Photo08

To reveal the child inside us.

Tip #2: Build your own props

Another way to get creative with props is to craft them yourself. This will not only ensure you have unique props to work with, but the whole process of making the props will make you think more creatively about how to use them.

A one meter long, origami paper boat, and a yellow balloon are good props to make one of my son’s fantasy and childish adventures come to life.

Photo09

A fantasy childhood adventure gets real in this photo.

If you are into origami, and tired of taking the usual portraits of your children, you could try to create adventures for them by folding big paper planes or animals, or whatever you know how to do with a piece of paper. Plus, you can find plenty of origami tutorials waiting for you online.

Once again, it is true you could easily compose the adventurous portrait of your child by adding elements to the photo later in Photoshop. But, again, what fun would that be for both of you?

Tip #3: Break the physical laws and go surreal

One of my favorite prop to work with are helium balloons, those you usually buy for parties. They are colorful, cheap, long lasting and very versatile.

Inspiration for their use is everywhere; have you watch the animation movie Up recently? Cool, wouldn’t it be fun to fly away holding tight to a bunch of balloons?

Photo10
Up, up we go. Here the low key really helped a lot to make the pose believable.

What about breaking the physical law by playing “tug of war” with those balloons, instead?

Photo11
Up and Down are quite arbitrary in this kind of photos. Here I was lying down on the floor but I tried to keep my shoulder off the ground, so that once I turned the photo 90 degrees counterclockwise, the pose was still believable. The low key helped by getting rid of the floor.

Tip #4: Prep your props

Sometimes, you can obtain something original just by prepping up a classic prop, such as the omnipresent book. Books are often used to fill a still life scene, or to get more interesting portraits.

Photo12
A funny contrast between the surprised grown up, rude, and bearded man, and the book of one of Winnie the Pooh adventures.

To make things more interesting, dynamic and less cliché, you can prep a book by sprinkling body powder on its pages and then have your model to blow the dust off while you take the photo. Or have him slam the book shut just before you fire the shutter, so to record of white powder flying out the book creating clouds.

Photo13

By adding body powder to the mix, you can obtain much stronger and dynamic portrait.

Powder makes things much more interesting, and the only limit is your creativity (or the absence of a working vacuum cleaner to clean up after the mess). You can sprinkled some body powder on a ball (another common prop) and make your model hit it with the hands just before taking the photo. You will capture great puffs of powder, helping to convey a feeling of action and power.

Photo14

Basketball and body powder mix in interesting ways.

Tip #5: Go crazy with conceptual photography

While it is challenging per se, I consider conceptual photography to be the best playground to learn to be creative with props.

When you do conceptual photography, your subject will be a concept, and the challenge is to translate it into an image by using props. At first, keep it easy, and don’t be afraid to get inspired by the work of other photographers.

Photo15

The chicken’s great escape, a concept I saw online and I made it mine by using my personal style, and adding the escaping chicken.

Because you want to convey a message, even with the simplest setup, you have to pay attention on how you place your props into the scene.

In the previous photo, the dark, out-of-focus chicken in the background is there to give the idea of the chicken moving away from the egg. While the broken shell with marks on its inside make the viewer think of it as the chicken prison. Had I placed the chicken in the foreground, in-focus and well lit as the egg’s shell, the message would have lost some strength.

When you do conceptual photography, do not focus on the photography aspect at first, but let your ideas and concepts spawn naturally from your everyday life. Are you cooking your favorite food? In that moment the idea that photography is a bit like cooking could strike you.

In photography, as in cooking, you combine what reality puts in front your lens (the ingredients) to create your vision of such reality (the finished food).

This idea struck me once and this was my personal way to translate it into a photo: the ingredients are the colorful paper rolls in front the lens of an old TLR camera, and those ingredients combine in-camera to reveal an origami nocturnal seascape crafted using the paper from the rolls. Photography magic.

Photo16
The fun of doing the origami seascape for real and the challenge to frame, focus, and light it, so I could photograph the scene through my old TLR camera, was so much more than just use an editing software to copy/paste, move, rotate, resize and bled all the different elements together.

Once you start this game, you can find concepts everywhere; was your Mexican food too spicy even for a chili lover as you are? Something like that could pop in your mind.

Photo17

The most useful kit for us chili lovers.

Bonus tip: The hunt for props

Now you know how you can get creative with props in many ways, even using common ones, but it is always good to hunt for more interesting ones.

A good way to hunt for unique and weird props is to visit flea markets and shops selling kitchen supplies, vintage clothes, and such. And then, as usual, once you’ve got your props, use them in a fresh and unconventional way.

Photo18
A variation of the concept shown in the photo opening this article; the same concept can be photographed in many different and original ways. Creativity is your only limitation.

Once again, the way you use and prep the props is crucial to create a convincing image. The coffee stains on the table and the squeezer, the squashed and broken capsules, and the smoke from a hidden candle, make the viewer understand what the meaning of the photo is, and the reason behind those props.

Conclusions

Don’t be afraid to use props in your photography to add something more. Just remember to use them wisely and creatively to push your photography further, and to avoid falling into photography clichés.

googletag.cmd.push(function() {
tablet_slots.push( googletag.defineSlot( “/1005424/_dPSv4_tab-all-article-bottom_(300×250)”, [300, 250], “pb-ad-78623” ).addService( googletag.pubads() ) ); } );

googletag.cmd.push(function() {
mobile_slots.push( googletag.defineSlot( “/1005424/_dPSv4_mob-all-article-bottom_(300×250)”, [300, 250], “pb-ad-78158” ).addService( googletag.pubads() ) ); } );

The post How to Boost Your Creativity by Including Props in Your Photography by Andrea Minoia appeared first on Digital Photography School.


Digital Photography School

 
Comments Off on How to Boost Your Creativity by Including Props in Your Photography

Posted in Photography


Leica T firmware 1.4 promises to boost AF speed and overall camera responsiveness

29 Oct

Leica has released a major firmware update for its T (Typ 701) APS-C mirrorless camera. Firmware 1.4 promises to make autofocus twice as fast, and improves touchscreen responsiveness by three times. The company has also announced plans to release two new prime lenses for the T in 2016. Read more

Articles: Digital Photography Review (dpreview.com)

 
Comments Off on Leica T firmware 1.4 promises to boost AF speed and overall camera responsiveness

Posted in Uncategorized


Fujifilm X-T1 users to get significant boost in autofocus performance and function

11 May

New firmware has been announced for the Fujifilm X-T1 mirrorless camera that promises to overhaul autofocusing performance and ‘introduces a new AF system’ to this X-series flagship body. Firmware version 4.00 will be available in late June, and seems to take significant steps towards solving issues with moving subjects and focusing in low contrast conditions. Read more

Articles: Digital Photography Review (dpreview.com)

 
Comments Off on Fujifilm X-T1 users to get significant boost in autofocus performance and function

Posted in Uncategorized