RSS
 

Posts Tagged ‘Blinds’

How to Simulate Venetian Blinds Lighting Using Photoshop

16 Apr

When you’re having a romantic dinner you light it with candles and not a bright reflector, right? That’s because light contributes to forming an atmosphere. When you’re making a photograph, measuring the right exposure is not the only thing that matters. Wouldn’t you agree that manipulating that light is what makes it or break it?

In this tutorial, I’ll show you how to simulate light coming in through a window, so that your photo has a warmer ambiance.

Venetian Blinds Lighting Effect Photoshop Tutorial Intro

Getting started

In this case, we’re going to make the effect of sunlight passing through a window with Venetian blinds. This is why the first thing you need to do is delineate the spacing in between the blinds. To make this task easier you can turn on the rulers, just go to Menu > View > Rulers so you can make the spaces more evenly.

Make a new empty layer by going to Menu > Layer > New Layer. Then select the Rectangle Marquee Tool and start tracing. They don’t have to be perfect just try to keep more or less the same width and the same spacing in between. The amount is up to you, for this example, I’ll do 8.

NOTE: Hold the Shift key down to add multiple rectangular selections.

Marquee Selection Venetian Blinds Through Window Light Photoshop Tutorial

Adding the light

Next, you need to fill the selections with white. You can either select the Paint Bucket Tool and click inside each of the rectangles, or you can go to Menu > Edit > Fill which will bring out a pop-up window. Just make sure the content is set to white and all the selected areas get colored at once when you click OK.

Edit Fill Venetian Blinds Through Window Light Photoshop Tutorial jpg

This doesn’t look very realistic yet, but don’t worry, we’ll make it better. To start, you need to give it some perspective to make it fit your image. For this, you can go to Menu > Edit > Transform > Perspective. Find the real light source and make the light (the white bars) smaller on that side. Then turn it and drag it until it feels as if the strips are coming out from that source.

Free Transform Venetian Blinds Through Window Light Photoshop Tutorial jpg

Tweak the light beams

Once it fits you need to make the white bars look more like light beams by smoothing them using a blur filter. Go to Menu > Filter > Blur > Gaussian Blur.

A pop-up window appears and you can set how blurred you want it by dragging the Radius slider. Make sure the preview option is checked so that you can see how your adjustment looks before you apply it. I’m leaving it at around 50 pixels but this is up to you. When you’re happy just click OK.

Gaussian Blur Venetian Blinds Through Window Light Photoshop Tutorial jpg

Then change the blending mode of the layer where your stripes are so that it integrates better with the background image. You can do this in the drop-down menu on top of the layers panel. Open it and select Soft Light blend mode.

SoftLigh Blend Mode Venetian Blinds Through Window Light Photoshop Tutorial

Apply a gradient

It’s already looking much better, there’s just one final touch that needs to be done. Because the light will obviously be stronger closer to the source and slowly fade away; you need to apply a gradient to achieve this effect.

Add a Layer Mask by clicking on the button that looks like a rectangle with a circle in the middle, located at the bottom of the layers panel. While the mask is selected, go to the Gradient Tool that is hidden behind the Paint Bucket Tool. Then from the top sub-menu, choose the one that goes from black to transparent.

Apply the gradient by dragging your mouse across your image. Follow the lines and make sure the white part of the gradient is at the end of the image where you want the light the brightest. If it’s not, you can just invert the layer mask, or undo it and try again.

Graded Layer Mask Venetian Blinds Through Window Light Photoshop Tutorial jpg

Finishing up

There you go, light passing through Venetian blinds from the window onto your subject without even needing a window!

Venetian Blinds Lighting Effect Photoshop Tutorial After

Applying the effect to the background only

This, of course, works if your subject is lit by the same source as the background, but what happens if you have two different light sources? Let’s do an example where we want only the background to receive the light from the window and the subject will be lit by a different light source.

Venetian Blinds Lighting Effect Photoshop Tutorial Before2

Start by doing exactly the same as you did in the previous example. When you’re done with that you have to add one more step. Duplicate the subject that you want to be in front of the Venetian blinds lighting effect.

You do this by selecting the object. It doesn’t matter which tool you use. In this case, I used a combination of the Quick Selection tool refined later in the Quick Mask. Once you have your selection go to Menu > Layer > New > Layer via Copy. A new layer will be created duplicating the subject that you selected onto an empty background; drag this layer to the top.

Venetian Blinds Lighting Effect Photoshop Tutorial Duplicate Layer

That’s it, your subject will be in front of the lighting effect and therefore won’t be affected by it. Give it a try and show us your results in the comment section below.

Venetian Blinds Lighting Effect Photoshop Tutorial After2

The post How to Simulate Venetian Blinds Lighting Using Photoshop appeared first on Digital Photography School.


Digital Photography School

 
Comments Off on How to Simulate Venetian Blinds Lighting Using Photoshop

Posted in Photography


Urban Blinds: Skyline Curtains Turn Bright Days into Dark City Nights

28 May

[ By WebUrbanist in Design & Furniture & Decor. ]

Casting pixelated patterns into day-lit rooms, these shades swap boring views (or overly bright days) for iconic scenes of metropolises at night.

This particular set by HoleRole features famous structures from cities like Manhattan (the Chrysler) and London (the “Gherken”).

In each piece, minimal geometric windows and pinpoint stars on black prompt observing eyes to complete each picture, but theirs is not the only (or first) approach to urban curtain design.

Aaalto+Aalto designed a similar series (Better View) some time ago but with a few key differences. For one thing: by varying the sizes of the perforations, their built landscapes take on more dimension. Implied curves as the windows recede, for instance, allow the flat surface to appear warped (as illustrated above).

Also, the larger holes let some details shine through from the background. While visible window elements and natural scenery can be identified with inspection, they also serve to animate the scenes — instead of a black-and-white image, additional details make it seem like there are objects or activities filling in the windows. The net effect adds a bit of character and fun unpredictability.

Of course, none of these are true “blackout” curtains in the traditional sense, but for mood lighting during the day they are certainly a bit more interesting when total darkness is not required.

Share on Facebook


[ By WebUrbanist in Design & Furniture & Decor. ]

[ WebUrbanist | Archives | Galleries | Privacy | TOS ]


WebUrbanist

 
Comments Off on Urban Blinds: Skyline Curtains Turn Bright Days into Dark City Nights

Posted in Creativity


Room with a View: How to Create this Window with Blinds Portrait Anywhere

13 Feb

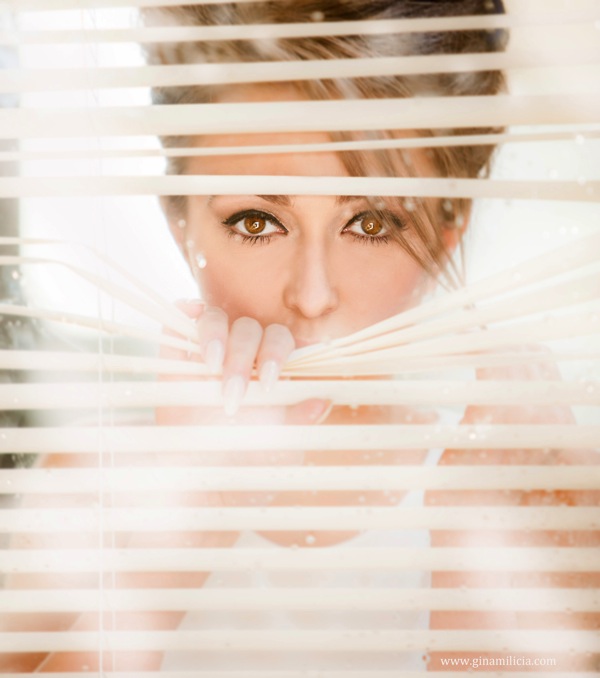
In this post Gina Milicia – author of our brand new Posing eBook – walks us through the taking of one of her portraits of Christy Vandenberg.

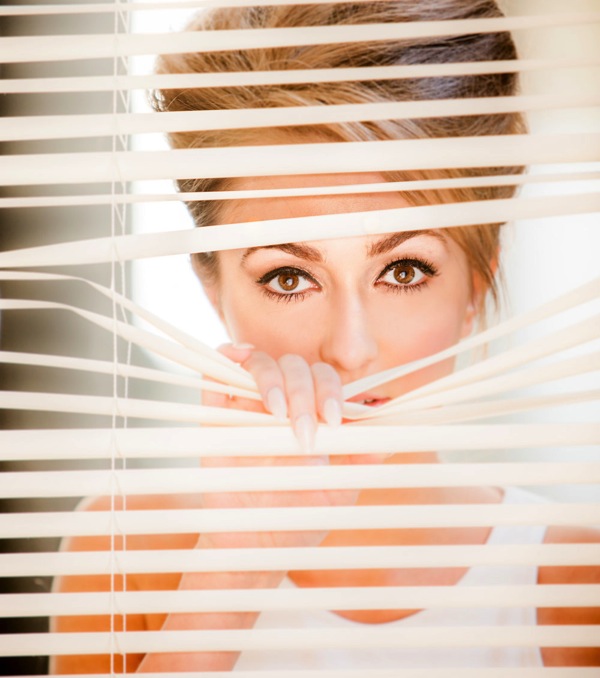
Final

I’m constantly on the look out for new and interesting ways to pose my models. This shoot only took me 20 minutes from start to finish and is really basic to set up and photograph.

The following tutorial is a step by step of how I pose and light my window portrait.

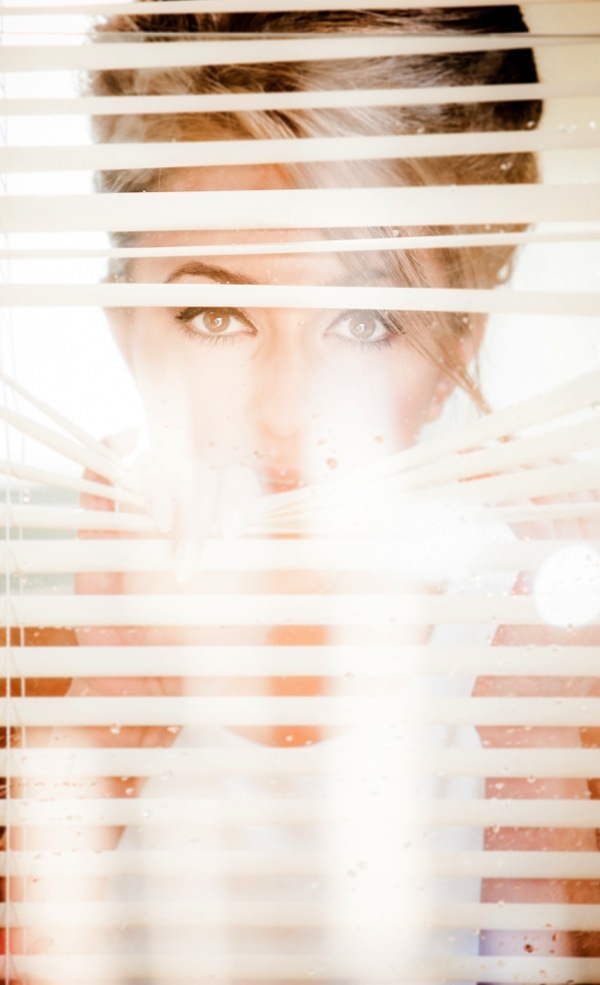
This set up is great way to add mood to a portrait. The reflections caused by the glass that partly obscure my model add a sense of mystery and romance to the shot.

This image was taken in my studio using daylight and can be recreated almost anywhere.

The example I’ve given is of a full-face shot but this also works with ¾ shots and profile shots and with or without venetian blinds.

Gear Checklist

  • Canon 5D Mark II
  • Canon EF 70-200mm f/2.8L IS lens*

I’ve used a focal length of 200mm but a focal length of anywhere between 70-200mm will work. If you have a cropped frame sensor a 50mm will also give a similar result.

  • Manfrotto 475B Pro

I shoot most of my headshots using a tripod because having my camera fixed gives me the freedom to focus on expression and pose rather than having to worry about whether my vertical and horizontal angles are straight.

The other reason I love shooting on tripod is it allows me to shoot portraits at very slow shutter speeds of 1/15th or 1/8th of a second, which I could never get using hand held.

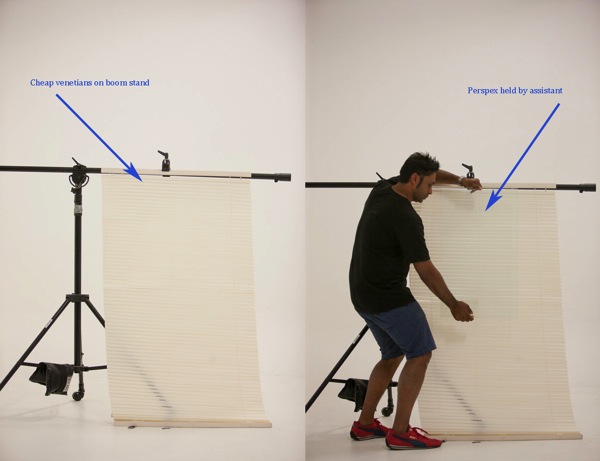
  • 1 x cheap Venetian blind + boom c stand or clothes rack to hold up venetians
  • 1 x sheet of clear Perspex* approx. 3ft x 3ft ( held by assistant)

* Perspex is lighter and cheaper than glass and easier to transport.

Camera Settings

  • ISO 400
  • 200mm
  • f/2.8 at 1/80th second
  • Daylight

I’ve used a long focal length of 200mm and short depth of field of f/2.8 because I wanted my models eyes to be in focus and the background to be out of focus.

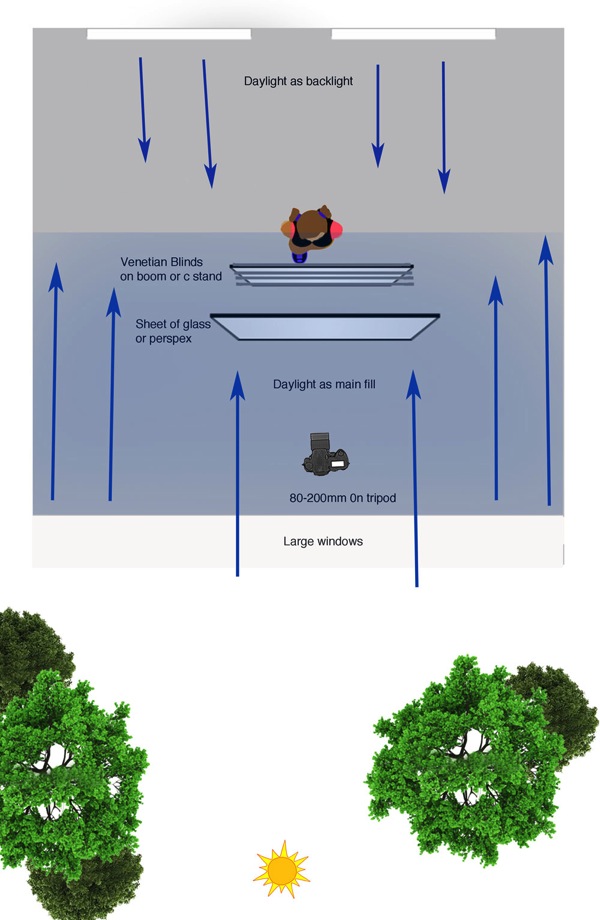
The lighting in this shot is very simple daylight coming in from a large window directly behind me.

The model is also backlit by two large windows directly behind her.

Window Diagram

Lighting diagram

Attach venetian blinds to your stand

Venetians 50

I positioned my model behind the venetians and then took a test shot to make sure my exposure was correct.

Venetian no glass 7

The Perspex is then held in front of the Venetian and tilted forward slightly to minimize reflections.

Flare 50

The style and type of reflections will vary depending on the location you shoot in.
I experimented by having the Perspex tilted at various angles. The example above has a slightly more mysterious vibe because the face is obscured by reflections.

Finally I introduced texture to the image by spraying water on the Perspex.

Final

The post Room with a View: How to Create this Window with Blinds Portrait Anywhere by Gina Milicia appeared first on Digital Photography School.


Digital Photography School

 
Comments Off on Room with a View: How to Create this Window with Blinds Portrait Anywhere

Posted in Photography