RSS
 

Posts Tagged ‘benefits’

5 Benefits of Using Photography Filters when Taking Photos

12 Feb

The post 5 Benefits of Using Photography Filters when Taking Photos appeared first on Digital Photography School. It was authored by Jeremy Flint.

benefits-of-using-photography-filters

Filters are optical attachments that attach to the front of the lens. They can be made of glass or resin and are used to restrict the light coming into the camera. Filters are a great piece of kit to consider carrying with you in your camera bag, particularly when you have been doing photography for a while and are more up to speed with how to use your camera. Described below are several key reasons and benefits to using filters as well as how to use them and the different types of filters available.

Image: Filters, like this kit from NISI, are a great addition to your photography kit, particularly...

Filters, like this kit from NISI, are a great addition to your photography kit, particularly if you do a lot of landscape photography.

1. Add color and contrast

Filters are a great way to improve your landscape photos. One of the most popular types of filters available on the market today is a polarizing filter.

There are a few reasons why it is beneficial to use polarizers.

Polarizing filters reduce reflections such as those found on glass or water. They can also help to restore natural color saturation and improve the contrast in your images. An example where a polarizer can be beneficial is when photographing woodlands, waterfalls or greenery to bring out more color in the vegetation.

using photography filters 01

You can vary the intensity of the polarization effect by rotating the filter until you achieve the desired effect. For the optimum effect, you are best to point your camera at around a 45-degree angle to the sun.

There are two types of polarizers available: a square and a circular version. You can use them as part of a square or round filter system.

You can place a square type of polarizing filter into one of the slots of the filter holder system that is attached to the camera lens via an adaptor ring.

The circular polarizer option either screws onto the front of the lens directly or attaches to the front of the square filter system by a ring. The front dial of the filter is then turned to polarize the light on the scene you photograph.

2. Create movement

5 Benefits of Using Photography Filters when Taking Photos

Another great advantage of using photography filters is to create some motion in your pictures.

Have you ever wanted to create more movement to a static looking scene?

Well, by using a Neutral Density (ND) filter, you can.

The way an ND filter works is by reducing the level of light that passes through the camera lens. If you haven’t used them before, they are quite straightforward to operate. You simply slot the ND filter into a filter holder attached to the camera lens. It then blocks some of the light that enters the camera sensor so that you can still use slower shutter speeds in bright daylight.

They come in a range of different densities varying from one, two, three, or even 10 or 16-stops of exposure. The darker the filter, the more significant the loss of light and the stronger the effect they can generate.

You may be wondering, do you really need one? Well, that depends on what you are photographing.

The 10-stop and 6-stop ND filters are specifically designed for long exposure photography. The 10-stop works very well for extending exposure times and blurring moving subjects in your images. It is great for capturing the motion of foliage, clouds, or water.

In comparison, the 6-stop can be beneficial for low-light conditions at dawn and dusk.

They are both advantageous. You can use them to accentuate cloud movement, create cloud patterns, or make running water appear smooth.

3. More balanced exposure

You can use filters to help capture a scene accurately. The fundamental reason for using a Neutral Density (ND) graduated filter is to reduce the amount of light entering the camera across the shaded gray part of the filter and correctly record the scene.

ND graduated filters are very popular for landscape photography as they help to provide more balanced exposures.

As great as modern cameras are you will often find with high-contrast landscape scenes, your pictures will either have a burnt-out sky or a dark, underexposed foreground. This is where the Neutral Density (ND) graduated filter works its magic.

using photography filters 02

In these high contrast scenes, when there are two different very unevenly lit subject areas, an ND graduated filter can be an appropriate solution.

For example, when shooting bright skies or sunsets, the exposure between the sky and the foreground varies significantly. Hence, an ND filter helps to capture the entire tonal range from the brightest to the darkest parts of an image, thus achieving a balanced exposure.

Start by placing the ND filter in the filter holder and position the dark section of the filter over the bright sky. This reduces the amount of light transferred to the sky part of the image whilst allowing the foreground to expose correctly.

This way, you capture detail in both parts of the image without the sky washing out due to too much light.

5 Benefits of Using Photography Filters when Taking Photos

In terms of the different types of ND grads available, they will either have a hard or soft edge where the gradation line gives a stronger or smoother transition from color to clear, respectively.

Hard ND grads are better suited to scenes with straight horizons, while soft grads are favorable when objects like buildings and trees cross the horizon.

ND graduated filters come in different strengths from 0.3, 0.6, 0.9, and 1.2 gradations. A 0.9 ND filter reduces the exposure by 3 stops of light. ND graduated filters alter the transition from dark to light, with 0.3 being a weaker gradation, and 1.2 being a stronger gradation.

4. Enhance images

Using photography filters can help to enhance your photography and different types of images, especially when using special effects filters.

You can get specific special effect filters that slot into your filter holder, such as infrared or black and white filters. Other filters you can use to develop wonderful in-camera effects include sunset and sunrise filters. These provide warm colors for dawn and sunrise.

using photography filters 03

Mist and fog filters are another popular type of special effect filter. They are used to imitate the effects of mist by carefully positioning the filter in the holder. You can also use these filters to clean up images by the removal of distracting backgrounds to create minimal compositions.

Other various filters can enhance effects in your photos. If you love to capture vivid, saturated shots, investing in color intensifiers is of benefit.

The intensifier filters broaden and enhance specific colors without affecting the other tones in your photograph.

Alternatively, there are sky filters available to enhance the colors in the sky, as well as autumn tint filters designed to accentuate golds, reds, and browns.

5. Change white balance

5 Benefits of Using Photography Filters when Taking Photos

When you are out capturing landscapes, you may want to alter the color temperature of the scene. Using specialist color temperature filters can be great for changing color tones with no added color cast.

Consider using photography filters that help to brighten up or cool down the white balance and give accurate color temperature corrections.

Coral filters are a great way to warm up a scene by adding pinks and reds.

Conclusion

In summary, popular filters, particularly amongst landscape photographers, include polarizers, graduated and neutral density graduated filters, and special effects filters.

Consider using photography filters as a way to add color to your images, manage variations in contrast, and to create more dynamic movement such as with clouds or water.

Filters are also a wonderful accessory to help protect your lenses and balance your exposures where tones are significantly different.

Do you use filters? What benefits do you find they provide? Share your comments with us below.

The post 5 Benefits of Using Photography Filters when Taking Photos appeared first on Digital Photography School. It was authored by Jeremy Flint.


Digital Photography School

 
Comments Off on 5 Benefits of Using Photography Filters when Taking Photos

Posted in Photography


8 Benefits of Using a Wireless Remote for Your Photography

22 Mar

Shooting with a wireless remote adds a lot of extra flexibility and scope to your options. Touching your camera is sometimes not practical or possible. Something as simple as pressing the shutter button with your hand can cause vibration and shake which compromises the image quality.

Benefits of Using a Wireless Remote for Your Photography

Being able to engage your camera to shoot while physically distant from it has a lot of benefits. There are cabled options which may be more cost-effective, but you are still limited by the range of the cable, and there are safety concerns. No one wants to trip over a cable and pull your tripod and camera over to smash on the ground!

Wireless remotes are a more expensive option but it offers up much more freedom with your shooting choices.

Benefits of Using a Wireless Remote for Your Photography

Top view with the module mounted on the hotshoe and plugged into the camera port.

Benefits of using a Wireless Remote

1. Macro photography

When working with a very small depth of field as in macro photography, sometimes measured in millimeters or less, you have to get your focus point exactly right to get the image sharp. The absolute slightest vibration can interfere with the focus accuracy.

When I shoot I make sure I am sitting some distance away from my tripod and I am very stable and grounded. Sometimes I even hold my breath.

Benefits of Using a Wireless Remote for Your Photography

Live View engaged, and the wireless remote is on the surface where I am positioning the cupcake, ready to go.

Sharper images

Two changes that I made to my macro shooting workflow made a massive difference in improving the number of sharp shots I was able to obtain. First was getting a wireless remote. The second was shooting in Live View mode, with the view zoomed in.

This allowed me to focus very accurately, sometimes on auto, and sometimes with manual focus. Then by using the remote, it takes vibration out of the shot in two ways – not touching the camera shutter means no movement is introduced. Second, when shooting in Live View, when the lens initially engages, it moves the tiniest amount. By half pressing the remote button, it engages the lens and everything moves a tiny bit and then holds there until the remote button is fully depressed and the shot is taken.

This method has reduced the number of shots taken to capture a sharp image to around 3-5 with around a 50% sharpness rate. Previously over 20 images could be taken and none in focus.

Benefits of Using a Wireless Remote for Your Photography

Cupcake being staged, camera set up with Live View for accurate focus and the wireless remote is within reach to take the shot.

My Canon 100mm F2.8 IS L Macro lens gets used for macro, food, flower and still life photography this way. It allows me to shoot much quicker as fewer shots are taken, and I have a much better feel for how good the shots are when using Live View. It’s a real time saver.

2. Self-Portraits

My work in fine art self-portraiture got a whole lot easier once the ability to shoot at a distance from the camera appeared in my hand, literally, in the form of a wireless remote. It still allows you to shoot using a time delay. So you can click the remote to start the timer, and then drop the remote out of the frame but within easy reach to experiment with different poses and angles.

This is also potentially useful for any portrait shots of pets or children, where it might be necessary to use your hands to attract their attention and direct their eyes toward the camera.  It also allows you to walk away from the camera to fix hair, adjust the fall of a dress or veil for a wedding, and other portrait style shots and still capture candids.

Benefits of Using a Wireless Remote for Your Photography

My first ever experiment shooting with myself as the model – this was extremely difficult to do before I had the remote.

3. Long Exposures

My Canon 7d Mark II has a built-in Bulb mode that shoots over 2 hours, so for me, a remote is not needed for long exposure photography.  However many cameras only shoot up to 30 seconds on Bulb mode, and so require you to either hold the shutter down manually or use a remote (cabled or wireless).

Minimizing camera shake is ideal, so not touching the camera is preferred. A remote allows you to hold the shutter open manually for as long as needed. Or as long as you are prepared to hold onto the button (some remotes will time the shot for you, or have a locking button so you don’t have to hold it).

Benefits of Using a Wireless Remote for Your Photography

A long exposure that was taken under the light of the full moon. Mote the shadow of the photographer in the bottom left-hand corner – it was so dark I didn’t see it on the shots on the camera. Next time I will know to walk out of frame.

4. Wildlife

Perhaps you are setup in a hide or near a preferred perch, with the camera all prefocused, ready to get the shot, but the critters are staying away. By having the option to move away from the camera and minimise human presence near the scene, it may help you to get the shot you want. Perhaps it might not be safe for you to be in the position, so you could shoot from the safety of a vehicle instead.

5. Using an intervalometer

An intervalometer is a special kind of remote with extra functionality built-in which allows more advanced photography options including shooting time-lapse, light trails, astrophotography, and lightning. Wired and wireless options exist and they do the basic features described in this article as well as offer more control over other options.

Time-lapse requires a sequence of shots taken over a period of time. The intervalometer allows specific control of the interval between shots, and the time period over which the shots are taken.

Light trails and astrophotography are often taken using similar techniques with a longer exposure to allow for vehicle or star movement. Because they are usually done at night, with minimal light, the shutter needs to be open for a lot longer, hence the need for an intervalometer. Plus you can sit in the warmth of your car or the tent for several hours while the camera does its thing.

Having more control over how long the shutter is open and when it is open is a key factor for successful lightning photography if you are not using a lightning trigger and shooting manually.

Benefits of Using a Wireless Remote for Your Photography

Learning how to do light trails would have been a lot easier had I longer than 30 sec to play with at a time!

6. High-speed photography

For those seriously into high-speed photography, they will probably invest in a triggering device, that will operate by sound or breaking a laser beam. For those of us wanting to experiment at home, using a remote and timing it with the event is a more affordable option initially.

You may have to repeat the thing – like bursting a balloon or water droplets – many hundreds or thousands of times to get the perfect shot, and timing is the key. If you are working alone, then a wireless remote is a key tool to enable you to pull off this kind of experiment and get the shot you are after.

Benefits of Using a Wireless Remote for Your Photography

I haven’t yet played with high-speed work so instead, have some nice Christmas lights.

7. Landscape photography

Minimizing camera vibration is a key to getting sharp shots. My camera has a custom function to lock up the mirror and hold for two seconds before taking the shot. This allows me to press the shutter button, let go and walk away and the camera does its thing. Another option is to not touch the camera at all, and use a remote, although you may also like to have a mirror lockup and pause in your process as well.

It’s also useful for getting your shadow out of the bottom of the frame, something that occasionally gets picked up when shooting with an ultra wide-angle lens like the 10-22mm.

Benefits of Using a Wireless Remote for Your Photography

A light show in winter that required long exposure experimentation to get the right time to get the best color display.

8. Physical issues

It may be physically difficult for to you get into a particular pose that is necessary to get your eye up to the camera for a long time. Lying on cold wet ground may be unpleasant or even dangerous in winter environments.

Your safety may be at risk for a variety of reasons, so being able to be away from the camera but still shoot, is a key benefit to wireless remotes in these situations.

Pros of wireless remotes

  • Shoot at the exact moment required.
  • Enables you to shoot some distance from the camera.
  • Reduces vibration.
  • Safety.
  • Allows for creative experimentation.
  • Frees up your hands for other purposes.

My Wireless remote (right) and the module that plugs into the camera (left with cable).

Cons

  • They’re expensive.
  • Fiddly bits that require lots of batteries to function.
  • Remote is easily lost.

Summary

Since getting a wireless remote it has completely changed the way I shoot and vastly improved the quality of my work while allowing many fewer shots to be taken. The freedom to shoot while away from the camera has allowed for a lot of very creative self-expression in the fine art space. Having my hands free while doing food photography makes it much quicker to tweak compositions by small amounts.

The next phase on my journey to shoot wireless will be going to a device like a Cam Ranger, which not only would allow me to shoot via my phone or iPad but to see what the camera is seeing. That’s especially useful for my self-portrait work and easier to view on a much bigger screen for eyes that don’t focus as well as they used to.

However such a device is quite expensive, and a wireless remote is a much more affordable option and allows you a lot of flexibility to try many new things.

So a wireless remote might be for you if you are frustrated with not getting sharp macro shots, or want better control over how you shoot, improve your keeper rate, or just try something new that you couldn’t do before. Maybe you just want to be warm when shooting in wet/cold weather? Get yourself a wireless remote and enjoy experimenting with some different shooting styles.

The post 8 Benefits of Using a Wireless Remote for Your Photography by Stacey Hill appeared first on Digital Photography School.


Digital Photography School

 
Comments Off on 8 Benefits of Using a Wireless Remote for Your Photography

Posted in Photography


7 Benefits of Printing Photographs

02 Nov

Digital sharing of photos may have reduced the urge to print a photograph after taking a shot with your digital camera. But printing photos offers you a lot of benefits as a photographer. Here are some of the reasons why you should consider buying a photo printer and start enjoying the benefits of photo printing. 1. Improve Your Photography Skills Continue Reading

The post 7 Benefits of Printing Photographs appeared first on Photodoto.


Photodoto

 
Comments Off on 7 Benefits of Printing Photographs

Posted in Photography


Benefits of Using a Large Aperture and Tips for Shooting Wide Open

04 Oct

Upon first glance of one of my most prized lenses, the Canon 50mm f/1.2L USM, a bewildered remark typically arises from professionals and hobbyists alike. Though absolutely spectacular photographers in the industry love working with a wide open aperture, there are equally as many who wouldn’t touch anything lower than a f/4.0 with a ten foot pole.

I’d never shoot as wide as f/1.2” is a common comment I’ve encountered over the years of working as a professional photographer.

Stylistic choices aside, upon further inquiry as to why the response to a f/1.2, f/1.8, or f/ 2.0 f-stop yielded such results the truth came out. There are common misunderstandings of how to use and work with a wide open aperture! If your artistic aesthetic drools over soft, dreamy photographs and creamy bokeh, then you better get ready to play with some low, low, low numbers.

Tips for Overcoming Common Misunderstanding of Shooting Wide Open

Before we get to the “how”, let’s discuss the “why”. There are several beneficial reasons to shoot with a wide open aperture, aside from simply liking the result.

Benefit #1 – Working with a Difficult Location

Depending on the type of photography that you do, you may not always have the option of utilizing an ideal location. Maybe your client is only able to commute to one place? Maybe the location of a shoot that was booked months prior has changed for the worse upon your arrival on site? Or maybe you just have to get a specific photo done pronto and you aren’t able to find a new spot?

Whatever the reason for your woes, a wide open aperture is here to help! With the depth-of-field being so shallow, whatever troubles you about the background can easily melt into a beautiful creamy bokeh. Utilizing an f-stop of f/2.0 or lower helps you work with a less than immaculate location, as the extremely shallow depth of field allows you to mask the flaws.

Tips for Overcoming Common Misunderstanding of Shooting Wide Open

Benefit #2 – Excellent for Detail Shots

A shallow depth of field can make for very beautiful detail shots. If you look through current wedding photography trends, you may find that several heavy-hitters in the industry are turning to wide open apertures to capture photographs of the bouquets, rings, and table settings. This is because photographs taken with a large aperture allow all of the focus to lie on the subject, and the background ceases to remain a distraction.

With events such as weddings, where the arrangements can appear cluttered if you only want to focus on one little aspect of the set-up, a shallow depth of field will keep the interest solely on your single subject. Music photography adores wide apertures for the same exact reason. If you want to bring out a detail while photographing behind-the-scenes of a recording session, f/1.2 is wonderful.

Tips for Overcoming Common Misunderstanding of Shooting Wide Open

Benefit #3 – Create a Dreamy Photographs without Post-Processing

With all of the technology available for photo editing, almost anything is possible with the right knowledge. However, rather than spending countless hours in the editing room creating a specific look artificially, why not get it right in the camera?

For those who adore dreamy, ethereal, or soft photographs, a wide aperture will quickly become your most trusted friend. Filmmakers consistently utilize wide open apertures in order to create a soft focus with a shallow depth of field to give the viewer the illusion of a dream-like state. When we dream, it is often hard to clearly and sharply recollect some of those thoughts when we wake. So the idea of soft and not perfectly in focus images came to mind.

We can replicate this using an aperture of f/1.2 easily, especially if you have objects in the foreground which are just as out of focus as the objects in the background.

Tips for Overcoming Common Misunderstanding of Shooting Wide Open

Benefit #4 – Makes Low Light Photography a Breeze

Possibly one of the most dreaded phrases in photography is “low light”. Two very short, simple words that cause some of the biggest photographer headaches. This is because there isn’t a lot of available light to play with, and as such, getting the right exposure can be hard.

However, if you want to take a well exposed photo in low light, you need a lens with a wide enough aperture to let in more light. Using a lens that goes down to f/1.8, for example, is a great way to let enough light in and make the frame bright. Remember, the aperture is the hole the light passes through in your lens. The wider the aperture, the more light that enters the camera.

Tips for Overcoming Common Misunderstanding of Shooting Wide Open

Now that we’ve covered some of the “why”, let’s have a nice chat about the “how.” Many of the challenges associated with a wide aperture revolve around the focus and photographing in bright light. From a recent poll I took, here are the primary issues troubling photographers about low f-stops, and some solutions to help you solve them.

Tip #1 – Shooting in Bright Sunlight Without Overexposing

With the aperture being the opening that lets light in through the lens, and a wide aperture which lets in a lot of light, one may think that shooting in the bright sunlight is off-limits. The solution to this dilemma is taking advantage of tinted filters that darken your lens, such as a neutral-density (or ND) filter. The purpose (and benefit) of an ND filter is to reduce the amount of light entering the lens. Doing so allows you to utilize a wide aperture that would otherwise produce overexposed pictures.

Benefits of Using a Large Aperture and Tips for Shooting Wide Open

Tip #2 – Getting Critical Focus

To quickly refresh you of the basics, when you focus your camera on a subject, it establishes a focal plane. To get your subject in focus, it has to be on the focal plane. Focal planes happen on an x (horizontal) and y (vertical) axis. This means anything along either of those axes will be in focus, and anything not on them will be out of focus.

Simple, right? Well, the difficulty with a wide open aperture is that your focal plane is quite small. As you decrease your aperture number and make the opening wider, the invisible area in front and behind the plane of focus will get smaller and smaller, leaving you with much less wiggle-room. As such, distance from the subject plays a key role in your focus.

When shooting wide open, even the smallest diversion from either of the focal plane axes will cause your subject to be out-of-focus photo. You cannot take a step forward or back without the need to refocus when shooting at a wide aperture. But by keeping this in mind, you can adjust your photography technique to better accommodate the small focal plane.

Benefits of Using a Large Aperture and Tips for Shooting Wide Open
A trick to help make sure that what you want in focus is indeed sharp, is to use single point autofocus. By default, your camera will probably select either the object that’s closest to the camera or what’s in the center of the frame. By using single point autofocus, you tell the camera exactly where to focus, which is extremely helpful with low aperture numbers. Refer to your camera model’s manual to find how to change the focus setting!

Benefits of Using a Large Aperture and Tips for Shooting Wide Open

Tip #3 – Getting Multiple Subjects Sharp

Keeping in mind how the focal plane works, there are several things you can do to ensure your multiple subjects are all in focus. First, try to set up all of your subjects on the same axis. Keep everything you want perfectly in focus the same distance from the camera.

Secondly, the farther away you are from the subject, the easier it is to get the subjects all in focus. If you have a large group of subjects you’d like in focus, move further away from them!

Benefits of Using a Large Aperture and Tips for Shooting Wide Open

Tip #4 – Getting Sharp Images Generally

Sharpness is an interesting concept. How sharp a subject appears is a matter of two things: the focus the camera captures and the amount of contrast on your subject. The term “sharpness” is, in fact, an illusion. You see, for an image to be considered sharp, it needs to have contrast. If the there is little contrast in the image, the subject will not look three-dimensional regardless of whether the focus is perfect or not.

Biologically, the way that our eyes work, our vision naturally detects edges to register sharpness, and shadows and highlights in order to record the depth in a subject. This is a very important concept to understand when answering the question of how to make images look sharp.

With this now in your knowledge arsenal, proper lighting aids significantly in making your images look sharp. The other factor in an image being sharp is, of course, the focus. Ensuring that your subject is in focus using the aforementioned techniques, combined with great lighting, will make certain that your images come out sharp.

Benefits of Using a Large Aperture and Tips for Shooting Wide Open

Now that you know how to take advantage of those low numbers and wide openings, go forth, and create!

Benefits of Using a Large Aperture and Tips for Shooting Wide Open

The post Benefits of Using a Large Aperture and Tips for Shooting Wide Open by Anabel DFlux appeared first on Digital Photography School.


Digital Photography School

 
Comments Off on Benefits of Using a Large Aperture and Tips for Shooting Wide Open

Posted in Photography


Learning Digital Photography May Have More Benefits Than You Think

25 Sep

Many people struggle with the different elements of learning photography. Mastering the technical aspects of your camera, on top of applying all of the creative and technical concepts, can make it a daunting pursuit for many. Now, with digital photography the norm for most photographers, there is also the added element of learning post-processing if you are really going to become successful as a photographic artist.

Learning Digital Photography May Have More Benefits Than You Think

Learning Photography and Aging

As you scratch your head trying to put all the pieces together, you may not have realized that you are exercising many aspects of your brain. Studies have found that digital photography keeps your brain sharp and your mind in good shape.

Learning Digital Photography May Have More Benefits Than You Think

I have watched one of my family members pursue digital photography well into his 90s. I always thought there was something about this activity and the creative process that was keeping him active and on track. But I never put much thought into it until I read this study from the University of Texas on digital photography and aging.

The study shows . . .

During the University of Texas study, six groups of individuals aged 60–90 were studied over a 10 week period. Each group was engrossed in a specific activity for 15 hours a week. The primary activities under observation included digital photography, digital quilting, and a variety of activities like playing cards and socializing. Only the groups doing quilting and photography improved their memory abilities when confronted with these continuous and prolonged mental challenges.

Learning Digital Photography May Have More Benefits Than You Think

The results of the University of Texas study showed that digital photography is the best activity to participate in for aging baby boomers interested in maintaining their cognitive health and development.

Benefits of learning digital photography

What were the benefits? The most significant improvement was found in their use of words and phrases as well as their recognition of conceptual and visual imagery. The reason digital photography came up so high in this cognitive study is that it uses many parts of the brain to be successful.

Learning Digital Photography May Have More Benefits Than You Think

It affects the creative and technical sides of your brain in both the shooting and post-processing. It also uses memory to make all of the functions work together. These benefits apply to someone who is shooting in full manual or partially automatic programs on their camera and are using advanced Photoshop or similar post-processing programs.

Learning Digital Photography May Have More Benefits Than You Think

How it works

Here’s an example of some of the brain functions that are used when you create an image: When you are out on a photo shoot, and you want to create a compelling image, it takes some time to think about how to creatively compose the scene. Then, you need to choose the aperture and shutter speed settings based on the best creative application for the image, applying your memory of how the camera works.

Some of the high-end cameras these days will give you a decent point and shoot shot, but if you are intentionally going to create something of value, you need to put some technical thought into the image. At the same time, when you are setting up a shot, it helps to think through what you might do for post-processing the image once you get home.

Learning Digital Photography May Have More Benefits Than You Think

Now that you have conquered the technical aspects of operating the camera, you need to bring the image into post-processing. Whether or not you are using Photoshop or Lightroom, you still need to have some technical ability on the computer and knowledge of how the program works. All of these activities together require memory, creativity, and cognitive abilities to perform these tasks correctly. This is all good exercise for your brain.

Learning Digital Photography May Have More Benefits Than You Think

What does all of this mean for you?

The process of creating a digital image is fun, creative and clinically proven to be good for your mind. Just like we need to keep our heart healthy with diet and exercise, we also need to keep our brain active as we age. It’s not just the activity, but learning new and mentally challenging subjects that is the important part of this puzzle.

If you continue to pursue and learn digital photography well into your later years, it will serve as a good way to keep your brain and memory functions sharp.

Does that sound like a good plan for you to continue practicing the craft of digital photography as you age?

Learning Digital Photography May Have More Benefits Than You Think

The post Learning Digital Photography May Have More Benefits Than You Think by Holly Higbee-Jansen appeared first on Digital Photography School.


Digital Photography School

 
Comments Off on Learning Digital Photography May Have More Benefits Than You Think

Posted in Photography


Compact CityTree: Vertical Micro-Garden Packs a Forest’s Worth of Green Benefits

17 Aug

[ By WebUrbanist in Architecture & Cities & Urbanism. ]

Packing the environmental impact of as many as 275 actual urban trees, these multi-functional CityTree units are dense and efficient fighters of urban air pollution (the single largest environmental health risk). Each CityTree can remove 240 metric tons of CO2 per year, as much as a small forest.

Developed by Green City Solutions in Berlin, the CityTree is covered in moss cultures — their high surface area ratios help remove dust and other airborne gasses and chemicals at a rate much higher than normal trees. Each unit has solar panels providing electricity and automated rainwater collection systems to store and distribute moisture as needed. Sensors help monitor soil humidity, temperature, water and air quality in and around each unit.

CityTrees have started sprouting in places like Paris, Brussels and Hong Kong, occupying a few square meters on city sidewalks while also (optionally) serving as public seating. Of course, air pollution is rarely evenly distributed in cities, so placement in high-traffic/emissions areas is also critical.

Developed by an architect and an engineer, the CityTree has been in the works for over a decade. “Our ultimate goal is to incorporate technology from the CityTree into existing buildings,” one of the designers told CNN. “We dream of creating a climate infrastructure so we can regulate what kind of air and also what kind of temperature we have in a city.” Beyond this compact and mobile application, lessons learned from monitoring and growing dense mosses on individual CityTree installations could also be applied on larger structural surfaces down the line.

Share on Facebook


[ By WebUrbanist in Architecture & Cities & Urbanism. ]

[ WebUrbanist | Archives | Galleries | Privacy | TOS ]


WebUrbanist

 
Comments Off on Compact CityTree: Vertical Micro-Garden Packs a Forest’s Worth of Green Benefits

Posted in Creativity


Maintaining a legacy or building for mirrorless, who benefits?

23 May
If Canon makes a full-frame mirrorless camera, should they forego some of the potential size benefits to maintain full EF-mount compatibility? And just how compatible would it be?

More than ever, rumors are circulating that Canon and Nikon are finally going to take mirrorless seriously by building full-frame mirrorless cameras. These rumors, which may well turn out to be nonsense, all seem to suggest that these cameras will be built around the companies’ respective DSLR mounts.

It’s an interesting quandary: develop a new, space-efficient mount or stick with your existing system?

I’m going to argue that the right answer is much clearer for a manufacturer than for the end consumer. And I think I can guess which option we’re likely to see.

Supporting your legacy

The benefits of supporting your legacy mount seem obvious: the manufacturer gets to keep selling their existing lenses and the consumer ends up with a huge range of lenses to choose from. Surely there’s no conflict there?

The advantage of all (or most) of an existing system’s lenses being compatible from day one seem overwhelming. Plenty of choice, the ability to sell mirrorless cameras to existing lens owners and no reputational damage. Everybody wins, right?

“There’s a risk of building a system that prioritizes backward compatibility over maximizing performance”

The problem with building a mirrorless camera with a full-depth mount goes deeper (pun intended) than all of your mirrorless models being bigger than necessary. That said, even people who prefer larger cameras are usually referring to grip depth and spacing of controls, rather than demanding their camera has a big box of fresh air in the middle of it, for no functional reason.

A question of focus

No, the bigger issue is that most DSLR lenses aren’t designed for mirrorless. I’m not just talking about some designs being larger than necessary, I’m talking about the use of focus motors that are great for DSLR phase detection but that are woefully clunky when driven using contrast detection AF. Secondary sensor AF, as used and painstakingly optimized for DSLRs is very effective at telling the lens where it needs to move its focus elements to. The ring-type ultrasonic motors used in most high-end DSLR lenses are great at responding to such a command.

Contrast detection asks very different things of its lenses. Instead of racing to a particular point, they need to smoothly scan through their focus range then perform a series of back-and-forth movements to find perfect focus. The result tends to be more accurate but requires a lightweight focus element and a very differently type of focus motor.

The K-01 used a full depth Pentax K mount which gave instant access to lots of lenses. Unfortunately, none of them had really been designed with contrast detection in mind…

The alternative approach: on-sensor phase detection, is in its relative infancy. It may be able to make better use of existing lenses with ring-type motors, but it’s still not clear how well it can interpret significantly defocused scenes.

Also, at present, most on-sensor phase detection information is fed into what are more precisely described as ‘Hybrid’ AF systems: they get very close to focus using phase detection then perform a CDAF hunt to confirm the optimal position. Perhaps this will change, hopefully without the loss of the precision that mirrorless AF tends to excel at, leaving us just with the size disadvantage.

It’s notable that, when it’s trying to build fast-focusing lenses for its mirrorless E-mount, Sony doesn’t tend to use ring-type focus motors. In the case of the 16-35mm F2.8 GM, it uses twin piezoelectric actuators.

Alternatively, of course, there’s a risk of building a system that prioritizes backward compatibility over maximizing performance. It’s noticeable, for instance, that Sony makes very little use of ring-type focus motors in the lenses its developing for the E-mount, despite having experience of using them for its DSLR A-mount.

‘It fits’ isn’t the same as ‘it’s good’

Either way, there’s a risk that we’ll be offered something that fits but doesn’t necessarily work as well as it could.

As an enthusiast photographer with limited lens-buying resources, one of the things that has always irritated me is seeing camera companies produce high-end lenses for their full-frame customers and carefully marketing the idea that this benefits all their users, so they need not develop anything good for their APS-C users. It’s a situation that leaves APS-C users with poor choices and the arguably false impression that by buying these poorly-suited lenses, they’re making progress along an upgrade path (a fallacy that benefits the camera makers more than the photographers).

The decision to adopt a new mount or continue with a legacy one risks the same thing: the appearance of lots of choice when what you’re actually being offered is compromise, and a situation with limited incentive for the manufacturers to dedicate their efforts towards the needs of their mirrorless users. Instead they can produce a lovely picture of their mirrorless camera flanked with 30 years’ worth of lens development and watch as brand loyalists insist that ‘their’ system has the most lenses, regardless of performance.

And this wouldn’t necessarily only apply to existing lenses. Let’s say Manufacturer X needs to develop a new fast 70-200mm F2.8 and the focusing design that would work best for mirrorless turns out to be slower than the one that suits the company’s flagship sports DSLR, which version of the lens do you think we’d see?

Precedent

There is something of a precedent for this. Canon got its reputation badly burned by abandoning its FD mount – something it took some photographers a long time to forgive –whereas Nikon and Pentax pressed on with progressively trying to modernize their 1950s film mounts.

Taking the hard decision arguably left Canon in the better position: the long-term benefit was a wide-throated, all-electronic mount. With the introduction of its latest ‘E’ lenses, Nikon’s venerable F-mount has finally caught up: with autofocus and aperture operated by the lens, but with a complex series of compatibility issues cropping up along the way. And, while they are still using a somewhat restrictively narrow mount at the end of it, they’ve benefited from not having to burn their users on the way (though they arguably handed-off responsibility for understanding the complexities of the F-mount’s development to every user looking to buy lenses).

So what’s the alternative?

Olympus expressly made the E-M1 to provide continued support for its legacy system but also developed the ‘PRO’ range of high-end lenses to make full use of the capabilities of Micro Four Thirds cameras.

The other way of doing things it to develop a dedicated mount and dedicatedly support it. This is the approach that Olympus took with the development of Micro Four Thirds and, to an extent, which Canon has with its EF-M mount. Olympus, along with Panasonic, took the brave step of designing a mirrorless-optimized mount when they developed Micro Four Thirds, rather than trying to press on with Four Thirds. They then offered an adapter to use the older lenses and, with the E-M1 and E-M1 II, developed cameras expressly with the intention of maintaining support for the older, outgoing system. This meant existing customers didn’t get too badly burned and new Micro Four Thirds customers got an increasingly impressive range of native lenses designed for them.

It’ll be interesting to see if Sony takes any pointers from this, as they decide how to support both E and A mounts.

I hope to be proven wrong

Perhaps I’ll be proved wrong in the end. Maybe Canon’s EF-M/EF cross-compatibility will end up reducing the incentives to develop interesting lenses for M series owners, in the same way that I worry sharing a mount would. Equally, perhaps Canon’s Dual Pixel AF (and Nikon’s on-sensor PDAF experience gleaned from its 1-Series cameras) will mean that there ends up being no AF compromise to sharing a mount. It may partly be overcoming this challenge that has led to its camera taking so long to arrive. At which point, using the existing mount would just mean carrying around a camera that’s a little lumpier than it needs to be.

Time, I’m sure, will tell. But, in the meantime, don’t necessarily take at face-value any promises that backwards compatibility is an unalloyed user benefit.

Articles: Digital Photography Review (dpreview.com)

 
Comments Off on Maintaining a legacy or building for mirrorless, who benefits?

Posted in Uncategorized


The Benefits of Shooting in Auto Mode

14 Feb

I can still hear the words I was told when I bought my first DSLR ringing in my ears just as clearly as if I heard them this morning. “You have to learn to shoot in manual mode.” When I started to get serious about photography I had no idea what aperture, shutter, or ISO meant, and thought P meant Professional. I didn’t know what I was doing at all and because everyone seemed to say so, I dove right into YouTube tutorials and online articles about how to get away from the dreaded Auto Mode setting on my camera. After all, no serious photographer would be caught dead using Automatic…right?

The Benefits of Shooting in Auto Mode

Auto Mode – don’t knock it until you try it. And even then, maybe give it a second chance.

The truth, like most things in life, isn’t so black and white. Auto mode, while often derided by online commenters and popular YouTube photographers, is not the scourge upon modern photography that some people claim. While it might not be the best way to get exactly the picture you want, and learning to shoot in manual is, of course, a rewarding and hugely beneficial way to increase your skills as a photographer, there is nothing inherently wrong with using Auto.

In fact, there are some clear benefits to using Auto. So, I’d like to explore some of its advantages and offer a few reasons why you shouldn’t feel so bad if you set your expensive DSLR camera on that familiar green Auto setting.

It just works – usually

It is certainly true that you have a much better idea of the picture you are trying to take than your camera does. However, it’s also true that you may not know how to (or care) make your camera do what you want it to do, in order to get the picture you want. Photographers sometimes talk about

use-auto-mode-gum-ball

Photographers sometimes talk about the decisive moment, which was a term used by Henri Cartier-Bresson to describe that instant in which all the elements within the frame come together to form the perfect photographic opportunity. Unfortunately, many amateur photographers will wistfully watch that moment pass by because they are fiddling with aperture controls and thinking about shutter speeds.

I’m all for learning more about how to use your camera (I write for DPS and that’s what we do!) but sometimes it’s nice to just put your camera in Auto mode and let it do all the grunt work for you.

The trade-off

Modern cameras are filled to the brim with all sorts of high-tech enhancements compared to their counterparts from days gone by, and along with this has been a string of steady improvements to their built-in Auto mode. For the most part, shooting in Auto will give you a well-exposed picture that will probably suit your needs. The downside is that your camera might make different choices than you prefer when it comes to selecting an aperture, shutter speed, or ISO value, and if there is not enough light you will likely see the pop-up flash rear its ugly head.

use-auto-mode-food

This is when you may start thinking about learning to use some of the other modes on your camera. But, if you don’t mind the creative decisions your camera makes or just don’t feel like learning the complexities of the Exposure Triangle, then, by all means, go ahead and shoot in Auto Mude. After all, it’s about the picture, and if you’re happy with the results then why not keep using it?

Auto lets you focus on other things too

When you take your camera out to record a moment, memory, or special event, there is usually a lot going on around you and that little black box in your hand. There may be people, kids, music, animals, wind, rain, or a combination of all that, plus much more.

An experienced photographer will know exactly how to set her camera to get the kind of pictures she is looking for and will know just what settings to tweak and change in order to get the right images. However, even experienced photographers can get a bit overwhelmed when there is so much going on, and for casual photographers, it is even worse. It’s times like these when Auto mode can be your best friend. You should not only not feel embarrassed about using it, but my advice is to openly embrace that comfortable little green setting.

The Benefits of Shooting in Auto Mode

Missing the shot due to not knowing the settings

One of the worst times for a photographer is that sinking feeling when you realize you just missed the shot. Even photographic veterans have been known to leave the lens cap on from time to time. If you are just getting started with photography or trying to improve your skills, then fiddling with aperture controls or trying to figure out the right metering mode for a particular scene is enough to make you want to toss your camera out the window in frustration. Many a photographer has missed the opportunity to take a picture because they were wrestling with camera settings and trying to get things just right before clicking the shutter.

By contrast, using Auto can free you up to take pictures while also taking in the rest of the experience around you. Instead of worrying about the ISO, trying to figure out what shutter speed to use, or wondering if you need to use the flash, Auto mode will just take care of these for you. The trade-off is that the results might not be exactly what you wanted (maybe you were going for a shallower depth of field, or would have preferred to not use the flash). But at least you’ll walk away with some pictures while also having the freedom to talk to other people, take in the scene, and be present in the moment. That is unless you accidentally leave your lens cap on!

The Benefits of Shooting in Auto Mode

Auto can help you understand your camera

One of the biggest barriers to entry for people who want to learn more about cameras and photography is all the technical details inherent in the art form. Understanding the basic elements of exposure is enough to make your head swim. On top of that, there are all sorts of other considerations like white balance, focal length, megapixels, etc. The list goes on and it often seems like a cruel and unforgiving proposition that is more alienating than inviting.

Fortunately shooting in Auto mode is a great way to dip your toes into the more complex aspects of photography, provided you don’t mind doing a little bit of legwork on your own.

The Benefits of Shooting in Auto Mode

Embedded in the metadata of every single picture, whether taken on an iPhone or a high-end DSLR, is a whole slew of information known as EXIF data. Most image editing programs, even basic ones like Apple Photos or online solutions like Flickr and Google Photos, let you peek inside the EXIF data to find out more about the technical underpinnings of a photo.

What Auto mode can show you

If you take pictures using Auto mode all the details such aperture, shutter speed, and ISO are saved in the EXIF data along with a slew of additional information like your camera model, whether the flash fired, what type of metering mode was used, even the location of the picture if your camera has GPS capability. Looking at the EXIF data of your photos, and other photos you see online is a fantastic way to learn about the technical aspects of photography so you can get a better sense of how the picture was taken. It’s almost like getting a movie on DVD or Blu-Ray and watching the behind-the-scenes bonus features or listening to the director’s commentary, in that you can get a good idea of what creative decisions were made in order to get the final result.

If you have ever wanted to get more serious about shooting in Manual or one of the semi-automatic modes on your camera, try shooting in Auto and then using the EXIF data to replicate that same shot in Manual mode. Then tweak the settings like aperture or shutter speed and you will start to see how changing these values affects the final image. But be careful – doing this can open you up to a much larger world of photography by helping you learn to creatively control your camera in ways you might have never thought possible!

The Benefits of Shooting in Auto Mode

Conclusion

There’s some kind of a stigma attached to Auto mode, where people sometimes think you are less of a photographer if that’s all you use. I liken this to people who get into arguments about Ford versus Chevy, Android versus iPhone, or any of the other sorts of silly things over which people tend to squabble. If you use Auto and you like it,

If you use Auto Mode and you like it, then by all means, keep using it! Certainly, it’s nice to have more control over your camera, but some people find that by giving up control and just using Auto they are free to focus on other things that matter more to them. If that sounds like you, then by golly (as my dad would say) put your camera mode dial to the green square and click away.

googletag.cmd.push(function() {
tablet_slots.push( googletag.defineSlot( “/1005424/_dPSv4_tab-all-article-bottom_(300×250)”, [300, 250], “pb-ad-78623” ).addService( googletag.pubads() ) ); } );

googletag.cmd.push(function() {
mobile_slots.push( googletag.defineSlot( “/1005424/_dPSv4_mob-all-article-bottom_(300×250)”, [300, 250], “pb-ad-78158” ).addService( googletag.pubads() ) ); } );

The post The Benefits of Shooting in Auto Mode by Simon Ringsmuth appeared first on Digital Photography School.


Digital Photography School

 
Comments Off on The Benefits of Shooting in Auto Mode

Posted in Photography


5 Important Focal Lengths to Know and the Benefits of Each

05 Apr

5 Focal Lengths and Why You Should Use Them 1

Please note: all focal lengths mentioned in this article are in reference to 35mm full frame sensors.

There are photographers that favor the convenience and flexibility of zoom lenses, and those that favor their sharper, lighter and cheaper counterpart, the prime lens. Note: some modern zooms do have prime-like optics. Often, it’s your line of work that will make that decision for you. Whichever variant you favor, you owe it to yourself to experiment with different focal lengths to learn where they each excel, and which ones mesh best with your style. You can achieve this with primes, or zooms if you can commit yourself to not touching that handy zoom barrel. Among the many options, five focal lengths you want to use are the: 24mm, 35mm, 50mm, 85mm, and 135mm.

Let’s look at each one at a time.

#1 – 24mm wide angle

Areas it excels in: landscapes, astrophotography, group portraits, and event photography.

This one is easy to experiment with because not only are there many affordable prime options available, but you’ll find this focal length at the wide end of many full frame zoom lenses. The 24mm prime lens is sufficiently wide and remarkably sharp, making it an ideal candidate for landscape photography. Zooms are wonderful for landscape photography too, but the locked-in field of view (or a prime lens) will force you to think carefully about your compositions.

5 Focal Lengths and Why You Should Use Them 2

The 24mm focal length also excels in situations that don’t offer a lot of light. That includes astrophotography, where 24mm lenses with wide apertures (f/.8 or wider) will facilitate shots of the milky way, and in event photography, where you’ll have an ample field-of-view to shoot indoors and add context to your photographs. Additionally, the 24mm focal length is sufficiently wide to capture group portraits with minimal perspective distortion. Just don’t get too close, and watch the edges of your frame.

5 Focal Lengths and Why You Should Use Them 3

#3 – 35mm focal length

Areas it excels in: street photography, events, environmental portraits, and shooting-across-the-dinner-table photography.

35mm is a classic focal length for many photojournalists. Part of that reason is that the field-of-view requires you to be close to the action, but still maintains enough of the environment surrounding your subject to give an image context. This same philosophy applies well to wedding or event photography, and makes the 35mm focal length a great fit.

5 Focal Lengths and Why You Should Use Them 4

Another great thing about the 35mm prime lens is that it just so happens to be the perfect focal length for shooting a portrait from across the dinner table. Any wider and your subjects face will suffer from perspective distortion (exaggerating their facial features) and any narrower and you’d have to get out of your seat for the shot.

5 Focal Lengths and Why You Should Use Them 5

#3 – 50mm (normal) lens

Areas it excels in: street photography, full-body portraits, walk-around shooting.

There are so many reasons to try shooting with a 50mm prime lens. Perhaps the best one is that they’re cheap. You can purchase a brand new 50mm lens for most DSLR systems for a little over $ 100. Also, they produce an image that is normal, or most-like the image that we see with our own eyes. There is a common misconception about this concept. The normal perspective that a 50mm lens offers refers to the perspective distortion (or lack thereof), not the field-of-view. For this reason, the 50mm lens is great for full-body portraits and walk-around or street photography.

5 Focal Lengths and Why You Should Use Them 6

5 Focal Lengths and Why You Should Use Them 7

The 50mm lens is another classic, and a large part of that reason is that often, the area in frame is just right. It’s narrow enough to create balanced compositions with ease, but still wide enough to create interest beyond your subject. That is why you will find a 50mm lens in the bags of most street photographers.

#4 – 85mm slight telephoto lens

Areas it excels in: portrait, events, and sports photography.

The 85mm focal length is one that you will find in the bag of many wedding and portrait photographers. It creates beautiful portraits with the ability to flatten one’s features, which is generally flattering, and brilliant background separation. The field of view is not so tight that you’ll feel like you need to be outdoors to use one, but it gives you a nice working distance that allows this focal length to sneakily capture candids at a wedding or family gathering.

5 Focal Lengths and Why You Should Use Them 8

That working distance is great for full body shots when you’re on the sidelines of a sporting event, too. The 85mm prime is also a great working distance for photographing your kids or pets.

5 Focal Lengths and Why You Should Use Them 9

#5 – 135mm telephoto

Areas it excels in: head-shots, portraits, and wedding photography.

When you need to get in close, or if you just love bokeh, the 135mm lens is a great pick. For details and head-shots that bring your subject to life, grab this focal length. The background separation is fantastic, due to the increased compression of the image. The flattering flattening effect (say that five times) from the compression, makes this lens great for shoulder shots, senior portraits, candids, and more. You’ll have fun shooting wide open to create magical separation between your subject(s) and their surroundings.

5 Focal Lengths and Why You Should Use Them 10

5 Focal Lengths and Why You Should Use Them 11

The drawback to this focal length is that you do need a lot of working room, and a lot of light. Remember the 1/focal length rule for shutter speed? In other words, you wouldn’t want to shoot a 135mm lens any slower than 1/135th of a second, without a very steady hand or a tripod. When light or space become a problem, it’s nice to have an 85mm lens to fall back on.

5 Focal Lengths and Why You Should Use Them 12

Chances are you will love some of these focal lengths and dislike others, but you’ll never know until you give them all a shot. Modern zoom lenses are remarkable in their optical-quality, but you do lose the connection you feel when you are truly in sync with your focal length. The more you shoot with a 50mm lens, the more you will start to see with a 50mm perspective. Good luck and happy shooting!

googletag.cmd.push(function() {
tablet_slots.push( googletag.defineSlot( “/1005424/_dPSv4_tab-all-article-bottom_(300×250)”, [300, 250], “pb-ad-78623” ).addService( googletag.pubads() ) ); } );

googletag.cmd.push(function() {
mobile_slots.push( googletag.defineSlot( “/1005424/_dPSv4_mob-all-article-bottom_(300×250)”, [300, 250], “pb-ad-78158” ).addService( googletag.pubads() ) ); } );

The post 5 Important Focal Lengths to Know and the Benefits of Each by Jason Checkla appeared first on Digital Photography School.


Digital Photography School

 
Comments Off on 5 Important Focal Lengths to Know and the Benefits of Each

Posted in Photography


6 Benefits of Using Cameras With Larger Sensors

08 Dec

With ever increasing megapixel counts in smartphone cameras, do you need a dedicated camera at all? Or perhaps could you just get a really tiny compact camera?

At this point in time at least, the answer is probably no. Or at least not if you really want consistently good image quality. The reason is, that these devices don’t have large enough digital sensors.

The digital image sensor is the part of the camera that actually captures the image, from the light that is reflected onto it by the lens. The sensors are of a good size in any DSLR or mirrorless camera you are likely to buy, but in an iPhone or compact camera they are tiny.

It may be obvious to you that a larger digital sensor might result in higher resolution in your pictures. But, there are other benefits of a larger sensor that you might not be aware of, which go well beyond resolution. Therefore, in this article, I want to explain why a digital sensor is so important to your photography. The fact is it may be the most important factor to consider when purchasing a new camera.

1. Larger sensors generally provide higher resolution

Sensor size comparison chart

Sensors in DSLRs and mirrorless cameras are generally either Micro Four Thirds, APS-C, or Full Frame. Any of these will usually work fine, and as you can see they are all of good size. The sensors for smartphones and compact cameras, on the other hand, are extremely small in comparison.

Let’s start with the obvious thing – resolution. Having a digital sensor with a larger surface area provides the opportunity to include more pixels. Assuming the pixels are the same size, having a digital sensor that is 40% larger, reads that there can be 40% more pixels. That means higher resolution for your images, which in turn means more detail and the ability to make them larger.

A larger sensor can also lead to larger pixels, which has significant benefits for your pictures. If you see a Full Frame camera with the same number of megapixels as an APS-C camera, that doesn’t mean they will have the same image quality. Rather, that means the pixels will have been spread out over a larger surface area in the Full Frame model, and as you will see in the remainder of this article, having larger pixels spread out over a wider surface area has a whole host of benefits for your photography.

2. Larger sensors result in improved low-light performance

The number one predictor of whether a camera will have good low-light performance is the size of the digital image sensor. The camera testing that has been done shows a direct correlation between larger image sensors, and improved low-light performance.

A company called DxO Mark tests all digital cameras and assigns them a low-light performance score, which it calls its “sports” score (presumably because using high ISO is important to sports shooters, who often face poor light and need to use fast shutter speeds). This score is actually an ISO value. Specifically, the score is the highest ISO at which the camera will create a picture, without noise becoming too large of an issue (there is actually a technical formula they use involving decibels and signal to noise ratio, but that is my layperson’s definition of their score). The higher the score, the higher the useable ISO for that camera. For example, if a camera scores 900, that means the highest usable ISO for that camera is ISO 900. A camera with a score of 1250 would mean that its low-light performance was better, and performed well up to ISO 1250. And so on.

When comparing the scores for the current models of DSLRs and mirrorless cameras being sold right now, and then separating the results by sensor size, the result is rather striking:

Low light performance by sensor size
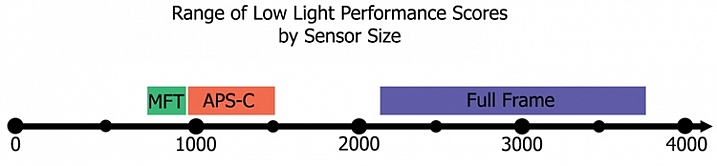
To explain this chart a little further, the range on the bottom is DxO Mark’s “sports scores,” which as mentioned above are really ISO values. Each camera was assigned a score, and I sorted them by sensor type. The range of values for Micro Four Thirds cameras is between ISO 757 and 896 (with the average at 825). The range for cameras with APS-C sensors is ISO 915 – 1438 (with an average of 1161). The range for full frame cameras is ISO 2293 – 3702 (with an average of 2811).

Notice that even the lowest rated APS-C camera performs better than the highest rated Micro Four Thirds camera. Similarly, even the lowest rated full frame camera performs better than the highest rated APS-C camera. When it comes to low-light performance, sensor size appears to make all the difference.

3. Dynamic range will likely be increased with larger image sensors

A larger digital image sensor also appears to lead to an increase in dynamic range for your camera. This is the range of tones that your camera can capture between pure white and pure black. The wider the range, the better.

There is no simple measurement for dynamic range, so comparing cameras is difficult. Finding the low-end of the spectrum (black) has a lot to do with the low-light performance of the camera, because digital noise increases when capturing very dark tones. At some point, the noise overwhelms the picture, so the bottom end of the dynamic range scale is not really “pure black” but rather “usable black.” What that means for us is that low-light performance determines part of the dynamic range of the camera, and as we saw in the previous section, low-light performance is largely a function of sensor size. Therefore, it would appear that a larger sensor would mean a higher dynamic range.

The digital image sensor testing done by DxO Mark bears this out. They call this their “landscape” score, and their results show a correlation between sensor size and an increase in dynamic range. The average for Micro Four Thirds cameras I looked at was 12.5 stops of dynamic range. That increased a bit to 13.0 for cameras with APS-C sensors, and then to 13.4 for full frame cameras. Therefore, a camera with a larger digital image sensor is very likely to have a larger dynamic range.

Comparison of dynamic range in digital cameras

All these scores are pretty comparable, and my point is not so much to compare these sensors (which will all get the job done), but rather simply to show that sensor size matters. Based on this, we can see that a camera with a much smaller image sensor (like a phone or compact camera) would not perform as well when it comes to these measures of image quality.

4. A larger sensor lets you create more background blur

If you want an appreciable degree of background blur in your images, you will need to use a larger digital image sensor. It is not just a function of aperture size (although that is obviously a very big part of it). In fact, it is virtually impossible to achieve a strong amount of background blur with a camera that has a tiny image sensor.

The relationship between digital image sensor size and background blur has actually been tested by the folks at DP Review. Here is a link to their testing and results. Be warned that they use a lot of math and technical terms. Here is a chart with some of their results:

DP-Review-Background-Blur-Chart


The results are that cameras with very small digital image sensors like smartphones and compact cameras are worthless if you aim to include background blur in your pictures. They go on to show that the larger the digital image sensor, the more blur you can include in your pictures. Therefore, sensor size is an important consideration if you want to achieve any amount of background blur in your photos.

5. A larger sensor can mean less diffraction

One other impact that the size of the digital image sensor has on your photos – and one of which you might not be aware – is on the amount of diffraction in your photos.

This may come as a surprise to you, if you are somewhat familiar with diffraction, because it is largely a function of using a very small aperture. Here’s how diffraction affects your pictures: When you use a small aperture, light reaching the edges of the image sensor can only get there after passing through the small aperture and then spreading out. That spreading of light causes the light rays to hit adjacent photo sites. Essentially, this spreading causes the light to sometimes hit the wrong photo site and leads to blur.

What does that have to do with the digital image sensor? Remember that diffraction is caused by a scattering of light across photo sites. Therefore, if you cram a lot of megapixels on a digital image sensor, the photo sites will be very small, and the scattering of light will cross over onto other photo sites more easily. That will mean an increase in diffraction. But in a camera where megapixels are more spread out, the same amount of scattering, will have less of an impact on your pictures.

As a result, larger image sensors where pixels are more spread out, tend to result in less image diffraction.

6. Larger sensors reduce the crop factor

Finally, let’s not forget about the crop factor that results from using a smaller digital image sensor. This chart shows the impact of crop factors. Notice in particular the yellow square in the center that shows the range of view for compact cameras:

Impact of crop factors

Of course, camera manufacturers have adapted to this by introducing extremely wide angle lenses which are designed for cameras with smaller sensors. Still it is generally much easier to obtain wide angle pictures using a larger image sensor.

Conclusion

It is not my intent to trash any particular camera, or system. The fact is that any camera is better than no camera, so use what you have. What I want to show here is that there are significant benefits to lugging around your DSLR, or mirrorless camera. That is true whether it is a Micro Four Thirds, APS-C, or a Full Frame camera. The benefits go well beyond resolution, and affect your overall image quality.

Larger sensors help you take better pictures in low-light, capture a greater dynamic range of tones, result in reduced diffraction, and let you achieve more background blur. So keep lugging around those cameras rather than trying to get it done with a phone or a compact model.

Do you have any additional data or questions you’d like to add? Please share in the comments below.

googletag.cmd.push(function() {
tablet_slots.push( googletag.defineSlot( “/1005424/_dPSv4_tab-all-article-bottom_(300×250)”, [300, 250], “pb-ad-78623” ).addService( googletag.pubads() ) ); } );

googletag.cmd.push(function() {
mobile_slots.push( googletag.defineSlot( “/1005424/_dPSv4_mob-all-article-bottom_(300×250)”, [300, 250], “pb-ad-78158” ).addService( googletag.pubads() ) ); } );

The post 6 Benefits of Using Cameras With Larger Sensors by Jim Hamel appeared first on Digital Photography School.


Digital Photography School

 
Comments Off on 6 Benefits of Using Cameras With Larger Sensors

Posted in Photography